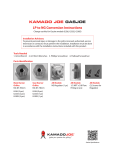
1
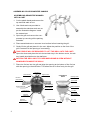
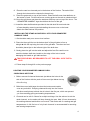
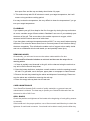
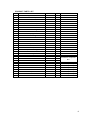
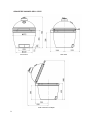
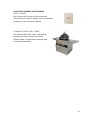
TABLE OF CONTENTS Warnings Before Use …….…………………………………….……………Page 2 Assembling Your GrandFire Kamado Grill …………………….…………..Page 3 Lighting Instructions…………………………………………….…………....Page 4 Controlling the Temperature…………………………………….…………. Page 5 Flashback……………………………………………………….…………….Page 6 Removing Ashes……………………….……………………….…………...Page 6 Care& Maintenance…………………………………………….………...…Page 6 GrandFire Kamado Grills Parts List ………………………….…………...Page 8 Grandfire Kamado Grill Spec.………………………………….…………..Page 9 GrandFire Kamado Accessories……………………………….…………..Page 10 Warranty Services……………………………………………….…………..Page 11 WARNINGS BEFORE USE OUTDOOR USE ONLY! ALWAYS EXERCISE CAUTION WHEN USING ANY HOT COOKING DEVICE; THE GRANDFIRE KAMADO COOKING GRID AND CHARCOAL ARE HOT WHEN IN USE! ALWAYS USE EXTREME CARE WHEN TRANSPORTING, MOVING OR LOADING AND UNLOADING AS PRODUCT IS HEAVY AND PERSONAL INJURY CAN OCCUR IF DROPPED OR TIPPED OVER. NEVER ATTEMPT TO MOVE, ROLL ORTRANSPORT THE KAMADO WHILE CHARCOALS ARE HOT! ALWAYS EXERCISE EXTREME CAUTION WHEN LIGHTING CHARCOAL, USING FIRE STARTERS, COOKING WITH HOT CHARCOAL OR HANDLING HOT COOKING SURFACES. NEVER ATTEMPT TO USE THE HANDLE, SIDE SHELVES AND HINGE ASSEMBLY AS A PERSONAL SUPPORT OR GRAB-RAIL, AND NEVER ALLOW CHILDREN TO PLAY NEAR A HOT KAMADO ALWAYS BE AWARE OF FIRE HAZARDS Do not leave a lit Grandfire Kamado with the dome open if it is unattended. Do be aware of dry leaves, decking and other combustible materials that may be in proximity to a Grandfire Kamado while it is in use, as they may present a fire hazard if any hot charcoal or sparks are allowed to come into contact. Do be aware of your surroundings if using a Grandfire Kamado while camping or cook outside, as any open flame can present a hazard to people and property. Do be aware that your relevant territorial authority may specify distance to place any outdoor cooker from a structure or may limit outdoor flame of any type during drought or fire hazard periods. 2 ASSEMBLING YOUR GRANDFIRE KAMADO ASSEMBLING GRANDFIRE KAMADO WITH A CART 1. Cut the plastic bands and remove the top and side walls of box. 2. Use 8 bolts and nuts provided to assemble the stainless steel cart as per the illustration diagram. Install the casters last. 3. Open the grill and remove the components by removing all the packing materials. 4. Place assembled cart on a secure Ievel surface before inserting the grill. 5. Gently lift the grill and place it in the cart. Adjust the position so the front of the grill is centered in the opening of surrounding. TWO PEOPLE WILL BE REQUIRED TO LIFT THE GRILL INTO THE CART! 6. Open the dome and place the ash slot and ash tray in the bottom center, the ash tray handle should direct to the draft door. CAUTION THE GRILL MAY TIP OVER WHEN DOME IS OPEN WITHOUT COMPONENTS INSIDE THE GRILL! 7. Place the fire box into the grill and align the opening at the bottom of the fire box with the opening in the draft door. This allows the air to flow freely into the grill. Top Vent Thermometer Upper Dome Bamboo Side Shelves COMPONENTS INSIDE Cooking Grate Grate Rack Utensil Hooks Bamboo Handle Heater Deflector Bottom Body Lower Vent Fire Box Charcoal Pan (NOT SHOWN) Stainless Steel Cart Stainless Steel Caster 3 Locker Caster Ash Tray Ash Slot 8. Place the cast iron charcoal pan in the bottom of the fire box. The ash will fall through the holes and be collected in the ash tray. 9. Place the grate rack on top of the fire box. Place the half-moon heat deflector at the bottom of rack. Put the half-moon cooking grate on the rack at a desired level. 10. Close the grill dome and place the stainless steel top vent on top of the dome. The “GRANDFIRE KAMADO “logo should face the front of the grill 11. Install the side shelf brackets provided in the side shelf kit onto both side of lower band by removing and reinstalling the acorn nuts on the band. Attach the Side shelves into position. INSTALLING THE STAND ALONE GRILL INTO YOUR GRANDFIRE KAMADO TABLE 1. Get the table ready on a secure level surface. 2. Place the three grill feet on the bottom shelf of the grill table to form a triangle▲ with the top being the back of the grill table. The other two feet should be placed just to the left and right of the draft door. 3. Gently place the grill into the table and adjust the feet. Be careful not to catch the bottom draft door handle on the edge of the hole to avoid damaging the handle or grill table surface. TWO PEOPLE WILL BE REQUIRED TO LIFT THE GRILL INTO THE TABLE! 4. Follow steps 6 through10 on the previous page. LIGHTING YOUR GRANDFIRE KAMADO GRILL CHARCOAL& AIR FLOW 1. Build a mound of charcoal that starts just below the holes in the side of the fire box with the peak of the mound just below the top of the fire ring. 2. Build the mound with large chunks at the bottom and smaller ones as you build it. Dumping charcoal directly into the fire box will allow small pieces to block the air holes in the fire pan, which can prevent you from reaching grilling and searing temperatures. 3. Charcoal can be relit 2-3 times for multiple cookings. Use the ash tool to stir the used charcoal, so the ashes will drop through the pan. Add 1/3 new charcoal to the existing charcoal and build a new mound. This works well for roasting and grill temperatures. A full fire box of only fresh charcoal is recommended for smoking and searing temperatures. 4 LIGHTING YOUR GRANDFIRE KAMADO Fire starter Cubes are one of the quickest ways to start your grill. They are odorless, smokeless and environmentally safe. Each cube burns up to 1300°F for 8-12 minutes to ensure that you're ready to cook in 15 minutes. 1. Light the charcoal with a fire starter cube or chimney starter, electric starter or other method. 2. Open the bottom draft door and leave the dome up. 3. Wait 8-10 minutes for the charcoal to build a small bed of embers. 4. Close the dome, open the top vent fully and adjust the airflow as needed as you near the target temperature. NEVER USE LIGHTER FLUID OR ANY OTHER COMBUSTIBLE LIQUID. Do not use lighter fluid, gas or other combustible liquids. Liquid chemicals are a fire hazard and they will impregnate the ceramic material and impart an undesirable taste to food. Do not use "Instant Light″ briquettes. It will impart an undesirable taste. Do not use briquette charcoal. This type of charcoal cannot reach temperatures above 500°F and it does not offer true charcoal flavor. ALWAYS COOK WITH THE DOME CLOSED! “IF YOU’RE LOOKING … YOU’RE NOT COOKING!” CONTROLLING THE TEMPERATURE Achieving a consistent temperature as high as 750oF or as low as 225 oF is easy on your GRANDFIRE KAMADO. In fact, you can maintain low temperatures for up to 12 hours without adding any more 100% Natural Lump Charcoal. 1. Close the dome and fully open the top vent. 2. When you are 25°F from your target temperature, close the top vent down to about 1/4 open. 3. Wait one minute and close or open the top Vent to lower or increase the temperature. A 5~6mm adjustment can change the temperature by as much as 25°F. USE ALL FRESH CHARCOAL FOR HIGH TEMPERATURE SEARING. ACHIEVING LOW TEMPERATURES 1 .For ″low and slow″ temperatures like 225°F start with a very small fire in one area of the charcoal. 2. Close the dome and allow the temperature to come up slowly with the lower vent 5 door open 5cm and the top vent daisy wheel holes fully open. 3. This method may take 30-45 minutes to reach your target temperature, but it will ensure a long and slow cooking period. It is easy to raise the temperature, but very difficult to lower the temperature if you go over your target temperature. FLASHBACK If you operate your grill, then deprive the fire of oxygen by closing the top and bottom air vents, a sudden surge of flame called a “flashback” can occur if you suddenly open the dome of the grill. This occurs due to the sudden exposure to oxygen, which causes a brief but intense amount of white heat. If you have been cooking at temperatures above 300°F, be very careful when opening the dome. First raise the dome about 3cm or 5cm and pause to hold it before raising the dome completely. This will allow the sudden rush of oxygen to burn safely inside and not as a flashback which could startle you and possibly cause injury. REMOVING ASHES Occasionally, you will need to remove the ashes underneath the fire box. Your GrandFire Kamado includes an ash tool and here are the steps for removing ashes. 1. If there is partially used charcoal in the grill, stir the charcoal using the ash tool so any ash in the fire box will drop down. 2. Open the bottom draft door, and place a small container under the opening to catch the ash. For grill table, use a dust pan, paper plate or newspaper to catch the ash. 3. Remove the ash tray containing the ashes and dispose of accordingly. Please ensure the ashes are cold before removing the ash tray. 4. Place the empty ash tray back into the ash slot. CARE & MAINTENANCE Your GrandFire Kamado Grill is made of quality materials, so general care and maintenance is minimal. The best way to protect your GrandFire Kamado from the elements is with a Grill Cover. GRILL BANDS Check the position and tightness of the bands at the beginning of each grilling season or annually. If the bands are in the proper position, use a 10mm wrench and Allen key to check the tightness of each band connector. You should not be able to easily turn the Allen key 6 while holding the nut in place. If loose, tighten firmly. MOLD If your GrandFire Kamado Grill is not used for an extended period of time, moisture can be trapped inside the grill and you may see areas of mold or mildew on the cooking grate or internal ceramics. This can easily be eliminated, because GrandFire Kamado Grills are self-cleaning. Do not use bleach or other cleaning products. It will add an unpleasant taste to food. Self-cleaning your GrandFire Kamado Grill: 1. Add charcoal, light it and allow the grill to heat to a temperature of 600°F for 15 minutes with the dome closed. 2. Allow the grill to cool down completely. 3. Before cooking, brush the cooking grate with a standard grill brush. You can also use a soft bristle brush on the ceramics to remove any residue. GASKET REPLACEMENT The gasket material will degrade over time. Depending on the amount of grill use, the exposed gasket material on the base and dome and the neck of the dome may need to be replaced every 2-3 years. HEAT DEFLECTOR AND PIZZA STONE Care and Cleaning of the Ceramic Plates 1. Allow ceramics to cool completely before cleaning and indoor storage. 2. Wipe off food material with a brush and store inside in a dry place. 7 Do not place on tables or surfaces that are not heat-resistant. Do not use either ceramic plate to cook with on a stove top. Do not season with olive oil or other cooking oils. Do not use cleaning chemicals or soap and water. Do not soak in water. It may cause it to crack with the next use. PRODUCT PARTS LIST SN PART DESCRIPTION 1 Upper Dome 2 Bottom Body 3 Fire Box 4 Bottom Pad 5 Gasket 6 Half Moon Heater Deflector 7 Pizza Stone 8 SS Band with Hinge 9 Bamboo handle 10 Spring 11 Half Moon Cooking Grate 12 Grate Rack 13 Charcoal Pan 14 Lower Vent 15 Top Vent 16 Ash slot 17 Ash tray 18 Temperature Gauge 19 Ash tool 20 Grate Gripper CODE GK23UPD GK23BBD GK23FBX GK23BPD GK23GSK GK23HHD GK23PST GK23SSB GK23BHD GK23SPG GK23HCG GK23GRK GK23CPN GK23LVT GK23TVT GK23ASL GK23ATR GK23TMG GKTOOL GKGRIP QTY 1 1 1 3 1 2 1 1 1 2 2 1 1 1 1 1 1 1 1 1 21 22 23 Stainless steel Cart Castors with & without Locker Side shelf GK23CRT GK23CST GK23SSH 1 4 2 *Packed In a Separate Box 24 25 26 27 28 29 Stainless Steel table Cover For Kamado Cart Model Cover For Kamado Table Model Chicken Stand Grill Expander Rib Rack GF-KJC GK23PLC GFKJ-GC18 GKCHST GKGEXD GKRBRK * * * * * * *Sale Separately *Sale Separately *Sale Separately *Sale Separately *Sale Separately *Sale Separately REMARK *Set *Set *Set 8 GRANDFIRE KAMADO GRILL SPEC Front View Side View Side View with Lid Open 9 GRANDFIRE KAMADO ACCESSORIES GRILL COVERS Our Premium Grill Covers for Cart model and Table model are made of durable vinyl for all-weather protection of your GrandFire Kamado. STAINLESS STEEL GRILL TABLE Our Stainless Steel Grill Table is the ultimate in beauty and match up with our outdoor kitchen system. Constructed of stainless steel. Comes fully assembled. 10 WARRANTY SERVICE How to Obtain Service: For warranty service, please contact your local dealer. Before you call, please have the following information available: • Model Number (see back of hinge) • Serial Number (see back of hinge) • Proof of purchase by the original owner • Date of installation • Brief description of problem Your satisfaction is important to us. If a problem cannot be resolved to your satisfaction, please feel free to contact us anytime. Hauland Pty Limited. Website: www. Grandfirebbqs.com.au [email protected] NZ office Hauland Limited. Unit b, 1 Douglas Alexander Parade, Albany Auckland Hotline: 0800 BUFFALO Website: www.hauland.co.nz Email: [email protected] LIMITED WARRANTY INFORMATION 5-Year Warranty on Ceramic Parts GrandFire Kamado warrants that all ceramic parts used in this GrandFire Kamado are free of defects in material and workmanship for a period of five (5) years as long as the original purchaser owns the grill. 5-Year Warranty on Metal Parts GrandFire Kamado warrants that all metal and cast iron parts used in this GrandFire Kamado are free of defects in material and workmanship for a period of five (5) years. 3-Year Warranty on Heat Deflector and Pizza Stone GrandFire Kamado warrants that the heat deflector frame and ceramic plate(s) and the pizza stone used for the GrandFire Kamado are free of defects in material and workmanship for a period of three (3) years. 1-Year Warranty on Thermometer and Gaskets GrandFire Kamado warrants that the thermometer and gaskets used in this GrandFire 11 Kamado are free of defects in material and workmanship for a period of one (1) year. Limitations and Exclusions 1) Warranty applies to the original purchaser and may not be transferred. 2) Warranty is in lieu of all other warranty, expressed or implied and all other obligations or liabilities related to the sale of use or use of its grill products. 3) Warranty shall not apply to damage resulting from misuse, abuse, alteration of or tampering with the appliance, accidental, hostile environment, flare-up fires, improper installation, or installation not in accordance with the instructions contained in this manual or local code. 4) Company shall not be liable for incidental, consequential, special or contingent damages resulting from its breach of this written warranty or any implied warranty. 5) No one has the authority to add to or vary this warranty, or to create any other obligation or liability in connection with the sales or use of the company’s products. Warranty shall not apply to cosmetic imperfections not affecting the structural integrity of the appliance, having been caused by fair wear and tear, or as a result of extreme seasonal or marine conditions. Warranty shall not apply to damage caused by acts of God, neglect of the product, or failure to maintain the product in full accordance with the User’s Manual. The term of this Warranty shall commence on the date of purchase, and is not subject to extension of any kind as a result of any repair or replacement being undertaken during the lifetime of the warranty. 12