1
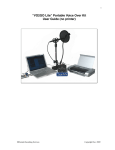
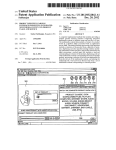
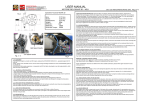
“VO2GO” Portable Voice Over Kit
User Guide
Copyright ERS 2009
Establishing an Internet Connection
**IMPORTANT! DO THIS IMMEDIATELY UPON ARRIVAL WHEN TRAVELING
TO NEW PLACES. YOU DONʼT WANT TO WAIT UNTIL THE LAST MINUTE
ONLY TO FIND OUT THE SERVICE IS INADEQUATE AT YOUR HOTEL OR
HOUSE.
1. This depends on your accommodations. You may have WiFi or you may have
a hard-line Ethernet cable. A hard-line Ethernet is recommended and
preferred.
WiFi can be problematic with dropouts and interference.
Launch a web browser (FireFox or Safari recommended) and establish a
connection with the hotel internet, if applicable. (usually a web page comes up
and you must log in.) Follow log in instructions for your hotel Internet service.
2. Measure your bandwidth
Next is to measure your available bandwidth. Connect to the network, whether
by Ethernet in your hotel room, or wirelessly at your local cafe, and go to
HYPERLINK "http://www.speakeasy.net/speedtest or speedtest.net"
www.speakeasy.net/speedtest or speedtest.net. If your up-speed and downspeed to the city nearest the studio you are connecting to (if bridging with Out of
Hear, then Los Angeles) is at least 300kbps, Source-Connect should work great
for you. If not, try and connect via Ethernet if you are wireless, or ask the hotel
manager if they have a better service available.
3. Connection Test
Because you are traveling, you probably can't have the firewall configured for
you to allow incoming UDP data. Source-Connect has a good chance of making
an incoming connection, however - if your Connection Test comes back 'port not
mapped', then you are likely to be able to hear the remote audio and only under
very rare cases will your remote studio not be able to receive you. Depending
on the firewall, Source-Connect has about an 85% chance of making an
incoming connection, and about a 98% chance of making an outgoing
connection. If it comes back 'failed', unfortunately Source-Connect is probably
going to disallow both incoming and outgoing data.
SEE MORE INFO IN APPENDIX
VO2GO Kit Inventory
Computer
Computer power supply
CEntrance Micport Pro w/ USB cable
Pop screen kit with mount
Mic mount arm w/clamp
Folding Mic Stand
Sennheiser 416 Microphone
Mic shock mount
Headphones
iLok USB key w/Source Connect license
Mouse
Quickstart Assembly
Connect USB Hub to PC
Connect printer and iLok to USB Hub (if needed)
Connect MicPort Pro directly to PC USB port
Connect MicPort Pro to microphone
Install mic in shockmount and attach to stand
Power on or restart PC to ensure drivers load properly (not always needed)
In Windows, make sure CEntrance MicPort Pro is the default audio device for
recording and playback
In Mac OS, be sure that Audio-Midi Settings in the Applications-Utilities folder
are set for the MicPort – usually, 48000 sample rate (must match recording
settings in your software)
Be sure that whatever audio software you use has the MicPort set for the Audio
Input and Output, otherwise you might end up recording from the mic built into
the laptop
Starting Source-Connect Session with “Source Elements
Desktop”
1. Set MicPort mic gain control to 12 oʼclock to start, and 48V on for condenser
mics
2. Plug headphones into the jack on the MicPort to monitor your recording
3. Headphone volume adjusted with “phones” knob on the MicPort
4. Check Microphone levels and adjust pre-amp gain if needed
5. If using Windows and the CEntrance Universal USB driver, be sure the
MicPort shows up in the driver control panel (icon in the Task Tray, lower right of
desktop)
6. Launch Source Elements Desktop (“Se” icon)
7. Click “Setup: configure audio i/o” button and set audio drivers to MicPort
8. Check Microphone levels and adjust pre-amp gain if needed
9. Click “Show: source-connect” Source Connect Plug-in will be ready to log in
10. Fill in user name and password you chose for Source Connect
11. Allow 10-20 seconds for LOG IN to establish
12. Set the “send quality” to “High-Mono” to start. Reduce to “Medium-Mono” if
needed due to poor Internet connection speed
13. Once LOG IN is complete expand Contacts window for the Source
Connection list
14. If you are waiting for the session to start and want to do a test, you can
connect with “Support” or “Support-eu”, they are Source Connectʼs tech support
users.
--NOTE: ONLY users that are LOGGED ON will appear in the Contacts list
15. When bridging through “Out of Hear”, they notify you which user account
you will connect to ahead of time.
16. Choose the appropriate contact and connect, wait for other user to respond.
17. Proceed with session, adjusting return feed on Source Elements Desktop
mixer for studio level
18. Should signal dropouts occur, change from High to Medium quality.
Medium is equivalent to a Zephyr set to MPEG Layer 2 Mono 128 (standard
ISDN session quality).
19. Should a hotelʼs firewall prevent sound coming back to you from the studio,
or session is for FTP only, use a phone patch, speaker phone, or earphone with
your telephone to receive cue from studio.
20. At completion of session, click “Disconnect” if no other session is to follow.
CEntrance Micport Pro Support
I. Windows PC users (Windows XP or Vista)
A. Installation
1. Download the CEntrance Universal Driver,
http://centrance.com/downloads/ud/
2. Run driver installation software and follow the on-screen instructions carefully
3. Be patient, there sometimes will be 10 or more seconds between prompts
4. Insert the USB cable for the Micport Pro ONLY WHEN PROMPTED TO!
a) Plug only directly into the computer, not into a USB hub
b) Use the SAME USB port every time you use the Micport Pro to prevent
Windows from prompting you to install drivers repeatedly
5. Once inserted, wait for Windows to detect the device (you should hear the 2
tone chime Windows makes when a USB device is connected)
6. Choose Install Automatically when Windows prompts to install driver and
click
Finish
7. CEntrance will then prompt to update the driver, click Next
8. If Windows complains that “installation is still in progress”, just click OK
9. Choose “Continue Anyway” when Windows warns about Logo testing
10. If Windows complains that “installation is still in progress”, just click OK
11. Click Finish when the CEntrance driver window reappear
B. CEntrance Audio Driver Control Panel
1. Double click on the silver UD icon in the task tray (bottom right, near the
clock) to open the control panel
2. There should be two items listed in the white box, ASIO Settings and
CEntrance MicPort Pro. If you don’t see the Micport Pro listed, then the driver
is not detecting the device. Restart your computer.
3. Select the Micport and set the Sample Rate as appropriate for your needs.
This needs to match the sample rate you use in your DAW software. Typical
setting is 48Khz, which is the TV/Film broadcast standard.
C. Setting up your DAW software
1. In your DAW of choice, you need to assign the CEntrance ASIO driver to the
Input
2. Assign your output to the Micport if you plug your headphones into the
Micport to use the on-board headphone monitor, otherwise choose the PC’s
onboard sound device to listen through the speakers to the PC headphone
jack
3. If your software is not ASIO compatible (Audition 1.5 and earlier, Audacity),
you may run into trouble
4. Be sure to set your software to record at the SAME Sample Rate as you set
in the Micport Pro Control Panel (see B. 3.)
II. Mac users (Mac OS 10.4 or higher)
A. Installation
1. No drivers to install, none
2. Plug the Micport into any USB port you like each time you use it
3. Set the Sample Rate in the Audio Midi Setup application, which is found in
Applications:Utilities
a) In “Properties For:” choose CEntrance Micport Pro
b) In “Audio Input” choose “Format: 48000.0 Hz”, or whatever Sample Rate
you use while recording in your DAW
c) In “Audio Output” set “Format” to the same Sample Rate
B. CEntrance Audio Driver Control Panel
1. Oh wait, there isn’t one
C. Setting up your DAW software
1. In your DAW of choice, you need to assign the CEntrance Micport Pro to the
Input
2. Assign your output to the Micport if you plug your headphones into the
Micport to use the on-board headphone monitor, otherwise choose the Built-in
Output to listen through the speakers connected to your Mac
3. If your software is not ASIO compatible (Audition 1.5 and earlier, Audacity),
you may run into trouble
4. Be sure to set your software to record at the SAME Sample Rate as you set
in Audio Midi Setup (see A.
III. Troubleshooting
-see http://centrance.com/forum/ for more help
A. Mic signal problems
1. No signal is reaching your headphones?
a) Headphones should be connected directly to the Micport Pro
b) Make sure 48V is selected if your mic requires phantom power (condenser
mics), it’s the little button next to the USB connector. The orange LED
light should be illuminated.
c) Make sure mic gain is turned up at least halfway as well as headphone vol
2. Signal is weak or distorted on recording
a) Make sure controls are set properly on mic preamp and mixer (see
reference photos of front panels if available)
b) Change mic preamp or connect mic directly to mixer mic input and turn on
48V power on mixer if needed
c) Change microphones if possible to determine whether problem is caused
by microphone or mic preamp
B. Recording problems - Recorded sound is glitchy, crackly, wrong speed
1. Sample Rate in your audio interface control panel must match that of the
recording project (In Windows, check driver control panel for the interface, in
Mac check the Audio Midi Setup application)
2. USB port on your computer might be under-powered, try another port. In rare
cases you may need to use a different computer.
3. MicPort must be plugged directly into the computer, not into a USB Hub
4. Email [email protected] for more support
APPENDIX:
Tutorial: Tips on connecting from a remote location
Firewall Tips:
Firewalls generally don't like to let incoming data get through. Firewalls are built
specifically to deny any incoming traffic that isn't specifically requested, and
Source-Connect data may appear to the firewall as undesirable traffic. There
are a couple of ways around this, however:
# Ask the Hotel manager to put you on the 'DMZ' for your session
Source-Connect Pro: Changing your receive port:
This is a trick that often works: if you connect successfully with Source-Connect
Pro once, then what may happen is that the firewall sees that there has been
data coming in on the port you specified (default: 6000), and then blocks it.
However, it won't do this until you disconnect. If you need to reconnect after your
session or test, and find that you are no longer receiving, set your port to
another even number between 1024 and 65000 and run the connection test
again. Chances are, you'll be able to receive again! You've gotten around the
firewall's block. NOTE: This option is only possible with Source-Connect Pro. If
you are not a licensed user of Source-Connect Pro you can rent a 2-day license
at anytime.
Ask the Hotel manager to put you on the 'DMZ' for your session
If you feel you can, ask the Hotel manager to help you out for your session and
give you a special IP address to connect on, called the DMZ, or 'Demilitarized
Zone'. This IP has special status, and is not affected by the firewall. If this is
possible, you'll need to open your Network Preferences and set your new IP in
your settings. See 'Technical Support' in the Support section of this website for
info on how to do this.
Source-Connect Network Configuration
For further support:
Chicago: +1 312 706 5555
London: +44 20 7193 3700
[email protected]
This document is designed to assist IT/Network administrators to configure your
network to allow Source-Connect traffic in and out of your firewalled or NAT
network.
Notes:
1. 'local' means the internal static IP of the Pro Tools machine, e.g. 192.168.1.5,
where the machine is behind NAT. If the Pro Tools machine is on DHCP, you
should
provide the machine with a static NAT IP first.
2. The IP of source-elements.com is 147.202.41.185. If you are analysing
network
activity you may also note activity coming from 147.202.41.186. This can be
ignored
as it is conducting secondary network tests to enable operation of SourceConnect
under less strict networks.
Configure:
1. Either allow all outbound UDP ports, or allow outbound UDP connections to
certain IPs as needed.
2. Port forward/map the following UDP ports to the local IP:
6000 - 6001
If the user has Source-Connect Pro, the above ports may be modified to
preferred
ports, between 1024 and 65535. The ports must be an even number plus the
port
immediately following, e.g. 10060 and 10061 or 25980 and 25981.
3. Ensure the firewall has been specified to allow inbound access on the 2
selected
UDP ports.
Once you have done this, you can log in. Then, to check that your UDP ports are
not
firewalled and are mapped to your local IP, the status panel has a port status
message. If the test comes back 'successful' (Pro) or 'open' (Standard), it means
that
the source-elements.com server is able to send and receive the UDP traffic. If
you get 'port not mapped' it means that there is either a firewall or there is
incorrect or
absent port mappings for the UDP ports. If you get 'failed' then there is a firewall
active on those ports for your local IP.
Source-Connect is peer to peer, and for the connection test to return successful
you
will need to allow outbound/inbound UDP from source-elements.com
(147.202.41.185). Note that this rule is not necessarily required for successful
operation of Source-Connect, it simply allows the user to be assured that the
network is properly functioning. As long as the IP address of the connection
partner
you wish to use is enabled then Source-Connect will function as expected.
More technical information can be found here, if needed:
HYPERLINK "http://www.source-elements.com/public" http://www.sourceelements.com/public
Introduction to how Source-Connect works.
Source-Connect transfers a real-time, high-quality audio stream between
remote locations via the UDP protocol. UDP is used in order to allow low delay
communication, and thus relies on network access to UDP ports.
Generally, the machine running Source-Connect is on a private network
address
(behind NAT, or Network Address Translation). UDP is unable to independently
negotiate NAT, so the network (secured by a router and/or firewall) must be
configured with specific Port Mapping (or Port Forwarding) rules.
If for some reason Port Mapping is not possible, e.g. the user has no
administration
access to the network, Source-Connect will attempt to negotiate the network.
Negotiation, if possible at all, is often slower and can create unwelcome delays
and
data loss because the UDP data must traverse an unknown and possibly
temporarily
available path. And, when this negotiation attempt simply attempt fails, the user
cannot receive the audio stream. In addition, if the ports are not mapped Quality
of
Service rules cannot be applied. Therefore, we recommend to all users that in a
permanent studio situation they administer the network appropriately to allow
proper UDP port mapping.
Using other port numbers:
Source-Connect allows the user to specify a particular set of UDP ports. First, the user
must
configure their internal network settings to connect via a static IP, rather than DHCP, and
then configure port mapping on the router. For example, the user configures the router to
forward all incoming UDP data on ports 6000 and 6001 to their internal IP address, and
enters the number 6000 in the Settings Panel of Source-Connect. (Ports may be any
even
number between 1024 – 65534 and this number plus one).
How Source-Connect determines its network status
1. Source-Connect determines the internal(private/local) and external (public) IP
addresses.
The external IP address is determined by sending an HTTP request to a remote
application
on our server, source-elements.com:80 (147.202.41.185:80).
2. Source-Connect determines the port mapping status by sending an HTTP request to
our
remote server to begin forwarding a series of test UDP packets to the specified ports
(e.g.
6000 and 6001) on the determined IP address.
If Source-Connect receives these test UDP packets, it knows that port mapping is
enabled,
and will use these ports for the incoming audio stream.
If Source-Connect does not receive any of the UDP packets, it will time-out and inform
the
user that the test has either returned 'port not mapped' or 'failed'. In the case of 'port not
mapped', Source-Connect may have detected an alternative method of connecting and it
is
still possible that the user will receive an incoming stream. Usually an outgoing stream is
still possible in this case. If 'failed' it is highly unlikely that there will be sent or received
audio.
Common issues:
Connection Test: ʻport not mappedʼ or ʻfailedʼ
The user is able to properly configure their network for UDP port mapping
however
the connection test does not return successfully.
Possible causes:
- The userʼs ISP will filter HTTP traffic on port 80
- The user is behind a HTTP proxy
- All TCP and/or UDP ports are firewalled
- The ISP is using a caching server for UDP traffic
In these cases Source-Connect will not be able to determine the userʼs public IP address, and
the test UDP packets will be ʻlostʼ within the ISPʼs network. The test will not return
successful, and the secondary, less reliable methods will be used where possible.
In instances where port mapping is simply not possible we suggest using a VPN server with
Source-Connect Pro.
For further support:
Chicago: +1 312 706 5555
London: +44 20 7193 3700
[email protected]
HYPERLINK "http://www.source-elements.com/support" http://www.source-elements.com/support
IF YOU HAVE ANY QUESTIONS:
Please call George Whittam at 310-686-3745, or email HYPERLINK
"mailto:[email protected]" info @eldorec.com.
You can connect to “support” and “support_eu” to do tests any time they are logged on and
not busy, or test with “outofhear”. George is ”soundgun” on Source Connect. Support
from Source Connect also available on Skype, username “source-connect”.
To schedule bridging, please give as much notice as possible to Steve at outofhear.com. He
can be reached at 310-721-3500 or HYPERLINK "mailto:[email protected]"
[email protected].