1
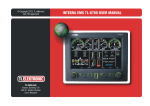
Cellometer Auto 1000 User Manual Introduction5 - What is Cellometer Auto 1000 5 - Quick Operation Instructions6 - User Interface Overview8 Getting Started20 - Starting the Auto 1000 20 - Taking a Background Image 20 - Auto-Save Set-up 21 - Preparing Reference Beads 21 - Counting Reference Beads22 - Comparing Viability Methods23 - Preparing Cell Sample for Trypan Blue Viability Determination 23 - Cell Concentration and Trypan Blue Viability using the Auto 1000 24 Tutorials26 - Overview26 - Staining Solutions26 - Installed Assays and Descriptions26 Operation Reference27 - Counting Options27 - Saving Options28 Technical Information30 - Specifications 30 - Getting Support30 - Warranty Information31 Introduction What is Cellometer Auto 1000? Cellometer® Auto 1000 is a compact, automated cell counting system to count, measure cell size and calculate cell concentration from a 20µL cell sample. The basic principle of the Cellometer automatic cell counter is imaging cytometry. Cells are loaded into the Disposable Counting Chamber and automatically spread into a thin layer by capillary action. Cellometer Auto 1000 then captures images of cells in the counting chamber, analyzes the number of cells and sizes of each cell, and then converts this data into concentration, size and viability.  The Cellometer Auto 1000 system consists of 2 main components: 1. Cellometer Auto 1000 instrument with analyzing software 2. Disposable Counting Chambers • Disposable counting chamber accommodates 2 individual samples and can be loaded through either port. • Pipette 20µL of cell sample into one of the ports with any standard single channel pipette. • Cellometer Auto 1000 comes with a starter set of 75 slides. Slides can be ordered directly from Nexcelom or your authorized Nexcelom dealer. © 2013 Nexcelom Bioscience LLC 5 Quick Operation Instructions 1. Select an Assay 2. Input Sample ID and Dilution Factor 3. Prepare Sample, load disposable counting chamber and insert into instrument 4. Click “Preview” 5. Adjust Focus Coarse Focus 6 Fine Focus © 2013 Nexcelom Bioscience LLC 6. Select image to preview and adjust exposure if needed 7. Click “Count” to begin counting process Count Count Current Image 8 .Review Counting Results 9. Select Details to review cell images and counted cell images Details View Details of Counting Results 10. Select Next Sample or Assay and Settings when done Done Begin Next Sample © 2013 Nexcelom Bioscience LLC 7 User Interface - Assay Selection Screen 1 2 4 3 5 6 11 7 11 8 9 10 1. Current Assay Indicates which Assay is currently selected to analyze a cell sample 2. Edit Assay Select to edit the Assay and Cell Type settings 3. Import Assay Select to Import additional assays 4. Sample ID Select to enter a Sample ID 5. Dilution Factor Select to enter a Dilution Factor 6. Assays Available List of Assays available for selection 7. Preview Select to Preview the cell sample image 8. Load Select to load and analyze previously saved images 9. Settings Select to edit instrument and UI settings 10. Help Select to access help options 11. Left/Right Arrows Select to page left/right to access all assays available 8 © 2013 Nexcelom Bioscience LLC Preview Screen 1 2 3 4 5 7 6 8 9 10 11 12 1. Current Assay Indicates which Assay is currently selected to analyze a cell sample 2. Assays & Settings Select to return to Assay Selection Screen 3. Sample ID Select to enter a Sample ID 4. Dilution Factor Select to enter a Dilution Factor 5. Focus Fine and coarse focus adjustment of the current cell image 6. Exposure Adjust the exposure time of the current cell image 7. Current View Red rectangle to show what area of the cell image is currently displayed 8. Pan Moves the area currently being shown within the current cell image 9. Zoom Zooms in or out of the current cell image 10. Count Starts counting of the current cell image 11. Abort Preview Cancels current cell preview and returns Assay Selection Screen 12. Current Image Select location on slide to preview © 2013 Nexcelom Bioscience LLC 9 Counting Screen 1 2 3 4 5 6 7 8 1. Current Assay Indicates which Assay is currently selected to analyze a cell sample 2. Assays & Settings Select to return to Assay Selection Screen (disabled while count is in progress) 3. Sample ID Select to enter a Sample ID (disabled while count is in progress) 4. Dilution Factor Select to enter a Dilution Factor (disabled while count is in progress) 5. Current Count Shows cell count numbers 6. Counting Progress Visually indicates the current count progress 7. Image Being Counted Indicates which image is currently being counted 8. Stop Stops cell counting 10 © 2013 Nexcelom Bioscience LLC Results Screen Current Assay: BR Cell line, total cell conc. 55 1 2 Assays & Settings 3 Sample ID: Cell Line 4 Dilution Factor: 1.00 Results Assay: Cell line, total cell conc. Sample ID: Cell Line Dilution Factor: 1.00 Total Count --------------------------------------------------612 cells Details 6 View Details of Counting Results Concentration --------------------------------------------------1.09x10^6 cells/ml Sample 7 Calculate and Adjust Sample Print Mean Diameter --------------------------------------------------15.5 microns 8 Send Results to Printer Next Sample 9 Begin Next Sample 1. Current Assay Indicates which Assay is currently selected to analyze a cell sample 2. Assays & Settings Select to return to Assay Selection Screen 3. Sample ID Select to enter a Sample ID 4. Dilution Factor Select to enter a Dilution Factor 5. Results Displays cell counting results including total cell count, live/dead cell count and viability 6. Details Select to go to the Details Screen 7. Sample Adjustment Calculator Select to launch the sample adjustment calculator. Useful for sample adjustment to get desired concentration or total cell number. 8. Print Send the counting results to a network printer 9. Done Select to start a preview of a new cell sample using the same Assay settings © 2013 Nexcelom Bioscience LLC 11 Calculate and Adjust Sample Screen 1 2 3 1. Sample Adjust Source Select which concentration source to use for the Sample Adjustment calculations 2. Original Sample Volume Select to indicate the original sample volume of the cell sample 3. Target Select to indicate the target concentration or number of cells which should be calculated 12 © 2013 Nexcelom Bioscience LLC Details Screen 1 2 3 4 5 6 9 7 10 8 11 12 13 1. Current Assay Indicates which Assay is currently selected to analyze a cell sample 2. Assays & Settings Select to return to Assay Selection Screen 3. Sample ID Select to enter a Sample ID 4. Dilution Factor Select to enter a Dilution Factor 5. View Data File Opens data file to view or print 6. View Size Histogram Opens separate window to display cell size histogram 7. Save Copy of Data Select to saves the current counting results and images 8. View Counted Image Shows cell image with green and red outlines to indicate cells counted 9. Current View Red rectangle indicates what area of the cell image is currently displayed 10. Pan Moves the area currently being shown within the current cell image 11. Zoom Zooms in or out of the current cell image 12. Return Select to return to Results Screen 13. Current Image Select location on slide to view counted image © 2013 Nexcelom Bioscience LLC 13 Assay Editor Main Screen 1 2 3 4 1. Current Assay Name of assay, description and icon that appears in the Assay Selection screen 2. Imaging Mode Select to indicate which type of images are captured and analyzed 3. Channel 1 Indicates which Cell Type parameters are used based on the Imaging mode selected. 4. Advance Settings Select to edit additional settings available for the imaging mode selected. 14 © 2013 Nexcelom Bioscience LLC Assay Description Screen © 2013 Nexcelom Bioscience LLC 15 Imaging Mode Screen 1 1.Calculations and Reports Select to edit the report formats and the calculations used to generate results. 16 © 2013 Nexcelom Bioscience LLC Channel Settings Screen © 2013 Nexcelom Bioscience LLC 17 Cell Type Library Screen 18 © 2013 Nexcelom Bioscience LLC Cell Type Parameters Screen © 2013 Nexcelom Bioscience LLC 19 Getting Started All Nexcelom products undergo a rigorous quality inspection prior to shipment and all reasonable precautions are taken in preparing them for shipment to assure safe delivery. The instrument should be unpacked and inspected for mechanical damage upon receipt. Mechanical inspection involves checking for signs of physical damage such as scratched, dents, etc. If damage is apparent, or any components are missing, please immediately contact Nexcelom (+1-978-3275340 or [email protected]) or your local dealer. After unpacking the instrument, plug the Cellometer Power Cable into the back of the instrument. The Auto 1000 is pre-configured with the Cellometer Auto 1000 software. No additional setup or configuration is required. Starting the Auto 1000 After plugging in the system, simply press the power button on the front of the unit. Taking a Background Image 1. When using the Auto 1000 for the first time, a background image should be taken. This step does not need to be repeated unless the instrument is moved. 2. Confirm that there is no slide in the Auto 1000 instrument. 3. Click on the “Settings” button, then take the “Take Background Image” button 4. Check the background image by clicking on the Cell Line, Total Cell Conc. assay and the Preview Image button. The display should show an even white screen. If any dark areas or variations are present, contact Nexcelom Technical Support. 20 © 2013 Nexcelom Bioscience LLC Auto-Save Set-up 1. Insert a USB drive or connect the Auto 1000 to a network drive via an Ethernet network cable. 2.Click on the “Settings” button, then the “Saving Options” button. 3. Click “Auto Save to Data File” and “Save Raw Images” to the “On” position. Click on the File and Folder buttons to set the locations for saving. In each case, select the USB drive or network drive and name the folder. Having saved images will help if any remote technical support is required and provides a permanent record of the raw data. Click “Done”, then click “Done” again. 4.Click “Done”, then click “Done” again. Done Begin Next Sample Preparing Reference Beads 1. Though the Auto 1000 instrument does not require any routine testing or calibration, reference beads are available. 2. Cellometer Check Validation Bead Solution, product number CCBM-011-2ML, is recommended for use with the Auto 1000. 3. Invert the reference bead solution a total of ten times 4. Vortex the bead solution for ten seconds 5. Set pipette to 20 µl 6. Pipette bead solution up and down ten times to break up any bead clumps © 2013 Nexcelom Bioscience LLC 21 Counting Reference Beads 1. Peel plastic off of both sides of the Cellometer slide. (for PD100 slides, the plastic has already been removed) 2. Place cell counting chamber on a fresh Kimwipe 3. Load 20 µl of mixed Reference Bead Solution into the Cellometer Counting Chamber. 4. Insert the loaded chamber into the Auto 1000 sample slot and gently push the slide to the stop. 5. Select the Cell line, total cell conc. assay. 6. Click on “Preview Image for Current Assay” 7. Adjust the focus if necessary using the coarse and fine adjustments on the left-hand side of the screen until the best bead counting focus is achieved. The beads should appear as dark circles with sharp edges. Coarse Focus Fine Focus 8. Click the Count button at the bottom of the screen. Count Count Current Image 22 © 2013 Nexcelom Bioscience LLC 9. When counting is complete, click on the “View Details” button at the bottom left of the screen. Details View Details of Counting Results 10. Click on the “View Counted Image” button on the left-hand side of the screen. Enlarge the image by clicking the “Zoom In” button on the right-hand side of the screen. Confirm that all of the beads are circled in green. _ q View Counted Image + Zoom In/Out Comparing Viability Methods Comparing Methods: When evaluating different viability methods, it is critically important to use one aliquot from the stock cell culture to perform all testing. The cell sample should be evaluated for concentration on the Cellometer Auto 1000 prior to staining. Trypan Blue Viability: For cell lines and cultured primary cells, bright field imaging and trypan blue viability may be used to determine the number, concentration, and percentage of live cells. The trypan blue method is not recommended for samples containing debris, platelets, or red blood cells. Fluorescence is required to accurately differentiate nucleated cells from platelets, red blood cells, and debris. Preparing Cell Sample for Trypan Blue Viability Determination 1. A cell concentration of 1.0 x 10⁵ to 1.0 x 10⁷ cells/mL can be analyzed on the Auto 1000. A concentration of 1.0 x 10⁶ cells/mL is optimal. 2. Invert the tube containing cells ten times and pipette up and down ten times to generate a homogeneous cell sample and reduce cell clumps. Do not shake or vortex the sample! This will generate bubbles. 3. For viability measurement, stain cells by combining 50 µl of cell sample with 50 µl of a 0.2% trypan blue staining solution (for a final concentration of 0.1% trypan blue). Gently mix by pipetting up and down ten times. © 2013 Nexcelom Bioscience LLC 23 Cell Concentration and Trypan Blue Viability using the Auto 1000 1. Pipette up and down gently 10x to break any potential cell clumps in the stained cell sample 2. Load 20µl of sample into the Cellometer Counting Chamber (CHT4) 3. Insert counting chamber into instrument. 4. Click on the “Cell line, viability trypan blue” assay. When prompted, enter your desired Sample ID and a dilution factor of 2. 5. Click on “Preview Image for Current Assay” 6. Adjust the focus if necessary using the coarse and fine adjustments on the left-hand side of the screen. Cells in focus will have a bright center and crisp edge. Coarse Focus Fine Focus 7. Click the Count button at the bottom of the screen. Count Count Current Image 8. Click on the “View Details” button at the bottom left of the screen, then click on the “View Counted Image” button on the left-hand side of the screen. Details q View Details of Counting Results 24 View Counted Image © 2013 Nexcelom Bioscience LLC 9. Review the counted image. Live cells should be circled in green. Dead cells, stained dark with trypan blue, should be circled in red. 10. The Auto 1000 is now ready to analyze the next sample. After inserting the imaging chamber loaded with the next sample, click on the “Next Sample” button at the bottom right of the screen. When prompted, enter the Sample ID, then click “Count”. Next Sample Begin Next Sample © 2013 Nexcelom Bioscience LLC 25 Tutorials Overview The following tutorials are intended as a guide to performing various cell counting assays using the Auto 1000. General sample preparation hints are included for each tutorial as well as instrument and software operation instructions. Each of the assays can also be performed using the sample images included in the software as a demonstration of the Auto 1000. Sample images for each cell counting assay can be found at C:\ Program Files\Nexcelom\Assay_Images\. Staining Solutions Trypan Blue Stock solution: 0.2% in PBS. Use 1:1 with cell sample. Dilution factor: 2 Installed Assays and Descriptions Cell Line, Total Cell Concentration No Stain Cell line or primary cells without debris, with viability greater than 98%. After taking brightfield images of a cell sample, all cells are counted to determine total cell concentration. Cell Line, Viability Trypan Blue Trypan Blue Cell line or cultured primary cells without debris. Trypan blue is routinely used to determine cell viability. Trypan blue penetrates and stains dead cells and leaves live cells unstained. After taking brightfield images of the stained sample, live and dead cells are counted to determine total, live and dead cell concentrations as well as compute percent viability. 26 © 2013 Nexcelom Bioscience LLC Operation Reference Counting Options 1 2 2a 2b 3 1. Count All Select to have all 4 positions of slide used for cell images 2. Speed Count Select to have counting use Cell Limit or Image Limit a.Use Cells Limit Check to stop counting after # of user defined cells are counted and the next frame has finished counting b.Use Images Limit Stop counting after finishing user defined images that are less than 4 images 3. Done: Save Settings Saves the current settings and returns to previous screen. © 2013 Nexcelom Bioscience LLC 27 Saving Options 1 4 2 5 3 6 9 7 10 8 11 12 13 14 Save Options 1. Set Sample ID as Cell Type Selecting this will auto input the Sample ID to match the Cell Type parameter name being used for counting 2. Auto Increment Sample ID Selecting this will auto append the Sample ID with an incremental numerical value (Example: CHO sample_001) 3. Log User Name Selecting this will require the user to enter in an ID that will be recorded with the data 4. Time Stamp Sample ID Selecting this will auto append the Sample ID with the date and time the count was performed 5. Include Instrument ID in File Selecting this will auto append the Instrument ID to the sample ID after the count is performed Auto Save 6. File this button brings up the File Dialog Window which allows the user to specify where the data.txt file will be saved when Auto Save to Data File is selected. 7. Auto Save to Data File Selecting this will auto save the data into the Data.txt file after a count is performed 28 © 2013 Nexcelom Bioscience LLC 8. Create New File for Each Sample Selecting this will auto create a new data.txt file for each sample and save the counting results to it after a count is performed 9. Folder this button brings up the File Dialog Window which allows the user to specify where the image folder will be saved when Save Raw Images or Save Counted Images is selected. 10. Save Raw Images Selecting this will auto save the images to the folder specified using the Folder command 11. Save Counted Images Selecting this will auto save the counted images to the folder specified using the Folder command Auto Print 12. Auto Print Results Select to have the results sent to the printer upon completion of count. 13. Print with Default Printer Select to have the Windows default selected printer used when Auto Print Results is selected. 14. Done Save Settings Click to save new settings and return to Assay and Settings main screen. © 2013 Nexcelom Bioscience LLC 29 Technical Information Specifications Size and Weight Height 9.0 inches (229 mm) Width 11.1 inches (282 mm) Depth 8.3 inches (211 mm) Weight 9.0 Pounds (4.1 kg) Environmental Requirements Typical biology lab environment Display 10.4 inch, 1024 x 768 TFT with LED back light Touch Screen 4-Pin resistive with controller 10.4 inch format Processor Intel® Core i3 Memory RAM Memory: 4 GB DDR2 Hard drive size: 16 or 32 GB Mini PC13 BIOS: 2 MB flash Operating System Windows embedded system External Connectors 2 USB 2.0 1 Ethernet 1 Power input plug Power Input 12 VDC @ 7.5 Amps External Button On/off 2-color button Orange: Standby Blue: Run Circulation and Cooling Allow at least 2 inches of unobstructed air circulation around the vent holes on the Auto 1000 while in use to ensure adequate cooling of the product. Getting Support We provide free consulting for your lab on cell type, assay type and sample conditions. The goal is to find the most suitable cell counting / analysis solution for your lab. Our team of Application Specialists are trained biologists with comprehensive understandings of cell counting, viability assay methods and best practices. Please contact us when you need to discuss specific types of cells, sample conditions, and applications. We are available between 8:30am and 5:00pm Eastern US time. For immediate help, please call us at 1-978-327-5340 or email [email protected] for applications and other technical information [email protected] for placing a purchase order or inquiries on a purchase order [email protected] for general inquiries 30 © 2013 Nexcelom Bioscience LLC Warranty Information Nexcelom warrants that Nexcelom instrumentation products shall, for a period of 12 (twelve) months from the date of purchase, be free of any defect in material and workmanship. The sole obligation of this warranty shall be to either repair or replace at our expense the product, at manufacturers option. The original sales receipt must be supplied for warranty repair. Products, which have been subjected to abuse, misuse, vandalism, accident, alteration, neglect, unauthorized repair or improper installation, will not be covered by warranty. Any Product being returned is to be properly disinfected and packaged (in original packing if possible). Damage sustained in shipping due to improper packing will not be covered by warranty. A valid Return Material Authorization Number (RMA#) is required for all warranty repairs. For RMA instructions, please contact our customer service department at 978-327-5340 or email [email protected]. License Agreement This agreement states the terms and conditions upon which Nexcelom Bioscience LLC (Nexcelom) offers to license to you the software together with all related documentations. The Software is licensed to you for use only in conjunction with Nexcelom’s family of products. Limitation of Liability (Hardware and Software) Cellometer® branded automatic cell counting instruments, software and consumables are intended for research use only. In no event shall Nexcelom be liable for any damages whatsoever (including, without limitation, incidental, direct, indirect, special or consequential damages, damages for loss of business profits, business interruption, loss of business information) arising out of the use or inability to use this Software, Consumables or related Hardware. © 2013 Nexcelom Bioscience LLC 31 Nexcelom Bioscience LLC 360 Merrimack Street Building 9 Lawrence, MA 01843, USA Phone: +1. 978.327.5340 Fax: +1.978.327.5341 Email: [email protected] www.nexcelom.com All content copyright 2013 Nexcelom Bioscience LLC Document 8001505 Rev A