1
ISO TC22/SC12/WG5
WorldSID TG N393
USER'S MANUAL FOR THE
WORLDSID 50TH PERCENTILE
MALE SIDE IMPACT DUMMY
TABLE OF CONTENTS
1.
PROCEDURES FOR DISASSEMBLING AND ASSEMBLING THE
WORLDSID.......................................................................................... 1
1.1
Head ....................................................................................... 1
1.1.1 Parts list for head...................................................................... 1
1.1.2 Disassembling .......................................................................... 3
1.1.3 Assembling .............................................................................. 5
1.1.4 Instrumentation mounting .......................................................... 6
1.2
Neck ....................................................................................... 7
1.2.1 Parts list for neck...................................................................... 7
1.2.2 Disassembling .......................................................................... 9
1.2.3 Assembling .............................................................................12
1.2.4 Instrumentation mounting .........................................................15
1.3
Thorax, abdomen and shoulder ..................................................16
1.3.1 Parts list .................................................................................16
1.3.2 Disassembling .........................................................................23
1.3.3 Assembling .............................................................................33
1.3.4 Instrumentation mounting .........................................................41
1.4
Full arm ..................................................................................46
1.4.1 Parts list .................................................................................46
1.4.2 Disassembling .........................................................................55
1.4.3 Assembling the arm .................................................................59
1.4.4 Adjusting the arm ....................................................................63
1.4.5 Changing full arm from left to right side impact ...........................68
1.5
Half arm .................................................................................70
1.5.1 Parts list for half arm................................................................70
1.5.2 Disassembling .........................................................................71
1.5.3 Assembling .............................................................................71
1.6
Pelvis .....................................................................................72
1.6.1 Parts list for pelvis ...................................................................72
1.6.2 Disassembling .........................................................................78
1.6.3 Assembling the pelvis...............................................................89
1.6.4 Instrumentation mounting .........................................................92
1.7
Full leg assembly .....................................................................92
1.7.1 Parts list .................................................................................92
1.7.2 Disassembling .......................................................................100
1.7.3 Assembling the leg.................................................................104
1.7.4 Adjusting the leg....................................................................112
1.8
Suit assembly........................................................................115
ii
1.8.1
1.8.2
1.8.3
Parts list for suit ....................................................................115
Disassembly ..........................................................................115
Assembly..............................................................................115
2.
2.1
2.2
2.3
2.4
2.5
2.6
2.6.1
2.6.2
2.7
RECOMMENDED WORLDSID GENERAL PRACTICES ..................117
Certification test intervals .......................................................117
Recommended inspection practices..........................................117
WorldSID thorax half width .....................................................118
Avoiding possible connector damage ........................................118
Temperature range .................................................................119
Dummy handling....................................................................119
General.................................................................................119
Procedures for using the lifting bracket are as follows ................121
Dummy storage .....................................................................121
3.
3.1
3.2
3.3
3.4
3.5
3.6
3.7
3.7.1
3.7.2
3.7.3
3.7.4
3.7.5
3.8
3.8.1
3.8.2
3.8.3
3.9
SUGGESTED WORLDSID WIRING PROCEDURES .......................122
Head Wiring ..........................................................................122
Neck ....................................................................................123
Shoulder rib and 1st thorax rib..................................................124
2nd and 3rd Thorax ribs and abdomen ribs ..................................124
Pelvis cable routing ................................................................126
Installation of sensor connectors to the thorax connector station.126
Instrumented arm cable routing ...............................................134
General considerations............................................................134
Lower arm cables...................................................................134
Upper arm cables ...................................................................134
Elbow cables .........................................................................135
Routing wires through flesh component ....................................136
Instrumented leg cable routing.................................................137
Lower leg cable routing ..........................................................137
Knee cable routing .................................................................138
Femoral neck cable routing .....................................................140
Wiring with an external DAS ...................................................141
4.
4.1
4.2
RECOMMENDED WORLDSID GROUNDING SCHEME ..................142
Parts list ...............................................................................142
Grounding procedures ............................................................142
5.
5.1
5.2
5.3
5.4
WORLDSID TEMPERATURE INFORMATION ..............................150
Temperature sensitivity of WorldSID ........................................150
Monitoring of temperature variations of WorldSID ......................150
Effect of internal DAS on dummy temperature...........................151
Practical notes for full body testing related to temperature..........152
iii
6.
6.1
6.1.1
6.1.2
6.2
6.2.1
6.2.2
6.2.3
RECOMMENDED WORLDSID SEATING PROCEDURE..................153
Placement procedures for the driver seat position ......................153
General.................................................................................153
Electronic spreadsheets ..........................................................153
Placement procedures for the rear seat position.........................153
ATD preparation ....................................................................153
Position the seat ....................................................................153
Dummy placement .................................................................153
7.
Mechanical Requirements and Certification Test Procedures for
WorldSID..........................................................................................155
7.1
Head ....................................................................................155
7.1.1 General description ................................................................155
7.1.2 Certification specification........................................................155
7.1.3 Certification test procedures ...................................................156
7.2
Neck ....................................................................................160
7.2.1 General description ................................................................160
7.2.2 Certification specification........................................................160
7.2.3 Certification test procedures ...................................................161
7.3
Thorax/abdomen/shoulder .......................................................166
7.3.1 General description ................................................................165
7.3.2 Full body test setup ...............................................................165
7.3.3 Shoulder ...............................................................................169
7.3.4 Thorax with half arm ..............................................................172
7.3.5 Thorax without arm ...............................................................174
7.3.6 Abdomen ..............................................................................177
7.4
Lumbar spine and pelvis..........................................................179
7.4.1 General description ................................................................179
7.4.2 Certification ..........................................................................179
7.4.3 Pelvis certification test procedure ............................................180
Annex A FASTENER TORQUE VALUES................................................ A-1
Annex B FASTENER ABBREVIATIONS ..................................................B-1
Annex C OVERVIEW OF AN EXAMPLE INTERNAL DATA ACQUISITION
SYSTEM .......................................................................................... C-1
C.1
General................................................................................. C-1
C.2
System components............................................................... C-1
C.3
G5 module ............................................................................ C-2
C.4
G5 docking station................................................................. C-2
C.5
G5-DB .................................................................................. C-3
C.6
Docking station to G5-DB cable ............................................... C-3
iv
C.7
C.8
C.9
C.10
C.11
C.12
C.13
C.14
C.15
C.16
C.17
C.18
C.19
In-dummy battery and cable .................................................... C-5
G5-DB to battery and temperature sensor cable......................... C-5
G5-DB to dummy exit cable .................................................... C-5
Dummy exit to TDAS status box cable ..................................... C-5
TDAS status box ................................................................... C-5
DC/DC converter ................................................................... C-6
AC/DC converter ................................................................... C-6
TDAS power supply ............................................................... C-6
TDAS software...................................................................... C-6
Status box to PC cable ........................................................... C-6
Notebook PC ......................................................................... C-6
Dummy exit to status box cable pinout..................................... C-7
Sensor cable length................................................................ C-8
Annex D OPTIONAL DTS G5 DAS LOW POWER MODE: HEAT BUILDUP
MITIGATION..................................................................................... D-1
D.1
General................................................................................. D-1
D.2
What is Low Power Mode? ..................................................... D-1
D.3
How to Implement Lower Power Mode ..................................... D-2
D.3.1 Update your tdas.ini file.......................................................... D-2
D.4
Enable Software Triggering and Low Power Mode...................... D-2
Annex E SUPPORT EQUIPMENT ..........................................................E-1
E.1
Specialized WorldSID support equipment ...................................E-1
E.2
Other support equipment typically available in test laboratories ....E-2
Annex F DRAWING LIST .....................................................................F-1
v
LIST OF FIGURES
Figure 1.1 — WorldSID head components ............................................... 2
Figure 1.2 — Removal of moulded head .................................................. 3
Figure 1.3 — Separating the head core from the neck............................... 4
Figure 1.4 — Removing upper neck load cell from instrumented head core .. 4
Figure 1.5 — Wire routing for head instrumentation.................................. 6
Figure 1.6 — WorldSID head instrumentation........................................... 7
Figure 1.7 — WorldSID neck components ............................................... 8
Figure 1.8 — Removing lower neck bracket ............................................. 9
Figure 1.9 — Removing upper neck bracket............................................. 9
Figure 1.10 — Using clamp to remove neck interface plate ..................... 10
Figure 1.11 — Neck dampers are free to be removed when interface plates
are removed ................................................................................. 11
Figure 1.12 — Lateral positions for neck buffers .................................... 12
Figure 1.13 — Assembling of neck buffers ............................................ 13
Figure 1.14 — Neck triaxial accelerometer installation ............................ 15
Figure 1.15 — Components of WorldSID thorax and abdomen ................. 18
Figure 1.16 — Shoulder ...................................................................... 20
Figure 1.17 — WorldSID spine box assembly......................................... 22
Figure 1.18 — Removing shoulder load cell assembly ............................. 23
Figure 1.19 — Detaching shoulder rib at front from sternum.................... 25
Figure 1.20 — Detaching the rib from the spine box at the rear ............... 26
Figure 1.21 — Battery assembly .......................................................... 28
vi
Figure 1.22 — Internal spine box assembly............................................ 29
Figure 1.23 — Angular accelerometer assembling .................................. 30
Figure 1.24 — IR-TRACC ball joint assemblies are mounted to the struck-side
plate of the spine box .................................................................... 32
Figure 1.25 — Shoulder rib is grey, the first thoracic rib is red, and the
second and third thoracic ribs and abdominal ribs are white................ 33
Figure 1.26 — Components of thorax rib............................................... 35
Figure 1.27 — Wire routing for rib instrumentation ................................. 36
Figure 1.28 — Plugging rib instrumentation cables into the front of the G5
modules mounted in the spine box .................................................. 36
Figure 1.29 — The rib and abdominal couplers are attached to the ribs after
instrumentation is plugged in .......................................................... 38
Figure 1.30 — Installation of G5 modules.............................................. 40
Figure 1.31 — WorldSID rib instrumentation .......................................... 42
Figure 1.32 — G5 DAS module ............................................................ 43
Figure 1.33 — Interposer connector ..................................................... 43
Figure 1.34 — DAS connector ............................................................. 43
Figure 1.35 — Arrangement of DAS, interposer connector, and connector 44
Figure 1.36 — Full arm, exploded......................................................... 47
Figure 1.37 — Shoulder-arm detail ....................................................... 48
Figure 1.38 — Upper arm, exploded ..................................................... 50
Figure 1.39 — Elbow section ............................................................... 51
Figure 1.40 — Lower arm, exploded ..................................................... 52
Figure 1.41 — Wrist ........................................................................... 54
Figure 1.42 — 'Z' Pivot and upper arm tube .......................................... 56
vii
Figure 1.43 — Elbow potentiometer ..................................................... 60
Figure 1.44 — Elbow potentiometer wiring............................................ 60
Figure 1.45 — Arm joint rotation.......................................................... 62
Figure 1.46 — Arm joint tension points................................................. 63
Figure 1.47 — Elbow adjustment ......................................................... 66
Figure 1.48 — Elbow friction adjustment............................................... 67
Figure 1.49 — Change-over components............................................... 69
Figure 1.50 — Arm assembly............................................................... 70
Figure 1.51 — WorldSID pelvis components .......................................... 74
Figure 1.52 — Rear view of pelvis assembly.......................................... 75
Figure 1.53 — Front view of pelvis assembly......................................... 75
Figure 1.54 — Close-up view of pubic assembly .................................... 76
Figure 1.55 — Close-up view of lumbar assembly .................................. 76
Figure 1.56 — Removing spine box from the pelvis ................................ 77
Figure 1.57 — Detaching the femur assemblies...................................... 78
Figure 1.58 — Pelvis flesh................................................................... 79
Figure 1.59 — Removing sacroiliac backing plates to separate the pelvic
bone-pubis assembly ..................................................................... 80
Figure 1.60 — Separating moulded pelvis bone from pubis assembly ........ 80
Figure 1.61 — Separating pubic buffers from pubic load cell structural
replacement.................................................................................. 81
Figure 1.62 — Detaching the lumbar spine ............................................ 82
Figure 1.63 — Separating the upper lumbar clamping plate and lumbar
mounting wedge from the lumbar spine ........................................... 82
viii
Figure 1.64 — Removing the lower lumbar mounting bracket weldment.... 83
Figure 1.65 — Removing the sacroiliac load cell interface ....................... 84
Figure 1.66 — Removing pelvis instrumentation cover plate .................... 84
Figure 1.67 — Removing the pelvis instrumentation bracket .................... 85
Figure 1.68 — Removing the DAS cover ............................................... 86
Figure 1.69 — Removing the docking station......................................... 86
Figure 1.70 — Removing interposer mass replacement ........................... 87
Figure 1.71 — Separating the sacroiliac and lumbar spine load cell structural
replacements ................................................................................ 87
Figure 1.72 — Routing of wires for pelvis instrumentation....................... 90
Figure 1.73 — Femoral neck ................................................................ 92
Figure 1.74 — Upper leg assembly ....................................................... 93
Figure 1.75 — Knee............................................................................ 94
Figure 1.76 — Lower leg tube assembly................................................ 96
Figure 1.77 — Foot and ankle .............................................................. 97
Figure 1.78 — Ankle assembly............................................................. 99
Figure 1.79 — Ankle..........................................................................102
Figure 1.80 — Knee assembling ..........................................................105
Figure 1.81 — Knee potentiometer wiring ............................................106
Figure 1.82 — Knee potentiometer installation ......................................106
Figure 1.83 — Torquing the knee contact load cell ................................107
Figure 1.84 — Ankle potentiometer wiring ...........................................109
Figure 1.85 — 'X' and 'Y' version assembling ......................................110
ix
Figure 1.86 — Ankle assembly potentiometers .....................................111
Figure 1.87 — Knee assembly ............................................................112
Figure 1.88 — Leg joint adjustments ...................................................113
Figure 1.89 — Ankle adjustment .........................................................114
Figure 2.1 — Lifting bracket assembly .................................................119
Figure 3.1 — Cable routing for the head...............................................121
Figure 3.2 — WorldSID neck cable routing ...........................................122
Figure 3.3 — IR-TRACC and linear accelerometer routing for shoulder and 1st
thorax ribs...................................................................................123
Figure 3.4 — Cable routing for IR-TRACC and linear triax accelerometers of
the 2nd, 3rd thorax ribs and abdomen ribs ......................................124
Figure 3.5 — Pelvis cable routing ........................................................125
Figure 3.6 — Installations of sensor connectors to the thorax connector
station ........................................................................................126
Figure 3.7 — Cable routing for the thorax connector station ...................128
Figure 3.8 — Thorax cable routing ......................................................129
Figure 3.9 — Shoulder area final cable routing ......................................130
Figure 3.10 — Pelvis cable and dummy exit cable routing ......................130
Figure 3.11 — Thorax cable routing.....................................................131
Figure 3.12 — DAS exit cable and tilt sensor cables ..............................132
Figure 3.13 — Shoulder load cell cable rounting....................................132
Figure 3.14 — WorldSID final dummy wiring ........................................133
Figure 3.15 — Lower arm cables.........................................................134
Figure 3.16 — Upper arm cables .........................................................135
x
Figure 3.17 — Cables in the elbow region ............................................135
Figure 3.18 — Lower arm flesh...........................................................136
Figure 3.19 — Upper arm flesh ...........................................................137
Figure 3.20 — Lower arm suit ............................................................137
Figure 3.21 — Lower leg cables ..........................................................138
Figure 3.22 — Knee area cable routing ................................................139
Figure 3.23 — Knee area cable routing ................................................139
Figure 3.24 — Knee area cable routing and flesh...................................140
Figure 3.25 — Femoral neck cable routing............................................141
Figure 4.1 — Cable attachment to the upper neck load cell ....................143
Figure 4.2 — Spine box cable routing ..................................................143
Figure 4.3 — Spine box cable attachment ............................................144
Figure 4.4 — Spine box cable attachment ............................................145
Figure 4.5 — Lumbar cable attachment................................................146
Figure 4.6 — Pelvic load cell cable attachment .....................................146
Figure 4.7 — Knee cable attachment ...................................................147
Figure 4.8 — Cable attachment...........................................................148
Figure 4.9 — Tibia cable attachment ...................................................149
Figure 5.1 — Location of temperature sensors used for internal temperature
survey ........................................................................................151
Figure 7.1 — Lateral head drop angle...................................................157
Figure 7.2 — Head bracket installation for lateral drops..........................158
Figure 7.3 — Frontal head drop angle ..................................................159
xi
Figure 7.4 — Head bracket installation for frontal drops .........................159
Figure 7.5 — Front view of setup for full dummy certification tests.........168
Figure 7.6 — Side view of setup for full dummy certification tests ..........168
Figure 7.7 — Using an inclinometer with the H-point tool to check pelvis
angle ..........................................................................................169
Figure 7.8 — Shoulder test, dummy and arm position ............................171
Figure 7.9 — Thorax test without arm, dummy and arm position ............176
Figure C.1 — WorldSID G5 DAS system diagram .................................. C-4
Figure C.3 — Dummy exit to TDAS status box cable 2B 19-pin lemo
connector, wiring side view, pins ................................................... C-8
xii
LIST OF TABLES
Table 1.1 — Parts list for WorldSID head ................................................ 1
Table 1.2 — Parts list for WorldSID neck ................................................ 7
Table 1.3 — Parts list for the WorldSID thorax, abdomen and shoulder ..... 16
Table 1.4 — Parts list for shoulder assembly ......................................... 19
Table 1.5 — Parts list for WorldSID spine box........................................ 20
Table 1.6 — Parts list for full arm......................................................... 45
Table 1.7 — Parts list for shoulder-arm ................................................. 48
Table 1.8 — Parts for upper arm .......................................................... 49
Table 1.9 — Parts list for elbow........................................................... 50
Table 1.10 — Parts for lower arm ........................................................ 51
Table 1.11 — Parts list for wrist .......................................................... 53
Table 1.12 — Parts list for WorldSID .................................................... 69
Table 1.13 — Parts list for WorldSID pelvis ........................................... 71
Table 1.14 — Parts list for femoral neck (W50-51034) ........................... 91
Table 1.15 — Parts for upper leg ......................................................... 92
Table 1.16 — Parts list for knee........................................................... 93
Table 1.17 — Parts list for lower leg tube ............................................. 95
Table 1.18 — Parts list for ankle-foot ................................................... 96
Table 1.19 — Parts list for ankle .......................................................... 97
Table 2.1 — Parts list for lifting bracket assembly .................................118
Table 4.1 — List of ground cables .......................................................142
xiii
Table 5.1 — Effect of internal and external DAS on WorldSID internal air
temperature.................................................................................151
Table 7.1 — WorldSID head certification specifications..........................155
Table 7.2 — WorldSID neck certification specifications ..........................160
Table 7.3 — Sensors for neck assembly...............................................162
Table 7.4 — Neck test preconditions ...................................................162
Table 7.5 — Pendulum arm deceleration pulse ......................................164
Table 7.6 — Filter specification for neck test ........................................165
Table 7.7 — Dummy full body test preconditions ..................................166
Table 7.8 — Relationship between mechanical measurement indicators and
the tilt sensors .............................................................................167
Table 7.9 — Dummy set up criteria .....................................................167
Table 7.10 — WorldSID shoulder certification specifications...................169
Table 7.11 — Sensors for shoulder test ...............................................170
Table 7.12 — Filter specifications for shoulder test ...............................171
Table 7.13 — WorldSID thorax with half-arm certification specifications ..172
Table 7.14 — Sensor specifications for thorax with half arm test............173
Table 7.15 — Filter specifications for thorax with half arm test ..............174
Table 7.16 — WorldSID thorax without arm certification specifications ...174
Table 7.17 — Sensor specifications for thorax without arm test .............175
Table 7.18 — Filter specifications for thorax without half arm test ..........176
Table 7.19 — WorldSID abdomen certification specifications..................177
Table 7.20 — Simulated armrest specifications .....................................178
Table 7.21 — Sensor specifications for abdomen test............................178
xiv
Table 7.22 — Filter specifications for abdomen test ..............................179
Table 7.23 — WorldSID pelvis certification specifications.......................180
Table 7.24 — Sensor specifications for pelvis test ................................180
Table 7.25 — Filter specifications for pelvis test ...................................181
Table A.1 — Screw torques................................................................ A-1
Table B.1 — Summary of fasteners abbreviations, descriptions and ISO
references ................................................................................... B-1
Table C.1 — WorldSID G5 DAS parts list ............................................. C-2
Table C.2 — Dummy exit to status box cable pinout ............................. C-7
Table C.3 — Example instrumentation cable lengths .............................. C-9
Table E.1 — Specialized WorldSID support equipment ............................E-1
Table E.2 — Other standard support equipment .....................................E-2
Table F.1 — WorldSID drawing list .......................................................F-1
Table F.2 — WorldSID fasteners ........................................................F-13
xv
SECTION 1
1.
PROCEDURES FOR DISASSEMBLING AND ASSEMBLING THE
WORLDSID
1.1
Head
1.1.1 Parts list for head
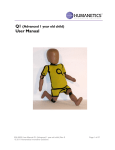
Table 1.1 lists the parts required for assembling the WorldSID head, which
are illustrated in Figure 1.1. Part numbers correspond to those on electronic
drawing W50-10000.
Table 1.1 — Parts list for WorldSID head
Item number
1
2
3
4
5
6
7
8
9
10
11
12
13
14
15
Not shown
Not shown
Not shown
Not shown
Description
Qty
Head core
Moulded head
Rotational accelerometer
Dual-axis tilt sensor
Linear triaxial accelerometer
Neck load cell structural replacement
SHCS M3 x 0,5 x 6
Cheese screw, M2 x 16
SHCS M4 x 0,7 x 10
SHCS M6 x 1 x 16
Flat washer M8 (8,9 ID x 18,8 OD x 2,3 thick)
BHCS M8 x 1,25 x 25
Neck shroud assembly
SHCS M6 x 12
BHCS M4 x 0,7 x 10
Rotational accelerometer mass replacement
Linear triaxial accelerometer mass replacement
Dual-axis tilt sensor mass replacement
Universal neck load cell
1
1
1
3
1
1
1
6
1
1
4
1
1
1
4
5
3
1
1
1
Part number
W50-10007
W50-14014
Endevco 7302M4
Endevco 7302M4
Endevco 7268C-2000M1
W50-71003
5000393
5000254
5000151
5000081
5000123
5000255
W50-24103
5000281
5000010
W50-10010
W50-61063
W50-10011
W50-71000
Figure 1.1 — WorldSID head components
2
1.1.2 Disassembling
As shown in Figure 1.2, remove the BHCS M8x25 (Figure 1.1, Item 12)
and M8 flat washer (Figure 1.1, Item 11) from the top of the head. Lift the
moulded head (Figure 1.1, Item 2) off the head core assembly. If the head
sticks to the core, tap the bottom edge of the head lightly with a plastic
hammer. Detach the neck shroud assembly (not illustrated, Item 13) from
the head by removing five screws, BHCS M5 x 10.
Figure 1.2 — Removal of moulded head
Remove the four SHCS M6 x 12 (Figure 1.1, Item 14) that connect the
head core assembly to the neck assembly (see Figure 1.3).
3
Figure 1.3 — Separating the head core from the neck
Remove the four SHCS M6 x 16 (Figure 1.1, Item 10) from the bottom
of the upper neck load cell structural replacement (Figure 1.1, Item 6) that
attach it to the bottom of the head core (see Figure 1.4).
Figure 1.4 — Removing upper neck load cell from instrumented head core
4
1.1.3 Assembling
Install the head instrumentation as described in 1.4. Use four SHCS
M6 x 16 (Figure 1.1, Item 10) to attach the upper neck load cell to the
bottom of the head core (Figure 1, Item 1). Make sure the slot at the top
front of the head core is lined up with the connector for the upper neck load
cell. Torque the screws to 6 Nm. Attach the head core assembly to the neck
assembly using four SHCS M6 x 12 (Figure 1.1, Item 14). Torque the screws
to 6 Nm.
Mount the neck shroud assembly (Table 1.1, Item 13) to the moulded
head (Figure 1.1, Item 2) using five BHCS M5 x 10. Place the head/neck
shroud assembly over the instrumented core, making sure that all wires are
free. Place the M8 flat washer into the recess at the top of the head and
connect the head to the instrumented core using the BHCS M8 x 25
(Figure 1.1, Item 12). Tighten the screw 1/4 - 1/2 turn after engagement of
the screw head and the skull.
As shown in Figure 1.5, bundle the wires from the head
instrumentation together at the rear with cable ties and route down the back
of the neck over to the non-struck side of the dummy. Pass the cables
between the shoulder rib and first thoracic rib to be plugged into the DAS
modules from the other wiring so it can be plugged into an off-board readout
during setup. As shown in Figure 1.5, make sure that the cable has some
slack. See Section 1.3 for more detailed wiring information.
5
b
a
80
1
2
1
Figure 1.5 — Wire routing for head instrumentation
1.1.4 Instrumentation mounting
As shown in Figure 1.6, the head core can be instrumented with three
rotational accelerometers (Figure 1.6, Item 3), one linear triaxial
accelerometer (Figure 1.6, Item 5), and one dual-axis tilt sensor (Figure 1.6,
Item 4). Each rotational accelerometer is secured with two SHCS M3 x 6
(Figure 1.6, Item 7) and that the y-axis rotational accelerometer is mounted
in the right-front chamber with screws accessed from the left-front chamber.
Mount the z-axis rotational accelerometer in the left-rear chamber with
screws accessed from the top. Mount the x-axis rotational accelerometer in
the right-rear chamber with screws accessed from the right-front chamber.
The linear triaxial accelerometer is mounted in the right-front chamber with
one cheese screw M2 x 16 (Figure 1.6, Item 8) that is accessed from the
right. Mount the tilt sensor in the right-rear chamber with one SHCS M4 x
10 (Figure 1.6, Item 9) accessed from the right-front chamber. The
instrumentation in the right-rear chamber must be installed before the
instrumentation in the right-front chamber. The upper neck load cell is also
considered part of the head assembly instrumentation.
6
Figure 1.6 — WorldSID head instrumentation
1.2
Neck
1.2.1 Parts list for neck
Table 1.2 lists the parts required for assembling the WorldSID neck,
which are shown in Figure 1.7. Part numbers correspond to those found on
drawing W50-20000.
Table 1.2 — Parts list for WorldSID neck
Item
number
Description
Qty
Part number
1
Lower neck bracket
1
W50-20009
2
Upper neck bracket
1
W50-20010
3
Neck load cell structural replacement
1
W50-71003
4
Neck column assembly
1
W50-21001
5
SHCS M6 x 50
2
5000324
6
Neck bracket nut
2
W50-20011
7
SHCS M6 x 12
8
5000281
8
Linear triaxial accelerometer
1
Endevco 7268C-2000M1
9
Cheese screw M1,5 x 16
1
5000227
Not shown
Linear triaxial accelerometer structural replacement
1
W50-61063
Not shown
Universal neck load cell
1
W50-71000
7
4
7
3
9
6
2
1
8
5
Figure 1.7 — WorldSID neck components
1.2.2 Disassembling
Separate the upper (Figure 1.7, Item 2) and lower (Figure 1.7, Item 1)
neck brackets by removing two SHCS M6 x 50 (Figure 1.7, Item 5) accessed
from the rear of the dummy (see Figure 1.8). Remove the two free neck
bracket nuts (Figure 1.7, Item 6), accessed from either side.
8
Figure 1.8 — Removing lower neck bracket
Remove the upper part of the neck bracket and lower neck load cell
structural replacement from the neck assembly by removing four SHCS M6 x
12 (Figure 1.7, Item 7) accessed from the bottom (see Figure 1.9). Remove
the lower neck load cell from the upper neck bracket by removing four SHCS
M6 x 12 (Figure 1.7, Item 7).
Figure 1.9 — Removing upper neck bracket
9
To take apart the neck assembly, use the neck compression wrench to
remove the half-spherical screw from the neck (see Figure 1.10). After the
interface plates come off, remove the four dampers by pulling them out (see
Figure 1.11).
Figure 1.10 — Using clamp to remove neck interface plate
10
Figure 1.11 — Neck dampers are free to be removed when interface plates
are removed
1.2.3 Assembling
When assembling the neck, mount the neck buffers with the circular
cross-sections on the lateral sides of the neck, and mount the neck buffers
with the square cross-sections on the front and rear of the neck. As shown
in Figure 1.12, the lateral locations for the buffers in the interface plates are
farthest from the holes for mounting the neck to the head and torso.
11
Figure 1.12 — Lateral positions for neck buffers
The circular cross-section buffers have a cylindrical end and a
mushroom-shaped end. Press the mushroom ends firmly into the top and
bottom interface plates so that the mushroom cap protrudes into the
counterbore on the flat face of the interface plate. A turning action during
assembly helps to get the circular buffers positioned correctly. Tune the
correct response of the neck in lateral bending by using three different
hardnesses of lateral circular cross-section buffers. When installing the
flexion/extension buffers in the interface plates, position them as shown in
Figure 1.13 so the end that sticks out farther is facing the moulded neck.
12
Figure 1.13 — Assembling of neck buffers
Position the interface plate with the installed buffers over one end of
the neck. Lubricate the surface of the half-spherical screw with the “Never
Seez” high-pressure grease, which is provided in the toolbox. Attach the
interface plate to the neck by tightening the half-spherical screws to 10 Nm
using the neck compression tool. Repeat for the other end of the neck.
Place the upper neck bracket (Figure 1.7, Item 2) over the lower neck
bracket (Figure 1.7, Item 1) and engage the teeth in the desired orientation.
Insert the neck bracket nut (Figure 1.7, Item 6) into the slot on one side and
orient it so the hole in the nut lines up with the hole accessed from the back
13
of the lower neck bracket. Insert the SHCS M6 x 50 (Figure 1.7, Item 5) to
secure the brackets together. Repeat with the second neck bracket nut and
SHCS on the other side.
Mount the neck load cell or its structural replacement (Figure 1.7,
Item 3) to the neck bracket with four SHCS M6 x 12 (Figure 1.7, Item 7).
Tighten the screws to 6 Nm. Attach the neck assembly (Figure 1.7, Item 4)
to the neck bracket/load cell assembly with four SHCS M6 x 12 (Figure 1.7,
Item 7) accessed from the bottom. Tighten the screws to 6 Nm.
1.2.4 Instrumentation mounting
The neck assembly includes a lower neck load cell (the upper neck load
cell is considered part of the head assembly). In addition a triaxial
accelerometer can be mounted in a recess in the back of the lower neck
bracket. Install the triaxial accelerometer or its mass replacement to the
upper neck bracket using a cheese screw M2 x 16 (see Figure 1.14).
14
Figure 1.14 — Neck triaxial accelerometer installation
1.3
Thorax, abdomen and shoulder
1.3.1 Parts list
1.3.1.1 Parts list for thorax, abdomen and shoulder assembly
Table 1.3 lists the parts required for assembling the WorldSID thorax,
abdomen and shoulder, which are illustrated in Figure 1.15. Part numbers
correspond to those on drawing W50-30000.
15
Table 1.3 — Parts list for the WorldSID thorax, abdomen and shoulder
Item
number
Description
Qty
Part number
1
Spine box assembly
1
W50-31000
2
IRTRACC displacement sensor assembly, ribs 1-6
6
IF-363
3
Thorax rib assembly 1, WorldSID
2
W50-32111
4
Thorax rib assembles 2 and 3, WorldSID
8
W50-32131
5
Sternum, thorax rib
1
W50-35022
6
Rib coupler, abdominal, WorldSID
1
W50-35021
7
Shoulder rib sternum mounting strip
2
W50-32177
8
Thorax and abdominal rib sternum mounting strip
10
W50-32178
9
Thorax and abdominal rib mounting strip, threaded
10
W50-32176
10
BHCS M5 x 0,8 x 10
64
5000003
11
Shoulder rib assembly, inner band, WorldSID
2
W50-32160
12
Thorax rib assembly, inner band, WorldSID
6
W50-32150
13
Abdomen rib assembly, inner band, WorldSID
4
W50-32155
14
Shoulder rib mounting bracket, struck side, WorldSID
2
W50-32171
15
Thorax and abdominal rib accelerometer mounting bracket, WorldSID
10
W50-32172
16
Accelerometer, linear triaxial
6
Endevco 7268C-2000M1
17
Rib assembly, shoulder
2
W50-32001
18
Shoulder rib sternum strip, threaded
2
W50-32175
19
Thorax and abdominal rib clamping bracket, WorldSID
10
W50-32173
20
FHCS M5 x 0,8 x 16
8
5000467
21
Screw, rib IRTRACC mount
6
W50-32179
22
Rib doubler, shoulder
2
W50-32010
23
Shoulder assembly
2
W50-61053
24
Clamp, damping
24
W50-32180
25
FHCS M5 x 0,8 x 10
48
5000084
26
BHCS M5 x 0,8 x 6
24
5000214
27
Shoulder pad, left, WorldSID
1
16
W50-35023-1
Item
number
Description
Qty
Part number
28
Shoulder pad, right, WorldSID
1
W50-35023-2
29
Battery mounting bracket
1
W50-37011
30
SHCS M5 x 0,8 x 30
2
5000471
31
Battery mass replacement
1
W50-37012
32
BHCS M2,5 x 0,45 x 10
6
5000208
33
FHCS M2,5 x 0,45 x 6
24
5000202
34
SHCS M5 x 18
2
5000112
35
Nut, locknut M12 x 1,75
2
5000462
36
Thorax pad
2
W50-35024
37
SHCS M6 x 1 x 16
4
5000081
38
Cheese screw M2 x 16
6
5000254
39
Cable tie mount, 0,50 x 0,50, nylon, adhesive backed
10
6002035
40
Cable tie mount, #4 screw, nylon
1
6002036
41
BHCS M3 x 0,5 x 6
1
5000399
42
Cable tie, 7,4 inch (not shown)
8
6000004
43
Temperature logger assembly
1
Dallas DS192H/Z
Not shown
IR-TRACC mass replacement
6
W50-31060
Not shown
Linear triaxial accelerometer mass replacement
6
W50-61063
Not shown
Temperature logger assembly mass replacement
1
W50-71701
17
Figure 1.15 — Components of WorldSID thorax and abdomen
18
1.3.1.2 Parts list for shoulder
Table 1.4 lists the parts required for assembling the WorldSID shoulder
(electronic drawing W50-61053), which is illustrated in Figure 1.16.
Table 1.4 — Parts list for shoulder assembly
Item
number
Description
Quantity
Part number
1
Shoulder load cell structural replacement
1
W50-71092
2
Shoulder pivot shaft
1
W50-61049
3
Shoulder pivot washer
2
W50-61050
4
Shoulder clevis assembly
1
W50-61117
5
M6 hex locknut
1
5000143
6
SSNT M4 x 0,7 x 4 mm
2
5000201
Not shown
Shoulder load cell
1
W50-71090
Not shown
SSFP M4 x 0,7 x 4 mm
2
5000618
Not shown
SSFT M6 x 10
1
5000226
19
Figure 1.16 — Shoulder
1.3.1.3 Parts list for spine box assembly
Table 1.5 lists the parts required for assembling the WorldSID spine
box. Part numbers correspond to those on drawing W50-31000 and shown
in Figure 1.17.
Table 1.5 — Parts list for WorldSID spine box
Item
number
Description
Qty
Part number
1
Mounting bracket 1
2
W50-31042
2
Upper bracket weldment, spine box, WorldSID
1
W50-31010
3
Interposer replacement
2
W50-75001
4
Side plate, left WorldSID
1
W50-31020
5
SHCS M3 x 0,5 x 10
7
5000119
6
Spacer, WorldSID
6
W50-31041
7
T12 accelerometer mount, WorldSID
1
W60-37024
8
Side plate, right WorldSID
1
W50-31030
9
SHCS M3 x 0,5 x 8
8
5000388
Connector housing mass replacement
2
W50-75002
10
20
Item
number
Description
Qty
Part number
11
Backup plate mounting bracket
2
W50-37022
12
SHCS M4 x 0,7 x 10
4
5000151
13
FHCS M2,5 x 0,45 x 6
24
5000202
14
Ball joint assembly, IRTRACC
15
FHCS M6 x 1 x 10
16
Accelerometer, linear triaxial
2
Endevco 7268C-2000M1
17
SHCS M2 x 0,4 x 12,0 12,9 alloy steel
8
5000382
18
Cheese screw M2 x 16
2
5000254
19
BHCS M6 x 1 x 18
4
5000465
20
Rotational accelerometer/tilt sensor mount bracket
1
W50-37023
21
Mounting bracket #2
2
W50-31043
22
G5 mass replacement
3
W50-74307
23
Cover plate spine box
2
W50-31045
24
Accelerometer, rotational
2
Endevco 7302BM4
25
SHCS M4 x 0,7 x 25
8
5000461
26
Bracket, rotational accelerometer mount
1
W50-37029
27
Tilt sensor, dual axis (ref)
1
See dummy manufacturer information
28
FHCS M3 x 0,5 x 10
2
5000203
29
SHCS M4 x 0,7 x 8
1
5000024
30
Pin, dowel M4 x 14
2
5000053
Not shown
Linear accelerometer mass replacement
2
W50-61063
Not shown
Rotational accelerometer mass replacement
2
W50-10010
Not shown
Dual axis tilt sensor mass replacement
1
W50-10011
6
18
21
W50-31050
5000204
Figure 1.17 — WorldSID spine box assembly
1.3.2 Disassembling
1.3.2.1 Separation of upper and lower torso
To separate the upper and lower torso, first make sure all the cables
running between the upper and lower torso are detached, these would
normally include communication cables if the pelvis DAS is installed, sensor
cables that were routed to the DAS in the thorax, and a ground cable. This
22
step may require disassembling of the sternum to access the sensor
collector. Thereafter, remove the four SHCS M8, two on each side of the
bottom of the spine box, to separate the upper and lower torsos.
1.3.2.2 Shoulder
As shown in Figure 1.18, remove the shoulder assembly (Figure 1.15,
Item 23) by removing the four FHCS M5 x 16 (Figure 1.15, Item 20) that
hold each in place.
Figure 1.18 — Removing shoulder load cell assembly
To remove the clevis assembly (Figure 1.16, Item 4), take off the M6
hex nut (Figure 1.16, Item 5) with the nylon washer (Figure 1.16, Item 3) at
the threaded end. Next, loosen the two SSNT M4 x 0,7 x 4 (Figure 1.16,
Item 6) in the clevis assembly that hold the pivot shaft (Figure 1.16, Item 2)
and the two SSFT M6 x 10 mm (in the load cell behind the clevis securing
23
the pivot shaft) from the load cell structural replacement then pull the shaft
out of the assembly.
NOTE
The shoulder load cell has two SSFP M4 x 4 mm securing the pivot
shaft instead of the one SSFT M6 x 10 in the load cell structural
replacement.
1.3.2.3 Thorax and abdomen
Remove the thorax pad (Figure 1.15, Item 36) by removing it from the
Velcro® that holds them in place. Remove the shoulder pads (Figure 1.15,
Items 27 and 28) by lifting them off of the dummy. Remove the lower neck
bracket from the spine box by removing four SHCS M6 x 16 (Figure 1.15,
Item 37).
Remove the shoulder rib mounting brackets (Figure 1.15, Item 14).
Detach the shoulder rib IR-TRACC (Figure 1.15, Item 2) from the shoulder rib
mounting bracket by removing the IR-TRACC rib mount screw (Figure 1.15,
Item 21), accessed from the bottom of the shoulder rib mounting bracket.
Remove the linear triaxial accelerometer (Figure 1.15, Item 16) from the
shoulder rib mounting bracket by removing the cheese screw M2 x 16
(Figure 1.15, Item 38). Detach the shoulder IR-TRACC assembly from the
spine box by removing the BHCS M2,5 x 10 (Figure 1.15, Item 32).
As shown in Figure 1.19, disconnect the shoulder rib (Figure 1.15,
Item 17) at the front by removing the two BHCS M5 x 10 (Figure 1.15,
Item 10) that attach the left and right shoulder ribs to the sternum thorax rib
(Figure 1.15, Item 3). Removing a shoulder rib sternum mounting strip
(Figure 1.15, Item 7) and a threaded shoulder rib sternum mounting strip
(Figure 1.15, Item 18) which are removed from each side.
24
Figure 1.19 — Detaching shoulder rib at front from sternum
Detach the left and right shoulder ribs from the spine box at the rear by
removing two BHCS M5 x 6 (Figure 1.15, Item 26) that hold each in place
(see Figure 1.20). On the non-struck side, remove the two damping clamps
(Figure 1.15, Item 24).
25
Figure 1.20 — Detaching the rib from the spine box at the rear
The procedures for disassembling the remaining ribs are similar to those
for the shoulder rib, but details for the first thoracic rib are included here in
order to include references to the correct item numbers. Detach the rib
clamping bracket (Figure 1.15, Item 19) and the rib accelerometer mounting
bracket (Figure 1.15, Item 15) by removing the four BHCS M5 x 10
(Figure 1.15, Item 10). Remove the triaxial accelerometer (Figure 1.15, Item
16) from the rib accelerometer mounting bracket (Figure 1.15, Item 15) by
removing the cheese screw M2 x 16 (Figure 1.15, Item 38).
Remove the IR-TRACC (Figure 1.15, Item 2) by removing the BHCS
M2,5 x 10 (Figure 1.15, Item 32) that secures it to the spine box. Detach it
from the rib accelerometer bracket by removing the IR-TRACC mount screw
(Figure 1.15, Item 21), which is accessed from the bottom of the rib
accelerometer bracket.
Detach the thorax rib at the front by removing the four BHCS M5 x 10
(Figure 1.15, Item 10) that connect it to the sternum (Figure 1.15, Item 5).
Remove the two sternum rib mounting strips (Figure 1.15, Item 8) and the
two threaded rib mounting strips (Figure 1.15, Item 9). Detach the inner
band of the thorax rib (Figure 1.15, Item 12) by removing the four BHCS M5
26
x 10 (Figure 1.15, Item 10) that hold them in place. Remove the two
damping clamps (Figure 1.15, Item 24). Detach the rib from the spine box at
the rear by removing two BHCS M5 x 6 (Figure 1.15, Item 26) that hold
them in place.
Repeat this procedure for the second and third thorax ribs and the two
abdominal ribs with the few differences in parts described here. Note that
the two abdominal ribs are attached at the front to the abdominal rib coupler
(Figure 1.15, Item 6), and that the inner rib bands of the two abdomen ribs
(Figure 1.15, Item 13) are different than the inner bands of the three thorax
ribs (Figure 1.15, Item 12). The damping material on the abdominal ribs is
thicker than that on the thoracic ribs. Also, the first thorax outer rib
(Figure 1.15, Item 3) is different from the thorax ribs 2 and 3 and the
abdominal ribs (Figure 1.15, Item 4), which are the same.
After the ribs are removed (see Figure 1.15), detach the battery mass
replacement (Figure 1.21, Item 31) from the non-struck side by removing
two SHCS M5 x 18 (Figure 1.21, Item 34). Then detach the battery
mounting bracket (Figure 1.21, Item 29) by removing the two SHCS M5 x
30 (Figure 1.21, Item 30) that secure it to the spine box.
27
30
29
3
34
31
mass
replacement
Figure 1.21 — Battery assembly
28
1.3.2.4 Spine box disassembling
Detach the right side plate (Figure 1.17, Item 8) from the spine box by
removing ten FHCS M6 x 10 (Figure 1.17, Item 15). Note that the internal
components of the spine box will now be visible (see Figure 1.23).
Figure 1.22 — Internal spine box assembly
Remove the T12 accelerometer mount (Figure 1.17, Item 7) from the
spine box by removing the two SHCS M3 x 10 (Figure 1.17, Item 5) that
secure the mount. Remove the accelerometer (Figure 1.17, Item 16) from
the mount by removing a cheese screw M2 x 16 (Figure 1.17, Item 18).
Note the rotational and linear accelerometer assembly shown in
Figure 1.23. To detach the rotational accelerometer assembly from the spine
box, remove the three SHCS M3 x 10 (Figure 1.17, Item 5) that secure it to
29
the spine box. Remove the dual-axis tilt sensor (Figure 1.17, Item 27) from
the rotational accelerometer bracket by removing the SHCS from the back of
the bracket. Detach the two rotational accelerometers by removing the two
FHCS that secure each to the bracket.
Rotational
accelerometer
Rotational and linear
accelerometer assembly
Figure 1.23 — Angular accelerometer assembling
Begin removal of the upper or middle G5 module mass replacements
(Figure 1.17, Item 22) by removing two SHCS M4 x 25 (Figure 1.17, Item
25) that secure the Number 2 mounting brackets (Figure 1.17, Item 21) to
the spine box weldment (Figure 1.17, Item 2). Remove two more SHCS M4
x 25 (Figure 1.17, Item 25) that secure the Number 1 mounting brackets
30
(Figure 1.17, Item 1) to the spine box. Remove the middle or upper G5
module mass replacement assembly (Figure 1.17, Item 22). Detach the spine
box cover plate (Figure 1.17, Item 19) from the back of each G5 module
mass replacement (Figure 1.17, Item 22) by removing two BHCS M6 x 18
(Figure 1.17, Item 24). Slide the G5 module mass replacement (Figure 1.17,
Item 22) from between the two mounting brackets (Figure 1.17, Item 1 and
21). Detach each interposer mass replacement (Figure 1.17, Item 3) from the
mounting brackets by removing the four SHCS M2 x 12 (Figure 1.17,
Item 17). Remove the two backup plate mounting brackets (Figure 1.17,
Item 11) from the spine box by removing the two SHCS M4 x 10
(Figure 1.17, Item 12) that hold each in place. Remove each connector
housing mass replacement (Figure 1.17, Item 10) from its backup plate
mounting bracket (Figure 1.17, Item 11) by removing three SHCS M3 x 8
(Figure 1.17, Item 9). Remove the lower G5 module mass replacement
(Figure 1.17, Item 22) from the spine box by detaching two pin dowel M4 x
14 (Figure 1.17, Item 30).
Turn the spine box over and remove seven FHCS M6 x 10 (Figure 1.17,
Item 15) to remove the seven spacers (Figure 1.17, Item 6) from the left
side plate (Figure 1.17, Item 4). Remove three more of the FHCS M6 x 10
(Figure 1.17, Item 15) to separate the upper spine box bracket weldment
(Figure 1.17, Item 2) from the left-side plate (Figure 1.17, Item 4).
As shown in Figure 1.24, the six IR-TRACC ball joint assemblies
(Figure 1.17, Item 14) are secured to the struck side plate, each with four
FHCS M2,5 x 6 (Figure 1.17, Item 13).
31
Figure 1.24 — IR-TRACC ball joint assemblies are mounted to the struck-side
plate of the spine box
1.3.3 Assembling
1.3.3.1 Assembling thorax and abdomen
Figure 1.25 shows the color coding scheme for the WorldSID ribs and
that the shoulder rib is grey, the first thoracic rib is red, and the remaining
ribs (thorax number two and three, both abdominal) are white.
Note that the inner bands of the two abdominal ribs (Figure 1.15,
Item 13) have a thicker layer of damping material than the inner bands of the
thoracic ribs (Figure 1.15, Item 12) and that the inner band of the shoulder
rib (Figure 1.15, Item 11) is different from the other inner bands.
32
Figure 1.25 — Shoulder rib is grey, the first thoracic rib is red, and the
second and third thoracic ribs and abdominal ribs are white
Begin assembly of the thorax by attaching the battery mounting bracket
(Figure 1.15, Item 29) with two SHCS M5 x 30 (Figure 1.15, Item 30) that
secure it to the spine box on the non-struck side. Attach the battery mass
replacement (Figure 1.15, Item 31) with two SHCS M5 x 18 (Figure 1.15,
Item 34).
Begin assembly of the ribs from the bottom. Attach the lower abdominal
rib (Figure 1.15, Item 4) to the spine box at the rear using two BHCS M5 x 6
(Figure 1.15, Item 26). Secure the inner band of the abdomen (Figure 1.15,
Item 13) with two damping clamps (Figure 1.15, Item 24) and four BHCS
M5 x 10 (Figure 1.15, Item 10). To permit easier access to the connector
33
boxes in the spine box, install the instrumentation before attaching the ribs
to the rib and abdominal couplers.
Attach the IR-TRACC (Figure 1.15, Item 2) to the spine box with a
BHCS M2,5 x 10 (Figure 1.15, Item 32). Connect it to the rib accelerometer
bracket (Figure 1.15, Item 15) with the IR-TRACC mount screw
(Figure 1.15, Item 21), accessed from the bottom of the rib accelerometer
bracket (Figure 1.15, Item 15). Connect the rib clamping bracket
(Figure 1.15, Item 19) and the rib accelerometer mounting bracket
(Figure 1.15, Item 15) to the inner band and rib with four BHCS M5 x 10
(Figure 1.15, Item 10). Secure the triaxial accelerometer (Figure 1.15, Item
16) to the rib accelerometer mounting bracket (Figure 1.15, Item 15) with a
cheese screw M2 x 16 (Figure 1.15, Item 38).
As each IR-TRACC assembly and accelerometer is installed, route the
cables toward the centre front (Figure 1.28 and Figure 1.29) of the dummy
and plug them into the G5 module connectors. See Section 3 for more
detailed wiring information.
Figure 26 shows the arrangement of the components in the first
thoracic WorldSID rib and that all of the ribs have a similar general assembly.
The inner band of the rib (Figure 1.26, Item 33) is attached to the spine box
with damping clamps (Figure 1.26, Item 10) and FHCS. The rib (Figure 1.26,
Item 28) is attached to the spine box (Figure 1.26, Item 13) at the rear with
BHCS, and to the thorax rib sternum (Figure 1.26, Item 3) at the front using
BHCS and the sternum mounting strip (Figure 1.26, Item 4) and threaded
sternum mounting strip (Figure 1.26, Item 7). Attach the IR-TRACC
assembly (Figure 1.26, Item 14) with a BHCS to the ball joint components
which are attached to the spine box. Secure the IR-TRACC to the rib
accelerometer mounting bracket (Figure 1.26, Item 32) with a special
mounting screw accessed from the bottom. A linear triaxial accelerometer
(Figure 1.26, Item 15) is attached to the rib accelerometer mounting bracket
(Figure 1.26, Item 32), which is then secured to the inner rib, rib, and rib
clamping bracket (Figure 1.26, Item 31) with a BHCS.
34
Figure 1.26 — Components of thorax rib
35
Figure 1.27 — Wire routing for rib instrumentation
Figure 1.28 — Plugging rib instrumentation cables into the front of the G5
modules mounted in the spine box
36
Continue installing the ribs with the preceding procedure. Attach the
shoulder rib mounting bracket (Figure 1.15, Item 14) to the shoulder rib and
shoulder load cell assembly (Table 1.3, Item 23) with four FHCS M5 x 16
(Figure 1.15, Item 20).
After the instrumentation is plugged into the connectors, position a
threaded rib mounting strip (Table 1.3, Item 18) behind the front holes on
each rib, and place the abdominal rib coupler (Figure 1.15, Item 6) over it.
Put the rib mounting strip (Figure 1.15, Item 8) over the rib coupler and
secure the rib at the front with two BHCS M5 x 10 (Figure 1.15, Item 10).
The installed rib couplers are shown in Figure 1.29.
Attach the lower neck bracket to the spine box with four SHCS M6 x
16 (Table 1.3, Item 37). Attach the thorax pad (Figure 1.15, Item 36) with
Velcro®. Place the shoulder pads (Figure 1.15, Items 27 and 28) in position.
To install the thorax pads, check fit the pad against the dummy to make
sure the pad covers the ribs and press into place, engaging the Velcro® with
light pressure.
37
Figure 1.29 — The rib and abdominal couplers are attached to the ribs after
instrumentation is plugged in
1.3.3.2 Assembling spine box
Begin assembly of the spine box by mounting the ball joints for the IRTRACC assemblies to the side plate so they face the struck-side of the
dummy. Secure each ball joint (Figure 1.17, Item 14) with four FHCS M2,5 x
6 (Figure 1.17, Item 13). Attach the seven spacers (Figure 1.17, Item 6) to
the struck-side plate (Figure 1.17, Item 4 or Item 8) using seven FHCS M6 x
10 (Figure 1.17, Item 15). Attach the upper spine box bracket weldment
(Figure 1.17, Item 2) to the struck-side plate with three more FHCS M6 x 10
(Figure 1.17, Item 15).
As shown in Figure 1.30, attach the lower G5 module or its mass
replacement (Table 1.5, Item 22) to the spine box with four SHCS M4 x 25
(Figure 1.17, Item 25). Attach each backup plate mounting bracket
(Figure 1.17, Item 11) to the spine box with two M4 x 14 pin dowels
38
(Figure 1.17, Item 30). Connect each interposer or its mass replacement
(Figure 1.17, Item 22) to the mounting brackets Number 1 (Figure 1.17, Item
1) and Number 2 (Figure 1.17, Item 21) with four SHCS M2 x 12
(Figure 1.17, Item 17). Secure the mounting brackets/interposers to the
spine box with four SHCS M4 x 25 (Figure 1.17, Item 25). Slide the G5
modules or their mass replacements (Figure 1.17, Item 22) into the mounting
brackets and connect them to the interposers. Attach the spine box cover
plate (Figure 1.17, Item 23) to the back of each G5 module or its mass
replacement with two BHCS M6 x 18 (Figure 1.17, Item 19). Attach each
connector housing or its mass replacement (Figure 1.17, Item 10) to its
backup plate mounting bracket (Figure 1.17, Item 11) with three SHCS M3 x
8 (Figure 1.17, Item 9).
Next assemble the angular accelerometer assembly (Figure 1.17, Item
24). Attach the z-axis angular accelerometer to the bottom of the bracket
with two FHCS. Attach the x-axis rotational accelerometer to the back of the
bracket with two FHCS so it is parallel to the bottom of the bracket. Attach
the dual-axis tilt sensor (Figure 1.17, Item 27) to the back of the bracket
with a SHCS. Position the rotational accelerometer assembly (Figure 1.17,
Item 24) on the spine box and secure it with three SHCS M3 x 10
(Figure 1.17, Item 5). Plug the cables for the rotational accelerometers
sensors into a G5 module, but leave the connectors for the dual-axis tilt
sensor free to be plugged into the off-board readout during dummy setup.
Attach the T12 accelerometer mount (Figure 1.17, Item 7) to the spine
box with two SHCS M3 x 10 (Figure 1.17, Item 5). Attach the
accelerometer (Figure 1.17, Item 16) to the mount with a cheese screw M2
x 16 (Figure 1.17, Item 18). Orient the accelerometer so that the cable
points upward and can be routed between the middle G5 module and angular
accelerometer assembly to be plugged into the G5 module. Attach the linear
triaxial accelerometer (Figure 1.17, Item 16) to the top of the spine box
weldment with a cheese screw M2 x 16 (Figure 1.17, Item 18). Plug the
cable for the upper accelerometer into the G5 module after the ribs are
installed.
39
Attach the other side plate (Figure 1.17, Item 4 or 8) to the spine box
with ten FHCS M6 x 10 (Figure 1.17, Item 15). Make sure the cables from
the T12 or angular accelerometer assembly are not pinched by the side plate.
Figure 1.30 — Installation of G5 modules
1.3.4 Instrumentation mounting
1.3.4.1 Thorax instrumentation
The thorax instrumentation for the WorldSID includes an IR-TRACC
deflection measurement assembly for each struck-side rib, plus a triaxial
accelerometer attached to the inner struck side of each rib. Figure 1.31
illustrates the configuration for the assembly of the rib with instrumentation.
The IR-TRACC assembly (Figure 1.31, Item 14) is attached to the spine box
with a BHCS M2,5 (Figure 1.31, Item 11), and that the other end of the IRTRACC assembly is attached to the rib accelerometer mounting bracket
(Figure 1.31, Item 32) with an IR-TRACC rib mount screw (Figure 1.31, Item
40
19) accessed from the bottom of the rib. A linear triaxial accelerometer
(Figure 1.31, Item 15) is secured to the rib accelerometer mounting bracket
(Figure 1.31, Item 32) with a cheese screw M2 x 16 (Figure 1.31, Item 37),
and that the rib accelerometer mounting bracket (Figure 1.31, Item 32) is
secured to the inner band of the rib (Figure 1.31, Item 33), the thorax rib
(Figure 1.31, Item 28), and the rib clamping bracket (Figure 1.31, Item 31)
with four BHCS M5 x 10 (Figure 1.31, Item 1).
A battery to power the G5 modules is part of the thorax assembly and
that additional instrumentation attached to the spine box is described in the
disassembly/assembly section for the spine box. A shoulder load cell is also
available for use with the WorldSID.
41
Figure 1.31 — WorldSID rib instrumentation
1.3.4.2 Spine box instrumentation
The spine box includes mounting positions for two G5 DAS modules,
one of which is shown in Figure 1.32. Note that for both of these, an
interposer connector (see Figure 1.33) is attached to the mounting brackets,
and the DAS module is plugged into this connector. The connector for each
DAS (see Figure 1.34), which is linked to the interposer connector, is
secured to a bracket mounted to the spine box. The arrangement of the DAS
and connectors is shown in Figure 1.35. Note that for the lower G5 module,
42
the connector is mounted adjacent to the module, so the module plugs in
directly to the connector and no interposer is used.
Figure 1.32 — G5 DAS module
Figure 1.33 — Interposer connector
Figure 1.34 — DAS connector
43
Figure 1.35 — Arrangement of DAS, interposer connector, and connector
Other instrumentation in the spine box includes a linear triaxial
accelerometer mounted directly to the spine box near the top, and that a
second linear triaxial accelerometer is mounted to a bracket attached to the
spine box near the location of the T12 thoracic vertebra. An angular
accelerometer assembly, which includes rotational accelerometers to
measure x- and z-axis angular acceleration, plus a dual-axis tilt sensor, is
mounted near the bottom of the spine box, and in addition, the ball joint
portions of six IR-TRACC assemblies are mounted to the spine box plate on
the struck-side of the dummy.
44
1.4
Full arm
1.4.1 Parts list
1.4.1.1 Parts list for full arm
The parts and assemblies required for assembling the WorldSID full arm
(W50-61000 (left); W50-61001 (right)) are the upper arm assembly, lower
arm assembly (see Figure 1.36, Items 1 and 9 respectively), moulded hand
(Figure 1.36, Item 10), shoulder assembly (Item 22; not included with
assembly, shown for reference only) and moulded shoulder bumper
(Figure 1.36, Item 19), potentiometer, pivot adjustment hardware, and strain
relief hardware.
Table 1.6 lists the parts required for assembling the WorldSID full arm,
which is illustrated in Figure 1.36.
Table 1.6 — Parts list for full arm
Item number
Description
Qty
Part number
1
Upper arm assembly, left
1
W50-61002
not shown
Upper arm assembly, right
1
W50-61003
2
Elbow shaft assembly
1
W50-61028
3
Elbow potentiometer mass replacement
1
W50-61123
4
M3 flat washer
2
5000181
5
BHCS M3 x 0,5 x 10 mm
2
5000178
6
BHCS M4 x 0,7 x 6 mm
1
5000179
7
M4 flat washer
1
5000155
8
Cable clamp
1
5000191
9
Lower arm assembly
1
W50-61034
10
Moulded hand assembly, left
1
W50-61037
not shown
Moulded hand assembly, right
1
W50-61069
11
Spring washer
1
W50-61022
12
SHSS M6 x 25 mm
1
5000163
13
BHCS M10 x 1,5 x 20 mm
1
5000176
14
Clamping washer (steel)
1
W50-61014
45
Item number
Description
Qty
Part number
15
Compression washer (rubber)
1
W50-61016
16
Friction washer
1
W50-52064
17
Cable guide
4
W50-61030
18
BHCS M3 x 0,5 x 6 mm
8
5000171
19
Shoulder bumper assembly
1
W50-61110
20
LHSHCS M3 x 0,5 x 12 mm
2
5000620
21
SSNT M3 x 0,5 x 3 mm
1
5000190
21
Flexion-extension stop assembly
1
W50-61054
22
Full arm clevis assembly
1
W50-61051
23
SSHDP M6 x 1,0 x 6 mm
1
5000165
Not shown
Upper arm flesh, left
1
W50-61099
Not shown
Upper arm flesh, right
1
W50-61098
Not shown
Lower arm flesh
1
W50-61100
Not shown
Elbow potentiometer (optional)
1
W50-61027
46
Figure 1.36 — Full arm, exploded
1.4.1.2 Parts list for shoulder arm
Table 1.7 lists the parts for assembling the WorldSID shoulder-arm,
which is illustrated in Figure 1.37.
47
Table 1.7 — Parts list for shoulder-arm
Item
number
1
Description
Qty
Part number
Shoulder load cell
1
W50-71090
Shoulder load cell structural replacement
1
W50-71092
2
Shoulder clevis assembly
1
W50-61051
3
SSNT M3 x 0,5 x 3 mm
1
5000190
4
Shoulder bumper
1
W50-61110
5
SSFP M4 x 0,7 x 6 mm
2
5000464
6
Spring plunger
1
5000256
7
Arm tube assembly
1
W50-61012
8
BHCS M6 x 1,0 x 16 mm
1
5000072
9
SSNT M6 x 1,0 x 6 mm
1
5000621
not
shown
Figure 1.37 — Shoulder-arm detail
48
1.4.1.3 Parts list for upper arm
Table 1.8 lists the parts required for assembling the WorldSID upper
arm, which is illustrated in Figure 1.38.
Table 1.8 — Parts for upper arm
Item number
1
Description
Qty
Upper arm "Z" pivot assembly, left
1
Upper arm “Z” pivot assembly, right
2
Upper arm tube assembly
3
Modified button head cap screw
4
Part number
W50-61006
W50-61111
1
W50-61012
12
W50-61042
Wrist washer
1
W50-61019
5
Spring washer
1
W50-61022
6
BHCS M6 x 1,0 x 16 mm
1
5000072
7
Universal arm load cell
1
W50-71070
not shown
Arm load cell structural replacement
1
W50-61041
8
Upper arm extension tube assembly
1
W50-61004
9
SHCS M2 x 0,4 x 18 mm
2
5000164
10
Accelerometer mass replacement
1
W50-61063
11
Elbow load cell
1
W50-71060
Not shown
Elbow structural replacement
1
W50-61065
Not shown
Triaxial linear accelerometer
1
Endevco 7268C-2000M1
49
Figure 1.38 — Upper arm, exploded
1.4.1.4 Parts list for elbow
Table 1.9 lists the parts required for assembling the WorldSID elbow,
which is illustrated in Figure 1.39.
Table 1.9 — Parts list for elbow
Item
number
Description
Quantity
Part number
1
BHCS M3 x 0,5 x 10
2
5000178
2
M3 flat washer
2
5000181
3
Elbow potentiometer assembly
1
W50-61027
4
Elbow clevis assembly
1
W50-61029
5
SSHDP M6 x 1,0 x 6 mm
1
5000165
6
Friction washer assembly
1
W50-52064
7
Compression washer
1
W50-61016
8
Clamping washer
1
W50-61014
9
BHCS M10 x 1,5 x 20 mm
1
5000176
10
Elbow load cell
1
W50-71060
11
Elbow shaft assembly
1
W50-61028
Elbow load cell structural replacement
1
W50-61065
Not shown
50
Figure 1.39 — Elbow section
1.4.1.5 Parts list for lower arm
Table 1.10 lists the parts required for assembling the WorldSID lower
arm, which is illustrated in Figure 1.40.
Table 1.10 — Parts for lower arm
Item
number
Description
Qty
Part number
1
Elbow clevis assembly
1
W50-61029
2
Modified BHCS
8
W50-61042
3
Arm load cell (optional)
1
W50-71070
Arm load cell structural replacement
1
W50-61041
BHCS M6 x 1,0 x 16 mm
1
5000072
5, 11
Spring washer
2
W50-61022
6
Wrist washer
1
W50-61019
7
Lower arm tube assembly
1
W50-61035
8
SHCS M3 x 0,5 x 12 mm
1
5000070
Not shown
4
51
Item
number
Description
Qty
Part number
9
Wrist pivot assembly
1
W50-61020
10
Wrist clevis assembly
1
W50-61033
12
SHSS M6 x 25 mm
2
5000163
13
Wrist pivot bumper
2
W50-61046
14
SSNT M6 x 1,0 x 6 mm
1
5000622
15
SHCS M2 x 0,4 x 18 mm
1
5000164
16
Accelerometer mass replacement
1
W50-61063
17
Accelerometer mount bracket
1
W50-61039
18
SHCS M2,5 x 0,45 x 8 mm
4
5000458
Not shown
Triaxial linear accelerometer
1
Endevco 7268C-2000M1
Figure 1.40 — Lower arm, exploded
1.4.1.6 Parts list for wrist
Table 1.11 lists the parts required for assembling the WorldSID wrist,
which is illustrated in Figure 1.41.
52
Table 1.11 — Parts list for wrist
Item number
Description
Quantity
Part number
1
Wrist clevis
1
W50-61033
2
Wrist pivot assembly
1
W50-61020
3
Lower arm tube assembly
1
W50-61036
4
SSNT M6 x 1,0 x 6 mm
1
5000621
5
SHCS M2 x 0,4 x 18 mm
1
5000164
6
Wrist accelerometer mount
1
W50-61039
7
SHCS M2,5 x 0,45 x 8 mm
4
5000458
8
Wrist washer
1
W50-61019
9
Spring washer
2
W50-61022
10
BHCS M6 x 1 x 16 mm
1
5000072
11
SHCS M3 x 0,5 x 12 mm
1
5000173
12
SHSS M6 x 25 mm
1
5000163
53
Figure 1.41 — Wrist
1.4.2 Disassembling
1.4.2.1 Full arm
To remove the arm assembly from the shoulder assembly, loosen the
two-friction adjustment set screws (SSFP M4 x 0,7 x 6 mm, Figure 1.37,
Item 5) in the shoulder bumper (Figure 1.37, Item 4). Unthread the shoulder
bumper from the shoulder clevis. Remove the SSNT M3 x 0,5 x 3 mm on the
top of the "Z" pivot assembly. Separate the arm assembly from the shoulder
assembly.
Remove the hand assembly by taking out the SHSS M6 x 25 mm
(Figure 1.36, Item 12) at the hand-wrist pivot joint. Watch for the spring
washer (Figure 1.36, Item 11) to fall out of the assembly as the screw is
removed. This washer is made of soft plastic (urethane) and thus the screw
head may damage it. Inspect and replace as necessary. Inspect the hand
bumpers, checking for cuts in the bumper material or signs that the bumper
adhesive may be failing.
54
Remove the upper arm flesh by opening the Velcro® on the inboard side
of the upper arm flesh and then pulling the arm flesh open and off of the
arm.
Remove the lower arm flesh by opening the Velcro® holding the flaps at
the elbow closed and moving them over the potentiometer assembly and
friction adjustment screw. Hold the upper arm and pull the flesh towards the
wrist to remove it from the lower arm.
Disassemble the lower arm from the upper by first disconnecting the
connector from the lower arm load cell. Remove the cable guides that are
held (Figure 1.36, Item 17) in position using two BHCS M3 x 0,5 x 6 mm
(Figure 1.36, Item 18) for each clamp. Remove the potentiometer assembly
from the elbow joint by taking out the BHCS M4 x 0,7 x 6 mm and M4 flat
washer (Figure 1.36, Items 6 and 7) holding the potentiometer wiring cable
in position. Remove the two BHCS M3 x 0,5 x 10 mm and M3 flat washer
(Figure 1.36, Items 5 and 4) securing the potentiometer body in position and
slide out the potentiometer from the body of the elbow shaft assembly
(Figure 1.36, Item 2).
Remove the BHCS M10 x 1,5 x 20 mm (Figure 1.36, Item 13) from the
elbow shaft assembly along with the three joint friction adjustment washers
(Figure 1.36, Item 14, 15 and 16). Remove the SSHDP M6 x 1,0 x 6 mm
(Figure 1.36, Item 23) securing the elbow shaft assembly in the elbow joint
and slide the elbow shaft assembly out of the elbow and separate the upper
and lower arm assemblies.
1.4.2.2 Disassembling upper arm
Disconnect the cables to the arm and elbow load cells and remove the
accelerometer.
To remove the elbow load cell (Figure 1.38, Item 11) take out the four
modified BHCS (Figure 1.38, Item 3) that attach it to the upper arm
55
extension tube (Figure 1.38, Item 8). The elbow load cell also contains the
mounting position for the triaxial linear accelerometer. Note that the
accelerometer is held in place using a SHCS M2 x 0,4 x 18 mm (Figure 1.38,
Item 9) on the rear side of the load cell.
Remove all the modified BHCS’s and separate the arm load cell
(Figure 1.38, Item 7) from the arm extension tube (Figure 1.38, Item 8) and
the upper arm tube assembly (Figure 1.38, Item 2) from the arm load cell.
To remove the "Z" pivot (Figure 1.38, Item 1), loosen the SSNT M6 x 0
x 6 mm friction adjustment screw (Figure 1.37, Item 9) and take out the
BHCS M6 x 1 x 16 mm (Figure 1.38, Item 6) and the spring washer
(Figure 1.38, Item 5) and wrist washer (Figure 1.38, Item 4). Pull the "Z"
pivot out of the upper arm tube assembly.
Figure 1.42 — 'Z' Pivot and upper arm tube
While the components are disassembled make a thorough inspection of
bearing and mating surfaces. Ensure that wear or damage will not affect the
performance of the arm assembly. Refer to Figure 1.42. Inspect the M1,5
roll pins in the end of the “Z” pivot (Figure 1.42, Item 1) to make sure they
are not bent.
56
1.4.2.3 Disassembling elbow
The elbow joint is disassembled by removing the BHCS M10 x 1,5 x
20 mm (Figure 1.39, Item 9) at the elbow pivot. This BHCS M10 provides
the tension necessary for the 1-to-2-G-setting in the elbow. When this screw
is removed the clamping, compression and friction washers (Figure 1.39,
Items 8, 7, and 6 respectively) can be pulled from the assembly.
Loosen or remove the SSHDP M6 x 1 x 6 mm (Figure 1.39, Item 5)
from the elbow load cell and the elbow shaft assembly (Figure 1.39, Item
11) can be pulled from the elbow joint. With the shaft assembly removed the
elbow load cell and clevis assembly can be pulled apart.
The elbow potentiometer (Figure 1.39, Item 3) can be removed by
taking out the two BHCS M3 x 0,5 x 10 mm (Figure 1.39, Item 1) and the
associated M3 flat washers (Figure 1.39, Item 2).
1.4.2.4 Disassembling lower arm
Before disassembling the lower arm assembly, remove the triaxial linear
accelerometer located in the wrist assembly. Remove the accelerometer
mounting bracket (Figure 1.40, Item 17). Hold the bracket in place by four
SHCS M2,5 x 0,45 x 8 mm (Figure 1.40, Item 18) and one SHCS M3 x 0,5
x 12 mm (Figure 1.40, Item 8). Hold the 7268C triaxial linear accelerometer
in position using a SHCS M2 x 0,4 x 18 mm (Figure 1.40, Item 15).
To begin disassembly, after disconnecting all cables, remove the
modified BHCS (Figure 1.40, Item 2) that secure the elbow clevis
(Figure 1.40, Item 1) and arm load cell (Figure 1.40, Item 3) and separate
these two components. Remove the modified BHCS screws that attach the
arm load cell and the wrist assembly, pull the two sections apart.
1.4.2.5 Disassembling wrist
The wrist assembly (W50-61035) is shown in Figure 1.41.
57
To remove the wrist pivot and clevis assemblies, take out the BHCS M6
x 1 x 16 mm (Figure 1.41, Item 10) that holds the wrist pivot assembly in
the wrist assembly. Remove the wrist washer (Figure 1.41, Item 8) and the
spring washer (Figure 1.41, Item 9). These two washers are the same as the
parts in the upper arm assembly (Figure 1.38, Items 4 and 5). Loosen the
SSNT M6 in the wrist assembly (Figure 1.41, Item 4) and pull the wrist pivot
assembly (Figure 1.41, Item 2) from the wrist assembly.
Take out the SHSS M6 x 25 mm (Figure 1.41, Item 12) and the rubber
washer (Figure 1.41, Item 9). Separate the wrist pivot and wrist clevis
assemblies (Figure 1.41, Items 2 and 1 respectively).
Inspect the rubber bumpers (W50-61038) on the wrist clevis to ensure
there is no damage to the material and that they are securely fixed in
position. If the bumpers should come loose or fall off, re-glue with Loctite®
414, “Super-Glue”, or equivalent cyanoacrylate based adhesive.
1.4.3 Assembling the arm
1.4.3.1 General
In general the procedure for assembling the arm is substantially the
opposite of the procedure for disassembling it. The following descriptions are
provided to assist the user to more efficiently assemble the WorldSID arm.
1.4.3.2 Assembling the upper arm
To assemble the arm to the upper torso, install the arm on the shoulder
load cell clevis. Push the arm onto the shoulder clevis (Figure 1.37, Item 2)
until it fully contacts the clevis face. Thread the shoulder bumper
(Figure 1.37, Item 4) onto the shoulder clevis. Thread the bumper as a
coarse adjustment for the arm’s 1-to-2-g-setting. Tighten the SSNT M3 x 0,5
x 3 mm (Figure 1.37, Item 3) to fine adjust.
58
Note that inside the upper arm tube there are three components that are
involved in the adjustment of "Z"-pivot joint: the wrist washer (Figure 1.38,
Item 4), spring washer (Figure 1.38, Item 5) and a BHCS M6 x 1 x 16 mm
(Figure 1.38, Item 6).
Slide the "Z"-pivot assembly (Figure 1.38, Item 1) into the upper arm
tube (Figure 1.38, Item 2). Install the wrist washer into the tube as shown in
Figure 1.42, orient the washer so that the through holes for the M1,5 pins
are aligned with the pins on the "Z"-Pivot. Place the spring washer on the
BHCS M6 (Figure 1.42, Item 5) and thread the screw into the base of the
"Z"-Pivot. Tighten the BHCS M6 and spring washer until they contact the
wrist washer and then turn it 1/8 turn tighter. Do not over tighten this joint;
the wrist pivot must be able to rotate.
1.4.3.3 Assembling elbow
To reassemble the elbow section, align the elbow load cell (Figure 39,
Item 10) and elbow clevis (Figure 1.39, Item 4) so that the elbow shaft
assembly (Figure 1.39, Item 11) can be inserted into the elbow pivot hole.
Line up the shaft-locking hole with the SSHDP M6 x 1 x 6 mm (Figure 1.39,
Item 5). This screw locks the elbow shaft to the elbow load cell so that the
potentiometer attached to the elbow clevis can measure the angular
displacement of the elbow load cell about the lower arm assembly.
Install the friction washer assembly (Figure 1.39, Item 6) on the elbow
shaft. Press the washer over the pins onto the elbow shaft completely.
Install the next two washers, (Figure 1.39, Items 7 and 8) on the elbow
shaft and secure all three in place with a BHCS M10 x 1,5 x 20 mm
(Figure 1.39, Item 9). Use this screw to adjust the joint tension to 1-to-2-gsetting. Do this adjustment with the complete arm assembly.
Attach the elbow potentiometer assembly to the elbow clevis assembly
using two BHCS M3 x 0,5 x 10 and two M3 flat washers (Figure 1.39,
Items 1 and 2 respectively). To adjust the potentiometer “zero” position align
59
the elbow load cell body with the elbow clevis body, and then connect the
potentiometer to the data acquisition system to be used for testing. Loosen
the two BHCS M3 (Figure 1.39, Item 1) securing it to the elbow clevis and
rotate the potentiometer body until 0 volts output is achieved. If there is not
sufficient angular displacement available to achieve 0 volts, remove the two
BHCS M3 and their associated washers, then lift the potentiometer assembly
out of the elbow shaft. Rotate the potentiometer insert (see Figure 1.43)
90°, replace the unit on the elbow clevis, and check the output again.
Figure 1.43 — Elbow potentiometer
Figure 1.44 — Elbow potentiometer wiring
60
1.4.3.4 Assembling lower arm
Attach the arm load cell (Figure 1.40, Item 3) (or structural
replacement) to the elbow clevis assembly (Figure 1.40, Item 1) using four
modified BHCS M6, torque to 10 Nm.
The wrist assembly is attached to the arm load cell using four modified
BHCS M6 (Figure 1.40, Item 2) torqued to 10 Nm.
1.4.3.5 Assembling wrist
Inspect the hand bumpers (W50-61048). If they are loose or missing,
reinstall using Loctite® 414, “Super-Glue” or equivalent cyanoacrylate based
adhesive.
The wrist assembly (see Figure 1.41) has the same type of joint as the
upper arm "Z"-pivot. Re-assemble the wrist assembly by installing the wrist
pivot (Figure 1.41, Item 2) into the lower arm tube (Figure 1.41, Item 3) and
then aligning the wrist washer (Figure 1.41, Item 8) on to the M1,5 pins.
After the wrist washer is installed insert the spring washer (Figure 1.41, Item
9) and an BHCS M6 x 1 x 16 (Figure 1.41, Item 10) into the tube and the
screw is tightened until the BHCS and spring washer contact the wrist
washer. Then turn the screw one-eighth (1/8) turn tighter. Use the SSNT
M6 x 1 x 6 mm (Figure 1.41, Item 4) to control rotational friction for the 1to-2-g-setting.
Fit the wrist-mounted triaxial linear accelerometer on the accelerometer
mount (Figure 1.41, Item 6). The mount is secured in place with four SHCS
M2,5 x 0,45 x 8 mm (Figure 1.41, Item 7) and one SHCS M3 x 0,5 x 12
mm (Figure 1.41, Item 11). Attach the accelerometer with an SHCS M2 x
0,4 x 18 mm (Figure 1.41, Item 5).
Attach the wrist clevis assembly (Figure 1.41, Item 1) to the wrist pivot
with a spring washer (Figure 1.41, Item 9) and an SHSS M6 x 25 mm
61
(Figure 1.41, Item 12). Tighten this screw to approximately a 1-to-2-gsetting, so that there is some stiffness to the joint without “locking” the
joint.
1.4.4 Adjusting the arm
1.4.4.1 General
The arm assembly friction is adjusted at several points along the arm to
ensure the biomechanical performance of the assembly during testing, and
that all joints are adjusted to a 1-to-2-G-setting.
Figure 1.45 — Arm joint rotation
62
Figure 1.46 — Arm joint tension points
Figure 1.45 shows the feasible rotations at each joint.
Perform the following procedures while the arm is attached to the
dummy.
1.4.4.2 Adjusting the shoulder x-axis pivot
Note the following:
-
The shoulder clevis pivots about the x-axis on the shoulder pivot
shaft (Figure 1.16, Item 2).
-
The full arm assembly should be able to support itself in the
horizontal position, parallel to the floor and perpendicular to the
dummy’s mid-plane.
-
A light force (1 to 2 G) applied to the hand should move the arm
assembly to the at rest position (against the upper torso).
63
Adjust the shoulder assembly movement by tightening the M6 hex locking
nut (Figure 1.16, Item 5) until the arm almost stays fixed when raised to the
side horizontally (parallel to floor, perpendicular to torso side). Make the final
1-to-2-G-setting by means of the two SSNT M4 x 0,7 x 4 mm (Figure 1.16,
Item 6).
1.4.4.3 Adjusting the arm z-axis pivot rotation
Ensure that the upper arm z-axis pivot is properly assembled prior to
undertaking the adjustment procedure. Note that the spring washer
(Figure 1.38, Item 5) in the z-axis pivot joint can cause some variability from
assembly to assembly.
Extend the complete arm laterally until it is parallel to the floor. Tighten
the shoulder-arm joint until the arm is locked in this position. Bend the arm at
the elbow so that the lower arm is perpendicular to the upper but still parallel
to the floor. If the z-axis pivot is properly adjusted the lower arm should
remain parallel to the floor but move easily when a downward force of 1-to2-G-setting is applied, and if it does not, the ‘Z’-pivot must be adjusted using
the friction adjustment screw (Figure 1.37, Item 9).
1.4.4.4 Adjusting the shoulder-arm y-axis pivot rotation
Fully extend the arm from the dummy’s upper torso, toward the front of
the torso, so that the complete arm is straight and parallel to the floor. Note
the following:
-
The assembly should be approximately parallel to the dummy’s
midsagittal plane.
-
If properly adjusted, the arm will maintain this position without
support and will move freely if a downward force of 1 G is
applied.
64
Tighten the bumper on the arm pivot shaft to ensure proper engagement
of the spring plunger mechanism (see Figure 1.37, Item 6). Loosen the two
set screws that lock the bumper in position (see Figure 1.37, Item 5).
Loosen the arm pivot set screw located at the top of the arm ‘Z’-pivot.
Rotate the bumper in a clockwise direction until the arm is almost able to
support its own mass without falling. Adjust the set screw M3 (Figure 1.37,
Item 3) until the arm will not drop when moved to the horizontal but will fall
with only a slight touch of the hand.
1.4.4.5 Adjusting the elbow y-axis pivot rotation
Position the upper arm perpendicular to the floor and parallel to the
upper torso. Position the lower arm assembly so that it is parallel to the floor
and perpendicular to the upper arm. Tighten the elbow pivot screw (see
Figure 1.47) so that the lower arm remains parallel to the floor until a
downward force of about 1 to 2 G is applied.
65
Figure 1.47 — Elbow adjustment
If tightening the elbow pivot screw does not provide enough friction to
maintain the 1-2 G adjustment, inspect the joint to ensure that it is properly
assembled. Note that the locking screw (see Figure 1.48) must be installed
so that it secures the elbow pivot shaft assembly to the elbow assembly and
the locking hole in the elbow pivot shaft assembly must be aligned with the
locking screw.
Inspect the three washers used with the elbow pivot screw. The
washers must be installed in the order shown in Figure 1.48 and the friction
washer must have the friction material toward the elbow clevis assembly.
Check the compression washer (neoprene material) for deformation or other
damage and replace as necessary.
66
Figure 1.48 — Elbow friction adjustment
1.4.4.6 Adjusting the wrist and hand pivot rotations
Note the following:
-
The wrist adjustments are not easily done due to the lack of mass
of the components.
-
This joint is adjusted to approximate a 1-to-2-G-setting.
Rotate the hand and tighten the modified SHSS M6 x 25 mm until there
is an appropriate friction in the Wrist-Hand joint.
1.4.5 Changing full arm from left to right side impact
To convert the instrumented arm from left-side impact to right-side
impact, or vice versa, several parts have to be exchanged. Replace the ‘Z’pivot (Figure 1.49, Item 1), hand (Figure 1.49, Item 4) and upper arm flesh
67
(not shown) with their corresponding components. For example, replace the
left hand with the right hand and so on.
Move the cable clamp (Figure 1.49, Item 2) on the elbow load cell, the
potentiometer assembly (Figure 1.49, Item 3), the BHCS M10 at the elbow
joint (Figure 1.49, Item 5) with its associated washers (Figure 1.49, Items 6,
7, 8), and the lower arm assembly cable clamps (Figure 49, Item 2). Attach
the potentiometer on the inside surface of the arm, closest to the torso.
Position Figure 1.49, Items 5, 6, 7, and 8 on the outboard side, away from
the torso.
68
Figure 1.49 — Change-over components
1.5
Half arm
1.5.1 Parts list for half arm
The half arm is moulded as one piece which consists of a plastic bone,
vinyl skin and urethane foam. The bone has a spring plunger for locating the
arm position. The locknut is used to adjust the 1-to-2-G-settings. The part
number for the half arm is shown in Table 1.12.
Table 1.12 — Parts list for WorldSID
Item number
1
Description
Quantity
Half arm assembly
2
69
Part number
W50-62000
1
Figure 1.50 — Arm assembly
1.5.2 Disassembling
Remove the half arm from the shoulder by removing the locknut with a
socket wrench.
1.5.3 Assembling
Attach the half arm to the shoulder using the locknut and a socket
wrench, adjusting the joint to a 1-to-2-G-setting.
70
1.6
Pelvis
1.6.1 Parts list for pelvis
Table 1.13 lists the parts required for assembling the WorldSID pelvis.
Note that part numbers refer to those on drawing W50-40000 and in
Figure 1.51, and that Figures 1.52 through Figure 1.56 illustrate different
views of the pelvis components.
Table 1.13 — Parts list for WorldSID pelvis
Item
number
Description
Qty
Part number
1
Pelvis flesh
1
W50-42019
2
Interposer mass replacement
1
W50-75001
3
G5 module mass replacement
1
W50-74307
4
Pelvis docking station
1
W50-41042
5
Moulded pubic buffer
2
W50-42510
6
Pubic load cell structural replacement
1
W50-71052
7
Connector housing mass replacement
1
W50-75002
8
Left sacroiliac load cell interface
1
W50-42016
9
Left pelvis bone
1
W50-42010
10
Lumbar bushing
6
W50-41019
11
Lumbar lower clamping plate
2
W50-41021
12
Lumbar upper clamping plate
1
W50-41022
13
Rubber lumbar spine
1
W50-41018
14
SHCS M8 x 18
4
5000209
15
BHCS M5 x 0,8 x 25
4
5000466
16
FHCS M6 x 1 x 16
4
5000090
17
Lower lumbar mounting bracket weldment
1
W50-41030
18
Dual-axis tilt sensor
1
See dummy manufacturer
information
19
Pelvis instrumentation cover plate
1
W50-42031
20
Linear triaxial accelerometer
1
Endevco 7268C-2000M1
21
Pelvis instrumentation bracket
1
W50-42030
71
Item
number
Description
Qty
Part number
22
Right sacroiliac load cell interface
1
W50-42017
23
DAS cover
1
W50-41041
24
Sacroiliac load cell structural replacement
1
W50-71975
25
Lumbar spine load cell structural replacement
1
W50-71122
26
Sacroiliac load cell backing plate
2
W50-42002
27
Right pelvis bone
1
W50-42011
28
Lumbar mounting wedge
1
W50-41026
29
Hip joint socket
2
W50-42005
30
Hip joint inner ring
2
W50-42007
31
Hip socket retainer
2
W50-42008
32
Trochanter assembly, right
1
W50-51022
Trochanter assembly, left
1
W50-51023
33
FHCS M6 x 1 x 20
6
5000036
34
FHCS M6 x 30
8
5000265
35
BHCS M6 x 1 x 16
2
5000072
36
FHCS M3 x 0,5 x 10
4
5000203
37
SHCS M4 x 0,7 x 8
1
5000024
38
SHCS M4 x 0,7 x 14
3
5000549
39
Cheese screw M3 x 6
4
5000222
40
Flat washer M8 (8,9 ID x 18,8 OD x 2,3 thick)
2
5000123
41
SHCS M2 x 0,4 x 10
4
5000215
42
SHCS M3 x 0,5 x 8
11
5000388
43
Flat washer M4 (4,3 ID x 9,0 OD x 0,7 thick)
6
5000155
44
BHCS M4 x 0,7 x 16
6
5000153
45
SHCS M6 x 1 x 10
16
5000457
46
Hex head screw M8 x 10
2
5000569
47
BHCS M6 x 1 x 20
6
5000438
48
Cheese screw M2 x 16
1
5000254
49
MSSFP M4 x 6
6
5000464
Dual axis tilt sensor mass replacement
1
W50-10011
Not numbered
Not shown
72
Item
number
Description
Qty
Not shown
Linear triaxial accelerometer mass replacement
1
W50-61063
Not shown
Pubic symphisis load cell
1
W50-71051
Not shown
Lumbar spine load cell assembly
1
W50-71120
Not shown
Sacro-iliac load cell assembly
1
W50-71130
73
Part number
Figure 1.51 — WorldSID pelvis components
74
Figure 1.52 — Rear view of pelvis assembly
Figure 1.53 — Front view of pelvis assembly
75
Figure 1.54 — Close-up view of pubic assembly
Figure 1.55 — Close-up view of lumbar assembly
76
1.6.2 Disassembling
As shown in Figure 1.56, remove the spine box from the pelvis
assembly by removing four SHCS M8 x 18 (Figure 1.56,Item 14) that
connect it to the lumbar mounting wedge (Figure 1.56,Item 28).
Figure 1.56 — Removing spine box from the pelvis
77
Detach the femur assemblies by removing the hex head screws M8 x
10 (Figure 1.57, Item 46) that attach each to the pelvis assembly (see
Figure 1.57). They are accessible from the interior of the pelvis bone and can
be removed with a box end wrench.
Hex Head
Screw
Figure 1.57 — Detaching the femur assemblies
78
Remove the pelvis flesh (Figure 1.51, Item 1) by peeling it away from
the pelvis (see Figure 1.58).
Figure 1.58 — Pelvis flesh
As shown in Figure 1.59, remove the sacroiliac load cell backing plates
(Figure 1.51, Item 26) by removing the four FHCS M6 x 30 (Figure 1.51,
Item 34) and three FHCS M6 x 20 (Figure 1.51, Item 33) that secure them.
Separate the two pelvis bones (Figure 1.51, Items 9 and 27), connected by
the pubic buffers (Figure 1.51, Item 5) and pubic load cell (Figure 1.51,
Item 6) from the lumbar instrumentation assembly.
79
Figure 1.59 — Removing sacroiliac backing plates to separate the pelvic
bone-pubis assembly
Detach the moulded pubic buffers (Figure 1.51, Item 5) from the
moulded pelvis by removing the three M4 x 16 (Figure 1.51, Item 44) and
M4 flat washers (Figure 1.51, Item 43) that hold each in place (see
Figure 1.60).
Figure 1.60 — Separating moulded pelvis bone from pubis assembly
80
Detach the pubic buffers from the pubic load cell structural replacement
(Figure 1.51, Item 6) by removing four SHCS M4 x 8 (Figure 1.51, Item 37)
from each side (see Figure 1.61.)
Figure 1.61 — Separating pubic buffers from pubic load cell structural
replacement
As shown in Figure 1.62, detach the lumbar spine (Figure 1.51, Item
13), remove the six BHCS M6 x 20 (Figure 1.51, Item 47) and six lumbar
bushings (Figure 1.51, Item 10) that attach it to the lower lumbar mounting
bracket weldment (Figure 1.51, Item 17). Remove the two lower lumbar
clamping plates (Figure 1.51, Item 11).
81
Figure 1.62 — Detaching the lumbar spine
Remove the upper lumbar clamping plate (Figure 1.51, Item 12) from
the lumbar spine by removing the four BHCS M5 x 25 (Figure 1.51, Item 15)
that secure it (see Figure 1.63). Remove the lumbar mounting wedge
(Figure 1.51, Item 28).
Figure 1.63 — Separating the upper lumbar clamping plate and lumbar
mounting wedge from the lumbar spine
82
As shown in Figure 1.64, remove the lower lumbar mounting bracket
weldment (Figure 1.51, Item 17) from the lumbar load cell structural
replacement (Figure 1.51, Item 25) by removing four FHCS M6 x 16
(Figure 1.51, Item 16).
Figure 1.64 — Removing the lower lumbar mounting bracket weldment
Detach the left and right sacroiliac load cell interfaces (Figure 1.51,
Items 22 and Item 8) by removing the eight SHCS M6 x 10 (Figure 1.51,
Item 45) that hold each in place (see Figure 1.65).
83
Figure 1.65 — Removing the sacroiliac load cell interface
As shown in Figure 1.66, remove the pelvis instrumentation cover plate
(Figure 1.51, Item 19) by removing four cheese screws M3 x 6 (Figure 1.51,
Item 39).
Figure 1.66 — Removing pelvis instrumentation cover plate
84
Detach the pelvis instrumentation bracket (Figure 1.51, Item 21) from
the sacroiliac load cell structural replacement (Figure 1.51, Item 24) by
removing three SHCS M4 x 14 (Figure 1.51, Item 38) accessed from the
back (see Figure 1.67).
Figure 1.67 — Removing the pelvis instrumentation bracket
Remove the connector mass replacement (Figure 1.51, Item 7) from the
front of the sacroiliac load cell structural replacement by removing three
SHCS M3 x 8 (Figure 1.51, Item 42). As shown in Figure 1.68, detach the
DAS cover (Figure 1.51, Item 23) by removing two BHCS M6 x 16
(Figure 1.51, Item 35). Slide out the G5 module mass replacement
(Figure 1.51, Item 3).
85
Figure 1.68 — Removing the DAS cover
Figure 1.69 illustrates detachment of the pelvis docking station
(Figure 1.51, Item 4) by removing four M3 x 10 FHCS (Figure 1.51, Item
36).
Figure 1.69 — Removing the docking station
86
As shown in Figure 1.70, detach the interposer mass replacement
(Figure 1.51, Item 2) by removing four SHCS M2 x 10 (Figure 1.51, Item
41).
Figure 1.70 — Removing interposer mass replacement
As shown in Figure 1.71, separate the structural replacements for the
sacroiliac and lumbar spine load cells by removing the four SHCS M6 x 30
(Figure 1.51, Item 34) accessed from the bottom.
Figure 1.71 — Separating the sacroiliac and lumbar spine load cell structural
replacements
87
1.6.3 Assembling the pelvis
In general the procedure for assembling the pelvis is substantially the
opposite of the procedure for disassembling it. The following descriptions are
provided to assist the user to more efficiently assemble the WorldSID pelvis.
Join the lumbar spine load cell or its mass replacement (Figure 1.51,
Item 25) to the sacroiliac load cell or its mass replacement (Figure 1.51,
Item 24) using four SHCS M6 x 30 (Figure 1.51, Item 34). The connectors
are at the bottom of the load cells and face the front of the dummy. Install
the interposer or its mass replacement (Figure 1.51, Item 2) to the pelvis
docking station (Figure 1.51, Item 4) with four SHCS M2 x 10 (Figure 1.51,
Item 41). Secure the docking station to the bottom of the sacroiliac load cell
with four FHCS M3 x 10 (Figure 1.51, Item 36). Slide the DAS unit
(Figure 1.51, Item 3) into the docking station and connect it to the
interposer. Install the DAS cover (Figure 1.51, Item 23) with two BHCS M6
x 16 (Figure 1.51, Item 35). Secure the connector or its mass replacement
(Figure 1.51, Item 7) to the front of the sacroiliac load cell with three SHCS
M3 x 8 (Figure 1.51, Item 42).
Mount the linear triaxial accelerometer (Figure 1.51, Item 20) to the
pelvis instrumentation bracket (Figure 1.51, Item 21) using a cheese screw
M2 x 16 (Figure 1.51, Item 48) accessed from the back. Attach the dualaxis tilt sensor (Figure 1.51, Item 18) with an SHCS M4 x 8 (Figure 1.51,
Item 37) accessed from the top. Secure the pelvis instrumentation bracket
(Figure 1.51, Item 21) to the sacroiliac load cell or its structural replacement
(Figure 1.51, Item 24) with three SHCS M4 x 14 (Figure 1.51, Item 38).
Mount the pelvis instrumentation cover plate (Figure 1.51, Item 19) with
four cheese screws M3 x 6 (Figure 1.51, Item 39). Ensure that the wires for
the accelerometer and tilt sensor exit the slot in the top of the
instrumentation bracket. Route the accelerometer wire over the non-struck
sacroiliac load cell interface towards the front of the dummy.
88
Attach the left and right sacroiliac load cell interfaces (Figure 1.51,
Item 22 and Item 8) with eight SHCS M6 x 10 (Figure 1.51, Item 45) that
hold each in place. Connect the lumbar mounting bracket weldment
(Figure 1.51, Item 17) to the lumbar load cell or its structural replacement
(Figure 1.51, Item 25) with four FHCS M6 x 16 (Figure 1.51, Item 16). Place
the lumbar mounting wedge (Figure 1.51, Item 28) on top of the lumbar
spine, lining up the threaded holes on the bottom with those in the lumbar
spine. Place the upper lumbar clamping plate (Figure 1.51, Item 12) over the
holes in the lumbar spine and secure it with four BHCS M5 x 25
(Figure 1.51, Item 15).
Place the assembled lumbar spine (Figure 1.51, Item 13) over the
lumbar mounting bracket. Position a lower lumbar clamping plate
(Figure 1.51, Item 11) over the holes in the side of the lumbar spine so the
curve of the plate matches the curve in the rubber, with the radius edge
facing down. Secure the lumbar spine and clamping plate to the mounting
bracket with three BHCS M6 x 20 (Figure 1.51, Item 47) and three lumbar
bushings (Figure 1.51, Item 10). Repeat the procedure for the other side of
the lumbar spine.
Connect the pubic buffers to the pubic load cell or its structural
replacement (Figure 1.51, Item 6) with four SHCS M4 x 8 (Figure 1.51, Item
37) on each side. Attach the moulded pubic buffers (Figure 1.51, Item 5) to
the moulded pelvis with three M4 x 16 (Figure 1.51, Item 44) and M4 flat
washers (Figure 1.51, Item 43) on each side. Position the central assembled
portion of the pelvis within the moulded pelvis/pubic assembly. Attach each
sacroiliac load cell backing plates (Figure 1.51, Item 26) with four FHCS M6
x 30 (Figure 1.51, Item 34) and three FHCS M6 x 20 (Figure 1.51, Item 33).
Use the shorter screws on the inboard holes.
If the pelvis DAS module is being used, plug in the connectors for the
lumbar, pubic, and sacroiliac load cells and the pelvis triaxial accelerometer
(see Figure 1.72). Make sure the connectors for the tilt sensor are free so
they can be connected to the off-board readout later. If a pelvis DAS is not
89
used, route the wires toward the front along the non-struck side so they can
be plugged into the lower G5 module on the spine box.
Figure 1.72 — Routing of wires for pelvis instrumentation
Place the pelvis into the pelvis flesh, placing the pubic assembly in first,
then adjusting the flesh over the pelvic bones. Make sure the flesh is
correctly positioned over the pelvis by checking that access holes in the
pelvis flesh line up with screws in the pelvis.
When assembling the hip joint as shown in Figure 1.51, apply grease to
the hip joint inner ring (Figure 1.51, Item 30) and the hip joint socket
(Figure 1.51, Item 29) before tightening the hip socket retainer (Figure 1.51,
item 31). Insert the hip joint assembly through the front access hole in the
pelvis flesh. Secure from the inside of the pelvis with a M8 x 10 bolt
(Figure 1.51, Item 46). Place the assembled spine box over the lumbar
wedge (Figure 1.51, Item 28) and secure with four SHCS M8 x 18
(Figure 1.51, Item 14).
90
1.6.4 Instrumentation mounting
The pelvis instrumentation for the WorldSID includes pubic, sacroiliac,
and lumbar spine load cells, and that a G5 module can be mounted to the
bottom of the pelvis assembly. The pelvis instrumentation cavity can be
equipped with a linear triaxial accelerometer and a dual-axis tilt sensor.
1.7
Full leg assembly
1.7.1 Parts list
1.7.1.1 General
The full leg assembly includes the femoral neck assembly, the upper leg
assembly, the knee assembly, the lower leg assembly and the ankle-foot
assembly.
1.7.1.2 Parts for femoral neck assembly
Table 1.14 lists the parts required for assembling the WorldSID femoral
neck assembly, which is illustrated in Figure 1.73.
Table 1.14 — Parts list for femoral neck (W50-51034)
Item number
Description
Quantity
Part number
1
SSCP M4 x 0,7 x 6 mm
1
5000076
2
Femoral neck ball
1
W50-51038
3
LWSHCS M6 x 1,0 x 12 mm
4
5000072
4
Femoral neck base
1
W50-51035
91
Figure 1.73 — Femoral neck
1.7.1.3 Parts list for upper leg assembly
Table 1.15 lists the parts required for assembling the WorldSID upper
leg, which is illustrated in Figure 1.74.
Table 1.15 — Parts for upper leg
Item number
Description
Quantity
Part number
1
LWSHCS M6 x 1,0 x 12 mm
4
5000194
2
Femoral neck assembly
1
W50-51034
3
Femoral neck load cell (optional)
1
W50-71080
Femoral neck load cell structural replacement
1
W50-71965
4
DAS mass replacement assembly
1
W50-51053
5
Modified BHCS
12
W50-61042
6
Knee assembly, right
1
W50-52001
not shown
Knee assembly, left
1
W50-52019
7
Leg tube assembly
1
W50-51068
8
Leg load cell (optional)
1
W50-71010
Leg load cell structural replacement
1
W50-51060
9
Trochanter assembly, right
1
W50-51022
not shown
Trochanter assembly, left
1
W50-51023
10
BHCS M6 x 1,0 x 16 mm
4
5000072
not shown
not shown
92
Figure 1.74 — Upper leg assembly
1.7.1.4 Parts list for knee assembly
Table 1.16 lists the parts required for assembling the WorldSID knee,
which is illustrated in Figure 1.75.
Table 1.16 — Parts list for knee
Item number
Description
Quantity
16
Part number
1
SHCS M4 x 0,7 x 10 mm
2
Knee cover
2
W50-52004
3
Knee contact load cell structural replacement
2
W50-52015
Not shown
Knee contact load cell (optional)
2
W50-71020
4
Rotary potentiometer (optional)
1
W50-61027
5
BHCS M3 x 0,5 x 6 mm
2
5000171
6
BHCS M3 x 0,5 x 6 mm
2
5000171
7
Cable guide
1
W50-61030
8
Knee pivot shaft assembly
1
W50-52008
9
Knee clevis assembly, right
1
W50-52009
not shown
Knee clevis assembly, left
1
W50-52021
93
5000151
Item number
Description
Quantity
Part number
10
Friction washer
1
W50-52064
11
Compression washer (rubber)
1
W50-61016
12
Clamping washer (steel)
1
W50-61014
13
BHCS M10 x 1,5 x 20 mm
1
5000176
14
Knee pad mould assembly
1
W50-52010
15
BHCS M4 x 0,7 x 12 mm
6
5000005
16
Knee bone assembly
1
W50-52002
17
SSHDP M6 x 1,0 x 12 mm
1
5000185
Rotary potentiometer mass replacement
1
W50-61123
Not shown
Figure 1.75 — Knee
94
1.7.1.5 Parts list for lower leg tube assembly
Table 1.17 lists the parts required for assembling the WorldSID lower
leg tube, which is illustrated in Figure 1.76.
Table 1.17 — Parts list for lower leg tube
Item number
1
Description
Quantity
Part number
Leg load cell (optional)
2
W50-71010
Leg load cell structural replacement
2
W50-51060
2
Modified button head cap screw
8
W50-61042
3
Lower leg tube
1
W50-53001
4
SSCP M6 x 1,0 x 8 mm
3
5000622
5
z-axis radial limit screw
1
W50-54041
6
'Z'-pivot pin
1
W50-54009
7
z-axis anti-rattle washer
1
W50-54024
8
z-axis rotational washer
1
W50-54010
9
z-axis nut
1
W50-54023
10
BHCS M3 x 0,5 x 6 mm
4
5000171
11
Cable guide
2
W50-61030
12
Leg flesh orienting block
1
W50-54038
13
SHCS M6 x 1,0 x 12 mm
1
5000281
not shown
95
Figure 1.76 — Lower leg tube assembly
1.7.1.6 Parts list for ankle-foot
Table 1.18 lists the parts required for assembly of the WorldSID anklefoot, which is illustrated in Figure 1.77.
Table 1.18 — Parts list for ankle-foot
Item
1
Not shown
2
3
Not shown
4
Description
Quantity
Part number
Leg load cell (optional)
1
W50-71010
Leg load cell structural replacement
1
W50-51060
Ankle assembly
1
W50-54054
Moulded foot assembly, right
Moulded foot assembly, left
1
W50-55005
W50-55004
SHCS M5 x 0,8 x 16
4
5000020
96
Figure 1.77 — Foot and ankle
1.7.1.7 Parts list for ankle
Table 1.19 lists the parts required for assembly of the WorldSID ankle,
which is illustrated in Figure 1.78.
Table 1.19 — Parts list for ankle
Item number
Description
Quantity
Part number
1
SSNT M6 x 1,0 x 6,0
1
5000621
2
Clevis assembly
1
W50-54047
3
SHCS M6 x 1,0 x 12 mm
6
5000281
4
Y-axis potentiometer assembly (optional)
1
W50-54052
SSNT M3 x 0,5 x 3
4
5000190
6
Left flexion centre assembly
1
W50-54048
7
SSCP M3 x 0,5 x 4 mm
1
5000470
8
SHCS M5 x 0,8 x 16 mm
4
5000020
9
Retainer bracket
2
W50-54014
10
BHCS M4 x 0,7 x 10 mm
6
5000010
11
Ankle joint cover
1
W50-54015
5, 14, 25
97
Item number
Description
Quantity
Part number
12
Ankle joint assembly
1
W50-54045
13
Front bearing assembly
1
W50-54042
15
SHCS M5 x 0,8 x 12 mm
6
5000002
16
X-axis potentiometer (optional)
1
W50-54012
17
Cable clamp, 1/8”
4
5000191
18
BHCS M3 x 0,5 x 6 mm
4
5000171
19
X-version assembly
1
W50-54044
20
Rear bearing assembly
1
W50-54043
21
X-version resistive element
8
W50-54035
22
Resistive element (Dorsi. & Plantar.)
8
W50-54036
23
Right flexion centre assembly
1
W50-54049
24
z-axis potentiometer assembly (optional)
1
W50-54051
26
Stop pad
4
W50-54022
27
Compression pad
2
W50-54021
Ankle potentiometer mass replacement
3
W50-54013
Not shown
98
Figure 1.78 — Ankle assembly
1.7.2 Disassembling
1.7.2.1 Femoral neck
Disassemble the femoral neck by loosening the SSCP M4 x 0,7 x 6 mm
(Figure 1.73, Item 1) that holds the femoral ball in place and unthread the
ball (Figure 1.73, Item 2) from the femoral neck base (Figure 1.73, Item 4).
Use a spanner wrench to turn the ball (modified 25 mm to 28 mm diameter;
99
W50-51001) and a spanner wrench 40 mm to 42 mm (W50-51002) to hold
the femoral neck base (Figure 1.73, Item 4). Be careful not to damage the
surface of the ball during disassembly and re-assembly.
Remove the four LWSHCS M6 x 1,0 x 12 mm (Figure 1.73, Item 3) that
attach the assembly to the femoral neck load cell (Figure 1.74, Item 3). Note
that these screws can be removed without removing the ball using a
modified hex key wrench (W50-51003).
1.7.2.2 Upper leg
Disconnect all the cable connectors and remove the cable guides.
Remove the femoral neck load cell (Figure 1.74, Item 3) by taking out
the four BHCS M6 x 1,0 x 16 (Figure 1.74, Item 10) that attach it to the
trochanter assembly (Figure 1.74, Item 9).
Remove the twelve modified BHCS (Figure 1.74, Item 5) that
respectively attach the trochanter (Figure 1.74, Item 9) to the leg load cell
(Figure 1.74, Item 8), the leg tube assembly (Figure 1.74, Item 7) to the leg
load cell and the leg tube assembly (Figure 1.74, Item 7) to the knee
assembly (Figure 1.74, Item 6). Separate these assemblies.
1.7.2.3 Knee
Detach the lower leg assembly by removing the four modified BHCS
that attach the knee assembly to the leg load cell at the upper tibia position
(Figure 1.76, Item 1).
Remove the knee covers (Figure 1.75, Item 2) by removing the four
SHCS M4 x 0,7 x 10 mm (Figure 1.75, Item 1) holding each cover in place.
Remove the potentiometer assembly (Figure 1.75, Item 4) by taking out the
BHCS M3 x 0,5 x 6 mm (Figure 1.75, Item 5) at each side of the
potentiometer. The knee contact load cell structural replacement
100
(Figure 1.75, Item 3) is positioned directly beneath the knee cover and is
removed by taking out four SHCS M4 x 0,7 x 10 mm (Figure 1.75, Item 1)
for each load cell. Note that the screw used to secure the knee covers is the
same size screw used to secure the knee contact load cell or its structural
replacement.
Remove the knee bone (Figure 1.75, Item 16) by taking out the SSHDP
M6 x 1,0 x 12 mm (Figure 1.75, Item 17). Remove the BHCS M10 x 1,5 x
20 mm (Figure 1.75, Item 13) along with the associated washers
(Figure 1.75, Item 12, 11 and 10). Inspect these washers for damage and
wear. The middle washer (Figure 1.75, Item 11) is the compression washer
and is made from a soft neoprene rubber. Note that because it is a soft
material permanent compression and/or tearing could occur. If the part is
permanently compressed or damaged in any way it should be replaced.
Remove the knee pivot shaft (Figure 1.75, Item 8) by sliding it out of
the assembly. Slide the knee bone out of the knee clevis assembly. Remove
the knee pad (Figure 1.75, Item 14) from the knee bone by taking out the six
BHCS M4 x 0,7 x 12 mm (Figure 1.75, Item 15) (three on each side) that
hold it in position. Inspect the knee pad for tearing and/or cuts in the
material.
1.7.2.4 Lower leg
Remove the BHCS M3 x 0,5 x 6mm (Figure 1.76, Item 10). Remove the
cable guides (Figure 1.76, Item 11) and disconnect the cables from the load
cells. Remove the upper tibia load cell by removing four modified BHCS
(Figure 1.76, Item 2) and separating the leg load cell (Figure 1.76, Item 1)
from the lower leg tube (Figure 1.76, Item 3).
Remove the z-axis radial limit screw (Figure 1.76, Item 5) to remove the
lower tibia leg load cell (Figure 1.76, Item 1). Loosen the NTSS M6 x 6 mm
(Figure 1.78, Item 1). Use this set screw to adjust the z-axis rotational
friction for the lower tibia load cell. Disconnect the cables from both of the
101
tibia loads. Using a modified 22 mm open-end wrench (W50-51004), hold
the z-axis nut (Figure 1.76, Item 9) in place while rotating the leg tube and
load cell assembly until the lower tibia leg load cell can be pulled from the
ankle assembly. Remove the anti-rattle and rotational washers (Figure 1.76,
Items 7 and 8) from the assembly.
Remove the four SHCS M5 x 0,8 x 16 mm that secure the foot to the
ankle assembly (Figure 1.77, Item 4) to remove the moulded foot.
1.7.2.5 Ankle
Remove the Y-Axis potentiometer (Figure 1.78, Item 4), if equipped, by
loosening the SSNT M3 x 0,5 x 3 mm (Figure 1.78, Item 5) holding it in
place. Pull the potentiometer from the assembly. Remove the six BHCS M4 x
0,7 x 10 mm (Figure 1.78, Item 10) that attach the ankle joint cover
(Figure 1.78, Item 11) to the ankle joint assembly (Figure 1.78, Item 12).
Figure 1.79 — Ankle
Lift the Y-version assembly off the X-version assembly. Note that when
the two assemblies separate, the resistive elements (Figure 1.78, Item 22)
will fall out of the assembly. With the two assemblies separated, take apart
102
each assembly. Check the resistive elements for signs of permanent
deformation, crushing or cracks.
To remove the z-axis potentiometer assembly (Figure 1.78, Item 24),
first loosen the SSNT M3 x 0,5 x 3 mm (Figure 1.78, Item 25) that holds it
in position. If the potentiometer is connected to a cable, first release the
cable from the cable clamps located along the side of the clevis assembly
(Figure 1.78, Item 2). Then move it downward out of the clevis assembly.
NOTE
When reinstalling each potentiometer, do not over tighten the set
screw on the body of the potentiometer or the device may be damaged.
Tighten it just enough to hold it in position securely.
To disassemble the X-version assembly, start by taking out the four
SHCS M5 x 0,8 x 16 mm (Figure 1.78, Item 8) that secure the retainer
brackets (Figure 1.78, Item 9). With the retainer brackets removed, remove
the ankle joint assembly (Figure 1.78, Item 12) from the assembly.
Note that while removing the retainer brackets the X-version resistive
elements (Figure 78, Item 21) could fall out. Check the resistive elements for
crushing, deformation or cracks.
Check the stop pads (Figure 1.78, Item 26) and compression pads
(Figure 1.78, Item 27) for tears and deformation. Re-secure the pads using
Loctite 414, “Super Glue” or equivalent cyanoacrylate based adhesive, if
they come loose.
1.7.3 Assembling the leg
In general the procedure for assembling the leg is substantially the
opposite of the procedure for disassembling it. The following descriptions are
provided to assist the user to more efficiently assemble the WorldSID leg.
103
1.7.3.1 Assembling the femoral neck
Thread the femoral neck ball on to the femoral neck base until tight (see
Figure 1.73). Tighten the ball on to the base using a modified 25 mm to 28
mm spanner wrench (W50-51001) to turn the ball and a spanner wrench 40
mm to 42 mm (W50-51002) to hold the femoral neck base (Figure 1.73,
Item 4). Be careful not to damage the surface of the ball during disassembly
and re-assembly. Secure the ball by tightening the SSCP M4 (Figure 1.73,
Item 1) to 2 Nm torque.
1.7.3.2 Assembling the upper leg
Attach the femoral neck load cell assembly (Figure 1.74, Item 3) to the
trochanter assembly (Figure 1.74, Item 9). Ensure that the base of the load
cell is aligned with the dowel pin in the trochanter before tightening the four
BHCS M6 x 1 x 16 mm (Figure 1.74, Item 5). Torque the BHCS M6 to 10
Nm.
Attach the trochanter assembly and the leg tube assembly (Figure 1.74,
Item 7) to the upper leg load cell (Figure 74, Item 8) using eight modified
BHCS M6 (Figure 1.74, Item 5), four at each side of the load cell. Torque the
modified BHCS M6 to 10 Nm.
The knee assembly (Figure 1.74, Item 6) is attached to the leg tube
assembly using four modified BHCS M6. The left and right knee assemblies
are different.
104
1.7.3.3 Assembling the knee
Figure 1.80 — Knee assembling
To assemble the knee, start by placing the knee bone (Figure 1.75,
Item 16) in the knee clevis (Figure 1.75, Item 9) and push the knee pivot
shaft (Figure 1.75, Item 8) into the pivot hole. Align the shaft-locking hole
with the SSHDP M6 x 1 x 12 (Figure 1.75, Item 17). Tighten the SSHDP M6
so that the knee pivot shaft is locked in place. Note that if the pivot shaft is
not locked into the knee bone the shaft will not rotate with the knee bone
during testing. Once the pivot shaft is in place, install the friction,
compression and clamping washers (Figure 1.80, Item 7, 8, and 9,
respectively). The friction washer (Figure 1.80, Item 7) is made up of two
disks; one disk is steel and the other is a commercial braking material. Push
the friction washer on to the pivot shaft pins so that the braking material
side of the washer is against the knee clevis. Install the compression and
clamping washers and secure them with a BHCS M10 x 1,5 x 20 mm
(Figure 1.80, Item 10), which is the adjustment for the 1-to-2-g-setting
adjustment of the knee section.
To install the knee potentiometer, place the potentiometer insert into
the square hole end of the knee pivot shaft (see Figure 1.82). Insert the two
BHCS M3 x 0,5 x 6 mm (Figure 1.75, Item 5) into the potentiometer clips
105
and thread them into the knee clevis. Tighten these two BHCS M3 so that
the potentiometer body is secure and will not rotate.
Figure 1.81 — Knee potentiometer wiring
Figure 1.82 — Knee potentiometer installation
106
Attach the knee contact load cell (Figure 1.75, Item 3), using four
SHCS M4 x 0,7 x 10 mm for each load cell (Figure 1.75, Item 1). Install the
load cell directly on to the knee clevis and install the M4 screws in the
counter bored holes. Tighten these M4 screws to 5 Nm, using the M4 “star”
pattern (see Figure 1.83) so as to distribute the load equally across the load
cell.
Figure 1.83 — Torquing the knee contact load cell
Attach the knee covers (Figure 1.75, Item 2) and pad (Figure 1.75, Item
14). Attach the knee covers directly to the knee contact load cells with four
SHCS M4 x 0,7 x 10. Re-attach the knee covers using the same “star”
pattern as the knee contact load cell (see Figure 1.83). Attach the knee pad
using six BHCS M4 x 0,7 x 12 mm (Figure 1.75, Item 15).
1.7.3.4 Assembling the lower leg
The lower leg load cells (Figure 1.76, Item 1) are attached to the lower
leg tube using four modified BHCS M6 (Figure 1.76, Item 2) for each load
cell. Torque these modified BHCS to 10 Nm. Both the upper and lower leg
load cells are W50-71010 and can be positioned interchangeably but must
be annotated so that the correct sensitivities are used. The load cells shall be
installed with the connectors positioned toward the knee end of the
assembly.
107
The ankle 'Z'-pivot pin (Figure 1.76, Item 6) is installed in the lower
load cell. The 'Z'-pivot pin is secured in position using three SSCP M6 x 1 x
8 mm (Figure 1.76, Item 4) installed in the load cell and aligned with the drill
points in the pin. A fourth screw (Figure 1.76, Item 5) is installed after the
ankle assembly is installed along with the anti-rattle washer, rotational
washer and nut (Figure 1.76, Items 7, 8, and 9 respectively). The fourth
screw is known as the z-axis radial limit screw.” This “limit screw” is a
modified SHCS M6 and is installed on the anterior of the lower leg to control
the radial travel of the ankle.
The ankle assembly (Figure 1.77, Item 2) is attached to the lower leg
assembly with the Z-pivot pin, anti-rattle washer, rotational washer and zaxis nut (Figure 1.76, Items 6, 7, 8, and 9 respectively) (see Figure 1.89 for
a clearer diagram of the ankle to lower leg assembly. These components
must be in place in the ankle before the lower leg assembly can be attached.
Once the lower leg assembly is installed on the ankle, the washers and
nut can be tightened until the z-axis movement is eliminated. Then, with the
leg flesh orienting block (Figure 1.76, Item 12) positioned toward the rear
(posterior) of the assembly, install the z-axis radial limiting screw
(Figure 1.76, Item 5 or Figure 1.89).
1.7.3.5 Assembling the ankle
The ankle assembly is made up of two sections: ‘X’ version and ‘Y’
version. The upper section is the ‘Y’ version assembly. The lower section of
the ankle assembly is the ‘X’ version assembly (see Figure 1.79 and
Figure 1.85).
Place the resistive elements, two on each side (Figure 1.85, Item 4), on
the ankle joint assembly (Figure 1.85, Item 5), slide the ‘Y’ version assembly
on to the ankle joint assembly. Check periodically for damage to the Teflon®
washers attached to the inner surfaces of the ‘Y’ version left and right
flexion centre assemblies (Figure 1.78, Items 6 and 23).
108
Figure 1.84 — Ankle potentiometer wiring
With the ‘Y’ version assembly positioned on the ankle joint assembly,
place the remaining four resistive elements on top of the left and right flexion
centre assemblies and install the ankle joint cover (Figure 1.85, Item 3). In
order to compress the resistive elements sufficiently to be able to insert the
six BHCS M4 x 0,7 x 10 mm to attach to the cover, two SHCS M4 x 0,7 x
18 mm are used. Tighten the two SHCS M4 (Figure 1.85, Item 1) until the
BHCS M4 x 0,7 x 10 mm can be installed and then replace the two SHCS
with BHCS M4.
109
Figure 1.85 — 'X' and 'Y' version assembling
Install the potentiometer (W50-54012) into the 'X' version assembly by
loosening the three screws (Figure 1.78, Item 15) and inserting the
potentiometer into the hole at the front side of the ankle assembly (see
Figure 1.86). Do not over-tighten the two SSNT M3 x 0,5 x 3 mm set
screws that secure the potentiometer body or there may be damage to the
potentiometer. Note that there is an SSCP M3 x 0,5 x 4 mm (Figure 1.78,
Item 7) that secures the potentiometer shaft.
To install the y-axis potentiometer, this section must be assembled on
to the 'X' version assembly. Insert the potentiometer body into the
appropriate mounting hole shown in Figure 1.86 and tighten the SSNT M3 x
0,5 x 3 mm. Do not over tighten this set screw or the potentiometer will be
damaged. Note that the SSNT M3 x 0,5 x 3 mm need only be tightened
enough to secure the body and keep it from moving.
110
Figure 1.86 — Ankle assembly potentiometers
1.7.4 Adjusting the leg
1.7.4.1 General
The WorldSID leg assembly has two joint adjustments that control the
1-to-2-G-setting, and that one of the joint adjustment points is located at the
knee pivot and the other is located at the top of the ankle assembly.
1.7.4.2 Adjusting the knee pivot rotation
Note the following:
-
The knee pivot screw (see Figure 1.87) controls the motion of the
lower leg. In order to do this there are several components
involved: clamping, compression and friction washers, and the
pivot shaft assembly. For the knee pivot screw to control the
friction in the knee joint all of these component must be correctly
installed and in good working condition. Tighten the knee pivot
111
screw to obtain a1-to-2-G-setting. This screw will squeeze the
compression washer against the friction washer thus increasing
the resistance to movement of the knee bone in the knee clevis.
-
The friction washer must be installed with the friction material
toward the knee clevis or the washer will provide very little
resistance to movement. The compression washer (a neoprene
material) should be inspected to ensure that it is not permanently
compressed or damaged.
-
The SSHDP that locks the pivot shaft assembly in place in the
knee bone must be correctly installed. The SSHDP M6 shown in
Figure 1.88 must be installed so that the tip is in the locking hole
at the middle of the pivot shaft.
Figure 1.87 — Knee assembly
112
Figure 1.88 — Leg joint adjustments
1.7.4.3 Adjusting ankle rotation
Note the following:
-
The ankle adjustments are not easily done due to the lack of
mass of the components.
-
This joint is adjusted to approximate a 1-to-2-G-setting.
-
The ankle rotation friction is controlled by a M6 set screw and a
M14 lock nut (z-axis nut) (see Figure 1.89).
Loosen the M6 set screw and check the z-axis movement of the lower leg
load cell in the ankle assembly. The z-axis is on a line extending
perpendicular to the sole of the foot and through longitudinal centerline of
the lower leg load cell. Tighten the z-axis nut sufficiently to eliminate
movement along the z-axis at the load cell while allowing for free rotation
about the z-axis.
Adjust the set screw M6 in the ankle assembly such that there is
consistent stiffness in the joint to approximate a 1-to-2-G-setting as the foot
is rotated about the lower leg.
113
Figure 1.89 — Ankle adjustment
1.8
Suit assembly
1.8.1 Parts list for suit
The part number for the WorldSID suit is W50-80100.
1.8.2 Disassembly
Unzip all suit zippers and carefully remove the suit by reversing the
assembly procedures.
1.8.3 Assembly
Install the dummy lifting bracket, and lift the dummy with a hoist. Open
all the zippers on the suit, including the front and rear of the thorax and both
legs. If working with a full arm, set the full arm sleeves aside at this point.
Insert the arms through the short sleeves and close the zipper on the rear
side of the dummy. Straighten the legs, pull the suit tight around the legs
114
and close both leg zippers. Make sure the shoulder pads are in the proper
position, and zip the front thorax zipper half way. Note the front thorax
zipper cannot be fully zipped due to the lifting bracket. Install full arm
sleeves if needed. Move the dummy to the bench or inside the vehicle;
remove the lifting bracket by removing the M8 bolt on the top and M12 bolt
on the bottom, and then close the front thorax zipper.
115
SECTION 2
2.
2.1
RECOMMENDED WORLDSID GENERAL PRACTICES
Certification test intervals
The acceptable interval between WorldSID certification tests is highly
dependent upon the type and severity of impacts to which the WorldSID is
subjected. Each user should determine their own requirements based on their
existing policies, regulatory requirements, impact severity, and experiences
with the WorldSID.
Users should perform certification tests as follows;
2.2
-
before and after each series of sled tests,
-
after every three full scale vehicle tests;
-
after each high energy impact;
-
after any unusual impact;
-
if ribs exhibit more than 2 mm of permanent deformation when
compared to their original shape.
Recommended inspection practices
As with the certification test interval discussed in 2.1, each WorldSID
user should determine their own inspection requirements based on their
existing policies, regulatory requirements, impact severity, and their
experience with the WorldSID.
When establishing appropriate inspection practices, users should
consider the following:
116
-
All parts should be visually inspected during each assembly and
disassembly process.
-
Before performing certification tests, the involved parts should be
visually inspected.
-
Components subjected to high energy impact should be inspected
following the test.
-
Ribs should be inspected on a regular basis and after high energy
impacts to determine if permanent deformation exceed 2 mm.
-
The rib doubler to rib joint should be inspected on a regular basis
and after high energy impacts to determine if there has been any
separation of the doubler from the rib.
-
Flesh components should be inspected for tears.
-
Sensor and DAS cables should be inspected for cuts and excessive
wear.
-
Joint tension should be checked and adjusted as described in
Section 1
Sensor and DAS functions should be verified prior to each test.
2.3
WorldSID thorax half width
When calculating thorax injury indices, a WorldSID thorax half width of
170 mm should be used.
2.4
Avoiding possible connector damage
When using the optional G5 DAS, each WorldSID sensor cable has a
connector with exposed pins which can be damaged during installation,
removal, or handling.
To prevent damage the user should consider the following preventative
measures:
117
1) Use extreme care when the connectors are installed, handled or routed
in the dummy.
2) Install available connector covers, any time the pins are exposed,
removing them only immediately before plugging the connector into
the interposer.
2.5
Temperature range
The WorldSID dummy temperature, when measured by the optional
internal temperature sensor, should be 20,6 degrees C to 22,2 degrees C.
The test environment temperature should be 20,6 degrees C to 22,2 degrees
C.
2.6
Dummy handling
2.6.1 General
A lifting bracket assembly and fasteners (part number W50-84100) as
shown in Figure 2.1 containing the parts listed in Table 2.1 is included with
each dummy for handling.
Table 2.1 — Parts list for lifting bracket assembly
Item
number
Quantity
Part number
1
1
5000537
Screw, SHCS M8 x 1,25 x 80
2
1
W50-84106
Handle, threaded rod
3
1
W50-84104
Handle, threaded hole
4
1
W50-84110
Lifting bracket weldment
5
1
5000538
Screw, SHCS M12 x 1,75 x 150
118
Description
Figure 2.1 — Lifting bracket assembly
119
2.6.2 Procedures for using the lifting bracket are as follows
1) Insert the lifting bracket (Figure 2.1, Item 4) through a hole on the
pelvis flesh and align it with the threaded hole inside the pelvis.
2) Thread bolt (Figure 2.1, Item 5) a few threads into the pelvis so that it
is engaged but not tight.
3) Bend the dummy forward to align the upper portion of the lifting
bracket with the hole on the top front of the spine box assembly.
4) Loosely install bolt (Figure 2.1, Item 1).
5) Tighten both bolts (Figure 2.1, Items 1 and 5).
6) If needed, some soft webbing can be used to loop around the upper
leg above the knee area and attached to the lifting bracket to help
support the legs.
7) Handles (Figure 2.1, Items 2 and 3) can be used for handling of the
dummy inside the vehicle.
8) When the dummy is positioned, remove the bracket from the dummy
before conducting any test.
2.7
Dummy storage
The dummy should be stored in a seating position with the lifting bracket
installed.
120
SECTION 3
3.
SUGGESTED WORLDSID WIRING PROCEDURES
3.1
Head Wiring
Head wiring should be installed as follows.
a
b
1
1
2
2
3
Figure 3.1 — Cable routing for the head
1) Use a cable tie to mount z-axis rotational accelerometer as illustrated
by Item 1 in Figure 3.1a.
2) Bundle the accelerometer and y-axis rotational accelerometer cables
with cable tie as shown by Item 1 in Figure 3.1b.
3) Sort all the cables together and tie them together with cable tie as
shown by Item 2 in Figure 3.1a.
121
4) Lay all the cables from the head as shown and tie them together with
the upper neck load cell cables as shown by Item 3 in Figure 3.1a.
5) Small extra loops of wire inside the head core may be utilized as a
precaution against cable pulls damaging the sensor.
3.2
Neck
Neck wiring should be installed as follows.
b
a
80 mm
1
2
1
Figure 3.2 — WorldSID neck cable routing
1) Install the head and install a cable tie mount on the back of the lower
neck bracket as shown by Item 1 in Figure 3.2a.
2) Bundle all the cables to the cable tie mount as shown, Item 2 in
Figure 3.2a, make sure the cable has enough slack as illustrated by
Item 1 in Figure 3.2b.
122
3.3
Shoulder rib and 1st thorax rib
Shoulder rib and 1st thorax rib wiring should be installed as follows.
a
b
1
Figure 3.3 — IR-TRACC and linear accelerometer routing for shoulder and 1st
thorax ribs
1) Lay the cables of the IR-TRACCs and rib accelerometers as shown in
Figure 3.3a.
2) Group these four cables and bundle them together with tie wrap as
shown by Item1 in Figure 3.3b.
3.4
2nd and 3rd Thorax ribs and abdomen ribs
Second and 3rd thorax ribs and abdomen ribs wiring should be installed
as follows.
123
Figure 3.4 — Cable routing for IR-TRACC and linear triax accelerometers of
the 2nd, 3rd thorax ribs and abdomen ribs
1) Layout the IR-TRACC and rib accelerometer cables similar to the
shoulder as shown in Figure e.3a.
2) Route sensor cables of the 2nd and 3rd thorax ribs thorough the gap
between 2nd and 3rd thorax ribs and bundle them as shown by Item 1
in Figure 3.4.
3) Route the sensor cables of the 1st and 2nd abdomen ribs as shown by
Item 2 in Figure 3.4.
124
3.5
Pelvis cable routing
Pelvis wiring should be installed as follows.
b
a
Figure 3.5 — Pelvis cable routing
1) Tie the T12 and ground cable to the back of spine box as shown in
Figure 3.5a.
2) Route the pelvis cable as shown in the Figure 3.5b.
3.6
Installation of sensor connectors to the thorax connector station
Thorax connector station wiring should be installed as follows.
125
b
a
Retaining Bar
Figure 3.6 — Installations of sensor connectors to the thorax connector
station
1)
Route all cables from the head, neck cables to the non-impact side
through the gap between the shoulder rib and 1st thorax rib.
2)
Sort all the cables in front of the connector station and determine the
final plug and connector positions.
3)
The following cable groupings are recommended. Dummies with a
pelvis DAS will be different.
DAS number 1 upper thorax:
1.
Upper neck load cell (6 channels)
2.
Lower neck load cell (6 channels)
3.
Shoulder load cell (3 channels)
4.
Head rotational accelerometer x
126
5.
Head rotational accelerometer y
6.
Head rotational accelerometer z
7.
Head triax accelerometer
8.
T1 triax accelerometer
9.
T4 triax accelerometer
10. Shoulder triax accelerometer
11. Shoulder IR-TRACC
12. Thoracic rib 1 IR-TRACC
DAS number 2 lower thorax:
1.
Thorax rib 1 triax accelerometer
2.
Thorax rib 2 triax accelerometer
3.
Thorax rib 3 triax accelerometer
4.
Abdominal rib 1 triax accelerometer
5.
Abdominal rib 2 triax accelerometer
6.
Thorax rib 2 IR-TRACC
7.
Thorax rib 3 IR-TRACC
8.
Abdominal rib 1 IR-TRACC
9.
Abdominal rib 2 IR-TRACC
10. T12 accelerometer
11. Pelvis triax accelerometer
12. Pubic load cell (1 channel)
13. Lumbar load cell (6 channels)
127
NOTE Special care is needed when plugging in the sensor connectors to
prevent pin damage. A flash light is helpful for better visibility.
4)
Plug in the connectors along one side for the upper thorax station as
shown in Figure 3.6a and then the other side as shown in
Figure 3.6b.
5)
Connect the DAS communication cable and secure the retaining bar
shown in Figure 3.6b with an SHCS M1,6.
6)
Repeat steps 4 and 5 for the lower thorax station as shown in
Figure 3.7.
Figure 3.7 — Cable routing for the thorax connector station
128
7)
Bundle the cables at the upper thorax portion to a cable mount as
shown in Figure 3.8a, tie the rest of the cable as illustrated in
Figure 3.8b.
a
cable tie
mount
b
Figure 3.8 — Thorax cable routing
8)
Group and bundle the cables in the shoulder area as shown in
Figure 3.9.
129
Figure 3.9 — Shoulder area final cable routing
9)
Tie the pelvis cable and dummy exit cable as shown in Figure 3.10.
The overall thorax cable routing will be as illustrated in Figure 3.11.
Figure 3.10 — Pelvis cable and dummy exit cable routing
130
Figure 3.11 — Thorax cable routing
10)
Install the sternum and the abdomen coupling, make sure that the
dummy exit cable and tilt sensor cables are routed between the
abdomen ribs as shown in Figure 3.12. Loop a cable tie around the
2nd abdomen rib (Figure 3.12), then secure the cables to the loop with
another cable tie (Figure 3.12).
131
Figure 3.12 — DAS exit cable and tilt sensor cables
Figure 3.13 — Shoulder load cell cable rounting
11)
Route the shoulder load cell cable as shown in Figure 3.12 and tie it
to the sternum with a cable tie. The finished wiring looks as shown in
Figure 3.14.
132
Figure 3.14 — WorldSID final dummy wiring
133
3.7
Instrumented arm cable routing
3.7.1 General considerations
The following are recommended WorldSID instrumentation cable routing
procedures. There are two primary concerns with instrumentation cable
routing: 1) cable protection during dynamic testing, 2) reducing the cable’s
influence on the motion of the dummy during dynamic testing.
3.7.2 Lower arm cables
Route and secure the lower arm cables as shown in Figure 3.15.
Figure 3.15 — Lower arm cables
3.7.3 Upper arm cables
Route and secure the upper arm cables as shown in Figure 3.16.
134
Figure 3.16 — Upper arm cables
3.7.4 Elbow cables
Route and secure cables in the area of the elbow as shown in
Figure 3.17.
Figure 3.17 — Cables in the elbow region
135
3.7.5 Routing wires through flesh component
The instrumented arm flesh and suit components should be installed
with wire routing as shown in Figure 3.18, Figure 3.19, and Figure 3.20.
Figure 3.18 — Lower arm flesh
136
Figure 3.19 — Upper arm flesh
Figure 3.20 — Lower arm suit
3.8
Instrumented leg cable routing
3.8.1 Lower leg cable routing
Route and secure the lower leg cables as shown in Figure 3.21.
137
Figure 3.21 — Lower leg cables
3.8.2 Knee cable routing
Route and secure cables in the area of the knee as shown in
Figure 3.22, Figure 3.23, and Figure 3.24.
138
Figure 3.22 — Knee area cable routing
Figure 3.23 — Knee area cable routing
139
Figure 3.24 — Knee area cable routing and flesh
3.8.3 Femoral neck cable routing
The femoral neck load cell cable should be routed as shown in
Figure 3.25.
140
Figure 3.25 — Femoral neck cable routing
3.9
Wiring with an external DAS
For sensor wiring in conjunction with an external DAS, the procedures
described in this Section which relate to the sensor end of the cable (see for
example Figure 3.1) should be followed when possible.
The routing of the cable or cables exiting the dummy may vary
depending upon the DAS, vehicle or test, but in all cases the cable should be
secured to the dummy such that the motion of dummy components of
interest (e.g., impact side ribs) are not affected and also such that cable
tension is not applied to sensors.
141
Section 4
4.
RECOMMENDED WORLDSID GROUNDING SCHEME
4.1
Parts list
The parts given in Table 4.1 should be used to provide electrical continuity
between the dummy components and an off-dummy electrical ground point.
Table 4.1 — List of ground cables
Cable number
4.2
Part number
Description
Quantity
1
W50-75801
head to thorax
1
2
W50-75802
torso to sacrum
1
3
W50-75803
sacrum to pubic
1
4
W50-75804
sacrum to upper leg
2
5
W50-75805
upper leg to lower leg
2
6
W50-75806
torso to external ground
1
Grounding procedures
The WorldSID dummy should be grounded as follows.
1)
Attach cable 1 to the right side rear mounting screw of the upper
neck load cell as shown in Figure 4.1.
142
Figure 4.1 — Cable attachment to the upper neck load cell
2)
Route cable one with the other cables around the neck and through
the spine box as shown in Figure 4.2.
Figure 4.2 — Spine box cable routing
143
3)
Attach the other end of cable 1 and one end of cable 2 to the spine
box with a SHCS M5 x 6 mm as shown in Figure 4.3. In addition,
attach one end of cable 6 (not shown) to this same screw.
Figure 4.3 — Spine box cable attachment
4)
Route cable 2 through the spine box as shown in Figure 4.4.
144
Figure 4.4 — Spine box cable attachment
5)
Attach the other end of cable 2 to the front lumbar to sacrum
attachment screw on the non-struck side along with one end of cable
3 and one end of cable 4 as shown in Figure 4.5.
145
Figure 4.5 — Lumbar cable attachment
6)
Attach the other end of cable 3 to the top inner pubic load cell
attachment bolt on the non-struck side as shown in Figure 4.6.
Figure 4.6 — Pelvic load cell cable attachment
146
7)
Attach the other end of cable 4 to the non-struck side knee clevis
using a BHCS M3 x 6 mm along with one end of cable 5 as shown in
Figure 4.7.
Figure 4.7 — Knee cable attachment
8)
Attach one end of the second cable 4 to the front lumbar to sacrum
attachment screw on the struck side as shown in Figure 4.8.
147
Figure 4.8 — Cable attachment
9)
10)
Attach the other end of the second cable 4 to the struck side knee
clevis using a BHCS M3 x 6 mm along with one end of the second
cable 5 as shown in Figure 4.7.
For each of the legs, attach the other end of cable 5 to the strain
relief attachment screw just below the upper tibia load cell as shown
in Figure 4.9.
148
Figure 4.9 — Tibia cable attachment
11)
Attach the other end of cable 6 to an off dummy earth ground point.
The same ground point should be used as for the DAS.
149
Section 5
5.
5.1
WORLDSID TEMPERATURE INFORMATION
Temperature sensitivity of WorldSID
It is believed that the WorldSID components with the most sensitivity to
temperature change are the inner ribs, as related to the energy absorbing
material which covers the inner ribs.
5.2
Monitoring of temperature variations of WorldSID
As specified in Section 2, the recommended chest cavity air
temperature operating range for the WorldSID is 20,6 to 22,2 degrees C.
This was based on a study of the influence of temperature variations on the
performance of the shoulder, thorax, abdomen and pelvis.
In addition, in order to quantify air temperature variations within the
chest cavity, internal air temperatures were measured by placing a
thermocouple on each of the inner ribs in the locations shown in Figure 5.1,
which are in the vicinity of typical maximum bending stress. From the
results, it was determined that the air temperature in the chest cavity has a
relatively uniform distribution.
The WorldSID has a permissible (i.e., optional) chest cavity air
temperature sensor mounted on the non-impact side of the spine box which
can be read directly through the TDAS G5 hardware and software. This
temperature sensor has an internal log function where it stores temperature
variation data from the last 24 hours.
150
Inner Ribs
Figure 5.1 — Location of temperature sensors used for internal temperature
survey
5.3
Effect of internal DAS on dummy temperature
Extensive testing was performed to determine the effects on internal air
temperature due to operation of the permissible internal TDAS G5 system.
Based on this testing, changes were made to the pre-production TDAS G5
design so that it would draw much less power. The internal DAS heating
was compared to heating created by running a typical external DAS with 10
V excitation and with the same set of sensors. A summary of the results is
given in Table 5.1. For the optional DTS TDAS control, refer to Annex D
regarding the low power mode intended to mitigate temperature concerns
due to prolonged sensor excitation.
Table 5.1 — Effect of internal and external DAS on WorldSID internal air
temperature
Condition
Temperature increase in thorax
Production TDAS G5 with 5 V excitation, system in fully armed 1,34 degrees C per hour
mode
External DAS with 10 V excitation
1,32 degrees C per hour
151
5.4
Practical notes for full body testing related to temperature
The following notes are provided for the information of users performing
full body testing with the WorldSID:
– Similar temperature increases occur when the same set of
sensors is used, regardless of whether a typical external DAS or
the internal TDAS G5 system is used.
– Since the temperature specification is 20,6 to 22,2 degrees C,
the dummy can be temperature soaked near the lower end of this
range to allow for heating during a test.
– Once the internal or external DAS is armed and sensor excitations
are powered, it is recommended that the test be performed within
30 minutes in order to minimize temperature effects (i.e., there is
an approximately 0,7 degrees C increase in 30 minutes).
– If the permissible internal TDAS G5 system is used, the software
will provide a real time internal chest cavity air temperature
measurement to the user. The previous 24 hour temperature time
history will also be automatically downloaded with the test data.
– If a different temperature sensor and recording method is used, it
is recommended that the internal chest cavity air temperature be
measured and monitored during the test.
152
Section 6
6.
6.1
RECOMMENDED WORLDSID SEATING PROCEDURE
Placement procedures for the driver seat position
6.1.1 General
The WorldSID should be positioned following the IIHS/UMTRI seating
procedure. Guidelines may be downloaded from
http://www.highwaysafety.org/ vehicle_ratings/tech_info.htm.
6.1.2 Electronic spreadsheets
Accompanying templates for position calculations may be downloaded
from http://www.highwaysafety.org/ vehicle_ratings/tech_info.htm.
6.2
Placement procedures for the rear seat position
6.2.1 ATD preparation
Adjust the dummy as recommended in Section 1. This adjustment
should include joint placement, like the neck bracket, and joint torque
specifications for the arms and legs.
6.2.2 Position the seat
If the seat position is adjustable on a track in the fore/aft direction,
place the seat in the rearmost locking position.
6.2.3 Dummy placement
6.2.3.1 Install the dummy into the vehicle such that the midsagittal plane is
vertical and coincident with the seat centreline. The buttocks and torso
should be in contact with the seat back.
6.2.3.2 Adjust the knee position such that the distance between the knees
is 330 mm measured at the knee centrelines. Alternatively, the knee
separation distance can be measured from the inside edge of the knee and
placed 102 mm from the seat centreline.
153
If either knee of the dummy is in contact with the vehicle interior, rotate
the entire contacting leg(s) at the hip joint away from the obstruction until no
contact occurs. Record any variation in the knee separation distance.
6.2.3.3 Place both feet with the heel on the floor pan and as far forward as
permitted by foot contact, thigh-cushion contact or leg contact with the
forward seat structure. For the rotation of the ankle joint, allow the feet to
remain in a neutral position. Align the feet parallel to the vehicle centreline.
6.2.3.4 Rear seats with adjustable seat backs.
6.2.3.5 Fully recline the seat back.
6.2.3.6 Hold the ATD's thighs down and push rearward on the upper torso
to maximize the ATD's pelvic angle.
6.2.3.7 While holding the thighs in place, rotate the ATD torso forward
until the torso recline angle (the angle of a side view line from the ATD Hpoint to the head’s center of gravity) is set to 12 degrees ± 1 degree. While
supporting the ATD, rotate the seat back forward until the ATD torso is
supported in the 12 degrees ± 1 degree torso recline position.
6.2.3.8 Gently rock the upper torso relative to the lower torso laterally in a
side-to-side motion three times through a ± 5 degree arc (approximately
50 mm side to side) to reduce friction between the ATD and the seat.
6.2.3.9 Reposition feet if necessary.
6.2.3.10 Rotate the arms to 45 degrees ± 1 degree.
6.2.3.11 Rear seats with non-adjustable seat backs.
6.2.3.12 Hold the ATD’s thighs down and push rearward on the upper torso
to maximize the ATD’s pelvic angle.
6.2.3.13 Gently rock the upper torso relative to the lower torso laterally in a
side-to-side motion three times through a ± 5 degree arc (approximately
50 mm side to side) to reduce friction between the ATD and the seat.
154
6.2.3.14 Reposition feet if necessary.
6.2.3.15 Rotate the arms to 45 degrees.
6.2.3.16 If applicable place the adjustable head restraint such that the
vertical centerline of the head restraint is aligned with the c.g. of the dummy
head.
7.
7.1
Mechanical Requirements and Certification Test Procedures for
WorldSID
Head
7.1.1 General description
The head assembly shall consist of the components and assemblies
listed in head assembly drawing W50-10000.pdf.
7.1.2 Certification specification
When assembled according to Section 1 and tested using the procedure
specified in 7.1.3, the head assembly shall meet the specifications given in
Table 7.1.
Table 7.1 — WorldSID head certification specifications
Frontal drop
Variable
Absolute value
Peak resultant acceleration (G)
225 to 275
Peak lateral acceleration (ay) (G)
<15
Maximum percentage, subsequent-to-main peak (%)
<10
Lateral drop
Variable
Absolute value
Peak resultant acceleration at CG (G)
99 to 121
Peak longitudinal acceleration (ax) (G)
<15
Maximum percentage, subsequent-to-main peak (%)
<10
155
7.1.3 Certification test procedures
7.1.3.1 Principle
Certify the dynamic response of a head assembly by performing a 200
mm lateral drop on each side of the head and a 376 mm drop on the
forehead.
7.1.3.2 Apparatus
–
49 CFR Part 572, Subpart E, horizontal head impact surface
–
chrome plated rigidly supported horizontal steel plate
50,8 mm x 610 mm x 610mm
– 8 – 80 rms micron/mm surface finish
–
–
Head drop tool assembly (drawing W50-82100.pdf)
–
Instrumented head assembly (drawing W50-10000.pdf) including
the instrumentation insert and upper neck load cell or structural
replacement
–
Two SHCS M6 x 12
7.1.3.3 Sensors
Use triaxial linear accelerometers as described in Section 1.
7.1.3.4 Preparation
–
Expose the head assembly to an environment with a temperature of
21,4 degrees C ± 0,8 degrees C and a relative humidity between
10% and 70% for a period of at least four hours prior to a test.
–
Clean the head skin surface and the surface of the impact plate
with 1,1,1 trichlorethane or equivalent.
–
Install the triaxial accelerometer in the head assembly.
156
–
Install the upper neck load cell, angular accelerometers and dualaxis tilt sensor, or their structural or mass replacements.
–
Attach the head drop tool to the bottom of the upper neck load cell
or its structural replacement with the two SHCS M6x12. Mount
the tool for left or right lateral, or frontal drops as shown in Figures
2, 3, 4 and 5. When mounted for lateral drops, position the head
such that its midsagittal plane has an angle of 35° ± 1° with the
impact surface and its anterior-posterior axis is horizontal to within
1 degree.
–
Suspend the head above the drop table using the head drop tool
and a quick release mechanism.
–
For lateral tests, position the head so its lowest point is 200 mm ±
0,25 mm above the impact surface and drop the head.
–
For a frontal test, position the head so the lowest point on the
forehead is 376 mm ± 0,25 mm above the impact surface.
35
º
Figure 7.1 — Lateral head drop angle
157
Figure 7.2 — Head bracket installation for lateral drops
158
Figure 7.3 — Frontal head drop angle
Figure 7.4 — Head bracket installation for frontal drops
159
7.1.3.5 Procedure
–
Record and filter the head accelerations from the triaxial
accelerometer according to SAE J211 and ISO 6487 Channel filter
class 1000.
–
Drop the head onto the rigid plate from the specified height by
means that ensure quick release.
–
Visually inspect the head for damage to the skin or skull, and note
any such damage in the test report.
–
Allow at least 2 hours between successive tests on the same head.
7.1.3.6 Test report
Document the results of both the left and right lateral and the frontal
drop tests.
7.2
Neck
7.2.1 General description
The neck assembly shall consist of the components and assemblies
listed in neck assembly drawing W50-20000.pdf.
7.2.2 Certification specification
When assembled according to Section 1, and tested using the
procedure specified in 7.2.3, the neck assembly shall meet the specifications
given in Table 7.2.
Table 7.2 — WorldSID neck certification specifications
Variable
Absolute value
Maximum angular displacement of the head form relative to the pendulum, β
(degrees)
50 to 61
Decay time of β to 0 degrees (ms)
58 to 72
Peak moment at occipital condyle (Nm)
55 to 68
160
Peak moment decay time to 0 Nm (ms)a
71 to 87
Peak forward potentiometer angular displacement (degrees)
32 to 39
Time of peak forward potentiometer angular displacement (ms)a
56 to 68
Peak rearward potentiometer angular displacement, θF (degrees)
30 to 37
Time of peak rearward potentiometer angular displacement, θR (ms)a
56 to 68
a
T=0 s at initial pendulum contact with honeycomb or alternative products which can be shown to lead to the same results.
7.2.3 Certification test procedures
7.2.3.1 Principle
Certify the dynamic response of the neck assembly by performing lateral
pendulum tests.
7.2.3.2 Materials
For the pendulum stop, use aluminium honeycomb, of density 28,8
kg/m3 ± 4,90 kg/m3 and dimensions 102,0 mm minimum x 102,0 mm
minimum with a thickness along the cells of 76,2 mm ± 4 mm or alternative
products which can be shown to lead to the same results.
7.2.3.3 Apparatus
–
Neck assembly as specified in 7.2.1.
–
WorldSID head form (drawing W50-83000.pdf)
–
Neck pendulum apparatus as specified in 49CFR Part 572,
Subpart E
7.2.3.4 Sensors
Perform the test using the sensors given in Table 7.3.
161
Table 7.3 — Sensors for neck assembly
Variable
Sensor
Pendulum acceleration
Single axis accelerometer
Performance
SAE J2570
Endevco 7231C-750
Pendulum velocity
Not specified
Resolution 0,02 m/s
or better
Angular displacement of forward pendulum-tohead form sliding rod, positive when doing a
right side impact (θF)
Angular potentiometer
SAE J2570
Angular displacement of rearward pendulumto-head form sliding rod, positive when doing
a right side impact (θR)
Angular potentiometer
SAE J2570
Angular displacement of head form about
forward pendulum-to-head form sliding rod,
positive when doing a right side impact (θH)
Angular potentiometer
SAE J2570
Neck moment Mx
Upper load cell
SAE J2570
Denton W50-71000
Neck force Fy
Upper load cell
SAE J2570
Denton W50-71000
7.2.3.5 Preparation
Expose the neck to the conditions specified in Table 7.4 for at least four
hours prior to a test.
Table 7.4 — Neck test preconditions
Variable
Specification
Temperature (degrees C)
21,4 ± 0,8
Relative humidity (%)
40 ± 30
–
Attach the top of the neck to the head form.
–
Attach the bottom of the neck to the pendulum interface. Ensure
that the screws do not protrude into the neck rubber as this may
influence the response. If the screws are too long, insert washers
under the head of the screw in order to prevent rubber contact.
Mount the pendulum interface to the pendulum such that the head
162
form’s midsagittal plane is vertical and is perpendicular to the plane
of motion of the pendulum’s longitudinal centreline.
–
Slide the carbon fiber rods through the potentiometer housings on
the pendulum. First slide the pivot of the potentiometer closest to
the pendulum over the central steel rod in the head form, then
install the small spacer ring and the second pivot. Carefully tighten
the second pivot.
7.2.3.6 Procedure
–
Record and filter the data according to ISO 6487 or SAE J211
Channel filter class 1000.
–
Release the pendulum and allow it to fall freely from a height such
that the velocity at impact is 3,4 m/s ± 0,1 m/s, measured at the
centre of the pendulum mounted accelerometer.
–
Decelerate the pendulum arm using the 28,8 kg/m3 aluminium
honeycomb or alternative products which can be shown to lead to
the same results, to achieve the pendulum pulse given in Table 7.5.
–
Allow the neck to flex without impact of the head or neck with any
object other than the pendulum arm.
–
Conduct the test such that the time between raising the pendulum
and releasing it does not exceed 5 minutes.
–
Conduct the test such that the time between any tests on the
same WorldSID neck is not less than 30 minutes.
163
Table 7.5 — Pendulum arm deceleration pulse
Variable
Value
Velocity change at 4 msa
0,77 m/s to 1,04 m/s
Velocity change at 8 msa
1,60 m/s to 2,16 m/s
Velocity change at 12 msa
2,43 m/s to 3,29 m/s
a T=0 s at initial contact with honeycomb or alternative products which can be
shown to lead to the same results.
7.2.3.7 Calculation procedures
–
Filter the data according to ISO 6487 or SAE J211, as given in
Table 7.6.
–
Integrate the filtered and adjusted acceleration time histories.
–
Calculate the flexion angle of the head form using the following
equation:
β = θF + θH
where:
β =
angular displacement of head form relative to the pendulum
θF =
Angular displacement of forward pendulum-to-head form
sliding rod, positive when doing a right side impact
θH =
Lateral angular displacement of head form about forward
pendulum-to-head form sliding rod, positive when doing a
right side impact
–
After performing this calculation, digitally filter all angular
displacements using ISO 6487 or SAE J211 CFC 180
–
Calculate the moment about the occipital condyle as MOCx = MX +
(Fy) x (0,0195m), where the MX and Fy polarities are in accordance
with the SAE J211 sign convention.
164
Table 7.6 — Filter specification for neck test
Variable
Filtersa
Pendulum acceleration
CFC 60
Pendulum velocity
No digital filtering
Angular displacement of forward rod (θF)
CFC 1000
Angular displacement rear rod (θR)
CFC 1000
Angular displacement of head form (θH)
CFC 1000
Neck moment M
CFC 600
x
Neck force F y
a
CFC 1000
ISO 6487 or SAE J211
7.2.3.8 Test reports
Document the results of the test.
7.3
Thorax/abdomen/shoulder
7.3.1 General description
The thorax/abdomen/shoulder assembly shall consist of the components
and assemblies listed in thorax/abdomen/shoulder assembly drawing W5030000.pdf.
7.3.2 Full body test setup
7.3.2.1 Materials
Use Teflon® sheets of sufficient size to cover seat.
7.3.2.2 Apparatus
–
H-Point tool (drawing W50-82500.pdf)
–
Tilt sensor or inclinometer
–
Dummy certification test bench
165
–
Seat and back Teflon® sheets described in Annex E.1
7.3.2.3 Preparation
Expose the dummy, clothed in its suit, to the conditions given in
Table 7.7 for at least four hours prior to a test.
Table 7.7 — Dummy full body test preconditions
Variable
Value
Temperature (degrees C)
21,4 ± 0,8
Relative humidity (%)
40 ± 30
7.3.2.4 Setup procedure
–
Install the H-point tool.
–
Install dual axis tilt sensors in the head, thorax and pelvis to check
the angles about x and y direction.
–
Cover the seat back and base with Teflon® sheets.
–
Seat the dummy on the rigid seat as shown in Figure 7.5 and
Figure 7.6.
–
Place the dummy on the seat and position it using either
mechanical measurements on a dummy component or tilt sensors
to verify the positions. The relationship between mechanical angle
measurements and the tilt sensors are given in Table 7.8.
–
Position the dummy according to the criteria given in Table 7.9.
166
Table 7.8 — Relationship between mechanical measurement indicators and
the tilt sensors
Location
Mechanical reference
Tilt sensor (angular displacement
about the noted axis)
Head zero
Landmark on head is horizontal
X : 0º, Y : 0º
Thorax zero
Top of the lower neck bracket is horizontal
X : 0º, Y : 0º
Pelvis zero
X angle zero degree H-point tool oriented at
45º below horizontal (Y)
X : 0º, Y : 14,5º
Table 7.9 — Dummy set up criteria
Variable
Criteria
Thorax angle
0º ± 2º
Pelvic orientation
5º ± 2ºa
Distance between knee centres
Sensor readings
This pelvic orientation is coincident with Hpoint tool at 40º ± 2º below horizontal, and a
pelvic tilt sensor at 19,5º ± 2º
279 mm ± 50 mm
a
Due to the low friction of the Teflon® pieces, the dummy is not able to sit at zero pelvis angle.
Five degrees is an achievable angle on the test bench.
167
Figure 7.5 — Front view of setup for full dummy certification tests
Figure 7.6 — Side view of setup for full dummy certification tests
168
Figure 7.7 — Using an inclinometer with the H-point tool to check pelvis
angle
7.3.3 Shoulder
When assembled according to Section 1, and tested using the
procedure specified in 7.3.2 and 7.3.3.1, the shoulder assembly shall meet
the specifications given in Table 7.10.
Table 7.10 — WorldSID shoulder certification specifications
Variable
Absolute value
Peak pendulum force (kN)
2,6 to 3,3
Peak shoulder rib deflection (mm)
35 to 44
7.3.3.1 Shoulder certification test procedures
7.3.3.1.1 Principle
Perform a test involving a lateral impact to the shoulder in order to
certify the dynamic response of the shoulders.
169
7.3.3.1.2 Apparatus
Use 49 CFR Part 572, subpart E Hybrid III 50th percentile adult male
dummy pendulum (23,4 kg, 152,4 mm face diameter).
7.3.3.1.3 Sensors
Install instrumentation to obtain data for the items given in Table 7.11.
Table 7.11 — Sensors for shoulder test
Variable
Sensor
Performance
Peak pendulum
acceleration (G)
See Table 7.3
Per SAE J2570
Peak shoulder rib
deflection (mm)
IR-TRACC
See sensor specification details on electronic
drawing number IF-363
Impact velocity (m/s)
Not specified
Resolution 0,02 m/s or better
7.3.3.1.4 Procedure
–
Set up the dummy in standard test posture as described in 7.3.2
with the half arm aligned horizontal on the impact side as shown in
Figure 7.8.
–
Align the pendulum centreline with the centreline of the shoulder
y-axis rotation point.
–
Raise the pendulum to achieve a 4,3 m/s ± 0,1 m/s impact
velocity.
–
Release the pendulum to impact the dummy.
170
Figure 7.8 — Shoulder test, dummy and arm position
7.3.3.1.5 Calculation procedures and expression of results
–
Filter the data according to ISO 6487 or SAE J211, as given in
Table 7.12.
–
Calculate the pendulum impactor force by multiplying the pendulum
acceleration time history by the measured impactor mass.
–
Graph the time histories of impactor force and shoulder deflection.
Table 7.12 — Filter specifications for shoulder test
Variable
Filter
Pendulum acceleration (G)
CFC 180
Shoulder deflection (mm)
CFC 600
7.3.3.1.6 Test reports
Document the results of the test.
171
7.3.4 Thorax with half arm
When assembled according to Section 1, and tested using the
procedure specified in 7.3.2 and 7.3.4.1, the thorax with half-arm assembly
shall meet the specifications given in Table 7.13.
Table 7.13 — WorldSID thorax with half-arm certification specifications
Variable
Absolute value
Peak pendulum force (kN)
4,7 to 6,4
Peak T4 acceleration along y axis (G)
24 to 33
Peak T12 acceleration along y axis (G)
20 to 28
Peak thorax rib 1 deflection (mm)
35 to 47
Peak thorax rib 2 deflection (mm)
42 to 57
Peak thorax rib 3 deflection (mm)
40 to 54
7.3.4.1 Thorax with half arm certification procedures
7.3.4.1.1 Principle
Perform a test involving a lateral impact to the thorax with the half arm
in order to certify the dynamic response of the thorax.
7.3.4.1.2 Apparatus
Use 49 CFR Part 572, subpart E Hybrid III 50th percentile adult male
dummy pendulum (23,4 kg, 152,4 mm face diameter).
7.3.4.1.3 Sensors
Install instrumentation in order to obtain data for the items given in
Table 7.14.
172
Table 7.14 — Sensor specifications for thorax with half arm test
Variable
Sensor
Performance
Peak pendulum acceleration (G)
See Table 7.3
SAE J2570
Peak upper spine (T4) y-axis
acceleration (G)
Triaxial linear accelerometer
SAE J2570
Peak lower spine (T12) y-axis
acceleration (G)
Triaxial linear accelerometer
First, second and third thorax
rib deflections (mm)
IR-TRACC
Model IF-363
See sensor specification details on
electronic drawing number IF-363
Impact velocity (m/s)
Not specified
Resolution 0,02 m/s or better
Endevco 7268C-2000M1
SAE J2570
Endevco 7268C-2000M1
7.3.4.1.4 Procedure
–
Set up the dummy in standard test posture as described in 7.3.2
with the half arm parallel to the thorax
–
Align the pendulum centreline with the centreline of the middle
thorax rib
–
Raise the pendulum to achieve a 6,7 m/s ± 0,1 m/s impact velocity
–
Release the pendulum to impact the dummy
7.3.4.1.5 Calculation procedures and expression of results
–
Filter the data according to ISO 6487 or SAE J211, as given in
Table 7.15
–
Calculate the pendulum impactor force by multiplying the pendulum
acceleration time history by the measured impactor mass
–
Plot the time histories of impactor force, T4 and T12 y-axis
accelerations, and deflections of thorax ribs 1, 2, and 3
173
Table 7.15 — Filter specifications for thorax with half arm test
Variable
Filter
Peak pendulum acceleration (G)
CFC 180
Peak T4 y-axis acceleration (G)
CFC 180
Peak T12 y-axis acceleration (G)
CFC 180
Peak thorax rib 1 deflection (mm)
CFC 600
Peak thorax rib 2 deflection (mm)
CFC 600
Peak thorax rib 3 deflection (mm)
CFC 600
7.3.4.1.6 Test reports
Document the results of the test.
7.3.5 Thorax without arm
When assembled according to Section 1, and tested using the
procedure specified in 7.3.2 and 7.3.5.1, the thorax without arm assembly
shall meet the specifications given in Table 7.16.
Table 7.16 — WorldSID thorax without arm certification specifications
Variable
Absolute value
Peak pendulum force (kN)
3,2 to 3,9
Peak T4 acceleration along y axis (G)
12 to 17
Peak T12 acceleration along y axis (G)
15 to 21
Peak thorax rib 1 deflection (mm)
34 to 43
Peak thorax rib 2 deflection (mm)
34 to 43
Peak thorax rib 3 deflection (mm)
34 to 43
7.3.5.1 Thorax without arm certification procedures
7.3.5.1.1 Principle
Perform a test involving a lateral impact to the thorax without the arm
in order to certify the dynamic response of the thorax.
174
7.3.5.1.2 Apparatus
Use 49 CFR Part 572, subpart E Hybrid III 50th percentile adult male
dummy pendulum (23,4 kg, 152,4 mm face diameter).
7.3.5.1.3 Sensors
Install instrumentation to obtain data for the items given in Table 7.17.
Table 7.17 — Sensor specifications for thorax without arm test
Variable
Sensor
Performance
Peak pendulum acceleration (G)
See Table 7.3
SAE J2570
Peak upper spine (T4) y-axis
acceleration (G)
Triaxial linear acceleration
SAE J2570
Peak lower spine (T12) y-axis
acceleration (G)
Triaxial linear acceleration
First, second and third thorax
rib deflections (mm)
IR-TRACC
Model IF-363
See sensor specification details on
electronic drawing number IF-363
Impact velocity (m/s)
Not specified
Resolution 0,02 m/s or better
Endevco 7268C-2000M1
SAE J2570
Endevco 7268C-2000M1
7.3.5.1.4 Procedure
–
Set up the dummy without arm in standard test posture as
described in 7.3.2.
–
Raise the arm to a vertical orientation as shown in Figure 7.9.
–
Align the pendulum centreline with the centreline of the middle
thorax rib.
–
Raise the pendulum to achieve a 4,3 m/s ± 0,1 m/s impact
velocity.
–
Release the pendulum to impact the dummy.
175
Figure 7.9 — Thorax test without arm, dummy and arm position
7.3.5.1.5 Calculation procedures and expression of results
–
Filter the data according to ISO 6487 or SAE J211, as given in
Table 7.18.
–
Calculate the pendulum impactor force by multiplying the pendulum
acceleration time history by the measured impactor mass.
–
Graph the time histories of impactor force, T4 and T12 y-axis
accelerations, and deflections of thorax ribs 1, 2, and 3.
Table 7.18 — Filter specifications for thorax without half arm test
Variable
Filter
Peak pendulum acceleration (G)
CFC 180
Peak T4 y-axis acceleration (G)
CFC 180
Peak T12 y-axis acceleration (G)
CFC 180
Peak thorax rib 1 deflection (mm)
CFC 600
Peak thorax rib 2 deflection (mm)
CFC 600
Peak thorax rib 3 deflection (mm)
CFC 600
176
7.3.5.1.6 Test reports
Document the results of the test.
7.3.6 Abdomen
When assembled according to Section 1, and tested using the
procedure specified in 7.3.2 and 7.3.6.1, the abdomen without arm
assembly shall meet the specifications given in Table 7.18.
Table 7.19 — WorldSID abdomen certification specifications
Variable
Absolute value
Peak abdomen rib 1 deflection (mm)
33 to 41
Peak abdomen rib 2 deflection (mm)
31 to 39
Peak pendulum force (kN)
2,6 to 3,3
Peak T12 acceleration along y axis (G)
15 to 20
7.3.6.1 Abdomen test certification procedures
7.3.6.1.1 Principle
Perform a test involving a lateral impact to the abdomen in order to
certify the dynamic response of the abdomen ribs.
7.3.6.1.2 Apparatus
Use the following items:
–
49 CFR Part 572, subpart E Hybrid III 50th percentile adult male
pendulum (23,4 kg, 152,4 mm face diameter).
–
Simulated armrest consisting of a rigid hardwood block as given in
Table 7.20 attached to the impact face of the pendulum. The
centreline of the armrest simulator shall be aligned with the
centreline of the pendulum.
177
Table 7.20 — Simulated armrest specifications
Variable
Value
Width (mm)
150 ± 0,5
Height (mm)
70 ± 0,5
Depth (mm)
60 ± 0,5
Corner radius (mm)
10 ± 1
Mass (Kg)
1,00 ± 0,01
7.3.6.1.3 Sensors
Install instrumentation in order to obtain data for the items given in
Table 7.21.
Table 7.21 — Sensor specifications for abdomen test
Variable
Sensor
Performance
Pendulum acceleration (G)
See Table 7.3
SAE J2570
Lower spine (T12) y-axis
acceleration (G)
Triaxial linear accelerometer
SAE J2570
Abdomen rib 1 and 2
deflections (mm)
IR-TRACC
Model IF-363
See sensor specification details on
electronic drawing number IF-363
Impact velocity (m/s)
Not specified
Resolution 0,02 m/s or better
Endevco 7268C-2000M1
7.3.6.1.4 Procedure
–
Set up the dummy in standard test posture as described in 7.3.2
with the half arm in the driving posture as shown in Figure 7.5.
–
Align the wood block face so it is aligned with and parallel to the
middle of the two abdomen ribs.
–
Place the wood block in contact with the side of the dummy.
–
Raise the pendulum to achieve a 4,3 m/s ± 0,1 m/s impact
velocity.
–
Release the pendulum to impact the dummy.
178
7.3.6.1.5 Calculation procedures and expression of results
–
Filter the data according to ISO 6487 or SAE J211-1, as given in
Table 7.22.
–
Calculate the pendulum impactor force by multiplying the pendulum
acceleration time history by the combined measured mass of the
pendulum and armrest simulator.
–
Graph the time histories of impactor force, T12 y-axis acceleration,
and deflections of abdomen ribs 1 and 2.
Table 7.22 — Filter specifications for abdomen test
Variable
Filter
Pendulum acceleration (G)
CFC 180
T12 y-axis acceleration (G)
CFC 180
Abdomen rib 1 deflection (mm)
CFC 600
Abdomen rib 2 deflection (mm)
CFC 600
7.3.6.1.6 Test reports
Document the results of the abdomen test.
7.4
Lumbar spine and pelvis
7.4.1 General description
The lumbar spine and pelvis assembly shall consist of the components
and assemblies listed in lumbar spine and pelvis assembly drawing W5040000.pdf.
7.4.2 Certification
When assembled according to Section 1, and tested using the
procedure specified in 7.3.2 and 7.6.3, the pelvis assembly shall meet the
specifications given in Table 7.23.
179
Table 7.23 — WorldSID pelvis certification specifications
Variable
Absolute value
Peak acceleration along y axis (G)
Peak pelvis pendulum force (kN)
Peak T12 acceleration along y axis (G)
41 to 51
6,3 to 7,8
10 to 14
7.4.3 Pelvis certification test procedure
7.4.3.1 Principle
Perform a test involving a lateral impact to the pelvis in order to certify
the dynamic response of the pelvis.
7.4.3.2 Apparatus
Use 49 CFR Part 572, subpart E Hybrid III 50th percentile adult male
dummy pendulum (23,4 kg, 152,4 mm face diameter).
7.4.3.3 Sensors
Install instrumentation to obtain data for the items given in Table 7.24.
Table 7.24 — Sensor specifications for pelvis test
Variable
Sensor
Performance
Pendulum acceleration (G)
See Table 7.3
SAE J2570
Lower spine (T12) y-axis
acceleration (G)
Triaxial linear accelerometer
SAE J2570
Pelvis acceleration (G)
Triaxial linear accelerometer
Endevco 7268C-2000M1
SAE J2570
Endevco 7268C-2000M1
Impact velocity (m/s)
Not specified
Resolution 0,02 m/s or better
7.4.3.4 Procedure
–
Set up the dummy with half arm in standard test posture as
described in 7.3.2.
–
Align the pendulum centreline with the H-point.
180
–
Raise the pendulum to achieve a 6,7 m/s ± 0,1 m/s impact
velocity.
–
Release the pendulum to impact the dummy.
7.4.3.5 Calculation procedures and expression of results
–
Filter the data according to ISO 6487 or SAE J211-1, as given in
Table 7.24.
–
Calculate the pendulum impactor force by multiplying the pendulum
acceleration time history by the measured impactor mass.
–
Graph the time histories of impactor force, pelvis and T12 y-axis
accelerations.
Table 7.25 — Filter specifications for pelvis test
Variable
Filter
Pendulum acceleration (G)
CFC 180
T12 y-axis accleration (G)
CFC 180
Pelvis y-axis acceleration (G)
CFC 180
7.4.3.6 Test reports
Document the results of the pelvis test.
181
Annex A
FASTENER TORQUE VALUES
Table A.1 — Screw torques
Screw Type
Torquea
Screw Size
Nm
in-lbf
SHCS
M2 X 0,4
1
9
SHCS
M2.5 X 0,45
1
9
SHCS
M4 X 0,7
4
35
SHCS
M5 x 0,8
8
71
SHCS
M6 x 1
14
124
SHSS (hand and wrist pivot screw)
M6 X 25 mm
3
27
BHCS
M3 X 0,5
1
9
BHCS
M4 X 0,7
3
27
Modified BHCS (p/n: W50-61042)
M6 x 1
10
89
BHCS ("Z" pivot screw)
M6 X 1
2b
18
BHCS (Elbow pivot screw)
M10 X 1,5
3b
27
FHCS
M4 X 0,7
3
27
LWSHCS
M3 X 0,5
3
27
LWSHCS
M6 X 1
15
133
CPSSS
M3 x 0,5
1
9
CPSSS
M6 x 1
7
62
SSCP
M4 X 0,7
2
18
SSCP
M6 X 1
7
62
SSFP
M4 X 0,7
2
18
SSNT
M3 x 0,5
1
9
SSNT
M4 X 0,7
2
18
SSNT (‘Z’ pivot screw)
M6 X 1
3b
27
SSHDP
M6 X 1
8
71
a
Torques based on manufacturer’s recommendation of 50% of yield strength.
b
Used for 1-to-2 G-setting. Torque may vary with components.
A-1
Annex B
FASTENER ABBREVIATIONS
Table B.1 gives a summary of fasteners abbreviations, descriptions and
ISO references, for the convenience of users of this document.
Table B.1 — Summary of fasteners abbreviations, descriptions and ISO
references
Abbreviations
Descriptions
ISO references
BHCS
Button head cap screw
ISO 7380
Cheese screw
Cheese head screw
ISO 1207
CPNT
Cone point nylon tip set screw
CPSS
Cone point set screw
ISO 4027
CPSSS
Cone point socket set screw
ISO 4027
FHCS
Flat head cap screw
ISO 10642
LHSHCS
Low head socket head cap screw
NTSS
Nylon tip set screw
SHCS
Socket head cap screw
ISO 4762
SHSS
Socket head shoulder screw
ISO 7379
SSCP
Set screw cup point
ISO 4029
SSFP
Set screw flat point
ISO 4026
SSHDP
Set screw half dog point
-
SSNP
Set screw nylon point
-
SSNT
Set screw with nylon tip
-
B-1
-
-
Annex C
OVERVIEW OF AN EXAMPLE INTERNAL DATA ACQUISITION
SYSTEM
C.1 General
This annex gives an overview of the main functional components of and
cable pinout scheme for the WorldSID G5 DAS which is an example internal
data acquisition system for the WorldSID.
Users of an internal data acquisition system should contact the
manufacturer to request operating procedures and specifications for the
system.
WorldSID Task Group document N397 contains some geometric, mass
and performance characteristics for permissible internal data acquisition
systems.
The WorldSID G5 DAS is an example of a system which conforms to
these normative specifications and was used in the 11 pre-production
WorldSIDs.
C.2 System components
The basic components of the WorldSID G5 DAS system are shown in
Figure C.1. Table C.1 lists parts and part numbers. A description of each
item is given below for the convenience of users of this example system.
C-1
Table C.1 — WorldSID G5 DAS parts list
Description
Part number
TDAS G5 Module
TDAS5-M32
TDAS G5-DB
TDAS5-DB
TDAS G5 DB Dog Bone connector clamp
TDAS5-DBCON-CL
TDAS G5-DB Dummy exit cable
TDAS5-C-DBDE
Dummy exit to TDAS status box cable
TDAS5-C-DESB
Ethernet communication cable: from status box to PC
TDAS5-ETH-SBPC
Wireless Ethernet programming cable
TDAS5-C-WEP
Wireless Ethernet jumper plug
TDAS5-P-WEJ
TDAS status box
TDAS5-SB
Antenna
TDAS5-SBAN
TDAS power supply
TDAS5-PS
TDAS G5 User’s manual and software
TDAS5-Soft
Allen wrench
TDAS5-Wrench
Rugged instrument case, Pelican 1550
TDAS5-1550
2,4 Amp power supply with 4-Pin Lemo connector
TDAS5-PS-2,4Amp
C.3 G5 module
Each G5 module records data from as many as 32 sensors and has
sensor ID capabilities. The G5 system installed on the WorldSID preproduction dummies had the provision for mounting five G5 modules on the
dummy, two in the spine, one in the pelvis, and one in each upper leg skin.
In addition, if needed, additional G5 units can be located in the dummy suit
pockets to support full arm sensors. See the manufacturer-supplied G5
module hardware user’s manual for additional information.
C.4 G5 docking station
The docking station consists of a mechanical guide and connector for
the G5 module, flex cable and sensor input connectors. As specified in the
G5 documentation, when attaching a G5 to the docking station the
attachment bolt torque should be 1,6 to 1,8 Nm. Additional information
C-2
regarding the docking station is found in the manufacturer-supplied G5
module hardware user’s manual.
C.5 G5-DB
The G5-DB is used to link up to five G5 Modules together inside the
dummy. Note that the in-dummy temperature sensor is also connected to the
G5-DB. The G5-DB also manages power input from the in-dummy battery
and external power sources. See the G5-DB hardware user’s manual for
additional information.
C.6 Docking station to G5-DB cable
The G5 docking station to G5-DB cable connects each G5 Module to
the G5-DB. Additional information regarding the cable is found in the G5-DB
hardware user’s manual.
C-3
Connect to ATD
on Status Box
19 Pin Lemo
(double key)
Connect to COMM
on Status Box
19 Pin Lemo
(single key)
Ethernet Cable
Connection to
Status Box or
Optional 13
Wireless
Ethernet
T=0
Power
Status
T=0 Signal
14
Connect to POWER
on Status Box
15
Optional
• Contact Closure
• 0-5 VDC
9
External
Power
Options
12
10
11
TDAS Power
Supply
8
8
10-16
VDC
WorldSID
1
1
2
2
Deliverables
1. Qty 2: G5 Modules
2. Qty 2: Docking Stations (FTSS)
3. Qty 2: DS to DB Cables (FTSS)
4. Qty 1: G5-DB (Distribution Box/Hub)
5. Qty 1: In-Dummy Battery & Cable (FTSS)
6. Qty 1: DB to Batt & Temp Cable (FTSS)
7. Qty 1: DB to Dummy Exit Cable
8. Qty 1: Dummy Exit to Status Box Cable
9. Qty 1: TDAS Status Box
10. Qty 1: External Power– Option 1
DC/DC Converter
11. Qty 1: External Power– Option 2
AC/DC Converter
12. Qty 1: External Power– Option 3
TDAS Power Supply & Cable – NOT
Crashworthy
13. Qty 1: TDAS Software
14. Qty 1: Status Box to PC Cable
15. Qty 1: Notebook PC (ordered separately)
BATT
5
5
7
7
3
3
Sensor connectors
1
1
2
2
4
4
Temp
6
6
100-240
VAC
3
3
Sensor connectors
Figure C.1 — WorldSID G5 DAS system diagram
C-4
C.7 In-dummy battery and cable
The in-dummy battery and integrated cable provide backup power for
the G5 system. This optional internal backup battery is provided, however it
is only for backup purposes and should not be relied upon for more than brief
periods (see manufacturers specification for battery capacities).
C.8 G5-DB to battery and temperature sensor cable
The G5-DB to battery and temperature sensor cable connects these
three components.
C.9 G5-DB to dummy exit cable
The G5-DB to dummy exit cable is a separate, replaceable cable used
for connecting the G5-DB system to the outside of the dummy. This cable
carries external power, Ethernet communications, t=0 event signal and
status signals. See the manufacturer-supplied G5-DB hardware user’s manual
for additional information.
C.10 Dummy exit to TDAS status box cable
The dummy exit to TDAS status box cable is a separate, replaceable
cable used for connecting the WorldSID to the TDAS Status Box. This cable
carries external power, Ethernet communications, t=0 event signal and
status signals. See C.5 for additional information.
C.11 TDAS status box
The impact resistant TDAS status box is connected to the WorldSID and
displays the status of the system via large red, yellow and green lights. In
place of the internal Li-Ion batteries, DTS has provided two options for
external power (see C.2.10 and C.2.11 below). The TDAS Status Box is
described in a later clause of this annex.
C-5
C.12 DC/DC converter
This impact resistant device accepts 10-18 VDC input and provides
13,5 VDC output to the TDAS Status Box. The user must supply a 10-18
VDC source with a minimum of 5A current capability.
C.13 AC/DC converter
This impact resistant device accepts 100-240 VAC input and provides
13,5 VDC output to the TDAS Status Box. The user must supply a 100-240
VAC source.
C.14 TDAS power supply
The TDAS power supply non-impact resistant device accepts 100-240
VAC input and provides 13,5 VDC output to the TDAS Status Box. The user
must supply a 100-240 VAC source.
C.15 TDAS software
The provided TDAS software is used for sensor database management,
test setup, test execution, data download, post test viewing and data
export. See the manufacturer-supplied software user’s manual for additional
information.
C.16 Status box to PC cable
The status box to PC cable connects a PC to the TDAS Status Box. This
cable carries Ethernet communications signals.
C.17 Notebook PC
If an optional notebook PC was acquired with the WorldSID G5 DAS, it
may be pre-loaded with TDAS software, sensor database and example test
setups. Since WorldSIDs will move from place to place, it is strongly
recommended that a PC be dedicated to the dummy. This will make setup at
the new operating location much easier.
C-6
C.18 Dummy exit to status box cable pinout
Table C.2 and Figure C.2 and Figure C.3 give the cable pinout scheme
for the dummy exit to status box cable.
Table C.2 — Dummy exit to status box cable pinout
Lemo Pin Number
20 Feet 9507 – Color Code
Function
1
RED
Main Power, +12 VDC
2
BLACK
Main Power, +12 VDC
8
BROWN
Main GND
4
BLACK
Main GND
5
GREEN
Ethernet +Rx
6
BLACK
Ethernet –Rx
7
ORANGE
Ethernet +Tx
3
BLACK
Ethernet –Tx
9
WHITE
Event +
10
BLACK
Event –
11
BLUE
Arm Status (RS-232 Level, +V=Armed)
12
BLACK
Power ON (short to GND = ON)
13
YELLOW
Status Output (5V = OK)
14
BLACK
Start Record (Vin = Record)
NOTE
Belden 9507 cable contains 7 twisted pairs. Each pair contains a black wire and a
colored wire. It is very important that the pairs be kept together as shown above.
C-7
Event (-), black, pair
Main Power +12 VDC, red,
Event (+), white, pair
10
9
Main GND, black, pair 6
Main GND, brown, pair
14
12
Power On, black, pair
3
13
7
Arm Status, blue, pair
2
11
8
Ethernet Tx (+), orange,
Main Power +12 VDC, black,
1
Ethernet Tx (-), black, pair
4
6
5
Start Record, black, pair
Ethernet Rx (+), green, pair
Status Out, yellow, pair
Ethernet Rx (-), black, pair
Figure C.2 — Dummy exit to TDAS status box cable 2B 14-pin lemo
connector wiring side view sockets
Start Record, black, pair
Status Out, yellow, pair
Main Power +12 VDC, red,
Power On, black, pair
Main Power +12 VDC, black,
1
Ethernet Tx (-), black, pair
3
Main GND, black, pair 6
14
13
18
19
15
4
Arm Status, blue, pair
12
2
11
10
17
9
16
5
6
Event (-), black, pair
Even t (+), white, pair
8
7
Main GND, brown, pair
Ethernet Rx (+), green, pair
Ethernet Tx (+), orange,
Ethernet Rx (-), black, pair
Figure C.3 — Dummy exit to TDAS status box cable 2B 19-pin lemo
connector, wiring side view, pins
C.19 Sensor cable length
When the G5 system is used in the WorldSID, sensor cable lengths will
be dependent upon the location of the sensor and the location of the G5
C-8
used to record the sensor data. Cable lengths for an example G5 and sensor
system are shown in Table C.3.
Table C.3 — Example instrumentation cable lengths
Position
No. of
channels
Lengtha
mm (inches)
DASb
location
Qty
Part number
Head accelerometer
3
767 (30,2)
Upper spine
1
W50-71164-767
Head rotation accelerometer
1
750 (29,5)
Upper spine
3
W50-71165-750
Upper neck
6
692 (27,2)
Upper spine
1
W50-71982-692
Lower neck
6
314 (12,4)
Mid spine
1
W50-71981-314
Thorax accelerometer
3
553 (21,8)
Mid spine
1
W50-71164-553
Thorax rotation accelerometer
1
234 (9,2)
Mid spine
1
W50-71165-234
T1 accelerometer
3
416 (16,4)
Mid spine
1
W50-71164-416
T4 accelerometer
3
326 (12,8)
Mid spine
1
W50-71164-326
Rib accelerometers
3
394 (15,5)
Mid spine
6
W50-71164-394
T12 accelerometer
3
347 (13,7)
Mid spine
1
W50-71164-347
Pelvis accelerometer
3
382 (15,0)
Pelvis
1
W50-71164-382
IR-TRACC (shoulder)
1
280 (11,0)
Upper spine
1
W50-74411
IR-TRACC (thorax)
1
280 (11,0)
Mid spine
3
W50-74411
IR-TRACC (abdominal)
1
280 (11,0)
Mid spine
2
W50-74411
Sacro-iliac (R & L)
6
290 (11,4)
Pelvis
2
W50-71983-290
Lumbarb
6
475 (18,7)
Mid spine
1
W50-71983-475
Lumbar
6
318 (12,5)
Pelvis
1
W50-71983-318
Pubic
1
246 (9,7)
Pelvis
1
W50-71987-246
Pubic
1
435 (17,1)
Mid spine
1
W50-71987-435
Femoral neck
3
406 (16,0)
Leg
2
W50-71984-406
Femoral neckb
3
1080 (42,5)
Pelvis
2
W50-71984-1080
Mid-femur
6
254 (10,0)
Leg
2
W50-71981-254
Knee contact
1
356 (14,0)
Leg
4
W50-71020-356
Knee pot.
1
356 (14,0)
Leg
2
W50-71162
Upper tibia
6
508 (20,0)
Leg
2
W50-71981-508
Lower tibia
6
686 (27,0)
Leg
2
W50-71981-686
Ankle pot.
3
914 (36,0)
Leg
2
W50-71161
Upper arm
6
700 (27,6)
Upper spine
1
W50-71981-700
C-9
No. of
channels
Lengtha
mm (inches)
Lower arm
6
1100 (43,3)
Wrist accelerometer
3
Elbow
Position
DASb
location
Qty
Part number
Upper spine
1
W50-71981-1100
1200 (47,2)
Upper spine
1
W50-71164-1200
2
800 (31,5)
Upper spine
1
W50-71992-800
Elbow accelerometer
3
1200 (47,2)
Upper spine
1
W50-71164-1200
Elbow potentiometer
1
950 (37,4)
Upper spine
1
W50-71163
Shoulder
3
355 (14,0)
Upper spine
2
W50-71986-355
a
9,2 m optional cables for off board DAS are also available
b
Multiple DAS locations require different cable lengths
C-10
Annex D
OPTIONAL DTS G5 DAS LOW POWER MODE: HEAT BUILDUP
MITIGATION
D.1 General
To help address temperature concerns inherent when sensors and DAS
are installed in-dummy, TDAS CONTROL has a Low Power Mode option for
use with iDummy™. Low Power Mode is only available when using Recorder
Mode for data collection.
D.2 What is Low Power Mode?
In the standard Recorder Mode, the system starts to collect data when
it receives the software ARM signal and it continues to collect data until a
hard-wired Start Record input is received. Once received, the system will
collect data until the test time expires.
Low Power Recorder Mode is a little different. When the system
receives the software ARM signal, it readies for data collection but does not
actually start collecting data. Instead, the system goes to sleep—it shuts off
excitation to all sensors and waits until it receives a hard-wired or softwaredriven Start Record signal. When it does, the TDAS G5 DAS wakes up,
turns on all excitation circuits—quickly powering up the sensors—and begins
to collect data. (The delay between the Start Record request and the start
of data collection is 100 milliseconds.) The system acknowledges that it is
now collecting data (visible via the status box lights) and will continue to do
so until the test time expires. (Currently the user is not able to change the
delay time between the Start Record request and the start of data
collection.)
D-1
D.3 How to Implement Lower Power Mode
D.3.1 Update your tdas.ini file
This can be done by changing the “Default Data Collection Mode” to
“Recorder” from within TDAS CONTROL (either “Edit TDAS.INI” or
“Setup>>Options” windows)...
...or by editing your tdas.ini file directly and changing the entry below.
D.4 Enable Software Triggering and Low Power Mode
This will enable the hidden Start Record and Trigger buttons. This can
be done from within TDAS CONTROL (the “Advanced” window accessible
by “Edit TDAS.INI”)...
...or by editing your tdas.ini file directly and changing the two entries below.
After these changes are made, every test performed will be armed using Low
Power Mode.
D-2
Annex E
SUPPORT EQUIPMENT
E.1 Specialized WorldSID support equipment
Specialized WorldSID support equipment needed for WorldSID
assembly, handling, or certification testing consists of the items given in
Table E.1.
Table E.1 — Specialized WorldSID support equipment
Reference
Description
Use
Part number
5.1
Head drop tool
Certification
W50-82100
5.2
Head form
Certification
W50-83000
5.1
Head sensor extension cables for head drop test
Certification
Customa
5.2
Head form rotational potentiometers, quantity of three
Certification
F.1A
5.2
Carbon rods for potentiometers
Certification
F.GL
5.2
Circular section neck buffers with different hardness
Certification
W50-20006
5.2
Neck and head form sensor extension cables for neck
test
Certification
Custom
5.3
H-Point tool
Test set up
W50-82500
5.3
Teflon® covered dummy certification test bench
Certification
W50-82200
5.3
Small Teflon® sheets for the seat and back
Certification
a
W50-82244
W50-82245
a
Modified spanner wrench, 25 mm to 28 mm dia.
Assembly
W50-51001
Spanner wrench, 40 mm to 42 mm dia.
Assembly
W50-51002
Modified hex key wrench
Assembly
W50-51003
Modified 22 mm open-end wrench
Assembly
W50-51004
Shortened 6 mm hex key 15 mm long
Assembly
W50-20018
C-wrench for hip joint
Assembly
W50-42521
Lifting mechanism
Handling
W50-84100 a
This equipment may need to be customized for each lab.
E-1
E.2 Other support equipment typically available in test laboratories
Other dummy support equipment needed for WorldSID certification and
typically available in test laboratories are given in Table E.2.
Table E.2 — Other standard support equipment
Reference
Description
Use
5.1
49 CFR Part 572, Subpart E horizontal head impact surface
Certification
5.1
Quick release mechanism
Certification
5.2
49 CFR Part 572, Subpart E neck pendulum apparatus
Certification
5.2
49 CFR Part 572, Subpart E pendulum decelerating aluminium
honeycomb or alternative products which can be shown to lead to the
same results
Certification
5.2
Neck bending pendulum accelerometer, Endevco 7231C-750
Certification
5.3
49 CFR Part 572, subpart E Hybrid III 50th percentile adult male
dummy pendulum (23,4 kg with 6 in. dia.)
Certification
5.3
49 CFR Part 572, subpart E Hybrid III 50th percentile adult male
dummy pendulum accelerometer, Endevco 7231C-750
Certification
E.BF
Neck compression wrench
Assembly
E-2
Annex F
DRAWING LIST
This annex lists the WorldSID drawings in Table F.1 and fasteners in
Table F.2 for the convenience of users.
Table F.1 — WorldSID drawing list
Drawing number
Description
Electronic file
format
PDF
W50-00000
WorldSID ATD
X
W50-10000
Head assembly, tested and certified
X
W50-10007
Head core
X
W50-10010
Rotational accelerometer replacement, Endevco 7302BM4
X
W50-10011
Tilt sensor mass replacement
X
W50-14014
Head, moulded tested and certified
X
W50-20000
Neck assembly
X
W50-20002
Neck/head/torso interface plate
X
W50-20006
Neck buffer assembly
X
W50-20007
Screw, half spherical
X
W50-20009
Lower neck bracket
X
W50-20010
Upper neck bracket
X
W50-20011
Nut, neck bracket
X
W50-20016
Flexion extension buffer
X
W50-20018
Shortened 6 mm hex key
X
W50-21001
Neck assembly tested and certified
X
W50-22003
Neck, moulded
X
W50-24013
Neck shroud assembly
X
W50-24014
Neck shroud ring
X
W50-24015
Neck shroud
X
W50-30000
Torso-shoulder thorax abdomen, WorldSID
X
W50-31000
Spine box assembly
X
F-1
STP
X
X
X
Drawing number
Description
Electronic file
format
PDF
W50-31010
Upper bracket weldment, spine box, WorldSID
X
W50-31011
Shoulder mounting plate
X
W50-31012
Middle plate
X
W50-31013
Neck bracket mounting plate
X
W50-31020_1
Side plate, left Worldsid
X
W50-31020_2
Side plate, left Worldsid
X
W50-31030_1
Side plate, right Worldsid
X
W50-31030_2
Side plate, right Worldsid
X
W50-31041
Spacer, WorldSID
X
W50-31042
Mounting bracket #1
X
W50-31043
Mounting bracket #2
X
W50-31045
Cover plate spine box
X
W50-31050
Ball joint assembly, IRTRACC
X
W50-31051
Ball-shaft assembly
X
W50-31053
Ball-shaft, IRTRACC
X
W50-31054
Ball socket, IRTRACC
X
W50-31055
Ball retainer, IRTRACC
X
W50-31060
IR-TRACC mass replacement
X
W50-32000
Rib, shoulder
X
W50-32001
Rib assembly, shoulder
X
W50-32010
Rib doubler, shoulder
X
W50-32110
Thorax rib 1, WorldSID
X
W50-32111
Thorax rib assembly 1 WorldSID
X
W50-32130
Thorax rib 2 and 3 abdominal ribs WorldSID
X
W50-32131
Thorax rib assembly, 2 and 3 WorldSID
X
W50-32150
Thorax rib assembly, inner band, WorldSID
X
W50-32151
Rib, damping
X
W50-32152
Thorax rib bent, WorldSID
X
W50-32155
Abdomen rib assembly, inner band, WorldSID
X
W50-32156
Rib, damping
X
W50-32160
Shoulder rib assembly, inner band, WorldSID
X
F-2
STP
Drawing number
Description
Electronic file
format
PDF
STP
W50-32161
Rib, damping
X
W50-32162
Shoulder rib bent, WorldSID
X
W50-32171
Shoulder rib mounting bracket, struck side, WorldSID
X
W50-32172
Thorax and abdominal rib accelerometer mounting bracket, WorldSID
X
W50-32173
Thorax and abdominal rib clamping bracket, WorldSID
X
W50-32175
Shoulder rib sternum mounting strip, threaded
X
W50-32176
Thorax and abdominal rib mounting strip, threaded
X
W50-32177
Shoulder rib sternum mounting strip
X
W50-32178
Thorax and abdominal rib sternum mounting strip
X
W50-32179
Screw, rib IRTRACC mount
X
W50-32180
Clamp, damping
X
W50-35021
Rib coupler abdominal, WorldSID
X
X
W50-35022
Sternum, thorax rib
X
X
W50-35023-1
Shoulder pad, left, WorldSID
X
X
W50-35023-2
Shoulder pad, right, WorldSID
X
X
W50-35024
Pad, thorax
X
W50-37011
Battery mounting bracket
X
W50-37012
Battery structural replacement
X
W50-37022
Backup plate mounting bracket
X
W50-37023
Angular accelerometer, tilt sensor mount bracket
X
W50-37024
T12 accelerometer mount, WorldSID
X
W50-37029
Bracket, rotational accelerometer mount
X
W50-38000
Battery assembly
X
W50-38001
Back plate, battery enclosure
X
W50-38002
Enclosure cover, battery
X
W50-38004
Foam pad, 3 mm thick
X
W50-40000
Pelvis assembly
X
W50-41018
Lumbar spine rubber
X
W50-41019
Bushing lumbar
X
W50-41020
Bushing, lumbar spine, top
X
W50-41021
Lumbar lower clamping plate
X
F-3
X
Drawing number
Description
Electronic file
format
PDF
STP
W50-41022
Lumbar upper clamping plate
X
W50-41026
Lumbar mounting wedge
X
W50-41030
Weldment lower lumbar mounting bracket
X
W50-41031
Lower lumbar mounting bracket
X
W50-41032
Dummy lifting socket
X
W50-41041
DAS cover
X
W50-41042
Docking station pelvis
X
W50-42002
Sacro-illiac load cell backing plate
X
W50-42005
Hip joint socket
X
W50-42007
Inner ring hip joint
X
W50-42008
Hip socket retainer
X
W50-42010
Pelvis bone, left hand
X
X
W50-42011
Pelvis bone, right hand
X
X
W50-42012
Insert, illiac wing
X
W50-42016
Sacro-illiac load cell interface left hand
X
W50-42017
Sacro-illiac load cell interface right hand
X
W50-42019
Pelvis flesh
X
W50-42030
Instrumentation bracket pelvis
X
W50-42031
Instrumentation cover plate, pelvis
X
W50-42510
Pubic buffer moulded
X
W50-42516
End plate medial
X
W50-42517
End plate lateral
X
W50-42521
C-wrench for hip joint
X
W50-51000
Upper leg assembly, right
X
W50-51001
Modification of small spanner wrench (25mm-28mm)
X
W50-51002
Unmodified large spanner wrench (40mm-42mm)
X
W50-51003
Modified 4mm hexagon key wrench
X
W50-51004
Modified 22mm open end wrench
X
W50-51017
Trochanter
X
W50-51022
Trochanter tube assembly, right
X
W50-51023
Trochanter assembly left
X
F-4
X
Drawing number
Description
Electronic file
format
PDF
STP
W50-51034
Femoral neck assembly
X
W50-51035
Femoral neck
X
W50-51038
Femoral ball
X
W50-51050
Upper leg assembly, left
X
W50-51052
G5 DAS leg docking station
X
W50-51053
G5 DAS structural replacement assembly
X
W50-51058
Upper leg flesh - right - velcro application
X
X
W50-51059
Upper leg flesh - left - velcro application
X
X
W50-51060
Leg structural replacement assembly
X
W50-51067
Leg extension tube assembly
X
W50-51068
Leg extension tube
X
W50-52001 sheet1
Knee assembly right
X
W50-52001 sheet2
Knee assembly right part list
X
W50-52002
Knee bone assembly
X
W50-52004
Knee cover
X
W50-52005 sheet1
Knee clevis, right
X
W50-52005 sheet2
Knee clevis, right
X
W50-52006
Knee clevis stop
X
W50-52007
Knee pivot shaft
X
W50-52008
Knee pivot shaft assembly
X
W50-52009
Knee clevis assembly, right
X
W50-52010
Knee pad moulded assembly
X
W50-52011
Side plate
X
W50-52015
Knee contact load cell structural replacement assembly
X
W50-52019 sheet1
Knee assembly, left
X
W50-52019 sheet2
Knee assembly, left parts list
X
W50-52020
Knee clevis, left
X
W50-52021
Knee clevis assembly, left
X
W50-52024
Knee bone
X
W50-52063
Knee washer
X
W50-52064
Friction washer assembly
X
F-5
Drawing number
Description
Electronic file
format
PDF
W50-52065
Braking washer
X
W50-52066
Braking washer backing
X
W50-53001
Lower leg tube
X
W50-53002
Lower leg flesh
X
W50-53007
Zipper assembly
X
W50-53008
Vinyl strips
X
W50-54002
Ankle clevis right and left lower limb
X
W50-54004
Left flexion centre rotational piece
X
W50-54005
Ankle joint
X
W50-54006
Base plate
X
W50-54008
Thrust washer
X
W50-54009
Z-pivot pin
X
W50-54010
Z-axis rotational washer
X
W50-54012
Potentiometer (optional)
X
W50-54013
Potentiometer structural replacement
X
W50-54014
Retainer bracket
X
W50-54015
Ankle joint cover
X
W50-54016
X-version bushing
X
W50-54019
Front bearing cover
X
W50-54020
Rear bearing cover
X
W50-54021
X-version compression element
X
W50-54022
Dorsiflexion and plantarflexion hard stop
X
W50-54023
Z-axis nut
X
W50-54024
Z-axis anti-rattle washer
X
W50-54031
Z-axis rotation bearing
X
W50-54033
Right flexion centre rotational piece
X
W50-54034
Foot sole locator pins
X
W50-54035
X-version resistive element
X
W50-54036
Resistive element
X
W50-54037
Bumper
X
W50-54038
Orientation block
X
F-6
STP
X
Drawing number
Description
Electronic file
format
PDF
STP
W50-54041
Z-axis radial limit screw
X
W50-54042
Front bearing assembly
X
W50-54043
Rear bearing assembly
X
W50-54044
X-version assembly
X
W50-54045
Ankle joint assembly
X
W50-54046
X-version assembly
X
W50-54047
Clevis assembly
X
W50-54048
Left flexion centre assembly
X
W50-54049
Right flexion centre assembly
X
W50-54050
Y-version assembly
X
W50-54051
Z-axis potentiometer assembly (optional)
X
W50-54052
Y-axis potentiometer assembly (optional)
X
W50-54053
Lower leg assembly
X
W50-54054
Ankle assembly
X
W50-54055
Lower leg assembly, right
X
W50-54056
Lower leg assembly, left
X
W50-55003
Sole plate
X
W50-55004
Left shoe
X
X
W50-55005
Right shoe
X
X
W50-61000
Arm assembly left
X
W50-61001
Full arm assembly, right
X
W50-61002
Upper arm, left assembly
X
W50-61003
Upper arm assembly, right
X
W50-61004
Upper arm extension tube assembly
X
W50-61005
Upper arm z-pivot, left
X
W50-61006
Upper arm z-pivot assembly, left
X
W50-61007
IGUS bearing (TFI-1214-08)
X
W50-61008
Z-stop pin
X
W50-61010
Upper arm z-stop
X
W50-61011
Arm tube
X
W50-61012
Upper arm tube assembly
X
F-7
Drawing number
Description
Electronic file
format
PDF
W50-61013
Elbow shaft
X
W50-61014
Clamping washer
X
W50-61016
Compression washer
X
W50-61017
Elbow stop
X
W50-61018
Wrist pivot
X
W50-61019
Wrist washer
X
W50-61020
Wrist pivot assembly
X
W50-61021
Hand bone
X
W50-61022
Spring washer
X
W50-61023
Elbow clevis
X
W50-61024
Elbow clevis assembly
X
W50-61025
Lower arm tube
X
W50-61026
Upper arm extension bone
X
W50-61027
Elbow potentiometer assembly
X
W50-61028
Elbow shaft assembly
X
W50-61029
Elbow clevis assembly
X
W50-61030
Cable guide
X
W50-61031
Elbow leg load cell structural replacement body
X
W50-61032
Wrist clevis
X
W50-61033
Wrist clevis assembly
X
W50-61034
Lower arm assembly
X
W50-61035
Wrist assembly
X
W50-61036
Lower arm tube assembly
X
W50-61037
Hand, moulded assembly left
X
W50-61038
Bumper
X
W50-61039
Accelerometer. mount bracket assembly
X
W50-61040
Accelerometer. mount bracket
X
W50-61041
Arm leg load cell structural replacement assembly
X
W50-61042
Modified button head screw
X
W50-61044
Bumper
X
W50-61045
Bumper
X
F-8
STP
Drawing number
Description
Electronic file
format
PDF
W50-61046
Bumper, wrist pivot
X
W50-61047
Modified IGUS bearing
X
W50-61048
Bumper, hand
X
W50-61049
Pivot shaft
X
W50-61050
Pivot washer
X
W50-61051
Shoulder clevis assembly
X
W50-61052
Bumper, moulded assembly
X
W50-61053
Shoulder assembly
X
W50-61054
Flexion-extension stop assembly
X
W50-61055
Flexion-extension stop
X
W50-61056
Stop bumper
X
W50-61057
Shoulder bumper plate
X
STP
W50-61058 sheet 1 Clevis
X
W50-61058 sheet 2 Clevis
X
W50-61059
Shoulder load cell abduction bumper
X
W50-61060
Friction pad
X
W50-61062
Elbow ballast for structural replace
X
W50-61063
7268-C accelerometer structural replacement
X
W50-61065
Elbow load cell structural replacement assembly
X
W50-61067
Moulded hand assembly, right
X
X
W50-61068
Moulded hand assembly, left
X
X
W50-61069
Hand, moulded assembly right
X
W50-61070-x
IGUS bearing general table
X
W50-61074
Arm tube assembly
X
W50-61084
Z-pivot, right
X
W50-61090
Modified IGUS bearing
X
W50-61098
Upper arm flesh - right - velcro application
X
X
W50-61099
Upper arm flesh - left - velcro application
X
X
W50-61100
Lower arm flesh velcro application
X
X
W50-61110
Shoulder bumper assembly
X
W50-61111
Z-pivot assembly, right
X
F-9
Drawing number
Description
Electronic file
format
PDF
W50-61113 sheet1
Shoulder clevis for half arm
X
W50-61113 sheet2
Shoulder clevis for half arm
X
W50-61117
Shoulder clevis assembly
X
W50-61123
Structural replacement-elbow potentiometer assembly
X
W50-62000
Half arm assembly
X
W50-62002
Half arm bone
X
W50-71000
Neck load cell assembly (optional)
X
W50-71003
Neck load cell structural replacement body
X
W50-71010
Leg load cell assembly (optional)
X
W50-71020
Knee contact load cell assembly (optional)
X
W50-71051
Pubic symphysis load cell
X
W50-71059
Pubic load cell structural replacement assembly
X
W50-71060
Elbow load cell assembly (optional)
X
W50-71070
Arm load cell assembly (optional)
X
W50-71077
Denton COE tilt sensor adaptor block head
X
W50-71079
Denton COE tilt sensor adaptor block
X
W50-71080
Femoral neck load cell assembly (optional)
X
W50-71090
Shoulder load cell assembly (optional)
X
W50-71092
Shoulder load cell structural replacement assembly
X
W50-71094
Denton COE tilt sensor adaptor block head
X
W50-71097
Bushing
X
W50-71098
Slug
X
W50-71120
Lumbar spine load cell assembly (optional)
X
W50-71122
Lumbar spine load cell structural replacement assembly
X
W50-71123
Lumbar spine load cell structural replacement body
X
W50-71130
Sacro-iliac load cell assembly (optional)
X
W50-71701
Temperature logger mass replacement
X
W50-71965
Femoral neck load cell structural replacement assembly
X
W50-71975
Sacro-iliac load cell structural replacement assembly
X
W50-74307
G5 DAS structural replacement, body
X
W50-75001
Interposer replacement
X
F-10
STP
X
Drawing number
Description
Electronic file
format
PDF
W50-75002
Connector housing replacement
X
W50-75102 sheet 1 Linear triax accelerometer cable, head
X
W50-75102 sheet 2 Linear triax accelerometer cable, head
X
W50-75108 sheet 1 Rotational accelerometer cable, universal
X
W50-75108 sheet 2 Rotational accelerometer cable, universal
X
W50-75201 sheet 1 Linear triax accelerometer cable, universal
X
W50-75201 sheet 2 Linear triax accelerometer cable, universal
X
W50-75801
Head to thorax
X
W50-75802
Torso to sacrum
X
W50-75803
Sacrum to pubic
X
W50-75804
Sacrum to upper leg
X
W50-75805
Upper leg to lower leg
X
W50-75806
Torso to external ground
X
W50-80100_1
WorldSID suit
X
W50-80100_2
WorldSID suit
X
W50-80100_3
WorldSID suit
X
W50-80100_4
WorldSID suit
X
W50-82100
Head drop bracket assembly, WorldSID
X
W50-82101
Base plate
X
W50-82102
Joint bracket
X
W50-82103
Head drop bracket
X
W50-82104
Joint bracket, top
X
W50-82105
Plate, magnet
X
W50-82200
WorldSID bench
X
W50-82245
Teflon® sheet
X
W50-82246
Teflon® sheet
X
W50-82500
H-point tool
X
W50-82501
H-point tool plate
X
W50-82502
H-point tool rod
X
W50-82600
C wrench
X
W50-82601
C wrench head
X
F-11
STP
Drawing number
Description
Electronic file
format
PDF
W50-82602
C wrench handle
X
W50-83000
Headform assembly, WorldSID
X
W50-83101
Centre plate
X
W50-83102
Disc A, WorldSID headform
X
W50-83103
Disc B, WorldSID headform
X
W50-83104
Upper neck interface plate
X
W50-83201
Lower neck interface plate
X
W50-83202
Shaft
X
W50-83205
Shaft coupling
X
W50-83206
Mounting base
X
W50-83207
Potentiometer mounting bracket
X
W50-84100
Lifting bracket assembly, WorldSID
X
W50-84104
Handle, threaded hole
X
W50-84106
Handle, threaded rod
X
W50-84110
Lifting bracket weldment
X
W50-84111
Upper rod
X
W50-84112
Lower rod
X
W50-84113
Middle bar
X
W50-84114
Wedge
X
000-2001
T-insert
X
734-0800
Temperature logger assembly
X
E_BF
Neck compression tool
X
E2-20123
Neck intermediate plate
X
F_D
Potentiometer assembly
X
F_DA
Potentiometer housing assembly
X
F_DB
Potentiometer clamp
X
F_DE
Bearing
X
F_DF
Potentiometer housing
X
f_e
Coupling assembly
X
f_ea
Coupling
X
f_eb
Bearing
X
F-12
STP
Drawing number
Description
Electronic file
format
PDF
F_GA
Arrow shaft-pivot assembly A
X
F_GB
Arrow shaft-pivot assembly B
X
F_GC
Arrow shaft assembly
X
F_GD
Pivot, inside assembly
X
F_GE
Pin, machined
X
F_GH
Pivot, outside
X
F_GJ
Pivot, inside
X
F_GK
Coupling
X
F_GL
Arrow shaft
X
F_HC
Space
X
F_IA
Rotary potentiometer
X
IF-363
IR-TRACC specification sheet
X
Table F.2 — WorldSID fasteners
Description
Fastener number
Ball nose spring plunger MCM# 84895A21
5000257
Ball nose spring plunger MCM# 84895A73
5000256
BHCS M10 X 1.5 X 20mm
5000176
BHCS M2.5 X 10
5000208
BHCS M2.5 X 3
5000248
BHCS M2.5 X 6
5000244
BHCS M3 X 0.5 X 10mm
5000178
BHCS M3 X 0.5 X 6mm
5000171
BHCS M4 X 0.7 X 10mm
5000010
BHCS M4 X 0.7 X 12mm
5000005
BHCS M4 X 0.7 X 6mm
5000179
BHCS M4 X 16
5000153
BHCS M5 X .8 X 25
5000466
BHCS M5 X 0.8 X 10.0
5000003
BHCS M5 X 20
5000210
F-13
STP
Description
Fastener number
BHCS M5 X 6
5000214
BHCS M6 X 1 X 18
5000465
BHCS M6 X 1.0 X 16
5000072
BHCS M6 X 22
5000211
BHCS M2.5 X .45 X 5
5000429
BHCS M6 X 1 X 20
5000438
BHCS M8 X 1.25 X 25
5000255
Cable clamp
5000191
Cheese screw M2 X 10
5000220
Cheese screw M2 X 12
5000253
Cheese screw M2 X 16
5000254
Cheese screw M2 X 18
5000221
Cheese screw M3 X 6
5000222
Dowel pin M1.5 X 5mm
5000224
Dowel pin M1.5 X 6mm
5000167
Dowel pin M2 X 5mm
5000225
Dowel pin M3 X 12mm
5000183
Dowel pin M3 X 16mm
5000223
Dowel pin M3 X 6mm
5000385
Dowel pin M3 X 8mm
5000384
Dowel pin M4 X 10
5000414
Dowel pin M4 X 14
5000053
Dowel pin M5 X 16
5000331
Dowel pin M6 X 12mm
5000217
FHCS M2 X 12
5000207
FHCS M2.5 X 12
5000206
FHCS M2.5 X 6
5000202
FHCS M3 X 10
5000203
FHCS M4 X 0.7 X 12mm
5000177
FHCS M5 X .8 X 16
5000467
FHCS M5 X 0.8 X 10
5000084
FHCS M6 X 1.0 X 20.0
5000036
FHCS M6 X 10
5000204
F-14
Description
Fastener number
FHCS M6 X 16 stainless steel
5000090
FHCS M6 X 30
5000265
Flat washer M3
5000181
Flat washer M4
5000155
Helicoil M4 X 0.7 X 8mm
5000047
Helicoil M4 X 12mm
5000205
Helicoil M4 X 6mm
5000200
Helicoil M5 X 10mm
5000213
Helicoil M6 X 1 X 6
5000049
Helicoil M6 X 1.0 X 6mm
5000087
Helicoil M6 X 1.0 X 9
5000088
Helicoil M6 X 12mm
5000175
Helicoil M8 X 1.25 X 8
5000348
Hex nut M2
5000216
Hex nut with nylon locking insert M14
5000219
HH BOLT M8 X 1.25 X 10
5000569
Locknut M6 HEX
5000143
Locknut, nylon insert, M12 X 1.75
5000462
LWSHCS M3 X 0.5 X 12mm
5000620
LWSHCS M6 X 1.0 X 12mm
5000194
Retaining ring 12mm Steel
5000249
Retaining ring 16mm Steel
5000250
Retaining ring 18mm Steel
5000251
Roll pin M1.5 X 8mm
5000189
Roll pin M3 X 10mm
5000199
Roll pin M3 X 12mm
5000166
Roll pin M3 X 14mm
5000196
Roll pin M3 X 20mm
5000188
Roll pin M3 X 8mm
5000195
Roll pin M4 X 10mm
5000182
Roll pin M4 X 14mm
5000197
SHCS M1.6 X 0.35 X 5
5000338
SHCS M1.6 X 6 CLASS 12.9 Alloy steel
5000343
F-15
Description
Fastener number
SHCS M2 X 0.4 X 18mm
5000164
SHCS M2 X 0.4 X 6mm
5000082
SHCS M2 X 0.4 X 8mm
5000083
SHCS M2 X 10
5000215
SHCS M3 X .5 X 6
5000393
SHCS M3 X 0.5 X 12mm
5000070
SHCS M3 X 10
5000119
SHCS M3 X 14
5000252
SHCS M4 X .7 X 10
5000151
SHCS M4 X 0.7 X 8.0
5000024
SHCS M5 X 0.8 X 12mm
5000002
SHCS M5 X 0.8 X 16mm
5000020
SHCS M5 X 18
5000112
SHCS M6 X 1.0 X 16
5000081
SHCS M6 X 1.0 X 20.0
5000001
SHCS M6 X 12
5000281
SHCS M6 X 50
5000324
SHCS M8 X 18
5000209
SHCS, M3 X 0.5 X 8
5000388
SHCS, M4 X .7 X 14
5000459
SHCS, M4 X .7 X 25
5000461
SHCS, M5 X .8 X 30
5000471
SHCS, M6 X 1 X 10
5000457
SHSS M6 X 25mm
5000163
Spring washer M6
5000134
SSCP M2.5 X 5
5000340
SSCP M3 X 0.5 X 4mm
5000470
SSCP M3 X 16
5000212
SSCP M4 X 0.7 X 6mm
5000076
SSCP M6 X 1.0 X 8mm
5000622
SSCP nylon tip M4 X .7 X 10
5000260
SSFP flat point M4 X 6
5000464
SSFT M6 X 10mm
5000226
F-16
Description
Fastener number
SSHDP M6 X 1.0 X 6mm
5000165
SSHDP M6 X 1.0 X 12mm
5000185
SSNT M3 X 0.5 X 3mm
5000190
SSNT M4 X 0.7 X 4mm
5000201
SSNT M6 X 1.0 X 6mm
5000621
Threaded rod M12 X 1.5
5000048
Washer, flat M1.6 X 1.7 X 4 X .25
5000428
Washer, flat M8 (8.9 ID X 18.8 OD X 2.3 THK)
5000123
F-17