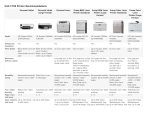
1
HP LaserJet Product
Update Newsletter.
Welcome to the HP LaserJet Product Update Newsletter! In this issue, you’ll find a
wide range of informative articles that provide technical responses, updates and
resolutions to specific challenges encountered in the field. Our current newsletter
begins with a new release announcement for the HP Universal Print Driver as well
as other UPD-related news, and continues with helpful troubleshooting tips for a
variety of monochrome and color HP LaserJet devices. As always, we appreciate
your ongoing feedback and suggestions for articles. Please continue sending any
questions or comments to [email protected]. Enjoy!
Table of Contents
Late-breaking support........................................................................................................................... 2
UPD 5.0 Update training (recorded)...................................................................................................... 2
Universal Print Driver Release 5.0 due mid-July....................................................................................... 2
UPD System Administrators Guide to be updated.................................................................................... 2
HP Monochrome LaserJet printer updates................................................................................................. 3
HP LaserJet P2015 Series Printer: Abnormal LED pattern.......................................................................... 3
HP LaserJet P2015 Series Printer: Dealing with old font or FW/Font combo DIMM...................................... 3
HP LaserJet P3005 Printer Series: Formatter part numbers........................................................................ 4
HP Monochrome LaserJet MFP updates.................................................................................................... 4
HP LaserJet M3027/M3035 MFP Series: Rhythmic hum or gear-grinding noise
from backside or fuser area of device................................................................................................... 4
HP LaserJet CM3530 MFP Series: Firmware fix for ADF jams.................................................................... 7
HP Color LaserJet printer updates............................................................................................................ 7
HP Color LaserJet CP3525 Printer Series: 68.2 error, 49.1D33 error, initialization hang............................... 7
HP Color LaserJet CP6015de Printer: Printer always warming up............................................................... 8
HP Color LaserJet CP3505 Printer Series: New part numbers for memory DIMMs....................................... 8
HP Color LaserJet MFP updates............................................................................................................... 9
HP Color LaserJet CM6030/6040 MFP Series: Carriage assembly and inverter not compatible.................... 9
HP Color LaserJet CM6040/6030 MFP Series: Rotate Offset feature......................................................... 9
HP Color LaserJet CM3530 MFP Series: Power on – boot-up hangs......................................................... 10
HP Color LaserJet CM3530 MFP Series: Troubleshooting 30.01.41 scanner failure.....................................11
HP Color LaserJet CM6030/CM6040 MFP Series: 49.4C02 error when scanning
A5 documents from the ADF...............................................................................................................11
HP Color LaserJet CM4730 MFP Series: Hang in processing or “?” message........................................... 12
HP Color LaserJet CM6040/CM6030 MFP Series: NVRAM initialization incorrectly
documented in service manual........................................................................................................... 12
HP Color LaserJet printer and MFP updates............................................................................................ 13
HP Color LaserJet CM3530 MFP and CP3520 Series Printers: Missing color due
to broken cartridge pressure lever....................................................................................................... 13
HP Color LaserJet CP6015 Printer and CM6030/CM6040 MFP Series: 58.04 error.................................. 13
HP Color LaserJet CP6015 Printer and CM6030/CM6040 MFP Series: 59.30 error.................................. 13
HP Color LaserJet CP3525 Printer and CM3530 MFP Series: “Tray 2 open” message............................... 14
HP Color LaserJet CP6015 Printer and CM6030/CM6040 MFP Series: Premature
replace cartridge message................................................................................................................ 14
HP Color LaserJet CP6015 Printer Series and HP Color LaserJet CM6040/6030 MFP
Series: Grinding noise when Tray 2 lifts............................................................................................... 15
HP Color LaserJet CP6015 Printer and CM6030/CM6040 MFP Series:
Clarification of stapler/stacker and bookletmaker product numbers......................................................... 16
Late-breaking support
Registration:
1. Logon to Grow @hp.
UPD 5.0 Update training (recorded)
2. Click Advanced Search.
Duration: 1 hrs. 30 mins.
Format: HPVC
3. Click Courses.
4. Input the course ID number 00107996 in the ID
field and click Search Learning Catalog.
Description: Recorded April 21, 2009. Provides training on new UPD 5.0 features. DMC utility usage and
driver upgrade discussion.
5. The course displays at the bottom of your screen.
Click on the course title.
Objectives: Support personnel will be able to explain
and support the new UPD 5.0 features.
7. Once registered, select Launch content.
Audience: All support personnel
Prerequisites: UPD support knowledge. This is not a
UPD beginner course.
Equivalencies: Not applicable
System Requirements:
To participate, you must have access to a computer
with Internet access and a telephone to connect to the
audio bridge line. Depending on your location, you
may be able to dial in using a toll-free number, but for
some locations you may have to dial a long-distance
or international number. The dial-in numbers will be
provided to you several days prior to your v-ILT event,
so please ensure that you will be able to dial in using
one of the numbers provided. Please also ensure that
your PC meets the minimum technical requirements for
the HP Virtual Training Room.
https://www.rooms.hp.com/requirements/
(view the requirements)
https://www.rooms.hp.com/testsetup/
(test your system)
6. Click the Register button.
For issues related to a course or to the Grow @hp
system, use the Contact HR support link provided
on your learner home page.
Universal Print Driver Release 5.0
due mid-July
The next major release of the Universal Print Driver
(UPD) is expected in mid-July 2009. This release will
incorporate both defect fixes and new features. Please
see the release notes accompanying the software for
a list of fixes and enhancements.
Watch for the new release on www.hp.com/go/upd.
Special requests for the new release will also be
handled by the LaserJet Technical Marketing Group
in Boise, Idaho.
UPD System Administrators Guide
to be updated
In conjunction with release of UPD 5.0, the UPD Systems
Administrators Guide will also be updated. The new
guide contains updated information about UPD functionality as well key instructions regarding such topics
as plug-and-play support, Citrix and Terminal Server
installations, and UPD roll-out planning.
The new guide will be posted at www.hp.com/go/upd
in July. Please take time to review it.
For more information, visit: www.hp.com
2
HP Monochrome
LaserJet printer updates
HP LaserJet P2015 Series Printer:
Dealing with old font or FW/Font
combo DIMM
HP LaserJet P2015 Series Printer:
Abnormal LED pattern
Background:
Since the HP LaserJet P2015 formatter is not flashable, a font DIMM or combo Font/FW DIMM has to
be installed to resolve specific font and networking
issues, as well as other related issues.
Issue Description:
After powering on the HP LaserJet P2015 series printer,
it does not go to a ready state (i.e., green light on), but
instead boots to an error state with abnormal LED
patterns. For example:
•The paper jam light is always on, even if there is
no paper jam
•The paper-out light remains on, even though there
is paper in the tray
This is caused by a charged USB cable that subsequently
discharges when it is inserted into the printer, causing
permanent damage to the formatter.
Solution:
To discharge the USB cable without causing any damage to the formatter, plug the cable into the host
device first (e.g., computer, hub, router, etc.), then
plug it into the printer. If the formatter has already
been damaged, it will need to be replaced. Once
replaced, follow the steps above for properly plugging in the USB cable.
Please note:
•The HP LaserJet P2015 printer may require one to
two minutes to boot up and reach a ready state,
especially after a P2015 Font/FW combo DIMM
has been installed.
•Do no replace the formatter to resolve any issues
(e.g., networking, font, etc.) that are listed in the
P2015 firmware fix list.
DIMM roll history:
There are four types of font DIMMs and combo Font/
FW DIMMs due to each FW update:
•CB456-67901 (Font DIMM)
•CE517-67901 (combo Font/FW DIMM with FW
datecode 2XX70813)
•CE517-67902 (combo Font/FW DIMM with
datecode 2XX80312)
•CE517-67903 (combo Font/FW DIMM with
datecode 2XX80915)
Issue Description:
The DIMMs listed above are not flashable by customers,
and the upgrade can only be done by the manufacturer. If there is already a DIMM (including
CB456-67901, CE517-67901 and CE517-67902) in
an HP LaserJet P2015 series printer when a customer
installs the latest combo Font/FW DIMM for firmware
update, please refer to the guidelines described in
the Solution
section below.
Solution:
If the quantity of old font or FW/Font combo DIMMs
is less than 500 pieces, please regard them as
replacement parts and the old DIMMs do not need
to be returned.
If the quantity of old font or combo Font/FW DIMMs
is greater than 500 pieces at a customer site (i.e., big
corporate account), please regard them as exchangeable parts and contact Sean at [email protected]
to rework.
Please note:
•For GSC (Global Solution Center), GCC (Global
Competency Center), TCs and ATS, please do
not order the FW/Font combo DIMM by the part
number mentioned in this article. A FW/Font DIMM
is available at: https://external1.collaboration.
www.hp.com/external/pcc/default.aspx
•For GPSC (Global Parts and Supply Chain), please
order the FW/Font combo DIMM directly through
the manufacturer.
For more information, visit: www.hp.com
3
HP LaserJet P3005 Printer Series:
Formatter part numbers
Issue Description:
The service manual for the HP LaserJet P3005 product
family did not include the service part numbers.
Solution or Workaround:
The part numbers are as follows:
Q7847-61004
(P3005, P3005d)
Q7848-61004
(P3005n, P3005dn, P3005x)
Rhythmic hum – This noise is typically seen only on units
that have printed in excess of 100,000 pages. This
noise is caused by tooth wear on the Fuser Idler Gear
RU5-0957-000CN. This noise tends to get louder as the
wear gets greater. We have not seen this produce
grinding or gear slippage, but it may at its extreme.
Fuser Idler Gear RU5-0957-000CN
HP monochrome LaserJet
MFP updates
HP LaserJet M3027/M3035MFP
Series: Rhythmic hum or gear-grinding
noise from backside or fuser area
of device
Issue Description:
Customers may report a noise coming from the HP
LaserJet M3027 or HP LaserJet M3035 MFP family of
products. This noise is usually reported after the device
has been installed and used for some time, so it does
not appear to be an out-of-the-box noise issue.
To identify this particular noise:
•Power off the device and remove the toner cartridge.
Good gear
Worn Gear
The worn gear above was from a unit that had over
230,000 engine cycles on it and the unit still functioned
properly, although it did have the rhythmic humming
noise.
Fuser gear grinding and paper jams – This is usually
seen earlier in life around 20,000 to 50,000 pages.
This behavior is caused by wear on the bushing that
supports the fuser pressure roller shaft. It seems that
only the blue/green bushings have this wear issue.
This bushing can be easily identified by removing the
fuser and locating the bushing on the left side of the
fuser assembly.
•Open the rear door to gain access to the fuser
compartment.
Fuser Pressure roller shaft bushing
located on the drive side of
the fuser.
•When you power on the device, you will hear the
noise as the fuser rotates and then it will stop. If no
noise is detected, replace the toner cartridge and
repeat the power-on evaluation. If the noise is coming
from the toner cartridge, replace it.
The unit with the worn blue/green
bushing was making a very loud
grinding noise and would no longer
transport paper without jamming.
•If the noise is heard coming from the fuser area with
the toner removed, you may want to install the toner
cartridge and further evaluate the noise by printing
internal pages. As pages are printed, listen for the
rhythmic noise or gear-grinding noise to determine
if it is coming from the fuser area.
Identify the component that is responsible for the noise.
There are two components that can cause noise from
the fuser gear train.
For more information, visit: www.hp.com
Good Brown Bushing
Worn Blue/Green Bushing
4
Solution:
2. Open the cartridge door.
Currently we believe these noise issues can be resolved 3. Open the rear output bin all the way, and then
by replacing the fuser or the Fuser Idler Gear RU5-0957press the output bin down firmly to disengage two
000CN. We have not seen a unit that exhibited both
door-stops (callout 2 in Figure 5-20).
worn parts. It is important to inspect these two parts to
4. Use a flat-blade screwdriver to press one tab
understand what component is causing the issue. If the
(callout 3) toward the back of the device, and then
fuser bushing is brown, it is probably good and there
rotate the cover away from the back of the device.
should be no need to replace the fuser. If in doubt, it is
best to err on the side of caution and replace both parts.
Figure 5-20 Removing the left-side cover (2 of 3)
Parts required:
Fuser, 110-127V
RM1-3740-000CN
1
Fuser, 220-240V
RM1-3741-000CN
1
17 Gear, 20T
RU5-0957-000CN
1
Caution: Gears 17 and 19 have teeth that slant in
opposite directions. Please be careful that these gears
are installed in their proper positions or gear grind
will occur. You shouldn’t need to remove gear 19 to
perform this service.
5. Slide the cover toward the front of the device to
clear tabs at the front (callout 4), and then lift the
cover away from the device.
Figure 5-21 Removing the left-side cover (3 of 3)
Repair Procedure:
To replace these components, please follow the steps
below.
Left-side cover
1. Remove two screws (callout 1).
Back cover
1. Remove the left-side cover and leave the rear
output bin all the way open.
2. Remove two screws (callout 1).
Figure 5-22 Removing the back cover (1 of 2)
Figure 5-19 Removing the left-side cover (1 of 3)
For more information, visit: www.hp.com
5
3. Release one tab (callout 2) inside the device and
then rotate the bottom of the cover away from the
device.
Figure 5-23 Removing the back cover (2 of 2)
2. Disconnect the fuser power cable (callout 2) and
remove the cable from the cable guide (callout 3).
Also disconnect two cables (callout 4) at the right
side of the fuser and remove one of the cables
from the cable guide (callout 5).
Figure 5-60 Removing the fuser (2 of 3)
4. Lift the cover away from the device.
I/O cover
1. Rotate the I/O cover to clear tabs at the right side
of the cover.
Figure 5-24 Removing the I/O cover
2. Lift the cover off of the device.
3. Remove three self-tapping screws (callout 6) and
one grounding screw (callout 7).
Figure 5-61 Removing the fuser (3 of 3)
4. Tilt the fuser slightly toward the back of the device,
and then slide the fuser out of the back of the device.
Fuser
1. Remove the duplexer inlet guide by releasing two
tabs (callout 1) on the guide, and then sliding the
guide toward the back of the device.
Figure 5-59 Removing the fuser (1 of 3)
Reinstallation tip. Make sure that both tabs snap into place when
reinstalling the duplexer inlet guide.
For more information, visit: www.hp.com
6
1. Remove the two fuser drive gears as indicated below
HP LaserJet CM3530 MFP Series:
Firmware fix for ADF jams
Issue Description:
Early shipments of the HP LaserJet CM3530 MFP are
experiencing several ADF jam issues. Most of these
jams are fixed in the latest revision of the firmware.
Solution or Workaround:
Update firmware to date code 53.011.2. The firmware
is now available on hp.com and fixes most ADF jams.
Note: There is one ADF jam failure that is not fixed in
version 53.011.2. If the paper fails to deliver completely
to the output bin, replace the ADF.
HP color LaserJet
printer updates
2. Replace just RU5-0957-000CN
HP Color LaserJet CP3525 Printer
Series: 68.2 error, 49.1D33 error,
initialization hang
3. Finally, install a new fuser if needed or replace the
existing fuser and reassemble the device.
Solution:
In the case of an initialization hang, it should be confirmed that pressing a control panel button causes the
68.2 Error. If not, the customer may be experiencing a
different issue.
Summary or Cause:
The root cause of these noises are not understood at
this time. However, we are continuing to investigate
these parts. Updates to these issues will continue as
more information is gathered. We would like for field
personnel to use the procedures and parts outlined in
this document to resolve these noise issues. If you find
that this process does not resolve the issue or that the
noise returns, or if you come across any additional
information, please escalate your case so we can
further investigate the issue.
Issue Description:
With the HP Color LaserJet CP3525 printer, customers
may see a 68.2 Error, a 49.1D33 Error, or a hang on
printer initialization after a power cycle, followed by a
68.2 Error when a control panel button is pushed. This
is typically caused by damage to the Interconnect
Board (ICB) component.
In all other instances, the customer will most likely
need to replace the Inner Connecting PCA Assembly
(RM1-5695-000CN), also known as the Interconnect
Board. Instructions for replacing this component may
be found in the service manual on page 238. The
formatter should NOT be replaced to correct
these errors.
NOTE: Please ensure that the flat flexible cable
between the ICB and DC Controller is fully connected
on both ends when replacing the ICB. Failure to seat
this cable correctly may result in a 55.04 error.
Warranty Considerations:
The Warranty period for this product is one year unless
an extended warranty has been purchased. The HP
LaserJet M3035mfp and HP LaserJet M3027 MFP data
sheets specify Recommended Monthly Page Volume of
2,000 to 6,000 pages. Within these parameters, a
customer would typically print between 24,000 and
72,000 pages per year. The device would have a
normal life expectancy of 2 to 6 years.
For more information, visit: www.hp.com
7
HP Color LaserJet CP6015de Printer:
Printer always warming up
Issue Description:
Customers who have purchased an Energy Star-compliant HP Color LaserJet CP6015de device may discover
that the printer remains in “warming up” mode longer
than other CP6015 family products. This is because
Energy Star Compliancy has been enabled in the
printer.
Solution:
Customers may select a different energy usage mode.
This can be done via the control panel:
1. Select Menu
2. Scroll down to Configure Device and select
3. Scroll down to System Setup and select
HP Color LaserJet CP3505 Printer
Series: New part numbers for
memory DIMMs
Issue Description:
The user manual and service manual of the HP Color
LaserJet CP3505 series printer did not include the service
part numbers for the various memory DIMMs. Please
note that these DIMMs are only for the CP3505 and will
not work with the CLJ3800 and CLJ3000 printers, since
they require a different DIMM as outlined in their
respective manuals.
Solution or Workaround:
The service part numbers and associated memory sizes
for the DIMMs are as follows:
CC409-67951
128 MB DIMM
4. Scroll down to Optimum Speed/Energy Used
and select
CC410-67951
256 MB DIMM
CC411-67951
512 MB DIMM
There are three options under this category: “Save
Most Energy,” “Faster First Page,” and “Save Energy.”
If “Save Most Energy” is selected (the default setting),
then the printer is in Energy Star Compliancy mode.
To reduce the amount of time the printer needs to
warm up, select either the “Faster First Page” or “Save
Energy” setting. This will take the printer out of Energy
Star Compliancy mode.
CC412-67951
1 GB DIMM
For more information, visit: www.hp.com
8
HP Color LaserJet CM6030/6040
MFP Series: Carriage assembly and
inverter not compatible
Issue Description:
When replacing either the carriage assembly (Q393867973) or inverter (Q3938-67905), the cable that
connects from the carriage assembly to the inverter
is a different size and will not connect.
Solution:
In July 2008, the carriage assembly was rolled to a new
version that is compatible only with the corresponding
new version of the inverter. If the product was manufactured with the previous version of the carriage assembly
and inverter, then when one of those parts is replaced,
the other must be replaced as well. To resolve this, the
carriage assembly and inverter part numbers will be
discontinued and a new kit will be provided as a replacement. This new kit contains both the carriage assembly
and inverter and is part number Q3938-67972.
Until the kit is available, if you install a carriage assembly and discover that the cable has an incompatible
number of pins to connect to the inverter, order the
inverter to be replaced as well. Conversely, if you
install an inverter and find that the cable from the carriage assembly has an incompatible number of pins
to connect to the inverter, order the carriage assembly
to be replaced.
in landscape, and so on. Once Rotate Offset is enabled,
regardless of inactivity period, the first copy of a job
outputs in the alternate orientation to the last copy of
the previous job. See the table below for an example
of how the document outputs.
Copy 1
Previous job’s
final copy output
in landscape
orientation.
Therefore, the first
copy of the next job
outputs in portrait
orientation.
Copy 2
HP Color LaserJet
MFP updates
This feature helps users sort through output copies easily
without the need for an external output device. Rotate
Offset can only be used with Letter/A4 media sizes.
(NOTE: This feature cannot be enabled on MFPs that
have external output devices attached.)
How does it work?
The Rotate Offset feature requires the use of at least
two trays. One tray is used to feed paper in long edge
orientation, and the second tray is used to feed paper
in short edge orientation. For example, load Tray 2
with Letter paper, and load Tray 3 with Letter-R
(rotated) paper.
To enable Rotate Offset
Rotate Offset can be enabled through Web Jetadmin,
the Embedded Web Server, or through the MFP control
panel. To enable Rotate Offset through the control
panel, follow these steps:
Additionally, it’s important to configure the jumpers on
the SCB when these parts and others are replaced. A
document is included with all pertinent parts explaining
how to configure the jumpers. The jumpers are included
as well.
1. Touch Administration
HP Color LaserJet CM6040/6030
MFP Series: Rotate Offset feature
NOTE: When Rotate Offset is enabled, all compatible
print and copy jobs are output in Rotate Offset format.
What is it?
Rotate Offset is a feature that allows users to print multiple copies of a job in alternate orientations. This new
feature can be used with either the Print or Copy path.
For example, the first copy outputs in landscape orientation, the second outputs in portrait orientation, the third
For more information, visit: www.hp.com
2. Touch Device Behavior
3. Touch Rotate Offset
4. Touch Enable
Software and driver notes
Supported PDLs include:
•PostScript
•PCL 5
•PCL 6
•Direct PDF printing
9
Performance
Using the Rotate Offset feature affects printing speed.
•First page out (FPO) speed slows due to the engine
rendering images to two different pages at the
beginning of the Rotate Offset job.
•Additional copies beyond the first two pages are
fractionally slower compared to regular Letter/A4-sized
print or copy jobs because feeding in Letter-R/A4-R
(short edge first) orientation is slower than feeding
in Letter/A4 (long edge first) orientation.
FW version and compatibility
Rotate Offset is currently only compatible with the
CM6040 MFP and CM6030 MFP. You must upgrade
your printer’s firmware version to 20090209 52.031.1_
i13380 or later to take advantage of this new
capability.
Solution:
If a boot-up hang occurs, record the phase and
component of the failure (ex. 6/6B). See the table
below for troubleshooting information.
Table 1: Troubleshooting Boot-up Hangs
Phase ( 1/6 – 6/6 )
Component
(A – F)
Troubleshooting steps
1/6
A-F
more troubleshooting info will be
added later
2/6
A-F
more troubleshooting info will be
added later
3/6
A-F
more troubleshooting info will be
added later
4/6
A-F
more troubleshooting info will be
added later
5/6
C
Scanner communications
6/6
B
1) Check cables:
• At top of ICB, reseat USB and
PCI-e cables
When is Rotate Offset not available?
There are a number of conditions under which the
Rotate Offset feature is not available, even if it has been
enabled. For a complete list of these conditions, please
see the whitepaper entitled “Rotate Offset feature for the
HP Color LaserJet CM6040/30 MFP” at www.hp.com.
• Reseat PCI-e at SCB
(see troubleshooting section
below)
2) Reseat formatter
3) Replace SCB
Hard disk drive (HDD)
communications
HP Color LaserJet CM3530 MFP
Series: Power on – boot-up hangs
Issue Description:
Beginning with the HP LaserJet CM3530, LaserJet MFPs
will now display a “Boot Progress Indicator” from poweron to Ready state. (see Figure 2 below)
Figure 2. Boot
Progress Indicator
1) Try a DISKINIT
2) Reseat HDD cables connections
at HDD and formatter
3) Replace HDD (Note: unlike
previous mfps, the CM3530 will
NOT boot without a HDD)
Additional Troubleshooting:
5/6C – Check scanner cabling: if a boot-up hang
occurs at this phase, power down the MFP and remove
the rear cover of the scanner. Reseat the cable connections as indicated below:
Figure 3. Cables at
rear of scanner (rear
cover removed)
2
The boot process is broken down into phases and
components within the phases:
•The phases are indicated as 1/6, 2/6, 3/6, 4/6,
5/6 and 6/6.
•The components within the phase are indicated as
A, B, C, D, E and F.
1
3
1. Reseat PCI-e cable at top of ICB
2. Reseat PCI-e cable at SCB pca
•(Note: The component indicators first appear gray,
3. Reseat Control Panel USB cable at side of ICB
and then turn black as that component is completed.)
For more information, visit: www.hp.com
10
HP Color LaserJet CM3530 MFP
Series: Troubleshooting 30.01.41
scanner failure
HP Color LaserJet CM6030/CM6040
MFP Series: 49.4C02 error when
scanning A5 documents from the ADF
Issue Description:
The 30.01.41 scanner error is the result of lost communication between the formatter and the scanner control
board (SCB). The message can also be displayed as
“Scanner error, Scanner power, Cable, and CPB” (the
copy process board [CPB] on this product is combined
with the SCB).
Issue Description:
With firmware version 52.031.1 or earlier, scanning
A5 or other sizes when combined with specific Default
Original page size settings from the ADF results in a
49.4C02 error.
Control Panel
ICB
Formatter
USB cable
SCB/CPB
ICB backplane
connector
PCI-e cable
Paper Size
ADF Orientation
Default Originals
Page Size
Result
A5
Short Edge*
A5
No Error
A5
Short Edge*
All Other Page
Sizes
49.4C02
LTR/A4
Short Edge (LTRR, A4-R)
LTR, A4
49.4C02
LTR/A4
Long Edge
LTR, A4
No Error
LTR/A4
Short Edge (LTRR, A4-R)
LTR-R, A4-R
No Error
LTR/A4
Long Edge
LTR-R, A4-R
No Error
* Long-Edge A5 is not supported from the ADF.
Solution:
Perform the following steps:
1. Upgrade the firmware (RFU) to 53.011.2. (This
revision contains a fix which resolves a potential
timing conflict at boot-up).
2. If the 30.01.41 continues and is intermittent, it is
likely related to a seating issue with one of the
cables in the communication path. Perform the
following steps:
•Reseat the formatter
•Reseat the PCI-e cable at the top of the ICB (#1 below)
•Reseat the PCI-e cable at the SCB (#2 below)
Figure 3. Cables at
rear of scanner (rear
cover removed)
2
Note that the 49.4C02 error can also occur if a user
is scanning any size document other than A3 and the
user has depressed the A3 ADF flag sensor. The error
occurs because the component that processes image
data fails if it receives a scanned image that is shorter than expected.
Solution:
There are several possible workarounds for this issue:
1. Change the “Optimize Text/Picture” setting from
“Manually Adjust” (default setting) to one of the
other settings available. Note that Text works well
with Fax, but does not work well for Send to Email
when scanning color documents.
2. Ask users to change the Document Size to A5 in
“More Settings” before either Faxing or Digitally
Sending A5 documents from the ADF.
3. The issue does not occur if documents are scanned
from the flatbed.
HP expects to release a revision of firmware in mid2009 that will resolve this issue.
1
If the 30.01.41 is a hard failure, try reseating the cables
as indicated above. Carefully inspect the standoffs
into which the cable attaches on the SCB. Verify the
standoffs are securely fastened to the SCB. If the failure persists, replace the SCB (CC454-60003).
For more information, visit: www.hp.com
11
HP Color LaserJet CM4730 MFP
Series: Hang in processing or “?”
message
Issue Description:
The touch panel of the HP Color LaserJet CM4730 MFP
shows the status as “Processing,” but the job never
prints. Additionally, if firmware version 50.161.2 or
newer is installed, the Attention screen on the touch
panel only displays a question mark after a job is sent,
but the job never prints. This typically occurs because
the sensor flag on the fuser is blocked, usually because
a small piece of paper remains in the fuser after a
paper jam has been cleared.
Solution:
Use the following steps to locate and remove the paper.
(Note: The fuser may be hot. Be careful when removing
the fuser.)
1. Open the MFP’s upper right door.
2. Using the green handle, lift the fuser access door
to reveal the fuser.
3. Grasp the purple handles on either side of the fuser
and pull the fuser out of the MFP.
4. Locate the output sensor flag on the back side of the
fuser, as shown below. It is a black flag with a small
clear roller on the end.
5. Clear any paper located in the fuser. The paper
is likely near the fuser exit flag, which is being
blocked by the paper.
6. After clearing the paper, reinstall the fuser in the
printer and close the upper right door.
Once the paper has been cleared, please elevate the
case to level 3 for visibility to the case. This is a firmware issue that is being investigated. The correct 13.20
paper jam message will be posted in the event log, but
is not being correctly posted on the touch panel.
HP Color LaserJet CM6040/
CM6030 MFP Series: NVRAM
initialization incorrectly documented
in service manual
Issue Description:
The service manual for the HP Color LaserJet CM6040/
CM6030 MFP series contains incorrect instructions for
performing an NVRAM initialization. If performed as
instructed in the manual, all NVRAM settings (including
page counts) will be reset. This type of initialization
should only be performed under select circumstances.
Solution:
The correct procedure is as follows:
1. Turn the product off and then on.
2. When the memory count appears on the control
panel display, press and hold 9 until all three LEDs
flash once and then stay on. This may take up to
20 seconds.
3. Press and release 3, then press and release Start.
4. Press and release 6.
For more information, visit: www.hp.com
12
HP Color LaserJet
printer and MFP
updates
HP Color LaserJet CM3530 MFP and
CP3520 Series Printers: Missing color
due to broken cartridge pressure lever
Issue Description:
If a color is missing when the device is first powered
on, remove the print cartridge and check the front of
the cartridge slot at the top. If the pressure lever on the
slot is broken, the ground spring will be pulled up and
away from the cartridge and the color will not print
(see Figures 1a and 1b).
Figure 1a. Good
lock lever
HP Color LaserJet CP6015 Printer
and CM6030/CM6040 MFP Series:
58.04 error
Issue Description:
The service manual for the HP LaserJet CP6015/
CM6030 MFP/CM6040 MFP devices has the incorrect
troubleshooting steps for a 58.04 error. Additionally,
an issue has been discovered that may cause a 58.04
to occur intermittently when the product comes out of
Powersave mode.
Solution:
•CP6015: A firmware upgrade is available on Tech
Web IV that will solve this issue. Please escalate
the issue to your HP representative for them to send
the file.
•CM6030/CM6040 MFP: A firmware upgrade is now
available at: www.hp.com
•If the error will not clear after the firmware upgrade,
replace the low-voltage power supply. If the error
continues, replace the fuser power supply. If the error
still continues, replace the fuser.
HP Color LaserJet CP6015 Printer
and CM6030/CM6040 MFP Series:
59.30 error
Figure 1b. Broken
lock lever
Issue Description:
Sometimes, when a printer shows a 59.30 error, it
may actually be “hiding” or masking a power supply
error. This is due to the way errors are prioritized in
the firmware, as well as the fact that the printer can
only show one error at a time.
Solution:
Follow the standard troubleshooting sequence for this
error (listed below), but add “Replace the Power Supply”
as a last troubleshooting attempt.
Solution:
Replace the pressure lever (RC2-3983-000CN). The
instructions for replacement can be found in document
number cxxxxxxxx.
Summary or Cause:
Rough handling during shipment causes the pressure
lever to fail. The lever provides the ground path for the
drum current during image formation. If there is no
ground, there is no image. A newly designed pressure
lever will soon be implemented to provide greater
immunity to rough handling during shipping.
For more information, visit: www.hp.com
1. Perform the fuser motor component test in the
Diagnostics Menu.
2. Reconnect the connectors of the fixing motor
(J1711), intermediate (J1720) and the DC
Controller PCA (J105).
3. Replace the fuser motor.
4. Replace the DCC PCA.
5. Replace the Low Voltage Power Supply.
13
HP Color LaserJet CP3525 Printer
and CM3530 MFP Series: “Tray 2
open” message
Issue Description:
“Tray 2 Open” message continues even though Tray 2
has been closed.
Solution:
1. Remove the individual color print cartridge indicated
in the control panel error message.
2. Turn the cartridge upside down, as shown in the
image below.
3. Check to make sure the toner gate on the cartridge
Solution:
Check the Tray 2 present flag on the back of the tray.
The flag can be knocked out of position when reinstalling the tray if the tray is not correctly positioned on the
rails. Reposition the flag to fix the problem.
Figure 4a. Tray 2
present flag in correct
position on gear shaft.
is closed. Open the shutter to see the gate. The
image on the left shows the gate open. The gate is
closed in the image on the right – this is the proper
position when the cartridge is outside the printer.
Figure 4b. Tray 2
present flag incorrectly
positioned on flange
of shaft – needs to be
moved down to ride on
the shaft.
HP Color LaserJet CP6015 Printer
and CM6030/CM6040 MFP Series:
Premature replace cartridge message
Issue Description:
After printing as few as 800 pages from a new print
cartridge, the Replace <Color> Cartridge message
appears on the control panel (due to the nature of the
issue, toner may have spilled inside the printer as well).
This typically occurs because the toner gates of the print
cartridge and the image drum are out of sync during
installation, thereby preventing toner from moving from
the print cartridge into the image drum. When the
image drum requests toner from the print cartridge
and the level does not change in the image drum, the
cartridge is assumed by the system to be empty and a
Replace <Color> Cartridge message appears on the
control panel.
For more information, visit: www.hp.com
4. If the gate is open, push the release lever up,
then turn the white gear 90 degrees until the gate
closes (see picture below). The white gear should
end straight up (note: it can actually be turned in
either direction).
5. Once the gate is closed, reinstall the cartridge into
the printer.
Note: It’s important to make sure the gate is closed
when the cartridge is being installed or removed from
the printer, as toner can easily escape the cartridge if
the gate is open.
6. Remove the image drum that corresponds with the
print cartridge.
14
7. Locate the toner gate on the top rear of the image
drum. The image on the left shows the gate open
and the image on the right shows the gate closed.
Closed is the proper position when the image
drum is outside the printer.
HP Color LaserJet CP6015 Printer
Series and HP Color LaserJet
CM6040/6030 MFP Series:
Grinding noise when Tray 2 lifts
Issue Description:
With the HP Color LaserJet CP6015 Printer Series
and HP Color LaserJet CM6040/6030 MFP Series,
when the customer closes tray 2 and the tray
attempts to lift, it makes a grinding noise.
8. If the gate is open, press the black lever release
down, the turn the white gear until the gate closes
completely (see image below).
Rotate white
gear until gate
is closed.
Solution:
1. Remove tray 2 and inspect the small white gear
on the rear of the paper tray. Note the tab which
holds the gear in place. It should be flush against
the center of the gear. The photos below show the
tab in both the correct and incorrect positions.
Tab in the correct position.
Press black
release lever
down.
9. Once the gate is closed, reinstall the image drum
into the printer.
Tab pulled out of position.
10.If the message does not clear, power cycle the
printer.
11.If the message still does not clear, replace both
the image drum and print cartridge. If the Replace
Cartridge message has been posted to the
control panel, then the cartridge e-label may have
been written to with information that indicated the
cartridge life has been fully consumed. Because
of this, the error may not clear. If that is the case,
both the image drum and print cartridge must be
replaced to clear the error message.
Note: It is important to make sure the gate is closed
when the image drum is outside the printer, as toner
can escape the drum if the gate is open.
Additionally, if either the cartridge gate or image
drum gate was in the wrong position when the cartridge was installed in the printer, toner may have
escaped the cartridge and spilled inside the printer.
A service technician will need to use a toner vacuum
to clean up any spilled toner.
For more information, visit: www.hp.com
2. If the tab is pulled out of position, the gear will not
mesh with the gear on the lift assembly, causing a
grinding noise as the lift assembly attempts to lift
the tray.
3. Replace the paper tray. The tab is being reinforced
to keep this from occurring in the future.
15
HP Color LaserJet CP6015 Printer
and CM6030/CM6040 MFP Series:
Clarification of stapler/stacker and
bookletmaker product numbers
Products Affected
Product Number(s) Affected
Starting SN
Ending SN
Q3931A
All
All
Q3932A
All
All
Q3933A
All
All
Q3934A
All
All
Q3938A
All
All
Q3939A
All
All
CE664A
All
All
CE665A
All
All
CC517A
All
All
CC516A
All
All
Q6998A
All
All
Q6999A
All
All
Issue Description:
This document is intended to provide clarification to
the product numbers for the Stapler/Stacker and
Bookletmaker finishers for use on the Color LaserJet
CP6015 and CM6040/6030MFP products.
The Stapler/Stacker and Bookletmaker for the CP6015
and CM6040/6030MFP have different product numbers because these devices ship with an Intermediate
Paper Transport Unit (IPTU) that is appropriate for either
the CP6015 or CM6040/6030MFP. However, the physical Stapler/Stacker or Bookletmaker is the same device
for all three products. It is important to order the correct
finisher for the model printer/MFP to which it will be
connected. The product numbers for the finishers are
as follows:
Product
Output device
Product Number
CP6015
Stapler/Stacker
Q6998A
CP6015
Bookletmaker
Q6999A
CM6040/6030MFP
Stapler/Stacker
CC517A
CM6040/6030MFP
Bookletmaker
CC516A
The finisher is received as one box which, when the
over-box is removed, reveals two boxes. One of the
inner boxes contains the finisher and the other contains
the IPTU. Some confusion has been caused because the
inner box that contains the finisher has the product
number for the CP6015 (Q6998A or Q6999A), even
if the finisher ordered was for the CM6040/6030MFP
(CC516A, CC517A). Additionally, the product number
on the serial number stocker located on the rear of
the finisher also has the Q6998A or Q6999A product number. This is due to the fact that the physical
finishing device is the same for both the CP6015 and
For more information, visit: www.hp.com
CM6040/ 6030MFP. If the correct product number is
on the outer box (CC517A, CC516A), the correct product has been received. This may be further verified by
installing the IPTU, since the IPTUs for the CP6015
and CM6040/ 6030MFP cannot physically be
installed on an incorrect product.
If a configuration page is printed on a CM6040/
6030MFP, the product number for the finisher, listed
under Paper Trays and Options, will either be Q6998A
or Q6999A instead of CC517A or CC516A. Please
be assured that the correct output device has been
installed, since the IPTU for the CP6015 cannot physically be installed on a CM6040/6030MFP.
Scope
All Stapler/Stackers will have the product number
Q6998A and Q6999A on the serial number label
located on the rear of the finisher and the Configuration Page for the CP6015 and CM6040/6030MFP
will always read Q6998 or Q6999A.
Resolution
If the correct product number is on the outer box,
please disregard the product number on the inner box
containing the finisher. When reviewing a configuration
page for a CM6040/6030MFP, recognize that it
will indicate the finisher is a Q6998A or Q6999A
instead of CC517A or CC516A.
Parts required
Replacement Part Number
Quantity
Description
Download File
Location
None
Downloadable solutions
Product Number
NA
Service Action
When unboxing a finisher to be connected to a
CM6040/630MFP, verify that the correct product
number (CC517A/CC516A) is on the outer box.
Please disregard the product number on the inner
box containing the finisher.
When reviewing a Configuration Page for a
CM6040/6030MFP, recognize that it will indicate the
finisher is a Q6998A or Q6999A instead of CC517A or
CC516A. This is normal behavior and does not indicate
the wrong finisher is attached. The finishers are the same
for both the CP6015 and CM6040/6030MFP. Only the
IPTU is different and cannot physically be installed in the
wrong printer/MFP.
16
To learn more, visit www.hp.com
© Copyright 2009 Hewlett-Packard Development Company, L.P. The information contained herein is subject to
change without notice. The only warranties for HP products and services are set forth in the express warranty
statements accompanying such products and services. Nothing herein should be construed as constituting an
additional warranty. HP shall not be liable for technical or editorial errors or omissions contained herein.
July 2009