1
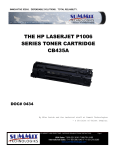
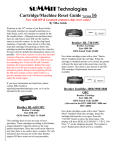
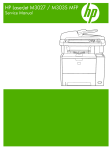
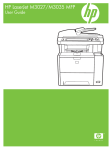
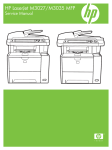
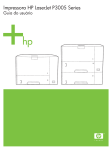
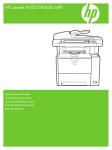
THE HP P3005 LASERJET
TONER CARTRIDGE
DOC# 0383
By Mike Josiah and the Technical Staff at Summit Technologies
HP LASERJET P3005 TONER CARTRIDGE REMANUFACTURING INSTRUCTIONS
USA Sales: T 800.221.3516 F 888.791.9188
International Sales: T +1 631.590.1040 F +1 631.218.3285
www.summitechnologies.com
Page 1
Remanufacturing the HP LaserJet
P3005 Toner Cartridge
The HP LaserJet P3005
Toner Cartridge
F
irst released in November 2006, the HP LaserJet
P3005 series of printers are based on a 1200dpi,
35ppm Canon engine, (except for the M3027 which
is rated for 27ppm). As with all the new HP cartridges,
these cartridges use a chip to monitor toner low
functions. These cartridges use the older larger format
chip board as found on the 4200/4300 series, not the
smaller version found on many other newer cartridges
like the CLJ 2600. The P3005 cartridge looks somewhat
like an updated/smaller version of the 5200 (Q7516A)
cartridge. The cartridges for the P3005 are the Q7551A
and Q7551X and are rated for 6,500 Pages and 13,000
pages respectively.
The LaserJet P3005 series of printers use a 400 MHz
processor and the most basic unit has 48Mb of DDR2
memory expandable to 320mb. They all show a first
page out at less than 9 seconds. The entire series has a
monthly duty cycle of 100,000 pages/month. The
cartridges have list prices of $128.99 for the A, and
$214.99 for the X cartridge. (Pricing as of Nov. 2006).
So far the machines based on the P3005 engine are
the:
LaserJet P3005, P3005d, P3005n, P3005dn, P3005x
and the LaserJet M3027 MFP, M3035 MFP, M3035xs
MFP
Figure 1
Figure 1 shows the pull tab for the seal. Similar to the
2420 and 5200, this tab prevents the cartridge from
HP LASERJET P3005 TONER CARTRIDGE REMANUFACTURING INSTRUCTIONS
USA Sales: T 800.221.3516 F 888.791.9188
International Sales: T +1 631.590.1040 F +1 631.218.3285
www.summitechnologies.com
Page 2
being installed unless the seal has been pulled. (Unless
the tab has been separated from the seal of course).
Unlike the other recent HP cartridges, only a few small
parts use plastic rivets to hold them together. For the
most part everything comes apart with screws. A
welcome change for the better!
As with all other black HP cartridges, the chips on these
cartridges do not shut down the entire cartridge, they
disable the toner low features. The cartridge will run if
the chip is removed, but the error message must be
cleared first. As with past HP chips, the toner low
function is disabled if a used chip is installed.
Printing test pages, cartridge troubleshooting as well as
some simple machine troubleshooting is covered at the
end of the article.
The theory for these cartridges is the same as most of
the other HP/Canon monochrome cartridges so we will
not go into it here. There is a difference however that
should be noted.
Figure 2
Figure 3
service manual, but my guess is that since these
cartridges also work in multifunction machines where
faxes are received, the second backup system is
needed. (Just like the windows used in Canon FX*
cartridges). Again this is a guess, but it would seem that
a good signal will be needed from both sensing bars
before the machine will print. The dedicated printers
may only use one bar, but the multifunction machines
will most likely use both. We will be running tests on
them to determine how they function.
Required Tools
Toner approved vacuum.
A small Common screwdriver
A Phillips head screwdriver
Needle nose pliers or Flush cutting Wire Cutters
Dremmel tool with side cutting bit. (Hobby rotary saw)
Required Supplies
The physical parts used for toner low monitoring are
different for these cartridges. Instead of the normal
single round toner low bar that runs through the center
of the hopper, there are now 2 contacts and 2 bars (See
Figure 2). The top bar is a piece of flat metal with a lip
that sits just under the Dr. blade (See Figure 3). There
is also a second bar that sits deeper into the hopper and
is hidden from the top, but the outside contact is visible.
These bars and the circuitry are not mentioned in the
Toner 330g HP-P3005 type (Preliminary weight)
New OPC Drum (P3005 specific)
New Wiper Blade (P3005 specific)
New PCR [Optional]
New mag. Roller [Optional]
New Dr. Blade [Optional]
99% Isopropyl Alcohol
Magnetic Roller Cleaner
Drum Lubricant
Conductive Grease
White Lithium grease
HP LASERJET P3005 TONER CARTRIDGE REMANUFACTURING INSTRUCTIONS
USA Sales: T 800.221.3516 F 888.791.9188
International Sales: T +1 631.590.1040 F +1 631.218.3285
www.summitechnologies.com
Page 3
1) Remove the drum cover by prying the spring loaded
arm, and then carefully pry off the two metal bars
out of their holders. The cover must be in the closed
position in order to pry off the spring loaded arm. Be
careful not to loose the spring! Both of the metal
bars should be removed from the front not the end.
See Figures 4, 5 & 6
2) Note on each end of the cartridge there are small
silver pins. To separate the two halves these pins must
be removed. Like the HP-1200 cartridges, these pins
cannot be pulled out or pushed in from the outside of the
cartridge. Small holes must be but in the top of the
cartridge to allow the pins to be pushed out.
Figures 7 & 8 show the area uncut.
Figure 7
Figure 4
Figure 5
Figure 8
Figure 5
Figure 6
Figure 9
HP LASERJET P3005 TONER CARTRIDGE REMANUFACTURING INSTRUCTIONS
USA Sales: T 800.221.3516 F 888.791.9188
International Sales: T +1 631.590.1040 F +1 631.218.3285
www.summitechnologies.com
Page 4
3) To remove the pins, cut the holes with the Dremmel
tool and a side cutting bit. See Figures 9 & 10
5) Separate the two halves See Figure 13
Figure 13
Figure 10
4) Push the pins out with a small Jewelers screwdriver.
See Figures 11 & 12
6) On the Waste section, take a common screwdriver
and remove the Metal Axle pin/spring loaded cover
located on the right side of the cartridge. This is the
same type of drum axle pin that the 2400 series uses. It
comes out easily enough, but be careful as it seems
somewhat fragile. See Figures 14 & 15
Figure 14
Figure 11
Figure 12
Figure 15
HP LASERJET P3005 TONER CARTRIDGE REMANUFACTURING INSTRUCTIONS
USA Sales: T 800.221.3516 F 888.791.9188
International Sales: T +1 631.590.1040 F +1 631.218.3285
www.summitechnologies.com
Page 5
7) Remove the Photoconductive Drum. See Figure 16
11) Due to the aggressive nature of the toner used in
these cartridges, we recommend that the Wiper Blade
be replaced each cycle. This blade looks very similar to
the HP-4000 & 4100, but is different. A dedicated bladed
is needed here. Lightly coat the new blade with you
preferred lubricant. Replace the Wiper Blade and 2
screws into the cartridge. See Figure 20
Figure 20
Figure 16
8) Remove the Primary Charge Roller (PCR), by prying
it out of the clips on either end. Clean the PCR with your
preferred cleaner and place the aside. See Figure 17
Figure 17
12) Clean the 2 PCR holders, and place a small amount
of conductive grease on the black PCR holder, install
the PCR. See Figure 21
9) Remove the wiper blade and 2 screws. See Fig. 18
Figure 21
Figure 18
13) If you are re-using the drum, check to make sure the
grease on the drum drive gear and hub is clean. If not
remove it and replace. White Lithium grease can be
used here. Install the drum. See Figure 22
NOTE: Be very careful not to damage or distort the thin
Mylar Recovery Blade next to the wiper blade. If this
blade is bent or damaged in any way, it should be
replaced.
10) Clean out any remaining waste toner. Make sure the
foam seals under the wiper blade are clean and not
damaged. See Figure 19
Figure 19
Figure 22
14) Install the spring in the holder as shown, install on
the cartridge and set the tail of the spring so it drops into
its slot. Replace the conductive grease on the end of the
drum axle tip, and install on the cartridge.
See Figures 23 & 24
HP LASERJET P3005 TONER CARTRIDGE REMANUFACTURING INSTRUCTIONS
USA Sales: T 800.221.3516 F 888.791.9188
International Sales: T +1 631.590.1040 F +1 631.218.3285
www.summitechnologies.com
Page 6
Figure 23
Figure 24
Figure 26
18) On the contact side, remove the 2 screws and end
cap. See Figures 27 & 28
Figure 27
15) Place the waste chamber aside.
16) On the supply section, remove the 2 screws from
the right side (Gear side) end cap. See Figure 25
Figure 25
17) Remove the end cap. Note that the gears stay with
it. See Figure 26
Figure 28
19) Remove the magnetic roller assembly from the
cartridge.
See Figure 29
HP LASERJET P3005 TONER CARTRIDGE REMANUFACTURING INSTRUCTIONS
USA Sales: T 800.221.3516 F 888.791.9188
International Sales: T +1 631.590.1040 F +1 631.218.3285
www.summitechnologies.com
Page 7
Figure 33
Figure 29
20) Remove the 2 screws and doctor blade.
See Figure 30
25) Clean the mag roller contact plate on the contact
end cap. Replace the conductive grease. See Figure 34
Figure 30
21) Clean out any remaining toner.
22) There is no fill hole in these cartridges so it must be
filled through the DB slot. Fill the cartridge with 330g
(Preliminary weight) of P3005 toner. See Figure 31
Figure 34
26) Install the end cap and 2 screws. See Figure 35
Figure 35
Figure 31
23) If a seal is available, install it now.
27) Clean the mag roller sleeve with a dedicated mag
roller cleaner.
24) Make sure the doctor blade seals are clean. If they
are coated with toner, clean them lightly with a cotton
swab and alcohol until they are sticky again. Install the
doctor blade and 2 screws. See Figures 32 & 33
28) Install the mag roller. Turn the stationary magnet so
that the keyed end will fit into the end cap. You cannot
see the keyed end so you have to set the magnet by
feel as you turn it. See Figure 36
Figure 32
Figure 36
HP LASERJET P3005 TONER CARTRIDGE REMANUFACTURING INSTRUCTIONS
USA Sales: T 800.221.3516 F 888.791.9188
International Sales: T +1 631.590.1040 F +1 631.218.3285
www.summitechnologies.com
Page 8
29) Install the gear end cap and 2 screws. If the end cap
does not fit, the stationary magnet most likely is not set
correctly. See Figure 37
31) Install the spring in the drum cover arm as shown.
Install the metal bar into the hole and slot. Install the
arm. See Figures 40 & 41
Figure 37
Figure 40
30) Place the 2 halves together. Make sure the springs
are set, and install the 2 pins. See Figures 38 & 39
Figure 38
Figure 41
32) Release the tail of the spring so that the cover
closes. See Figure 42
Figure 39
Figure 42
HP LASERJET P3005 TONER CARTRIDGE REMANUFACTURING INSTRUCTIONS
USA Sales: T 800.221.3516 F 888.791.9188
International Sales: T +1 631.590.1040 F +1 631.218.3285
www.summitechnologies.com
Page 9
4) Press the UP or DOWN arrows until “PRINT
QUALITY” appears on the display.
5) Press the SELECT button.
6) Press the UP or DOWN arrows until “TONER
DENSITY” appears on the display.
7) Press the SELECT button.
8) Press the UP or DOWN arrows until the desired
setting (1-5) appears on the display. “3” is the default
setting
33) Replace the chip. See Figure 43
Printing Test Prints
Figure 43
Running the Cleaning page.
The cleaning page helps keep the fuser free of toner
particles. HP recommends that it be run every time a
new cartridge is installed.
1) Press the MENU button to open the menus.
2) Press the UP or DOWN arrows until “CONFIGURE
DEVICE” appears on the display.
3) Press the SELECT button.
4) Press the UP or DOWN arrows until “PRINT
QUALITY” appears on the display.
5) Press the SELECT button.
6) Press the UP or DOWN arrows until “CREATE
CLEANING PAGE” appears on the display.
7) Press the SELECT button.
8) Load the cleaning page face down in tray 1
9) Press the DOWN arrow until “PROCESS CLEANING
PAGE” appears on the display
10) Press the SELECT button.
Changing the Printers Intensity (Density)
1) Press the MENU button to open the menus.
2) Press the UP or DOWN arrows until “CONFIG
DEVICE” appears on the display.
3) Press the SELECT button.
There are a number of test pages that can be run from
the menu. There is a “Menu map”, “Configuration Page”,
“Supplies Status Page”, “Usage page”, and the “PCL
font list”. The Supplies Status Page or the Configuration
page are the best to use. They have Solid Black, Gray
Scales, and text.
1) Press the MENU button to open the menus.
2) Press the UP or DOWN arrows until “INFORMATION”
appears on the display.
3) Press the SELECT button.
4) Press the UP or DOWN arrows until the page you
wish to print appears on the display.
5) Press the SELECT button.
Cartridge Troubleshooting:
Repetitive defect chart:
96mm Drum
76mm Upper Fuser roller
62mm lower pressure roller
47mm Magnetic roller
43.6mm transfer roller
38mm PCR
A dirty or Bad Primary Charge Roller (PCR): this will
show on the test print as vertical gray streaks down the
page, as a gray background throughout the page, or as
ghosting where part of a previously printed area is
repeated.
HP LASERJET P3005 TONER CARTRIDGE REMANUFACTURING INSTRUCTIONS
USA Sales: T 800.221.3516 F 888.791.9188
International Sales: T +1 631.590.1040 F +1 631.218.3285
www.summitechnologies.com
Page 10
Dirty PCR Connection: This will show as horizontal
dark black bars across the page, or as shading
throughout the page.
50.1 Fuser error. AC Power to the fuser is bad
50.6 Fuser error. Main or sub thermistor bad
Scratched Drum: This is shown by a very thin, perfectly
straight line that runs from the top to the bottom of the
test page.
52.00 Scanner error
Chipped Drum: This will show as a dot or serie of dots
that repeat every 96mm.
59.50 Printer motor error
57.XX fan Error
Light Damaged Drum: This will show up as a shaded
area on the test print that should be white. Again this will
repeat every 96mm.
Worn-Out Drum: This will usually show up as shading
on the right side of the page. It will usually start right
from the edge of the page, and work in towards the
center. The pattern will normally look like tire tracks.
Bad Wiper Blade: This will show as either a gray line
approximately 1/8" thick or as shading across the entire
page. In either case there will be a film of toner on the
drum surface that matches the defect.
Bad Magnetic Roller Bushing: When this round
shaped bushing wears out, gray scale pages, and pages
with heavy graphics will exhibit light and dark line across
the page.
Printer Troubleshooting
Most of the error messages show on the display in plain
English so we will not go into them here. Some of the
more common numeric messages are as follows:
10.10.00 Error. Bad or missing chip
10.32.YY Unauthorized supply. A new non HP supply
has been installed. Press the OK button to clear.
10.XX.YY Supply Memory Error. Bad or missing chip
13.XX.YY paper jams in printer
HP LASERJET P3005 TONER CARTRIDGE REMANUFACTURING INSTRUCTIONS
USA Sales: T 800.221.3516 F 888.791.9188
International Sales: T +1 631.590.1040 F +1 631.218.3285
www.summitechnologies.com
Page 11