1
USER MANUAL
KBU-25S SERIES
LAE controller from Italy
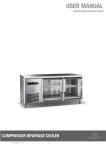
COMPRESSOR WINE CELLAR
www.kingsbottle.com
CONTENTS
CONGRATULATIONS
Congratulations and thank you for choosing
our KingsBottle Wine Cellars . We are sure
you will find your new appliance a pleasure
to use . Before you installing and operating
the wine cellar, we recommend that you
read through the relevant sections of this
manual, which provides a description of
your wine cellar and its functions .
To avoid the risks that are always present
when you use an electric appliance, it is
important that the appliance is installed
correctly and that you read the safety
instructions carefully to avoid misuse and
hazards .
We recommend that you keep this
instruction booklet for future reference and
pass it on to any future owners .
After unpacking the appliance, please check
it is not damaged . If in doubt, do not use
the appliance but contact us or your local
customer care centre
www.kingsbottle.com
TABLE OF CONTENTS
CHAPTER
CONTENTS
PAGE
Part I
Important Safety & Pre-Use Instructions
3
Part II
Diagram & Description of Wine Cellar
4
Part III
Installation Instructions
5-10
Part IV
Operating Your Wine Cellar
11-14
Part V
Temperature Settings
15
Part VI
Layout & Storage
16
Part VII
Removing the Rolling Shelf
17
Part VIII
Technical Data
18
Part IX
Warranty Information
20
2
+/2146#065#('6;+05647%6+105
+/2146#065#('6;+05647%6+105
+/2146#065#('6;+05647%6+105
+/2146#065#('6;+05647%6+105
PART
I IMPORTANT SAFETY INSTRUCTIONS
0LEASE¬READ¬THE¬USER¬MANUAL¬CAREFULLY¬AND¬STORE¬IN¬A¬HANDY¬
5#('6;
5#('6;
SAFETY
4.
Please
read the user manual carefully and store in a handy
0LEASE¬READ¬THE¬USER¬MANUAL¬CAREFULLY¬AND¬STORE¬IN¬A¬HANDY¬
place
for later reference.
0LEASE¬READ¬THE¬USER¬MANUAL¬CAREFULLY¬AND¬STORE¬IN¬A¬HANDY¬
5.
place
for
reference
. The symbols you will see in this
place
forlater
later
reference.
The
symbols
you
will see in this booklet have these meanings:
place
for
later
reference.
0LEASE¬READ¬THE¬USER¬MANUAL¬CAREFULLY¬AND¬STORE¬IN¬A¬HANDY¬
booklet
have these
meanings:
The symbols
symbols
you will
will
see in
in this
this booklet
booklet have
have these
these meanings:
meanings:
The
see
6.
place
for lateryou
reference.
The symbols you will see in this booklet have these meanings:
WARNING
WARNING
WARNING
6FGQQWK@MJGLBGA?RCQGLDMPK?RGMLAMLACPLGLEWMSPNCPQML?JQ?DCRW
This
symbol
indicates information concerning your personal safety
7.
6FGQQWK@MJGLBGA?RCQGLDMPK?RGMLAMLACPLGLEWMSPNCPQML?JQ?DCRW
6FGQQWK@MJGLBGA?RCQGLDMPK?RGMLAMLACPLGLEWMSPNCPQML?JQ?DCRW
WARNING
6FGQQWK@MJGLBGA?RCQGLDMPK?RGMLAMLACPLGLEWMSPNCPQML?JQ?DCRW
CAUTION
CAUTION
CAUTION
6FGQQWK@MJGLBGA?RCQGLDMPK?RGMLMLFMURM?TMGBB?K?EGLERFC
6FGQQWK@MJGLBGA?RCQGLDMPK?RGMLMLFMURM?TMGBB?K?EGLERFC
This
symbol indicates information on how to avoid damaging the
6FGQQWK@MJGLBGA?RCQGLDMPK?RGMLMLFMURM?TMGBB?K?EGLERFC
?NNJG?LAC
?NNJG?LACCAUTION
appliance
?NNJG?LAC
6FGQQWK@MJGLBGA?RCQGLDMPK?RGMLMLFMURM?TMGBB?K?EGLERFC
?NNJG?LAC
TIPS
TIPS &
& INFORMATION
INFORMATION
TIPS & INFORMATION
6FGQQWK@MJGLBGA?RCQRGNQ?LBGLDMPK?RGML?@MSRSQCMDRFC?NNJG?LAC
6FGQQWK@MJGLBGA?RCQRGNQ?LBGLDMPK?RGML?@MSRSQCMDRFC?NNJG?LAC
6FGQQWK@MJGLBGA?RCQRGNQ?LBGLDMPK?RGML?@MSRSQCMDRFC?NNJG?LAC
This
symbol
indicates
tips and information about use of the
TIPS
& INFORMATION
appliance
+/2146#065#('6;+05647%6+105
6FGQQWK@MJGLBGA?RCQRGNQ?LBGLDMPK?RGML?@MSRSQCMDRFC?NNJG?LAC
ENVIRONMENTAL TIPS
ENVIRONMENTAL TIPS
6FGQQWK@MJGLBGA?RCQRGNQ?LBGLDMPK?RGML?@MSRCAMLMKGA?J?LB
6FGQQWK@MJGLBGA?RCQRGNQ?LBGLDMPK?RGML?@MSRCAMLMKGA?J?LB
CAMJMEGA?JSQCMDRFC?NNJG?LAC
ENVIRONMENTAL TIPS
CAMJMEGA?JSQCMDRFC?NNJG?LAC
0LEASE¬READ¬THE¬USER¬MANUAL¬CAREFULLY¬AND¬STORE¬IN¬A¬HANDY¬
This
symbol indicates tips and information about economical and
6FGQQWK@MJGLBGA?RCQRGNQ?LBGLDMPK?RGML?@MSRCAMLMKGA?J?LB
place
for later
reference.
Meanings
symbols
used in this manual are shown below:
CAMJMEGA?JSQCMDRFC?NNJG?LAC
ecological
use of
of the
appliance
Meanings
symbols
used
in this
manual
shown
below:
The
symbolsofyou
will see
in this
booklet
haveare
these
meanings:
6FGQQWK@MJGLBGA?RCQLCTCPRMBMRFGQ
Meanings of symbols used in this manual are shown below:
8.
9.
10.
11.
12.
13.
WARNING
WARNING
TheWARNING
refrigerator must be plugged into its own
The
refrigerator
must or
be50Hz
plugged
intowith
its this
own
Don’t
use
extension
cords
adapter
plugs
WARNING
dedicated
220-240V,
AC
electrical
outlet.
The
refrigerator
must
be
plugged
into
its
own
dedicated
220-240V, 50Hz
50Hz AC
AC electrical
electrical outlet.
outlet.
cellar
. plug must
dedicated
220-240V,
The
be
accessible
wheninto
theitsrefrigerator
is
The
refrigerator
must
be plugged
own
If the
power
cord
is
damaged,
have
it
replaced
by
a
The
plug
must
be
accessible
when
the
refrigerator
is
in
Theposition.
plug must
be accessible
the refrigerator
dedicated
220-240V,
50Hz when
AC electrical
outlet. is
qualified
service technician .
in
position.
Itinisposition.
essential
point iswhen
properly
earthed to is
The
plug
mustthe
bepower
accessible
the refrigerator
Unplug
the cellar
before
cleaning
changing
the light to
It is
is essential
essential
the
power
pointit,
isorproperly
properly
earthed
ground.
Consult
a
qualified
electrician
if earthed
you are unsure.
It
the
power
point
is
to
in
position.
bulb
to
avoid
electric
shock
.
ground. Consult a qualified electrician if you are unsure.
ground.
Consult
a
qualified
electrician
if
you
are
Don’t
use
extension
cords
or
adapter
plugs
with
this
ItDon’t
is unplug
essential
the
power
pointorthe
isadapter
properly
earthed
tounsure.
Never
cellar
bycords
pulling
electricalplugs
cord as
use the
extension
with
this
refrigerator.
Don’t
use
extension
cords
or
adapter
plugs
with
ground.
Consult
a
qualified
electrician
if
you
are
unsure.
thisrefrigerator.
may damage it. Grip the plug firmly and pull straight this
Ifrefrigerator.
cord is cords
damaged,
have itplugs
replaced
by a
outDon’t
. the power
extension
or adapter
with this
If the use
power
cord is damaged,
have it replaced
by a
If
the
power
cord
is
damaged,
have
it
replaced
by a
qualified
service
technician.
Choose
a
location
for
your
cellar
that
isn’t
too
cold
.
The
refrigerator.
qualified service technician.
qualified
service
ambient
temperature
should
be cleaning
above
the
refrigerator
before
it,. or changing
IfUnplug
the room
power
cord technician.
is damaged,
have 50°F
it replaced
by a
Unplug
the refrigerator
before cleaning
it, or changing
Stand
your
cellar
in
a
dry
place
–
avoid
areas
of
high
Unplug
the
refrigerator
before
cleaning
it, or changing
the
light
bulb
to
avoid
electric
shock.
qualified
service
technician.
the light bulb
to avoid
electric shock.
moisture
orunplug
humidity
.avoid
the light
bulb
to
electric
shock.
Never
the
refrigerator
pulling
Unplug
the
refrigerator
before by
cleaning
it,the
orelectrical
changing
Never
unplug
the
refrigerator
by
pulling
the
electrical
Don’t
put
the
cellar
in
frosty
or unprotected
areas
likefirmly
a
Never
unplug
the
refrigerator
by
pulling
the
electrical
cord
as
this
may
damage
it.
Grip
the
plug
and
the
light
bulb
to avoid
electric
shock.
cord
as
this
may
damage
it.
Grip
the
plug
firmly
and
garage
oras
onthis
theout.
verandah
.
cord
may
damage
it.
Grip
the
plug
firmly
and
pull
straight
pull
straight
out.
Never
unplug
the
refrigerator
by
pulling
the
electrical
Keep
cellar out
of direct sunlight .
pullthestraight
out.
Choose
aa location
for
refrigerator
that
too
cord
as this
may
it.
Griporthe
plugisn’t
and
Choose
location
for your
your
refrigerator
that
isn’t
too cold.
cold.
Don’t
locate
the
cellar damage
near
stoves,
fires
heaters
. firmly
Choose
a
location
for
your
refrigerator
that
isn’t
too
cold.
The
ambient
room
temperature
should
be
above
pull
straight
out.
Theinstalled
ambientcorrectly,
room temperature
should be above 10°C.
10°C.
When
your cellar should:
The ambient
room temperature
should
be
above
10°C.
Stand
your
refrigerator
in
arefrigerator
place
––for
avoid
areas
a location
foratyour
that
isn’t
cold.
Standadequate
your
refrigerator
in back
a dry
dryand
place
avoid
areas
Have
space
the
sides
air too
• Choose
Stand
your
refrigerator
in a dry
place
avoid 10°C.
areas
of
high
moisture
humidity.
The
ambient
roomor
temperature
should
be–above
of WARNING
high
moisture
or
humidity.
circulation.
of high
moisture
or humidity.
Don’t
put
refrigerator
in
frosty
or
areas
Be
to
the
surrounding
.unprotected
the
refrigerator
in
frosty
or unprotected
areas
yourthe
refrigerator
acupboards
dry
place
– avoid
• Stand
Thealigned
refrigerator
must beinplugged
into
its
own areas
Don’t
put
the
refrigerator
in
frosty
or
unprotected
like
a
garage
or
on
the
verandah.
Have
doors
that
will
self-close
from
a
partially
open
garage
or
on
the
verandah.
high
moisture
or
humidity.
• of
dedicated 220-240V, 50Hz AC electrical outlet.areas
like a the
garage
or on the
verandah.
position
Keep
refrigerator
out
of
direct
sunlight.
refrigerator
out in
of frosty
direct
sunlight.
Don’t
put must
the
refrigerator
unprotected
areas
The plug
be accessible
whenor
the
refrigerator
is
5#('6;
Keep
the refrigerator
outverandah.
of direct sunlight.
like
a locate
garage
orrefrigerator
on the
in
position.
Don’t
the
near
locate
the
refrigerator
near stoves,
stoves, fires
fires or
or heaters.
heaters.
locate
the power
refrigerator
near
stoves,
fires or heaters.
Keep
the
refrigerator
out
of
direct
sunlight.
ItDon’t
is essential
the
point
is properly
earthed
to
installed
correctly,
your
refrigerator
should:
When
installed
correctly,
your
refrigerator
should:
When
installed
correctly,
your
refrigerator
should:
ground.
Consult
a
qualified
electrician
if fires
you
are
unsure.
Have
adequate
space
at
the
back
and
sides
–
Have
adequate
space
at
the
back
and
sides
Don’t
locate
the
refrigerator
near
stoves,
or
heaters.
6FGQQWK@MJGLBGA?RCQLCTCPRMBMRFGQ
BEFORE USING YOUR WINE CELLAR
– use
Have
adequate
space
at
the
back
and
sides
WARNING
air
circulation
(refer
to
page
9).
Don’t
extension
cords
or
adapter
plugs
with
this
for
air
circulation
(refer
to
page
9).
1. Remove
exterior correctly,
and interioryour
packing.
Whenthe
installed
refrigerator
6FGQQWK@MJGLBGA?RCQ?JU?WQBMRFGQ
6FGQQWK@MJGLBGA?RCQLCTCPRMBMRFGQ
for
air
circulation
(refer
to
page
9). should:
–
Be
aligned
to
the
surrounding
cupboards.
TO
REDUCE
THE RISK OF FIRE, ELECTRICAL SHOCK,
refrigerator.
Be
aligned
to
the
surrounding
cupboards.
6FGQQWK@MJGLBGA?RCQ?JU?WQBMRFGQ
6FGQQWK@MJGLBGA?RCQGLDMPK?RGMLAMLACPLGLEWMSPNCPQML?JQ?DCRW
2. Before
connecting
the
wine
cellar
to
the
power
source,
let
–– Have
adequate
at the back
and sides
Be
aligned
tothat
thespace
surrounding
cupboards.
Have
doors
will
self-close
from
a partially
OR INJURY WHEN USING YOUR APPLIANCE, FOLLOW
Have
doors
will
self-close
from
If the–upright
power
cord
isthat
damaged,
have
it9).
replaced
by a
it stand
approximately
24
hours.
This
willa partially
for
airfor
circulation
(refer
to
page
6FGQQWK@MJGLBGA?RCQ?JU?WQBMRFGQ
–
Have
doors
that
will
self-close
from
a partially
open
position.
THESE BASIC PRECAUTIONS:
open
position.
qualified
service
technician.
reduce
possibility
of
a the
malfunction
in the cupboards.
cooling
–theBe
aligned
to
surrounding
open position.
CAUTION
1. Read
all instructions before using the wine cellar.
WARNING
system
handling
transportation.
–from
Have
doorsduring
that will
self-close
from
Unplug
the
refrigerator
before
cleaning
it, aorpartially
changing
WARNING
2.
DANGER or WARNING: Risk of child entrapment.
s¬¬))F¬PRESSURISED¬AEROSOL¬CONTAINERS¬BEAR¬THE¬WORD¬
F¬PRESSURISED¬AEROSOL¬CONTAINERS¬BEAR¬THE¬WORD¬
6FGQQWK@MJGLBGA?RCQGLDMPK?RGMLMLFMURM?TMGBB?K?EGLERFC
3. Clean
interior
surface
withelectric
lukewarm
water using a
open
the the
light
bulbposition.
to avoid
shock.
s¬¬
s¬¬‘flammable’
)‘flammable’
F¬PRESSURISED¬AEROSOL¬CONTAINERS¬BEAR¬THE¬WORD¬
Child
entrapment and/or
and suffocation
not only
problems of the
and/or
a small
smallareflame
flame
symbol,
?NNJG?LAC
softNever
cloth.
WARNING
a
symbol,
WARNING
unplug the refrigerator by pulling the electrical
WARNING
‘flammable’
and/or
a appliances
small
past.
or abandoned
aresymbol,
still dangerous…
doJunked
not store
store
them inside
inside
any flame
refrigerator
or
WARNING
do
not
them
any
refrigerator
or
4#4'(4+)'4#069#40+0)
cord
as
this may damage it. Grip the plug firmly and
s¬¬
)
F¬PRESSURISED¬AEROSOL¬CONTAINERS¬BEAR¬THE¬WORD¬
4#4'(4+)'4#069#40+0)
do
not store
them
inside
any
or
even
if they
will
“just
sit so
in
the
garage
for
a fewan
days”.
freezer.
you
do
so
you
mayrefrigerator
cause
an
explosion.
freezer.
IfIf you
do
you
may
cause
explosion.
4#4'(4+)'4#069#40+0)
This appliance
appliance
may
contain aa small
small quantity
quantity of
of environmentally
environmentally
pull
straight
out.contain
‘flammable’
and/or
a
small
flame
symbol,
This
may
WARNING
TIPSIfyou&
INFORMATION
freezer.
you
do away
so you
may
an explosion.
s¬¬7
7Before
HEN¬YOU¬DISPOSE¬OF¬YOUR¬OLD¬REFRIGERATORS¬AND¬FREEZERS¬
3.
throw
your
old cause
wine cellar:
s¬¬
HEN¬YOU¬DISPOSE¬OF¬YOUR¬OLD¬REFRIGERATORS¬AND¬FREEZERS¬
This
appliance
may
contain
a
small
quantity
of
environmentally
friendly,
but
flammable,
non-synthetic
R600a
refrigerant:
not
store
them
inside
any refrigerator
or if they get
Choose
a location non-synthetic
for your refrigerator
isn’t too cold.
friendly,
but flammable,
R600athat
refrigerant:
s¬¬do
7
remove
any
doors.
Children
can suffocate
suffocate
Take
off the
door.
4#4'(4+)'4#069#40+0)
• HEN¬YOU¬DISPOSE¬OF¬YOUR¬OLD¬REFRIGERATORS¬AND¬FREEZERS¬
6FGQQWK@MJGLBGA?RCQRGNQ?LBGLDMPK?RGML?@MSRSQCMDRFC?NNJG?LAC
remove
doors.
if they get
friendly,
but
flammable,
non-syntheticshould
R600a
refrigerant:
s¬¬%%NSURE¬THAT¬THE¬TUBING¬OF¬THE¬REFRIGERANT¬CIRCUIT¬IS¬NOT¬
NSURE¬THAT¬THE¬TUBING¬OF¬THE¬REFRIGERANT¬CIRCUIT¬IS¬NOT¬
freezer.
Ifany
you
do soChildren
you
maycan
cause
an explosion.
The
ambient
room
temperature
be
above
10°C.
s¬¬
remove
any
doors.
Children
can
suffocate
if
they
get
trapped
inside.
Leave
the
Shelves
in
pieces
so
that
children
may
not
This
applianceduring
may contain
a small quantity
of environmentally
•
s¬¬%damaged
NSURE¬THAT¬THE¬TUBING¬OF¬THE¬REFRIGERANT¬CIRCUIT¬IS¬NOT¬
trapped
inside.
transportation
and installation.
s¬¬
HEN¬YOU¬DISPOSE¬OF¬YOUR¬OLD¬REFRIGERATORS¬AND¬FREEZERS¬
damaged
during
transportation
and
installation.
Stand
your
refrigerator
in
a
dry
place
–
avoid
areas
trapped
s¬¬7
4HIS¬APPLIANCE¬CONTAINS¬INSULATION¬FORMED¬WITH¬mAMMABLE¬
climbinside.
inside easily.
friendly,
but flammable,
non-syntheticand
R600a
refrigerant:
damaged
during transportation
installation.
s¬4HE¬ROOM¬FOR¬INSTALLING¬APPLIANCE¬MUST¬BE¬AT¬LEAST¬M¬PER¬
s¬¬remove
4HIS¬APPLIANCE¬CONTAINS¬INSULATION¬FORMED¬WITH¬mAMMABLE¬
any
doors.
Children
if they
get
s¬4HE¬ROOM¬FOR¬INSTALLING¬APPLIANCE¬MUST¬BE¬AT¬LEAST¬M¬PER¬
gases.
Avoid
safetycan
hazards
carefully
of high moisture or humidity.
s¬¬4blowing
HIS¬APPLIANCE¬CONTAINS¬INSULATION¬FORMED¬WITH¬mAMMABLE¬
ENVIRONMENTAL
TIPS
4.
Never
allow
children
to operate,
playsuffocate
with,by
or crawl
inside
s¬¬
%
NSURE¬THAT¬THE¬TUBING¬OF¬THE¬REFRIGERANT¬CIRCUIT¬IS¬NOT¬
8g of refrigerant. The amount of refrigerant charged in the
s¬4HE¬ROOM¬FOR¬INSTALLING¬APPLIANCE¬MUST¬BE¬AT¬LEAST¬M¬PER¬
blowing inside.
gases. Avoid safety hazards by carefully
trapped
+/2146#065#('6;+05647%6+105
8gDon’t
ofWARNING
refrigerant.
The
amount in
of frosty
refrigerant
charged in areas
the
disposing
of thisAvoid
appliance.
blowing
gases.
safety hazards by carefully
the appliance.
putcan
theberefrigerator
unprotected
damaged
during
transportation
and or
installation.
6FGQQWK@MJGLBGA?RCQRGNQ?LBGLDMPK?RGML?@MSRCAMLMKGA?J?LB
appliance
found
on the
plate
on the appliance.
8g
of refrigerant.
The
amount
ofrating
refrigerant
charged
in the
disposing
of
this
appliance.
s¬¬4disposing
HIS¬APPLIANCE¬CONTAINS¬INSULATION¬FORMED¬WITH¬mAMMABLE¬
appliance
can
be
found
on
the
rating
plate
on
the
appliance.
of
this
appliance.
5.
Never
clean
appliance
parts
with
flammable
fluids.
The
like a garage
on the
s¬4HE¬ROOM¬FOR¬INSTALLING¬APPLIANCE¬MUST¬BE¬AT¬LEAST¬M¬PER¬
CAMJMEGA?JSQCMDRFC?NNJG?LAC
s¬+EEP¬VENTILATION¬OPENINGS¬IN¬THE¬APPLIANCE¬ENCLOSURE¬OR¬
appliance
can beorfound
on verandah.
the
rating into
plateitsonown
the appliance.
blowing
gases.
Avoid
safety or
hazards
by carefully
The refrigerator
must be
plugged
s¬+EEP¬VENTILATION¬OPENINGS¬IN¬THE¬APPLIANCE¬ENCLOSURE¬OR¬
fumes can
create
a fire hazard
explosion.
8g
of refrigerant.
The amount
ofofdirect
refrigerant
charged in the
in
the
built-in
structure,
clear
obstruction.
Keep
the
refrigerator
out
of
sunlight.
s¬+EEP¬VENTILATION¬OPENINGS¬IN¬THE¬APPLIANCE¬ENCLOSURE¬OR¬
disposing
of this
appliance.
220-240V,
50Hzobstruction.
AC electrical outlet.
in dedicated
the built-in
6.
Do not store
in the
vicinity
appliance.
Do notbelow:
appliance
canstructure,
be found clear
on theof
rating
plate on the appliance.
Meanings
of symbols
used of
in any
thisother
manual
are shown
s¬$O¬NOT¬USE¬MECHANICAL¬DEVICES¬OR¬OTHER¬MEANS¬TO¬
in Don’t
the built-in
structure,
clear
ofnear
obstruction.
0LEASE¬READ¬THE¬USER¬MANUAL¬CAREFULLY¬AND¬STORE¬IN¬A¬HANDY¬
locate
the
refrigerator
stoves,
fires or heaters.
The
plug
must
be
accessible
when
thethan
refrigerator
s¬$O¬NOT¬USE¬MECHANICAL¬DEVICES¬OR¬OTHER¬MEANS¬TO¬
store near gasoline or any other flammable vapors. The
s¬+EEP¬VENTILATION¬OPENINGS¬IN¬THE¬APPLIANCE¬ENCLOSURE¬OR¬
accelerate
the
defrosting
process,
other
those is
s¬$O¬NOT¬USE¬MECHANICAL¬DEVICES¬OR¬OTHER¬MEANS¬TO¬
place for later reference.
in
position.
When
installed
correctly,
your
refrigerator
should:
accelerate
the
defrosting
process,
other
than
those
fumes
can
create
a
fire
hazard
or
explosion.
in
the built-inthe
structure,
clear
of obstruction.
recommended
by the manufacturer.
6FGQQWK@MJGLBGA?RCQLCTCPRMBMRFGQ
accelerate
defrosting
process,
other than those
The symbols
you will see in this booklet have these meanings:
– Have the
adequate
space
the back
and sides
recommended
by
It is essential
power
point isatproperly
earthed
to 3
s¬$O¬NOT¬USE¬MECHANICAL¬DEVICES¬OR¬OTHER¬MEANS¬TO¬
s¬4HE¬ROOM¬FOR¬INSTALLING¬APPLIANCE¬MUST¬BE¬AT¬LEAST¬M
recommended
by the
the manufacturer.
manufacturer.
3
for
air
circulation
(refer
to
page
9).
s¬4HE¬ROOM¬FOR¬INSTALLING¬APPLIANCE¬MUST¬BE¬AT¬LEAST¬M
3
ground.
Consult
a
qualified
electrician
if
you
are
unsure.
accelerate
the
defrosting
process,
other
than
those
per
8g
of
refrigerant.
The
amount
of
refrigerant
charged
6FGQQWK@MJGLBGA?RCQ?JU?WQBMRFGQ
s¬4HE¬ROOM¬FOR¬INSTALLING¬APPLIANCE¬MUST¬BE¬AT¬LEAST¬M
–
Be
aligned
to
the
surrounding
cupboards.
per
8g
of
refrigerant.
The
amount
of
refrigerant
charged
in
the
appliance
can
be
found
on
the
rating
plate
on
recommended
by
the
manufacturer.
WARNING
Don’t
use
extension
cords
or
adapter
plugs
with
this
per 8g of refrigerant. The amount of refrigerant charged
– Have doors
will self-close
from aplate
partially
in
the
appliance
can
be
on
on
therefrigerator.
appliance.
s¬4HE¬ROOM¬FOR¬INSTALLING¬APPLIANCE¬MUST¬BE¬AT¬LEAST¬M
in
the
appliance
can that
be found
found
on the
the rating
rating
plate
on3
6FGQQWK@MJGLBGA?RCQGLDMPK?RGMLAMLACPLGLEWMSPNCPQML?JQ?DCRW
1.
The cellar must be plugged into its own dedicated
open
position.
the
appliance.
per
refrigerant.
amount have
of refrigerant
charged
theIf 8g
appliance.
110-115V, 50/60Hz AC electrical outlet .
the of
power
cord isThe
damaged,
it replaced
by a
in the
appliance
cantechnician.
be found on the rating plate on
2. TheWARNING
plug must be accessible when the cellar is in
qualified
service
the appliance.
CAUTION
s¬¬)F¬PRESSURISED¬AEROSOL¬CONTAINERS¬BEAR¬THE¬WORD¬
position
.
Unplug the refrigerator before cleaning it, or changing
‘flammable’
and/or
a
small
flame
symbol,
3.
It is essential the power point is properly earthed to
6FGQQWK@MJGLBGA?RCQGLDMPK?RGMLMLFMURM?TMGBB?K?EGLERFC
theWARNING
light bulb to avoid electric shock.
doground
not store
themainside
any
refrigerator
. Consult
qualified
electrician
if you or
are unsure .
?NNJG?LAC
4#4'(4+)'4#069#40+0)
Never unplug the refrigerator by pulling the electrical
freezer. If you do so you may cause an explosion.
This appliance
may
contain
a small
quantity
environmentally
cord as this
may
damage
it. Grip
the of
plug
firmly and
s¬¬7HEN¬YOU¬DISPOSE¬OF¬YOUR¬OLD¬REFRIGERATORS¬AND¬FREEZERS¬
friendly,
but
flammable,
non-synthetic R600a refrigerant:
pull
straight
out.
TIPSany
& INFORMATION
remove
doors. Children can suffocate if they get
s¬¬%NSURE¬THAT¬THE¬TUBING¬OF¬THE¬REFRIGERANT¬CIRCUIT¬IS¬NOT¬
Choose a location for your refrigerator that isn’t too cold.
trapped
inside.
6FGQQWK@MJGLBGA?RCQRGNQ?LBGLDMPK?RGML?@MSRSQCMDRFC?NNJG?LAC
damaged
during
transportation
installation.
The ambient
room
temperature and
should
be above 10°C.
s¬¬4HIS¬APPLIANCE¬CONTAINS¬INSULATION¬FORMED¬WITH¬mAMMABLE¬
s¬4HE¬ROOM¬FOR¬INSTALLING¬APPLIANCE¬MUST¬BE¬AT¬LEAST¬M¬PER¬
Stand
your
refrigerator
in
a
dry
place
– avoid areas
blowing gases. Avoid safety hazards by carefully
8gofofhigh
refrigerant.
Theoramount
of refrigerant charged in the
moisture
humidity.
ENVIRONMENTAL
TIPS
disposing of this appliance.
appliance can be found on the rating plate on the appliance.
Don’t put the refrigerator in frosty or unprotected areas
6FGQQWK@MJGLBGA?RCQRGNQ?LBGLDMPK?RGML?@MSRCAMLMKGA?J?LB
s¬+EEP¬VENTILATION¬OPENINGS¬IN¬THE¬APPLIANCE¬ENCLOSURE¬OR¬
a garage
or on clear
the verandah.
CAMJMEGA?JSQCMDRFC?NNJG?LAC
www.kingsbottle.com
3
in like
the built-in
structure,
of obstruction.
Keep the refrigerator out of direct sunlight.
s¬$O¬NOT¬USE¬MECHANICAL¬DEVICES¬OR¬OTHER¬MEANS¬TO¬
Meanings of symbols used in this manual are shown below:
accelerate
the the
defrosting
process,
Don’t locate
refrigerator
near other
stoves,than
firesthose
or heaters.
recommended by the manufacturer.
5#('6;
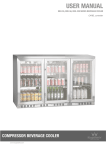
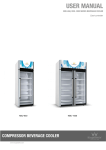
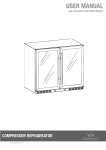
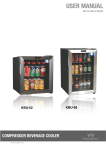
COMPRESSOR WINE CELLAR
FEATURES
PART II
DIAGRAM & DESCRIPTION OF WINE CELLAR
FREE STANDING SINGLE ZONE WINE CELLAR: KBU-25S SERIES
1 Control board
2 Housing
3 Ventilation DC Fan
4 Sliding shelf
5 Front grill
6 Door hinge
7 Controller
8 Glass Door
9 Adjustable stand feet
YOUR WINE CELLAR ALSO INCLUDES THE FOLLOWING:
• Instruction manual
• Two keys
• Top and bottom hinges , also screws for changing the door hinge
Note: Above diagram and description is for SINGLE ZONE WINE CELLAR MODELS: KBU-25S series
www.kingsbottle.com
4
INSTALLATION
PART III
INSTALLATION INSTRUCTIONS
CUTOUT DIMENSION ILLUSTRATED
KBU-25S SERIES
15.01”W x 24.03”D x 34.87”H
( 381W x 610D x 885H mm )
Included stand height 0.98” (25mm)
MODEL
WIDTH
DEPTH
HEIGHT
INCLUDED
STAND
HEIGHT
KBU-25S
15.01”
381mm
24.03”
610mm
34.87”
885mm
0.98”
25mm
NOTE
Free standing model.
If you need to use as BUILT-IN
installation purpose, recommend
to consider our other built-in
models. Or, at least 1.5” tor each
side to keep air flow exchange
easily, specially at rear side
COMPRESSOR WINE CELLAR
www.kingsbottle.com
5
INSTALLATION
PART III
INSTALLATION INSTRUCTIONS
A. GENERAL INSTALLATION INSTRUCTIONS
1. This appliance is designed as free standing unit.
2. Place your wine cellar on a flat, solid floor that is strong enough to support it when it is fully loaded. To level your wine cellar, adjust
the leveling leg at the bottom of the wine cellar
3. When moving your wine cellar, please do not incline it more than 45 degrees.
4. Locate the wine cellar away from direct sunlight and sources of heat (stove, heater, radiator, etc.). Direct sunlight and heat sources
may increase electrical consumption. Extreme cold ambient temperatures may also cause the unit to perform improperly.
5. Avoid locating the unit in damp areas.
6. Plug the wine cellar into an exclusive, properly installed and grounded wall outlet. Do not under any circumstances cut or remove the
third (ground) prong from the power cord. Any questions concerning power and/or electrical grounding should be directed to a
certified electrician or authorized products service center.
B. HANDLE INSTALLATION
Step 1 Take out the handle from the cellar and remove the plastic bag, also remember 2pcs of screw are packed inside.
Step 2
Pull out a bit of rubber gasket from the back side of the hole.
Step 3 Insert the screw through the hole and connect with the handle
www.kingsbottle.com
6
INSTALLATION
PART III
INSTALLATION INSTRUCTIONS
C. INSTALLATION OF FRONT GRILL
D. INSTALLATION OF BUILT-IN CELLAR (MINIMUM CAVITY SPACE REQUIRED)
The cutout dimension illustrated in figure (D) allows for door swing and access to the pull-out shelves when installed as a built-in appliance.
If installing between frameless cabinets, a 1.5” wide filler strip or side panel may be needed on hinge side.
The filler strip will act as a spacer between the appliance case and adjacent cabinet door swing.
(mini
)
+ 1.5” (mini)
”
+ 1.5
+ 1.5” (m
ini)
Figure D
Note:
This model is designed as free standing unit. If you want to use as built-in installation, it’s necessary to
consider leaving at least 1.5” for each side, specially consider the air flow exchange at the rear side. Also
need to consider door swing, etc. Failure to allow minimum clearance will void all warranties.
Failure to allow minimum clearances will void all warranties
COMPRESSOR WINE CELLAR
www.kingsbottle.com
7
INSTALLATION
PART III
INSTALLATION INSTRUCTIONS
E. REVERSING THE DOOR SWING OF YOUR APPLIANCE
• The unit is delivered to you with the door opening from the left side (hinge on right side)
• The door of this appliance is capable of opening from either the left or right side. To reverse the door swing of your cooler and open
from the right side, please follow the instructions and diagram as follows
• There is a extra set of hinges in the plastic bag which contains instruction manual
INSTRUCTION OF REVERSING DOOR FOR KBU-120 /170 SERIES
5#('6;
+/2146#065#('6;+05647%6+105
WARNING
The refrigerator must be plugged into its own
dedicated 220-240V, 50Hz AC electrical outlet.
0LEASE¬READ¬THE¬USER¬MANUAL¬CAREFULLY¬AND¬STORE¬IN¬A¬HANDY¬
The plug must be accessible when the refrigerator is
place for later reference.
in position.
The symbols you will see in this booklet have these meanings:
It is essential the power point is properly earthed to
ground. Consult a qualified electrician if you are unsure.
WARNING
Don’t use extension cords or adapter plugs with this
• Before you begin to reverse the door, it is recommended to tape downrefrigerator.
shelves to avoid movement during the process
6FGQQWK@MJGLBGA?RCQGLDMPK?RGMLAMLACPLGLEWMSPNCPQML?JQ?DCRW
• It is recommended to take out the wine bottles from the cellar before reversing
the door
If the power
cord is damaged, have it replaced by a
qualified service technician.
CAUTION
Unplug the refrigerator before cleaning it, or changing
6FGQQWK@MJGLBGA?RCQGLDMPK?RGMLMLFMURM?TMGBB?K?EGLERFC
the light bulb to avoid electric shock.
?NNJG?LAC
Never unplug the refrigerator by pulling the electrical
cord as this may damage it. Grip the plug firmly and
pull straight out.
TIPS & INFORMATION
Choose a location for your refrigerator that isn’t too cold.
6FGQQWK@MJGLBGA?RCQRGNQ?LBGLDMPK?RGML?@MSRSQCMDRFC?NNJG?LAC
The ambient room temperature should be above 10°C.
Stand your refrigerator in a dry place – avoid areas
of high moisture or humidity.
ENVIRONMENTAL TIPS
Don’t put the refrigerator in frosty or unprotected areas
6FGQQWK@MJGLBGA?RCQRGNQ?LBGLDMPK?RGML?@MSRCAMLMKGA?J?LB
like a garage or on the verandah.
CAMJMEGA?JSQCMDRFC?NNJG?LAC
www.kingsbottle.com
8
Keep the refrigerator out of direct sunlight.
Meanings of symbols used in this manual are shown below:
Don’t locate the refrigerator near stoves, fires or heaters.
When installed correctly, your refrigerator should:
6FGQQWK@MJGLBGA?RCQLCTCPRMBMRFGQ
INSTALLATION
PART III
INSTALLATION INSTRUCTIONS
INSTRUCTION OF REVERSING DOOR FOR KBU-50 SERIES
WARNING
• Before you begin to reverse the door, it is recommended to tape down shelves to avoid movement during the process
• It is recommended to take out the wine bottles from the cellar before reversing the door
COMPRESSOR WINE CELLAR
www.kingsbottle.com
9
INSTALLATION
PART III
INSTALLATION INSTRUCTIONS
F. INSTALLING YOUR WINE COOLER
1. Move the appliance into its final position .
2. If the appliance is not tilting back as described earlier, minor adjustments can be made to the leveling legs.
3. Compare the alignment of the appliance to the surrounding cupboard . The top of the appliance should be level from side to side
(see diagram below) .
4. If the appliance now rocks from one corner to the opposite rear corner, this means that the floor is uneven. You may need to put
some packing under the ridge to the rear of the appliance . You could use thin pieces of solid material such as thin board, vinyl floor
tiles or laminate .
5. You may now need to fine tune the installation by repeating steps 2, 3 and 4 .
6. Wipe off any dust that has accumulated during shipping and clean following the directions in Part VIII ( Care & Maintenance)
7. Plug the appliance into the power point. Don’t use a double adaptor or extension cord .
8. It is recommended that you let the appliance for an hour or two before you put any wine in it . This will confirm that it is operating
correctly and make the conditions appropriate for wine storage .
Congratulations! You have successfully installed your cellar/refrigerator/freezer
DOOR LOCK
This unit comes with an optional key lock. The keys are located inside the plastic bag that contains the user manual. To unlock the door,
insert the key into the lock and turn counterclockwise. To lock the door, simply reverse the operation making sure the metal pin is
engaged completely. Then remove the key and place it is a secure place for safekeeping.
www.kingsbottle.com
10
OPERATION
PART IV
OPERATING YOUR WINE CELLAR
This wine cellar series comes with LAE controller from Italy, one of the best quality supplier of controllers. Before using your wine cellar, please
read this instruction carefully .
OPERATION
DISPLAY
During normal operation, the display shows either the temperature measured or one of the following indications:
DEF Defrost in progress
HI
Room high temperature alarm
Recovery after defrost
LO
Room low temperature alarm
OFF Controller in stand-by
E1
Probe T1 failure
E2
Probe T2 failure
REC
CL Condenser clean warning
DO Door open alarm
INFO MENU
The information available in this menu is:
T1 Instant probe 1 temperature
TLO
Minimum probe 1 temperature recorded
T2 Instant probe 2 temperature
CND
Compressor working weeks
LOC
Keypad state lock
THI
Maximum probe 1 temperature
recorded
COMPRESSOR WINE CELLAR
www.kingsbottle.com
11
OPERATION
Access to menu and information displayed.
•
Press and immediately release button
•
With button
or
•
Press button
to display value.
.
select the data to be displayed.
• To exit from the menu, press button
Reset of THI, TLO, CND recordings
•
With button
•
Display the value with button
•
While keeping button
or
or wait for 10 seconds.
select the data to be reset.
.
pressed, use button
SETPOINT (display and modification of desired temperature value)
•
Press button
•
By keeping button
SPH limit).
•
When button
for at least half second to display the setpoint value.
pressed, use button
to set the desired value (adjustment is within the minimum SPL and the maximum
or
is released, the new value is stored.
STAND-BY
Button
, when pressed for 3 seconds, allows the controller to be put on a stand-by or output control to be resumed (with SB=YES only).
KEYPAD LOCK
The keypad lock avoids undesired, potentially dangerous operations, which might be attempted when the controllers is operating in a public place. In the INFO
menu, set parameter LOC=YES to inhibit all functions of the buttons. To resume normal operation of keypad, adjust setting so that LOC=NO.
SELECTION OF SECOND PARAMETER GROUP
It’s possible to select control parameters between two different pre-programmed groups, in order for the fundamental control parameters to be adapted quickly to
changing needs. With IISM=MAN, changeover from Group I to Group II takes place manually by pressing button
for 2 seconds. The activation of Group
II is signalled by the lighting up of the relevant LED on the controller display. If IISM=NON, switchover to group II is inhibited.
DEFROST
Timed defrost. Defrosting starts automatically when necessary time has elapsed to obtain the defrosting frequency set with DFR (IIDF). For example, with DFR=4
defrosting occurs once every 6 hours. The internal timer is set to zero when power is applied to the controller and at each subsequent defrost start. When the
controller is put on a standby, the accumulated time count is “frozen” (is not incremented).
Manual defrost. Defrosting may also be induced manually by keeping the button
pressed for 2 seconds.
Defrost type. Once defrost has started, Compressor and Defrost outputs are controlled according to the parameters DTY and OAU. The AUX output is associated
to defrost function with OAU=DEF exclusively.
If FID=YES the evaporator fans are active all through defrost.
Defrost termination. Defrost lasts as long as time DTO but, if the evaporator probe has been enabled (T2=YES) and temperature DLI is achieved before this
time elapses, defrost will be terminated in advance.
Resuming thermostatic cycle. When defrost is over, if DRN is greater than 0, all outputs will remain off for DRN minutes, in order for the ice to melt completely
and the resulting water to drain. Moreover, if probe T2 is active (T2=YES), the fans will re-start when the evaporator gets to a temperature lower than FDD; Vice
versa, if such condition does not occur after 4 minutes following defrost termination, the fans will be switched on anyway.
Caution: if C-H=HEA all defrost functions are inhibited; if DFR=0 the timed defrost function is excluded; during defrost, the high temperature alarm is
inhibited.
CONFIGURATION PARAMETERS
•
To get access to the parameter configuration menu, press button
•
With button
•
Press button
•
By keeping button
•
When button
•
To exit from the setup, press button
or
+
for 5 seconds.
select the parameter to be modified.
to display the value.
pressed, use button
or
to set the desired value.
is released, the newly programmed value is stored and the following parameter is displayed.
www.kingsbottle.com
or wait for 30 seconds.
12
OPERATION
PAR
SCL
RANGE
1°C;
2°C;
°F
DESCRIPTION
Readout scale.
1°C (with INP=SN4 only): measuring range -50/-9.9 … 19.9/80°C
2°C : measuring range -50 … 120°C
°F : measuring range -55 … 240°F
Preset Value
°F
Caution: upon changing the SCL value, it is then absolutely necessary to re-configure the parameters
relevant to the absolute and relative temperatures (SPL, SPH, SP, ALA, AHA, etc..).
SPL
-50..SPH
Minimum limit for SP setting.
41
SPH
SPL.120°
Maximum limit for SP setting.
64
SP
SPL... SPH
Setpoint (value to be maintained in the room).
59
C-H
REF; HEA
Refrigerating (REF) or Heating (HEA) control mode.
HYS
1...10°
OFF/ON thermostat differential
REF
5
Refrigerating control (C-H=REF)
Heating control (C-H=HEA)
CRT
0...30min
Compressor rest time. The output is switched on again after CRT minutes have elapsed since the
previous switchover. We recommend to set CRT=03 with HYS<2.0°.
6
CT1
0...30min
Thermostat output run when probe T1 is faulty. With CT1=0 the output will always remain OFF.
3
CT2
0...30min
Thermostat output stop when probe T1 is faulty. With CT2=0 and CT1>0 the output will always be ON.
Example: CT1=4, CT2= 6: In case of probe T1 failure, the compressor will cycle 4 minutes ON and 6
minutes OFF.
6
6
CSD
0..30min
Compressor stop delay after the door has been opened (active only if DS=YES).
DFR
0... 24(1/24h)
Defrost frequency expressed in cycles/24 hours.
DLI
-50...120°
Defrost end temperature.
39
DTO
1...120min
Maximum defrost duration.
20
DTY
OFF;
ELE;
GAS
Defrost type
OFF: off cycle defrost (Compressor and Heater OFF).
DRN
0...30min
Pause after defrost (evaporator drain down time).
DDY
0...60min
FID
FDD
NO/YES
-50...120°
Display during defrost. If DDY=0 during defrost the temperature continues to be displayed. If DDY > 0,
during defrost the display shows DEF, and at the end of defrost it shows REC for DDY minutes.
Fans active during defrost.
Evaporator fan re-start temperature after defrost.
FTC
NO/YES
Optimised fan control enabling. With FTC = NO the fans remain on all the time.
ELE: electric defrost* (Compressor OFF and Heater ON).
GAS: hot gas defrost* (Compressor and Heater ON).
* The defrost output is active if only OAU=DEF.
Fig. 2 Optimised fan control (FTC=YES)
FT1
0...180sec
Fan stop delay after compressor stop. See Fig. 2.
FT2
0...30min
Timed fan stop. With FT2=0 the fans remain on all the time.
FT3
0...30min
Timed fan run. With FT3=0, and FT2 > 0, the fans remain off all the time.
3
OFF
0
1
YES
32
YES
180
1
1
COMPRESSOR WINE CELLAR
www.kingsbottle.com
13
OPERATION
PAR
ATM
RANGE
NON;
ABS;
REL
DESCRIPTION
Preset Value
Alarm threshold management.
NON: all temperature alarms are inhibited (the following parameter will be ADO).
ABS: the values programmed in ALA and AHA represent the real alarm thresholds.
REL: the values programmed in ALR and AHR are alarm differentials referred to SP and SP+HY.
ABS
Temperature alarm with relative thresholds, refrigerating control (ATM=REL, CH=REF).
ALA
-50... 120°
Temperature alarm with relative thresholds, heating control (ATM=REL, CH=HEA).
Low temperature alarm threshold.
37
AHA
-50... 120°
High temperature alarm threshold.
68
ALR
-12... 0°
Low temperature alarm differential. With ALR=0 the low temperature alarm is excluded.
AHR
0... 12°
High temperature alarm differential. With AHR=0 the high temperature alarm is excluded.
ATD
0... 120min
Delay before alarm temperature warning.
120
ADO
0... 30min
Delay before door open alarm warning.
10
ACC
0...52weeks Condenser periodic cleaning. When the compressor operation time, expressed in weeks, matches the
ACC value programmed, “CL” flashes in the display. With ACC=0 the condenser cleaning warning is
disabled.
NON;
Switchover mode to second parameter set
MAN;
NON: inhibition to use the second parameter group (the following parameter will be SB).
IISM
IISL
IISH
IISP
MAN: button
switches the two parameter groups over.
-50...IISH
Minimum limit for IISP setting.
IISL...120°C Maximum limit for IISP setting.
IISL... IISH Setpoint in mode 2.
IIHY
IIFT
IIDF
SB
1...10°
NO/YES
DS
NO/YES
Door switch input enabling (closed when door is closed).
LSM
NON;
MAN;
DOR
Light control mode
NON : light output not controlled.
OFF/ON differential in mode 2.
Optimised fan control enabling in mode 2.
0... 24(1/24h) Defrost frequency expressed in cycles/24 hours in mode 2.
NO/YES
Stand-by button enabling.
0
NON
41
64
59
5
YES
3
YES
NO
MAN
OS1
MAN : light ouput controlled through button
(if OAU=LGT).
DOR : light ouput switched on when door is opened (if OAU=LGT).
NON;
AUX output operation.
0-1;
NON : output disabled (always off).
DEF;
0-1 : the relay contacts follow the on/standby state of controller.
LGT;
DEF : output programmed for defrost control.
AL0;
LGT : output enabled for light control.
AL1
AL0 : contacts open when an alarm condition occurs.
AL1 : contacts make when an alarm condition occurs.
SN4; ST1
Temperature sensor selection. With INP = SN4, the probes must be the LAE models SN4..; with INP =
ST1, the probes must be the LAE models ST1...
-12.5..12.5°C Probe T1 offset.
T2
NO/YES
OS2
-12.5..12.5°C Probe T2 offset.
0
TLD
1...30 min
Delay for minimum temperature (TLO) and maximum temperature (THI) logging.
5
SIM
0...100
Display slowdown.
3
ADR
1...255
AD3-5 address for PC communication.
1
OAU
INP
Probe T2 enabling (evaporator).
www.kingsbottle.com
LGT
SN4
0
YES
14
OPERATION
PART V
TEMPERATURE SETTINGS FOR WINE SERVICE
1.
1.
2.
3.
Different varietals of wine require different temperature settings. The recommended temperature ranges for serving different varietals of wine
are listed below.
• Red Wines: 52-64°F ( 15-18°C )
• White Wines: 44-51°F ( 9-15°C )
• Sparkle Wines: 41-43°F ( 5-9°C )
CAUTION:
In the event of a power interruption, all previous temperature settings will be automatically saved and each compartment will return to the
previous temperature setting.
If the unit is unplugged, loses power, or is turned off, you must wait over 6 minutes before restarting. Within this 6 minutes, compressor
protect itself and will not start even power ON again
When you use the wine cellar. for the first time or restart the wine cellar after having been shut off for a long time, there will be a few degrees
variance between the temperature you select and the one indicated on the LED readout for the first few hours of operation. After a few hours
of operation, the temperature will normalize to the displayed temperature.
www.kingsbottle.com
15
STORAGE
PART VI
LAYOUT AND STORAGE
YOUR CABINET WAS DESIGNED TO STORE A MAXIMUM NUMBER OF BOTTLES SECURELY. WE RECOMMEND THAT YOU
OBSERVE THE TIPS BELOW TO OPTIMIZE LOADING.
1. Disperse your bottles even so as not to concentrate weight in any one area. Also, be careful that your bottles do not touch either the
back of the cabinet or the step at the bottom.
2. Also make sure that bottles are not all grouped together either at the top or bottom of the cabinet.
3. Never try to pull out more than one rolling shelf at a time.
4. Maximum capacity per shelf is 55 lbs
5. Storage in details for different models (see diagram below):
KBU-25S storage
KBU-25S storage
• Each rolling shelf is designed to hold one row of 3 to 6 bottles.
PLEASE NOTE
Before modifying your cabinet’s original configuration in any way, be sure to ask your dealer for advice.
COMPRESSOR WINE CELLAR
www.kingsbottle.com
16
REMOVING SHELF
PART VII
REMOVING THE ROLLING SHELF
5#('6;
TO REMOVE A ROLLING SHELF:
1. Remove all bottles
2. Pull the shelf out as far as possible
3. Push the LEFT side lever
downward but RIGHT side lever
upward (as illustrated below)
4. Remove the shelf
+/2146#065#('6;+05647%6+105
WARNING
The refrigerator must be plugged into its own
dedicated 220-240V, 50Hz AC electrical outlet.
The plug must be accessible when the refrigerator is
place for later reference.
in position.
The symbolsYOUR
you willWINE
see inCELLAR
this booklet have these meanings:
CLEANING
It is essential the power point is properly earthed to
ground. Consult a qualified electrician if you are unsure.
WARNING
Don’t use extension cords or adapter plugs with this
refrigerator.
BEFORE
CLEANING: Turn off the power,
6FGQQWK@MJGLBGA?RCQGLDMPK?RGMLAMLACPLGLEWMSPNCPQML?JQ?DCRW
unplug the appliance, and remove all items
If the power cord is damaged, have it replaced by a
including all shelves.
qualified service technician.
CAUTION
inside surfaces with warm water and baking soda solution. The solution
be about 2 tablespoons
of baking
soda
with a
• Wash the
Unplugshould
the refrigerator
before cleaning
it, or
changing
quart of water.
6FGQQWK@MJGLBGA?RCQGLDMPK?RGMLMLFMURM?TMGBB?K?EGLERFC
the light bulb to avoid electric shock.
Wash the shelves with a mild detergent solution.
•?NNJG?LAC
Never unplug the refrigerator by pulling the electrical
• Wring excess water out of the sponge or cloth when cleaning area of the controls, or any electrical parts.
cord as this may damage it. Grip the plug firmly and
• Wash the outside cabinet with warm water and mild liquid detergent. Rinse well and wipe dry with a clean soft cloth.
pull straight out.
TIPS
& grill
INFORMATION
front
and back of the unit twice yearly. Make sure the power is off before cleaning.
• Dust the
Choose
a location
for your
It is recommended to clean the unit completely inside and out once a year to
maximize
the longevity
of therefrigerator
wine cellar.that isn’t too cold.
•6FGQQWK@MJGLBGA?RCQRGNQ?LBGLDMPK?RGML?@MSRSQCMDRFC?NNJG?LAC
The ambient room temperature should be above 10°C.
Stand your refrigerator in a dry place – avoid areas
POWER FAILURE
high moisture
orappliance
humidity.if you minimize the number of
ENVIRONMENTAL
TIPSwithin a few hours and should not affect theoftemperature
Most power
failures are corrected
of your
Don’tyou
putneed
the refrigerator
in frosty
ortounprotected
times
the door is opened. If the power is going to be off for a longer period of time,
to take the proper
steps
protect your areas
6FGQQWK@MJGLBGA?RCQRGNQ?LBGLDMPK?RGML?@MSRCAMLMKGA?J?LB
like a garage or on the verandah.
contents.
CAMJMEGA?JSQCMDRFC?NNJG?LAC
Keep the refrigerator out of direct sunlight.
VACATION
Meanings ofTIME
symbols used in this manual are shown below:
Don’t locate the refrigerator near stoves, fires or heaters.
Short vacations: You may leave the Wine Cellar operating during vacations of less than three weeks.
When installed correctly, your refrigerator should:
Long 6FGQQWK@MJGLBGA?RCQLCTCPRMBMRFGQ
vacations: If the appliance will not be used for several months, remove all items and turn off the appliance. Clean and dry the interior
– Have adequate space at the back and sides
thoroughly. To prevent mold growth, leave the door open slightly, blocking it open if necessary.
for air circulation (refer to page 9).
6FGQQWK@MJGLBGA?RCQ?JU?WQBMRFGQ
– Be aligned to the surrounding cupboards.
MOVING YOUR WINE CELLAR
– Have doors that will self-close from a partially
1. Remove all items.
open position.
PART VIII
0LEASE¬READ¬THE¬USER¬MANUAL¬CAREFULLY¬AND¬STORE¬IN¬A¬HANDY¬
CARE
AND MAINTENANCE
2. Securely tape down all loose items (shelves) inside your appliance.
WARNING
3. Turn the adjustable leg up to the base to avoid damage.
s¬¬
)
F¬PRESSURISED¬AEROSOL¬CONTAINERS¬BEAR¬THE¬WORD¬
4. Tape the door shut.
smallsecure
flamein symbol,
5. ‘flammable’
Be sure the and/or
applianceastays
the upright position during transportation.
Also protect the outside of the appliance with a
WARNING
doblanket
not store
themitem.
inside any refrigerator or
or similar
4#4'(4+)'4#069#40+0)
freezer. If you do so you may cause an explosion.
This appliance may contain a small quantity of environmentally
friendly, but flammable, non-synthetic R600a refrigerant:
anyshould
doors.
suffocate
get away from heat producing appliances, and away from direct sunlight.
Theremove
wine cellar
be Children
located in can
the coolest
areaifofthey
the room,
s¬¬%NSURE¬THAT¬THE¬TUBING¬OF¬THE¬REFRIGERANT¬CIRCUIT¬IS¬NOT¬
trapped inside.
damaged during transportation and installation.
s¬¬4HIS¬APPLIANCE¬CONTAINS¬INSULATION¬FORMED¬WITH¬mAMMABLE¬
s¬4HE¬ROOM¬FOR¬INSTALLING¬APPLIANCE¬MUST¬BE¬AT¬LEAST¬M¬PER¬
blowing gases. Avoid safety hazards by carefully
8g of refrigerant. The amount of refrigerant charged in the
disposing of this appliance.
appliance can be found on the rating plate on the appliance.
s¬+EEP¬VENTILATION¬OPENINGS¬IN¬THE¬APPLIANCE¬ENCLOSURE¬OR¬
in the built-in structure, clear of obstruction.
s¬$O¬NOT¬USE¬MECHANICAL¬DEVICES¬OR¬OTHER¬MEANS¬TO¬
accelerate the defrosting process, other than those
recommended by the manufacturer.
s¬4HE¬ROOM¬FOR¬INSTALLING¬APPLIANCE¬MUST¬BE¬AT¬LEAST¬M3
per 8g of refrigerant. The amount of refrigerant charged
in the appliance can be found on the rating plate on 17
www.kingsbottle.com
the appliance.
s¬¬7HEN¬YOU¬DISPOSE¬OF¬YOUR¬OLD¬REFRIGERATORS¬AND¬FREEZERS¬
ENERGY
SAVING TIPS
COMPRESSOR WINE CELLAR
TECHNICAL DATA
PART VIII
TECHNICAL DATA
MODEL NO.
KBU-25S
ACCOMMODATION
(BOTTLES)
25
TYPE OF COOLING
compressor with air-circulated fan cooling
CLIMATE TYPE
N
ELECTRICITY PROTECTION
GRADE
I
NOMINAL VOLTAGE/
FREQUENCY
RATED POWER(W)
AMBIENT TEMPERATURE
TEMPERATURE RANGE
110-115V/50-60HZ
120W
32 - 100 °F
41-64 °F
NET WEIGHT
92 lbs (42 KGS)
GROSS WEIGHT
99 lbs (45 KGS)
DIMENSION
www.kingsbottle.com
15.01”W x 24.03”D x 34.87”H
( 381W x 610D x 885H mm )
Included stand height 0.98” (25mm)
18
NOTES
COMPRESSOR WINE CELLAR
www.kingsbottle.com
19
WARRANTY
PART IX
WARRANTY INFORMATION
Please speak to your Retailer before calling BTO AMERICA LIMITED if you did not purchase your Wine Cellar directly from
BTO AMERICA LIMITED
Limited warranty – 90 day replacement plan with a free 9 months upgrade, totaling 1 year, on parts and labor from the date of shipment.
For customer service, please contact BTO AMERICA LIMITED by e-mail ( [email protected]) .
The limited warranty does not cover: Damage due to such things as accident, misuse, abuse, mishandling, neglect, unauthorized repair
or any other cause beyond the control of the seller whether similar or dissimilar to the foregoing. Purchaser understands and acknowledges
that the goods sold here are wine cellars, which house wine. Purchaser assumes all the risk of using these units, including risk of spoilage,
humidity variations, temperature variations, leaks, fires, water damage, mold, mildew, dryness and similar perils that may occur.
COMPRESSOR WINE CELLAR
www.kingsbottle.com
20