1
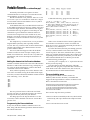
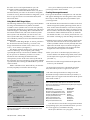
This free back issue of THE QUICK ANSWER is provided courtesy of… The Monthly Newsletter for Sesame Database Manager http://www.insidesesame.com Read a Free Issue of Inside Sesame! AND Makers of Sesame Database Manager Compatible with Symantec Q&A™ http://www.lantica.com Quick Answer The Creating Postable Records On-the-Fly TOM PETIT The The Independent Independent Guide Guide to to Q&A Q&A Expertise Expertise When you need to create records you can post to for a reports or archive database, here’s an easy and efficient way to do it. February 1998 R ECENTLY, a clients requirements posed an interesting challenge. It was a non-profit organization that sometimes received multiple donations from the same donor. The client wanted the donors record to show each donation date and amount, but he also wanted some donation recap reports that would show brakdowns by date ranges or the various projects donors supported. The Donors database was a multi-lineitem database. (See Figure 1.) With the donation dates, amounts, and other information stored in the donor records as lineitems, the reports posed a problem. For example, a February 5 donation from donor Jones might be entered on the first donation line of his record, whereas a donation on the same day from donor Smith might appear on the second or third donation line of her record. How could I create a report sorted by any criteria and hope to include the two donations in the same column? The first step I started out by copying each donation in the donors record to a separate donations database. (Ill refer to the original database as Donors.dtf, and the second database as Donates.dtf.) This separate database contained a record for each donation, with the following fields: Donor ID: Date: Check No: Amount: Project: (Speedy field) (Date field) (Text field) (Money field) (Text field) Volume 9, Number 2 1 Create Postable Records On-the-Fly Tom Petit 2 Tip: Two Tricky Date Calculations 4 Q&A Data in Word/WinFax Fax Merges William Halpern 7 Simplify Searches with a Query Builder Erika Yoxall 8 Tip: Ensure Correct Form Navigation 9 @Help Edited by Bill Halpern & Gordon Meigs • Update Part Prices From an ASCII file • Eliminate Report Column Headings • Get More Custom Menu Selections 10 Tip: Add Custom Picklist Instructions 11 Design a Custom Report Interface, Part 1 Jeff Nitka WinFax Pro With each donation stored in the separate database this wayone record per donationit would be easy to generate reports by donor, donation date range, amount levels, or project. The Figure 1. The Donors database has a multi-lineitem structure (at the bottom of the form) that isn’t well-suited for reports. question was, how best to copy a new donation from the Donors record to a new record in the Donates database. I looked at several options. Jeff Nitkas article on how to create reports from a multi-lineitem database in the October 1997 Quick Answer offered an interesting approach that exports the records from the original database into a second database designed for reports. What I needed, though, was a way to copy each donation to the second database as soon as it was entered in the Donors database. Continues on page 3 Now We’re Cookin’! Quick Answer The TOM MARCELLUS TM B Y the time you read this, The Quick Answers Web site should be up and running. If you have an Internet connection, set your browser to http://www.quickanswer.com and give it a look-see. (Youll get the best viewing results with Internet Explorer 3.0 or higher or Navigator 3.0 or higher.) For more on the benefits of subscribing to The Quick Answer Online edition, see Upgrading to the Online Edition at the Web site, or on page 11 in last months issue. Speaking of the Online edition, youll see this icon at the top of two of this months articles (pages 1 and 7) and in upcoming issues as well. It indicates that the sample databases featured in the article, complete with programming and macrosready-to-use as-is or modifyare included with the Online edition. (You can download a sample isue of The Quick Answer Online edition from our Web site.) Heres a comment from a reader who recently took a look at the new Online edition: Got Acrobat Reader 3.01 downloaded and installed.Opened the Jan 1998 issue... Amazing! Looks great! Printed darn good on the lowest quality setting on my inkjet... Great job! Meanwhile, at another readers suggestion, were considering a plan to better serve Online subscribers. Each month, around the 5th, well send each Online subscriber an email notification with a hyperlink in the message. This way, they simply click on the hyperlink to go to the Web site to pick up their new issue. This month Bill Halpern and Gordon Meigs take over the @Help column from T.J. Shuflin, whose professional obligations in the forensic field (he directs a crime lab) have placed increasing demands on his available time. Good luck, T.J.and dont work to hard! Erika Yoxall and Jeff Nitka show how to create custom interfaces that make Q&A easier than ever to use. And Tom Petit, in his first Quick Answer appearance, shows how he makes Q&A automatically create, on-the-fly, the new records he can then post to. Tricky Date Calculations Editor / Publisher Tom Marcellus The Quick Answer (ISSN 1052-3820) is published monthly (12 times per year) by Marble Publications, Inc., 1927A Harbor Blvd., Costa Mesa, CA 92627 USA Cost of domestic subscriptions: 12 issues, $89; Outside the U.S., $109; Online edition, $69. Single copy price: $10; outside the U.S., $12.50. All funds must be in U.S. currency. Back issues are available upon request, for the same price as a single copy. Postage paid at Costa Mesa, CA. POSTMASTER: Send address changes to The Quick Answer, 1927A Harbor Blvd., Costa Mesa, CA 92627. Copyright © 1997 by Marble Publications, Inc. All rights reserved. No part of this periodical may be used or reproduced in any fashion (except in the case of brief quotations embodied in articles and reviews) without the prior written consent of Marble Publications, Inc. Address editorial correspondence, @HELP questions, or requests for special permission to: Marble Publications, Inc., The Quick Answer, 1927A Harbor Blvd., Costa Mesa, CA 92627 Phone 800-780-5474 or 714-722-9127. Fax 714-722-9127, [email protected] http://www.QuickAnswer.com For Q&A technical support, call Symantec 503-465-8600. Q&A is a trademark of Symantec Corp. Other brand and product names are trademarks or registered trademarks of their respective holders. This publication is intended as a general guide. It covers a highly technical and complex subject and should not be used for making decisions concerning specific products or applications. This publication is sold as is, without warranty of any kind, either express or implied, including but not limited to implied warranties for the publication, quality, performance, merchantability, or fitness for any particular purpose. Marble Publications, Inc., shall not be liable to the purchaser or any other person or entity with respect to any liability, loss, or damage caused or alleged to be caused directly or indirectly by this publication. Articles published in The Quick Answer do not necessarily reflect the viewpoint of Marble Publications, Inc. How to Reach Us Phone Fax Email Web Mail 800-780-5474 714-722-9127 714-722-9127 [email protected] http://www.quickanswer.com Marble Publications The Quick Answer 1927A Harbor Blvd. Costa Mesa, CA 92627 Two tricky date calculations are ofren required to determine billing cycles and the like—the number of days in a month, and the date of its last day. Using MyDate (Date), DaysInMonth (Text or Number), and LastDateOfMonth (Date) fields, you can find the two variables with the following program in the MyDate field: Else DaysInMonth = @Right(@Left(MyDate, 8) + "31",2); > Rem" If MyDate isn't January, add 1 month, make the day 01, then subtract 1 day”; The two parts of the program work independently. That is, you don’t need the DaysInMonth field to get the LastDateOfMonth value, and vice versa. For a current month calculation, you can dump the MyDate field, and replace it in the program with @Date. If @Month(MyDate) <> 12 Then DaysInMonth = @Right(@Todate(@Left(MyDate, 5) + @Str(@Month(MyDate) + 1) + "/01") -1, 2) 2 If @Month(MyDate) <> 12 Then LastDateOfMonth = @Todate(@Left(MyDate, 5) + @Str(@Month(MyDate) + 1) + "/01") -1 Else LastDateOfMonth = @Left(MyDate, 8) + "31" The Quick Answer ● February 1998 Postable Records ... continued from page 1 Eventually, I decided to use Q&A 5.0s XPost command because it would post a new donation to the second database on-the-fly in real time. But this introduced a new problem. XPost cant create new records to post to. I would have to make sure a target record existed in the Donates database for every XPost from the Donors database. In the March 1996 issue, Tom Marcellus showed how to use @Shell to launch a second copy of Q&A, add a new record to the target database, then return to the original record in the first copy of Q&A to execute the post. This seemed like a good solution for situations where an occasional new target record was needed. In my case, though, a new target record was needed every time a donation was received. I wanted an easier way to get the same result. The simplest way, it seemed to me, was to pre-fill the target database (Donates) with a quantity of blank records. This way, I could execute an XPost from Donors, and have Q&A simply pick a blank Donates record to post the donation data to. Fine so far, but what happens when all the blank Donates records have been used up? I simply add a bunch of new blank ones. And I do it in a way thats fast and efficient, and doesnt interrupt the normal flow of data entry. Adding the elements to the Donates database I added a text field named Form to the end of the Donates database. I made it three characters long, and Speedy, so its value can be the matching key value for the XPost commands in the Donors database. Next, I added a quantity of records to Donates with AAA in the Form field, leaving all the other fields empty. To do this, I created a Standard ASCII file in Write with 60 lines containing AAA, like this: “AAA”, “AAA”, “AAA”, “AAA”, “AAA”, “AAA”, “AAA”, ... Check -----C1: C2: C3: C4: Amount -----A1: A2: A3: A4: Project ------P1: P2: P3: P4: Posted -----Pst1: Pst2: Pst3: Pst4: I added the following program to the Pst1 field: < If D1 <> “” and Pst1 = “” then XPost(“Donates”, “AAA”, “Form”, Donor ID, “Donor ID”); If @Error Then {@Msgbox(“No blank records to post to.”, “Press Enter to add some”,”to Donates database”); @Macro(“Add records to Donates”) } Else { XPost(“Donates”, Donor ID, “Donor ID”, C1, “Check No”); XPost(“Donates”, Donor ID, “Donor ID”, D1, “Date”); XPost(“Donates”, Donor ID, “Donor ID”, A1, “Amount”); XPost(“Donates”, Donor ID, “Donor ID”, P1, “Project”); XPost(“Donates”, Donor ID, “Donor ID”, “”, “Form”); Pst1 = “x” } When a new donation has been entered, Q&A looks for a Donates record with AAA in the Form field. If it finds one (no error), it posts the Donor ID plus the line 1 fields (D1, C1, A1, and P1) to it. If, on the other hand, the first post attempt generates an error, it means Donates needs some more blank records to post to. The macro, which Ill show you later, takes care of adding the blank records, then returns to the originating Donor record to perform the post. The final XPost command blanks the Form field to prevent the record from being posted again. Once the post is complete, an x is placed in the Pst1 field to prevent reposting. The other three Post fields (Pst2, Pst3, and Pst4) contain the same program, except that their references are to the fields on the same donation line, such as D2, A2, P2, and Pst2 for the second donation lineitem. The record-adding macro The program we looked at earlier contains an @Macro(Add records to Donates) command that triggers if the target database contains no blank records. Heres what the macro looks like: <begdef><nokey><name>”Add<sp>Records<sp>to<sp>Donates” <vidon><home><home><home><f11><capsf10>uis<home> c:\qa\aaa.asc<enter>donates<enter><end><end><end>1 <f10><f10><esc>sdonors<enter><f12><f10><dn><dn><dn> <dn><dn><dn><dn><enddef> This way, when its time to add some new blank records, I can have my program in Donors run a macro that imports this file (AAA.ASC) into Donates. The Merge Spec for the import includes a 1 in the Form field, so thats the field in all 60 new records that gets the AAA. Programming the Donors database In my case, the Donors database included a Donor ID field, along with the following lineitem donation fields at the bottom of the form: The Quick Answer Date ------D1: D2: D3: D4: ● February 1998 These are the steps the macro performs: 1. Moves to the Donor ID field (in this case, the first field on the form), and copies the ID to the Clipboard with F11. 2. Saves and exits the Donor record. Continues on page 12 3 Using Your Q&A Data in Word/WinFax Fax-Merges WILLIAM HALPERN With a little help from Microsoft Word, Symantec’s WinFax Pro 8.0, and any fax modem, you can run fully personalized fax-merges using your Q&A data. I N the December 1997 issue, Tom Marcellus showed two ways to automate the process of creating a Q&A export file for Microsoft Word and having Word run a mail-merge with it. Both ways use an @Shell technique to create the export file on-the-fly and start Word with an autorun macro. (You can also use Q&A 5.0s External Programs feature to start Windows 95 programs and run macros in them to automate procedures. See the Sidebar.) So, theres no problem mail-merging your Q&A data with Word documents in order to take advantage of the powerful formatting, font, and graphics capabilities of a Windows word processor. But what if you want to run a Word fax-merge using your Q&A data? Since version 3.0, Q&A has supported plain-Jane faxmerges via a SatisFAXtion fax modem, but your faxes cant contain fonts or graphics. Now, with Q&A 5.0, Word, and WinFax Pro 8.0, you can perform a fax-merge to multiple recipients, with each fax as personalized as any merge-letter. Whats more, your faxes can contain attractive fonts, tables, graphics, and features that just come natural to a Windows word processor like Word. What makes it possible are special Word macros that come bundled with WinFax Pro 8.0, and Q&As ability to run external programs in the Windows 95 environment. Using Microsoft Word to illustrate (WinFax comes with similar macros for WordPerfect and Ami Pro), Ill show you how to set up a Word/WinFax fax-merge using your Q&A data. Tom covered the finer points of designing a Word merge document and merging the Q&A data with it, so Ill cover only what you need to know about using the resulting merge document in a fax-merge. Getting started If you havent installed the Word macro that comes with WinFax Pro 8.0, start Word, and select File / Open. Navigate to your WinFax\Macros subdirectory, and open the appropriate Word documentWord60.doc for Word 6.0, Word70.doc for Word 7.0 (Word 95), or Word97.doc for Word 97). Depending on your default settings in Word, Word might ask you to confirm that you want to open a document containing a macro. In addition to installing 4 Starting Windows Apps Via External Programs When you use Q&A 5.0’s Alt-F9 External Programs feature to start Windows applications, you have to make sure the command line is properly set up. For example, a command line to start Microsoft Word and run an autostart Word macro might look like this (your path might be different): C:\Msoffice\Winword\Winword.exe /m%f As shown in this example, you first specify the path to Word. You then follow it with a space and the /m Word macro startup switch. Finally, you tack on the %f parameter to pick up the value of the current Q&A database field, which in this case contains the name of the Word macro you want to run. If you wanted avoid having to press Alt-F9 and select Word, you could record a Q&A macro to do it for you. You could then have an @Macro command run the macro from the field that contains the Word macro’s name. The macro would simply “press” Alt-F9 to display the External Programs menu, then select Microsoft Word from it. If the name of the Word macro you wanted to run was always Merge1, you could use an External Programs command line like this instead: C:\Msoffice\Winword\Winword.exe /mMerge1 This would let you start Word from the External Programs menu from anywhere in Q&A, and would always invoke the Merge1 Word macro. To return to Q&A automatically after quitting Word, you must be running Q&A in a Window. Also, Q&A’s shortcut properties must include both Expanded and Extended memory set to 1024, and Q&A must not be set to prevent it from detecting Windows. (To find out how to change Q&A’s shortcut properties, see David Dvorin’s articles in the October and November 1997 issues.) The Quick Answer ● February 1998 the macro and a set of required WinFax styles, the document contains instructions you should read. Once youve installed the WinFax macro, any future Word documents you create can be made fax-mergeable. To make an existing Word document fax-mergeable, youll have to copy its text into a new Word document, then take it from there. Once youve defined your data source, you can add your merge fields to the document. Creating the merge document First, type the documents boilerplate textthe text that will appear unchanged in each merged fax. Then, follow these steps to add and apply the proper WinFax styles your merge fields: Using Word’s Mail Merge Helper The following instructions for setting up a Word/WinFax fax-merge are distilled from a Symantec document available at www.symantec.com. To read and optionally download the document, go to symantec.com, and choose Technical Support / Knowledge Base. Select WinFax Pro 8.0 from the Products list, and search for the keywords Microsoft Word. The document you want is How to Use Microsoft Word Mail Merge with WinFax PRO 7.x or 8.0. Its also available by return fax as Fax On Demand Document #04240; 01142. Word has a Mail Merge Helper. To start it, pull down the Tools menu and select Mail merge. To start a new merge document from a blank screen, select Create / Form Letters / Active window. (See Figure 1.) The Helper will then prompt you to specify the data source for the merge. You can specify your existing exported Q&A data (in a form such as dBASE or ASCII). If you export as an ASCII file, youll have to create a Word header file containing the field names that correspond to (and are in the same order as) the data in the export file. You can avoid this by using Q&As dBASE export format, then selecting the dBASE file as your data source in Word. With a valid data source, Word will let you select the records (recipients) to include in the fax-merge. 1. The document must contain the fax number as the first WinFax merge field. (Other Q&A merge fields, such as those for the name and address, can be above it.) Place your cursor on an empty line where you want to insert the fax number, click the Insert Merge Field button, and select the fax number field from the list. (To make the fax number invisibleso it doesnt print in the faxsee the sidebar Cleaning Up Your Fax-Merge Document.) 2. With the cursor on the fax number field, pull down the styles list on the left side of the screen just below the toolbar (it should contain Normal by default) and select WfxFaxNum from the styles list. Word will apply the style to the line, and WinFax will recognize the data merged here as the recipients fax number. 3. Place your cursor on another empty line where you want to add the next WinFax merge field, insert it, then use the Styles list to apply the appropriate style to it. (See Table 1.) 4. Insert the rest of the merge fields from the Q&A data source to your document. A merge field can appear in a document more than once, but a Wfx style cant be applied more than once. The macro that performs the fax-merge scans the document from top to bottom for Wfx style markers, so the Wfx styles must appear in the document in the precise order listed in Table 1. Table 1. Available WinFax (Wfx) styles. You don’t have to use them all. Those you do will appear in your WinFax Send log. Each style can appear only once in the document. Merge Field Fax number (47 characters max.) Recipient’s name (31 characters max.) Transmit time (HH:MM:SS time format) Transmit date (MM/DD/YY date format) Company (42 characters max.) Subject (79 characters max.) Keywords (33 characters max.) Billing code (26 characters max.) Figure 1. Word’s Mail Merge Helper. When the merge document and data source have been defined, as in this example, the Merge button under Step 3 will be available. The Quick Answer ● February 1998 WinFax Style WfxFaxNum WfxRecipient WfxTime WfxDate WfxCompany WfxSubject WfxKeyword WfxBillCode You dont have to use all these merge fields and their corresponding styles. Just remember that those you dont use wont appear in your WinFax Send log. Word styles affect the entire paragraph, so make sure 5 that any line containing a Wfx style contains only one merge field and nothing else. For example, you cant have something like Fax Number: <<Fax>> on the same line because WinFax will try to dial the literal string and fail. If you want to include a label to identify merged data, place it above the field, like this: Fax Number <<Fax>> (Normal text — no Wfx style applied) (Merge field with WfxFaxNo style applied) Tip—You can place Wfx-styled merge fields in a Word table, and apply your Wfx styles to the appropriate cells, leaving adjacent cells unstyled. This way, you can place a WinFax merge field along with text and non-WinFax merge fields on the same line (the same row of the table). If you like, you can format the cell and table borders not to print. See Figure 2.) Cleaning Up Your Fax-Merge Document You don’t have to sacrifice the appearance of your faxes for the sake the specially-styled WinFax merge fields. For example, the merge document must contain a Wfx-styled fax number field, yet for aesthetic reasons you might not want the fax number to appear in it. Here’s a trick you can use to make the fax number (and any other WinFax merge fields) invisible. Place the field on a line by itself, assign the correct Wfx style to it, then do this: 1. Select (highlight) the entire line. Figure 2. You can work around the “one-styleper-line” restriction by placing your elements in a Word table. Make sure Fax Preview is turned off in your WinFax Setup, or youll have to manually click the Send button to fax each document. When your document is finished, pull down the Tools menu, select Mail Merge, then click Merge. Select Merge to New Document, and Word will create a new document (consisting of all the faxes) with the data all nicely merged. Review the faxes. If theyre okay, you can go ahead and send them this way: 1. Pull down the Tools menu and select Macro. 2. From the Macro list, choose DDEFaxMerge. (In Word 97, choose DDEFaxMerge.Main.) 3. Click Run. A DDEFaxMerge Macro dialog box will appear. 4. Select Dont Show WinFax Send Dialog, then click OK (In Letters Making the Autodialer Work When trying to implement Bill Halperns Q&A 5.0 phone autodialer featured in the May 1996 Quick Answer, I couldnt figure out why the variable (the phone number in field #10) wasnt being passed to the Dial.bat batch file. It turns out that it must be passed to the batch file as a number, not text. So, for anyone trying to use this great little custom feature, the part of 6 2. Pull down the Format menu, and choose Font. 3. Choose the smallest font size and line spacing you can, so the line won’t take up much space in the document. 4. Change the color of the font to White so it won’t print. (You can’t Hide the merge field, because then WinFax won’t be able to see it if your word processor is set to not print hidden fields.) Repeat these steps with any other Wfx-styled merge fields you don’t want to appear in the fax. Word 97, Just click OK.) When the faxes have been sent, a WinFax icon will appear in the lower left-hand corner of your screen. You see, we can still use our favorite database manager to store and manipulate our information, and at the same time take advantage of the power and flexibility that Windows 95 programs offer. Bill Halpern is president of Professional Computer Technology Associates in Newtown, Pennsylvania. His firm specializes in data management and supporting systems and services. 215-598-8440, [email protected] the program that invokes the batch file should read as follows: #20=@Shell(“C:\QA5\DIAL.BAT “ + @Num(#10)); The field containing the program was formatted for text to accommodate the Dial label, so the @Num function is required to pass the variable correctly. JAMES POGANY, OAKVILLE, ONTARIO, CANADA The Quick Answer ● February 1998 Simplify Record Selection with a Query Builder ERIKA YOXALL Filling out a Retrieve Spec can be frustrating because you have to tell Q&A precisely what you want. Wouldn’t it be nice if you could choose your retrieval criteria from pop-up selection lists? You can! O NE of the things that bugs me about using a Retrieve Spec in Q&A is that I cant get a list of values to choose from for a given field. I have to try to remember how to spell something, or use a wildcard that might not get me exactly what I want. It also makes it difficult for anyone other than the person who does the data entry to figure out what to search for. There had to be a way to create a point-and-shoot method to find records without having to deal with the Intelligent Assistant, so I came up with what I call a Query Builder. The key to making the Query Builder work is Q&As ability to evaluate a programming expression to retrieve a set of records. For example, if you have a number field named Apples and another number field named Oranges, you can get the records where the total of both fields is greater than 50 by placing { (Apples + Oranges) > 50 } in any Retrieve Spec field. If you have a LastName field, and you want to retrieve the records where LastName = Yoxall, rather than typing Yoxall into the LastName field, you can type {LastName = Yoxall} into any field. This means that as long as you use correct syntax, you can write your retrieval expression anywhere you want and simply paste it into the first Retrieve Spec field. Sample application <Customer: If Customer = “” Then Customer = @XUserselect(“Shipment”, “Customer”) Offers a selection list of customer names to choose from. < PartNumber: If PartNumber = “” Then PartNumber = @XUserselect(“Shipment”, “Part Number”) Offers a selection list of part numbers to choose from. > BeginShipDate: EndShipDate = BeginShipDate Makes sure EndShipDate isn’t empty if a BeginShipDate is entered. < ViewRecords: GoTo RetrieveSpec Goes to the RetrieveSpec field when clicked. < RetrieveSpec: RetrieveSpec = “{“ + @Txt(Customer<>””,”Customer =” + @Chr(34) + Customer + @Chr(34) + “ and “) + @Txt(PartNumber<>””,”PartNumber =” + @Chr(34) + PartNumber + @Chr(34) + “ and “) + @Txt(BeginShipDate<>””,”(Ship Date >=” + @Chr(34) + @Str(BeginShipDate) + @Chr(34) + “ and Ship Date <=” + @Chr(34) + @Str(EndShipDate) + @Chr(34) + “ and Ship Date <=” + @Chr(34) + @Str(EndShipDate) + @Chr(34) + “)”)+ “}”; If @Right(RetrieveSpec,5) = “and }” Then RetrieveSpec = @Repllas(RetrieveSpec,” and “,””); @Macro(“Run Query”) The RetrieveSpec fields program is where all the work gets done. It takes the selected and entered values To illustrate the technique, I created a simple Query Builder database (Querybld.dtf). (See Figure 1.) Its a onerecord database I use to find records in an external database named Shipment.dtf. Querybld.dtf contains the following fields: Customer: PartNumber: BeginShipDate: EndShipDate: RetrieveSpec: ViewRecords: Text Text Date Date Text, accessible by clicking ViewRecords Text, JC, Set to contrasting color at Palette Spec to look like a button. Initial Value = View Records. Accessible only by clicking. Programming Clear (Customer, PartNumber, BeginShipDate, EndShipDate, RetrieveSpec) This on-record-exit statement clears all the fields in preparation for the next query. The Quick Answer ● February 1998 Figure 1. The Querybld database lets you choose the company and part number to query from pop-up selection lists. 7 from the other fields and strings them together into an expression suitable for use in a Retrieve Spec. (See Figure 2.) @Txt is used to determine if a field is blank before adding its elements to the expression. This way, it works regardless of whether some fields are left blank. @Chr(34) is the ASCII character code for a double quote mark ( ). The last thing the program does is run a simple macro that exits Querybld.dtf, opens Shipment.dtf in Search/Update mode, and pastes the programming statement into the Retrieve Spec: <begdef><nokey><name>”Run<sp>Query”<vidon><f11><capsf10> sshipment<enter><f12><f10><enddef> You can use this technique to create a highly customizable form to allow you and your users to find exactly what they need in a database. The programming expression you create can be used in any Retrieve Spec, including Report and Print Specs. I use this method to create executive report menus, record selection forms of all kindsanything where my client can benefit from being able to quickly select a set of records without having detailed knowledge of the data or knowing how to use a Retrieve Spec. Erika Yoxall owns Hammer Data Systems in Garrettsville, Ohio, specializing in Q&A and Microsoft Access. Phone/Fax 330-527-4018, [email protected]. Figure 2. The retrieval expression created by the programming appears long enough for the macro to copy it to the clipboard to paste into the target database’s Retrieve Spec. [Q&A evaluates a retrieval expression against every record in the database (without using any available indexes). So expect record retrieval times to correspond roughly to the number and size of the records in the database and your PCs speed. For a custom interface technique thats similar in some respects, see Jeff Nitkas Selective Mail Merge Made Easy in the December 1997 Quick Answer. Also, see Jeffs article in this issue, where he uses a specialized database as an interface to simplify creating reports. Ed.] This application is available for download from The Quick Answers Web site at http://www.quickanswer.com Ensure Correct Form Navigation Sometimes, clients’ users “out-smart” the usual form navigation rules. A “clever” user finds out he or she can move through a form more rapidly by pressing the Down Arrow key rather than the usual Tab or Enter key. This can bypass fields and defeat critical on-field-entry or on-field-exit programming. We don’t like to “hard-code” strict cursor movement because it requires a navigation program in virtually every field, and makes it difficult for the DB administrator or programmer to quickly move through a form when necessary. So, what we sometimes do in cases like this is redefine the Down Arrow key. Please read all of this tip before attempting what I’m about to suggest. You might also want to clear your regular macro file (Shift-F2, Clear Macros), and after defining the new macro, save it to a file other than your default qamacro.asc file. Press Shift-F2, Define macro. When Q&A prompts for the macro identifier, press the Down Arrow key. Q&A will respond 8 with a message saying, That key is already used by Q&A. Do you want to redefine it? (Y/N). Answer Yes, press the Tab key, then press Shift-F2 to save the macro. You can name it New Down Arrow, then save it to a new macro file. One of the first things you’ll notice is that you can no longer navigate Q&A’s menus or List of Files screens using the Down Arrow key. Therefore, you, as the DB Administrator, might want to define a “secret” Down Arrow key—one this isn’t normally used, such as the right square bracket. Do this before you redefine the Down Arrow key. Otherwise, when you record the keystroke to assign to the right square bracket key, the real Down Arrow key won’t be available. After defining your “secret” Down Arrow key, don’t tell anyone about it. With the Down Arrow key redefined as Tab, users can press Tab, Enter, or Down Arrow to move through forms correctly, helping to ensure that your field programming will be executed. GORDON MEIGS, 215-598-8440, [email protected] The Quick Answer ● February 1998 EDITED BY BILL HALPERN AND GORDON MEIGS Updating Fields from an ASCII File Always make a backup copy of your database before attempting a Mass Update like this. I regularly receive an ASCII file containing updated parts price information, and I want to use it to update the list price and cost fields in my main parts database. I’d like Q&A to find matching part numbers in both files, and update the price and cost in my parts database only if they’ve changed. Also, can Q&A do a mass part number change? If I have 50 records with “47” in the part number, can I change it to “48”? Mitchell King via email Q&A can do both. Lets take your questions one at a time. Update prices on matching part numbers First, create a temporary database with a field for each field in the ASCII file. Import the file into it using File / Utilities / Import / ASCII (Standard or Fixed, depending on the files structure). Make the part number field Speedy. Now you can Mass Update your main parts database using the temporary database as a lookup source. Use an Update Spec program like the following to lookup the price and cost on each part number match. #1: XLookup(“TempDb”, Part Number, “Part Number”, “NewPrice”, Price, “NewCost”, Cost) Follow these steps each time you receive an updated ASCII file, and your prices will be current with very little effort. Just remember that this will work only if the part numbers are unique in both databases. Update a portion of a part number If the 47 occurs anywhere in the part number, and you want to change it to 48, you can Mass Update the database using ..47.. in the part number field at the Retrieve Spec. In your Update Spec, you can use the @Replace function to change the 47 to 48 and leave the rest of each part number unaffected. If the part number field were #10, the Update Spec would look like this: #10=@Replace(#10, “47”, “48”) Eliminate Report Headings Is there any way to create a Q&A report without column headings and the dashed lines underneath them? Justin Bratnober, St. Paul, Minnesota Yes. By default, Q&A uses the field name for the column heading and a dashed line as the separator between the heading and report body. Suppressing these involves using special commands. For a Customer Name field, for example, you might use a simple Column/Sort Spec code of 10,AS. To suppress the heading, add H(\ ) (a backslash followed by a space) To suppress the separator line, add HS(\ ) to the columns spec. The resulting spec would read 10,AS,H(\ ),HS(\ ). You can suppress a derived columns heading by placing the H(\ ) code on the Heading line, and suppress the separator by placing the HS(\ ) code on the Column/Sort Spec line. If you want something besides a dashed line as the separator, simply specify the character to use. A few other examples: HS(_) uses the underscore character as the separator. HS(*) uses an asterisk. HS(=) creates a continuous double underline using ASCII character 205. (To type it, hold down the Alt key and type 205 on the numeric keypad.) Appendix H of the Q&A User Manual provides a table of ASCII characters and their codes. Here are some other codes you can use to create custom separator lines: SL(\ ) suppresses the single separator line on subcalculations and breaks. SL(+) changes the single separator line on subcalculations and breaks to the plus sign. (Choose whatever character you like.) DL(\ ) Suppresses the double separator line when Stumped? Send your Q&A questions to @Help, The Quick Answer, Marble Publications, Inc., 1927A Harbor Blvd, Costa Mesa, CA 92627 or email to [email protected]. Include your name, address, phone, and your Q&A version number (and whether DOS or Windows) and a detailed description of the problem. We’ll publish those questions we feel are of general reader interest; individual responses aren’t possible. The Quick Answer ● February 1998 9 printing grand totals. DL(+-+-+) changes the double separator when printing grand totals to a string of plus and minus signs. (Choose whatever characters you like.) Needs More Cutom Menu Selections I wish my custom main menu (which I display by pressing Alt-M) could have more than nine selections. I know I can use other key combinations to call other menus (Alt-A, AltB, and so forth), but I’d prefer having more selections on my one main menu. Q&As Main menu when the Esc key is pressed. To have your submenus return to your custom main menu, just enter the name of the main menu in the On Escape, Show Menu line. Bill Halpern and Gordon Meigs own Professional Computer Technology Associates (PCTA) in Newtown, Pennsylvania. PCTA specializes in data management and supporting systems and services. 215-598-8440, [email protected]. Dana Kusic, Bridgeport, NJ Nine selections is the limit on a custom menu, but you can have your custom main menu call other menus, giving you fast access to as many selections as you need. For instance, a custom main menu when viewed at the Application Menu Options screen (Shift-F2, M - Create Menu) might look like the sample menu in Figure 1. The macro names listed on the right side of the screen are actually menu names. The six selections take you to six other menus, each of which can include up to nine choices. Those choices can either run macros or call other menus. This custom main menu is designed to return to Figure 1. A custom Main menu with selections that call other menus. Add Custom Instructions to the Tops of Your Selection Lists Userselect and XUserselect lists always appear near the upper right corner of the screen, one line below the top. I place an Instructions field on the top line, defined with angle brackets (< and >) so it doesn’t show. This way, whenever I display a selection list, I can fill the field with custom instructions, like this: < Customer: If Customer = “” Then { Instructions = “Select a Customer name.”; Customer = @XUserselect(“Customer”,”Name”); Instructions = “” } You can set the Instructions field to a contrasting color using the Change Palette Spec, and place it so the right angle bracket is at the far right side of the screen with the text justified right. You can also make your instructions blend in with the list (like they’re part of the list) as shown in Figure 1. Erika Yoxall, 330-527-4018, [email protected] 10 Figure 1. If you make the Instructions field 23 characters wide, center justified, and use the @Color command to temporarily set its background to white and text to black, you can make your custom instruction line look like it’s part of the picklist. The Quick Answer ● February 1998 The Program Spec Designing a Custom Report Interface, Part 1 JEFF NITKA If there’s one thing that can frustrate a novice user, it’s designing a report. But you can simplifying the process with a custom report design interface. O NE of Q&As great strengths is its easy interface. Sometimes, though, it isnt easy enough. I had a client who wanted employees to have the freedom to create whatever crosstab reports they needed. The problem was that most of them werent Q&A-savvy enough to deal with the steps a crosstab requires. Having to figure out which records to include, which fields should be used for the row, column, and summary, then which type of outputit involved just too much. Rather than train all the employees on how to deal with the various crosstab report specs, the client wanted me to design a custom interface that would simplify crosstab setup. It had to provide the following features: • Picklists of available fields for the Row, Column, and Summary field, and a picklist for the type of output. • The ability to provide flexible record selection criteria. • Onscreen help to guide users through the process. My solution met the clients requirement for ease of use, but it took some doing. First, there was the interface itselfwhat the users saw. Then, there was the programming to make it functional. Finally, macros to handle report printing. Ill show you how I did it in several installments over the next few months. First, Ill deal with the starting pointthe interface design. The custom interface shown in Figure 2 is actually a graphic representation of the data entry database form shown in Figure 1but with a twist. It lets users enter record selection criteria into any of the fields, just as though they were running the report directly from the Crosstab Spec. It also provides fields for the user to select a row field, a column field, a summary field, along with the output deviceall from picklists. These four additional text fields are shown in Figure 2. (Keep in mind that with a technique like this, you can always eliminate any fields that wouldnt be used for record selection.) The first interface field (Start), along with the last two (Check and Run), are needed for programming and macro execution, as youll see in the next installments. At this point, the interface design is done. All the various report characteristics are on one screen (instead of three) providing a complete picture of the report. How users work within the interface will be next months topic. (In a nutshell, the user fills in the fields using a combination of picklists and basic data entry.) The next task is to program the fields in a way that gives users all the flexibility they need to create the kinds of report they want. Thats where the real fun begins. Jeff Nitka develops Microsoft Access and Q&A applications for Epoch Software, [email protected]. Jeff is the author of the Program Evaluator (a Q&A program debugging utility), SurfDrve (a Q&A disk drive reader), and FaxMan (a Q&A faxing database), all of which are available from Marble Publications. Interface design Consider a simple invoice database like Figure 1. Figure 1. A simple multi-lineitem invoice database for data entry. The Quick Answer ● February 1998 Figure 2. A representation of the invoice database with additional fields for selecting various crosstab specifications. 11 Postable Records...continued from page 3 3. Imports the AAA.ASC file as a Standard ASCII file into the Donates database, adding 60 new blank records with AAA in the Form field. 4. Returns to the Donor record by pasting the Donor ID into the Donor ID field at the Donor.dtf Retrieve Spec. 5. Moves the cursor into the donation lineitems area so the user can now perform the post. Depending on how you use the post-to database, there might a small liability connected with having blank records in ityou have to remember to exclude them during retrieval operations. In this case, youd have to be sure to exclude any records that contain anything in the Form field. You can do this by placing = (the equals sign) in it at the Retrieve Spec for any report youre designing. When you have a quick and easy way to keep enough blank records in your post-to database, as in the two examples Ive shown, youll never have to do double data entry again or interrupt your work flow to add a new record to post to. Tom Pettit is the owner of DataBase Systems in Indianapolis, Indiana. He has been designing custom Q&A applications for a variety of businesses and organizations for 12 years. 317-251-8541. Using This Technique in Non-Lineitem Databases For non-lineitem databases, you can use this same technique to create new records to post to. Suppose your Orders database displays an XUserselect picklist of customer names from a customer database. You start to enter a new order, when you find that the customer’s name isn’t on the list. With some blank records in the customer database, you could create a new customer record from the Orders database using a program along these lines: If ...your posting conditions ... Then { XPost(“Customer”, “AAA”, “Form”, Name, “Name”); Xpost(“Customer”, “AAA”, “Form”, Phone ,”Phone”); XPost(“Customer”, “AAA”, “Form”, Address, “Address”); XPost(“Customer”, “AAA”, “Form”, City, “City”); XPost(“Customer”, “AAA”, “Form”, State, “State); XPost(“Customer”, “AAA”, “Form”, Zip, “Zip”); XPost(“Customer”, “AAA”, “Form”, “”, “Form”); } When you XPost using this technique, Q&A will post all the data to the first AAA record it finds. The final post command will then blank the Form field to prevent the record from being posted again. And the next time the picklist of customer names displays in the Orders database, the new customer will be on it. Visit The Quick Answer’s Web Site at http://www.quickanswer.com • Complete Back Issue Index 1990-1997 • Comprehensive Topic Index 1990-1998 • Find Out About Online Subscription Benefits Dated material—Please Rush 1927A Harbor Blvd. Costa Mesa, CA 92627 12 • Q&A Online Tip-of-the-Month • Q&A Brain Teaser • Copy and Paste Web Site Programs • Downloadable Freebie Files • Database Applications for Sale • Q&A Consultants Directory • Links to Useful Web Sites & More! Bulk-Rate U.S. Postage PAID Torrance CA Permit No. 333 The Quick Answer ● February 1998