1
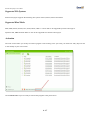
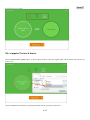
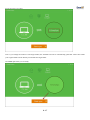
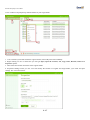
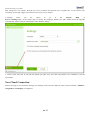
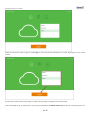
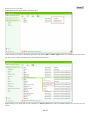
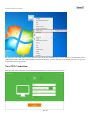
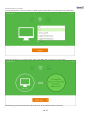
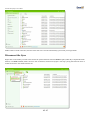
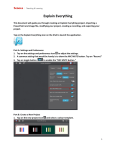
EaseUS EverySync User Guide
EaseUS® EverySync
User Guide
1 / 17
EaseUS EverySync User Guide
EaseUS EverySync
EaseUS EverySync....................................................................................................................................................................... 2
Welcome........................................................................................................................................................................................3
Get Started.................................................................................................................................................................................... 3
Hardware Requirements............................................................................................................................................................... 3
System Requirements................................................................................................................................................................... 3
Supported File Systems................................................................................................................................................................ 4
Supported Hard Disks...................................................................................................................................................................4
Activation......................................................................................................................................................................................4
Home Page.................................................................................................................................................................................... 5
My computer/Network shares.......................................................................................................................................................6
New Cloud Connection...............................................................................................................................................................10
New FTP Connection..................................................................................................................................................................13
Disconnect the Sync....................................................................................................................................................................15
System Tray Menu...................................................................................................................................................................... 16
Support........................................................................................................................................................................................ 16
Troubleshooting.......................................................................................................................................................................... 16
2 / 17
EaseUS EverySync User Guide
Welcome
Thank you for using EaseUS EverySync, an all-in-one and easy-to-use programs to synchronize your data with your local
computer, FTP and a reliable tool to manage your multiply cloud accounts. It is endowed with a visualized interface and
straightforward user experience to ensure an easy and smooth use for common users.
This User Manual includes a detailed instruction of how to use the program and all the features in this product.
Get Started
Some basic references about using this product and how to activate trial after purchase are included in this section. User
probably get a main idea if this product is suitable for my case after reading it.
Hardware Requirements
500 MHz processor or faster
At least 1 gigabytes (GB) RAM, At least 2 GB RAM under Window 8/8.1/10
At least 1 GB of available space on the hard disk
Keyboard and a Microsoft Mouse or some other compatible pointing device
System Requirements
Your computer must be running one of the following operating systems:
Windows XP®
Windows Vista®
Windows® 7
Windows® 8
Windows® 10
Windows Server® 2003
Windows Server® 2008
Windows Server® 2008 R2
Windows Server® 2012
Windows Server® 2012 R2
Windows Small Business Server 2003
Windows Small Business Server 2008
Windows Small Business Server 2011
3 / 17
EaseUS EverySync User Guide
Supported File Systems
EaseUS EverySync supports the following file systems: FAT12, FAT16, FAT32 and NTFS.
Supported Hard Disks
IDE, EIDE, SATA, ESATA, ATA, SCSI, iSCSI, USB 1.1/2.0/3.0 disk are all supported by EaseUS EverySync.
Dynamic disk, MBR and GPT disks are also in the supported list of EaseUS EverySync.
Activation
The Trial version offers you 30 days to test this program. After creating a new sync task, you notice how many days are left
in the validity of your Trial version.
Click Activate Now if you are ready to activate this program to the paid version.
4 / 17
EaseUS EverySync User Guide
Fill in the license code you purchase and click Activate to register it to the full version. Please click Purchase it now if you
currently do not have a license code.
Home Page
When first launching this program, first to be noticed is a visualized interface with 2 clickable circles and other options.
First to select to sync data between My computer/Network shares, My computer/Cloud or My computer/FTP
5 / 17
EaseUS EverySync User Guide
My computer/Network shares
Choose Click to select a folder option. In the prompted window select the original folder which contains the contents you
want to sync.
Choose the Bidirectional Mode or Unidirectional Mode to keep your files synchronous.
6 / 17
EaseUS EverySync User Guide
Click the circle at the left to select the location of the target folder, which can be a local or external drive. NAS and other
network drives also supported.
The default target folder will be named as EverySync. After you select the folder you want to sync, a new subfolder with the
same name as your original folder will be automatically generated under the target folder.
7 / 17
EaseUS EverySync User Guide
Note: if you change the location of the target folder, this subfolder will not be automatically generated. All the files under
your original folder will be directly saved under the target folder.
Click Start sync when you are ready.
8 / 17
EaseUS EverySync User Guide
A new window will prompted up with the details of your target folder.
1. A list of all the synced files with their original names, last modify time and availability.
2. Right clicking on one or multi files you will get Open, Open the location, Cut, Copy, Paste, Rename, Delete and
Properties options.
3. Here shows the location and name of the original folder.
4. Properties Settings where you can view and modify the location of original and target folder, sync mode and plan
settings. See screen shot below.
9 / 17
EaseUS EverySync User Guide
Plan settings have two options: Execute sync every X minutes and Execute sync at regular time. If you need to sync
real-timely, we strongly suggest you choose Execute sync every 0 minutes.
5. Settings
offers
you
the
option
to
go
to
the
Activate,
Help,
A
bout and Settings Page. In the setting page, to modify the Language, default sync path, enable Check the Upgrade
Automatically, Start EverySync automatically when Windows startup.
6. Create a New Sync task. If you keep the default sync path, every sync task will generate a new subfolder to save the
synced files.
New Cloud Connection
EaseUS EverySync can centralized manage your multiply cloud accounts under the New Cloud Connection. OneDrive,
Google Drive and Dropbox are supported.
10 / 17
EaseUS EverySync User Guide
Select the Cloud you want to sign in, click Login. A new web browser will direct you to the login page of your Cloud
website.
Click Accept to allow EaseUS EverySync to achieve the privilege to manage your Cloud account.
After confirming the sync, all the files in your Cloud are marked as Available Online-only in the list. Currently they are not
11 / 17
EaseUS EverySync User Guide
downloaded into the target folder of the local drive.
Select the files you want to download, right click and choose Make available offline under the Availability you will check
the status of these files, synchronizing or successfully synchronized.
Right clicking every single file on your computer, an Add to Cloud option will be available and allow you to sync it to your
Cloud.
12 / 17
EaseUS EverySync User Guide
By doing this with many other sync program, this file will be first automatically moved to their local Cloud folder before
uploading to Cloud. This will not be operated in EaseUS EverySync, your file will stay in the default path and no copy will
be generated in the target folder.
New FTP Connection
Switch to New FTP Connection, fill in the inquired information to login into your FTP server.
13 / 17
EaseUS EverySync User Guide
You are also allowed to switch to SFTP over SSH, Explicit FTPS (SSL/TLS) and Implicit FTPS (SSL/TLS)
When the connection to your FTP is made, please click Start sync to manage your synced files.
The following operation and interface with be the same as the Cloud and local connections.
14 / 17
EaseUS EverySync User Guide
Note: Unlike a Cloud connection, the files in the FTP server will be automatically synced into your target folder.
Disconnect the Sync
Right click on the folder you want to disconnect the synchronization and select Remove sync (under My Computer/Network
Shares) or Unlink account (Under Cloud or FTP connection). EaseUS EverySync will stop syncing files between these 2
folders and remove this folder from the list.
15 / 17
EaseUS EverySync User Guide
System Tray Menu
Find the tray icon in the Windows Taskbar, left click on it to enable the EaseUS EverySync System Tray Menu.
1.
2.
3.
4.
The processing bar of the synchronizing file.
Here check the speed of the synchronization.
Enable/Disable the Automatic Sync
Exit the program
Support
If you cannot find what you are looking for in this manual, please feel free to contact us by sending your email to
[email protected].
If there is any error on using EverySync, please take screenshot about the error and run errReport.exe in 'bin' folder under
the installation directory of EverySync to get an error report, and describe the issue clearly then send them to our support
email. We would provide the right solution immediately for you.
Troubleshooting
FAQ
Q1: How to create a new sync task if you already have one?
A: You can click the 'Create New Sync' in the lower-left corner to create a new one.
16 / 17
EaseUS EverySync User Guide
Q2: In which side should the files in the list showing in the right side of the program locate?
A: They are the files that have been synced between both sides. (Similar to the file display mode of a Cloud program)
Q3: How to synchronize files manually?
A: Sorry, the current version of EverySync can only do the file synchronization automatically.
Q4: How to set the time interval of the auto-sync?
A: You could set under the “Properties” of the sync task.
Q5: Why I can find some redundant files like abc(1).txt generated in EverySync after processing a synchronization?
A: To avoid a file conflict, EverySync will rename a file if it detects there are files with same name under one directory.
Q6. Why I cannot switch the sync mode under the subdirectories of a 'My computer' sync task?
A: Only switching the sync mode under root directory is supported in the current version.
Q7: Why the sync task is lost after switching the user?
A: The sync task for each user is independent.
17 / 17