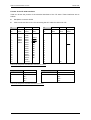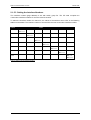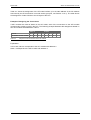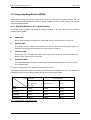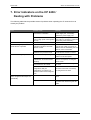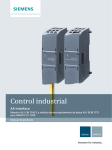
1
Introduction Technical description and guidelines for installing the CP 2430 1 2 Standard operation 3 SINEC Extended operation SINEC S1 Master Module CP 2430 Multiprocessor mode C79000-G8976-C062 Replacing a defective slave / Automatic address programming 6 Error indicators / Dealing with problems 7 4 5 Release 01 Volume 1 of 1 Appendix PICS A Status word ANZW and parameter assignment error byte PAFE B Further reading C Abbreviations / Terms D SINEC is a trademark of SIEMENS Siemens Aktiengesellschaft E SINEC SINEC S1 Master Module CP 2430 Manual C79000-B8976-C085 Note We would point out that the contents of this product documentation shall not become a part of or modify any prior or existing agreement, commitment or legal relationship. The Purchase Agreement contains the complete and exclusive obligations of Siemens. Any statements contained in this documentation do not create new warranties or restrict the existing warranty. We would further point out that, for reasons of clarity, these operating instructions cannot deal with every possible problem arising from the use of this device. Should you require further information or if any special problems arise which are not sufficiently dealt with in the operating instructions, please contact your local Siemens representative. General This device is electrically operated. In operation, certain parts of this device carry a dangerously high voltage. Failure to heed warnings may result in serious physical injury and/or material damage. WARNING ! ! Only appropriately qualified personnel may operate this equipment or work in its vicinity. Personnel must be thoroughly familiar with all warnings and maintenance measures in accordance with these operating instructions. Correct and safe operation of this equipment requires proper transport, storage and assembly as well as careful operator control and maintenance. Personnel qualification requirements Qualified personnel as referred to in the operating instructions or in the warning notes are defined as persons who are familiar with the installation, assembly, startup and operation of this product and who posses the relevant qualifications for their work, e.g.: - Training in or authorization for connecting up, grounding or labelling circuits and devices or systems in accordance with current standards in saftey technology; - Training in or authorization for the maintenance and use of suitable saftey equipment in accordance with current standards in safety technology; - First Aid qualification. B897600-C085 Contents CONTENTS 1. INTRODUCTION 1-1 1.1 General Information 1.1.1 Overview of the Chapters 1.1.2 Symbols and Conventions Used in the Text 1.1.3 Requirements for Understanding the Manual 1.1.4 Sample Programs/Readme File 1.1.5 Further Information 1.1.6 Hotline 2. TECHNICAL DESCRIPTION AND GUIDELINES FOR INSTALLING THE CP 2430 2.1 Overview of the Module 2.1.1 Introduction 2.1.2 Technical Data of the Module 2.1.3 Connection Between the PLC and CP 2430 2.1.4 Design and Interfaces of the CP 2430 2.1.5 Settings on the CP 2430 2.1.5.1 Setting the Start Address of the I/O Area 2.1.5.2 Setting the Mode 2.1.5.3 Setting the Interface Numbers 2.1.6 Installing the CP 2430 in the PLC Rack 2.1.7 Control and Display Elements of the CP 2430 2.1.8 Types of Operation with the CP 2430 3. STANDARD OPERATION OF THE CP 2430 (MODE 1) 1-2 1-2 1-3 1-3 1-3 1-3 1-3 2-1 2-2 2-2 2-3 2-5 2-5 2-7 2-7 2-8 2-10 2-12 2-15 2-18 3-1 3.1 Configuring the CP 2430 for Standard Operation 3-1 3.2 Addressing the CP 2430 in the PLC 3-3 3.3 How the PLC Addresses the Slaves on the AS-I Cable 3-3 4. EXTENDED MODE (HDB MODE) OF THE CP 2430 (MODES 2 AND 3) 4-1 4.1 Introduction 4.1.1 HDB Mode Combined With the I/O Mode (Mode 2) 4.1.2 Simple HDB Mode of the CP 2430 (Mode 3) 4.1.3 Configuring the CP 2430 in the HDB Mode 4-1 4-1 4-2 4-3 4.2 Using Handling Blocks (HDBs) 4.2.1 Handling Blocks as a Program Interface 4.2.2 Supplying the HDBs with Parameters 4.2.3 Startup Synchronization in the HDB Mode 4-4 4-4 4-5 4-7 4.3 Interface for AS-I Commands (Modes 2/3) 4.3.1 Overview of the Commands Supported by the CP 2430 4.3.1.1 Set_Permanent_Parameter 4.3.1.2 Get_Permanent_Parameter 4.3.1.3 Write_Parameter 4.3.1.4 Read_Parameter 4.3.1.5 Store_Actual_Parameters I-1 4-8 4-9 4-10 4-11 4-12 4-13 4-14 Contents B897600-C085 4.3.1.6 Set_Permanent_Configuration 4.3.1.7 Get_Permanent_Configuration 4.3.1.8 Store_Actual_Configuration 4.3.1.9 Read Actual Configuration Data 4.3.1.10 Set_LPS 4.3.1.11 Set_Offline_Mode 4.3.1.12 Select Autoprogramming 4.3.1.13 Set_Operation_Mode 4.3.1.14 Change_Slave_Address 4.3.1.15 Read Slave Statun 4.3.1.16 Read Lists and Flags (Get_LPS, Get_LAS, Get_LDS, Get_Flags) 4.3.1.17 Read Total Configuration 4.3.1.18 Configuring the Total System 4.3.1.19 Write Parameter List 4.3.1.20 Read Parameter Echo List 4.3.1.21 Read Version ID 4.3.1.22 Slave Diagnostics 4.3.1.23 Read Slave Status and Delete 4.3.1.24 Read Slave ID 4.3.1.25 Read Slave I/O 4.3.1.26 Read S1 Diagnostic Data 4.4 Transferring I/O Data of the AS-I Slaves Using HDBs (Only Mode 3, ANR 200, 201) 4.4.1 Transferring the Output Data to the AS-I Slaves (ANR 200) 4.4.2 Reading the Input Data of the AS-I Slaves (ANR 201) 4-15 4-16 4-17 4-18 4-19 4-20 4-21 4-22 4-23 4-24 4-25 4-27 4-29 4-31 4-32 4-33 4-34 4-35 4-36 4-37 4-38 4-39 4-39 4-39 5. MULTIPROCESSOR MODE 5-1 6. REPLACING A DEFECTIVE SLAVE / AUTOMATIC ADDRESS PROGRAMMING 6-1 7. ERROR INDICATORS ON THE CP 2430 / DEALING WITH PROBLEMS 7-1 A ASI PROTOCOL IMPLEMENTATION CONFORMANCE STATEMENT (PICS) A-1 A.1 PICS for the CP 2430 A-1 B STATUS WORD ANZW AND PARAMETER ASSIGNMENT ERROR BYTE PAFE B-1 B.1 Meaning and Structure of the ANZW B-1 B.2 Content of the Status Word B-2 B.3 Possible Status Words With the Jobs Permitted on the CP 2430 B-6 B.4 The Parameter Assignment Error Byte PAFE B-10 C FURTHER READING C-1 D ABBREVIATIONS / TERMS D-1 I-2 B897600-C085 Contents I-3 B8976-C085 SINEC S1 Master Module CP 2430 1. Introduction This manual describes the functions of the CP 2430 and the procedure for programming the module. Before you read this manual, it is assumed that you know the contents of the chapter “SINEC S1/AS-I Introduction and Basic Information”. We recommend the following procedure when... ...You want an overall picture of SINEC S1. ´ Read the manual “SINEC S1/AS-I Introduction and Basic Information”. This manual contains general information about SINEC S1. ...You want to know how to program the CP 2430. ´ Read the manual “SINEC S1/AS-I Introduction and Basic Information”, Chapter 1 Section 1.5 “The Master Mode”. You should also read Chapters 3 and 4 in this manual. ...You want to start up the CP 2430 PLC master module. ´ You will find the information you require in Section 2.1 ‘Overview of the Module’ and in Chapter 3 ‘Standard Operation of the CP 2430 (Mode 1)’. ...You want to create a PLC program for standard applications. ´ Chapter 3 contains all the information you require for standard operation. 1-1 SINEC S1 Master Module CP 2430 B8976-C085 1.1 General Information 1.1.1 Overview of the Chapters Chapter 1 Introduction This chapter contains general information about the layout and use of the manual. Chapter 2 Technical Description and Guidelines for Installing the CP 2430 This chapter provides an overview of the modes, installation and startup and the display and operating elements of the CP 2430. Chapter 3 Standard Operation of the CP 2430 (Mode 1) Chapter 3 describes standard operation of the module which is particularly straightforward and easy to use. This mode allows direct access to the inputs and outputs of the AS-I slave just like digital I/O modules of the SIMATIC PLC. Chapter 4 Extended Operation (HDB Mode) of the CP 2430 (Modes 2 and 3) Chapter 4 describes the extended mode of the CP 2430 that requires standard handling blocks (HDBs) in the controller. When using this mode, it is, for example, possible to assign parameters to the AS-I slaves or modify the slave addresses by programming the changes in an S5 program. Chapter 5 Multiprocessor Mode Chapter 5 contains information about operating the CP 2430 in multiprocessor PLCs. Chapter 6 Replacing a Defective Slave/Automatic Address Programming This chapter explains how you can replace a defective AS-I slave simply and easily. Chapter 7 Error Indicators on the CP 2430/Dealing With Problems This chapter lists and explains the possible error and fault indications on the CP 2430 and describes ways to eliminate problems. 1-2 B8976-C085 SINEC S1 Master Module CP 2430 1.1.2 Symbols and Conventions Used in the Text General symbols in the text: This symbol indicates an action for you to perform. This symbol highlights special features or dangers. 1.1.3 Requirements for Understanding the Manual To fully understand the manual, you should already be familiar with the following: ± Programming in STEP 5 ± The ‘SINEC S1/AS-I Introduction and Basic Information’. 1.1.4 Sample Programs/Readme File The floppy disk accompanying this manual contains sample programs in the directory \CP2430\English that provide you with instructions and help when programming the CP 2430. These sample programs are explained. The readme.txt file contains up-to-date information and explains any restrictions that apply to the use of the CP 2430. 1.1.5 Further Information Order numbers for the products referred to in this manual can be found in the latest release of the appropriate catalog. If you require further information about SINEC S1 and AS-I components, please contact your local SIEMENS office. 1.1.6 Hotline If you have technical questions, please use our hotline on the following numbers: xx49-9131-7-43147 xx49-9131-7-43157 1-3 SINEC S1 Master Module CP 2430 B8976-C085 1-4 B8976-C085 SINEC S1 Master Module CP 2430 2. Technical Description Installing the CP 2430 and Guidelines for This chapter outlines the basic functions of the SINEC S1 CP 2430 master module and explains how the module is installed and started up. You will learn the following: ± Which PLC systems can be operated using the CP 2430 on SINEC S1. ± How to install the CP 2430. ± Which modes are supported by the CP 2430. 2-1 SINEC S1 Master Module CP 2430 B8976-C085 2.1 Overview of the Module 2.1.1 Introduction The CP 2430 module can be operated in the programmable logic controllers (PLCs) S5-115U, S5135U, S5-155U. It allows the connection of two independent AS-I chains to the programmable logic controller mentioned above. SINEC H1 or SINEC L2 CP2430 Chain A AS-I cable Chain B Passive AS-I module (without slave ASIC) Active AS-I module (with slave ASIC) AS-I cable AS-I power unit (4 x slave) Binary sensors and actuators with slave ASIC = Slave ASIC Binary sensors and actuators without slave ASIC Active or passive AS-I module Actuator or sensor with direct connection Branch of the AS-I cable Figure 2-1 Possible Applications of the SINEC S1 CP 2430 Module Components Supplied The product CP 2430 includes the following components: 1. The CP 2430 module 2. Two connectors for connection to the AS-I cable If you want to order more of these connectors, please contact your SINEC sales office. For further products, refer to /3/ or contact your SINEC sales office. 2-2 B8976-C085 SINEC S1 Master Module CP 2430 2.1.2 Technical Data of the Module The essential technical data of the CP 2430 module is as follows: ± The CP occupies one slot in the SIMATIC PLC. If you operate the module in the S5-115U, an adapter module is required. ± The CP 2430 module is a double master. This means that two AS-I chains operating completely independently of each other can be connected. The CP 2430 has two independent channels A and B to which the two AS-I chains A and B can be connected. ± From the point of view of the PLC, the CP 2430 uses 32 input bytes and 32 output bytes if the I/O mode is activated for both AS-I chains (channels A and B). If the I/O mode is only activated for one channel, the addresses occupied are reduced to 16 input bytes and 16 output bytes. If the I/O mode is disabled for both channels, the module does not require any I/O address area. ± The programmable logic controller can access the inputs and outputs of the AS-I slaves using the I/O area of the CP 2430 in the same way as it accesses the inputs and outputs of a digital I/O module. ± The CP 2430 has two pages with consecutive interface numbers. A page is assigned to each channel. Using the pages, the S5 programmable logic controller can transfer AS-I commands to the CP 2430 using standard handling blocks. As an option, it is also possible to exchange I/O data of the AS-I slaves between the CP 2430 and S5 PLC using handling blocks. ± The page interface provided by the CP 2430 is an efficient mechanism for handling AS-I commands. The option of using the page interface to transfer the input and output data of the AS-I slave allows address area to be saved in the PLC. ± The AS-I slave configuration is saved using switches on the front panel or by special commands. ± The AS-I cable is connected using connectors with screw contacts. 2-3 SINEC S1 Master Module CP 2430 B8976-C085 Further Technical Data Bus cycle time 5 ms with 31 slaves Configuration By switches on the front panel or using special commands AS-I profiles supported Without handling blocks: M0 With handling blocks: M1 AS-I interface connection Using connectors with screw contacts Adress range 32 input bytes and 32 output bytes of the PLC if the I/O mode is set for both channels. If the I/O mode is activated for only one channel, the CP 2430 occupies 16 input bytes and 16 output bytes. If the I/O mode is disabled for both channels, the CP 2430 does not occupy any I/O address area. Number of pages The CP 2430 has two pages. Each channel is assigned one page. An interface number (page address) is only occupied when the page mode is activated for the corresponding channel (selected with DIP switch). Power supply SIMATIC backplane bus Power supply from the AS-I cable Power consumption from DC 5 V Power consumption from the AS-I cable Ambient conditions 5 V d.c. According to the AS-I specification typically 700 mA maximum 100 mA • • • • • Operating temperature 0 to 60°C Transport and storage temperature -40°C to +70°C Relative humidity max. 95% at +25°C Weight approximately 400g Space required 1 slot Table 2-1 Technical Data 2-4 B8976-C085 SINEC S1 Master Module CP 2430 2.1.3 Connection Between the PLC and CP 2430 Figure 2-2 shows the connection between the PLC and the CP 2430 module. As already mentioned, the two channels A and B on the module are completely independent of each other. Each channel has an I/O interface and a page interface that can be activated or deactivated using a DIP switch. If the I/O interface is not activated, the I/O area assigned to it is not used by the module. In the same way, if the page interface is disabled, the interface number (page address) is not used by the module. The I/O data of the AS-I slaves are exchanged between the PLC and CP 2430 on the I/O interface. Access is transparent just as with an I/O module. AS-I commands are transferred using the page interface (handling block mode). As an option, the I/O data of the AS-I slaves can also be transferred using the page interface. In this case, the I/O interface for the channel in question is disabled. CP2430 channel A Page with SSNR K ASI master PM switch channel A channel A 16 bytes in the I/O area with start address n Connection channel A I/O switch channel A PLC CP2430 channel B Page with SSNR K+1 ASI master PM switch channel B channel B channel B SINEC004 16 byte in the I/O area with start address n+16 Connection I/O switch channel B Figure 2-2 Connection Between the PLC and CP 2430 2.1.4 Design and Interfaces of the CP 2430 Design of the CP 2430 This diagram illustrates the design of the CP 2430. The addresses and modes of the module are set using switches S2 and S4 (see Section 2.1.5) S4 S2 X1 X10 X2 X11 Figure 2-3 Layout of the CP 2430 2-5 SINEC S1 Master Module CP 2430 B8976-C085 Pinouts of the CP 2430 Interfaces Table 2-2 shows the pinouts of the electrical interfaces of the CP 2430. These interfaces are as follows: ± Backplane connector X1/X2 ± Male connectors X10 or X11 for connecting the AS-I cable for channel A or B X1 D B Z X2 D B Z Pin No. Signal Name Signal Name Signal Name Pin No. Signal Name Signal Name Signal Name 2 4 6 8 10 12 14 16 18 20 22 24 26 28 30 32 ADB12 ADB13 ADB14 ADB15 - Ground PESP ADB0 ADB1 ADB2 ADB3 ADB4 ADB5 ADB6 ADB7 ADB8 ADB9 ADB10 ADB11 BASP Ground P5 RESET MEMR MEMW RDY DB0 DB1 DB2 DB3 DB4 DB5 DB6 DB7 - 2 4 6 8 10 12 14 16 18 20 22 24 26 28 30 32 - Ground +5V +5V NAU - Table 2-2 Pin Assignment of the Backplane Connectors X1 and X2 X10 (Channel A) X11 (Channel B) Pin No. Signal Name Pin No. Signal Name 1 2 3 4 ASI + ASI ASI + ASI - 1 2 3 4 ASI + ASI ASI + ASI - Table 2-3 Pin Assignment of the Male Connectors X10 and X11 2-6 B8976-C085 SINEC S1 Master Module CP 2430 2.1.5 Settings on the CP 2430 The start address of the I/O area and the mode of the two AS-I channels of the CP 2430 are set using switch group S2. With switch group S4, you select the interface number. Both switch groups are located on the module next to the upper backplane connector X1. 2.1.5.1 Setting the Start Address of the I/O Area The CP 2430 occupies 32 input bytes and 32 output bytes in the I/O area of the S5 PLC starting at the selected start address if the I/O mode is activated for both channels. The start address is set using DIP switches (switch group S2). Example: If the value 0 is set as the start address, the CP 2430 occupies input bytes 0 to 31 and output bytes 0 to 31 that are assigned to the two channels as follows: Channel A input byte 0 to 15 Channel B input byte 16 to 31 output byte 0 to 15 output byte 16 to 31 Table 2-4 Input and Output Assignment If the I/O mode is switched off on one channel, the input and output bytes are not used and are free to be used by other modules. The start address is selected in increments of 32 using switch group S2. The DIP switches of S2 are labeled S2-1, S2-2 to S2-7. S2-1 S2-2 S2-3 Start Address OFF OFF OFF 0 OFF OFF ON 32 OFF ON OFF 64 OFF ON ON 96 ON OFF OFF 128 ON OFF ON 160 ON ON OFF 192 ON ON ON 224 Table 2-5 Setting the Start Address The default setting of the start address is 0. 2-7 SINEC S1 Master Module CP 2430 B8976-C085 Examples: Switch up 1 2 3 Switch group S2 SINEC_1 OFF Switch down Selected start address = 32 Figure 2-4 Switches for the Start Address In the digital I/O area from 0 to 127, a maximum of four CP 2430 modules each with two AS-I chains with a total of 1024 input and 1024 output bits can be plugged in when the I/O area of both channels is activated on these modules. In this case, the complete address area for the digital I/Os is used. No further digital I/Os can then be plugged into the programmable logic controller. Since the CP 2430 can also be addressed in the area of the analog I/Os, a further four CP 2430 modules can be plugged in from I/O byte 128 to 255 if the I/O mode is activated on both channels of these modules. In this case the complete address area for the analog I/Os is occupied and no further analog modules can be plugged in. The CP 2430 can be addressed in the same way as “normal” I/O modules using the extended I/O area (O area) providing the CPU being used supports this type of addressing. For further details, refer to the manual of your CPU. 2.1.5.2 Setting the Mode You also set the mode of your CP using switch group S2. Switch up 4 5 6 7 Switch group S2 SINEC _2 OFF Switch down B A PM IO PM IO Set for both channels: I/O mode activated and page mode deactivated (mode 1) Figure 2-5 Switches for Setting the Mode 2-8 B8976-C085 SINEC S1 Master Module CP 2430 Using these switches, you can set the mode for channel A and channel B separately. You can also activate or deactivate the page mode (switch PM = page mode) and the I/O mode (switch IO = Input/Output mode) on the module separately for each channel. The I/O mode for the corresponding AS-I channel is activated or deactivated with the I/O switch. The page mode for the corresponding channel is activated or deactivated with the PM switch. The following table shows the switch settings and their significance: PM Switch IO Switch Mode OFF OFF The corresponding channel of the AS-I master is deactivated (recognizable by the LEDs for this channel remaining unlit). The I/O address area for this channel is not used and is then available for other modules. The page reserved for the channel is also not used. OFF ON Mode 1: Standard mode, only the I/O mode is active, the page mode is disabled. (Setting when the module is supplied) The page reserved for the channel is not used. ON OFF Mode 3: Only page mode The I/O address area selected for this channel is not used and is free for other modules. ON ON Mode 2: I/O mode and page mode Table 2-6 Modes 2-9 SINEC S1 Master Module CP 2430 B8976-C085 2.1.5.3 Setting the Interface Numbers The interface number (page address) is set with switch group S4. The CP 2430 occupies two consecutive interface numbers for channel A and channel B. To select the interface number for channel A, the values of the switches set to “ON” in the following table must be added. The interface number of channel B is the next consecutive interface number. Switch S4-1 S4-2 Value ON = 128 OFF = 0 ON = 64 OFF = 0 S4-3 S4-4 ON = 32 OFF = 0 ON = 16 OFF = 0 S4-5 ON = 8 OFF = 0 S4-6 ON = 4 OFF = 0 S4-7 ON = 2 OFF = 0 Table 2-7 Switches for the Interface Numbers 2-10 B8976-C085 SINEC S1 Master Module CP 2430 Example of an interface number setting: 1 2 3 4 5 6 7 S w itc h b lo c k S 4 SINE C_3 OFF Sw itch do wn Figure 2-6 Example of the Interface Number Setting (Interface Number Selected: Channel A=80, Channel B=81) Switch S4-1 Value OFF = 0 S4-2 ON = 64 S4-3 OFF = 0 S4-4 ON = 16 S4-5 OFF = 0 S4-6 OFF = 0 S4-7 OFF = 0 Interface no. Channel A Interface no. Channel B 64 + 16 = 80 = Interface number channel A + 1 = 81 Table 2-8 Example of an Interface Number Setting If switch group S2 is deactivated for both channels for the HDB mode, (switch PM = OFF), the CP 2430 does not occupy any interface number, in other words, the settings of switch group S4 are irrelevant. 2-11 SINEC S1 Master Module CP 2430 B8976-C085 2.1.6 Installing the CP 2430 in the PLC Rack When supplied (mode 1: only I/O mode), the CP 2430 can be operated in the central controllers and expansion units in all CP and I/O slots (it cannot be plugged in directly into the S5-115U). The module can be operated without a fan. If the page mode is activated for one or both channels, the CP 2430 must be plugged into a CP slot. When installing the CP 2430 in the S5-115U programmable logic controller, an adapter module is necessary. Modules must only be plugged in or removed when the power supply to the rack is turned off. The modules contain electrostatically sensitive devices (ESD) and you must take the usual measures to avoid electrostatic charges. The following tables show the slots available for both modes. Slots for the SINEC CP 2430 (max. 4 x CP 2430 modules per S5-115U to 155U) CP 2430 in the I/O mode: Rack / Device Accessories S5-115U CR 700-0LA CR 700-0LB CR 700-1 CR 700-2 CR 700-3 ER 701-2 ER 702-3 Adapter module Adapter module Adapter module Adapter module Adapter module Adapter module Adapter module Slots for the CP 2430 0 1 2 3 4 5 6 7 2 3 4 5 6 7 Table 2-9 Slots for the I/O Mode CP 2430 in the HDB mode: Rack / Device Accessories S5-115U CR 700-0LB CR 700-2 CR 700-3 ER 702-3 Adapter module Adapter module Adapter module Adapter module Slots for the CP 2430 0 1 Table 2-10 Slots for the HDB Mode = possible slot 2-12 B8976-C085 SINEC S1 Master Module CP 2430 CP 2430 in the I/O mode: Rack / Device Accessories Slots for the CP 2430 S5-135U/-155U CC 135U/155U; CC 135-U.;CC135-K.. CC 155 EG 183U EG 184U EG 185U EG 187U 3 11 19 27 35 43 51 59 67 75 83 91 99 107115123131139147155163 Table 2-11 Slots for the I/O mode CP 2430 in the HDB mode: Rack / Device Accessories S5-135U/-155U CC 135U/155U; CC 135-U.. CC 135-K.. CC 155 EG 185U Slots for the CP 2430 3 11 19 27 35 43 51 59 67 75 83 91 99 107115123131139147155163 Table 2-12 Slots for HDB Mode = possible slot The CP is approved for the following CC-EU connections: IM 304, IM 314 For HDB and/or I/O mode IM 307, IM 317 IM 300-5, IM 312-5 IM 305 For I/O mode (HDB mode not possible!) IM 306 2-13 SINEC S1 Master Module CP 2430 B8976-C085 Connecting the CP 2430 to the AS-I Cable The AS-I cable is connected using the connector supplied that has two pairs of terminals that are jumpered internally inside the CP 2430. + brown - blue These connections are jumpered by the CP 2430 + brown SINEC005 - blue Figure 2-7 Connector for the AS-I Cable The second pair of terminals is for connecting the AS-I power supply unit or for a branch of the AS-I cable. The AS-I power supply unit can, however, be connected at any other point on the AS-I cable. Noise Immunity/Grounding To ensure the noise immunity of the CP 2430, the PLC and AS-I power supply unit must be grounded correctly. For more detailed information, refer to the system manuals of the PLCs and the description of the AS-I power supply unit. 2-14 B8976-C085 SINEC S1 Master Module CP 2430 2.1.7 Control and Display Elements of the CP 2430 The following diagram shows the front panel of the CP 2430 with the control and display elements. These are described in detail below. The front panel contains a matrix display of the active slaves that can be switched over to channel A or B. Below this display there are two separate fields for the switches and displays of channels A and B and the connections for the two AS-I chains. Matrix display of the active slaves. The display can be switched to channel A or B using the ‘DISPLAY’ switch. Each slave is assigned a dot in the display. Defective or existing slaves that have not been configured are indicated by their dot flashing in the “protected mode”. ACTIVE SLAVES 30 25 20 15 10 5 0 0 1 2 3 4 A D ISP L AY B S E TC A C H G M OD Control and display field for channel A RUN FAULT AUPRG S1PF CMOD CERR S E TC B C H GMOD RUN FAULT AUPRG S1PF CMOD CERR Control and display field for channel B Connection for AS-I chain A A (The chain is connected using the supplied connector with screw terminals) Connection for AS-I chain B S IN E C0 0 6 B Figure 2-8 Front Panel of the CP 2430 2-15 (The chain is connected using the supplied connector with screw terminals) SINEC S1 Master Module CP 2430 ACTIVE SLAVES B8976-C085 The matrix displays which slaves on the AS-I cable are activated. The CP 2430 can only exchange data with activated slaves. Each slave is assigned a dot in the display that lights up if the slave is activated. Defective or existing slaves that have not been configured are indicated by the display flashing in the protected mode. The display can be switched between channel A and B using the ‘DISPLAY’ switch. The following statuses can be indicated by the displays for each channel: RUN 1. LED lit continuously: Indicates that the CP has started up correctly. 2. LED flashes This indicates that the CP 2430 is waiting for synchronization by the S5 PLC (HDB SYNCHRON). The RUN LED can only flash when the page mode is activated for the particular channel (switch group S2, switch PM). FAULT 1. LED lit continuously: This indicates that the CP 2430 has detected a hardware fault. In this case, the CP must be replaced. 2. LED lit while pressing the mode selector This indicates that the CP cannot accept the mode change either because a slave with address 0 exists or because the CP is not in the configuration mode when you switch to SET CONFIG. AUPRG This indicates that automatic address programming of a slave is possible. The automatic address programming makes it much easier to exchange a defective slave on the AS-I cable. If the AUPRG display is lit, this indicates that one configured slave does not exist on the AS-I cable (for example, a station has failed). If the AUPRG display is lit, you can replace the failed slave with an identical slave with the address 0 (default address). The CP then automatically reprograms the address 0 to the address of the failed slave. S1 PF S1 Power Fail. Indicates that the voltage supplied by the AS-I power unit on the AS-I cable is too low or has failed. CMOD Configuration Mode. This displays the operating mode. 2-16 B8976-C085 SINEC S1 Master Module CP 2430 Display on: Configuration mode Display off: Protected mode The configuration mode is only required when installing the CP 2430. In the configuration mode, the CP 2430 activates all connected slaves and exchanges data with them. For more information about the configuration mode/protected mode, refer to Section 3.1. CERR Here, the CP 2430 indicates whether the slave configuration detected on the AS-I cable matches the configuration stored on the CP (LPS). If they do not match, the CERR display is lit The CERR display is lit in the following situations: ¾ ¾ ¾ ¾ When a configured AS-I slave does not exist on the AS-I cable (e.g. fault on the slave). When a slave exists on the AS-I cable but has not been configured. When a connected slave has different configuration data (I/O configuration, ID code) from those configured on the CP. When the CP is in the offline phase. Switch SETC/CHGMOD The switch is only required for configuring the CP 2430 in standard operation. The switch is only activated in the STOP mode of the PLC and has the following functions. ¾ Switch in CHGMOD position -> mode change This position brings about a change between the configuration mode and the protected mode. The mode is signaled by the "CMOD" indicator. ¾ Switch in SETC position -> automatic configuration. If the CP is in the configuration mode (CMOD indicator on) and if the switch is set to the SETC position, the CP is configured automatically. Configuration then involves the following steps: 1. The existing slave configuration indicated by the “ACTIVE SLAVES” LED is saved by the CP as the desired configuration (in non-volatile memory). 2. The CP then switches over to the protected mode. For more information on configuring the CP 2430, refer to Section. 3.1 2-17 SINEC S1 Master Module CP 2430 B8976-C085 2.1.8 Types of Operation with the CP 2430 With the CP 2430 module, 2 types of operation are possible: ± Standard operation (without function blocks). ± Extended operation (with function blocks). The difference between the two types of operation is as follows: Standard Operation (mode 1) In this type of operation, the CP 2430 operates as a conventional digital input/output module. For each slave on the AS-I cable four input and four output bits are reserved in the process image of the analog I/Os. The input/output data are transferred to and from the slaves on the AS-I cable. In standard operation, no commands or special parameters can be transferred to the slaves on the AS-I cable. This type of operation corresponds to the profile M0 of the AS-I master specification. Extended Operation (modes 2 and 3) In extended operation, the PLC programmer has the complete range of functions available in the AS-I system. In particular, the assignment of parameters to slaves with an integrated AS-I connection is possible. This type of operation corresponds to the profile M1 of the AS-I master specification. The handling blocks (HDBs) are required on the S5 PLC for extended operation. These handling blocks are integrated in some of the S5 CPUs. For other S5 CPUs, the handling blocks can be ordered separately. 2-18 B8976-C085 SINEC S1 Master Module CP 2430 3. Standard Operation of the CP 2430 (Mode 1) Standard operation represents the most common and at the same time simplest use of the CP 2430. It allows direct access to the inputs and outputs of the slave (e.g. bus modules) just as with digital I/O modules of the SIMATIC PLC. When the CP is supplied, this type of operation is already set, no handling blocks are required. 3.1 Configuring the CP 2430 for Standard Operation The CP 2430 is capable of two operating modes, the configuration mode and the protected mode. When the CP 2430 is delivered, the configuration mode is set and this is signaled by the CMOD LED being lit. ± Configuration Mode: The configuration mode is used to install and start up an AS-I network. In the configuration mode, the CP 2430 can exchange data with every slave connected to the AS-I cable. Any slaves that are added later are detected immediately by the master and included in the cyclic data exchange. After testing the PLC program, the CP 2430 can be changed to the protected mode using the switch on the front panel. ± Protected Mode If the CP 2430 is in the protected mode, it only exchanges data with slaves that are “configured”. In this sense, “configured” means that the slave address saved on the CP and the configuration data stored on the CP match the values of a slave. Configuration of the CP 2430 during installation and start-up of the AS-I network. The following situation is assumed: ± The connected AS-I slaves are supplied with addresses (address programming device). ± The AS-I bus is complete, i.e. with the AS-I power supply unit in operation. To configure the CP 2430 in standard operation while installing the AS-I network, follow the steps outlined below: Switch the PLC to the STOP mode Change the CP 2430 to the configuration mode (switch the mode selector to the bottom position; the CMOD indicator lights up). If the CP is already in the configuration mode (as supplied), this step can be omitted. Switch the PLC to RUN and test your program. Note: In the configuration mode, you can add or remove slaves on the AS-I cable. Newly added slaves are activated immediately by the CP 2430. On completion of the installation of the AS-I slaves, switch the PLC to STOP Now move the mode selector of the CP 2430 to the upper position. The CP adopts the configuration displayed by the “ACTIVE SLAVES” display as the desired configuration and switches to the protected mode. 3-1 SINEC S1 Master Module CP 2430 B8976-C085 In the protected mode, the "CMOD" LED is switched off. Switch the PLC to RUN. The installation of the CP is then completed. Simplified Configuration Once you are certain that all the slaves on the AS-I cable are functioning correctly (for example, after a CP 2430 has been replaced), you can start up the CP 2430 as follows: Switch the PLC to STOP. Change the CP 2430 to the configuration mode (set the “SETC/CHGMD“ switch to the bottom position, the CMOD indicator lights up). If the CP is already in the configuration mode (as supplied), this step can be omitted. Now move the “SETC/CHGMD“ switch on the CP 2430 to the upper position. The CP then adopts the configuration displayed by the “ACTIVE SLAVES” indicator as the desired configuration and then switches to the protected mode. In the protected mode, the "CMOD" LED is switched off. Switch the PLC to RUN. The installation CP is then completed. The CERR indicator lights up briefly when the module changes to the protected mode. 3-2 B8976-C085 SINEC S1 Master Module CP 2430 3.2 Addressing the CP 2430 in the PLC In standard operation (Mode 1), the CP 2430 occupies 16 input and 16 output bytes in the I/O address area of the S5 programmable logic controller for each activated channel. This means that a maximum of 64 bytes can be occupied in the I/O address area per CP 2430. The start address of this address area is selected using switches on the CP 2430, see Section 2.1.5.1. 3.3 How the PLC Addresses the Slaves on the AS-I Cable Each station (slave) on the AS-I cable is assigned a nibble by the CP 2430. The PLC can write (slave output data) and read (slave input data) this nibble. In this way, bidirectional slaves can also be addressed. Of the 32 byte address area of the CP 2430, 31x4 bits are occupied by the AS-I slave data of channel A and 31x4 bits by the AS-I slave data of channel B. The remaining 2x4 bits are available for control commands and status messages on channel A or channel B of the CP 2430 (control nibble/status nibble). 3-3 SINEC S1 Master Module CP 2430 B8976-C085 Assignment for channel A: Byte number Bit 7-4 Bit 3-0 n+0 Control/status nibble Slave 1 n+1 Slave 2 Slave 3 n+2 Slave 4 Slave 5 n+3 Slave 6 Slave 7 n+4 Slave 8 Slave 9 n+5 Slave 10 Slave 11 n+6 Slave 12 Slave 13 n+7 Slave 14 Slave 15 n+8 Slave 16 Slave 17 n+9 Slave 18 Slave 19 n+10 Slave 20 Slave 21 n+11 Slave 22 Slave 23 n+12 Slave 24 Slave 25 n+13 Slave 26 Slave 27 n+14 Slave 28 Slave 29 n+15 Slave 30 Bit 3 Bit 3 | Bit 2 | Bit 2 | Bit 1 | Bit 0 Bit 3 | Bit 2 PLC I/O bits | Bit 1 | Bit 0 Slave bits Slave 31 | Bit 1 | Bit 0 Bit 3 | Bit 2 | Bit 1 | Bit 0 Assignment for channel B: Byte number Bit 7-4 Bit 3-0 n+16 Control/status nibble Slave 1 n+17 Slave 2 Slave 3 n+18 Slave 4 Slave 5 n+19 Slave 6 Slave 7 n+20 Slave 8 Slave 9 n+21 Slave10 Slave 11 n+22 Slave 12 Slave 13 n+23 Slave 14 Slave 15 n+24 Slave 16 Slave 17 n+25 Slave 18 Slave 19 n+26 Slave 20 Slave 21 n+27 Slave 22 Slave 23 n+28 Slave 24 Slave 25 n+29 Slave 26 Slave 27 n+30 Slave 28 Slave 29 n+31 Slave 30 Bit 3 Bit 3 | Bit 2 | Bit 2 | Bit 1 | Bit 0 Bit 3 | Bit 1 | Bit 0 Slave 31 | Bit 1 | Bit 0 Bit 3 n: Selected base address Table 3-1 | Bit 2 PLC I/O bits Assignment of the CP 2430 Interface 3-4 | Bit 2 | Bit 1 | Bit 0 Slave bits B8976-C085 SINEC S1 Master Module CP 2430 Table 3-1 shows the assignment of the CP 2430 interface (n is the start address of the I/O address area used by the CP 2430 which is set with switch group S2, see Section 2.1.5.1). The table shows the assignment of slave I/O bits to the I/O bytes of the PLC. Example of Assigning the Connections If AS-I modules are used as slaves on the AS-I cable, each of the connections on the AS-I module corresponds to exactly one bit in the PLC. The following example illustrates this assignment based on two AS-I modules with addresses 2 and 3. Slave 2 Slave 3 PLC bit 7 6 5 4 3 2 1 0 Connection on AS-I module 4 3 2 1 4 3 2 1 Table 3-2 Assignment of the Connections on the AS-I Module Explanation: In this case, slave 2 corresponds to the AS-I module with address 2 slave 3 corresponds to the AS-I module with address 3. 3-5 SINEC S1 Master Module CP 2430 B8976-C085 Example of how the PLC addresses a slave The inputs and outputs of the AS-I slaves can be accessed just like standard modules of the digital I/Os of the SIMATIC PLC. The following example illustrates this standard procedure: Example: CP 2430 being used with start address n= 64 S ta rt ad dress 64 64 65 S5 - 115/135/155U Bit 3 S lave 2 Bit 3 Bit 2 66 Bit 3 Bit 2 79 Bit 3 Bit 2 7 6 Channel A S la ve 1 C o ntro l/sta tus n ibble Bit 1 Bit 0 Bit 1 Bit 0 Bit 1 Bit 0 S la ve 3 Bit 1 Bit 0 Bit 3 Bit 0 Bit 3 Bit 1 Bit 0 Bit 3 Bit 2 Bit 1 Bit 0 5 4 3 2 1 0 Bit 1 Bit 0 S lave 4 Bit 1 Slave 3 0 80 Bit 2 Bit 2 S lave 5 Bit 2 S lave 31 S la ve 1 C o ntro l/sta tus n ibble Bit 3 Bit 2 Channel B 95 Slave 3 0 S lave 31 Bit 3 Bit 2 Bit 1 Bit 0 Bit 3 Bit 2 Bit 1 Bit 0 7 6 5 4 3 2 1 0 I/O byte no . I/O bit no. AS-I slaves Slave no.31 Channel B Slave no. 2 C hannel A Slave no. 3 Channel A Slave no. 4 Channel A I/O c od e = 9H I/O c ode = EH I/O c od e = 8 H ( A S-I m odule I/O c o de = 0H ) Bit 3 Bit 2 Bit 1 Bit 0 C o nn ec tion A S -I-m odule 1 Bit 3 Bit 2 Bit 1 Bit 0 Bit 3 Bit 2 Bit 1 Bit 0 Bit 3 Bit 2 Bit 1 Bit 0 C onn ec tion A S -I-m od ule 2 used as output used as outp ut used as input C on ne ction A S -I-m odule 3 used as outp ut C on nectio n A S-I-mo du le 4 used bidirectionally Figure 3-1 Mapping of the Slave Addresses on the PLC Slots 3-6 B8976-C085 SINEC S1 Master Module CP 2430 This arrangement results, for example, in the following I/O accesses if slave 2 and slave 4 are monodirectional slaves and slave 3 is a bidirectional slave: ± ± ± Slave 2, channel A Bit 0 Bit 3 S Q 65.4 O I 65.7 Slave 3, channel A Bit 2 Bit 2 A I 65.2 = Q 65.2 Slave 31, channel B Bit 2 = Q 95.2 Each slave address is assigned four I/O bits in the address area of the PLC. By setting the output bit of a slave, the corresponding output data of a slave are changed, by reading the input bit, the input data of a slave are read indirectly. This is the same reaction as with a conventional I/O module. Access to the Control/Status Nibble In addition to the I/O data, the CP 2430 also has a control/status nibble in the I/O data area that can be written or read. ± By writing this nibble, different CP 2430 modes can be selected. ± By reading this nibble, status and error bits of the CP 2430 can be read. What do you have to do? A quick checklist The list below is a brief overview of the points to bear in mind when creating the program Cyclic operation: You program the control nibble in the start-up OB so that the required mode is set. You scan the status nibble to make sure start-up was successful. In the cyclic mode, you write and read the I/O bytes as usual. In the cyclic mode, evaluate the status information (status nibble) to be able to react to an error. The exact significance of the control and status nibble is described on the following pages. 3-7 SINEC S1 Master Module CP 2430 B8976-C085 Status Nibble (Reading) When reading the control/status nibble, you obtain status information from the CP 2430. Bit 7 Meaning Table 3-3 Bit 6 Bit 5 0 = Voltage on the 0 = No error AS-I cable OK 1 = Configuration 1 = An ASI Power error Fail has occurred. The data are invalid Bit 4 0 = CP startup active 0 = CP in protected mode 1 = CP startup completed 1=CP in configuration mode Assignment of the Status Nibble Bit 7 "ASI Power Fail" This bit indicates whether or not the power supply on the AS-I cable is OK, too low or has failed completely. If the voltage is incorrect or has failed the input data of all slaves are set to 0. Bit 6 "Config Error" This bit indicates whether the configuration saved on the master matches the configuration of the slaves connected to the AS-I cable. If the configurations do not match, the input data of missing or failed slaves are set to 0. Bit 5 "Startup Bit" This bit indicates to the PLC whether or not the CP 2430 has completed its startup and internal initialization. This bit must be tested by the PLC during startup for the actual PLC program can be started. Bit 4 "Mode" This bit indicates whether the CP 2430 is in the configuration mode or in the protected mode. This bit can, for example, be used to configure the CP 2430 (see example program). Example: If the CP 2430 has the start address 32 and if the actual user program is contained in PB3, the user program can be started following the CP startup using the following statements: . . :A :JC . . I 32.5 PB 3 3-8 B8976-C085 SINEC S1 Master Module CP 2430 Control Nibble (Writing) Using the control nibble, two different modes can be set for the CP 2430. The control nibble is set by the user. Bit 7 Bit 6 Bit 5 Bit 4 Meaning 0 0 0 0 Standard operation 0 0 0 1 Timeout mode Example: With the statements :AN :S Q Q 64.4 64.4 the timeout mode is set on a CP 2430 with start address 64. When the timeout mode is set in the CP 2430 protected mode, a timeout is indicated when the PLC accesses the I/O area on the module and when there is a configuration error at the same time. A timeout is also indicated when the voltage on the AS-I cable is too low (ASI Power Fail). 3-9 SINEC S1 Master Module CP 2430 B8976-C085 3-10 B8976-C085 SINEC S1 Master Module CP 2430 4. Extended Operation (HDB Mode) of the CP 2430 (Modes 2 and 3) For modes 2 and 3 (extended mode) the standard handling blocks (HDBs) are required on the S5 programmable logic controller. This section explains which extra functions are available compared with the standard mode when operating the CP 2430 with handling blocks. 4.1 Introduction As an introduction to the following sections, the following aspects are explained: ± The differences between the types of operation in the HDB mode. ± How the CP 2430 is configured for the HDB mode. Please remember that the channels A and B of the CP 2430 operate completely independently of each other. This means that different modes can be set for channels A and B. The setting of the modes for the individual channels is described in Section 2.1.5.2. The HDB mode of the CP 2430 is only possible when the CP 2430 is plugged into a CP slot, see Section 2.1.6. 4.1.1 HDB Mode Combined With the I/O Mode (Mode 2) I/O Data of the AS-I Slaves In mode 2, the data exchange (input and output data) with the AS-I slaves is just as in the standard mode using the input and output area of the SIMATIC PLC (I/O data). The CP 2430 behaves in this case just like a digital input or output module. The I/O interface is described in Chapter 3 (standard mode). Command Calls Command calls to the CP 2430 from the S5 program use standard handling blocks (HDBs). With these command calls, the CP 2430 supports the complete range of functions in the actuator-sensor interface specification /2/ (to be more precise, all the functions marked as “mandatory” in the M1 profile are supported). These command calls, for example, allow a slave to be assigned parameters or a slave address to be modified. Commands are sent to the CPU by calling the SEND handling block with job number (ANR) 202. If return values are required from the CP 2430, these are made available to the S5 program by means of a RECEIVE handling block call with ANR 202. The channels A and B of the CP 2430 operate independent of each other. They are distinguished in the SEND and RECEIVE handling block calls by different interface numbers (SSNR). 4-1 SINEC S1 Master Module CP 2430 B8976-C085 PLC Command calls SEND with ANR 202 RECEIVE with ANR 202 CP2430 Return values for command calls Output data (e.g. PIQ) A/B Output data ASI slaves Input data ASI slaves S INE C002 Input data (e.g. PII) ASI connection Figure 4-1 CP 2430 Interface to the S5 Program in the Combined I/O and HDB Mode (Mode 2) 4.1.2 Simple HDB Mode of the CP 2430 (Mode 3) I/O Data of the AS-I Slaves In mode 3, in contrast to mode 2, the input and output data for the AS-I slaves are also transferred from the S5 PLC to the CP 2430 and vice-versa using handling block calls. The transfer of the output data of the AS-I slaves from the S5 PLC to the CP 2430 makes use of a SEND call with job number (ANR) 200. The input data of the AS-I slaves can be read by the S5 PLC using a RECEIVE call with ANR 201. The channels A and B of the CP 2430 operate independent of each other. They are distinguished in the SEND and RECEIVE handling block calls by different interface numbers (SSNR). 4-2 B8976-C085 SINEC S1 Master Module CP 2430 Command Calls As in mode 2, the command calls to the CP 2430 make use of a SEND call with ANR 202. When return values are expected from the CP 2430, they can be read using a RECEIVE job with ANR 202. PLC R E C E IV E w ith A N R 2 02 S E N D w ith A NR 200 R E C EIVE w ith A NR 201 C om m a n d calls R eturn va lu es for co m m an d ca lls CP2430 A S I c on n e c tio n A /B O u tp u t d a ta A S I slave s Inp u t d ata A S I sla ve s SINEC 001 SE N D w ith A N R 202 Figure 4-2 CP 2430 Interface to the S5 Program in the Simple HDB Mode (Mode 3) 4.1.3 Configuring the CP 2430 in the HDB Mode When configuring the CP 2430 in modes 2 and 3, there are two alternatives: ± The CP 2430 can be configured using the control switches as in the standard mode, see Section 3.1. ± As an alternative, a CP 2430 channel can be configured by the S5 user program by transferring the configuration data to the CP 2430 from a data block using a SEND call with ANR 202. For more information about the exact procedure, refer to the description of the example program on the diskette accompanying the manual. 4-3 SINEC S1 Master Module CP 2430 B8976-C085 4.2 Using Handling Blocks (HDBs) Apart from the I/O interface for each channel (A or B) the CP 2430 also has a page interface. Each of these interfaces is identified by the interface number (SSNR). Access to these interfaces is possible using the handling blocks. 4.2.1 Handling Blocks as a Program Interface The STEP 5 user program can access the page interfaces of the CP 2430 using the following handling blocks (HDBs): ± SEND HDB This is used to transfer commands or output data (mode 3) from the S5 PLC to the CP. ± RECEIVE HDB This block is used to transfer return values from the CP 2430 to the S5 program. (Data in response to a command or input data of the AS-I slaves in mode 3). ± CONTROL HDB This block is used to update the status word of a job sent to the CP 2430. This allows the status of a job sent to the CP to be read. ± SYNCHRON HDB The SYNCHRON block of the CP 2430 is used for startup synchronization of the CP 2430 in the extended mode. No further handling blocks are required to operate the CP 2430. The handling blocks are available in special function blocks of the SIMATIC S5 PLC. The assignment of handling block to function block number can be seen in the following table: PLC S5-115U S5-135U/155U CPU: CPU: CPU: 941, 942, 943 922, 928, 948 946/47 HDB 944, 945 SEND FB244 FB120 FB120 RECEIVE FB245 FB121 FB121 CONTROL FB247 FB123 FB123 SYNCHRON FB249 FB125 FB125 Table 4-1 Handling Blocks and Their FB Numbers 4-4 B8976-C085 SINEC S1 Master Module CP 2430 For more detailed information about the handling blocks of the individual SIMATIC S5 PLCs, please refer to the descriptions of the programmable logic controllers in question or /4/. 4.2.2 Supplying the HDBs with Parameters SYNC H RO N C O N TR O L SSNR B LG R P A F E SSNR A -N R AN ZW PAFE SEND R E C E IV E SSNR A -N R A N ZW Q TYP DBNR QANF Q LAE PAFE SSNR A -N R AN ZW Q TYP DBNR Q ANF Q LA E P A F E SIN EC _0 08 The HDBs must be supplied with the following interface parameters: Figure 4-3 Interface Parameters of the HDBs SSNR The CP 2430 has separate interface numbers for channel A and channel B. The interface number decides which CP the HDB call is intended for and in the case of the CP 2430 whether an HDB call is intended for channel A or channel B of the CP. The interface number (page address) of channel A is set on the module using the switch group S4. The interface number for channel B is the next higher interface number. If, for example, SSNR 80 is set for channel A, channel B then has SSNR 81; see Section 2.1.5.3. Example: SSNR : KY 0 , 52 The number 52 specifies that the HDB call is for CP interface (page) 52. A-NR The job number specifies how the particular channel on the CP 2430 interprets the HDB call sent to it. A-NR 202 is used on the CP 2430 to transfer command jobs. A-NR 200 and A-NR 201 are used to transfer I/O data in mode 3. No further job numbers are used on the CP 2430. Example: A-NR : KY 0 , 202 The number 202 indicates to the CP that the HDB call is a command job. 4-5 SINEC S1 Master Module CP 2430 B8976-C085 ANZW The status word contains the status of the jobs sent to the CP 2430. ANZW occupies two words in the S5 program. In the first word, the HDBs enter status information about the job. The next (second) word contains the number of data transferred to or from the CP 2430. A separate ANZW should be assigned in the user program for each SSNR/A-NR combination. For SEND (A-NR 202) and RECEIVE (A-NR 202) the same ANZW is used per channel. The structure of ANZW is explained in the appendix. Example: ANZW : FW 10 The status of the specified job number is entered in flag bytes 10 and 11, FW12 contains the transferred (byte) length. BLGR The field size is only specified with the SYNCHRON HDB and has no significance for the CP 2430. The CP 2430 operates with a fixed field size of 64 bytes. Example: BLGR : KY 0 , 0 The entry for BLGR has no significance for the CP 2430. QTYP, DBNR, QANF, QLAE These four block parameters determine the source of the data, in other words which data and how many data are transferred with a SEND call to the CP 2430. Example: QTYP : DBNR : QANF : QLAE : KS DB KY 0 , 10 KF +4 KF +8 The SEND block transfers a total of 8 data words to the CP 2430 from data block DB 10 starting at word 4. ZTYP, DBNR, ZANF, ZLAE These four block parameters determine the destination of the data, in other words which data and how many data are transferred with a receive call to the CP 2430. Example: ZTYP : KS DB DBNR : KY 0 , 11 ZANF : KF +13 ZLAE : KF -1 The RECEIVE enters the data fetched from the CP 2430 in DB 11 starting at word 13. ZLAE = -1 instructs the HDB to transfer as much data as is provided by the CP 2430. On completion of the data exchange, the transferred byte length is entered in the second word of ANZW. 4-6 B8976-C085 SINEC S1 Master Module CP 2430 PAFE The parameter assignment error byte signals errors recognized by the HDB itself. The meaning of the PAFE byte is explained in the appendix. Example: PAFE : FY 20 Errors detected by the HDB are entered in FY 20. The flag 20.1 (=1) indicates that an error has been detected. The diskette accompanying the manual contains example programs illustrating the use of the handling blocks on the CP 2430. 4.2.3 Startup Synchronization in the HDB Mode In the extended mode of the CP 2430, the SYNCRON block must be called in all PLC reset modes for each interface of the CP 2430 for which the extended mode is set. This synchronizes the interface with the programmable logic controller. The CP 2430 sets a field size of 64 bytes regardless of the value selected for the BLGR parameter in the HDB. When the S5 PLC starts up, the AS-I slaves connected to the AS-I cable are reset and assigned new parameters (transition online - offline - online). Once the SYNCHRON block has run, the CP 2430 is once again ready for operation. While the S5 PLC is in the STOP mode, the CP 2430 switches the outputs of the slave to 0. 4-7 SINEC S1 Master Module CP 2430 B8976-C085 4.3 Interface for AS-I Commands (Modes 2/3) The following sections describe the AS-I command calls that can be sent by the S5 PLC to the CP 2430. Using these command calls, the CP 2430 makes available the entire functions of the master profile M1 of the AS-I master specification /2/. Using command calls, the CP 2430 can also be configured completely by the S5 PLC. Command calls are sent using a SEND call with job number 202. By reading the status word of the SEND call, the program can check whether or not the job was executed free of errors. If an error occurs, the status word contains an error ID. The meaning of the error IDs is explained in the appendix. In the following command descriptions, it is assumed that data blocks are being used both as the data source of the SEND (QTYP) and the data destination of the RECEIVE (ZTYP). The type of command is specified by the data block entry (job DB) whose content is transferred to the CP 2430 with the SEND job. The following sections illustrate which data block entries are required for the particular calls. The commands require return values, these return values can be fetched from the CP 2430 on completion of the SEND job using a RECEIVE call with job number 202. The structure of the return values entered in a data block by the handling block is specified in the job itself. Conventions used for representing the command field of the SEND DB: The relevant fields are on a white background, gray shaded fields are irrelevant. Fields to be completed Irrelevant field The entry for a command must be entered in the job DB starting at the data word specified by the QANF parameter of the SEND HDB. The QLAE parameter contains the number of data words required for a command with the SEND HDB call. The required number of data words is specified in the particular command calls. Conventions used for representing the command word data in the data block of the RECEIVE HDB: The relevant fields are on a white background, gray shaded fields are irrelevant. Return field Irrelevant field 4-8 B8976-C085 SINEC S1 Master Module CP 2430 4.3.1 Overview of the Commands Supported by the CP 2430 For more detailed information about using the jobs, refer to the descriptions of the individual jobs in the ‘SINEC S1/AS-I Introduction and Basic Information’ manual, the PICS appendix and the detailed descriptions in /1/ and /2/0. The following table contains and overview of the commands available: Name / Chapter Parameter Data Returned Code: Set_Permanent_Parameter / 4.3.1.1 Slave address, parameter Get_Permanent_Parameter / 4.3.1.2 Slave address Parameter 01H Write_Parameter / 4.3.1.3 Slave address, Parameter echo (optional) parameter 02H Read_Parameter / 4.3.1.4 Slave address Parameter value 03H Store_Actual_Values / 4.3.1.5 None 04H Set_Permanent_Configuration / 4.3.1.6 Slave address, configuration 05H 00H Get_Permanent_Configuration / 4.3.1.7 Slave address Desired configuration data 06H Store_Actual_Configuration / 4.3.1.8 None 07H Read_Actual_Configuration_Data / 4.3.1.9 Slave address Actual configuration data 08H Set_LPS / 4.3.1.10 LPS 09H Set_Offline_Mode / 4.3.1.11 Mode 0AH Select_Autoprgramming / 4.3.1.12 Mode 0BH Set_Operation_Mode / 4.3.1.13 Mode 0CH Change_Slave_Address / 4.3.1.14 Address 1, address 2 0DH Read_Slave_Status / 4.3.1.15 Slave address Error record of the slave 0FH Read Lists and Flags / 4.3.1.16 None LES,LAS,LPS,flags 10H Actual configuration data, current parameters LAS, flags 19H Read_Total_Configuration / 4.3.1.17 Configuring the Total System / 4.3.1.18 Total configuration 1AH Write Parameter List / 4.3.1.19 List of parameters 1CH Read Parameter Echo List / 4.3.1.20 None Parameter echo list 13H Read Version ID / 4.3.1.21 None Version string 14H Slave Diagnostics / 4.3.1.22 Slave address Error counter of the slaves Read Slave Status and Delete / 4.3.1.23 Slave address Error record of the slave 15H 16H Read Slave ID / 4.3.1.24 Slave address ID code 17H Read Slave I/O / 4.3.1.25 Slave address I/O configuration 18H Read S1 Diagnostic Data / 4.3.1.26 Table 4-2 List of slaves with different configurations Overview of the Command Jobs 4-9 1BH SINEC S1 Master Module CP 2430 B8976-C085 4.3.1.1 Set_Permanent_Parameter Meaning With this call, a parameter value for the specified slave is transferred to the CP 2430. The value is saved as a configured value in non-volatile memory. The parameter is not transferred to the slave by the CP 2430 immediately. The parameter value is only transferred after a power up on the PLC when the slave is activated. Structure in the job DB Bit 15 Bit 12 Bit 11 KH: 0H 0H KH: 0 Parameter Bit 8 Bit 7 Bit 4 Bit 3 Slave address Number of data words (QLAE): 2 4-10 Bit 0 B8976-C085 SINEC S1 Master Module CP 2430 4.3.1.2 Get_Permanent_Parameter Meaning With this call, a slave-specific parameter value in the EEPROM of the CP 2430 is read. Structure in the job DB Bit 15 KH: Bit 12 0H Bit 11 Bit 8 Bit 7 1H Bit 4 Bit 3 Bit 0 Slave address Number of data words (QLAE): 1 Structure in the response DB Bit 15 KH: Bit 12 0H Bit 11 Bit 8 Parameter 4-11 Bit 7 Bit 4 Bit 3 Bit 0 SINEC S1 Master Module CP 2430 B8976-C085 4.3.1.3 Write_Parameter Meaning With this call, a parameter value is transferred and is sent directly via the AS-I bus to the addressed slave. The parameter is stored in temporary storage. In the response, the slave returns the current parameter value. This can deviate from the values just written according to the AS-I master specification (/2/). The slave response is entered in the parameter echo field. The RECEIVE job for “fetching” the parameter echo is optional. Normally the parameter echo is not evaluated in the S5 program. Structure in the job DB Bit 15 Bit 12 Bit 11 KH: 0H 2H KH: 0 Parameter Bit 8 Bit 7 Bit 4 Bit 3 Bit 0 Slave address Number of data words (QLAE): 2 Structure in the response DB Bit 15 KH: Bit 12 0 Bit 11 Bit 8 Parameter echo 4-12 Bit 7 Bit 4 Bit 3 Bit 0 B8976-C085 SINEC S1 Master Module CP 2430 4.3.1.4 Read_Parameter Meaning With this call, the current parameter value (actual parameter) of a slave is returned. Structure in the job DB Bit 15 KH: Bit 12 0H Bit 11 Bit 8 Bit 7 03 H Bit 4 Bit 3 Bit 0 Slave address Number of data words (QLAE): 1 Structure in the response DB Bit 15 KH: Bit 12 0H Bit 11 Bit 8 Parameter 4-13 Bit 7 Bit 4 Bit 3 Bit 0 SINEC S1 Master Module CP 2430 B8976-C085 4.3.1.5 Store_Actual_Parameters Meaning With this call, the configured parameters in permanent storage are overwritten by the actual parameters, in other words the parameters are reconfigured. Structure in the job DB Bit 15 KH: 0H Bit 12 Bit 11 Bit 8 4H Number of data words (QLAE): 1 4-14 Bit 7 Bit 4 Bit 3 Bit 0 B8976-C085 SINEC S1 Master Module CP 2430 4.3.1.6 Set_Permanent_Configuration Meaning With this call, the I/O configuration data and the ID code for the addressed AS-I slave are configured. The data are stored permanently on the AS-I master module. When executing this command, the CP changes to the offline phase and then switches to the normal mode (cold restart on the CP). Structure in the job DB Bit 15 Bit 12 Bit 11 Bit 8 KH: 0H 5H KH: ID code I/O configuration Bit 7 Bit 4 Bit 3 Slave address Number of data words (QLAE): 2 4-15 Bit 0 SINEC S1 Master Module CP 2430 B8976-C085 4.3.1.7 Get_Permanent_Configuration Meaning With this call, the desired configuration data stored in the EEPROM (I/O configuration data and the ID codes) of an addressed slave are returned. Structure in the job DB Bit 15 KH: Bit 12 Bit 11 0H Bit 8 Bit 7 6H Bit 4 Bit 3 Bit 0 Slave address Number of data words (QLAE): 1 Structure in the response DB Bit 15 KH: Bit 12 ID code Bit 11 Bit 8 I/O configuration 4-16 Bit 7 Bit 4 Bit 3 Bit 0 B8976-C085 SINEC S1 Master Module CP 2430 4.3.1.8 Store_Actual_Configuration Meaning With this call, the actual I/O configuration data and actual ID codes of all slaves are saved permanently in the EEPROM as the desired configuration data. The list of active slaves (LAS) is also entered in the list of configured slaves (LPS). When executing this command, the CP changes to the offline phase and then switches to the normal mode (cold restart on the CP). This call is not executed in the protected mode. Structure in the job DB Bit 15 KH: 0H Bit 12 Bit 11 Bit 8 7H Number of data words (QLAE): 1 4-17 Bit 7 Bit 4 Bit 3 Bit 0 SINEC S1 Master Module CP 2430 B8976-C085 4.3.1.9 Read Actual Configuration Data With this call, the actual I/O configuration data and actual ID codes of an addressed slave detected on the AS-I are returned. Structure in the job DB Bit 15 KH: Bit 12 0H Bit 11 Bit 8 Bit 7 8H Bit 4 Bit 3 Bit 0 Slave address Number of data words (QLAE): 1 Structure in the response DB Bit 15 Bit 12 ID code Bit 11 Bit 8 I/O configuration 4-18 Bit 7 Bit 4 Bit 3 Bit 0 B8976-C085 SINEC S1 Master Module CP 2430 4.3.1.10 Set_LPS Meaning With this call, the list of configured slaves is transferred for permanent storage in the EEPROM. When executing this command, the CP changes to the offline phase and then switches to the normal mode (cold restart on the CP). This call is not executed in the protected mode. Structure in the job DB Bit 15 Bit 12 Bit 11 Bit 8 Bit 7 Bit 4 Bit 3 Bit 0 KH: 0H 9H KH: LPS slave 0..3 0 | 1 | 2 | 3 LPS slave 4..7 4 | 5 | 6 | 7 LPS slave 8..11 8 | 9 | 10 | 11 LPS slave 12..15 12 | 13 | 14 | 15 KH: LPS slave 16..19 LPS slave 20..23 LPS slave 24..27 LPS slave 28..31 Number of data words (QLAE): 3 4-19 SINEC S1 Master Module CP 2430 B8976-C085 4.3.1.11 Set_Offline_Mode Meaning This call switches between the online and offline mode. The OFFLINE bit is not permanently stored, i.e. during the startup/restart the bit is set to ONLINE again. In the offline mode, the CP only processes jobs from the user. There is no cyclic data exchange. The online mode is the normal situation with the AS-I master. Here, the following jobs are processed cyclically: • During the data exchange phase, the fields of the output data are transferred to the slave outputs for all slaves in the LAS. The addressed slaves transfer the values of the slave inputs to the master when the transfer was free of errors. • This is followed by the inclusion phase in which there is a search for the slaves connected to the AS-I and newly added slaves are entered in the LDS or LAS. • In the management phase, jobs from the user such as writing parameters are executed. Structure in the job DB Bit 15 KH: Bit 12 Bit 11 0H Bit 8 AH Bit 7 Bit 4 0H Number of data words (QLAE): 1 4-20 Bit 3 Bit 0 Mode (0=online 1=offline) B8976-C085 SINEC S1 Master Module CP 2430 4.3.1.12 Select Autoprogramming Meaning With this call, the automatic address programming function can be enabled or disabled. The AUTOADDRESS_ENABLE bit is stored permanently. Structure in the job DB Bit 15 KH: Bit 12 Bit 11 0H Bit 8 BH Bit 7 Bit 4 0H Bit 3 Bit 0 Mode (1=Autoprog allowed 0=Autoprog disabled) Number of data words (QLAE): 1 Changing the AUTOADDRESS_ENABLE bit from 1 to 0 is effective immediately, changing the bit from 0 to 1 is only effective after the CP 2430 has changed to OFFLINE. 4-21 SINEC S1 Master Module CP 2430 B8976-C085 4.3.1.13 Set_Operation_Mode With this call, you can select between the configuration mode and the protected mode. In the protected mode, only slaves marked in the LPS and whose desired and actual configuration match are activated, in other words if the I/O configuration and the identification codes of the slaves in the LDS are identical to those of the configured values. In the configuration mode, all detected slaves (except slave address “0”) are activated. This also applies to slaves for which there is a difference between the desired and actual configuration. The OPERATION MODE bit is saved permanently in the EEPROM, i.e. it is retained following a startup/warm restart. When changing from the configuration mode to the protected mode, the CP is restarted (transition to the offline phase followed by switchover to the online mode) If the address 0 is entered in the LDS for a slave, the CP cannot switch from the configuration mode to the protected mode. Structure in the job DB Bit 15 KH: Bit 12 Bit 11 0H Bit 8 CH Bit 7 Bit 4 0H Number of data words (QLAE): 1 4-22 Bit 3 Bit 0 Mode (0=protected mode 1=configuration mode) B8976-C085 SINEC S1 Master Module CP 2430 4.3.1.14 Change_Slave_Address Meaning With this call, the slave address can be changed. This call is mainly used to add a new AS-I slave with the default address 0 to the SINEC S1 system. In this case the address is changed from the old slave address (0) to the new slave address. This change can only be made when the following conditions are fulfilled: 1. A slave with the old slave address exists. 2. If the old slave address is not equal to 0, then a slave with address 0 cannot be connected at the same time. 3. The new slave address must have a valid value. 4. No slave with the new slave address must already exist. Note: When changing the slave address, the slave is not reset, in other words the output data of the slave are retained until new data arrive for the new address. Structure in the job DB Bit 15 KH: KH: Bit 12 Bit 11 0H Bit 8 DH Bit 7 Bit 4 Bit 3 old slave address new slave address Number of data words (QLAE): 2 4-23 Bit 0 SINEC S1 Master Module CP 2430 B8976-C085 4.3.1.15 Read Slave Statun Meaning With this call, the status register of the addressed slave can be read out. The flags of the status register have the following significance: S0 “Address volatile” This flag is set - when the internal slave routine for permanent storage of the slave address is active. This can take up to 15 ms and must not be interrupted by a further addressing call. - when the internal slave address comparison recognizes that the stored address is not the same as the entry in the address register. S1 “Parity error detected” This flag is set when the slave has recognized a parity error in a received frame since the last “read and delete status” job. S2 “End bit error detected” This flag is set when the slave has recognized an end bit error in a received frame since the last “read and delete status” job. S3 “Read error non-volatile memory” This flag is set when a read error has occurred when reading the non-volatile memory. Structure in the job DB Bit 15 Bit 12 Bit 11 0 Bit 8 Bit 7 F Bit 4 Bit 3 Bit 0 Slave address Number of data words (QLAE): 1 Structure in the response DB Bit 15 KH: Bit 12 0 Bit 11 Bit 8 Slave status S3 | S2 | S1 | S0 4-24 Bit 7 Bit 4 Bit 3 Bit 0 B8976-C085 SINEC S1 Master Module CP 2430 4.3.1.16 Read Lists and Flags (Get_LPS, Get_LAS, Get_LDS, Get_Flags) Meaning With this call, the following entries are read out of the AS-I master CP: • the list of configured slaves • the list of active slaves LAS • the list of detected slaves LDS • the flags according to the AS-I specification Structure in the job DB Bit 15 KH: Bit 12 Bit 11 1H Bit 8 Bit 7 Bit 4 Bit 8 Bit 7 Bit 4 Bit 3 Bit 0 0H Number of data words (QLAE): 1 Structure in the response DB Bit 15 Bit 12 Bit 11 Bit 3 Bit 0 LAS slave 0..3 LAS slave 4..7 LAS slave 8..11 LAS slave 12..15 LAS slave 16..19 LAS slave 20..23 LAS slave 24..27 LAS slave 28..31 LDS slave 0..3 LDS slave 4..7 LDS slave 8..11 LDS slave 12..15 LDS slave 16..19 LDS slave 20..23 LDS slave 24..27 LDS slave 28..31 LPS slave 0..3 LPS slave 4..7 LPS slave 8..11 LPS slave 12..15 LPS slave 16..19 LPS slave 20..23 LPS slave 24..27 LPS slave 28..31 Flag1 Flag 1: Name Flag2 Flag 2: Bit number Name Bit number OFFLINE_READY 8 OFFLINE 0 APF 9 RESERVED 1 NORMAL_MODE 10 EEPROM_OK 2 CONFIG_MODE 11 AUT_ADDR_ENABLE 3 AUTO_ADDR_AVAIL 12 RESERVED 4 AUTO_ADDR_ASSIGN 13 RESERVED 5 LES_0 14 RESERVED 6 CONFIG_OK 15 RESERVED 7 4-25 SINEC S1 Master Module CP 2430 B8976-C085 Meaning of the flags OFFLINE_READY The flag is set when the offline phase is active. APF This flag is set when the voltage on the AS-I cable is too low. NORMAL_MODE This flag is set when the CP is in the normal mode. CONFIG_MODE The flag is set in the configuration mode and reset in the protected mode. AUTO_ADDR_AVAIL This flag is set when the automatic address programming can be executed (in other words exactly one slave is currently out of operation). AUTO_ADDR_ASSIGN This flag is set when the automatic address programming is possible (in other words AUTO_ADDR_ENABLE = 1 and there is or was no “incorrect” slave connected to the AS-I cable. LES_0 This flag is set when a slave exists with address 0. CONFIG_OK This flag is set when the desired (configured) and actual configuration match. OFFLINE This flag is set when the CP is to change to the OFFLINE mode or is already in this mode. EEPROM_OK This flag is set when the test of the internal EEPROM did not detect any errors. AUTO_ADDR_ENABLE This flag indicates whether the automatic address programming is enabled or disabled by the user (can be set with an HDB call). 4-26 B8976-C085 SINEC S1 Master Module CP 2430 4.3.1.17 Read Total Configuration Meaning With this command, the following data are read from the CP: • The list of active slaves (LAS). This indicates which of the connected slaves are activated. • The current configuration data of the connected slaves (I/O configuration and ID code), • The current parameters of the slaves (actual parameters). • The current flags. This command can, for example, be used to find out the configuration of the stations connected to the SINEC S1 cable after installation. The configuration data that are read in can, if necessary, be modified and saved as the desired configuration on the CP 2430 using the command “configure total system” (see Section 4.3.1.18). Structure in the job DB Bit 15 Bit 12 Bit 11 1H Bit 8 9H Number of data words (QLAE): 1 4-27 Bit 7 Bit 4 Bit 3 Bit 0 SINEC S1 Master Module CP 2430 B8976-C085 Structure in the response DB Bit 15 Bit 12 Bit 11 Bit 8 Bit 7 Bit 4 Bit 3 Bit 0 LAS slave 0..3 LAS slave 4..7 LAS slave 8..11 LAS slave 12..15 LAS slave 16..19 LAS slave 20..23 LAS slave 24..27 LAS slave 28..31 ID code slave 0 I/O conf. slave 0 ID code slave 1 I/O conf. slave 1 ID code slave 2 I/O conf. slave 2 ID code slave 3 I/O conf. slave 3 ID code slave 4 I/O conf. slave 4 ID code slave 5 I/O conf. slave 5 ID code slave 6 I/O conf. slave 6 ID code slave 7 I/O conf. slave 7 ID code slave 8 I/O conf. slave 8 ID code slave 9 I/O conf. slave 9 ID code slave 10 I/O conf. slave 10 ID code slave 11 I/O conf. slave 11 ID code slave 12 I/O conf. slave 12 ID code slave 13 I/O conf. slave 13 ID code slave 14 I/O conf. slave 14 ID code slave 15 I/O conf. slave 15 ID code slave 16 I/O conf. slave 16 ID code slave 17 I/O conf. slave 17 ID code slave 18 I/O conf. slave 18 ID code slave 19 I/O conf. slave 19 ID code slave 20 I/O conf. slave 20 ID code slave 21 I/O conf. slave 21 ID code slave 22 I/O conf. slave 22 ID code slave 23 I/O conf. slave 23 ID code slave 24 I/O conf. slave 24 ID code slave 25 I/O conf. slave 25 ID code slave 26 I/O conf. slave 26 ID code slave 27 I/O conf. slave 27 ID code slave 28 I/O conf. slave 28 ID code slave 29 I/O conf. slave 29 ID code slave 30 I/O conf. slave 30 ID code slave 31 I/O conf. slave 31 Parameter slave 1 Parameter slave 2 Parameter slave 3 Parameter slave 4 Parameter slave 5 Parameter slave 6 Parameter slave 7 Parameter slave 8 Parameter slave 9 Parameter slave 10 Parameter slave 11 Parameter slave 12 Parameter slave 13 Parameter slave 14 Parameter slave 15 Parameter slave 16 Parameter slave 17 Parameter slave 18 Parameter slave 19 Parameter slave 20 Parameter slave 21 Parameter slave 22 Parameter slave 23 Parameter slave 24 Parameter slave 25 Parameter slave 26 Parameter slave 27 Parameter slave 28 Parameter slave 29 Parameter slave 30 Parameter slave 31 Flag 1 Flag2 Flag 1 Flag 2 Name OFFLINE_READY Bit number 0 Name OFFLINE Bit number 0 APF 1 RESERVED 1 NORMAL_MODE 2 EEPROM_OK 2 CONFIG_MODE 3 AUTO_ADDR_EN 3 AUTO_PROG_AVAIL 4 RESERVED 4 AUTO_PROG 5 RESERVED 5 LES_0 6 RESERVED 6 CONFIG_OK 7 RESERVED 7 The meaning of the flags is the same as for the read lists and flags job(Get_LPS, Get_LAS, Get_LDS, Get_Flags), see Section 4.3.1.16. 4-28 B8976-C085 SINEC S1 Master Module CP 2430 4.3.1.18 Configuring the Total System Meaning With this call, the desired total configuration is transferred to the CP 2430 and saved on the CP 2430 as the desired configuration. This configures the CP 2430. The following data are transferred: • The list of configured slaves specifying the slaves that can be activated by the CP 2430 in the protected mode. • The list of configuration data specifying the ID codes and I/O configurations the slaves must have. • The list of parameters saved in non-volatile memory on the CP. This is transferred to the slaves during the start up of the CP 2430. • The flags that determine the mode of the CP 2430 after start up (in other words after the CP 2430 has been synchronized). Structure in the job DB Bit 15 Bit 12 1 Bit 11 Bit 8 Bit 7 Bit 4 Bit 3 Bit 0 A LPS slave 0..3 LPS slave 4..7 LPS slave 8..11 LPS slave 12..15 LPS slave 16..19 LPS slave 20..23 LPS slave 24..27 LPS slave 28..31 ID code slave 0 I/O conf. slave 0 ID code slave 1 I/O conf. slave 1 ID code slave 2 I/O conf. slave 2 ID code slave 3 I/O conf. slave 3 ID code slave 4 I/O conf. slave 4 ID code slave 5 I/O conf. slave 5 ID code slave 6 I/O conf. slave 6 ID code slave 7 I/O conf. slave 7 ID code slave 8 I/O conf. slave 8 ID code slave 9 I/O conf. slave 9 ID code slave 10 I/O conf. slave 10 ID code slave 11 I/O conf. slave 11 ID code slave 12 I/O conf. slave 12 ID code slave 13 I/O conf. slave 13 ID code slave 14 I/O conf. slave 14 ID code slave 15 I/O conf. slave 15 ID code slave 16 I/O conf. slave 16 ID code slave 17 I/O conf. slave 17 ID code slave 18 I/O conf. slave 18 ID code slave 19 I/O conf. slave 19 ID code slave 20 I/O conf. slave 20 ID code slave 21 I/O conf. slave 21 ID code slave 22 I/O conf. slave 22 ID code slave 23 I/O conf. slave 23 ID code slave 24 I/O conf. slave 24 ID code slave 25 I/O conf. slave 25 ID code slave 26 I/O conf. slave 26 ID code slave 27 I/O conf. slave 27 ID code slave 28 I/O conf. slave 28 ID code slave 29 I/O conf. slave 29 ID code slave 30 I/O conf. slave 30 ID code slave 31 I/O conf. slave 31 Parameters slave 1 Parameters slave 2 Parameters slave 3 Parameters slave 5 Parameters slave 6 Parameters slave 7 Parameters slave 4 Parameters slave 8 Parameters slave 9 Parameters slave 10 Parameters slave 11 Parameters slave 12 Parameters slave 13 Parameters slave 14 Parameters slave 15 Parameters slave 16 Parameters slave 17 Parameters slave 18 Parameters slave 19 Parameters slave 20 Parameters slave 21 Parameters slave 22 Parameters slave 23 Parameters slave 24 Parameters slave 25 Parameters slave 26 Parameters slave 27 Parameters slave 28 Parameters slave 29 Parameters slave 30 Parameters slave 31 Flag 1 Flag 2 4-29 SINEC S1 Master Module CP 2430 B8976-C085 Flag 1 Flag 2 Name OFFLINE_READY Bit number 0 Name OFFLINE Bit number 0 APF 1 RESERVED 1 NORMAL_MODE 2 EEPROM_OK 2 CONFIG_MODE 3 AUTO_ADDR_EN 3 AUTO_PROG_AVAIL 4 RESERVED 4 AUTO_PROG 5 RESERVED 5 LES_0 6 RESERVED 6 CONFIG_OK 7 RESERVED 7 Number of data words (QLAE): 28 The value of the gray shaded flags can change the mode of the CP 2430: CONFIG_MODE The entry ‘0’ means that the CP 2430 starts up in the protected mode after synchronization. The entry ‘1’ means that the CP starts up in the configuration mode. AUTO_ADDR_EN ‘0’ means that the automatic address programming is disabled, ‘1’ means that the automatic address programming is enabled. The values of the other flags are irrelevant for the “configure total system” command. 4-30 B8976-C085 SINEC S1 Master Module CP 2430 4.3.1.19 Write Parameter List Meaning With this command, the parameters for all slaves are transferred to the CP 2430. The CP 2430 transfers only the parameters that have changed to the slaves, in other words that deviate from the current actual parameters. Structure in the job DB Bit 15 KH: Bit 12 Bit 11 1H Bit 8 Bit 7 Bit 4 Bit 3 Bit 0 CH Parameter slave 1 Parameter slave 2 Parameter slave 4 Parameter slave 5 Parameter slave 6 Parameter slave 7 Parameter slave 8 Parameter slave 9 Parameter slave 10 Parameter slave 11 Parameter slave 12 Parameter slave 13 Parameter slave 14 Parameter slave 15 Parameter slave 16 Parameter slave 17 Parameter slave 18 Parameter slave 19 Parameter slave 20 Parameter slave 21 Parameter slave 22 Parameter slave 23 Parameter slave 24 Parameter slave 25 Parameter slave 26 Parameter slave 27 Parameter slave 28 Parameter slave 29 Parameter slave 30 Parameter slave 31 Number of data words (QLAE): 9 4-31 Parameter slave 3 SINEC S1 Master Module CP 2430 B8976-C085 4.3.1.20 Read Parameter Echo List Meaning This call takes into account possible future extensions of the AS-I function. When the parameters are transferred to the slave, they return “echo values” as the response. The read parameter echo list call reads out the echo values of all slaves. Structure in the job DB Bit 15 KH: Bit 12 Bit 11 1H Bit 8 Bit 7 Bit 4 Bit 3 Bit 0 Bit 8 Bit 7 Bit 4 Bit 3 Bit 0 3H Number of data words (QLAE): 1 Structure in the response DB Bit 15 Bit 12 KH: Bit 11 Par.echo slave 1 Par.echo slave 2 Par.echo slave 3 KH: Par.echo slave 4 Par.echo slave 5 Par.echo slave 6 Par.echo slave 7 KH: Par.echo slave 8 Par.echo slave 9 Par.echo slave 10 Par.echo slave 11 KH: Par.echo slave 12 Par.echo slave 13 Par.echo slave 14 Par.echo slave 15 KH: Par.echo slave 16 Par.echo slave 17 Par.echo slave 18 Par.echo slave 19 KH: Par.echo slave 20 Par.echo slave 21 Par.echo slave 22 Par.echo slave 23 KH: Par.echo slave 24 Par.echo slave 25 Par.echo slave 26 Par.echo slave 27 KH: Par.echo slave 28 Par.echo slave 29 Par.echo slave 30 Par.echo slave 31 4-32 B8976-C085 SINEC S1 Master Module CP 2430 4.3.1.21 Read Version ID Meaning With this call, the version ID of the AS-I master software is read out. Structure in the job DB Bit 15 KH: Bit 12 Bit 11 1H Bit 8 Bit 7 Bit 4 Bit 3 Bit 0 4H Number of data words (QLAE): 1 The reply of the CP contains the name and the firmware version number of the CP in the form shown below: Structure in the response DB Bit 15 Bit 12 Bit 11 Bit 8 Bit 7 Bit 4 Bit 3 KS: S i KS: e m KS: e n KS: s KS: A G KS: KS: C KS: P KS: 2 4 KS: 3 0 KS: KS: KS: V KS: x . KS: y y x.yy stands for the current version number. 4-33 Bit 0 SINEC S1 Master Module CP 2430 B8976-C085 4.3.1.22 Slave Diagnostics Meaning This command returns the number of AS-I errors that occurred in conjunction with a slave. With this call, the error counter is then deleted. The value of the error counter is incremented in the following situations: ± When a slave does not reply correctly during the data exchange phase despite repeating the master frame (i.e. missing or incorrect slave frame). ± With slaves that have not been activated, the error counter is incremented when a slave has already been detected (i.e. it exists in the LDS) but then no longer correctly replies. The error counter is incremented to a maximum value of 255 and then remains at this value until deleted. Structure in the job DB Bit 15 KH: Bit 12 Bit 11 1H Bit 8 Bit 7 5H Bit 4 Bit 3 Bit 0 Slave address Number of data words (QLAE): 1 Structure in the response DB Bit 15 KY: Bit 12 Bit 11 Bit 8 Slave error counter 4-34 Bit 7 Bit 4 Bit 3 Bit 0 B8976-C085 SINEC S1 Master Module CP 2430 4.3.1.23 Read Slave Status and Delete Meaning With this call, the status of a slave is read out and at the same time the status register of the slave is deleted. The flags of the status register have the following meaning: S0 “Address volatile” This flag is set - when the internal slave routine for permanent storage of the slave address is active. This can take up to 15 ms and must not be interrupted by a further addressing call. - when the internal slave address comparison recognizes that the stored address is not the same as the entry in the address register. S1 “Parity error detected” This flag is set when the slave has recognized a parity error in a received frame since the last “read and delete status” job. S2 “End bit error detected” This flag is set when the slave has recognized an end bit error in a received frame since the last “read and delete status” job. S3 “Read error non-volatile memory” This flag is set when a read error has occurred when reading the non-volatile memory. Structure in the job DB Bit 15 KH: Bit 12 Bit 11 1H Bit 8 Bit 7 6H Bit 4 Bit 3 Bit 0 Slave address Number of data words (QLAE): 1 Structure in the response DB Bit 15 KH: 0H Bit 12 Bit 11 Bit 8 Slave status 4-35 Bit 7 Bit 4 Bit 3 Bit 0 SINEC S1 Master Module CP 2430 B8976-C085 4.3.1.24 Read Slave ID Meaning With this call, the ID code of a slave can be read out directly over the AS-I cable. The call is intended for diagnostic purposes and is not required in the normal master mode. Structure in the job DB Bit 15 KH: Bit 12 Bit 11 1H Bit 8 Bit 7 7H Bit 4 Bit 3 Bit 0 Slave address Number of data words (QLAE): 1 Structure in the response DB Bit 15 KH: Bit 12 0H Bit 11 Bit 8 Slave-ID 4-36 Bit 7 Bit 4 Bit 3 Bit 0 B8976-C085 SINEC S1 Master Module CP 2430 4.3.1.25 Read Slave I/O Meaning With this call, the I/O configuration of a slave can be read out directly over the AS-I cable. The call is intended for diagnostic purposes and is not required in the normal master mode. Structure in the job DB Bit 15 KH: Bit 12 Bit 11 1H Bit 8 Bit 7 8H Bit 4 Bit 3 Bit 0 Slave address Number of data words (QLAE): 1 Structure in the response DB Bit 15 KH: Bit 12 0H Bit 11 Bit 8 Slave ID 4-37 Bit 7 Bit 4 Bit 3 Bit 0 SINEC S1 Master Module CP 2430 B8976-C085 4.3.1.26 Read S1 Diagnostic Data Meaning: Structure in the job DB Bit 15 KH: Bit 12 Bit 11 1H Bit 8 Bit 7 Bit 4 Bit 3 Bit 0 Bit 4 Bit 3 Bit 0 BH Number of data words (QLAE): 1 Structure in the error information field of the CP Bit 15 ² Bit 12 Bit 11 Bit 8 Bit 7 Disc.slave 0-3 Disc.slave 4-7 Disc.slave 8-11 Disc.slave 12-15 Disc.slave 16-19 Disc.slave 20-23 Disc.slave 24-27 Disc.slave 28-31 List of slaves with configuration discrepancies. Each bit corresponds to exactly one slave. Bit = 1 means that the slave differs from the set configuration. 4-38 B8976-C085 SINEC S1 Master Module CP 2430 4.4 Transferring I/O Data of the AS-I Slaves Using HDBs (Only Mode 3, ANR 200, 201) If mode 3 is set for a channel of the CP 2430, this means switch PM = ON and switch IO = OFF, the I/O data for the individual AS-I slaves are not transferred on the I/O interface but using the page interface. In this case, this channel does not use any I/O address area. 4.4.1 Transferring the Output Data to the AS-I Slaves (ANR 200) The output data of the slaves are transferred to the CP 2430 using a SEND call with job number 200. With the SEND call, 16 bytes must always be transferred, in other words the output data for all slaves are transferred to the CP 2430. The output data is generally transferred at the end of the cycle, this can,, however, take place at any point in the PLC cycle (OB1). If you use a data block (parameter QTYP = ‘DB’) as the data source, the following table shows how the output data of the slaves are stored in the data block. Bit 15 Bit 12 QANF: Bit 11 Bit 8 Bit 7 Bit 4 Bit 3 Slave 1 Slave 2 Slave 4 Slave 5 Slave 6 Slave 7 Slave 8 Slave 9 Slave 10 Slave 11 Slave 12 Slave 13 Slave 14 Slave 15 Slave 16 Slave 17 Slave 18 Slave 19 Slave 20 Slave 21 Slave 22 Slave 23 Slave 24 Slave 25 Slave 26 Slave 27 Slave 28 Slave 29 Slave 30 Slave 31 Bit 0 Slave 3 QLAE = 8 A timeout as in the I/O mode cannot be set. 4.4.2 Reading the Input Data of the AS-I Slaves (ANR 201) The input data of the slaves are read from the CP 2430 using a RECEIVE job with job number 201. With this RECEIVE job, the CP 2430 always returns 16 bytes containing the input data of the AS-I slaves. The following table shows the assignment of the input data to the individual AS-I slaves if a data block is being used as the data destination (parameter ZTYP = ‘DB’). Bit 15 ZANF: Bit 12 Bit 11 Bit 8 Bit 7 Bit 4 Bit 3 Status nibble Slave 1 Slave 2 Slave 4 Slave 5 Slave 6 Slave 7 Slave 8 Slave 9 Slave 10 Slave 11 Slave 12 Slave 13 Slave 14 Slave 15 Slave 16 Slave 17 Slave 18 Slave 19 Slave 20 Slave 21 Slave 22 Slave 23 Slave 24 Slave 25 Slave 26 Slave 27 Slave 28 Slave 29 Slave 30 Slave 31 4-39 Bit 0 Slave 3 ZLAE = 8 SINEC S1 Master Module CP 2430 B8976-C085 Status Nibble The status nibble has the same meaning as in the standard mode. Bit 7 Meaning Table 4-3 Bit 6 0 = Voltage on the 0 = No error AS-I cable is OK 1 = Configuration 1 = An ASI Power error Fail has occurred. The data are invalid Bit 5 Bit 4 0 = Startup active 1 = CP startup completed 0 = CP in protected mode 1=CP in configuration mode Assignment of the Status Nibble Bit 7 "ASI Power Fail" This bit indicates whether or not the power supply on the AS-I cable is OK, too low or has failed completely. If the voltage is incorrect or has failed the input data of all slaves are set to 0. Bit 6 "Config Error" This bit indicates whether the configuration saved on the master matches the configuration of the slaves connected to the AS-I cable. If the configurations do not match, the input data of missing or failed slaves are set to 0. Bit 5 "Startup Bit" This bit indicates to the PLC whether or not the CP 2430 has completed its startup and internal initialization. This bit must be tested by the PLC during startup for the actual PLC program can be started. Bit 4 "Mode" This bit indicates whether the CP 2430 is in the configuration mode or in the protected mode. This bit can, for example, be used to configure the CP 2430 (see example program). 4-40 B8976-C085 SINEC S1 Master Module CP 2430 5. Multiprocessor Mode The CP 2430 can also be used in multiprocessor PLCs. If possible, one channel of the CP 2430 should be assigned exclusively to an S5 CPU. In this case, there are no restrictions. If a channel of the CP 2430 is addressed by several S5 CPUs at the same time, the following conditions should be taken into account: Multiprocessor Mode Using the I/O Interface of the CP 2430 If the S5 CPU accesses the I/O interface of the CP 2430, the same restrictions apply as for digital input and output modules. This means that inputs can be read by all CPUs. An output must, however, only be used exclusively by one CPU. Multiprocessor Mode Using the Page Interface of the CP 2430 If several S5 CPUs access the same page interface using handling blocks, they coordinate the access themselves. The following points should however be noted with respect to the PLC user programs: ± When the SEND/RECEIVE direct block is run with RLO = 1, PAFE = 81h can occur (interface occupied by a different CPU). In this case the HDB run was not successful (no data transfer). ± Since the same SSNR/ANR combinations can be used in different CPUs, the status word of a job can change from the point of view of a program without the program itself being responsible for the change (for example due to a job being triggered on a different CPU). ± The SEND job with ANR 200 that transfers output data for the AS-I slaves must only be used by one S5 CPU. ± When handling a management function with ANR 202, it is possible that a management function was triggered by CPU X using SEND direct, the result of the function (for example an ID code that has been read out) can, however only be fetched by a different CPU Y using the RECEIVE direct. The CP 2430 does not have any interlock mechanisms for such situations. The user programs must recognize such situations by appropriate programming. 5-1 SINEC S1 Master Module CP 2430 B8976-C085 5-2 B8976-C085 SINEC S1 Master Module CP 2430 6. Replacing a Defective Slave / Automatic Address Programming If the indicator AUPRG is lit in the protected mode of the CP 2430, it indicates the following: ² Exactly one slave has failed. ² Automatic address programming by the CP 2430 is possible. You can now replace the defective slave as follows: Remove the failed slave from the AS-I cable. You can identify the failed slave simply by the dot of the failed slave flashing in the matrix display. Replace the defective slave with an identical slave with address 0 (as supplied). The CP 2430 then programs this slave with the address of the original station that had failed. The "AUPRG" indicator then goes off. The CP 2430 indicates the new slave in the LED display of the "ACTIVE SLAVES". Note that “automatic address programming” is only possible when the CP 2430 is in the protected mode and when only one slave has failed. If a non-configured slave was connected to SINEC S1, the “automatic address programming” is disabled by the CP until: 1. The “incorrect slave” is removed and 2. The CP goes through a cold restart (AS-I power on and off or S5 power on and off). 6-1 SINEC S1 Master Module CP 2430 B8976-C085 The following table lists the possible causes of errors that can occur during “automatic address programming” and how to remedy the problem. Error Mögliche Ursache After a slave fails, the "AUPRG " The CP is in the configuration indicator remains off. mode. Remedy “Automatic programming” is not possible in the configuration mode. The address of the new slave must be programmed with the address programming unit. More than one slave has failed (check "ACTIVE SLAVES" indicators). Check AS-I cable. If “APF” is indicated at the same time, check the power supply to the AS-I cable. If more than one slave is defective, the addresses of the replacement slaves must be programmed with the address programming unit. The CP has detected unconfigured slaves. Remove unconfigured slaves from the AS-I cable. Reset the CP by setting "RUN""STOP"-RUN" on the PLC. Automatic address programming The configuration data (I/O not done although the "AUPRG" configuration, ID code) of the is lit. replacement slave do not match the values of the original slaves. Replacement slave does not have the address “zero”. Check whether the correct replacement slave was used. Compare the vendor’s information with the configuration data. If you want to replace the original slave with a different type, the address must be assigned with the address programming unit and the CP 2430 re-configured using the switches. Set the address of the replacement slave with the address programming unit. Replacement slave not correctly Check the connections of the connected or defective. slave; if necessary, replace the slave. Table 6-1 Causes of Errors and Remedy with Automatic Address Programming 6-2 B8976-C085 SINEC S1 Master Module CP 2430 7. Error Indicators on the CP 2430 / Dealing with Problems The following table lists the possible causes of problems when operating the CP 2430 and how to remedy the problem. Error Possible cause Remedy S1 PF - indicator lit. The AS-I power supply unit is not connected or is defective. Check the connection of the AS-I power supply unit; if necessary replace the power supply unit. Power requirements of the AS-I Check the power requirements of the slave too high (total current greater AS-I station. If necessary, supply the than 2A). slaves with power externally. FAULT LED lit continuously. CP 2430 defective Replace the CP 2430 FAULT LED lights up when the mode selector is pressed. You want to change to the protected mode but a slave with address 0 exists. Remove the slave with address 0 from the AS-I cable or program an address with the addressing unit and then run a PLC cold restart. The mode selector was set to SET CONFIG in the protected mode. Switch the CP to CHMD with the mode selector and then to SCFG. CERR indicator lights up. The CP 2430 is not yet configured. Configure the CP with the mode selector on the front panel. A configured slave has failed (evaluate the "ACTIVE SLAVES" indicator). Replace the defective slave or if the slave is not required, re-configure the CP 2430. An unconfigured slave was connected to the AS-I cable. Remove the slave or re-configure the CP 2430. A slave has been connected whose Check whether an incorrect slave configuration data (I/O has been connected. If necessary, configuration, ID code) do not re-configure the CP 2430. match the value of the configured slave. CERR indicator flickers, meaning that a configured slave drops out sporadically. Bad contact. Check the connections of the AS-I slave. Interference on the AS-I cable. Make sure the PLC is correctly grounded and check along the AS-I cable. 7-1 SINEC S1 Master Module CP 2430 B8976-C085 Error indicators (continued) Error Possible cause CP does not switch from the The PLC is in the “RUN” mode. configuration mode to the protected mode. Remedy Switch the PLC to "STOP". Selector not activated long enough. Make sure the selector is activated for 0.5 s. A slave with the address 0 is connected to the AS-I cable. The CP 2430 cannot switch over to the protected mode as long as this slave exists. CP does not switch from the The PLC is in the "RUN" mode. protected mode to the configuration mode. Button not activated long enough. Table 7-1 Error Indications in Standard Operation 7-2 Remove the slave with address 0. Switch the PLC to "STOP". Make sure the selector is activated for 0.5 s. B8976-C085 A SINEC S1 Master Module CP 2430 ASI Protocol Implementation Conformance Statement (PICS) A.1 PICS for the CP 2430 Vendor Siemens AG Product Name CP 2430 - SINEC S1 master module for S5-115U, S5-135U and S5-155U Order Number 6GK1243-0SA00 Version 1 Master Profile M1 with handling blocks, M0 without handling blocks Date 29. Aug. 1995 List of Master Functions Available with Handling Blocks No. Function or Call on the Host Interface (symbolic representation) M1 Comment / Function implemented by / Section 1 Image, Status = Read_IDI() X By the controller accessing the I/O interface of the CP 2430 (for example using the PII) Using a SEND job with ANR 200 2 Status = Write_ODI(Image) X By the controller accessing the I/O interface of the CP 2430 (for example using the PIQ) Using a RECEIVE job with ANR 201 3 Status = Set_Permanent_Parameter(Addr, Param) X 4.3.1.1 4 Param, Status = Get_Permanent_Parameter(Addr) X 4.3.1.2 5 Status, GParam = Write_Parameter(Addr, Param) X 4.3.1.3 6 Status, Param = Read_Parameter(Addr) X 4.3.1.4 7 Status = Store_Actual_Parameters() X 4.3.1.5. 8 Status = Set_Permanent_Configuration(Addr, Config) X 4.3.1.6 9 Status, Config = Get_Permanent_Configuration(Addr) X 4.3.1.7 10 Status = Store_Actual_Configuration() X 4.3.1.8. This command also triggers a cold restart on the CP. 11 Status, Config = Read_Actual_Configuration(Addr) X 4.3.1.9 12 Status = Set_LPS(List31) X 4.3.1.10 13 Status, List31 = Get_LPS() X Read lists and flags / 4.3.1.16 A-1 SINEC S1 Master Module CP 2430 B8976-C085 14 Status, List31 = Get_LAS() X Read lists and flags / 4.3.1.16 15 Status, List32 = Get_LDS() X Read lists and flags / 4.3.1.16 16.0 Status = Get_Flags() X Read lists and flags / 4.3.1.16 16.1 Status, Flag = Get_Flag_Config_OK() X CP error bit, LED display Read lists and flags / 4.3.1.16 16.2 Status, Flag = Get_Flag_LDS.0() X Read lists and flags / 4.3.1.16 16.3 Status, Flag = Get_Flag_Auto_Address_Assign() X Read lists and flags / 4.3.1.16 16.4 Status, Flag = Get_Flag_Auto_Prog_Available() X Read lists and flags / 4.3.1.16 16.5 Status, Flag = Get_Flag_Configuration_Active() X Read lists and flags / 4.3.1.16 16.6 Status, Flag = Get_Flag_Normal_Operation_Active() X Read lists and flags / 4.3.1.16 16.7 Status, Flag = Get_Flag_APF() X CP error bit, LED display Read lists and flags / 4.3.1.16 16.8 Status, Flag = Get_Flag_Offline_Ready() X Read lists and flags / 4.3.1.16 17 Status = Set_Operation_Mode(Mode) X 4.3.1.13 18 Status = Set_Offline_Mode(Mode) X 4.3.1.11 19 Status = Activate_Data_Exchange(Mode) - not implemented 20 Status = Change_Slave_Address(Addr1, Addr2) X 4.3.1.14 21 Status = Set_Auto_Address_Enable X 4.3.1.12 22 Status = Get_Auto_Address_Enable X Read lists and flags / 4.3.1.16 A-2 B8976-C085 Nr. Function or Call on the Host Interface (symbolic representation) SINEC S1 Master Module CP 2430 M1 Comment / Function implemented by / Section 23.1 Status, Resp = Cmd_Reset_ASI_Slave(Addr, RESET) - not implemented 23.2 Status, Resp = Cmd_Read_IO_Configuration(Addr, CONF) X 4.3.1.25 23.3 Status, Resp = Cmd_Read_Identification_Code(Addr, IDCOD) X 4.3.1.24 23.4 Status, Resp = Cmd_Read_Status(Addr, STAT) X 4.3.1.15 23.5 Status, Resp = Cmd_Read_Reset_Status(Addr, STATRES) X 4.3.1.23 List of Master Functions Available Without Handling Blocks Nr. Function or Call on the Host Interface (symbolic representation) M0 Comment / Function implemented by / Section 1 Image, Status = Read_IDI() X By the controller accessing the I/O interface of the CP 2430 (for example using the PII) 2 Status = Write_ODI(Image) X By the controller accessing the I/O interface of the CP 2430 (for example using the PIQ) 3 Status = Set_Permanent_Parameter(Addr, Param) - not implemented 4 Param, Status = Get_Permanent_Parameter(Addr) - not implemented 5 Status, GParam = Write_Parameter(Addr, Param) - not implemented 6 Status, Param = Read_Parameter(Addr) - not implemented 7 Status = Store_Actual_Parameters() - not implemented 8 Status = Set_Permanent_Configuration(Addr, Config) - not implemented 9 Status, Config = Get_Permanent_Configuration(Addr) - not implemented 10 Status = Store_Actual_Configuration() X By switches on the front panel 11 Status, Config = Read_Actual_Configuration(Addr) - not implemented 12 Status = Set_LPS(List31) - not implemented 13 Status, List31 = Get_LPS() - not implemented 14 Status, List31 = Get_LAS() - not implemented 15 Status, List32 = Get_LDS() - not implemented - not implemented 16.0 Status = Get_Flags() A-3 SINEC S1 Master Module CP 2430 B8976-C085 16.1 Status, Flag = Get_Flag_Config_OK() X CP error bit, LED display on front panel 16.2 Status, Flag = Get_Flag_LDS.0() - not implemented 16.3 Status, Flag = Get_Flag_Auto_Address_Assign() - not implemented 16.4 Status, Flag = Get_Flag_Auto_Prog_Available() - not implemented 16.5 Status, Flag = Get_Flag_Configuration_Active() - not implemented 16.6 Status, Flag = Get_Flag_Normal_Operation_Active() - not implemented 16.7 Status, Flag = Get_Flag_APF() X CP error bit, LED display on front panel 16.8 Status, Flag = Get_Flag_Offline_Ready() - not implemented 17 Status = Set_Operation_Mode(Mode) X Switch on front panel of the CP 18 Status = Set_Offline_Mode(Mode) - not implemented 19 Status = Activate_Data_Exchange(Mode) - not implemented 20 Status = Change_Slave_Address(Addr1, Addr2) - not implemented 21 Status = Set_Auto_Address_Enable X 4.3.1.12 22 Status = Get_Auto_Address_Enable X Read lists and flags / 4.3.1.16 23.1 Status, Resp = Cmd_Reset_ASI_Slave(Addr, RESET) - not implemented 23.2 Status, Resp = Cmd_Read_IO_Configuration(Addr, CONF) - not implemented 23.3 Status, Resp = Cmd_Read_Identification_Code(Addr, IDCOD) - not implemented 23.4 Status, Resp = Cmd_Read_Status(Addr, STAT) - not implemented 23.5 Status, Resp = Cmd_Read_Reset_Status(Addr, STATRES) - not implemented Key to column 3 Symbol Meaning X Function exists - Function does not exist ASI Cycle Time Related to the Number of Connected Slaves The maximum cycle time is <= 5 ms for 31 Slaves. This maximum time is hardly reduced if less slaves are connected. A-4 B8976-C085 SINEC S1 Master Module CP 2430 B Status Word ANZW and Parameter Assignment Error Byte PAFE Overview The CP 2430 signals the status of each job (permitted job numbers ANR 200, 201, 202) and any error codes that occur, as follows: ± Using the status word ANZW (information about job processing) ± Using the parameter assignment error byte PAFE (indicates incorrect job parameter assignment). B.1 Meaning and Structure of the ANZW The status word contains the processing status of each job. A separate job number must be used in the S5 user program for each job number used on the CP 2430. The status word must be evaluated immediately after the handling block has been run. Structure of the ANZW The status word consists of the actual status word (first word) and a length word (second word). It has the following basic structure: 15 1st word free 12 11 8 7 4 3 0 Error management Data management Status bits 2nd word Length word Meaning of the Length Word The handling blocks (SEND, RECEIVE) enter the number of data words transferred for the job in the length word. Explanation The following sections explain how to handle the status bits. For each bit, you will see how the bit is set, how the bit is reset (deleted) and which analysis is useful. The assignment of the bits is explained in the explanation of the nibbles. B-1 SINEC S1 Master Module CP 2430 B8976-C085 B.2 Content of the Status Word ± Nibble 1, bits 0 to 3, status bits of the job: These bits indicate whether a job has already started, whether errors have occurred or whether the job is disabled, for example because the wrong mode is set. ± Nibble 2, bits 4 to 7, data management of the job: These bits indicate whether the data transfer for the job is still active or whether the data transfer or data acceptance for the job has already been completed. With the “Enable/Disable” bit, the data transfer for the job can be disabled. (Disable = 1; Enable = 0). The “Enable/Disable” function is not required for the CP 2430 and the bit is always set to “Enable”. ± Nibble 3, bits 8 to 11, error bits of the job: Any errors that have occurred in the job are indicated in these bits. These error bits are only valid when the bit “job complete with error” is set in the status nibble. ± Nibble 4, bits 12 to 15: These bits are reserved for expansions. Meaning of the Bits in the Status Word a) Bit 0: Receive possible Set: By the handling blocks. Receive possible (=1) is set by the RECEIVE block and indicates that data can be fetched from the CP 2430 using the appropriate RECEIVE job. Reset: By the handling blocks, after the RECEIVE has been processed. Analysis: By the RECEIVE block: The RECEIVE block only initiates the data exchange with the CP when this bit is set. By the application: The application can check whether data for the job can be fetched from the CP 2430. b) Bit 1: Job active/SEND disabled Set: By the handling blocks, when the job is sent to the CP. Reset: By the handling blocks, when a new SEND job can be triggered. Analysis: By the SEND block: A new SEND job is only processed when the previous SEND job has been completed. By the user: To find out whether it is possible to trigger a new job. c) Bit 2: Job completed without error Set: By the handling blocks, when the corresponding job was completed without an error. Reset: By the handling blocks, when the job is triggered again. Analysis: By the user: To check whether the job was completed without errors. B-2 B8976-C085 SINEC S1 Master Module CP 2430 d) Bit 3: Job completed with error Set: By the handling blocks, when the corresponding job was completed with an error. The cause of the error is then coded in the high part of the status word. Reset: By the handling blocks, when the job is triggered again. Analysis: By the user: To check whether the job was completed with an error. If the identifier “job completed with error” is set, the cause of the error is located in the high byte (error management) of the status word. e) Bit 4: Data acceptance/data transfer active Set: By the SEND/RECEIVE handling blocks, when the transfer/acceptance of data has started (the bit is only set when larger volumes of data are transferred. On the CP 2430, this bit is always “0”). Reset: By the SEND, RECEIVE handling blocks, when the data exchange for a job is completed. Analysis: The analysis of this bit is not necessary on the CP 2430 since the data transfer/data acceptance takes place in one block run through. This bit is always set to “0” for the user. f.) Bit 5: Data transfer successful Set: By the SEND handling block when the data transfer for a job was successful. Reset: Reset by the SEND handling block when the data transfer for a newly triggered job starts. By the user when the bit has been evaluated (signal edge). Analysis: By the user: With this bit, the user can find out whether the data record for a job has already been transferred to the CP or when a new data record can be made available for the current job. g.) Bit 6: Data acceptance successful Set: By the RECEIVE handling block when the data for a job were accepted successfully. Reset: By the RECEIVE handling block when the transfer of data to the PLC has started for a newly triggered job. By the user when the evaluation is completed (signal edge). Analysis: By the user: With this bit, the user can find out whether the data record of a job has already been transferred to the PLC. h.) Bit 7: Disable/Enable data field Set: By the user to prevent an area being written to by the RECEIVE block or an area being read out by the SEND block. Reset: By the user to enable the data area in question. Analysis: By the SEND and RECEIVE handling blocks. If bit 7 is set, the blocks do not transfer data but signal the error to the CP. Note: When operating the CP 2430, this bit must always be set to ENABLE ( = 0 ). B-3 SINEC S1 Master Module CP 2430 B8976-C085 i) Bits 8 to 11: Error nibble: If the CP enters an error identifier in the job status (for example job completed with error), the handling blocks enter an error ID in the error nibble. This error ID is explained in detail in the following section. j) Bits 12 to 15: These bits are reserved for later expansions. Error Nibble The following section explains the meaning of the error nibble of the status word and the possible remedies. The errors are as follows: ± 0 to 5 are errors detected by the HDB ± 6 to F are errors signaled by the CP 2430 All the possible errors are listed in the following table: 0h Cold restart (Synchron) 1h Source/destination parameters invalid • The HDB has detected invalid values for the source/destination parameters. • The user has disabled data transfer with bit 7 in the status word. 2h Area does not exist on PLC • When the job was triggered, a data block, for example, was specified as the DBNR that does not exist on the PLC. 3h Area on PLC too small • The total of Q/ZANF and Q/ZLAE exceeds the area limit. 4h Timeout on PLC • The Q/Z parameters specified an area (for example AS, PB or similar) that is not equipped with memory or is defective. 5h Error in the status word • The specified ANZW cannot be processed. 6h Source/destination parameters not supported by CP • Q/ZTYP has an identifier not supported by the CP 2430 (for example NN, RW) • With ANR 200: QLAE is not 16 bytes • With ANR 202 : Length is less than expected 7h Listen error • The addressed slave is not in the LAS 8h Job not permitted in the current status of the CP 2430 • A management call was triggered in the incorrect status (for example "configure ID code” while the CP is in the protected mode). 9h SND_ERROR • Address invalid ( = 0 or > 31) • Change slave address: Old slave address not recognized B-4 B8976-C085 Ah SINEC S1 Master Module CP 2430 SD0_ERROR • Change slave address: Slave with address 0 already exists. • Set protected mode: Slave 0 exists Bh SD2_ERROR • Change slave address: New slave address already exists. Ch DE_ERROR • Change slave address: Error deleting the slave address. Dh SE_ERROR • Change slave address: Error setting the new slave address • EEPROM ERROR • Incorrect slave response three times from AS interface (e.g. timeout, parity error etc.) Eh AT_ERROR • Change slave address: Address only temporarily stored Fh Job number or function code unknown • ANR 200/201: Data exchange via inputs outputs set on CP. • ANR 202: Wrong function ID in byte 0 of the transmit data • ANR 202: Wrong parameter values (byte values in bits: For example set OFFLINE with MODE = 2 or higher) B-5 SINEC S1 Master Module CP 2430 B8976-C085 B.3 Possible Status Words With the Jobs Permitted on the CP 2430 Exchange of AS-I parameters, management and diagnostic information with ANR 202 (SEND and RECEIVE ) With communication using ANR 202, two different situations must be distinguished: First situation: Job without acknowledgment data (for example set_LPS) In this case, the function code and any management data are transferred with the SEND direct (ANR 202). The transfer of the data is acknowledged by the CP. There is no subsequent RECEIVE call. Possible status words (error-free sequence) ANZW (hex) Remarks 000A 0000 After SYNCHRON: Send and Receive disabled; old job completed with error, error identifier = cold restart 0008 0000 After CP_READY: Send enabled 0022 len After running the SEND with RLO=1: Job active; Send and Receive disabled; data transfer completed (len = number of bytes sent by the PLC) (0002 0000) (Can be entered by the user program for signal edge generation) 0004 0000 After the CP has processed the function; job completed without error; Send enabled B-6 B8976-C085 SINEC S1 Master Module CP 2430 Second version: Job with acknowledgment data (e.g. Read_lists_and_flags) In this situation, the function code and any management data are transferred with the SEND direct (ANR 202). The transfer of the data is acknowledged by the CP. After processing the command, the acknowledgment data are made available by the CP 2430 and read by the PLC using a RECEIVE direct (ANR 202). Possible status words (Error-free sequence) ANZW (hex) Remarks 000A 0000 After SYNCHRON: Send and Receive disabled; old job complete with error, error identifier = cold restart 0008 0000 After CP_READY: Send enabled 0022 len After running through the SEND with RLO=1: Job active; Send and Receive disabled; data transfer completed (len = number of bytes transmitted by the PLC) 0023 0000 After the function has been processed by the CP: Job active; Send disabled; Receive enabled 0066 len After running through the RECEIVE with RLO=1: Job completed without error; Send and Receive disabled; data acceptance completed (len = number of bytes read by the PLC) 0064 len After the CP has enabled the SEND (at the latest after one FW cycle (approximately 6ms)) 0X6A len After RECEIVE with RLO=1 has run: Job completed with error (X = error identifier); Send and Receive disabled; data acceptance completed (len = number of bytes read by the PLC) 0X68 len After the CP has enabled the SEND (at the latest after one FW cycle (approximately 6ms)) B-7 SINEC S1 Master Module CP 2430 B8976-C085 Sending AS-I Data Bits With ANR 200 Possible status words (Error-free sequence) ANZW (hex) Remarks 000A 0000 After SYNCHRON: Send and Receive disabled; old job completed with error, error identifier = cold restart 0008 0000 After CP_READY: Send enabled 0026 len After the SEND with RLO=1 is run through: Job completed without error; Send and Receive disabled; data transfer completed (len = number of bytes transmitted by the PLC) (0006 0000) (Can be set by the user program for signal edge generation) 0004 0000 After the SEND has been enabled by the CP: (At the latest after one FW cycle (approximately 6ms)) B-8 B8976-C085 SINEC S1 Master Module CP 2430 Reading the AS-I Data Bits With ANR 201 Possible status words (Error-free sequence) ANZW (hex) Remarks 000A 0000 After SYNCHRON: Send and Receive disabled; old job completed with error, error identifier = cold restart 000B 0000 After CP_READY: Receive enabled 0046 len After the RECEIVE with RLO=1 has run: Job completed without error; Send and Receive disabled; data acceptance completed (len = number of bytes read by the PLC) (0006 0000) (Can set by the user program for signal edge generation) 0005 0000 After the CP has enabled the RECEIVE: (At the latest after one FW cycle (approximately 6ms)) B-9 SINEC S1 Master Module CP 2430 B8976-C085 B.4 The Parameter Assignment Error Byte PAFE PAFE is set when the handling block detects a parameter assignment error. Meaning of the individual bits: Bit 7 0 Error number Bit 0 0 = no error 1 = error Bit 1...3 not used Bit 4...7 output of the error number: 0 no error 1 wrong ORG format 2 area does not exist ( DB ) 3 area too short 4 timeout error 5 wrong status word 6 irrelevant for the CP 2430 7 interface does not exist 8 interface not ready 9 interface overloaded A free B illegal job number ANR C interface not acknowledged or enabled. D not used E not used F not used B-10 B8976-C085 SINEC S1 Master Module CP 2430 C Further Reading /1/ ASI Das Aktuator-Sensor-Interface für die Automation Werner Kriesel, O.W. Madelung, Carl Hanser Verlag München Wien 1994 /2/ ASI Complete Specification can be ordered from the ASI association e.V. (The AS-I technology is promoted by the ASI association e. V.). Address: ASI-Verein e.V. Auf den Broich 4A 51519 Odenthal Germany Tel.: 02174 / 40756 Fax.:02174 / 41571 /3/ SINEC Industrial Communications Networks Catalog IK 10 /4/ Handling blocks are described in the following: For the S5-115 U as part of the User Manual ) Order no.: 6 ES 5998-3UFx 1 * for CPU 945 ) Order no.: 6 ES 5998-0UFx 3 * for CPU 941 - CPU 944 For the S5-135 U: can be ordered as a package HDB Software + Description Order no.: 6 ES 5842-7CB 01 for CPU 928 A/B - CPU 948 For the S5-155 U: can be ordered as a package HDB Software + Description Order no.: 6 ES 5846-7CA 01 for CPU 946 / 947 ) * x : randomly C-1 SINEC S1 Master Module CP 2430 B8976-C085 C-2 B8976-C085 SINEC S1 Master Module CP 2430 D Abbreviations / Terms AS-I Actuator-Sensor-Interface APF cable ASI Power Fail. Flag or LED display indicating that the power supply on the AS-I is too low or has failed (e.g. AS-I power unit defective) CP Communications Processor: module for installation in computers and programmable logic controllers. CP 2430 Communications processor for SIMATIC S5-115U, S5-135U and S5-155U programmable logic controllers on SINEC S1. LAS List of activated slaves LDS List of detected slaves LPS List of configured (permanent) slaves PG Programmer (programming device) AG Programmable logic controller; e.g. SIMATIC S5 PLC SINEC 'Siemens Network Architecture for Automation and Engineering', Range of Siemens products for industrial communication. D-1 SINEC S1 Master Module CP 2430 B8976-C085 D-2 B8976-C085 SINEC S1 Master Module CP 2430 E Notes on the CE Marking of SINEC Products Product Name EC EMC Directive 89/336/EEC CP 2430 6GK1 243-0SA00 The SINEC products listed above meet the requirements of the EC Directice 89/336/EEC “Electromagnetic Compatibility“ The EC conformity certificates are kept for the authorities responsible according to the EC directives listed above at the following address: Siemens Aktiengesellschaft Bereich Automatisierungstechnik Industrielle Kommunikation (AUT 93) Postfach 4848 D-90327 Nürnberg Federal Republic of Germany Area of Application EMC The product meets the following requirements: Area of application Industry Requirements Emission Immunity EN 50081-2 : 1993 EN 50082-2 : 1995 The product can also be used in the residential environment (residential, commercial and light industry). Area of application Residential Requirements Emission Immunity Individual approval EN 50082-1 : 1992 You must acquire the individual approval from the respective national authority or testing body. Installation Guidelines This product meet the requirements providing you adhere to the installation guidelines 1. Manual of the CP 2430 Master Module; 2. System Manual AG S5-135U/155U; Manual for S5-115U/H/F Installation of the Equipment Programmable logic controllers of the SIMATIC S5-135U/155U series must be installed in metal cabinets according to these guidelines.Programmable logic controllers of the SIMATIC S5-115U/H/F series must be installed in grounded, closed metal cabinets (for example, switchgear cubicles) Working in Cabinets To protect the module from electrostatic discharge, make sure that you neutralize any electrostatic charge on your body before opening the cabinet. Notes for the Manufacturers of Machines The product is not a machine in the sense of the EU directive. There is therefore no conformity certificate for the EU directive 89/392 for machines. If the product is part of the electrical equipment of a machine, the manufacturer of the machine must include the product in the conformity certificate E-1 SINEC S1 Master Module CP 2430 B8976-C085 procedure for the machine. E-2 SIEMENS AG AUT 933 Siemensallee 84 Vorschläge Suggetions Korrekturen Corrections Für Druckschrift bzw. Handbuch For instruction or manual 76187 Karlsruhe Federal Republic of Germany Titel/title Absender/From - Name/Name Bestell-Nr./Order No. SINEC S1 Master module 2430 6GK 1971-2SA01-0AA1 Firma/Dienststelle - Company/Department Anschrift/Address Vorschläge und/oder Korrekturen Suggestions/Corrections Telefon/Telephone Sollten Sie beim Lesen dieser Unterlage auf Druckfehler gestoßen sein, so bitten wir Sie, uns diese mitzuteilen. Ebenso sind wir für Anregungen, Hinweise und Verbesserungsvorschläge dankbar. Should you come across any printing errors when reading this publication, we would ask you to inform us using this form. We would also welcome any suggestions you may have for improvement. Bitte die Bestell-Nr. der betreffenden Druckschrift oder des Handbuches oben eintragen! Please fill in the order no. of the affected document! SIEMENS AG AUT 933 Siemensallee 84 Corrections Correcciones Pour l’imprimé ou le manuel Para folleto o manual 76187 Karlsruhe Federal Republic of Germany Titre/titulo Expediteur/Expeditor - Nom/Nombre y apelido N° de ref./N° de ped. SINEC S1 Master module 2430 6GK 1971-2SA01-0AA1 Société/Service - Empresa/Seccion Adresse/Direction Propositions ou corrections Propuestas y/o correcciones Téléphone/Téléphono Si, lors de la lecture de ce document, vous trouvez des fautes d’imprimerie, nous vous prions de nous en faiire part dans ce formulaire. Nous recevrons aussi avec reconnaissance vos suggestions, remarques et propositions d’amélioration. Si encuentra Usted erratas de imprenta, por favor, infórmenos utilizando este formulario. Le rogamos que nos communique también las reclamaciones, indicaciones, y propuestas de mejoramiento. Indiquez s.v.p. le n° de référence de l’imprimé ou de manuel concerne ! Indique por favor el N° de pedido del folleto o del manual respectivo!