1
PERFORMANCE ANALYSIS
OF
INTRUSION DETECTION SYSTEMS
Thesis Submitted in partial fulfillment of the requirements for the award
of degree of
Master of Engineering
In
Software Engineering
Thapar University, Patiala
Submitted By:
MANDEEP SINGH
(Roll No. 80731012)
Under the supervision of:
Mrs. SANMEET BHATIA
Lecturer
SMCA
COMPUTER SCIENCE AND ENGINEERING DEPARTMENT
THAPAR UNIVERSITY
PATIALA – 147004
JUNE 2009
ABSTRACT
==============================================================
Network Security is becoming an important issue for all the organizations, and with the
increase in knowledge of hackers and intruders they have made many successful attempts
to bring down high-profile company networks and web services. With the recent
advances in the field of network security a technique called Intrusion Detection System
are develop to further enhance and make your network secure. It is a way by which we
can protect our internal network from outside attack, and can take appropriate action if
needed. Using intrusion detection methods, information can be collected from known
types of attack and can be used to detect if someone is trying to attack the network.
Both open source and commercial tools are available for detecting intrusion in a network,
many vulnerability assessment tools are also available in the market. Many techniques
are there to detect intrusion in a network like signature matching, anomaly based and
others.
The work presented here discusses one of the techniques of signature matching in an
open source intrusion detection system Snort. Another open source intrusion detection
system Bro is also discussed. The main emphasis will be to explore and analyze Snort,
and then based upon CPU utilization and memory constraints Performance Analysis of
both the systems will be done. We will capture live traffic using Wireshark and then
offline analysis of this captured data will be done in both the tools. During Snort
exploration live traffic will also be analyzed.
iii
Table of Contents
==================================
Certificate…………………………………………………………………...i
Acknowledgement……………………………………………..…………...ii
Abstract………………………………………………………………….…iii
Table of Contents…………………...………………………….…..……...iv
List of Figures………………………………………..…………..……….vii
List of Tables……………………………………………………………….x
Chapter 1: Introduction………………………………… ……….……….1
1.1 Introduction to Network Security………… ………….…….……1
1.2 Types of attack in a Network…………………………………..…1
1.2.1 SYN Flooding……………………………..………....…2
1.2.2 Flood Attack………………………………………….....2
1.2.3 Packet Sniffing……………………………………….....2
1.2.4 Spoofing…………………………………………... …...3
1.2.5 Viruses……………………………………………….….3
1.2.6 Spyware………………………………………………....3
1.3 Introduction to Intrusion……………………………………….…4
1.3.1 Various methods of Intrusion…………………………...4
1.4 Security Tools and Techniques…………………………………...4
1.4.1 Firewall…………………………………………………..5
1.4.2 Intrusion Prevention System………………………….…6
1.4.3 Intrusion Detection System………………………………7
1.5 Goals of Intrusion Detection System……………………………..8
Chapter 2: Detail of Literature Survey………………………………….10
iv
2.1 Introduction……………………………………………………...10
2.2 Brief history and evolution……………………………………...10
2.3 Need for Intrusion Detection Systems……………………..……11
2.4 Structure and Architecture of IDS………………………….…...12
2.5 Placing the IDS in the Network…………………………………13
2.6 Intrusion Detection Systems Approach…………………….……14
2.6.1 Signature based detection Approach……………….…..15
2.6.2 Anomaly based detection Approach……………………15
2.7 Intrusion Detection System Implementation…………………....17
2.7.1 Host based ……………………………………………..17
2.7.2 Network based……………………………………….…18
2.8 Comparison of NIDS and HIDS…………………………….…..19
2.9 Limitation of Intrusion Detection Systems…………….....……..20
Chapter 3: Exploring Various Intrusion Detection Systems……..….....21
3.1 Bro Intrusion Detection Systems……………………….…..…...21
3.1.1 Architecture of Bro……………………………………..22
3.2 Snort Intrusion Detection Systems………………………...........26
3.2.1 Snort Features…………………………………………..26
3.2.2 Components of Snort………………………………..….27
3.2.3 Alerts in Snort…………………………………………..30
3.2.4 Writing Snort Rules…………………………………….32
Chapter 4: Problem Statement…………………………...……………...36
Chapter 5: Implementation and Experimental Results………………..38
5.1 Steps Performed During Configuration and Implementation…...38
5.2 Milestones Covered and Experimental Results…………………41
v
5.2.1 Script to Start Snort During Boot Time……………..…42
5.2.2 Signature in Snort to Detect the use of Orkut website…50
5.2.3 Signature in Snort to Detect the usage of Yahoo
Messenger………………………………………………54
5.2.4 Capture Live Traffic using Wireshark and Analyze in
Snort……………………………………………………55
5.2.5 Analyzing Traffic using 3621 Rules in Snort…………..57
5.2.6 Exploring Intrusion Detection System Bro……………..60
Chapter 6: Conclusion and Future Work……………………………….64
6.1 Conclusion ……………………………………………………...64
6.2 Future work……………………………………………………...67
References …………………………………………………………….…..68
List of Publications ……………………………………………………….71
vi
List of Figures
=============================================================
Figure No
Name of Figure
Page No
Figure 1.1
Network Security Tools and Techniques…………….5
Figure 1.2
Firewall………………………………………………...5
Figure 1.3
Intrusion Detection System……………………………7
Figure 2.1
History and evolution of IDS…………………….….10
Figure 2.2
Symantec Report …………………….........................11
Figure 2.3
Sample IDS Architecture……………………………12
Figure 2.4
Deployment of IDS Sensor and Management Console
in a Network………………………………………….14
Figure 2.5
CPU Usage difference in Anomaly Detection………16
Figure 2.6
Host based Intrusion Detection System…………….17
Figure 2.7
Network based Intrusion Detection System………...18
Figure 3.1
BRO Architecture…………………………………….22
Figure 3.2
Components of Snort………………………………..27
Snapshot 5.1
Tables in Snort Database…………………………….40
Snapshot 5.2
Bro Configuration Summary………………………...41
Snapshot 5.3
Snort Started at Boot Time in Ubuntu……………...48
Snapshot 5.4
Checking Snort Status ………………………………48
vii
Snapshot 5.5
Snort Stopped using Command
/etc/init.d/snort/stop………………………………….49
Snapshot 5.6
Snort Started using Command
/etc/init.d/snort start…………………………………49
Snapshot 5.7
Configure Snort.conf to Log Alert in Alert File
In /var/log/alert.csv…………………………………...50
Snapshot 5.8
Alerts Generated in Default Auth.log File………….51
Snapshot 5.9
Alerts Generated by Signature Orkut Detected in
Alert.csv File………………………………………….52
Snapshot 5.10
Alerts Stored in Mysql ………………………………53
Snapshot 5.11
Alerts Stored in Mysql by Signature Chat yahoo Im
Ping Detected…………………………………………54
Snapshot 5.12
Analyzing Capturedata.trace File using Web-Server
Rules in Snort…………………………………………55
Snapshot 5.13
Signatures Triggered using Web-Server Rules…….56
Snapshot 5.14
CPU Utilization when capturedate.trace File is
Analyzed with Web-Server Rules inSnort………….57
Snapshot 5.15
Signatures Triggered during 3621 Rules…………...58
Snapshot 5.16
CPU Utilization when Analyzing capturedata.trace
File with 3621 Rules in Snort………………………..59
Snapshot 5.17
Bro CPU Utilization and Percentage of Memory used
During Starting………………………………………60
Snapshot 5.18
Increase in CPU Utilization in Case of Bro in
Watching Condition………………………………….61
viii
Snapshot 5.19
Connection File Created by Bro……………………..62
Snapshot 5.20
Http File Created by Bro…………………………….62
Snapshot 5.21
CPU Utilization and Percentage of Memory used in
case of Analyzing File capturedata.trace……………63
Figure 6.1
Snort Performance Evaluation ……………………..64
Figure 6.2
Bro Performance Evaluation………………………..65
ix
List of Tables
=============================================================
Table 2.1
Comparison of NIDS and IDS……………………….19
Table 3.1
Default Policies Loaded in Bro………………..…….25
Table 3.2
Policies Not Loaded By Default………………..……26
Table 3.3
Description of Snort Components…………………...29
Table 3.4
Alert Mode in
Snort…………………………………………………...32
Table 3.5
General Rule Option Keywords in
Snort……………………………………..……………35
Table 5.1
Rules Triggered Using Web-Server
Rules……………………………………………….….56
Table 5.2
Signatures Triggered Using 3621
Rules……………………………………………..……58
Table 6.1
Comparison of Snort and
Bro…………………………….....................................66
x
Chapter 1
Introduction
==============================================================
1.1
Introduction to Network Security
With the evolution of internet, possibilities and opportunities are limitless, unfortunately,
so too are the risks and chances of malicious intrusions. More than ever before, we see
that the Internet is changing computing as we know it and with the increasing demand
and advances in the field of internet and network, now a day’s almost each organization
shares data over network (LAN, WAN) or internet, as a result they connect their network
to another which is already connected to some other network, this chain goes on
increasing day by day due to which chances of getting loop holes in the network
increases. So there is a need to protect these networks from viruses, hackers,
unauthorized attack and other network vulnerabilities that are available. Here comes the
issue and concern for security, which is becoming an issue of concern and important for
the organizations to handle [15].
Network is interconnection or links, for example network of road, network of computer.
Security is the freedom from danger or anxiety so Network Security is about securing and
protecting the network (externally and internally) from Distributed Denial of Service
attacks, rapidly propagating viruses, self-replicating worms and other attacks. Network
security begins with authorization and authentication. Organizations are spending billions
of dollars just to make their network secure and protect their data from outside and inside
attack. However securing and protecting today’s complex network in not so easy, it is
challenging and demanding [1].
1.2
Types of Attack in a Network
In terms of the relation intruder-victim, attacks are, Internal, coming from own
enterprise’s employees or their business partners or customers and External, coming from
outside, frequently via the internet.
1
1.2.1
SYN Flooding
The SYN flood attack is, simply, to send a large number of SYN packets and never
acknowledge any of the replies. A SYN flood is a form of denial-of-service attack in
which an attacker sends a succession of SYN requests to a target's system. The attacker
sends several packets but does not send the "ACK" back to the server. The connections
are hence half-opened and consuming server resources, a legitimate user, tries to connect
but the server refuses to open a connection resulting in a denial of service.
1.2.2 Flood Attack
The earliest form of denial of service attack was the flood attack. The attacker simply
sends more traffic than the victim could handle. This requires the attacker to have a faster
network connection than the victim. This is the lowest-level of the denial of service
attacks, and also the most difficult to completely prevent, for example a UDP flood attack
is a denial of service attack (DOS) attack using User Datagram protocol, a session
less/connectionless computer networking protocol. An UDP protocol attack can be
initiated by sending large number of UDP protocol packets to random ports on a remote
host. As a result the random host will:
Check for application listening on that host.
Sees that no application listens on that port.
Reply with an ICMP destination unreachable packet.
1.2.3 Packet Sniffing
A packet sniffer, sometimes referred to as a network monitor or network analyzer, can be
used legitimately by a network or system administrator to monitor and troubleshoot
network traffic. Using the information captured by the Packet sniffer, an administrator
can identify erroneous packets and use the data to pinpoint bottlenecks and help maintain
efficient network data transmission. In its simple form a packet sniffer simply captures all
packets of data that pass through a given network interface. Typically, the packet sniffer
would only capture packets that were intended for the machine in question. However, if
placed into promiscuous mode, the packet sniffer is also capable of capturing all packets
2
traversing the network regardless of destination. By placing a packet sniffer on a network
in promiscuous mode, a malicious intruder can capture and analyze all of the network
traffic. Within a given network, username and password information is generally
transmitted in clear text which means that the information would be viewable by
analyzing the packets being transmitted [8].
1.2.4 Spoofing
In the context of network security, a spoofing attack is a situation in which one person or
program successfully provides some kind of false information and thereby gaining an
illegitimate advantage.
1.2.5 Viruses
A small piece of software that replicates itself on real programs and runs every time a
program runs .Most can reproduce and attack other programs. The following are the most
common types of viruses:
E-mail viruses: Moves around in e-mail messages, usually replicates itself by
automatically mailing itself to dozens of people in the victim’s e-mail address
book.
Worms: A small piece of software that uses computer networks and security
holes to replicate itself. Worms can expand very rapidly scans a network for
another machine that has a specific security hole and copies itself to the machine.
Trojan horses: A computer program that contains hidden functions that can
exploit the privileges of the user running the program. Can erase the disk, send
your credit card numbers, and password to the hackers.
1.2.6 Spyware
Spyware is computer software that is installed surreptitiously on a personal
computer to collect information about a user, their computer or browsing habits
without the user's informed consent. There are three classes of Spyware:
3
Harmless but annoying: This will change the default homepage of your
browser to some target ads, pop up etc.
Information collection: This class of spyware is generally interested in
collecting some kind of useful information about you, the sites you visited
most, and so that third party can send you targeted popup and ads.
Malicious: This class includes full logging and collecting information
along with sending private and confidential information to the server.
1.3
Introduction to Intrusion
The act of detecting actions that attempts to compromise the confidentiality,
integrity or availability of a resource. Intrusion is the act of violating the security
policy or legal protections that pertain to an information system. An intruder is
somebody (“hacker" or "Cracker") attempting to break into or misuse your system
[16].
1.3.1 Various Methods of Intrusion
There are basic three ways by which intruders can get into the system:
Targeting hardware and security system: This method assumes that the
intruder knows some information about the hardware and security
methods used in the system in which he's attacking.
Exploitation of known weaknesses: Software bugs are being brought
attention quite frequently. Unfortunately sometimes, fixes for these bugs
are not made available soon enough.
Brute force attacks: In this method, the attacker attempts to break a
system by trying to guess its security codes, such as attempting to guess
the root password by trying possible combinations of characters [18].
1.4
Security Tools and Techniques
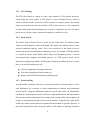
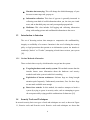
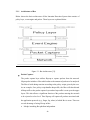
In network security basic two types of tools and techniques are used, as shown in Figure
1.1, Reactive tools and Proactive tools. Reactive tools and techniques are those that
4
generate some kind of response or alert after detecting some unidentified behavior. They
are called reactive as first the activity occurs and they respond accordingly. Firewalls and
IDS come under this category.
Network Security Tools
And Techniques
Reactive Tools
Intrusion Detection Systems
Proactive Tools
Firewalls
Inrusion Prevention System
Figure 1.1: Network Security Tools and Techniques
1.4.1 Firewall
A firewall is a combination of software or hardware that protects the network from
outside attack or outside network. A firewall is considered a first line of defense in
protecting private information. As can be seen from Figure 1.2, firewall can act as a wall
between the two networks. The person want access to the either network has to pass this
wall before entering. A firewall is a system that is set up to control traffic flow between
two networks. Firewall prevents what IDS detect [9].
Figure 1.2: Firewall [7]
5
There are many types of firewall techniques like:
Packets filter: Looks at each packet entering or leaving the network and accepts
or rejects it based on user-defined rules. Packet filtering is fairly effective and
transparent to users, but it is difficult to configure. In addition, it is susceptible to
IP spoofing.
Application gateway: Applies security mechanisms to specific applications, such
as FTP and Telnet servers. This is very effective, but can impose performance
degradation.
Circuit-level gateway: Applies security mechanisms when a TCP or UDP
connection is established. Once the connection has been made, packets can flow
between the hosts without further checking.
Proxy server: Intercepts all messages entering and leaving the network. The
proxy server effectively hides the true network addresses.
1.4.2 Intrusion Prevention System
When the blocking capabilities of a firewall are combined with the deep packet
inspection of IDS, it is called Intrusion Prevention Systems. IPS are combination
of hardware and software or completely a software deployed on hardware that
monitors network traffic and can react in real time in blocking or prevent the
intrusion attack. These systems are proactive defense mechanisms designed to
detect malicious packets within normal network traffic and stop intrusions
automatically, before it does any damage rather than simply raising an alert.
Intrusion Prevention is the process of performing intrusion detection and
attempting to stop detected incidents on real time. Just like intrusion detection,
information about the incident is logged and reported to the security
administrator. The difference between network intrusion detection and network
intrusion prevention is that network intrusion detection only monitors incidents,
where as intrusion prevention attempts to stop them [11].
6
1.4.3
Intrusion Detection Systems
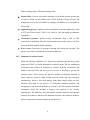
IDS are a type of security management system for computers and networks which
consists of software or hardware or both. An Intrusion Detection system gathers
and identifies information from various areas of a network to detect possible,
malicious activity which includes both intrusions (attacks from outside the
organization) and misuse (attacks from within the organization). As can be seen
from Figure 1.3 below IDS protects the internal as well as external network from
outside attack .In the physical analogy, an Intrusion detection system is equivalent
to a video camera and motion sensor detecting unauthorized or suspicious activity
and working with automated response. These devices, similar to firewalls, inspect
incoming and outgoing network traffic. Unlike firewalls, however, they do not
alter the traffic flow by dropping or passing certain packets. Rather, they look for
malicious traffic that may be indicative of an attack or other misuse and log an
alarm with specific data for administrative review [16].
Fig 1.3: Intrusion Detection Systems [10]
7
1.5
Goals of Intrusion Detection System
Intrusion Detection System primary goal is to detect abuse of computer systems. The
ideal IDS would be capable of detecting intrusive behavior in progress, notify the security
personnel about the problem through email or alert, and be capable of taking independent
action to minimize the risk posed by such abuse. Next goal of IDS is to collect data about
the system, their behavior in order to facilitate recovery in case of a failure, log events
and identify the source and techniques involved in an attack. This information can further
be used for legal purpose and as an evidence of proof against the attacker. The following
are the goals of an Intrusion Detection System:
IDS must be capable of accurately differentiate between a normal or acceptable
user behavior and a potentially unsafe or suspected behavior.
Should be easy to scale within and across the large composite networks
increasingly and within an organization.
IDS should be capable of deploying easily within the network and system
architecture and also should handle the complex structures and modern
heterogeneous networks.
It should be capable of responding to attacks even if the attack are new one that
are not recognized earlier with minimum human intervention required.
Should be capable of generating reports and graphs in real-time so that the
administrator can take the necessary action without any delay avoiding further
damage to the network.
IDS should also be fit in the overall security mechanism of the network and also
with other security mechanism.
IDS should act as second level of defense and also capable of detecting failures or
attacks on other security mechanisms.
IDS should be capable of responding to intrusive and illegitimate behavior by
increasing its monitoring increasing the security in relevant sections, or by
excluding or restricting intrusive behavior.
IDS should be able to recognize illegitimate behavior in all sections of a system.
8
An IDS system should have the capability to protect itself against attack and make
sure that the overall system’s integrity remain same and also the audit information
does not get compromised and remain intact , make sure that the component or
the system cannot adversely affect the overall functioning of the system and try to
minimize the attack from affected component .
It should have the capability to work/continue its functioning in case of network
failures, unreliable transmission, high system loads, and denial of service attacks.
An IDS system should use minimum system resources and limited memory, so
that it should have minimum impact on the legitimate user working along with
minimum communication resources.
The type of information generated by the IDS should be such that so that we can
use that information for latter recovery of the system and for network profiling in
case of any damage and can also be used as evidence in a court of law.
IDS should reflect the security policy of the organization in which it is deployed,
allowing the priorities of that organization to shape the level and form of
monitoring present [17].
9
Chapter 2
Detail of Literature Survey
=============================================================
2.1
Introduction
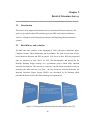
This section is the output of the literature survey on Intrusion Detection Systems. The
goal is to give details about IDS and their types how IDS works and its architecture.
Various techniques used in detecting an intrusion and Exploring Intrusion detection
systems.
2.2
Brief history and evolution
The IDS came into existence in the beginning of 1980, with James Anderson's paper,
Computer Security Threat Monitoring and Surveillance. His work was the start of hostbased intrusion detection and IDS in general. Let's focus on how IDS has progressed
since its Inception in early 1980’s. In 1983, SRI International, and specifically Dr.
Dorothy Denning, began working on a government project which helps intrusion
detection development. The aim was to create user’s profile based upon their activity by
analyzing the audit trail One year later, the first model for intrusion detection, the
Intrusion Detection Expert System (IDES), was developed by Dr Denning which
provided the framework for the IDS technology development[19].
Figure 2.1: History and evolution of Intrusion Detection System [27]
10
2.3
Need for Intrusion Detection Systems
When there is a firewall installed, patch operating system, sound passwords and latest
antivirus so why we need to have IDS installed? This question is often asked by user, and
the answer is simple and straight because the intrusion still can occur. Sometimes we
forget to update a firewall or an antivirus so intrusion can occur, even the most secure
systems with all the protection are still not 100 percent secure, Passwords can be cracked,
users can lose their passwords. Software can have bugs that compromise the system
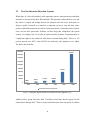
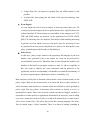
security. According to the 14th version of report issued by Symantec Corporation there is
a significant spike in new malicious code threats occurred during 2008. There is a 165
percent increase over 2007, when 624,267 new malicious code signatures were added.
The data is shown below:
1800000
1656227
1600000
1400000
1200000
1000000
800000
624267
600000
400000
200000
18827
69107
113025
140690
0
2003
2004
2005
2006
2007
2008
New Malicious Code Signature
Fig 2.2: Symantec Report on the new malicious code signature [13].
Another Foley's group lists more than 79 million records data breach reported in the
United States through 2007. That's a nearly fourfold increase from the nearly 20 million
11
records reported in all of 2006. So we need to develop IDS systems and intrusion
detection techniques to detect, fight and discover against all these intrusion attack [4].
The IDS can provide the following:
Provide a greater degree of integrity to infrastructure of the organization.
Able to trace user activity from entry point to point of impact.
Will record alteration of data and give a report.
IDS also helps in monitoring the Internet for the latest attacks
Notify us when the system will be under attack.
Analysis of abnormal activity patterns [18].
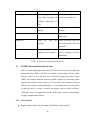
2.4
Structure and Architecture of IDS
An intrusion detection system always has its core element - a sensor (an analysis engine)
that is responsible for detecting intrusions. This sensor contains decision-making
mechanisms regarding intrusions. Sensors receive raw data from three major information
sources as can be seen from Figure 2.3 these are:
Own IDS knowledge base.
Syslog.
Audit trails.
Figure 2.3: Sample IDS Architecture [2]
12
The syslog may include configuration of file system, user authorizations etc. This
information creates the basis for a further decision-making process.
Sensors
Act as an agent who continuously watches or monitors the network in real time.
They are responsible for collecting data. The input for a sensor may be any part of
a system that could contain evidence of an intrusion. Example types of input to a
sensor are network packets, log files, and system call traces. Sensors collect and
forward this information to the analyzer.
Database
In database all the information about the attack signatures or pattern should be
present that are previously detected. When the sensor detects some kind of
malicious activity or signature it matches it with the current database, and report
to attack response module.
Attack Response Module
Based upon the type of configuration the Response Module can either send an
alarm or an email notification about the intrusion detected to the administrator
[18].
2.5
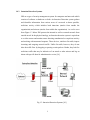
Placing the Intrusion Detection System in the Network
Although putting the IDS depends highly on the environment of the organization,
but the most common places where IDS can be installed are as follows:
Between the network and Extranet.
Between the firewall and the internal network, to identify an attack in case it
passes a firewall.
In the Remote area network.
If possible between the servers and user community, to identify the attacks from
the inside.
13
On the intranet, ftp, and database environment [14].
Fig 2.4: Deployment of IDS Sensor and Management Console in a Network [14].
As can be seen from Figure 2.4 IDS sensors are placed between internet and the firewall
or can be between two LAN, the green boxes shown are the IDS sensors dark blue sensor
shown the IDS management console.
2.6
Intrusion Detection Systems Approach
There are basically two approaches used in detecting an intrusion in an Intrusion
Detection System. These are as follows:
14
2.6.1 Signature based detection approach
Signature detection aims at searching network traffic for a data or packet known to be
malicious. If we know the network behavior in advance then developing signatures
becomes an easy task. It just compares what it is analyzing to a given list of signatures
using string comparison regular expressions. For example:
•
An HTTP request for “/etc/passwd” addressed to a Linux web server.
•
An e-mail with an attached file named morw.exe, which is a known form of
malware.
One of the major disadvantages of signature based detection is that they only detect
known attacks, a signature must be created for every attack, and new attacks cannot be
detected. They are also prone to false positives since they are commonly based on regular
expressions and string matching. Both of these mechanisms merely look for strings
within packets transmitting over the wire. While signatures work well against attacks
with a fixed behavioral pattern, they do not work well against the behavior of attack
patterns created by a human or a worm with self-modifying behavioral characteristics.
Detection of signature becomes further complicated when the attacker attack behind a
payload encoders and behind some encrypted data channels. For Signature-based analysis
to be successful, it is necessary to have an up to date list of signatures. The quality of the
analysis will be just as accurate as the quality of the signature base. Unknown or recent
worms might go undetected. Polymorphic worms, a worm which changes its appearance
(sometimes by encrypting itself) while propagating, may not be detected. If the signatures
are made public, variants can be created to avoid them [21].
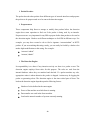
2.6.2 Anomaly based detection approach
Anomaly based detection approach are those that can be used to detect attacks that falls
within a certain environment or certain state. The idea behind this approach is to measure
a "baseline" of such states as CPU utilization, disk activity, user logins, and file activity.
Then, the IDS can trigger when there is a deviation from this baseline. The benefit of this
approach is that it can detect the anomalies without understanding the underlying cause
behind the anomalies. Anomaly detection identifies any unacceptable deviation from
15
expected behavior. Expected behavior is defined, in advance, by a manually developed
profile or by an automatically developed profile. An automatically developed profile is
created by software that collects and processes characteristics of system behavior over
time and forms a statistically valid sample of such behavior. Note that an unexpected
behavior is not necessarily an attack; it may represent new, legitimate behavior that needs
to be added to the category of expected behavior. Events in an anomaly detection engine
are caused by any behaviors that fall outside the predefined or accepted model of
behavior. As can be seen from Figure 2.5, in case of Abnormal Process, the process size
varies as compared to Normal process. If the normal process size for the certain behavior
is 49 percent then the abnormal process size for the same case will be around 90 percent.
A disadvantage of anomaly-detection engines is its complexity to define rules. Each
protocol being analyzed must be defined, implemented and tested for accuracy. The rule
development process is also compounded by differences in vendor implementations of
the various protocols. Custom protocols traversing the network cannot be analyzed
without great effort. On the other hand, once a protocol has been built and a behavior
defined, the engine can scale more quickly and easily than the signature-based model
because a new signature does not have to be created for every attack and potential
variant. Another pitfall of anomaly detection is that malicious activity that falls within
normal usage patterns is not detected [29].
100
90
80
70
60
50
40
30
20
10
0
Abnormal Process
Normal Process
Process size
Process size
Process size
Figure 2.5: CPU Usage Difference in case of Anomaly detection
16
However, anomaly detection has an advantage over signature-based engines in that a new
attack for which a signature does not exist can be detected if it falls out of the normal
traffic patterns.
2.7
Intrusion Detection Systems Implementation
Based upon the implementation detail the Intrusion Detection System can either be
implemented on the network as Host based and Network based. Nowadays a hybrid
approach is also being implemented to provide a greater security.
2.7.1 Host based
The HIDS reside on a particular computer and provide protection for a specific computer
system. Host intrusion detection systems are installed locally on host machines making it
a very versatile system compared to NIDS. HIDS can be installed on many different types
of machines namely servers, workstations and notebook computers. The model shown in
Figure 2.6 allows for remote monitoring, remote storage of events logs and ability to
PUSH agents to new or existing hosts [12].
Figure 2.6: Host based Intrusion Detection System [32]
17
2.7.2 Network based
Network based IDS captures network traffic packets (TCP, UDP) and analyzes the
content against a set of rules or signatures to determine if a possible event took place.
NIDS monitors packets on the network wire and attempts to discover if a hacker/cracker
is attempting to break into a system (or cause a denial of service attack). A typical
example is a system that watches for large number of TCP connection requests (SYN) to
many different ports on a target machine, thus discovering if someone is attempting a
TCP port scan. A NIDS may run either on the target machine who watches its own traffic
or on an independent machine promiscuously watching all network traffic (hub, router,
and probe). NIDS is network based they do not only deal with packets going to a specific
host – since all the machines in a network segment benefit from the protection of the
NIDS. Note that a "network" IDS monitors many machines. Network-based IDS can also
be installed on active network elements, for example on routers. Typical Network Based
IDS are Cisco Secure IDS, Hogwash, Dragon, E-Trust IDS [23].
Figure 2.7: Network based Intrusion Detection System [32].
18
2.8
Comparison of Network Intrusion Detection System and Host
Intrusion Detection System:
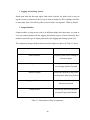
The Host based and the Network based IDS can be compared based upon the following
functions as given in table 2.1
Function
HIDS
NIDS
Protection on LAN
Yes
Yes
Protection off LAN
Yes
No
Versatility
More
Less
Price
More affordable
High
Packet rejection
No
Yes
Failure rate
Low
High
Local machine registry
scan
Alarm function
Yes
No
Yes
Yes
Cross platform
compatibility
Less
More
Attacks detected
Encrypted network
traffic
Overwrite the login
executable
Walk up to the
keyboard attack
eg. Sun open prom
SYN Flood attack
Land, Smurf,
TearDrop attacks
BackOrifice hacker
tool.
Win Nuke attack.
Table 2.1: Comparison of NIDS and HIDS [23].
19
2.9
Limitation of Intrusion Detection System
Although Intrusion Detecion System helps in securing our network from various attacks
and viruses, but there are certain limitation of these systems as discussed below:
Not an alternative for a weak identification and authentication mechanisms.
Unable to conduct monitoring or to investigate attack without human intervention.
Unable to deal with problem with integrity and quality of information provided by
the system.
Unable to analyze all the traffic on a busy network.
Cannot always deal with problems involving packet-level attacks [22].
False negative occurs when the IDS fail to identify an intrusion when one has
in fact occurred.
False positive occurs when the IDS incorrectly identifies an intrusion when
none has occurred [18].
20
Chapter 3
Exploring Various Intrusion Detection Systems
=============================================================
3.1
BRO Intrusion Detection System
Bro is a research tool being developed by the Lawrence Livermore National
Laboratory. Bro is a Unix-based Network Intrusion Detection System (NIDS).Bro
was designed and developed by Vern Paxson of ICSI’s Centre for Internet (ICIR),
Berkeley. He started the project in the year 1995 and bro is under active
development since then. Bro is operationally deployed at the University of
California, Berkley and at LBL .Bro fundamental design goal is to separate policy
and mechanism. Bro is neither fundamentally anomaly based nor misuse-based
intrusion detection system because bro is by policy neutral itself, the network
activity is abstracted into events which are further passed to policy layer. On the
policy layer the administrator defines its own environmental constraints by
writing its own custom scripting in a scripting language. Bro is very
customizable, and there are several ways to modify Bro to suit your environment.
You can write your own policy analyzers using the Bro language. Most sites will
likely just want to do minor customizations, such as changing the level of an alert
from "notice" to "alarm", or turning on or off particular analyzers.
Bro provide a real time network monitoring. It comes with a predefined set of
policy scripts which should be tuned by the user to the specific network in which
it shall run. Deploying and understanding Bro takes more time than other IDSs.
The Bro language is harder to learn than e.g. Snort’s language for building custom
rules. The coding of Bro is also not very well polished and the documentation
often lies behind the recent version. Bro comes also with a module for converting
Snort rules. In this way a user can download Snort rules and can use these in Bro
[5].
21
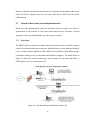
3.1.1 Architecture of Bro
Below shown the basic architecture of Bro Intrusion Detection System that consists of
policy layer, event engine and packet. These layers are explained below.
.
Figure 3.1: Bro Architecture [31].
Packet Capture:
The packet capture layer utilizes libpcap to capture packets from the network.
Libpcap also includes a filter which reduces the amount of packets to be analyzed.
The filter is built during run-time according to the policy scripts given by the user.
As an example, if no policy script handles http traffic, the filter will then discard
all http traffic at the packet capture layer and no http traffic is sent up to the upper
layers. This also allows a significant fraction of the packets entering the network
to be rejected at a low level. Thus libpcap will capture all packets associated with
the application protocols (e.g., finger, ftp, telnet) of which Bro is aware. There are
several advantage of using Libcap in Bro:
It helps in making Bro platform independent.
22
Using Libcap, Bro can operate on tcpdump files and offline analysis is also
possible.
It isolates Bro from getting into the details of the network technology used
FDDI, SLIP.
Event Engine:
At event engine layer the low-level analysis of network packets takes part. The
event layer performs integrity checks on packet headers first, single IP packets are
collected and then TCP data streams are reassembled. At the transport level TCP,
UDP and ICMP packets are analyzed. At the application level HTTP, SMTP,
DNS, FTP and many more are analyzed. If an analyzer finds anything interesting
it generates an event which is sent up to the policy layer for processing. Events
are generated from this process and placed on a queue to be interrogated by the
policy script interpreter which resides in the third layer.
Policy Layer:
At this layer, policy scripts written in the proprietary Bro-language by the user
handle events generated by the event engine. An event can be processed by
several handlers successively. When Bro starts, it looks through the enabled event
handlers to find which event engine analyzers to start . To add new capability to
Bro, one needs to identify the events associated with the protocols of the
application, and write corresponding event handlers to extend the functionality of
the policy script interpreter which improves Bro’s extensibility [31].
Basic analyzers used by Bro to determine what network events are alarm worthy are the
policy scripts. What are the various actions to be taken and how to report activities, as
well as determine what activities to scrutinize all has been defined or can be specified by
policy script. Bro uses policies to determine what activities to classify as active, or
questionable in intent. These active network sessions can then be flagged, watched, or
responded to via other policies or applications determined to be necessary, such as calling
rst to reset a connection on the local side, or to add an IP address block to a main router's
ACL (Access Control List). The policy files use the Bro scripting language. Bro Policy
files are loaded using a @load command. There is no harm in loading something in
23
multiple policy scripts as the semantics of @load are "load in this script if it hasn't
already been loaded". The following policy scripts are included with Bro. The first set are
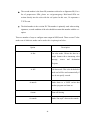
all loaded by default as shown in Table 3.1, and the second group can be added by adding
them to path site/brohost.bro policy file as shown in Table 3.2. Table 3.1 policy files are
loaded by default. To modify which analyzers are loaded, edit or create a file in
”$BROHOME/SITE”. If you write your own new custom analyzer, it goes in this
directory too. To disable an analyzer, add”@unload policy.bro” to the beginning of the
file “$BROHOME/site/brohost.bro”, before the line “@load brolite.bro”. To add
additional analyzers, add them @load then in “$BROHOME/site/brohost.bro”.
Site
Defines local and neighbor network from
static ping.
Alarm
Open logging file for alarm event.
TCP
Initialize BPF filter for SYN/RST TCP
packets.
Login
rlogin/telnet analyzer, ensure they are
disabled.
Weird
Initialize mechanism for detecting unusual
events.
Conn
Access and record connection events.
Hot
Defines certain form of sensitive access.
Frag
Process Tcp fragments.
Print resources
On exit print resource usage information,
useful for tuning.
Signatures
The signature policy engine.
Scan
Scan detection mechanism.
Trw
More san detective mechanism.
HTTP
General http analyzer.
HTTP-request
Detailed analysis of http requests.
HTTP-reply
Detailed analysis of http-reply.
FTP
FTP analyzer.
24
Port mapper
Record and analyze RPC portmapper
requests.
SMTP
Record and analyze email traffic.
TFTP
Identify and log Tftp sessions.
Worm
Flag http-based worm source such as Code
Red.
Software
Track software version
Blaster
Looks for blaster worm.
Synflood
Looks for synflood.
Stepping
Used to detect when someone logs into
your sites from an external net and then
soon logs into another site.
Reduce memory
Sets shorter timeouts for saving state, thus
saving memory. If bro is using 50% of ram
it is recommended not to load it.
Table 3.1: Default policies loaded in BRO
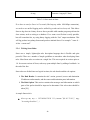
These are not loaded by default:
Policy
Description
Why off by default
Drop
Include if site has ability to Turn on if needed.
drop hostile remotes.
ICMP
Icmp analyzer
CPU
intensive
and
low
intensive and
low
payloff
DNS
DNS analyzer
CPU
payoff.
Ident
Ident program analyzer.
Historical
no
longer
interesting
Gnutella
Looks for
host
Gnutella.
running Turn this on if you want to
know about this.
25
SSL
SSL analyzer.
SSH-stepping
Detect
Still experimental.
stepping
stones Possibly too CPU intensive
where both incoming and needs more testing also.
outgoing connections are
SSH.
Analy
Backdoor
Performs statistical
Only
used
for
offline
analysis.
analysis.
Looks for backdoor.
Effective when capturing
bulk traffic.
Passwords
Looks
for
clear
text Needs to turn on if your site
password.
does not provide clear text
password.
File-flushed
Causes all log files to be Needs to turn on when you
flushed every N seconds.
want to perform real time
monitoring.
Table 3.2: Policies not loaded by default [25].
3.2
SNORT Intrusion Detection System
Snort is a small, lightweight open source IDS written by Marty Roesch which has
become the most widely used IDS. It is capable of performing real-time traffic
analysis. Snort is a free and open source Network Intrusion prevention system
(NIPS) and network intrusion detection (NIDS) capable of performing packet
logging and real-time traffic analysis on IP networks. Snort performs protocol
analysis, and content searching/matching, it is commonly used to actively block
or passively detect a variety of attacks and probes, such as buffer overflows,
stealth port scans, web application attacks, SMB probes, and OS fingerprinting
attempts, amongst other features.
3.2.1 Snort Features
Engine capable of detecting more than 1300 different types of attacks
26
Ability to record packets in human-readable, binary, XML, and other formats
Network-based IDS that uses the libpcap26 packet capture library
Ability to alert based on pattern matching for threats including buffer overflows,
stealth port scans, CGI scans, SMB probes, NetBIOS queries, DDoS attacks,
Trojan horse attacks, and certain types of viruses and worms.
Snort can compile and run on Linux, windows and other as well [26].
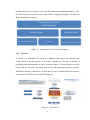
3.2.2 Components of Snort
Snort is logically divided into multiple components. These components work together to
detect particular attacks and to generate output in a required format from the detection
system. A Snort-based IDS consists of the following major components:
Packet Decoder
Preprocessors
Detection Engine
Logging and Alerting System
Output Modules
Figure 3.2: Components of Snort [26]
27
Packet Decoder:
The packet decoder takes packets from different types of network interfaces and prepares
the packets to be preprocessed or to be sent to the detection engine.
Preprocessors:
These components help Snort to arrange or modify data packets before the detection
engine does some operation to find out if the packet is being used by an intruder.
Preprocessors are very important for any IDS to prepare before data packets to be send to
the detection engine. Hackers use different techniques to fool IDS in different ways. For
example, you may have created a rule to find a signature “autorun/admin” in HTTP
packets. If you are matching this string exactly, you can easily be fooled by a hacker who
makes slight modifications to this string. For example:
“autorun/./admin”.
“artorun/,/admin”.
The Detection Engine:
Its responsibility is to detect if any intrusion activity are there in a packet or not. The
detection engine employs Snort rules for this purpose. The rules are read from the
internal database where they are matched and checked. If a packet matches any rule,
appropriate action is taken otherwise the packet is dropped. Actions may be logging the
packet or generating alerts. The detection engine is the time-critical part of Snort. The
load on the detection engine depends upon the following factors:
Number of rules defined in the snort engine.
Power of the machine on which Snort is running.
Data transfer rate used in the Snort machine.
Load on the network number of systems currently running.
28
Logging and Alerting System
Based upon what the detection engine finds inside a packet, the packet may be used to
log the activity or generate an alert. Logs are kept in simple text files, tcpdump-style files
or some other form. All of the log files are stored under /var/log/snort folder by default.
Output Modules
Output modules or plug-ins are used to do different things based upon how you want to
save your output generated by the logging and alerting system of Snort. Basically these
modules control the type of output generated by the logging and alerting system [29].
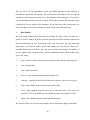
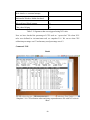
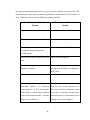
The components along with their function and description are shown in Table 3.3 below.
Name of component
Description
Packet Decoder
Prepares packet before sending to
detection engine
Preprocessor
Arrange or modify data packets,
can rearrange packets if needed
Detection engine
Detects the intrusion in the packet
based upon the rules being defined
Logging and alert system
Use to send an alert when
intrusion is detected
Output module
Process logs and alerts and store
its output in prescribed format.
Table 3.3: Description of Snort Components.
29
Snort can be analyzed in many modes via
Sniffer mode, which simply reads the packets off of the network and displays
them for you in a continuous stream on the console (screen).
Packet Logger mode, which logs the packets to disk.
Network Intrusion Detection System (NIDS) mode, the most complex and
configurable configuration, which allows Snort to analyze network traffic for
matches against a user-defined rule set and performs several actions based upon
what it sees.
Inline mode, which obtains packets from iptables instead of from libpcap and then
causes iptables to drop or pass packets based on Snort rules that use inlinespecific rule types.
3.2.3 Alerts in Snort:
To send alerts to syslog, use the -s switch. The default facilities for the syslog alerting
mechanism are LOG AUTHPRIV and LOG ALERT. If you want to configure other
facilities for syslog output, use the output plug-in directives in the rules files. For
example, use the following command line to log to default (decoded ASCII) facility and
send alerts to syslog: /snort -c snort.conf -l. /log -h 192.168.1.0/24 –s.
As another example, use the following command line to log to the default facility in
/var/log/snort and send alerts to a fast alert file: ./snort -c snort.conf -A fast -h
192.168.1.0/24.
When Snort generates an alert message, it will usually look like the following: [**]
[120:56:1] (snort_decoder): T/TCP Detected [**]
The first number is the Generator ID, this tells the user what component of Snort
generated this alert. In this case, we know that this event came from the “decode”
(120) component of Snort.
30
The second number is the Snort ID (sometimes referred to as Signature ID). For a
list of preprocessor SIDs, please see etc/gen-msg.map. Rule-based SIDs are
written directly into the rules with the sid option. In this case, 56 represents a
T/TCP event.
The third number is the revision ID. This number is primarily used when writing
signatures, as each rendition of the rule should increment this number with the rev
option.
There are number of ways to configure snort output in NIDS mode. There are total 7 alert
modes out of which six modes can be used with -A option given below.
Option
Description
-A fast
Fast alert mode. Writes the alert in a
simple format with a timestamp, alert
message,
source
and
destination
IPs/ports.
-A full
Full alert mode. This is the default alert
mode and will be used automatically if
you do not specify a mode.
-A unsock
Sends alerts to a UNIX socket that
another program can listen on.
-A none
Turns off alerting.
Sends “fast-style” alerts to the console
-A console
31
Generates “cmg style” alerts.
-A cmg
Table 3.4: Alert mode in Snort
If we have to analyze Snort in Fast mode (like keep up with a 1000 Mbps connection),
we need to use unified logging and a unified log reader such as barnyard. This allows
Snort to log alerts in a binary form as fast as possible while another program performs the
slow actions, such as writing to a database. If we want a text file that is easily parsable,
but still somewhat fast, try using binary logging with the “fast” output mechanism. This
will log packets in tcpdump format and produce minimal alerts. For example:”./snort -b A fast –c snort.conf”.
3.2.4 Writing Snort Rules:
Snort uses a simple, lightweight rules description language that is flexible and quite
powerful. There are a number of simple guidelines to remember when developing Snort
rules. Most Snort rules are written in a single line. This was required in versions prior to
1.8. In current versions of Snort, rules may span multiple lines by adding a backslash \ to
the end of the line.
Snort rules are divided into two logical sections, the rule header and the rule options.
The Rule Header: It contains the rule’s action, protocol, source and destination
IP addresses and netmasks, and the source and destination ports information.
The Rule Option: This section contains alert messages and information on which
parts of the packet should be inspected to determine if the rule action should be
taken [28].
A sample Snort rule is:
Alert tcp any any -> 192.168.84.128/24 111 (content:”|00 01 70 b1|”; msg:
“Accessing the device”; )
32
The text up to the first parenthesis is the rule header and the section enclosed in
parenthesis contains the rule options. The words before the colons in the rule options
section are called option keywords. All of the elements in that make up a rule must be
true for the indicated rule action to be taken. When taken together, the elements can be
considered to form a logical AND statement. At the same time, the various rules in a
Snort rules library file can be considered to form a large logical OR statement.
Rule Header
The rule header contains the information that defines the who, where, and what of a
packet, as well as what to do in the event that a packet with all the attributes indicated in
the rule should show up. The first item in a rule is the rule action. The rule action tells
Snort what to do when it finds a packet that matches the rule criteria. There are 5
available default actions in Snort, alert, log, pass, activate, and dynamic. In addition, if
you are running Snort in inline mode, you have additional options which include drop,
reject, and sdrop.
1.
alert - generate an alert using the selected alert method, and then log the packet
2.
log - log the packet
3.
pass - ignore the packet
4.
activate - alert and then turn on another dynamic rule
5.
dynamic - remain idle until activated by an activate rule , then act as a log rule
6.
drop - make iptables drop the packet and log the packet
7.
reject - make iptables drop the packet, log it, and then send a TCP reset if the
protocol is TCP or an ICMP port unreachable message if the protocol is UDP.
8.
sdrop - make iptables drop the packet but does not log it.
We can also define our own rules and configure one or more output plug-in with them.
33
Protocol
The next field in a rule is the protocol. There are four protocols that Snort currently
analyzes for suspicious behavior– TCP, UDP, ICMP, and IP. In the future there may be
more, such as ARP, IGRP, GRE, OSPF, RIP, IPX, etc.
IP Addresses
The keyword any may be used to define any address. Snort does not have a mechanism to
provide host name lookup for the IP address fields in the rules file. The addresses are
formed by a straight numeric IP address and a CIDR block. The CIDR block indicates the
netmask that should be applied to the rule’s address and any incoming packets that are
tested against the rule. A CIDR block mask of /24 indicates a Class C network, /16 a
Class B network, and /32 indicates a specific machine address. For example, the
address/CIDR combination 192.168.1.0/24 would signify the block of addresses from
192.168.1.1 to 192.168.1.255. Any rule that used this designation for, say, the destination
address would match on any address in that range. There is an operator that can be
applied to IP addresses, the negation operator. This operator tells Snort to match any IP
address except the one indicated by the listed IP address. The negation operator is
indicated with a !.
Port Numbers:
Port numbers may be specified in a number of ways, including any ports, static port
definitions, ranges, and by negation. Any ports are a wildcard value, meaning literally
any port. Static ports are indicated by a single port number, such as 111 for portmapper,
23 for telnet, or 80 for http, etc. Port ranges are indicated with the range operator.The
range operator may be applied in a number of ways to take on different meanings, such as
log tcp any any -> 192.168.1.0/24 1:1024 log tcp This tells that log traffic coming from
any port and destination ports ranging from 1 to 1024.
Rule Options:
Rule options form the heart of Snort’s intrusion detection engine, combining ease of use
with power and flexibility. All Snort rule options are separated from each other using the
34
semicolon (;) character. Rule option keywords are separated from their arguments with a
colon (:) character.
There are four major categories of rule options.
General: These options provide information about the rule but do not have any affect
during detection.
Payload: These options all look for data inside the packet payload and can be interrelated.
Non-payload: These options look for non-payload data.
Post-detection: These options are rule specific triggers that happen after a rule has
“fired.”
Keyword
Msg
Description
The msg keyword tells the logging and alerting engine the
message to print with the packet dump or alert.
Reference
It allows rules to include references to external attack
identification systems.
Gid
This keyword is used to tell what part of the snort generated the
alert when a specific rule is triggered.
Sid
This is used to uniquely identify Snort rules.
Rev
It is used to uniquely identify revision Snort rules.
Classtype
This is used to categorize a rule as detecting an attack that can be
more general type of attack.
Priority
It is used to give priority to the rules.
Metadata
It allows adding or embedding some additional information within
the rule or about the rule.
Table 3.5: General Rule Option Keyword in Snort [28].
35
Chapter 4
Problem Statement
==============================================================
With the increasing demand of network and advances in the field of network, now a days
each organisation wants to have their own network and furthermore they want to connect
or interact with each other in a reliable way. So Network Security is becoming more and
more important and also getting more complicated issue with recent advances and with
increasing demand. When an organisation try to expose itself globally then the chances of
having loop holes in their network are very high due to availability of their network
globally and chances of getting virus, worms, trojan, dos attack and even hacking
increases.
So, the issue of protecting the network withing an organisation arises. Here comes the
role of detecting the malicious activity or intrusion in a network or secure our system
against malware ,viruses, outside attacks.
Two popular tools for detecting intrusion in a system available as an open source are
Snort and Bro. Here we will introduce these two open source Intrusion Detection Tools,
and performance analysis of both these tools will be done on ubuntu platform.
Our objective is to study and explore Intrusion Detection Systems by configuring
Network Intrusion Detection Systems Snort and Bro in a given environment.
Exploring Snort will be the first objective. The comparison of Snort with Bro will be
done based upon performance. Development of own set of signatures will be done in
Snort and based upon some default set of rules we will explore these Intrusion Detection
System. My-sql can be used as a database in case of snort and various intrusion detected
can be stored, and can be retrieved from that database only using various sql
commands.The database schema used in creating tables is of default schema provided by
snort.
36
Live traffic will be captured and based upon our own set of signatures we will explore
these tools in that traffic to detect intrusions in a network. Offline analysis on a particular
captured file will be done in both the tool to evaluate and analyze their performance
together.
However based upon the memory constraints and CPU utilisation also the performance
analysis will be done, main emphasis will be to explore Snort.
37
Chapter 5
Implementation and Experimental Results
==============================================================
In this chapter various steps that have been performed to implement and configure the
two tools used “snort” and “bro” are explained. Configuration steps of Mysql as a
database in case of Snort are also explained.
5.1
Steps performed during Configuration and Implementation are:
Step 1:
To establish a segregate network using virtualization. VMware Server Console
version 1.0.5 is used to establish a segregate network and Ubuntu 8.04
operating system is installed on it.
Step 2:
Configuring Snort in Ubuntu 8.04 platform [28].
Step 2.1
Prerequisites for installing Snort.
All the dependant packages are grabbed from Synaptic i.e. System >
Administration >Synaptic Package Manager Searches for the following
packages were done if not present were installed.
Libpcap0.8-dev
libmysqlclient15-dev
mysql-client-5.0
mysql-server-5.0
bison
flex
apache2
38
libapache2-mod-php5
php5-gd
php5-mysql
libphp-adodb
php-pear
One more package is needed “apt-get install libc6-dev g++ gcc” [6].
Step 2.2
Snort was downloaded under root privileges from www.snort.org and
installed by Tar command “tar -xvzf /root/desktop/snort-2.7.0.tar.gz”.
Step 2.3
Configuration of Mysql with snort is done as follows:
a) Changes to configuration file of Snort is done which is stored in /etc/snort
/snort.conf."VAR HOME_NET any" is changed to "VAR HOME_NET
192.168.84.128 /24”.
b) "VAR EXTERNAL_NET any" is changed to "VAR EXTERNAL_NET !$
HOME_NET".
c) "VAR RULE_PATH /rules" is changed to "VAR RULE_PATH /etc/snort/rules"
d) "# Output database: log, mysql, user=" "#" is removed from the front of this
line.
Leave
the
"user=root",
"password=password"
is
changed
to
"password=new _root_ password", "dbname=snort".
e) Now we need to set up Mysql server log to Mysql server with # mysql -u root
–p.User name and password is entered . After logging you mysql> password
is set for root@localhost=password=”new_root_password”.
f) Database snort is created in mysql with “Create Database” snort command
and exit. Inbuilt database schema of Snort is extract to the Mysql database
with command “# mysql -D snort -u root -p < /root/snort-2.8.0/schemas/
create_mysql” where snort-2.8.0 is the version of snort installed it can be
different depending upon which version to installed.
39
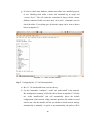
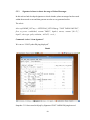
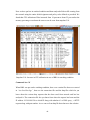
g) It’s time to check snort database, whether snort tables were installed properly
or not. Checking snort tables is done with command log to mysql and
“connect Snort”. This will return the connection id along with the current
database connected in this case snort, then “show tables” command is used to
check the tables. If everything goes ok then the output can be seen as shown
below in snapshot 5.1.
Snapshot 5.1: Tables in snort database.
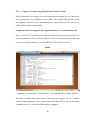
Step 3 Configuring Bro-1.3.2 in Ubuntu platform.
a) Bro-1.3.2 is downloaded from www.bro-ids.org.
b) Use the Commands “/configure”, “make” and “make install” in the terminal.
Bro configuration summary will be like this as shown in snapshot 5.2. Finally
use “make install-brolite” this will automatically detect the default
configuration of the network, along with some questions like whether to send
email or not. Also the installer will ask you whether to check network settings
automatically or manually, we prefer to use automatically, the packet will be
40
captured by tcp-dump and send back to bro, detecting the network
configuration. Now the bro has been configured and the check up is
performed by command “/usr/local/bro/etc/bro.rc--start”, the ….SUCCESS
status can be seen.
c) To check the status type “/usr/local/bro/etc/bro.rc status” this will return the
bro PID number along with version number and the time since it was running.
d) To stop the bro use “/usr/local/bro/etc/bro.rc--stop”.
Snapshot 5.2: Bro Configuration Summary.
5.2
Milestones covered and Experimental Results:
The following are the various tasks and milestones completed along with results. All the
results are checked on machine Intel® Core™2 Duo CPU T7250 @ 2.00 GHz with
frequency 778 MHz along with 2 GB RAM space. The operating system used was
Ubuntu-8.04 Linux operating system which was installed using virtualization server
software.
41
5.2.1
Script to start Snort during boot time.
First we will develop a script to start snort during boot time so that as soon as the
operating system boot up Snort can be analyzed and its performance can be measured
during loading.
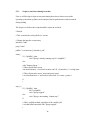
The Script is as follows this script should be written in etc/init.d.
#!/bin/sh
# This version looks at the pid file in /var/run
# Change the interface as necessary
interface="eth0"
prog="snort"
pidfile="/var/run/snort_${interface}.pid"
start() {
if [ -f $pidfile ]; then
echo "$prog is already running as pid `cat $pidfile`"
else
echo "Starting $prog..."
# This will run snort as root
/usr/local/bin/snort -c /usr/local/etc/snort.conf -D -i ${interface} -l /var/log/snort
# This will run snort as user 'snort' and group 'snort'
# /usr/local/bin/snort -c /usr/local/etc/snort.conf -D -u snort -g snort -i
fi
}
stop () {
if [ -f $pidfile ]; then
kill `cat $pidfile`
echo "$prog stopped."
else
echo "$prog is not running. Cannot stop."
fi
# This is a killall method, regardless of the variable 'pid'
# /usr/bin/killall snort && echo "$prog stopped."
}
42
status() {
if [ -f $pidfile ]; then
echo "$prog is running as pid `cat $pidfile`"
else
echo "$prog is not running."
fi
}
case "$1" in
start)
start
;;
stop)
stop
;;
restart)
stop
# It seems that killing of snort requires some time
sleep 5
start
;;
status)
status
;;
*)
echo $"Usage: $0 {start|stop|restart|status}"
;;
esac
exit 0
-------------- next part -------------############################################################
To start snort at boot, "/etc/init.d/snort boot" is put in /etc/rc.local (without quotes, above
the line exit 0)
############################################################
# Sanity checks
Check for stale lock files
if [ -z "$PID" ]; then
43
rm -f /var/run/snort_"${IFACE}"*
fi
# Declair variables
SNORT='/usr/sbin/snort -c /etc/snort/snort.conf -u snort -g snort -D'
ZEN="/usr/bin/zenity"
ZENINF='$ZEN --width=700 --title "Mandeep snort script" --info --text'
ZENWARN='$ZEN --width=700 --title "Mandeep snort script" --warning --text'
ZENMSG='"$TXT"'
PID=`pidof snort`
#Set prompt colors
RED='\e[0;31m'
GREEN='\e[0;32m'
BLUE='\e[0;34m'
BLACK='\e[0;34m'
NC='\e[0m' # No Color
start ()
{ #start snort
if [ -z "$HOST" ];then
$SNORT -i "$IFACE" &
else
$SNORT -i "$IFACE" not \(`echo "$HOST"`\)&
44
fi
PID=`pidof snort`
if [ ! -z "$PID" ]; then
if [ ! -z "$WHITELIST" ]; then
TXT="Snort successfully started, using a Whitelist of "$WHITELIST""
else
TXT="Snort started successfully ..."
fi
zeninfo &
exit 0
else
TXT="Snort failed to start ..."
zenwarn &
exit 1
fi
}
stop ()
{
if [ ! -z "$PID" ]; then
kill -9 ""$PID""
rm -f /var/run/snort_"${IFACE}"*
45
TXT="Snort stopped ..."
zeninfo &
exit 0
else
TXT="Snort is not running ..."
zenwarn &
exit 1
fi
}
restart ()
{
if [ ! -z "$PID" ]; then
kill -9 "$PID"
rm -f /var/run/snort_"${IFACE}"*
fi
start }
status ()
{ if [ ! -z $PID ] ; then
TXT="Snort is running ..."
else
TXT="Snort is not running ..."
46
fi
zeninfo & }
start)
if [ ! -z "$PID" ]; then
TXT="Snort is already running ..."
zenwarn &
exit 1
else
start ;;
stop)
stop ;;
restart|reload
restart ;;
status)
status ;; *)
TXT="Usage start|stop|restart|reload|status|boot"
zenwarn
exit 1 ;; esac exit 0
47
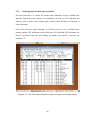
Snapshot 5.3: Snort started at boot time in Ubuntu operating system.
As can be seen from snapshot 5.3, snort started during boot time “Snort started
successfully”.
After loading the operating system it’s time to check the status of snort whether snort
engine is running or not type.
Command “etc/init.d/snort status”.
The result is as shown in snapshot 5.4 below.
Snapshot 5.4: Checking Snort status.
48
In order to stop Snort type the Command “/etc/init.d/snort stop”.
The result can be seen from snapshot 5.5, snort stopped message appears on
screen.
Snapshot 5.5: Snort stopped using command /etc/init.d/snort/stop.
To run Snort again type the command “/etc/init.d/snort start”.
The result can be shown below in snapshot 5.6.
Snapshot 5.6: Snort Started again using command /etc/init.d/snort start.
49
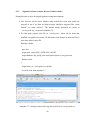
5.2.2
Signature in Snort to detect the use of Orkut website:
During this task we have developed signatures using snort language,
The first one will be detect whether orkut website has been used within the
network or not if yes then an alarm message should be triggered like “orkut
banned” or “orkut detected”. The default alarms generated are stored in
“/var/log/auth.log” as shown in snapshot 5.8.
We had made separate alert file in “/var/log/alert” where all the alerts that
matched our signature are stored. We had made some changes in snort.conf file to
store these alerts in alert file.
Ruletype redalert
{
type alert
output alert_syslog:LOG_AUTH LOG_ALERT
output database: log, mysql, user=snort password=new_root_password
dbname=snort
}
Output alert_csv: /var/log/alert.csv default.
As can be seen from snapshot 5.7
Snapshot 5.7: Configure snort.conf to log alert in alert file in /var/log/alert.csv.
50
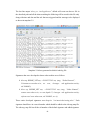
The last line output “alert_csv: /var/log/alert.csv” default will create an alert.csv file in
the described path and all the alerts matching the following will be stored in this file only
along with time and date and the rule that was triggered and the message to be displayed
as shown in snapshot 5.9.
Snapshot 5.8 Alerts generated in default Auth.log file.
Signatures that were developed to detect orkut website are as follows:
Alert tcp $HOME_NET any ->209.85.225.85 any (msg: “Orkut Detected”;
Uricontent:www.orkut.co.in;
no
case;
classtype:
web-application-activity;
sid:1000002);
Alert tcp $HOME_NET any ->209.85.225.85 any (msg: “Orkut Banned”;
content:www.orkut.co.in; no case;depth:15; classtype: web-application-activity;
reference:url:www.orkut.com; sid:1000005; rev:4);
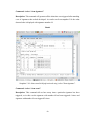
These entire developed signatures were kept in “/etc/snort/rules/testing.rules”. Each
signature should have its own sid number which should be added to the sid-msg.map file.
The sid-msg .map file has all the sid number of the default signature and added signature.
51
We store the signature sid number 1000002 and 1000005. Now in snort.conf file these
testing rules path should be added. Under customize rule set path for these rule set
“include $RULE_PATH /TESTING.rules”.
Then snort was run.
Command: snort –l /var/log/snort –c /etc/snort/snort.conf
Description: This will tell snort to log to directory “/var/log/snort” and using the snort
configuration placed in “/etc/snort/snort.conf” file, then we analyzed live traffic coming
from various website like www.orkut.com,www.google.com and see the alerts generated
in alert file and also in Mysql. The snapshot 5.9 below show alerts generated by
signatures in alert.csv file.
Snapshot 5.9 Alerts generated by signature “orkut detected” in alert.csv file.
We have configured the Mysql as a database so these alerts are being stored there too in
database name Snort that we have configured during configuration steps.
52
Command: “select * from signature”.
Description: This command will generate all the alerts that were triggered after matching
a set of signatures that we had developed. As can be seen from snapshot 5.10 the orkut
detected alert is displayed with signature number 68.
Result
Snapshot 5.10: Alerts stored in Mysql retrieved using “select *from signature”.
Command: “select * from event”.
Description: This command tells us how many times a particular signature has been
triggered, as in this case the signature with number 68 has been triggered 4 times and
signature with number 69 was triggered 2 times.
53
5.2.3
Signature in Snort to detect the usage of Yahoo Messenger.
In this task we had developed signature to check whether yahoo messenger has been used
within the network or not and then generate an alert as was generated earlier.
The rule is:
Alert tcp $HOME_NET any -> EXTERNAL_NET 5050(msg:”CHAT YAHOO IM PING”;
flow: to_server: established; content:”YMSG”; depth:4; nocase; content:”|00 12|”;
depth 2; class-type: policy violation ; sid:2452; rev:4; )
Command: “select * from signature”.
We can see “CHAT yahoo IM ping displayed”.
Result
Snapshot 5.11 Alert stored in Mysql by Signature CHAT YAHOO IM ping detected.
54
5.2.4
Capture live traffic using Wireshark and analyze in Snort.
In this milestone we will capture live traffic from internet websites like ww.yahoo.com,
www.youtube.com, www.rediff.com, www.cricinfo.com. Around 38000 packets of data
was captured and stored in file “captureddata.trace” using Wireshark. Our task is to do
offline analysis on this captured data.
Command: snort-r/var/log/snort/user/captureddata.trace –c /etc/snort/snort.conf.
There were total 1672 rules that were defined in snort when the data was analyzed. We
have only enabled Web-Server Rules in this case. Now in etc/snort/snort.conf file these
testing rules path are added using “include $RULE_PATH /Web-Server.rules”.
Result
Snapshot 5.12: Analyzing “capturedata.trace” file using Web-Server Rules in Snort.
The above snapshot shows how snort is analyzing the captured file, the “/var/log/
snort/user/capturedata.trace” file is location where the captured file is stored, sensor name
“reading from a file “ tell us that offline analysis is going on.
55
Command: “select * from signature”.
Result
Snapshot 5.13: Signatures that were triggered using Web-Server Rules.
As we can see from snapshot that there were total 4 rules that were triggered ,
Rules triggered
Number of times.
Community Web-Misc mod_jrun overflow 60
attempt.
(http_inspect)
Bare
Byte
Unicode 10
Encoding.
Double Decoding Attack.
5
Oversize Request –URI Directory
10
Table 5.1: Rules triggered using Web-server rules only.
56
Now we will check the percentage of CPU used when the Web-Server rules were defined
in /etc/snort/snort.conf.
Command: “TOP”.
Result
Snapshot 5.14: Cpu utilization when “capturedata.trace” file is analyzed with “WebServer” rules only in Snort.
As can be seen from snapshot 5.15, the percentage of CPU utilization was 31.3 and
memory used is 1.7. Snort is running with a PID number 8412.
5.2.5 Analyzing Traffic using 3621 Rules in Snort.
Earlier we have analyzed the “capturedata.trace” file using Web-Server rules only, now
in this task we have analyzed the datacaptured files using 3621 rules defined in
snort.conf.
57
The command used will be same, but the rules defined in /etc/snort/snort/conf will be
3621 instead of 1672.
Using command “select * from signature” in Mysql, all the signature that were
triggered can be retrieved as can be seen from snapshot 5.15.
Snapshot 5.15: Signatures that were triggered when 3621 rules were defined in Snort.
The first 4 rules are the same, the new rules six more that were triggered are as follows.
Rules triggered.
Number of times rule triggered.
Scan upnp service discover scan.
5
Chat yahoo IM successful.
10
58
Web-Attacks cc command attempt.
3
Multimedia Windows Media download.
4
Info web-bug 0X0 gif attempt.
10
Chat yahoo IM ping
30
Table 5.2: Signatures that were triggered using 3621 rules.
Now we have checked the percentage of CPU used on “capturedata” file when 3621
rules were defined in /etc/snort/snort.conf, see snapshot 5.16. We can see that CPU
utilization percentage was 87 and memory used percentage was 4.2.
Command: TOP
Result
Snapshot 5.16: CPU utilization when analyzing capturedata.trace file with 3621 rules in
Snort.
59
5.2.6
Exploring Intrusion Detection System Bro.
Our next milestone is to explore the features and commands of freely available Bro
Intrusion Detection System, analyze its performance in terms of CPU utilization and
Memory used, so that we can compare them with the Snort IDS that was explored in
earlier milestone.
First we have start bro using command:“/usr/local/bro/etc/bro.rc start” and find out the
memory and the CPU utilization in this default case. We found that CPU utilization was
about 16 percent in this case and Memory percentage was around 2.5 percent, see
snapshot 5.17.
Snapshot 5.17: Bro CPU utilization and Percentage of memory used during starting.
60
Now we have put bro in watched condition and then analyzed all the traffic coming from
the network using the entire default signature and policy rules defined as provided. We
found that CPU utilization of Bro increased from 16 percent to about 22 percent but the
memory percentage was almost the same as can be seen from snapshot 5.18.
Snapshot 5.18: Increase in CPU utilization in case of BRO in watching condition.
Command: bro -W
When BRO was put under watching condition, there were certain files that were created
in “/usr/local/bro/logs”, these are the connection files and the http files which let you
know about the various http requests that has been send from network and bro has
analyzed it. The connection file lets you know from where the request has been send the
IP address 192.168.84.128 to which IP along with whether it’s a DNS query , a HTTP
request along with port number. As we can see from http file that what were the websites
61
that was used when Bro was enabled, in this case www.orkut.com, start.ubuntu.com,
www.google.com. An overview of all the logs files that were created is shown in
snapshot 5.19 and snapshot 5.20.
Snapshot 5.19: Connection file created by BRO.
Snapshot 5.20: Http file created by BRO.
62
Analyzing the same captured data that was analyzed earlier in Snort.
Now we have analyzed the same captured data file stored in “var/log/snort/
user/capturedata.trace” that was analyzed earlier in Snort to evaluate the
performance of both IDS. We have evaluated both IDS with their maximum default
capacity. We have evaluated bro with all the default snort-signature it has, see
snapshot below.
Command: “bro - r/var/log/snort/user/capturedata.trace - s snort-default.sig”.
Command:”Top”
Result
Snapshot 5.21: CPU utilization and percentage of memory used in case of
analyzing file “Capturedata.trace”
63
Chapter Six
Conclusion and Future Work
=============================================================
6.1
Conclusion
Although a lot has been done in the field of Intrusion Detection Systems but a lot of work
still has to be done. As with the recent advances and emerging technologies, increases in
the types of intruder goals, intruder abilities, tool sophistication, and diversity, as well as
the use of more complex, subtle, and new attack scenarios challenges to the IDS systems
goes on increasing. The IDS field is still immature and in its beginning stage, there are no
industry standards defined about how to detect intrusion. Even now the tools developed
are not fully automated and human intervention is required. So certain tools and
techniques are needed to be developed to make our network more secure and reliable.
Snort and Bro are the two most widely and effective tools used in detecting an intrusion.
In this thesis work we explore Snort and Bro features, signatures were made in Snort and
also some offline analyses was done in case of both the tool. A live data file of around
38000 packets were captured and analyzed in both the IDS. We found that as the number
of signatures increase in case of Snort, the Snort CPU utilization capacity and memory
usage increase more than Bro. So Snort performance degrades as the number of signature
increases see figure below.
100
90
80
70
60
50
40
30
20
10
0
Cpu utilization %
Memory %
Web Rules
3621 Rules
Startup
Fig 6.1: Snort Performance Evaluation
64
25
20
15
Cpu utilization %
10
Memory %
5
0
Capture File
Watching
Condition
Start Up
Fig: 6.2: Bro Performance Evaluation.
Based upon these facts we can say that Bro is more stable as compare to Snort. Snort
presents several other advantages when compared to Bro. Snort provide an up-to-date,
well-documented, and tested set of rules (signature). Snort, as well as Bro, is oriented to
high speed links. Its rule matching engine is more efficient than Bro’s.
Bro, uses a very different architecture than Snort, bro provide a layered approach where
each packet is treated interdependently. Bro reassembles the packet stream prior to
reaching the event engine. The great feature of the bro is that it can memorize the states
of the each flow, and can use it for detecting malicious activity. Bro creates a virtual
connection for every five-tuple. Once the connection is reassembled, the event engine
triggers events which might be treated or ignored by the policy engine. Since Bro has its
own, simple-to-use, policy script language, it allows us to easily create new policy scripts
which lead to sound deep packet inspection analysis and anomaly-based analysis.
Another important difference is on its regular expressions matching mechanisms. While
Snort has a powerful, flexible, human readable Perl Compatible Regular Expressions
(pcre) engine, Bro uses a simpler but faster regular expression library based on flex.
Developing Snort signature are easy as compare to Bro. Bro is more tuned for the
performance of the monitoring, and provide great flexibility of the policy rules. Also, it
provide the functionality of the maintaining the states of the flows. But, the easiness of
65
the usage is main disadvantage. Snort is easy to use and to add the new policy rules. But
the performance of the software cannot be guaranteed with the increase of the number of
rules. Table below shows various differences in Snort and Bro.
Snort Intrusion Detection
System
Bro Intrusion Detection
System
Highly documented and maintained.
Less documentation.
Rule matching engine is more efficient.
Less efficient as compare to Snort.
It uses human readable flexible Pearl
It uses simple but faster FLEX engine.
Compatible Regular Expression
(PCRE) engine.
Does not use a layered approach as Bro
Uses a Layered Approach.
uses.
Performance degrades as number of
More stable as compare to Snort, and
signatures increases.
provide more flexibility in defining the
policy rules.
Signatures are developed.
Snort
Policy rules are defined.
allows the user to
maximum
number
of
specify
Bro does not provide a mechanism to
concurrent limit the size of data structures to a
connections for its TCP preprocessor. fixed size; its relies on timeouts, which
If this limit is reached, Snort randomly can be set on a per-data structure basis,
picks some connections and _uses their and with respect to when state was first
state to free up memory.
created, or last read or updated.
66
Snort shows high packet missing rate Bro provides a superset of Snort's
as compare to Bro.
functionality, since it includes both a
signature-matching
engine
and
an
application-analysis scripting language
Table 6.1: Comparison of Snort and Bro
6.2
Future Work
We have analyzed Snort and Bro by capturing online data using wireshark and then
analyzed these packets of captured data offline. However both Snort and Bro can be
analyzed online along with same set of rules. This thesis can be used to develop
signatures in Snort to detect particular websites that is being used on the network like we
have detected the orkut website, similarly other websites can also be detect like yahoo,
google, rediff, youtube. Also yahoo messenger usage is being detected, the future work
can be detecting the latest messenger and the usage of messenger that are in-built in
websites like www.gmail.com and now www.yahoomail.com also. We have analyzed
and explore the performance of Snort and Bro on the basis of CPU utilization and
Memory usage as the signatures increases. Future work can be analysis of these tools
based upon the set of common rules, alerts and response in a common captured packet
either offline and online.
67
References
===========================================================
1.
“A beginner guide to network security”, Cisco System 2001.
2.
“A Sample IDS”, http://www.windowsecurity.com.
3.
Anderson.M, “Comparing risk analysis methodologies” In D. T. Lindsay and
W.Price, editors, Information Security. Elsevier Science Publishers, 1991.
4.
Aurobindo Sundaram: ”An Introduction to Intrusion Detection Documents &
Media ID=6874 & Filename=2007+ID+Theft_ +79M+Records+Compromise
d.pdf”.
5.
Bro: “Quick Start Guide” version 0.9, 11-15-2004, DRAFT.
6.
Gutsy Gibbon, “Intrusion Detection” Snort, Base, MySQL, and Apache2
http://www.howtoforge.com.
7.
http://www.secureworks.com/services/managed/firewall_management.
8.
http://netsecurity.about.com/cs/hackertools/a/aa121403.htm
9.
http://www.cisco.com.
10.
http://www.iu.hio.no/teaching/materials/MS004A/html/pictures/ids.png.
11.
http://www.securitytechnet.com/resource/security/ids/ips.pdf
12.
http://www.windowsecurity.com/articles/IDS-Part2-Classification-methodstechniques.html.
13.
Internet security threat report volume xiv: April 2009,
http://www.symantec.com.
14.
IDS Deployment http://www.sans.org/reading_room/whitepapers /detection/34
3.php.
15.
International Journal of Network Security, Vol.1, No.2, PP.84–102, Sep. 2005
http://isrc.nchu.edu.tw/ijns.
16.
“Intrusion detection systems definition, need and challenges”
http://www.sans.org/reading_room/whitepapers/detection/343.php.
17.
Inline intrusion prevention white papers: www.intoto.com.
18.
J. Allenetal, “State of the Practice of Intrusion Detection Technologies”, Tech
68
Report CMU/SEI-99-TR-028, Carnegie Mellon Univ., Software Engineering
Inst., Pittsburgh, 2000.
19.
J.P. Anderson, Computer Security Threat Monitoring and Surveillance, tech.
Report, James P. Anderson Co., Fort Washington, Pa, 1980.
20.
K. Wang and S. Stolfo. “Anomalous payload-based network intrusion
detection”, in Proceedings of Recent Advance in Intrusion Detection (RAID),
Sept. 2004.
21.
Mehdi Salour and Xiao Su Computer Engineering Department San Jose State
University One Washington Square San Jose, CA Dynamic Two-Layer
Signature- Based IDS with Unequal Databases.
22.
Moses Garuba, Chunmei Liu, and Duane Fraites Department of Systems and
Computer Science, Howard University” Intrusion Techniques: Comparative
Study of Network IntrusionDetection Systems”.
23.
Network- vs. Host-based Intrusion Detection “A Guide to Intrusion Detection
Technology” 6600 Peachtree-Dunwoody Road 300 Embassy.
24.
NIDS Intrusion Detection Systems (IDS) “What are They and How do They
Work”? Security intrusion www.it.ojp.gov/.../asp/introduction/section7.htm.
25.
Paxson,V,Rothfuss,J,& Tierney, B. Bro User Manual. http://www.bro-ids
.org/Bro-user manual.pdf, 0.9, draft edition, January 2004.
26.
Rafeeq Ur Rehman “Intrusion Detection Systems with Snort:Advanced IDS
Techniques with Snort, Apache,MySQL, PHP, and ACID” 2003 Pearson
Education, Inc.
27.
Richard A. Kemmerer and Giovanni Vigna Reliable Software Group,Computer
Science Department,Universityof California Santa Barbara “IDS A brief
overview and history”.
28.
Snort TM Users Manual 2.8.0 The Snort Project August 22, 2007.
29.
T .Phuskal, “Intrusion detection system based on process behavior rating”,
2004.
30. Theuns Verwoerd, Ray Hunt Honours Report Active Network Security 5
November,1999.
31.
Vidar Evenrud Seeberg “BRO - an IDS - IMT5151 Intrusion Detection and
69
Prevention”1. December 2005.
32.
Wayne T Work “Intrusion Detection System What are They How do They
Work”2003.
70
List of publications
=============================================================
1. Mandeep Singh, Sanmeet Bhatia, “Intrusion Detection System and Techniques to
Detect Intrusion in a Network”; National Conference on Advances in Computer
Networks and Information Technology (NCACNIT 2009), April 2009 at Guru
Jambheshwar University, Hisar.
71