1
GETTING STARTED WITH SMARTEE
2
GETTING STARTED WITH SMARTEE
This document is the property of Webee L.L.C.. The data contained here, in whole or in part, may not be duplicated, used or
disclosed outside the recipient for any purpose. This restriction does not limit the recipient's right to use information contained
in the data if it is obtained from another source without restriction.
Webee Smartee
1
GETTING STARTED WITH SMARTEE
2INDEX
Chapter 1: Installing your Smartee
Plugging your Smartee........................................................03
Connecting your Smartee to Internet...................................04
Chapter 2: Registering your Smartee
Registering your Smartee....................................................05
Chapter 3: Using your Smartee with an HDMI monitor
Adding a Device...................................................................06
Setting your preferences......................................................07
Chapter 4: Using your Smartee with a Smartphone
Downloading Webee App....................................................08
Connecting your Smartee to Internet...................................09
Linking your Smartee to your account.................................10
Adding your Devices............................................................11
Creating your first space......................................................12
Controlling your appliances.................................................13
Creating Rooms...................................................................14
Creating Functions..............................................................15
Creating Scenes..................................................................16
Chapter 5: Using your Smartee on the Web
Logging into the Web App....................................................17
Creating your first space......................................................18
Linking your Smartee to your account.................................19
Adding your Devices............................................................20
Creating Rooms/Functions...................................................21
Chapter 6: Z-wave functionalities
Accessing Z-wave console...................................................22
Description of Z-wave console..............................................23
Adding Z-wave devices to Smartee......................................24
Removing Z-wave devices from Smartee.............................25
Entering to the Learn Mode..................................................26
Smartee Z-wave capacities...................................................27
Webee Smartee
Getting started
© 2014 Webee LLC, All rights reserved. The Webee logo, Boss and Bees are trademarks or registered trademarks of Webee LLC
Page 02
GETTING STARTED WITH SMARTEE
1
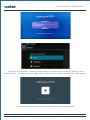
2 1 INSTALLING YOUR SMARTEE
1-Plug your Smartee to a power Supply and to TV HDMI connector.
2-Plug your Air Mouse Dongle to your Smartee in order to use your Air Mouse.
AIR MOUSE CHECK LIST
Look carefully inside your package for the small white
USB Dongle.
Ÿ Once the Dongle is connected make sure that the Air
Mouse is charged. If it’s blinking red and blue it means
that ran out of battery.
Ÿ The Air Mouse will go to sleep mode after a while of
being unused, just click on any button to restart it.
Ÿ While you Air Mouse is charging, you can plug any
regular mouse to the USB port of your Smartee to
continue enjoying the Webee experience.
Ÿ
Webee Smartee
Getting started
© 2014 Webee LLC, All rights reserved. The Webee logo, Boss and Bees are trademarks or registered trademarks of Webee LLC
Page 03
GETTING STARTED WITH SMARTEE
2
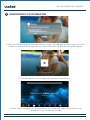
3-Connect your Smartee to Internet using a Wireless connection by clicking on “Settings” and
selecting Wi Fi. Or plug an Ethernet Cable and the Smartee will connect automatically to the network.
4-Smartee will automatically start downloading the most recent updates.
Webee Smartee
Getting started
© 2014 Webee LLC, All rights reserved. The Webee logo, Boss and Bees are trademarks or registered trademarks of Webee LLC
Page 04
GETTING STARTED WITH SMARTEE
2
REGISTERING YOUR SMARTEE
5- Next, you will get a pop-up message asking to access the USB device. Make sure to click OK
in order to continue with the registration process.Otherwise, the Smartee will not be register.
6- Your Smartee will start the registration process automatically.
7- Make sure to configure your Date and Time. You will be able to do it by clicking on the
configuration icon on the main screen.
Webee Smartee
Getting started
© 2014 Webee LLC, All rights reserved. The Webee logo, Boss and Bees are trademarks or registered trademarks of Webee LLC
Page 05
GETTING STARTED WITH SMARTEE
3
2
USING YOUR SMARTEE WITH HDMI MONITOR
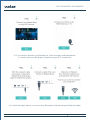
7- Once the registration is complete, access the Launchpad
by tapping on the Welcome screen, and select SmartHome.
8- To add a device, on the SmartHome screen select Devices.
9- Select Add Device, and the Smartee will automatically search
for the connected devices to add them to the cloud.
Webee Smartee
Getting started
© 2014 Webee LLC, All rights reserved. The Webee logo, Boss and Bees are trademarks or registered trademarks of Webee LLC
Page 06
GETTING STARTED WITH SMARTEE
2
10-Once you have all your devices connected, go back to the SmartHome screen
and select settings to configure your Smartee with your own preferences.
Webee Smartee
Getting started
© 2014 Webee LLC, All rights reserved. The Webee logo, Boss and Bees are trademarks or registered trademarks of Webee LLC
Page 07
GETTING STARTED WITH SMARTEE
2
4
USING YOUR SMARTEE WITH A SMARTPHONE
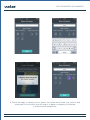
1- Download the App from the store.
Enter MyWebee on the App Store or Play Store browser.
Webee Smartee
Getting started
© 2014 Webee LLC, All rights reserved. The Webee logo, Boss and Bees are trademarks or registered trademarks of Webee LLC
Page 08
GETTING STARTED WITH SMARTEE
2
3- If you haven't register your Smartee yet, follow the steps indicated above
to connect your your Smartee to Internet using a Wi Fi connection.
4-Or follow the steps above to connect your Smartee to Internet using an Ethernet cable.
Webee Smartee
Getting started
© 2014 Webee LLC, All rights reserved. The Webee logo, Boss and Bees are trademarks or registered trademarks of Webee LLC
Page 09
GETTING STARTED WITH SMARTEE
2
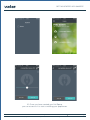
5- Register an account or log in if you have one already.
You can also create your account by entering our web www.webeelife.com.
6- If you are using IOs, the app will automatically find your Smartee
(as long as the Smartee is connected to Internet and properly registered.
Just make sure to Click Sure! when getting the pop-up message to associate your Smartee.
If you are using Android, once you have created your space, you will be prompt to enter
your Smartee's MAC address, which is located on a sticker at the back of your Smartee
Webee Smartee
Getting started
© 2014 Webee LLC, All rights reserved. The Webee logo, Boss and Bees are trademarks or registered trademarks of Webee LLC
Page10
GETTING STARTED WITH SMARTEE
2
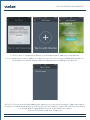
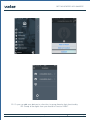
7- On IOs, prior to creating your Space, you will be prompt to add your smart devices.
It is not necessary for you to add all your devices now; you can continue adding devices later on.
On Android, you will be able to create your Space prior to adding smart devices.
8-On IOs, Once you've finished adding your devices, you can move forward to “Add a new space”
For both IOs and Android, please notice that you will only need to create ONE space for your house.
You will be able to create different rooms associated to this space
later on. Ed kitchen, bedroom, living-room
Webee Smartee
Getting started
© 2014 Webee LLC, All rights reserved. The Webee logo, Boss and Bees are trademarks or registered trademarks of Webee LLC
Page11
GETTING STARTED WITH SMARTEE
2
9- Follow the steps to create your first space. You will be ask to enter your location and
some specific information that will help us to better configure your Smartee
to maximize your experience.
Webee Smartee
Getting started
© 2014 Webee LLC, All rights reserved. The Webee logo, Boss and Bees are trademarks or registered trademarks of Webee LLC
Page12
GETTING STARTED WITH SMARTEE
2
10- Once you have created your first Space,
you can access to it to start controlling your appliances.
Webee Smartee
Getting started
© 2014 Webee LLC, All rights reserved. The Webee logo, Boss and Bees are trademarks or registered trademarks of Webee LLC
Page13
GETTING STARTED WITH SMARTEE
2
11- You can create a Room to group all devices that are located
on the same room within your Space.
Webee Smartee
Getting started
© 2014 Webee LLC, All rights reserved. The Webee logo, Boss and Bees are trademarks or registered trademarks of Webee LLC
Page14
GETTING STARTED WITH SMARTEE
2
12- Or you can add your devices to a function, to group them by their functionality.
ED: Group all the lights from your house to Function LIGHT.
Webee Smartee
Getting started
© 2014 Webee LLC, All rights reserved. The Webee logo, Boss and Bees are trademarks or registered trademarks of Webee LLC
Page15
GETTING STARTED WITH SMARTEE
2
13- And you can group specific tasks and rules to create Scenes,
which are a sequence of actions defined by your preferences. ED “Waking up”.
Webee Smartee
Getting started
© 2014 Webee LLC, All rights reserved. The Webee logo, Boss and Bees are trademarks or registered trademarks of Webee LLC
Page16
GETTING STARTED WITH SMARTEE
2 USING YOUR SMARTEE ON THE WEB
5
1- Access my.webeelife.com and log in to your account.
Before starting, make sure your Smartee is connected to Internet and registered in our cloud.
If not please check step 1-5 of the Chapter 1 of this manual to learn how to do it.
Webee Smartee
Getting started
© 2014 Webee LLC, All rights reserved. The Webee logo, Boss and Bees are trademarks or registered trademarks of Webee LLC
Page17
GETTING STARTED WITH SMARTEE
2
3-You will be prompt to create your first SPACE. If you have already created,
it will be displaying on the screen.
4- Complete all fields to create your space (if you haven’t done it already)
Webee Smartee
Getting started
© 2014 Webee LLC, All rights reserved. The Webee logo, Boss and Bees are trademarks or registered trademarks of Webee LLC
Page 18
GETTING STARTED WITH SMARTEE
2
4- Once you have created your space, click on the blue button ADD SMARTEE.
4- You will me prompt to enter your MAC address. Please enter using all capital letters an no colons.
6- Find your Mac Address at the bottom of your Smartee.
Webee Smartee
Getting started
© 2014 Webee LLC, All rights reserved. The Webee logo, Boss and Bees are trademarks or registered trademarks of Webee LLC
Page 19
GETTING STARTED WITH SMARTEE
2
7- Once your Smartee is linked to your account ,you will be able to start
adding and controlling your devices
8- To Add a Device, on the Main Menu select Devices.
Webee Smartee
Getting started
© 2014 Webee LLC, All rights reserved. The Webee logo, Boss and Bees are trademarks or registered trademarks of Webee LLC
Page 20
GETTING STARTED WITH SMARTEE
2
9- You will also be able to create Rooms to identify each room of your house within your Space.
This way you can group devices by room.
10- You can also create Functions, grouping devices by function.
Perhaps you could group all lights together under Function “Lighting”.
Webee Smartee
Getting started
© 2014 Webee LLC, All rights reserved. The Webee logo, Boss and Bees are trademarks or registered trademarks of Webee LLC
Page 21
GETTING STARTED WITH SMARTEE
2 ZWAVE FUNCTIONALITIES
6
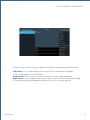
Description of Z-wave Console
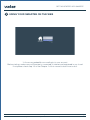
1- Go to “developer tools” and enter to “ZWave console”.
Webee Smartee
22
GETTING STARTED WITH SMARTEE
2
2-The z-wave console contains 3 panels: left-panel, center panel and right panel.
Left Panel: Is a scrollable panel and shows up the z-wave devices added
to the z-wave network of the Smartee.
Center Panel: Shows the information and controls of the selected device.
Right Panel: Is a scrollable panel and contains all the controller commands related
to z-wave networking management and basic control of z-wave devices.
Webee Smartee
23
GETTING STARTED WITH SMARTEE
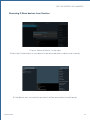
2 Adding Z-Wave devices to Smartee
1-Tap on “Add Device” on the right panel for normal power inclusion or
“NW Inclusion” for Network Wide Inclusion.
2- Press the Z-wave button on your device to add it (refer to device user manual).
3-After a new device is detected, it will appear on the left side panel.
4-If the device was successfully added to the Smartee, all the device information
will be at the center panel.
4-If the inclusion process fails, when selecting the device this message will appear:
“The new device was not successfully added. Please, remove it and try again”.
In this case follow the remove device instruction and try again.
Webee Smartee
24
GETTING STARTED WITH SMARTEE
2 Removing Z-Wave devices from Smartee
1-Tap on “Remove Device” on the right.
2-Press the Z-wave button on your device to be removed (refer to device user manual).
3-If the device was successfully removed, it will be removed from the left panel.
Webee Smartee
25
GETTING STARTED WITH SMARTEE
2
Entering the Learn Mode
1- For this process, to add a Z-wave controller to Smartee,all the Z-wave devices
must be removed from the Smartee. See “Remove Z-wave Device” on page 25.
2- The other Z-wave controller should be put into inclusion mode.
See controller’s instructions.
3-Tab on Start Learn Mode on the Right panel.
It may take longer to receive all the network info and load all the devices.
At the end of this process all the devices added to the other controller will appear
in the left panel.
Webee Smartee
26
GETTING STARTED WITH SMARTEE
2
Smartee Z-wave Capacities
w
w
Basic Commnad Class Support:
The Smartee does not map the Basic Command Class to any functionality.
It ignores Basic Get requests.
Association Command Class Support:
The Smartee support Association Command Class. It has one association group
("Lifeline" group), only one device can be associated to this group.
The Smartee will send reset notifications to the associated device when the hub
is factory reset.
w
Security Command Class Support:
The Smartee is a Security-enabled device.
When a security-enabled Z-Wave device is added to the hub's network,
its secure communication will be 128-bit AES encrypted.
Webee Smartee
27
GETTING STARTED WITH SMARTEE
2
V1.0 REV. January, 2015
© 2014 Webee LLC, All rights reserved. The Webee logo, Boss and Bees are trademarks or registered trademarks of Webee LLC
Webee Smartee
28