1
1
Index
1
Preface ........................................................................................................................................... 5
2
About your DataStation® pocket air ..................................................................................... 6
3
Specifications ............................................................................................................................... 7
4
Package contents ....................................................................................................................... 8
5
6
Safety instructions ...................................................................................................................... 9
5.1
Battery .................................................................................................................................... 9
5.2
Operation .............................................................................................................................. 9
5.3
Cleaning and maintenance ............................................................................................. 9
Get to know your DataStation ............................................................................................. 10
6.1
7
Control elements and connectors .............................................................................. 10
Starting up for the first time ................................................................................................. 11
7.1
Charging your DataStation ........................................................................................... 11
8
Using the DataStation as an external USB hard drive .................................................. 12
9
Using the DataStation as a network storage................................................................... 12
9.1
Installing PocketAirFinder ............................................................................................. 12
10 Setting up the DataStation® for Wi-Fi access .................................................................. 13
10.1 Setting up via Wi-Fi ......................................................................................................... 13
10.2 Setting up via PocketAirFinder (Wi-Fi and LAN)..................................................... 13
11 The Setup menu of the DataStation® ................................................................................ 14
11.1 Log in to the DataStation® menu................................................................................ 14
12 "My PocketAir" Web Management ..................................................................................... 15
12.1 Explorer Function ............................................................................................................ 15
12.2 Information ........................................................................................................................ 15
12.2.1
Device Information .............................................................................................. 15
2
12.2.2
Storage Information ............................................................................................ 15
12.2.3
Network Information........................................................................................... 15
12.3 Settings ............................................................................................................................... 16
12.3.1
User ........................................................................................................................... 16
12.3.2
Disk ........................................................................................................................... 16
12.3.3
Network ................................................................................................................... 16
12.3.4
Services.................................................................................................................... 18
12.3.5
System ..................................................................................................................... 19
12.3.6
Wizard ...................................................................................................................... 20
12.4 Help ...................................................................................................................................... 20
13 About PocketAir app .............................................................................................................. 21
13.1 Starting the PocketAir app............................................................................................ 21
13.2 The PocketAir menu ....................................................................................................... 22
13.2.1
The "My PocketAir" menu .................................................................................. 23
13.2.2
The "My Device" menu ....................................................................................... 24
13.3 Copy and delete files ...................................................................................................... 25
13.3.1
Copy ......................................................................................................................... 25
13.3.2
Delete ....................................................................................................................... 25
13.4 Media playback ................................................................................................................ 26
13.4.1
Audio files ............................................................................................................... 26
13.4.2
Photos ...................................................................................................................... 27
13.4.3
Videos ...................................................................................................................... 28
13.4.4
Documents ............................................................................................................. 28
14 Using the DataStation® for Wi-Fi Internet access (Hotspot) ....................................... 29
15 Using the DataStation® as a charging station ................................................................. 29
3
16 Disconnecting the DataStation® from the computer (USB) ....................................... 30
17 Turning off the DataStation®................................................................................................ 30
18 Resetting / Load default settings ........................................................................................ 30
19 Copyrights and trademark notice ...................................................................................... 31
20 Battery disposal ........................................................................................................................ 32
21 CE .................................................................................................................................................. 33
22 Support information ............................................................................................................... 34
4
1
Preface
We wish you a lot of fun with the TrekStor DataStation pocket air.
Please read the following instructions carefully so that you can become acquainted
with the functions of this product and its use.
The manual describes the operation of the device as an example. Due to the variety
of external devices with different operating systems and applications, formal
variations are possible.
Current product information can be found at the TrekStor website www.trekstor.de.
Other products and accessories are available at www.trekstor-onlineshop.de.
The manufacturer retains the right to continually improve the product. These
changes may be made without being directly described in these operating
instructions. For this reason, the information provided in these operating
instructions may not reflect the current state of the art.
5
2
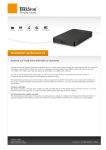
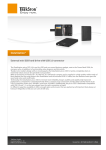
About your DataStation® pocket air
The TrekStor DataStation pocket air is an external hard drive with the Wi-Fi feature,
USB 3.0 interface and network connection. The device offers wireless access to files
and streams music, video and pictures to your tablet, smartphone or notebook. The
integrated battery does Wi-Fi regardless of the power outlet and is also suitable as a
mobile charging station (Power-Bank).
a Attention: It is essential to observe the safety and usage instructions listed in
Chapter 5!
Use the device only for its intended purposes above.
The manufacturer accepts no liability for any damage resulting from non-intended
use of the device. Furthermore, the manufacturer accepts no liability for damaged or
lost data and all consequential damages.
i Note: The capacity indicated by your operating system can be different than the
actual capacity of your device. Like most manufacturers of computer hardware, TrekStor
uses the prefixes for units (e.g. 1 GB = 1.000.000.000 bytes) as prescribed by the
International System of Units (SI). Unfortunately, many operating systems do not comply
with this norm and display a lower capacity because they base their calculations on the
assumption that 1 GB = 230 bytes = 1.073.741.824 bytes.
6
3
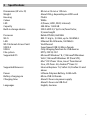
Specifications
Dimensions (W x H x D)
Weight
Housing
Colour
LED
Capacity
Built-in storage device
Processor
Wi-Fi
LAN
WI-FI Internet Access Point
USB 3.0
USB-A
File system
Supported OS
Supported Browsers
Power
Battery charging via
Charging time
Languages
82 mm x 25 mm x 129 mm
About 285 g, depending on HDD used
Plastic
White
4 (Power, HDD, WI-FI, Internet)
500 GB or 1.000 GB
SATA-HDD 2,5" (6,35 cm) form factor,
9,5 mm height
Ralink RT5350, 360 MHz
802.11 b/g/n, 2,4 GHz, up to 150 Mbit/s
Ethernet RJ-45 female, 100 Mbit/s
Via Ethernet
SuperSpeed USB 3.0 Micro female
Only charging function for USB devices
NTFS, FAT32, FAT
Microsoft Windows® 8, 7, Microsoft Windows
Vista®, Microsoft Windows XP (from SP2),
Mac® OS X from 10.6.x, Linux® from Kernel
2.6.x, iOS from 4.0, Android™ from 2.3
Internet Explorer 7.0, Safari 3.0, Firefox 3.5 and
above
Lithium-Polymer-Battery, 3.000 mAh
Micro-USB 3.0 female
About 3 hours via power supply
About 5 hours via USB-Port
English, German
7
4
Package contents
•
•
•
•
•
TrekStor DataStation pocket air
USB 3.0 cable (USB-A / Micro-USB)
Quick guide
Software PocketAirFinder (Windows / Mac) on HDD
PocketAir App (via Download)
8
5
Safety instructions
It is essential to observe the following safety instructions!
a Technical work on the product can be performed only by qualified persons. The
product may neither be opened nor changes be carried out to it. The
components cannot be serviced by the user.
5.1 Battery
a Charge the battery only in a temperature range from 5° to 35° C.
a Do not charge the DataStation, if the battery is damaged or leaking.
5.2 Operation
a Do not cover the DataStation during operating or charging. This can lead to
overheating.
a Only operate the device in the temperature range of 5 ° to 35 ° C..
a Turn off power immediately if it becomes wet. Let the unit check before using
the device again.
a Do not move the device while the integrated hard disk drive is active. This can
result in data loss or damage to the hard disk drive. Operate the device on a
stable surface. Ensure horizontal operation (LED indicators on top).
i Protect the DataStation from strong sunlight, extreme temperatures, moisture,
high humidity, corrosive substances or vibration.
i In certain circumstances, exposing the device to an electrostatic discharge may
interrupt the data transfer and impair the functions of the device. If this occurs,
all cables should be unplugged and Wi-Fi disconnected. Then connect again.
i Do not use USB cables longer than 3 meters.
5.3 Cleaning and maintenance
i
i
Maintain a dust free environment when using or storing the device.
Never clean the surface of the device with solvents, paint thinners, cleansers or
other chemical products. Instead, use a soft, dry cloth or soft brush.
9
6
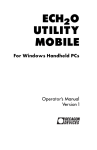
6.1
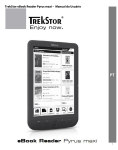
Get to know your DataStation
Control elements and connectors
10
A)
B)
C)
D)
E)
F)
G)
H)
I)
7
USB-A female for using the Power-Bank function
Battery status LED
HDD status LED
Wi-Fi status LED
Internet connection status LED
On/Off switch / Network function
Micro-USB-B 3.0 female
Reset
RJ-45 LAN port
Starting up for the first time
You must charge the DataStation before initial use and when the battery is running
low.
7.1 Charging your DataStation
Once you have connected your DataStation via the included micro USB cable to a
computer or to a socket using a suitable power supply (e. g. TrekStor USB-Charger
e.fs), it is automatically charged. After 3 hours with USB power adapter (5 hours over
PC), the battery will be fully charged and the charging will stop automatically to
prevent overcharging.
i Note: During charging, the battery status LED (E) lights up green. Once charging is
completed, the status LED turns off. When recharging during ON state, the battery status
LED (E) is flashing in 4 second intervals to indicate the achievement of capacity.
i Note: A solid red battery status LED indicates a low battery. The lights change to
flashing if battery level drops below a critical value. Charge the DataStation
immediately!
i Note: The maximum battery runtime is reached after about 10 battery charging
cycles.
11
8
Using the DataStation as an external USB hard drive
Ensure that the DataStation is turned off. Connect your DataStation via the included
USB 3.0 cable to a computer. In activity, the HDD status LED lights up white (USB 2.0
connection) or blue (USB 3.0 connection). The DataStation is now shown as an
external drive "TREKSTOR". You can now transfer data.
i Note: While the HDD is in power saving mode, a simultaneous charging of the
internal battery is shown by flashing the status LED battery. This is about 4 minutes
without access.
9
Using the DataStation as a network storage
9.1 Installing PocketAirFinder
The PocketAirFinder software helps you to get comfortable access to DataStation
from your PC or Mac via LAN or WI-FI. You'll find it on your DataStation in the main
directory or even on the product page www.trekstor.de. Copy the software to the
desktop or a folder of your choice.
•
•
•
•
•
Connect the DataStation with a network cable to your network. (for LAN only)
Push the )-button (F) to switch on the DataStation.
Double-click to start PocketAirFinder and follow the instructions.
To start the program, please confirm window appearing with "YES".
After a short time the name of your DataStation appears with its IP address.
i Note: If the name does not appear, click the "REFRESH" BUTTON OF POCKETAIRFINDER´S
WINDOW.
•
•
•
•
•
Click on the name of your DataStation. It is now selected and highlighted in
blue.
Click on "MY STORAGE".
Enter your username and password. The default username is "admin" and the
password field is left blank.
Confirm the input by clicking "OK".
This opens a window with a folder icon of the DataStation.
12
•
Open the folder by double clicking. You see the contents of your DataStation.
Now you can manage files and folders, as you are accustomed to from an external
hard drive.
10
Setting up the DataStation® for Wi-Fi access
The integrated web management software is an HTML-based utility. It requires no
software installation.
10.1 Setting up via Wi-Fi
•
•
•
•
•
Press )-button (F) to start the Wi-Fi feature.
The Wi-Fi status LED will flash blue.
Wait until the Wi-Fi status LED turns solid blue.
The Wi-Fi of the DataStation is ready to use.
Activate the Wi-Fi function of your device.
i Note: Take your device manual for assistance, if necessary.
•
•
•
•
•
Select the WI-FI of the DataStation "DSPA-xxxx" from the available networks and
connect to.
The password for logging in to the DataStation Wi-Fi defaults to "11111111".
You are now connected to the Wi-Fi of the DataStation.
In the web browser of your device, enter the IP address 10.10.10.254.
The login screen for the web management software of the DataStation appears.
Follow the instructions on the screen of your device (see 11.1)
10.2 Setting up via PocketAirFinder (Wi-Fi and LAN)
•
•
•
•
Copy the software PocketAirFinder to your Computer (see 9.1)
LAN only: Connect the DataStation with a network cable (optional) to your
network.
Press )-button (F) to start your DataStation.
Double-click to start PocketAirFinder and follow the instructions.
13
•
•
To start the program, please confirm the appearing window with "YES".
After a short time the name of your DataStation appears with an IP address,
assigned by your router for the LAN connection. Furthermore, with active and
connected Wi-Fi, the IP address of the DataStation is also displayed.
i Note: If the name does not appear, click the "REFRESH" BUTTON OF POCKETAIRFINDER´S
WINDOW.
•
•
•
Select the DataStation and click "SETUP".
The login screen for the web management software of the DataStation appears.
Follow the instructions on the screen of your device (see 11.1)
i Note: If the DataStation is switched off, it cannot be detected by the network.
11 The Setup menu of the DataStation®
The integrated web management software enables the configuration of your
DataStation and gives you access to more information. Start the menu with
PocketAirFinder (see 10.2) or enter the Wi-Fi IP address of DataStation into the
address line of your Internet browser: "10.10.10.254" (Wi-Fi). The login screen of
DataStation will appear.
11.1 Log in to the DataStation® menu
Enter at your first log in as User "admin". Leave the field Password blank. Select your
language. Click "LOG IN".
If you have logged in successfully, you will see the three main menus “EXPLORER",
"INFORMATIONS", "SETTINGS" and "HELP" in the lower part of the window.
14
12 "My PocketAir" Web Management
12.1 Explorer Function
“My PocketAir” allows you to upload or download files to your PC, Mac, Tablet or
Smartphone. You can even create, copy, cut, delete and rename folders and file
names - just as known from your PC or Mac.
12.2 Information
Detailed information about hardware, disk space and network status are found here.
12.2.1 Device Information
The device information shows device-related information, such as device host name,
serial number, vendor, model and the CPU occupancy rate.
12.2.2 Storage Information
Storage information displays the partition information of the storage devices, such
as the partition of the remaining capacity and the total capacity.
12.2.3 Network Information
Network information displays the mode of the device, the IP information of the
device, wireless LAN information and SSID.
15
12.3 Settings
The default settings can be changed here. Please note that incorrect entries may
lead to malfunction of DataStation. In this case you have to load default settings
(Chapter 12.3.5.4).
12.3.1 User
Click the “USER” thumbnail. This window will allow you to modify the admin
password. The password should be at minimum 5 characters to maximum 32
characters in length. Click on “SAVE” button to confirm the password.
The default User Name is "admin" and the password field is left blank.
12.3.2 Disk
Click the thumbnail "DISK". In the submenu of "DISK1" you will find information about
the internal hard drive. The detailed information includes firmware version, serial
number and total capacity of the disk. With a click on “VOLUME” your partitions are
displayed.
12.3.3 Network
Network setting includes the host name and the settings for Wi-Fi and LAN, DHCP
server and Internet.
12.3.3.1 Host Name
The Host name is a name that is assigned to a device connected to a computer
network. It must begin with a letter and followed by a combination of letters and
numbers. Its length has to be between 2 and 8 characters.
12.3.3.2 Wi-Fi and LAN
The settings for Wi-Fi and LAN can be customized:
SSID: Enter only a combination of letters and numbers. The SSID is composed of a
maximum of 32 characters.
Region: Select your country.
Mode: The default setting is 802.11b/g/n. You can also manually set the modes to 11
Mbps (802.11b), 54 Mbps (802.11g), and 150 Mbps (802.11n).
16
Channel: The default setting is "AUTO". There are 13 channels available to be selected.
Password: Here you can create a new password for your wireless connection
(default 11111111). Use minimum 8 to maximum 63 characters.
Security: Available settings are None, WPA-PSK, WPA2-PSK, WPA2-PSK mixed
(standard).
MAC-Address: Shows the MAC-Address of your DataStations Wi-Fi-Adaptor.
Hide SSID: Here you can prevent the SSID of your DataStation is shown in the
network search.
IP-Address: The default IP address is set to 10.10.10.254. The IP address can be
changed.
Subnet Mask: The subnet mask is pre-set to 255.255.255.0.
12.3.3.3 DHCP-Server
The DHCP or Dynamic Host Configuration Protocol is a network protocol that allows
a server to automatically assign an IP address to a computer connected into a
network. By default, the DHCP Server option is "ENABLED". This option can be disabled
if needed and the IP address can be manually assigned. By clicking on "CLIENT LIST", the
devices connected via Wi-Fi are displayed.
12.3.3.4 Internet
Here you can apply an existing access to the Internet via LAN or Wi-Fi. You can
choose between two available Internet access options. By default "WIRED ACCESS" is
selected.
-
Wireless Access: Connecting DataStation to another wireless network to have
internet access.
-
Wired Access: Directly connect DataStation via router, for connecting to the
internet through another network.
17
Selecting Wireless Access
SSID: Type-in the SSID name or click the “SCAN” button to automatically search for
the available wireless networks. To view it, click the arrow icon in the SSID entry field.
The available Wi-Fi connections are displayed. Select your preferred network.
Password: Type in the correct password to join the selected wireless network
connection.
IP-Address: By selecting "DHCP", the host will provide an automatic IP address to
connect to the internet. By selecting "MANUAL", you have to manually assign an IP
address, subnet mask and gateway to connect to the internet.
Selecting Wired Access
By selecting Wired Access, the Dynamic IP is selected as the default setting. You can
manually assign your own IP address by clicking on the arrow and select the Static IP
option.
i Note: If you cannot connect with another network, ask your network administrator
for the guidelines applicable to you.
12.3.4
Services
12.3.4.1 Win File Service
Data sharing and accessing DataStation is made easy by enabling Win File Service. By
default, this feature is activated with „ON“.
Win File Service ensures that a folder can be displayed with the content of your
DataStation®, in "PocketAirFinder" by clicking on "My Storage" (Chapter 9).
18
12.3.5
System
12.3.5.1 Time Settings
The time of the device can be set automatically, over the internet using NTP
(Network Time Protocol) server or by hand setting. Depending on the location, select
the time zone from the drop-down list. If the clock is set via the Internet, select
the "ON/OFF" button and enter the frequency of the clock synchronization. Click
"SYNCHRONIZE" for instant upgrade. If daylight saving is valid, select the "ON/OFF“
button. Complete the process by clicking "SAVE".
12.3.5.2 Backup
By clicking "SAVE" the system configuration of "My PocketAir" will be saved and it will
be restored with "RESTORE".
12.3.5.3 Firmware Upgrade
With this function the device firmware is being upgraded:
Step 1: Download, if available, the latest version of the firmware from the website
www.trekstor.de to your PC.
Step 2: Click the "UPGRADE" button and follow the instructions to complete the
upgrade.
After upgrading the system reboots and you can check the firmware version at the
bottom of “My PocketAir” main menu.
12.3.5.4 Reset Settings
The device settings can be restored to default configuration. Select the "RESTORE TO
FACTORY DEFAULT SETTINGS" option and press “SAVE” button to execute.
i Note: Please note that the default User Name is "admin" and the password field is
blank (siehe 9.1).
19
12.3.6 Wizard
Using the wizard you can easily and conveniently make the necessary settings.
Simply follow the instructions for Internet access, Wi-Fi settings and user settings.
After that "My PocketAir" restarts and you can log in with the new settings.
12.4 Help
Here you will find the integrated help for My PocketAir Web management.
20
13 About PocketAir app
The "PocketAir" App is a software application to gain access from smartphones and
tablets to the DataStation. Please download the app from Google Play Store for
Android devices or from AppStore for Apple devices.
1.
2.
3.
4.
5.
Turn on Wi-Fi on the DataStation by pressing the )-button (F). The Status LED
Wi-Fi (D) lights blue.
Start the WI-FI function of your device according to the manufacturer's
instructions.
Search the ID of the DataStation (DSPA-xxxx) from the available networks and
click on it.
Enter the password (default: "11111111").
After successful login you are connected to the DataStation.
i Note: Steps 3 and 4 are only required, if you are first time connecting your device to
DataStation´s WI-FI.
13.1 Starting the PocketAir app
Tap the "POCKETAIR" icon on the screen of your device.
In case of an initial connection between the device and the DataStation tap the
required password, default is "11111111". A menu appears on the screen of your
mobile device.
21
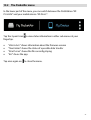
13.2 The PocketAir menu
In the lower part of the menu, you can switch between the DataStation "MY
POCKETAIR" and your mobile device "MY DEVICE".
Tap the 3-point icon to view status information in other sub-menus at your
fingertips.
•
•
•
•
"VERSION INFO" shows information about the firmware version
"TRANSFERRING" shows the status of a possible data transfer
"NOW PLAYING" shows the file currently playing
"EXIT" closes the app.
Tap once again on
to close the menu.
22
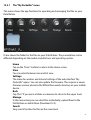
13.2.1
The "My PocketAir" menu
This menu shows the app functions for operating and managing the files on your
DataStation.
It also shows the folder for the files on your DataStation. The presentation can be
different depending on the model, manufacturer and operating system.
Home
Tap on the "HOME"- button to return to the Home screen.
View
You can select between icon and list view.
Settings
The menu for wireless and Internet settings of the web interface "My
PocketAir" opens. You can also update the firmware. This requires a newer
firmware version placed in the WDisk\Documents directory on your mobile
device.
Back
Tap "BACK" if you are in a folder or submenu to return to the upper level.
Manage
In this menu item you can select files individually, upload them to the
DataStation or delete them (Download 13.3).
Search
Easy search function for files on the same level.
23
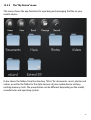
13.2.2
The "My Device" menu
This menu shows the app functions for operating and managing the files on your
mobile device.
It also shows the folders from the directory "WDISK" for documents, music, photos and
videos, as well as the folder for the data memory of your mobile device and any
existing memory cards. The presentation can be different depending on the model,
manufacturer and operating system.
24
Home
Tap on the "HOME"- button to return to the Home screen.
View
You can select between icon and list view.
Back
Tap "BACK" if you are in a folder or submenu to be back again one level
higher.
Manage
In this menu item you can select files individually, upload them to the
DataStation or delete them (Upload 13.3).
Search
Easy search function for files on the same level.
13.3 Copy and delete files
With the “PocketAir” app you can download files from your mobile device to the
DataStation and vice versa, or delete them. Locate the appropriate file and tap the
folder icon "MANAGE“. You can now select the files you want to copy or delete from or
to your device. Selected files will receive a check mark.
13.3.1
Copy
Click the “Upload” or “Download” icon in the bottom line. You can now select the
destination folder or create a new one. With a tap on "CONFIRM", the selection will be
copied. The transfer window shows you the processing progress. After the
completion of the data transfer, close the transfer window and tap "DONE" to close
the Administrative Tools menu.
13.3.2
Delete
Click the “trash can” icon in the bottom line. Confirm the security prompt with "OK".
The file is deleted.
i Note: You cannot copy or delete folders by using this app .
25
13.4 Media playback
With the "PocketAir" App you can open supported audio, video and image files from
your DataStation and directly play or display. Locate the respective file and tap it.
i Note: The presentations may vary depending on the model, manufacturer and
operating system of your mobile device.
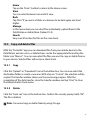
13.4.1
Audio files
Music and voice files are provided with a note symbol. Tap the icon to play the audio
file. A player will open.
All tracks in the current folder are played in sequence and repeated by default. Other
playback modes are: one-time play, repeat the current file, random and one-time
playback of all files in the folder.
26
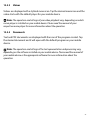
13.4.2
Photos
Representable photos are accompanied by an icon of its content. Tap the icon to
display the image. An image viewer will open.
Tap the image to see the menu bar. By default, only the tapped image is displayed.
Tap the “Play” icon. It displays all the images in the folder as a slideshow.
Furthermore an audio file can be played by tapping on the note icon. Tap the icon
on the right to open another submenu "SHARE" to share the image with web
applications, or sent by e-mail. Using the submenu item "SAVE“ will save your photo
in the folder "\WDISK\Photos" on your mobile device.
27
13.4.3
Videos
Videos are displayed with a stylized movie icon. Tap the desired movie icon and the
video starts with the default player for your mobile device.
i Note: The operation and settings of your video playback vary, depending on which
movie player is installed on your mobile device. Please read the manual of your
respective movie player for more information about the operation.
13.4.4
Documents
Text and PDF documents are displayed with the icon of the program created. Tap
the desired document and it will open with the default program on your mobile
device.
i Note: The operation and settings of the text representation and processing vary,
depending on the software installed on your mobile device. Please read the manual of
your mobile device or the appropriate software for more information about the
operation.
28
14
Using the DataStation® for Wi-Fi Internet access (Hotspot)
Using a router with internet access, but without Wi-Fi, you can connect your device
via the Wi-Fi feature of your DataStation to the internet.
•
•
•
•
•
•
Connect the DataStation to the router with a RJ-45 Ethernet network cable.
Switch the DataStation Wi-Fi feature on and wait until the Internet status LED
and the Wi-Fi status LED light up continuously.
DataStation is now connected to the internet.
Select the WI-FI of the DataStation "DSPA-xxxx" from the available networks of
your device and connect.
The password for logging in to the DataStation Wi-Fi defaults to "11111111".
You are now connected to the Wi-Fi of the DataStation.
i Note: Take your device manual for assistance, if necessary.
15
Using the DataStation® as a charging station
The USB 2.0 port (A) allows the use of your DataStation as a mobile charging station
("Power-Bank").
•
•
•
Make sure that the Wi-Fi feature of DataStation is off (Wi-Fi status LED inactive).
Connect your DataStation to the target device using a USB cable.
Make sure that the DataStation does not fully discharge and, if necessary, plug it
to a power source in due time.
29
16
Disconnecting the DataStation® from the computer (USB)
a Attention: Please follow the recommended log-off procedure to avoid damages
to the device or data loss!
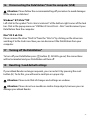
Windows® 8/7/Vista™/XP
Left-click to the symbol "SAFELY REMOVE HARDWARE" at the bottom right corner of the task
bar. Click in the popup menu on "USB MASS STORAGE DEVICE - DRIVE" and disconnect your
DataStation from the computer.
Mac® OS X ab 10.6
Please remove the drive "TREKSTOR" from the "DESKTOP" by clicking on the drive icon
and drag it to the trash icon. Now you can disconnect the DataStation from your
computer.
17
Turning off the DataStation®
To turn off your DataStation press )-button (F). All LEDs go out, the connections
will be terminated and your DataStation will turn off.
18
Resetting / Load default settings
If your eBook Reader no longer responds, you can restart it by pressing the reset
button (H). To do this, you will need a small pin or a paper clip.
a Attention: Please note that all changes and settings are undone.
a Attention: Please do not use needles or similar sharp objects, because you can
damage your eBook Reader.
30
19
Copyrights and trademark notice
Copyright laws prohibit copying any data of this product or the contents of this
manual (illustrations, related documents etc.) in whole or in parts without the
permission of the copyright holder.
Additionally, the use of the data of this product or the contents of this manual are
not allowed without TrekStor® GmbH's permission except for personal use.
Windows and Windows Vista are either registered trademarks of Microsoft
Corporation in the United States and/or other countries.
Mac OS is a registered trademark of Apple Inc. in the United States and/or other
countries.
Linux is a registered trademark of Linus Torwalds in the United States and/or other
countries.
Adobe, the Adobe logo, Reader and PDF are either registered trademarks or
trademarks of Adobe Systems Incorporated in the United States and/or other
countries.
IOS is a trademark or registered trademark of Cisco in the U.S. and other countries
and is used under license
Copyright © 2013 TrekStor GmbH. All rights reserved. Other cited product or
company names may be trademarks or brand names of the respective owner.
31
20
Battery disposal
Reporting requirement according to the Battery Directive (BattV)
Batteries are not part of the domestic waste. The consumer is obliged to return no
longer used batteries properly. Please dispose of them by a specialized trade or a
battery collection point. Hereby you make an important contribution to
environmental protection.
Since 1998 the German Battery Directive compels all citizens to dispose of used
batteries exclusively through the trader or specially equipped departments (legal
return obligation).
Trade and manufacturers are committed to take back batteries for free and to exploit
it properly or to remove it as special waste (legal take-back obligation).
The built-in lithium-polymer battery of this device is marked with the
adjoining symbol, consisting of a crossed out bin and the used battery type.
Remove battery
a Before you return a disused device for disposal, the battery has to be removed
from the device.
32
21
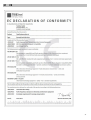
CE
33
22
Support information
If you have any questions regarding your TrekStor product, please proceed as
follows:
•
•
•
Check the features as well as the functions of your device (apparent on the
packaging), in order to use the correct settings.
Read the manual carefully.
Inform yourself on our website www.trekstor.de/en about the up-to-date
information concerning your product (e. g. available most recent firmware
releases).
In the case you have further questions regarding your product, please note the
following TrekStor support options:
FAQ
The FAQ area of our website offers you a wide range of problem solving hints.
Here you can obtain answers to the most frequently asked questions concerning our
products.
E-Mail
Please fill in the support form on our website or send an E-Mail to
[email protected]. You can find mailing addresses for other countries when
you click "SERVICE" at the menu bar on our website.
Phone support
Please find the number of the support hotline for your country on our
website under "SERVICE" as well.
User manual version
BA-DSPA-V1-13-EN-20130923
TrekStor GmbH
Kastanienallee 8-10
D-64653 Lorsch, Germany
www.trekstor.de
34