1
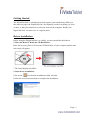
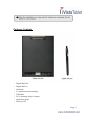
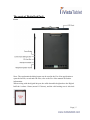
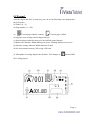
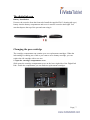
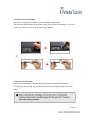
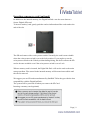
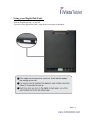
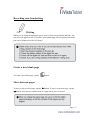
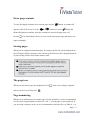
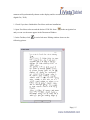
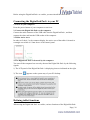
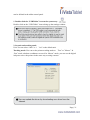
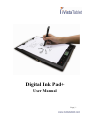
Digital Ink Pad+
User Manual
Page | 1
Welcome.
Dear user, thank you for purchasing this product.
Much investment in time and effort has gone into its development, and it is our hope
that it will give you many years of trouble-free service.
Notice
1. Purchasing new ink cartridges:
The dimension of the pen cartridge is 2.3~2.4mm (diameter) x 67mm (length). You
are recommended to use products of tested brands, such as KANGHER, MINI STAR,
SCHMIDT 628F, and ROTRING.
Note: Unqualified cartridges may affect the functionality of the digital ink pen.
Cartridges of unspecified sizes may cause damage to the digital ink pen.
2. Replace the battery of the digital ink pen when any of the followings occurs:
a. When the LED on the pen lights up.
b. The strokes of the pen show serious distortion.
c. Abnormal pen strokes appear on areas that you did not write on.
d. The pen strokes appear to be seriously missing or dragging.
3. Notes on maintaining the Digital Ink Pad+ and the digital ink pen:
a. Avoid using the device in places near sources of strong magnetic or electromagnetic
fields.
b. Do not place magnetic objects on the surface of the Digital Ink Pad+.
c. Do not disassemble the Digital Ink Pad+ or digital ink pen.
d. Do not drop the device heavily to a hard surface. Severe impact may cause
malfunction to the Digital Ink Pad+ and digital ink pen.
e. Do not tap or knock heavily on the digital ink pen cartridge. Doing so may cause
damage to the pen tip or the pen itself and result in malfunction.
4. Notes on formatting memory:
a. If the file information of the internal memory does not display correctly, please
format the internal memory on the computer.
b. If the file information of the purchased memory card does not display correctly,
please format the memory card on the computer.
5. Do not dispose of the Digital Ink Pad+ or digital ink pen at will:
If the device has become unusable, please dispose of the device according to the
environmental regulations enforced by your country.
Page | 2
Getting Started
The Digital Ink Pad+ is a handy device that captures your handwriting. While you
take notes on paper, the Digital Ink Pad+ also digitally records everything you write
or draw, so that you can present or edit your work on the computer. Besides, the
Digital Ink Pad+ can also serve as a regular tablet.
Driver installation
Before using the Digital Ink Pad+ as a tablet, you must install the tablet driver.
1. Place the Driver CD into the CD-ROM drive.
Place the accessory Driver CD into the CD-ROM drive of your computer and the auto
run screen will appear.
* The actual display may differ.
2. Start driver installations.
Click on the
icon and the installation wizard will start.
Follow the on-screen instructions to complete the installation.
Page | 3
Package Contents
‧ Digital Ink Pad+
‧ Digital Ink Pen
‧ Notebook
‧
‧
‧
‧
2 x replacement ink cartridges
USB cable
ZA13 (hearing aid type ) battery
Quick start guide
‧ Software CD
Page | 4
The parts of Digital Ink Pad+
Front
Note: The synchronized editing button can be used in the Free Note application to
open the last file, record and edit files, refer to the Free Note manual for further
information.
When writing with the digital ink pen, the valid detectable height above the Digital
Ink Pad+ is about 13mm (around 135 sheets), and the valid writing area is A4 sized.
Page | 5
LCD panel
After the Digital Ink Pad+ is turned on, you can see the following icons displayed on
the LCD panel:
(a) Folder (A ~ Z).
(b) Page number (1 ~ 999).
(c)
Current page contains contents.
Current page is blank.
(d) Appears when writing with the digital ink pen.
(e) Icons displayed when hovering over the Ink Pad control buttons.
(f) Battery life indicator. Blank indicates no power. Flashing indicates low power.
(g) Memory storage indicator. Blank indicates no data.
(h) M: using internal memory; SD: using a SD card.
(i) Microphone recording displays the filename. This changes to
when an MP3
file is being played.
Page | 6
The digital ink pen
Battery Installation
Unscrew the rear tube from the front tube. Install the supplied ZA13 (hearing aid type )
battery into the battery compartment and screw it onto the rear tube until tight. You
can then depress the top of the pen and start using it.
Changing the pen cartridge
The cartridge compartment can contain up to two replacement cartridges. When the
ink cartridge is running out of ink or you want to use a dummy cartridge, you can
replace the old cartridge with a new one.
1. Open the cartridge compartment cover.
Slide opens the cartridge compartment cover on the lower right side of the Digital Ink
Pad+. Inside the compartment you can find two replacement cartridges.
Page | 7
2. Pull out the old cartridge.
Insert the pen tip into the clip hole in the cartridge compartment.
Tilt the pen to grip the pen tip, and then gently pull out the old cartridge. Or you can
use the accessory tweezers to pull out the old cartridge.
3. Insert a new cartridge.
Insert a new ink/dummy cartridge and gently slide the cartridge into the pen.
Carefully tap the cartridge tip against a hard surface until the cartridge clicks into
place.
Page | 8
Inserting a memory card (optional)
In addition to the internal memory, the Digital Ink Pad+ can also store data on a
Secure Digital (SD) card.
To insert a memory card, gently push the card as indicated until the card reaches the
end of the slot
.
The SD card comes with a write-protect switch. Normally, the card is non-writable
when the write-protect switch is set to the lock position. If you neglect to set the
write-protect switch to the Unlock position during inking, this device allows the SD
card to become writable even if the write-protect switch is set to Lock.
When a memory card is inserted, the Digital Ink Pad+ will use the card as the main
storage medium. Files stored in the internal memory will become inaccessible until
the card is removed.
We suggest you use SD cards manufactured by SanDisk TM as they provide the best
compatibility with the Digital Ink Pad+.
The system will be powered off when you remove the SD Card.
Inserting a memory card (optional)
Page | 9
Inserting a notebook
To hold a sheet of paper on the Digital Ink Pad+, lift the paper clip upward and place
the paper on to the surface of the pad. Then release the paper clip to hold.
Page | 10
Using your Digital Ink Pad+
Turn the Digital Ink Pad+ on and off.
To power on the Digital Ink Pad+, push the power button as indicated.
Page | 11
Recording your handwriting
Writing
When you are using the digital ink pen to write or draw on the Digital Ink Pad+, the
pen icon will appear on the LCD panel. Your handwriting will be captured when this
pen icon is displayed on the LCD panel.
Create a new blank page
To create a new blank page, tap the
button.
Move between pages
To move to the previous page, tap the
button. To move to the next page, tap the
button. Note that you cannot move to a page that is not yet created.
Page | 12
Erase page contents
To erase the digital contents of the current page, tap the
appear on the LCD screen. Use the
or
button. A prompt will
buttons to select
and tap the
Menu/OK button to confirm. After the contents are erased, the page icon will
become
. You should then remove or cross out the same paper page and start a new
page accordingly.
Storing pages
When you are using the internal memory for storage, the M icon will be displayed on
the LCD panel. When a memory card is inserted, the SD icon will be displayed and all
of your writing will be saved in the memory card.
The page icon
When you start a new page, the displayed icon is
. After your writing is captured
and saved, the icon will become
Page numbering
When you are taking notes over many pages of your notebook, you are recommended
to write down a page number, such as A01, A02..., on each page of your notebook. If
you are using a memory card, you are recommended to add a prefix (e.g. SDA01...) to
Page | 13
make the page number distinctive.
Memory
When the memory full (
) icon is displaying on the LCD panel, it means the
internal memory or memory card (depending on which you are using) has no more
space to store your digital pages. Under such circumstances, you should erase some
unwanted content if you need to continue writing on the same page. You can also use
a new memory card, but old pages will become inaccessible and you will need to start
writing on a whole new page.
Recording a voice memo
To record a voice memo you can either use the built in microphone or connect one to
the microphone socket
on the left of the pad.
1. Start recording by tapping the
button for more than 2 seconds. The current
folder and file will be displayed on the bottom of the LCD panel.
2. To stop recording tap the button
.To pause the recording tap
.
The icon flashes while the recording is paused. The recorded voice memos are stored
in the corresponding folders with the handwriting.
3. To resume the recording, tap the
button for more than 2 seconds.
The only limit to the length of the recording is the amount of available memory. To
playback the recorded file see the Play Audio section.
Synchronized Editing--Proceed to Write Your Ink Notes
Sometimes you may want to continue your digital note which is taken by Digital Ink
Pad+. In Ink note Editing window, you can online update your digital ink document,
means every written stroke you write on the hard copy by Digital Ink Pad+ at this
Page | 14
moment will synchronically shown on the display and be recorded into the original
digital file (.TOP).
1. Check if you have finished the FreeNotes software installation
2. Open FreeNotes software and the desired .TOP file from
in the navigation bar
and you can see the notes appear in the Document Window.
3. In the Toolbar, click
to active Ink notes Editing window shown as the
following picture.
Page | 15
4. Proceed to write your ink notes with Digital Ink Pad+ and Digital Ink Pen.
5. When the editing is finished, click Exit to close the window.
Menu Functions
Folder functions
Create new folders
To create a new folder, tap the
tap Menu/OK >
>
button for more than 2 seconds or
. The next folder in sequence is created.
Move between folders
To move between folders tap the Menu/OK button >
or
>
. Tap the
to select the folder letter. Tap Menu/OK to move between the numbers
and tap the arrow buttons to select the folder. The other way to move between folders
Page | 16
is simply by tapping
or
for more than 2 seconds and next folder in
sequence is opened. Folders first need to be created (see below) before you can move
to them.
Play audio
Play voice recording
1. Voice recordings can be heard through a PC when the Digital Ink Pad+ is connected
via the USB cable.
2. In order to hear your recorded memo - see Recording a voice memo
-you first
need to connect headphones to the Digital Ink Pad+. To listen to the recording, tap
> Menu/OK >
> Menu/OK. Tap Menu/OK to move between the
Menu/OK >
numbers and tap the arrow buttons to select the folder.
3. You can also tap the
button for more than 2 seconds to listen to the last
recorded voice memo.
Play audio
The Digital Ink Pad+ can play WAV files from the \audio folder of the inserted SD
card or internal memory. To play a file simply tap the
. To stop the file either tap
skip to next audio file tap
the beginning tap
to pause the file or tap
or tap Menu/OK >
>
to stop the playback. To
for more than 2 seconds. To playback currently file from
button.
Note 1: The Digital Ink Pad+ will only play files stored in the \audio folder of the SD
card or internal memory.
Note 2: The \audio folder will be automatically created once the SD card is inserted
into the Digital Ink Pad+, if it doesn’t already exist.
Page | 17
Settings
Clock
The internal clock can be set by either synchronizing the digital tablet with a PC, see
Connection Modes on page 13 or manually. To manually configure the time tap
Menu/OK >
>
. Use the
to move sequentially through the date. Tap
Menu/OK to move forwards to the next field. Tap ESC to move backwards. Tap
Menu/ OK after the minutes field to confirm the date and time.
Deleting and Formatting
The deleting and formatting of folders and audio is performed by tapping Menu/OK
>
.
Folders - Select
, use the
Menu/OK and then use the
Audio - Select
, use the
to select the folder to delete and tap
to highlight the tick, tap Menu/OK to confirm.
to select the folder containing the audio and tap
to highlight file numbers and tap
Menu/OK to move to the file then use the
to find the audio file the tick, tap Menu/OK to confirm and then use the
to highlight the tick, tap Menu/OK to confirm.
Formatting - Warning: Formatting deletes all information from the
Digital Tablet - To format the tablet select
highlight
and then use the
to
, tap Menu/OK to confirm.
Volume
The volume can be adjusted by using either the volume buttons on the front of the
tablet or by using the LCD panel.
Volume buttons - Tap the
to see the volume bars. See the image below. Tap
them again to increase and decrease the volume.
Page | 18
LCD panel - Tap Menu/OK >
>
. Use the
to increase and decrease
the volume.
Volume Bar
Note that it takes 2 taps to fill a volume bar. So the 5 bars represent 10 increments.
Connection Modes
Transfer data between PC and tablet
Transferring notes between the tablet and a PC requires the installation of the My Ink
or Free Notes software suite, see the user manual included with the software for
details on use. To begin synchronization automatically, connect the supplied USB
cable between the tablet and a PC.
To switch to “data transfer” mode tap Menu/OK >
>
>
. In “data
transfer” mode the battery is recharged and the connection between the Digital Ink
Pad+ and the host is established.
The Connection Mode is set to be “data transfer” mode by default. By pressing the
editing button on the left of the tablet you can switch between editing and tablet
functions. (see Software Quick Start Guide)
Just recharging battery
You can switch to “recharge only” mode by tapping Menu/OK >
>
>
and
then connect the supplied USB between the tablet and a PC.
The battery charge icon will flash. The Digital Ink Pad+ can continue to be used
whilst charging.
The Connection Mode will be reset to “data transfer” mode when you connect the
Digital Ink Pad+ next time.
Using the Digital Ink Pad+ as a Tablet
Page | 19
Before using the Digital Ink Pad+ as a tablet, you must install the tablet driver.
Connecting the Digital Ink Pad+ to your PC
1. Power on your computer.
Press the power button of your computer to turn it on.
2. Connect the Digital Ink Pad+ to the computer.
Connect the mini connector of the USB cable into the Digital Ink Pad+, and then
connect the other end into the USB socket of the computer.
3. Tablet Active Area
In order to fit the 4:3 scale common display, the active area of the tablet is located at
rectangle area which is 15mm above of the control panel.
4. The Digital Ink Pad+ is detected by the computer.
You can tell the computer has correctly detected the Digital Ink Pad+ by the following
signals:
1) The LCD panel of the Digital Ink Pad+ is displaying icons as indicated on the right.
2) The icon
appears on the system tray of your PC desktop.
Defining tablet functions
When using the Digital Ink Pad+ as a tablet, various functions of the Digital Ink Pad+
Page | 20
can be defined in the tablet control panel.
1. Double-click the “USB Tablet” icon on the system tray.
Double-click on the “USB Tablet” icon to bring up the settings window.
2. Set unit and tracking mode.
Unit: You can select “inch” or 1 “cm” as the default unit.
Tracking mode: You can set the pointer tracking mode to “Pen” or ”Mouse”. In
“Pen” mode, absolute coordinates are used. In “Mouse” mode, you can use the digital
ink pen to move the pointer in the same way as using a mouse.
Page | 21
Page | 22
Page | 23
Page | 24
82-803w92030 v3.0
Page | 25