Transcript
Features of the Tutto Multi-Chain Tool
Fit Dial: The Fit Dial is used to adapt your Tutto Multi-Chain Tool to almost any modern chain.
The Fit Dial wheel has 4 anvil features. Inspecting closely you will find that each anvil feature
differs from the other in height or style. Each anvil is marked with a series of dots denoting which
setting is in use. A Fit Dial usage guide is laser etched on the Tutto handle for easy reference.
Each indexed setting is easily selected by rotating the Fit Dial.
Fit Dial 11 SPEED
9/10
SPEED
11 SPEED
PEEN
Tutto
Multi-Chain Tool
User Manual
1-8 SPEED
RPG: The RPG, or Retracting Pin Guide, is a multi-purpose feature found only on the Tutto
Multi-Chain Tool. First, the spring loaded RPG supports the pin up to the face of the chain
eliminating broken pins and ensuring perfect alignment every time. Second, for chains with guide
pins like Shimano® or Campagnolo®, the RPG encloses the guide pin to prevent loss, bending or
breakage, and ensuring perfect installation. Third, the RPG accepts the 11-Speed Peening Bit
required for installation of Campagnolo® 11-speed chains.
Guide Pin
Sheer Slot RPG Guide Pin Sheer Slot: For chains that use a guide pin for installation, the Guide Pin Sheer
www.pedros.com Slot provides an integrated tool to remove the guide section from installation pins. After pressing
the master pin into the chain, simply insert the guide section into the sheer slot and rotate the tool
up or down.
11-Speed
Peening Bit The Tutto Multi-Chain Tool is designed as a shop quality tool. The Tutto is easily adapted to most bicycle chains from single-speed to eleven-speed. This level of flexibility is
achieved through use of features such as the Fit Dial, RPG, and 11-Speed Peening Bit. While the tool is designed to be simple to use, it is important to understand a few
important usage details to prevent damage to the tool or chain. Depending on the chain you are working with, methods for installation, modification, or removal can differ
considerably. It is important to read and follow any guidelines provided by the chain manufacturer. The following instructions cover general guidelines for installing,
modifying, or removing the most common chain types using a Tutto Multi-Chain Tool.
Separating a chain with Tutto Multi-Chain Tool
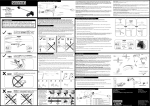
1 1. Identify chain size. Using thumb or finger, turn Fit
Dial to position corresponding with chain size. In
example, if working with 9-speed chain, the Fit Dial
would be set to position 2.
5.
2. Place chain onto bridge pressing downward lightly
on chain to ensure proper positioning. Most chains
should position snugly onto the bridge when set to
the corresponding Fit Dial position.*
3. When mounted correctly, the roller of the chain
should be bottomed onto bridge and Fit Dial anvil
should be coincident with outer plate of chain.
Installing Chain with Master Link/Installation Rivet
2 3 3. Continue turning until
rivet is fully removed.*
For chains using reusable rivets, make sure
to stop press before
rivet is fully removed.
2/3 5 6 This type of chain is assembled
using a special master pin made up
of a guide section and a rivet
section. Please read and follow any
manufacturer instructions when
installing this type of chain.
1. Insert master link into the chain.
Set Fit Dial.
2. Mount chain onto bridge as
described above. Ensure drive
screw is positioned to allow
master pin to pass RPG.
3. Turn drive knob clockwise
advancing drive screw assembly
forward and surrounding master
pin with RPG.
Campagnolo® 11-Speed Only: Flaring Master Rivet
2 1 3 Campagnolo® 11-Speed Chains
require extra installation steps.
These steps follow the 6 steps
described for “Installing Chain with
Master Link/Installation Rivet”
6mm HEX
1. Remove 11-Speed Peening Bit
from base of Handle by rotating
counter-clockwise using a 6mm
hex wrench,
4 5 X 1 2 3 4 *If front edge of drive screw
begins contacting chain, do
not continue turning. This
can damage bridge of tool.
Rivet Section Guide Section
4 How to Service Your Tutto Multi-Chain Tool
2. Turn drive knob
clockwise advancing
drive screw assembly
toward chain. RPG will
contact chain first
ensuring alignment and
pin support.
*In some instances, the sizing of a
chain of a given type, such as 9
speed, may differ between
manufacturers. It is important to
ensure proper fitment of chain
onto tool before moving forward
with installation, modification, or
removal of chain.
4. If mounting chain onto bridge requires significant
force or cannot be positioned correctly, remove
chain and adjust Fit Dial to next looser setting.
1 Similarly, if mounting
chain onto bridge is
loose and anvil is not
contacting outer plate of
chain, remove chain and
adjust Fit Dial to next
tighter setting.
ALL CHAINS
1. Set Fit Dial and mount
chain onto bridge.
Setting Fit Dial and Properly Mounting Chain
X 11-Speed Peening Bit: The 11-Speed Peening Bit is handily stored in the base of the Tutto
handle. This bit is used for Campagnolo® 11- speed chain installation which requires a peening
operation during installation of the chain rivet. The bit is easily removed from the handle and fits
onto the end of the RPG allowing installation of Campagnolo® 11- speed chains.
PN 6460340
Revision 1, 03/2011
©2011 Pedro’s Inc.
X Tutto Component List
2. Position 11-Speed Peening Bit onto
front tip of RPG as shown.
Ensure chain can be mounted onto
bridge without contacting 11Speed Peening Bit.
3. Rotate Fit Dial to position 4.
4. Continue turning drive
knob, pressing rivet
section of master pin
into chain. Rivet should
be centered between the
outer plates of the chain
when in final position.
5. Once rivet is pressed to
proper position, turn
drive knob counterclockwise to pull drive
screw assembly away
from chain. Remove
chain from bridge.
6 5 8 7 6. Bringing Tutto to other
side of chain, insert guide
section of master link
into Guide Pin Sheer
Slot. Rotate tool to
separate guide section
from rivet section.
4. Mount chain onto bridge.
Note orientation of
chain on bridge. The
side from which the
guide section was
removed should face 11Speed Peening Bit.
9 10 5. Turn drive knob
clockwise until
resistance increases.
Continue approximately
3/4 of a turn more to
peen master link.
6. Turn drive knob
counterclockwise until
11-Speed Peening Bit
clears face of chain.
Remove chain from
bridge. Remove 11Speed Peening Bit from
RPG. Return to handle.
The Pedro’s Tutto Multi-Chain Tool is designed to
be fully serviceable ensuring long service and high
performance. You will need the following items:
11mm Open-end Box Wrench
Combination Jaw Pliers
1.5mm Hex Wrench
Rag & Pedro’s Green Fizz
Pedro’s Go! or Chainj Lubricant
1.
Remove drive screw assembly from Tutto Main Body.
Set body portion aside. Position 11mm open-end box
wrench over two flats at base of Main Drive Screw.
2.
Holding Drive Knob, rotate wrench and knob against
each other counter-clockwise unthreading Main Drive
Screw from Drive Knob.
3.
Once unthreaded, remove wrench and pull drive screw
to remove. If RPG and return spring remain on pin, slide
off and set aside. If RPG and spring remain In drive
screw, push RPG rearward to remove. Be sure to
prevent loss of spring when removing RPG and spring.
4.
Using pliers, lightly grip Collar Nut and break free by
counter-clockwise rotation. Finish Collar Nut removal
by hand. Remove pin from Drive Knob
5.
With components disassembled, clean any contaminated
parts using rag and Pedro’s Green Fizz. Rinse with
water and let dry. Inspect each part for damage which
may impede proper function. Replace if damaged.
Liberally lubricate all threaded and sliding parts using a
low viscosity lubricant like Pedro’s Go! or Chainj.
6.
Begin reassembly of drive screw assembly. Insert pin
into Drive Knob. Slide Collar Nut over pin and thread
clockwise onto Drive Knob. Lightly tighten with pliers.
7.
Slide RPG and return spring over pin with spring
positioned between Collar Nut and RPG as shown.
8.
Insert partially assembled drive knob into rear of drive
screw and hand thread clockwise. Using 11mm openend wrench, tighten using moderate force. Check RPG
function to ensure components are properly assembled.
RPG should slide past tip of pin till coincidence with
opening of Main Drive Screw and should return freely.
9.
Set drive screw assembly aside. Taking body portion,
find Fit Dial Axle located centrally on front face of body.
Using a 1.5mm hex wrench, remove Fit Dial Axle by
unthreading counter-clockwise and pulling outward.
The Fit Dial can now be removed.*
10. With Fit Dial removed, clean cavity of Main Body and
surfaces of Fit Dial using rag and Pedro’s Green Fizz.
Rinse with water and let dry. Inspect each part for
damage which may impede proper function. Replace if
damaged. Liberally lubricate all threaded and sliding
parts using a low viscosity lubricant like Pedro’s Go! or
Chainj. Reinstall Fit Dial and axle tightening lightly with
1.5mm hex wrench. Check rotation and indexing of Fit
Dial to ensure proper installation.
*Fit Dial Index Bearing should be retained by Fit Dial Backer
Insert when Fit Dial is removed. However, it is suggested that
special attention be given to ensuring ball bearing remains in place
as Fit Dial is removed. It may be necessary to partially back out
M3x3.0mm Set Screw to remove preload from Fit Dial Index
Bearing Spring. Removal of Index Bearing or associated
components and Fit Dial Backer Insert is not recommended.
LIFETIME
WARRANTY
Visit pedros.com for details.
Tutto Multi-Chain Tool
PN 6460340
Made in Taiwan
Specifications subject to change without notice.
Pedro’s Inc.
147 Essex Street
Haverhill, MA 01832, USA
Tel: +1 978 657 7101
Svenska filialen till Sports
Adventures Intl. SA, Schweiz
Västra Granholmen,
185 99 Vaxholm, Sweden
Tel: +46 8 559 21 800
