1
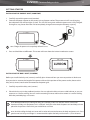
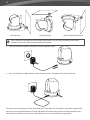
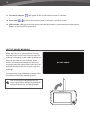
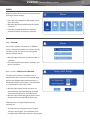
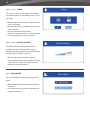
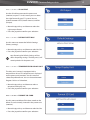
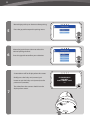
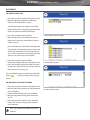
LUVION
Premium Baby products
SUPREME CONNECT
1
2
LUVION
Premium Baby products
instruction manual
3
4
instruction manual
TABLE OF CONTENTS
IntroDuction2
Safety Instructions2
Contents Of Package3
Accessories3
Overview Parent Unit (Monitor)
4
Overview Baby Unit (Camera)
7
Getting Started (InstallatioN&Setup)
9
Menu (Options&Settings)13
Pairing19
Playback21
Troubleshooting22
Technical Specifications23
INTRODUCTION
Thank you for purchasing the Luvion Supreme Connect. Now, you will be able to see and hear your baby (or even
more babies/children by using up to three additional camera’s) in and around the house.
Please keep the original dated sales receipt for your administration and proof of warranty. For service and warranty
issues, you will always be asked for a copy. For warranty issues, you may contact your Luvion dealer or your local
Luvion distributor. More information can be found on our website: www.luvion.com.
This user manual provides you with all information neccesary for a safe, pleasant, and easy use of the Luvion
Supreme Connect. Before use, we ask you to thoroughly read this user manual. We ask for your special attention for
the safety instructions below.
LUVION
Delft, The Netherlands
www. luvion.com
SAFETY INSTRUCTIONS
---------
Keep small parts away from children.
This product is not intended as a toy. Please refrain children from playing with the product.
This product is not intended as a substitute for adult supervision.
Only use the original supplied power chargers.
Do not use the product in humid conditions or nearby water.
Only use the product between 10°C - 35°C.
Always keep the camera and any cords of the power adapters at least 1,5 meter away from the baby.
Do not attempt to open the product yourself or you may void your warranty, please contact your local
dealer or distributor.
Batteries:
-- Fully charge the monitor before first use, to ensure an optimal battery capacity. The battery is fully
charged when the charging light, on the side of the monitor, turns green.
LUVION
5
Premium Baby products
CONTENTS OF PACKAGE
The system includes the following components:
- 1 x parent unit (monitor)
- 1 x baby unit (camera)
- 1 x power adapter for the parent unit
- 1 x power adapter for the baby unit
- 1x baby unit mounting frame
- 1 x wall plugs and screws
- 1 x RCA cable (TV-Out)
Check the package to confirm that you have received the complete system, including all components listed
above.
Baby Unit (Camera)
Parent Unit (Monitor)
Power Adapters
RCA Cable
ACCESSORIES
The following accessories are available for the Luvion Supreme Connect:
wi-fi cradle*
additional cameras
The Luvion Supreme Connect
WIFI Cradle enables you to
connect it to the internet. Now
you can view live video of
your child on your pc, laptop,
tablet and phone; anytime,
anywhere.
The Luvion Supreme Connect
supports the use of up to
four cameras. Now you can
monitor multiple children or
rooms at the same time.
*Available soon
Plugs, Screws
& Mounting Frame
6
OVERVIEW OF PARENT UNIT (MONITOR)
1
2
3
talk
4
ZooM
5
caM
6
Menu
7
8
9
front View
10
Back View
11
12
13
LUVION
7
Premium Baby products
1. Power LED - This LED indicates whether the parent unit is switched on. When the parent unit is switched
on, the Power LED will turn green. This LED will start blinking when the battery of the parent unit is
running low. Please use the included power adapter to recharge the battery.
2. Sound Bar - These LED’s indicate the level of sound detected by the baby unit. The amount of LED’s that
are lit up indicate the intensity of the detected sound. This enable you to keep an eye on the sound levels
within your child’s room, even when the sound of the parent unit is muted.
3. Screen - 4,3” TFT LCD Screen.
4. Talk button - Press this button to speak through the baby unit to your child. Wait before speaking until
the Talk icon
is displayed on the screen. You can increase the volume by using the volume button on
the baby unit. When multiple cameras are used, you will speak only through the baby unit that is being
displayed on the screen.
5. Zoom button - Press this button to zoom in on the video. The video will then be doubled in size. 2X will
appear on the screen. When the video is magnified, you can use the joystick to navigate to parts of the
video that are outside the range of the screen. Press zoom again to exit zoom mode.
note: It is not possible to move the baby unit lens with the joystick when the parent unit is zoomed in (2x is
displayed on the screen). Zoom out to change the position of the baby unit lens.
6. Cam button - Press the Cam button to switch between the different cameras connected to the parent
unit. The channel indicator identifies the different cameras.
7. Menu button - Use the Menu button to open the main menu. Use it in a menu to close a menu (or move
up a level) without saving any new settings.
8. Microphone - The sounds detected by this microphone will be transmitted to the baby
unit (camera) when the Talk button is pressed.
9. Joystick - Use the joystick to move the camera lens of the baby unit and within in the
menu to change a selection. Press the joystick to confirm a selection and to save your
setting.
TOP View
14
15
BOTTOM View
19
20
16
17
18
8
10. Battery compartment - Only replace the battery of your monitor with an authorized Luvion Supreme
Connect battery. Using a different battery will cause you to void your warranty.
11. Speaker - Produces the sound received from the connected baby unit. Use the volume buttons (27) to
decrease/increase the sound level.
12. Stand - You can use the stand to place the monitor in an upright position.
13. Reset button - Use a paperclip to press this button in the event of a frozen screen. You can then use the
on/off button to switch the parent unit back on.
14. Antenna - Sends & receives data to the baby unit.
15. On/Off button - Press and hold this button to switch the parent unit on/off. Briefly press this button
when the parent unit is on to go to the ‘sound-only mode’ (Turning off your screen to save battery).
16. Night light button - Our baby units are fitted with a special night light to comfort your child. Press the
‘ ’-Button to remotely (de-)activate the night light of the baby unit (When multiple baby units are in use,
the night light of the unit of which the video is currently displayed on the screen is controlled). The night
light icon ( ’) will appear on the screen when the night light of the baby unit is activated.
17. Record button - Use this button to capture a video recording. A micro SD-card (see 30, page 7) is
required to capture a recording. When activated, the recording icon will now appear on the screen.
18. Snapshot button - Use this button to make a snapshot of the video. An SD card is required before any
snaphots can be taken (see 30, page 7).
21
27
22
23
28
24
29
25
30
26
SIDE View
SIDE View
19. Wi-fi Cradle connectors - Ensures that the parent unit will be correctly placed on the optional Wi-fi
Cradle.
20. Mini USB port - Connects to the optional Wi-fi cradle.
21. Lock button - Locks the frontal touch interface on the front of the parent unit (monitor) to prevent
accidental changes within settings. A lock icon is begin displayed when active.
22. Quad/Auto button - The baby monitor is equipped with a quad-camera function. This
function enables you to simultaneously observe 4 baby units (cameras). Press once to
activate. Press again to auto-switch between connected baby units every 3 seconds.
LUVION
9
Premium Baby products
note: There is no sound available within quad mode.
23. AV-Out - The Audio / Video socket enables you to connect the parent unit to an analog connection on
your television set. An RCA cable is included.
24. Service-Port - Connects the parent unit to your computer with an USB cable for firmware updates.
25. Power input - Input for the included Luvion power adapter 5V-1.0A.
26. Charging LED - Becomes red to indicate when the built-in battery is being charged. Once fully charged,
the LED will turn green.
5V 1.5A
27. Volume button - Increase/decrease the volume of the parent unit speaker.
28. Play/Pause / - Play/Stop a lullaby, the unit will automatically play through all lullabies.
29. Next Song button - Skips to the next lullaby.
30. Micro SD Slot - Insert a Micro SD card (Not included) in this slot to enable the recording and snapshot
functions. The parent unit supports Micro SD cards with memory up to 32 GB.
OVERVIEW OF BABY UNIT (MONITOR)
7
2
3
6
4
1
LUVION
8
5
FRONT View
1.
2.
3.
4.
5.
6.
7.
8.
9.
BACK View
Temperature sensor - The measured ambient temperature is displayed on the screen of the parent unit.
Light Sensor - Allows the baby unit to correct itself under changing light conditions.
5m
Camera lens - Detects the visual environment and sends this to the parent unit.
Microphone - Detects sound and sends this to the parent unit.
Speaker - Enables the ability to talk to your child over distance.
IR LED’s - Allows for 10m distance of night vision, automatically activates within low lights conditions.
Antenna - Sends data to and receives data from the parent unit.
5V 1.5A
Power input - Input for the Luvion power adapter 5V 1.0A.
Volume - Rotary wheel to increase/decrease the volume produce form the baby unit speaker. This
10
12
13
14
PAIR
11
9
10
side View
bottom View
function only affects the baby unit, e.g. the svolume of playing lullabies or the talk back function.
10. On/Off button - Press and hold to switch the baby unit on/off.
11. Power LED (Green) - Indicates whether the baby unit is operational.
12. Mounting frame connectors - Connects the baby unit to the included mounting frame, which can be
attached to a wall or ceiling.
13. Ceiling mounting switch - Flips the image of the video upside down. Enable this switch in case when the
baby unit is mounted upside down, e.g. on a ceiling.
14. Pairing button - Establishes a new connection between the baby and parent unit during the pairing
process. Pairing should be used when installing an additional camera or when the monitor does not
recognize the baby unit (‘Buiten Bereik’). Consult page 19 for more information on the pairing process.
LUVION
Premium Baby products
11
GETTING STARTED
Installing the parent unit (MONITOR)
1. Carefully unpack the parent unit (monitor).
2. Connect the power adapter to the parent unit and power socket. The parent unit will start charging;
the indication LED will now light up (red). This LED will turn green when the parent unit is fully charged.
During first use, please allow the unit to completely charge to ensure optimal battery capacity.
note: Charge the parent unit completely before first use.
3. Press and hold the on/off button. The screen will now show the Luvion introduction screen.
lUViON
Installing the baby unit (CAMERA)
Before you install the baby unit (camera), carefully plan where and how you want to position it. Make sure
that you take in account the length of the power cable and the position of the power socket, because the
baby unit (camera) needs to be connected to the power grid.
1. Carefully unpack the baby unit (camera).
2. Place the baby unit in the preferred position. You can place the baby unit on a table/cabinet, or you can
mount it on a wall or ceiling. You can use the mounting frame to mount the camera on a wall or ceiling.
With the provided plugs and screws.
note: Before permanently installing the baby unit (camera), make sure that the wireless connection
between the baby unit and parent unit is sufficient. Verify this when both the parent unit and baby unit are
placed in the positions from which you would like to use them.
note:
Avoid installing the baby unit near walls or other obstruction between the baby and parent unit. For a
good sound sensitivity and image it is recommended to place the baby unit between a 1,5-3m distance .
12
Wall mounted
Ceiling mounted
Wall mounted (upside down)
note: If you mount the baby unit on the ceiling (upside down), use the Ceiling mounting switch at the
bottom of the camera to flip the video image of the camera.
3. Connect the power adapter to the baby unit and a power socket.
4. Press and hold the on/off button to switch the baby unit on. The power LED will now light up.
The parent unit will display the video of the baby unit, when both are switched on and within range of each
other. The message “Buiten Bereik” will be displayed on the screen of the parent unit when the baby unit is
outside the range of the parent unit or when the baby unit is not switched on or recognized.
LUVION
13
Premium Baby products
USING THE SYSTEM
The video of the baby unit will be displayed
on the screen of the parent unit when both
are switched on. The icons on the screen are
explained below.
1. Signal indicator
The signal
indicator shows the strength of the
connection between units. no bars
indicate a poor signal and 4 bars
indicate the strongest signal (see table).
11
2. Overwrite
indicator; when you have
selected “yes” for the SD-card overwrite
function. The icon will be displayed on
the screen.
3. Channel indicator
The channel
indicator displays the current channel.
Press the CAM button (page 4) to switch
between the different channels.
4. SD card indicator
The SD icon will
appear when an SD card has been
properly inserted in the SD slot of the parent
unit.
1
2
3
4
5
6
7
8
9
10
12
Signal strength
13
14
15
Indicator Warning
Perfect
None
Good
None
Fair
None
Low
Out of range
No Signal
Out of range
The SD icon will start to flash on screen when the SD card is full.
5. Full SD card indicator
New file indicator
This icon will appear and flicker when a new video has been recorded but has not
yet been watched.
6. Temperature indicator Displays the temperature measured by the baby unit.
7. Night light indicator
8. Battery indicator
Is being displayed when the night light on the baby unit is activated.
Indicates the battery life of the parent unit.
9. Zoom indicator Indicates that the video from the baby unit is zoomed in.
10. Talk indicator
Appears when the talk button is pressed. You can now talk through the baby unit.
11. Sound indicator
When the volume has been decreased to mute, the mute icon will be displayed on
the screen. Press the volume button to increase the volume.
12. Lullaby indicator
When the play lullaby button is pressed the lullaby indicator is displayed on the
screen. Press next to switch between songs.
14
13. Time alarm indicator
14. Alarm time
Will appear on the screen when the timer is activated.
Displays the remaining time (in minutes) until alarm sounds
15. Lock indicator Will appear on the screen when the lock button is pressed to deactivate the touch
buttons at the front of the parent unit.
OUT OF RANGE WARNING
When the baby unit is positioned too far away
from the parent unit, the warning message “Out
of Range” will appear on the screen of the parent
unit and the video will start to flicker. When
there is no connection between the baby and
the parent unit, the screen of the parent unit will
be black and display the warning message “Out
of Range”.
To improve the range of the baby monitor, move
the antenna of the baby monitor upwards.
note:
If moving the baby and parent unit
closer together does not help, try pairing the
baby and parent unit. see Pairing chapter.
Out of Range
LUVION
Premium Baby products
MENU
Open the menu of the Luvion Supreme Connect
to change device settings.
>> Press the menu button on the parent unit to
open the menu.
>> Move the joystick to the left/right to select a
submenu.
>> Press the Joystick to confirm a selection,
marked dark blue, and open a submenu.
menu
> alarm
The Luvion Supreme Connect has 2 different
alarms, a temperature alert and a timer. Use this
submenu to set an alarm and to change the
volume of these alarms.
>> Move the joystick to the up/down to select a
submenu.
>> Press the Joystick to confirm a selection, and
open a submenu.
menu
> alarm > TemP. alert range
The baby unit (camera) is equipped with a
temperature sensor. You can set a temperature
alert to get notified when the temperature is
either too cold/hot. This feature is not intended
as a substitute for adult supervision.
>> Move the joystick to the up and down to
move between Low Temperature and High
Temperature and the On and Off buttons.
>> Move the joystick to the right to increase the
temperature and to the left to decrease it.
When the Low and High Temperature are
correctly set:
>> To set the alarm navigate to the On button
and press the joystick. To turn off the alarm
navigate to the Off button and press the joystick.
15
16
menu
> alarm > Timer
You can set a timer on the parent unit to help
you remind baby nap and feeding times. To set
the timer:
>> Move the joystick to the left or right to select
hours or minutes.
>> Move the joystick up and down to adjust the
hours/minutes.
>> Press the joystick to set the time.
>> Select ‘On’ to start the timer and ‘Off’ to stop it.
>> Press the joystick to save your settings.
menu
> alarm > Alarm Volume
The Alarm Volume sets the volume of the
Temperature Alert and Timer. This volume
setting will also change the volume of the beep
you hear when a button is pressed.
>> Move the joystick to the left or right to
increase/decrease the alarm volume. To mute,
empty the bars all the way down. Press the
joystick to save your setting.
menu
> RECORDING
You can change the recording settings in this
menu.
>> Move the joystick to the up/down to select a
submenu.
>> Press the Joystick to confirm a selection and
to open a submenu.
LUVION
menu
Premium Baby products
> recording > VIDEO QUALITY
You can set the resolution of the recorded
videos in this menu. There are two options: For
TV and For Baby Monitor. Unless connected to
an HD, refrain to the ‘For Baby Monitor’-option.
>> Move the joystick up and down to select the
preferred quality.
>> Press the joystick to confirm your selection.
menu
> recording > FILE OVERWRITE
You can overwrite earlier recorded files when
the memory SD card is full.
>> Move the joystick up and down to select Yes/
No.
>> Press the joystick to confirm your selection.
note: When the overwrite function is
enabled the overwrite icon
on the screen.
menu
will appear
> setup
You can change the camera (baby monitor)
setup in this menu.
>> Move the joystick to the up/down to select a
submenu.
>> Press the Joystick to confirm a selection and
to open a submenu.
menu
> setup > Brightness
You can change the brightness of the baby unit
video in this menu. When the image of the
video is too dark, try to increase the brightness.
The minimum Brightness is no bars and the
maximum Brightness is 5 bars.
>> Move the joystick to the left or right to
increase/decrease the brightness.
>> Press the joystick to confirm your setting.
17
18
menu
> setup > pairing
You can use the pairing function to restore the
connection/or make a new connection between
the baby unit and parent unit. It also enables
you to connect additional baby units to the
parent unit. For more info see page 19.
>> Move the joystick up or down to change the
camera channel you would like to pair.
>> Press the joystick to confirm your selection.
>> The parent unit will count down. Briefly press
the pair button on the baby unit during this
time.
note: It is highly recommended to pair
the baby units to the parent unit before
permanently mounting them.
menu
> SETTINGS
You can change the settings in this menu.
>> Move the joystick to the up/down/left/right
to select a submenu.
>> Press the Joystick to confirm a selection and
to open a submenu.
LUVION
menu
Premium Baby products
> settings > Av output
Use the AV cable to connect the parent unit
(monitor) to your TV. In this menu you can select
the right format for your TV system. You can
choose between NTSC (North America) and PAL
(Europe).
>> Move the joystick up and down to select the
right output format.
>> Press the joystick to confirm your selection.
menu
> settings > Default settings
Use this menu to restore the Default Settings
(factory settings).
>> Move the joystick up and down to select Yes/No.
>> Press the joystick to confirm your selection.
note: Restoring the Default Settings will not
affect the pairing settings. The baby unit(s) will
remain paired with the parent unit.
menu
> settings > temperature display unit
The baby unit (camera) is equipped with a
temperature sensor. This temperature is displayed
on the parent unit (monitor). Use this menu to
select the preferred unit. You can choose between
Degrees Celsius or Fahrenheit.
>> Move the joystick up and down to select a
temperature display unit
>> Press the joystick to confirm your selection.
menu
> settings > format sd card
Use this menu to delete all the data stored on the
Micro SD card currently inserted in the parent unit
(monitor).
>> Move the joystick up and down to select Yes/No.
>> Press the joystick to confirm your selection.
19
20
menu
> settings > date & time
The Date & Time are used to name recorded
videos.
>> Move the joystick left and right to select an
input field.
>> Move the joystick up and down to change the
value of the input field.
>> Press the joystick to confirm your selection.
menu
> settings > language
The default language of the menus of the parent
unit is English. However, Dutch and French are
also available. Use this menu to change the
menu language.
>> Move the joystick up and down to select a
language.
>> Press the joystick to confirm your selection.
menu
> POWER SAvE
The Power Save mode is a battery-conserving
function that turns off the screen of the parent
unit when the camera has not detected any loud
sound for 3 minutes. When sound is detected,
the parent unit will turn back on.
>> Move the joystick up and down to select
On/Off.
>> Press the joystick to confirm your selection.
LUVION
Premium Baby products
21
PAIRING
Use the Pairing function to connect a baby unit (camera) to the parent unit (monitor). Up to 4 baby units can
be connected to the monitor. They need to be paired on a different channel.
1
Switch the baby unit (camera)
on by holding down the power
button until the Power LED turns
green .
Hold and press the On/Off button to switch
the parent unit (monitor) on.
2
lUViON
Press the menu button
3
Move the joystick to the left or right to
select setup.
4
Press the joystick to open the setup menu.
22
Move the joystick up or down to select pairing.
5
Press the joystick to open the pairing menu.
Move the joystick up or down to select the
desired pairing channel.
6
Press the joystick to confirm your selection.
A countdown will be displayed on the screen.
Briefly press the baby unit (camera) pair
button to pair the baby unit (camera) to the
parent unit (monitor).
7
PLEASE PRESS
PAIR KEY
ON CAMERA SIDE
12
The video from the camera should now be
displayed on screen.
IR
PA
LUVION
Premium Baby products
PLAYBACK
to view your files
>> Press the joystick to enter the Playback menu
>> Move the joystick up/down to select the
VIDEO or PICTURE folders. (img. I)
All recorded videos are stored in the VIDEO
folder. While all the snapshots that have been
taken are stored in the PICTURE folder.
>> Press the joystick to open a folder.
>> Move the joystick up and down to select a
folder from which you would like to see the
videos. (img. II)
I: Select Video or Picture folder
note:
The folders are named by month/day/year
For example a file named 02042013 means that
the file was created on the 4th of February (02)
2013. Photos and videos are named by the time
(hhmmss) at which they were recorded.
>> Press the joystick to open a folder.
>> Select the video/photo you would like to see.
>> Press the joystick to play the video/show the
photo. Press right to fast forward the video, or
left to rewind it. (see img. III)
II: Select folder by date
Press the MENU button to go back to the folder.
Select
and press the joystick to go up
a level.
to delete files and folders
>> Press the joystick to enter the Playback menu.
>> Move the joystick up/down to move between
files and folders.
>> Select the file of folder you wish to delete.
>> Move the joystick to the right to select the
red “X”.
>> Press the joystick to confirm your selection.
>> Select Yes and press the joystick to delete
your selection.
note: The Video/Picture folders cannot be
deleted.
III: Select video by time
23
24
Troubleshooting
If you have any problems with the Luvion Supreme Connect, there is often a quick and simple solution.
Please try the following:
Problem
Solution
No video from the baby
unit
1. Check the power supply of the baby unit. Make sure the power
adapter is plugged in and the green power LED is switched on.
2. Make sure that the parent unit is switched on.
3. Make sure that the baby unit is in range of the parent unit.
4. Make sure that the parent unit is not in the audio only mode (press
the power button shortly to exit the audio only mode)
5. Make sure that the parent unit is not in the power save mode. Go to
menu > power save and switch the power save mode off.
The video is dropping/
I have a constant low
reception/“Buiten Bereik”
message
1. Move the baby unit closer to the parent unit.
2. Try repositioning the baby and/or parent unit (away from walls) to
improve the reception.
3. Place the antenna of the parent unit in the upright position.
4. (re-)Pair the parent unit with the baby unit (see pairing chapter)
Audio problems
1. Make sure that the volume on the parent unit is not muted. Press the
+ volume button on the parent unit to increase the volume.
2. Make sure that there is sound within range of the baby unit
microphone.
3. If the unit emits a loud, screeching noise, move the baby and parent
unit further apart.
The video is or has become
choppy
The video may become choppy when a lower frame rate is experienced
(i.e. 10 frames per second instead of 20 frames per second).
1. Try moving the baby unit closer to the parent unit.
2. Remove obstructions between the baby and parent unit.
3. Place the antenna of the parent unit in the upright position.
The battery of the parent
unit runs out very fast
Use the power save mode or replace the battery with an official one.
Official batteries can be acquired at your local luvion dealer.
The screen is frozen and I
can’t use the on/off button
to switch off the parent
unit.
Use the reset button located at the back of the parent unit to switch of
the parent unit. You can use the on/off button to switch it back on.
The image is upside down
Use the videoswitch on the bottom of the camera unit to flip the image.
(see Overview baby unit).
LUVION
Premium Baby products
TECHNICAL SPECIFICATIONS
General Specifications
Operating Frequency Range
2.400 MHz ~ 2.483,5 MHz
Transmitting Power
15 dBm Max
Receiving Sensitivity
-81 dBm
Type of Spread Spectrum
FHSS 39 Channels
Type of Modulation
GSFK
Data Rate
2 Mbps
Transmitting Distance
300 m (Line of Sight)
Baby unit (camera)
Image Sensor Type
1/6” v 7660 Color CMOS Image Sensor
Effective Pixels
H: 640 px, V: 480 px
Image Resolution/Frame Rate
20 fps
White Balance
Auto
Lens
3.0 mm, F 2.8
Field of View
60°
IR On/Off
15-25 Lux Off, 5-15 Lux On
IR LED Type/Night Vision
850 nm / 5 m
Speaker Output
0.5 W Max
Power Requirement
5 Vdc +/- 10%
Power Consumption
600mA +/- 20mA
Operating Temperature Range
- 10° ~ 40°
Operating Humidity Range
80% HR
Environment Rating
N/A (for indoor use only)
Dimensions
72*46*41 mm
Regulation Compliance
FCC/CE
Camera Housing Material
Plastic
Motory Type
Stepping motor
Moving Angle
Up 90° Down 20° Left/Right 135°
25
26
Parent unit (monitor)
LCD Panel Size
4,3“ / 10,9 cm
LCD Resolution
H: 480 px, V: 272 px
Viewing Angle
H: 150° V: 130°
A/V Out Resolution
CCIR656 YUV640
Power Requirement
5 Vdc 1.5A +/- 5 %
Power Consumption
360mA
Operating Temperature
- 10° ~ 40°
Operating Humidity
0% ~ 85%
LUVION
Premium Baby products
27
28
Luvion Premium Baby products
Visit us at:
www. Luvion.com
v. 201309