Download here - my Writing Portfolio
Transcript
HandyB HandyBot Well Well-Designed Designed to Save Time Owner’s Manual Quick Start Steps Safety Tips Indoor & Outdoor Out Tasks Advanced Options Custom Scheduling Answers to FAQ Faith Iverson, J McCarty-Bell, Bell, Sinthu Selvan, Sherry Pace, Tanade Mohamed, Rachael Sewell 7/23/2013 HandyBot Owner’s Manual 2013 CONTENTS Parts Diagram ................................................................................................................................................................3 HandyBot Parts & Supplies: .....................................................................................................................................3 Welcome ........................................................................................................................................................................4 Register Now .............................................................................................................................................................4 Getting Started ..............................................................................................................................................................4 System Requirements ...............................................................................................................................................4 Initial Setup ...............................................................................................................................................................4 Control Panel ............................................................................................................................................................4 Outdoor Tasks ................................................................................................................................................................5 Initial Outdoor Setup ................................................................................................................................................5 Quick Start for Outdoor Tasks...................................................................................................................................5 Advanced Outdoor Settings ......................................................................................................................................5 Custom Mowing with Edging Option ...................................................................................................................5 Custom Watering with Fertilizing Option.............................................................................................................5 Indoor Tasks...................................................................................................................................................................6 Quick Start for Indoor Tasks......................................................................................................................................6 Advanced Indoor Settings .........................................................................................................................................6 Custom Shampooing & Mopping .........................................................................................................................6 Custom Vacuuming ..............................................................................................................................................6 Scheduling Tasks ............................................................................................................................................................6 Maintenance .................................................................................................................................................................7 Battery Charging .......................................................................................................................................................7 Detailed Instructions for Self-Clean & Water Refill ..................................................................................................7 HandyBot Maintenance Chart .......................................................................................................................................8 Warranty Information ...................................................................................................................................................9 Frequently Asked Questions ..........................................................................................................................................9 Conclusion .....................................................................................................................................................................9 Index ..........................................................................................................................................................................10 This document was completed as the final requirement for the Fundamentals of Technical Writing course at Bellevue College, Summer, 2013. 2 HandyBot Owner’s Manual 2013 PARTS DIAGRAM Upper Sensor Array and multi-color alert strobe Telescoping Shoulders Control Panel (see Figure 2 for more Fertilizer Storage Water Input Valve Super Sprinkler (SS) Guard and Lower Sensor Array Docking Port (DP) Power Cord FIGURE 1 – HANDYBOT PARTS DIAGRAM HANDYBOT PARTS & SUPPLIES: Upper Sensor Array & Multi-Color Alert Strobe Control Panel (removable) Super Sprinkler (removable) Docking Port with 4 ft Power Cord Telescoping Shoulders Fertilizer Storage Water Input Valve Guard & Lower Sensor Array Cleaner Tank (located underneath) High Efficiency Particulate Air (HEPA) Filter HandyBot Performance Plus Oil, 12 oz bottle HandyBot Concentrated Fertilizer: Lawn & Plants Boundary Wire, 6000 ft NOTES ON USE: flashes to indicate errors or maintenance controls HandyBot’s tasks and displays information waters efficiently and distribute fertilizer charges and stores HandyBot keep HandyBot stable stores fertilizer attaches to water hose senses obstacles stores cleaning fluid (not shown on diagram) captures dust during indoor tasks lubricates HandyBot's moving parts refills Fertilizer Storage and nourishes lawn & garden marks perimeters of tasks 3 HandyBot Owner’s Manual 2013 WELCOME Thank you for choosing HandyBot. This manual contains instructions for safe and efficient HandyBot use. Let this information be your guide to spending less time on chores around your home. Please take a moment to become a registered HandyBot user. Registration activates your warranty and gives you access to additional HandyBot tasks. REGISTER NOW www.HandyBot.com/register GETTING STARTED Start here for first-time operation. Refer to the parts shown in Figure 1 as you learn to use HandyBot. SYSTEM REQUIREMENTS Docking Port area, at least 24 by 24 in., sheltered from rain with unobstructed access (Recommended DP areas include garages, patios, laundry rooms, and mud rooms.) 120 volt receptacle within 4 ft of DP Draining area, a surface that can accommodate water mixed with grass clippings and vacuum waste (A yard, plant bed, or sewage drain is ideal.) Water hose, long enough to reach the draining area while attached to a water supply INITIAL SETUP HandyBot comes fully assembled, charged, and prefilled for fast setup. Follow these steps for first-time use: 1. 2. 3. 4. Remove HandyBot and its docking port from the packing box. Place HandyBot upright in the selected DP area. Plug the DP into the selected 120 V receptacle. Power-on by pressing the Stop/Resume button on the HandyBot Control Panel: . CONTROL PANEL HandyBot has a removable Control Panel, Figure 2. To use, firmly press buttons in order as this manual shows. FIGURE 2 – HANDYBOT CONTROL PANEL IN MAIN MENU MODE 4 
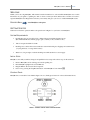
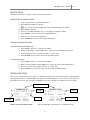
HandyBot Owner’s Manual OUTDOOR TASKS HandyBot cares for your yard with: • • • • • • Boundary wire installed on the ground for safe and accurate perimeters Sharp blades that mow grass to the desired height Outdoor wheels that easily move over most terrain Precise edging options while mowing that reach beyond the wheels Super Sprinkler that does the work of many sprinklers and drippers Fertilizer that can be applied while watering and selected by plant type INITIAL OUTDOOR SETUP 1. 2. 3. Attach the boundary wire firmly to the ground on HandyBot’s outdoor perimeter. Move HandyBot inside the boundary wire. For watering and fertilizing, connect the SS to front ring as shown in Figure 1. QUICK START FOR OUTDOOR TASKS 1. 2. 3. 4. 5. 6. Power-on by pressing the Stop/Resume button on the HandyBot Control Panel. Press> B-outdoor to reach the Outdoor Menu from the Main Menu. Select> A-mowing, B-weeding, or C-watering from the Outdoor Menu. Press> ENTER to select task and view the Task Schedule Menu. Press> A-now on the Task Schedule Menu. Press> ENTER: The selected outdoor task will begin immediately. ADVANCED OUTDOOR SETTINGS CUSTOM MOWING WITH EDGING OPTION 1. 2. 3. 4. 5. Press> MENU> B-outdoor to view the Outdoor Menu. Hold down A-mowing with the MENU key to display the Custom Mowing Options. Select >A-1in., B-1 ½ in., or C-2 in. to adjust the desired lawn height. Press> D to switch between EDGING ON and EDGING OFF. Press> ENTER: Your selections will become the default mowing settings. CUSTOM WATERING WITH F ERTILIZING OPTION 1. 2. 3. 4. 5. Press> MENU> B-outdoor to view the Outdoor Menu. Hold down C-watering with the MENU key to display the Custom Watering Options. Select>A-lawn or C-garden or both to customize watering area. Press> D to switch between FERTILIZER ON and FERTILIZER OFF. Press>ENTER: Your selections will become the default watering settings. 5 2013 HandyBot Owner’s Manual 2013 INDOOR TASKS HandyBot vacuums floors, shampoos carpet, and mops hard surfaces. QUICK START FOR INDOOR TASKS 1. 2. 3. 4. 5. 6. 7. 8. Setup a task perimeter using the boundary wires. Move HandyBot within the perimeter. Power-on by pressing the Stop/Resume button on the HandyBot Control Panel. Press> MENU> A-indoor. Select> A-vacuuming, B-shampooing, or C-mopping from the Indoor Menu. Press>ENTER to select task and view Task Schedule Menu. Press>A-now on the Task Schedule Menu. Press> ENTER: The selected task will begin immediately. ADVANCED INDOOR SETTINGS CUSTOM SHAMPOOING & MOPPING 1. Press> MENU> A-indoor to view the Indoor Menu. 2. Hold down B-shampoo with the MENU key to display the Custom Shampooing Options. 3. Select the agitation level> A-gentle, B-normal, or C-heavy duty. 4. Press> ENTER: Your selections will become the default settings. CUSTOM VACUUMING 1. Press> MENU> A-indoor to view the Indoor Menu. 2. Hold down A-vacuuming with the MENU key to display the Custom Vacuuming Options. 3. Choose the suction level> A-light, B-normal, or C-heavy duty. 4. Press> ENTER: Your selections will become the default vacuuming settings. SCHEDULING TASKS After a task is selected in the Indoor, Outdoor, or Maintenance Menu, the Control Panel displays a Schedule Menu. Pressing> D-schedule from the Main Menu also displays the Schedule Menu for the last task viewed. In addition to the Quick Start (>A-now) option used above, HandyBot tasks can be scheduled* by >B-time and >C-date menus: Title = Menu & Task Set Min. Start/End FIGURE 3- TIME and DATE SCHEDULE MENUS Set Day AM/PM Save Schedule *Visit www.HandyBot.com/schedule for a scheduling tutorial. 6 HandyBot Owner’s Manual 2013 MAINTENANCE Regular care will ensure that HandyBot performs at its best and lasts for years to come. HandyBot automatically calculates a maintenance schedule based on use and sensors. The strobe flashes when HandyBot’s condition, task hours, or task distances indicate that maintenance is required. The control panel displays the recommended maintenance task. Most maintenance tasks include some simple manual steps. Refer to the Maintenance Table on the next page for task details and directions. BATTERY CHARGING Unlike the tasks in the Maintenance Table, battery charging is part of HandyBot’s routine operation. HandyBot can operate for 12 hours on a full charge, but automatically returns to the DP to recharge whenever possible. To extend battery life, HandyBot should connect to the DP for at least of 8 hours per day. When the battery charge is too low to complete a task the strobe will flash and the Control Panel will alert you to allow recharging in the DP. DETAILED INSTRUCTIONS FOR SELF-CLEAN & WATER REFILL The most common maintenance tasks are Self-Clean and Water Refill. They can be completed together or separately. Both require the following steps: 1. Move HandyBot to the selected draining area. 2. Secure a water hose to the Water Input Valve. 3. Turn the water on. HandyBot automatically stops the flow when the cleaning and/or refill completes. 4. power-on >MENU > C-maintenance > A-self clean and/or C-water > ENTER >A-now 5. When the Strobe flashes and the Control Panel displays TURN WATER OFF, turn the water source off. 6. Slowly detach the hose from HandyBot. Some water may be released in the draining area during this step. Self-Clean and Water Refill will finish in less than 15 minutes. You do not need to remain nearby. HandyBot can wait for your return when the maintenance is done. 7 HandyBot Owner’s Manual 2013 HANDYBOT MAINTENANCE CHART Maintenance Task Self-Clean What is done? Removes debris from interior systems & cleans outdoor wheels Preparation Frequency Time Needed 1. Move to DA 2. Attach hose 3. Turn water on After completing preparation steps*: Weekly or as needed 10 min. Provides water for HandyBot tasks 2. Attach hose Weekly or as needed < 5 min. MENU> C-maintenance> C-water refill >ENTER>A-now As needed < 5 min. Wipe surface & base with damp cloth Every 7 acres or as needed 30 min. 3. Turn water on Exterior Cleaning Outside surfaces are cleaned Blade Care Sharpens, balances and tightens mower & edge trimming blades as needed. Fertilizer Refill Provides the desired fertilizer for your plants HandyBot Concentrated Fertilizer Cleaner Refill Provides a universal cleaning solution for Indoor & Outdoor tasks Dawn® dish detergent, Filter Change Replaces the HEPA filter used during indoor tasks Oil Change Replaces the oil used to lubricate HandyBot’s moving parts. Restore All Settings Resets all options to initial default values Moisten a clean cloth None, Note: This task is loud. non-sudsing ammonia HandyBot HEPA Filter HandyBot Performance Plus Oil None MENU> C-maintenance> A-self-clean >ENTER>A-now After completing preparation steps*: 1. Move to DA Water Refill Instructions As needed As needed Every 3 months or as needed MENU> C-maintenance > B-blades > ENTER> A-now < 2 min. 1. Turn HandyBot off 2. Open the fertilizer storage lid 3. Fill with HBC fertilizer to the line 4. Close the lid securely < 2 min. 1. Turn HandyBot off 2. Open the cleaner tank lid 3. Add equal parts Dawn & ammonia 4. Close the lid securely 5 min. 1. Turn HandyBot off 2. Remove filter cover 3. Remove used filter 4. Insert clean filter 5. Replace filter cover Pour 2-3 tsp. oil along HandyBot’s telescoping shoulders then press: Annually 30 min. MENU> C-maintenance> D-oil > ENTER> A-now As needed <1 min. MENU> C-maintenance> hold down both A&D while pressing ENTER *See previous page for more detailed instructions, including the option to combine Self-Clean and Water Refill. 8 HandyBot Owner’s Manual 2013 WARRANTY INFORMATION HandyBot is covered by a 3-year unlimited warranty from date of purchase when used in accordance with the guidelines published in the HandyBot User Manual. www.HandyBot.com/register To activate the warranty, register now: FREQUENTLY ASKED QUESTIONS Q. How does the HandyBot navigate and avoid crashes? Handybot uses a stereoscopic vision system in its Upper Sensor Array to track its path. The HandyBot uses the Global Positioning System (GPS) to control its location. A built-in crash sensor prevents collisions with walls, furniture, and other obstacles. Q. Is HandyBot safe around children and animals? Yes. When doing tasks, HandyBot detects and avoids people, pets and wildlife. If a person or animal comes too close, HandyBot will flash its strobe, back away, and pause until the area is clear. Q. Is HandyBot waterproof? No. HandyBot is water resistant, but not entirely waterproof. HandyBot should never be submerged in water. Use the boundary wire to exclude any water features from the task area. Exposure to heavy rain or high pressure water spray may result in more frequent maintenance alerts. Q. Can HandyBot handle stairs, inclines, and drop-offs? Yes. HandyBot can move on slopes of any nonvertical angle. In addition, HandyBot can step up or down abrupt vertical changes of 4 feet or less. Use the boundary wires to protect HandyBot from any drop-offs greater than 4 ft. Larges changes of elevation during a task will deplete HandyBot’s battery more rapidly. Q: Will HandyBot track dirt into my home after doing outdoor work? No. HandyBot uses one set of wheels for indoors and another for outdoors. When switching to indoor tasks, the outdoor wheels retract into sealed compartments, and the indoor wheels emerge. The Self-Clean maintenance task cleans the outdoor wheels as needed. CONCLUSION We sincerely hope that your HandyBot provides you with many years of excellent and reliable service. If you have questions or comments about HandyBot, please contact us at [email protected] . For support tips, upgrade options, and information about accessories or additional HandyBot features, visit: www.HandyBot.com 9 HandyBot Owner’s Manual 2013 INDEX Accessories. See Parts Animals, 8 Barrier. See Bondary wire Battery, 6, 8 Boundary wire, 2, 4, 7, 8 Calendar, 5 Carpet, 5 Cats, 8 Caution. See Safety Charging, 6 Children, 8 Clean, 7 Cleaner tank, 2, 7 Cleaning, 6, 7 Cliffs, 8 Control Panel, 2, 3–5, 6 Cord, power, 2, 3 Danger. See Safety Days, 5 Dirt, 8 Docking Port (DP), 2, 3, 6 Dogs, 8 Draining Area, 3, 6 Dull blades, 7 Edging, 4 Equipment, 2 Filter, 2, 7 Flashing. See Strobe Floors, 5 Garden, 4 Grass, 4 Guarantee, 8 Hazards. See Safety Height, grass, 4 Help, 8 Holes, 8 Inclines, 8 Kids. See Children Lawn, 4, 8 Light. See Strobe, See Lubrication, 7 Maintenance, 6–7 Mopping, 5 Mowing, 4, 8 Mud, 8 Navigation, 8 Noise, 7 Obstacles, 8 Oil Change, 7 Outlet, 3 Parts, 2, 3, 7, 8 Perimeter, 4, 5 Pets, 8 Pond, 8 Pool, 8 Power, 6 Rain, 8 Refill cleaner, 7 fertilizer, 7 oil, 7 Registration, 3, 8 10 Routine, 5, See Scheduling Safety, 2, 4, 6, 8 Scheduling, 5 Scrubbing, 5 Sensor Array, 2, 8 Sharpening Blades, 7 Shoulders, telescoping, 2, 7 Sprinkler, 2, 4 Stairs, 8 Steps, 8 Storage HandyBot, 3, 8 wheels, 8 Storms, 8 Strobe, 2, 6, 8 Suction, 5 Supplies, 2 Telescoping. See Shoulders Timing, 5 Updates, 3 Vacuuming, 5 Voltage, 3 Warning. See Safety Warranty, 8 Washing. See Cleaning Water, 3, 6, 7, 8 Water Input Valve, 2, 6 Watering, 4 Weeding, 4 Wheels, 4, 7, 8 Yard, 4, 8