1
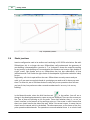
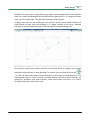
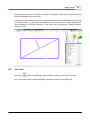
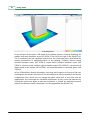
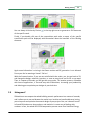
Getting Started
© 2010 Sound of Numbers S.L.
Welcome
Wilkommen
Bienvenu
Bem-vindo
Benvenuto
Bienvenido
SONarchitect ISO, the ultimate software for the computation of the acoustic insulation in the entire building
This is a quick guide to familiarize you with the ways of SONarchitect
ISO. Here you will learn how to solve a simple building and you will get a
glimpse of the capabilities of SONarchitect ISO.
SONarchitect ISO Quick Guide
© 2010 Sound of Numbers S.L.
All rights reserved.
SONarchitect ISO crew:
Julio Martín Herrero
Geometric engine and graphical interface
Alfonso Rodríguez Molares
Acoustic engine
Cástor Rodríguez Fernández
Graphic design and documentation
Getting Started
4
Index
Intro
5
Getting started
5
1 Drawing
.............................................................................................................................................................. 6
2 Inserting plans .............................................................................................................................................................. 9
3 Use units
.............................................................................................................................................................. 13
4 Slabs
.............................................................................................................................................................. 17
5 Walls
.............................................................................................................................................................. 18
6 Elastic junctions.............................................................................................................................................................. 22
7 Windows, doors...
.............................................................................................................................................................. 24
8 Let's rock!
.............................................................................................................................................................. 25
9 Histograms?
.............................................................................................................................................................. 33
10 To report or not..............................................................................................................................................................
to report!
35
© 2010 Sound of Numbers S.L.
Intro
1
5
Intro
Welcome to SONarchitect ISO v2.2, the ultimate software tool for computing sound
insulation according ISO EN 12354 parts 1,2,3,4 and 6 in the entire building.
2
Getting started
Here you can learn the first steps with SONarchitect ISO. Double-click the icon in your
desktop to run SONarchitect ISO.
If you have a Professional or Educational version of SONarchitect ISO, ensure that the
security hardlock is connected to a USB port of your PC. If you have the Demo version you do
not need the hardlock to run the program.
Hardlock
You can check the Help Manual by pressing the F1 key or the Help button
find some additional information.
, and you will
Let us help you create your first SONarchitect ISO project.
© 2010 Sound of Numbers S.L.
6
Getting Started
After launching SONarchitect ISO press New project in the toolbar. You may notice that
SONarchitect has not a menu bar. All the SONarchitect functions are accessed via the
buttons in the toolbar.
Let us draw our first building. Insert some information in the New Project dialog box such as
project name, Building Code requirements or the default materials for roofs, floors, and
walls.
Project configuration
You may save the default material set to use them as defaults in other projects. By now it
does not matter what you choose since this is a toy project. Press OK and SONarchitect will
ask you for the first plan details (name, height, and repetitions). You can change these at
any time later. By now let us call "General" the first plan, 3 m high, and just one repetition.
Then you will access the drawing canvas and tools. Let us start!
2.1
Drawing
Find the Plans button
and press it. A panel will appear on the left with the Plan list
and Tracing (imported templates) plans. Here you can create new plans, copy them to create
© 2010 Sound of Numbers S.L.
Getting started
7
similar floors, change their order in the building, etc. Buildings in SONarchitect are
composed by floors which are created from repetitions of plans.
We will begin by drawing a first floor that we have called "General", 3 m high, and which will
appear in the building only once. The drawing mode must be active. Click
Select the Pen tool
and draw an horizontal line in the lower part of the screen. To do
that, click and release the left mouse button to start the line and then move the mouse to
the right. To get a perfectly horizontal line, press Ortho Global tool
or CTRL key while
moving the mouse. The text box at the lower left corner shows the real world length (in
meters) of the line that you are currently drawing. If you want to specify a given length for
your line just write it (the numbers you type will appear in the text box) and press ENTER.
When using only the keyboard, as you have to release CTRL to enter the length, you can lock
the drawing tool by pressing the space bar before releasing the CTRL key. Thus you ensure
that no accidental mouse displacement can spoil the horizontality of the line. Pressing the
space bar again unlocks the drawing, in case you change your mind. Try with 10 meters.
Now move the mouse upwards. You will see that, by default, you are drawing a new line
beginning at the end of the one you just finished. If you would not want another line now,
you would press ESC. But we will draw now a perfect vertical line, so press again the CTRL
key. Lock the drawing tool with the space bar, type 5 and press ENTER to get a 5 m line.
© 2010 Sound of Numbers S.L.
8
Getting Started
We want to close a rectangle in a right angle, so click
or press the “X” key to enable
“Normal” detection. When “Normal” detection is enabled the label "Normal" appears in the
status bar. Check it.
Now, to draw the upper side of the rectangle, press CTRL while moving your mouse to the
left. If “Normal” detection is enabled, a dashed blue line will appear when you come close to
the zone where the line should end to form a right angle. The blue dashed line means that
your line would end at a point where a normal (the blue dashed line) from a previous line
end would meet your line. When you see the blue dashed line click to draw the line.
Finally, click the right mouse button to automatically close the polyline. By right clicking you
will close the polyline as long as the polyline starting point remains unconnected. If it has
been modified by the drawing supervision rules, which prevents geometrical artifacts
without architectural sense, and manages the matching between plans and rooms, the
polyline will not be automatically closed. If the starting point is not free, right clicking just
ends the drawing pretty much as the ESC key.
Now we have a perfect rectangle!
Move the mouse over the bottom line of our rectangle. You will see that the cursor sticks to
the line and to its singular points (center and both ends). Draw a line from the center of the
bottom line to the center of the top line. You do not need to press CTRL to ensure verticality
in this case, as with two perfectly matching lines, from center to center verticality is
guaranteed. You have just created you first two rooms.
© 2010 Sound of Numbers S.L.
Getting started
2.2
9
Inserting plans
Press the Plans button
in the toolbar, and create a new plan by pressing
. The new
plan will source four floors of dwellings of our toy building, so name it “Dwellings”, or
similar, and specify 4 repetitions in the New plant dialog.
Note that all plans have a small icon with an eye . This allows you to make visible or
invisible the different plans, to use them as guides for other plans. The current plan, the plan
that you are editing, is the one selected in the Plans list, and it is shown in solid black lines
in the drawing area, while the rest of visible plans are shown in light gray. The current plan
name is shown in the status bar. Ensure that the current plan is Dwellings and that the first
floor plan, General, is visible.
Use the Pen tool to draw in Dwellings an outer contour matching that of the General plan.
Note that this could also be done by copying the “General” plan using the button
in the
plan list, and then deleting the inner vertical line in the new plan, selecting it after clicking
and delete it pressing "Delete" in the keyboard or clicking
. With time you will
© 2010 Sound of Numbers S.L.
10
Getting Started
learn all the tricks that will allow you to work with SONarchitect at cheetah speed. But for
the moment, let us continue at snail pace.
Once you have the outer contour of the building in Dwellings, draw an inner separating line
from one corner to the opposite as shown in the figure below.
Now click on the center point of the diagonal separator. This time click Ortho Local button
or press SHIFT while moving the mouse. With the SHIFT key you force the line being
drawn to be normal to the line at the starting point (if any). It is a “local ortho” mode.
Remember that by pressing CTRL (“global ortho”) you force horizontal or vertical lines (press
CTRL and see the difference). Now using SHIFT draw a line from the center point of the
diagonal line to the top line, as shown in the figure. Now Dwellings has three rooms! Note
that you can see the General plan in light gray, which allows you to ensure proper matching
of elements between adjacent floors with different floor plans.
© 2010 Sound of Numbers S.L.
Getting started
11
Now let us create the last plan, the attic, different from the dwellings plan. This time we will
do it faster. Open the Plans list by pressing
button. Select the dwellings plan and copy
it by pressing
. A new plan appears in the plans list ,with the same name with an
apostrophe added at the end. Double click on the new plan and change its name to "Attic" or
the like. Change the repetitions number to 1.
Press OK to go back to the plans list. Now press the small button with an upwards arrow
to move the new plan to the top of the list, above the dwellings plan. The order of the floors
in the building is given by the order in the plans list. You can change it at any moment as
well as the repetitions of each plan, but it is a good advice that you draw your plans in the
order they will appear in the building, to ensure proper matching between corresponding
elements in adjacent floors with different floor plans.
At some point, SONarchitect will ask you to save the project. SONarchitect does not feel at
ease if you have not saved your project for a while since you started. Once you have saved it
the first time, for your safety, a backup copy of your project will be automatically saved
every few minutes with “.bup” extension. You can see it in your working directory. However,
© 2010 Sound of Numbers S.L.
12
Getting Started
do not rely on the backup mechanism to protect your work. Remember to save your project
from time to time, and it is always safer, in big projects, to save new versions of your project
with different file names as you progress. Save your project with the name "Toy project" or
something similar. The drawing canvas will resize from the initial default dimensions to your
current building dimensions.
With the attic plan selected in the plans list, go to the drawing area and delete the four
rightmost lines, keeping only the room on the left. Use the selection tool
. You can
select lines one by one, by left-clicking or by dragging with the right button of the mouse. If
you drag towards the right, all the lines partially included in the selection box will be
selected. If you drag towards the left, all the lines completely included in the selection box
will be selected. Select the four rightmost lines, as in the figure, and press DEL to delete
them, or press the rubber button
in the toolbar.
We have drawn a toy building.
You can press the 3D button
at any time to see the structure of your building. This is
the 3D mode. Play with the 3D navigation tools, which will be very useful when browsing the
calculation results. There are tools to drag or rotate the camera, and to orbit around the
© 2010 Sound of Numbers S.L.
Getting started
13
model. You can move forwards or backwards with the mouse wheel. By pressing CTRL while
moving your mouse, you can translate the camera without changing your 3D navigation tool.
If you lose sight of the building while flying around it, just click the restore view button.
2.3
Use units
Before assigning materials let us assign uses and use units. Each room in SONarchitect has
an “Identifier”, a “Use” and a “Use unit”. The Identifier is just the room name, with no
implications in the calculation, that you may chose at your will, but allows you to better
identify the rooms in the results. The “Use” let you define the type of room. In SONarchitect
you can define as many uses as you want in the Requirement settings.
The uses let you configure any Building Code requirements through the Project Configuration
Form. There you can change the required parameters and quantities, which are defined from
a given “Use” to another “Use”. Do not try to completely understand the requirement
configuration now. It will be clearer when we get to the results section.
Besides the Use, a room has also a “Use unit” identifier, which identifies all the rooms that
belong to the same dwelling, habitation unit, or, in general, Use unit. Thus, in a dwelling,
you have rooms with different Uses but with the same Use unit. The Use unit identifier can
be as simple as a letter. SONarchitect distinguishes Use units in different floors, so you can
use the same letters for any floors. You can configure this behavior through the Project
Configuration form, for specific multiple floor Use units, such as duplex apartments.
© 2010 Sound of Numbers S.L.
14
Getting Started
Let us assign uses to our toy building. Press
is the Type/Units mode.
and a panel will appear on the right. This
This could be an example of Uses definition.
Select the first plan, General, in the plans list. By right-clicking and dragging select both
rooms. You can also do multiselection by picking while holding SHIFT. The Common Area use
is set as the default use of any new room, so you do not need to assign it. By selecting the
rooms one at a time, assign a suitable identifier in the Enclosure identifier text box, such as
"Entrance", for instance. Notice that the identifier is shown inside the rooms. Common area
rooms do not need use unit identifier. By default they are always different from any other
use unit, although you can modify this behavior through the Project Configuration form.
© 2010 Sound of Numbers S.L.
Getting started
15
Go now to the dwellings plan. Select the biggest room (right bottom one) and assign a
Protected use by clicking the Protected button. The room color changes to green, which is
the color of protected rooms, as you can see in the corresponding button. As identifier you
may write something like "Bedroom". Now select the left room and assign a Habitable use.
The color should change to yellow. As identifier you may write something like "Bathroom".
Select both rooms and specify use unit "A", by typing A in the Use unit text box. The “A”
letter appears, in brackets, next to each room identifier and the line between the rooms is
now thinner, as they belong to the same use unit. Finally, select the third room and assign to
it a Stairs use. Its color should change to dark gray. Name it "Stairs", or similar. The result
should look like the figure below.
© 2010 Sound of Numbers S.L.
16
Getting Started
Go to the room in the “Attic” plan. Assign it a Protected use and name it "Bedroom". Use “A”
as unit identifier.
© 2010 Sound of Numbers S.L.
Getting started
2.4
17
Slabs
It is time to specify the materials. Go back to the dwellings plan. Press the "Materials mode
button"
and the Materials Catalog will be shown. There you can select and assign all
the materials for your building elements and linings.
First we will select "Slab" in the first material list. The rooms color will change to the color of
the default slab solution you chose at the beginning of the project. Move the mouse over the
rooms and you will see the material name in the status bar. If you want to change the slab
material select the room or rooms, locate the material in the catalog and press the "Assign"
button. The configurable colors in the material list provide visual feedback in the modified
slabs.
For the "Stairs" enclosure we are going to manage a slightly more refined situation. Let us
imagine that we have a lightweight stair in the room, such that the enclosure is connected
from floor to floor. It is a unique enclosure 18 m high. To get it we just need to select the
"Stairs" room and click the Virtual2D button
or press the "V" key (“V” for Virtual). Thus
you virtualize the inner slabs in a series of repetitions, i.e. you remove them from the
building, connecting adjacent volumes between floors stemming from repetitions of the
given plan.
Note that, by using the Vritual2D button or the “V” key, you virtualize the slabs only between
plan repetitions. For other slabs, you must use the corresponding tool in the 3D view of the
building.
© 2010 Sound of Numbers S.L.
18
Getting Started
Thus, for instance, if you want to design an inner courtyard, you also need to virtualize the
roof in the last floor repetition, and you must use the 3D virtualization tool
in the 3D
mode
. You also need this tool to virtualize any slabs between adjacent floors with
different plans.
2.5
Walls
Select now Walls in the material list. The plan scheme changes to show the vertical
elements of the building, in the color of the corresponding default solution you have chosen
at the beginning of the project. Now select Wall lining. The representation changes to show
the wall linings of the building. When in light gray, no linings have been assigned yet. You
may want to assign some or change the walls materials. To do that, just select the walls or
linings, browse the catalog and press “Assign”. Browse the different Subtypes and Catalogs
through the lists in the Right Panel. If you are using the Demo version you will see only a few
materials available, but enough to play with the toy building.
© 2010 Sound of Numbers S.L.
Getting started
19
There are some shortcuts to ease the task of assigning materials. When you click inside a
room, all the walls are selected or, if in Wall lining mode, all the inner linings. By clicking
or pressing "F" (façade) all the outer walls of the plan will be selected. If in Wall
lining mode, all façade inner linings will be selected. By clicking
or pressing "I" (inner)
all the inner walls will be selected, or the inner linings if in Wall lining mode.
When all the wall linings of a room are selected (by clicking inside the room in the wall
© 2010 Sound of Numbers S.L.
20
Getting Started
lining mode), a common area for instance, you can change the selection to the neighbor
linings just by clicking
or pressing "C" (complementary). This way you can quickly
assign a common solution to every inner lining of all rooms adjacent to a common area,
which, for our experience, saves a lot of time. “C” also works when only a few linings are
selected.
Finally, if you select some walls, in Wall mode, and then switch to Wall linings mode, the
selection will carry to the linings, i.e. all the linings of the previously selected walls will be
selected.
Remember that for multiple selection you can use SHIFT and pick, or drag with the right
mouse button, either to the left or to the right, depending whether you want strictly inclusive
selection or partial inclusive selection.
F key - Façade
© 2010 Sound of Numbers S.L.
Getting started
21
I key - Interior walls
Room selection
© 2010 Sound of Numbers S.L.
22
Getting Started
C key - Complementary selection
2.6
Elastic junctions
Junction configuration used to be tedious and confusing in ISO 12354 calculations. But with
SONarchitect this is no longer the case. SONarchitect really understands the geometry of
your building. It knows whether a junction is T- or X-shaped. It knows the materials meeting
at any junction in the building so it knows whether the elements are heavy or light, double or
single, massif, light façade, and so on. SONarchitect has, but also understands, all that
information and it will make the right choice of the adequate Kij (vibration reduction index)
for you.
Regrettably, still a bit is required from the user. SONarchitect currently cannot read you
mind, so if you want to use elastic bands in your design you need to tell it where you want
them. To solve this, we at SON have devised a really easy-to-use procedure that will save
you lots of time, but you have to take a second to understand it. Let us try it in our toy
building!
In the Materials mode, select the Wall Junction tool
in the toolbar. You will see a
change in the drawing representation; some arrows are displayed. There are four arrows per
line. Two of them are pointing to the line ends. These mark whether there is, or not, an
elastic interface in the extreme of the wall they point to. If the arrow is solid it means that
there is an elastic band in that side of the wall, whilst if the arrow is open, it means that no
elastic band is inserted, which is the default. The other two arrows, at the center of the line,
point upwards and downwards. The upwards arrow marks whether there is an elastic band
© 2010 Sound of Numbers S.L.
Getting started
23
between the wall and the ceiling (hence up), whilst the downwards arrow marks whether
there is an elastic band between the wall and the floor (guess what?). To change the arrows
state, just click inside them. They will switch between solid and open.
In bigger plans than our toy building you may need to use the mouse wheel to zoom and
move around the plan. Note that zooming in is always focused at the cursor, whereas
zooming out centers the drawing. Hold CTRL and drag to move the drawing area.
You may also need to insert elastic junctions into the slab, which is of great use to model
the dilation joints common in large buildings. To do that, select the Slab Junctions tool
. You will see that arrows appear inside the contour of each room, pointing towards it. They
mark whether there is, or not, an elastic interface between the slab and the wall they are
pointing to. As before, with Wall junctions, solid arrow means that there is an elastic
interface, while open means there is not.
© 2010 Sound of Numbers S.L.
24
2.7
Getting Started
Windows, doors...
Let us provide some sunlight to the prospective dwellers by adding some windows and
doors.
Press again the
button in the tool bar, browsing the Window type. Select, for instance,
the wall between the bedroom and the stairs. Select Door in the material list, browse the
catalog for the door you want, and click
or press Enter. A dialog will ask you for the
surface area of the door. Of course, you should insert an area which is less than the wall
surface area.
A symbolic representation of a door is displayed in the selected wall or walls. The symbol
just indicates that there is a door in the wall, not the exact position of the door in the wall,
nor its characteristics. For the computation of ISO 12354, the location of the openings in the
walls is not relevant. So keep in mind that the doors and windows you can see in the 2D and
3D representations of your buildings are just mere indicators of presence. Do not expect that
the 3D view of the façade of your model will look like the real building. SONarchitect is an
advanced acoustic computation tool, not a photorealistic 3D renderer. To check the
characteristics of any openings in a given wall, you have to select the wall, go to the
© 2010 Sound of Numbers S.L.
Getting started
25
openings tab and inspect the list at the bottom of the panel. There you can also delete any
unwanted windows, ducts and doors.
It may be of great convenience to insert a door between Bedroom and Bathroom to get relief
in critical moments. Try also to put some windows and ventilation ducts. Notice that you can
insert windows in all façade elements in one strike just by selecting all façade elements
with the “F” key.
2.8
Let's rock!
Just press
and our toy building project would be solved in a fraction of a second.
Let's see all the results in that toy building (requirements have to be configured):
© 2010 Sound of Numbers S.L.
26
Getting Started
Total building emission
On the left part of the screen a 3D model of the building appears, currently displaying the
outdoor noise map calculation as per ISO 12354-4. The tree on the right is the Results Tree.
This is no ordinary tree, but a powerful analysis tool. You can browse every detail about the
acoustic performance or underperformance of the building, including airborne sound
insulation between rooms (ISO 12354-1), impact sound insulation between rooms (ISO
12354-2), airborne sound insulation against outdoor sound (ISO 12354-3), transmission of
indoor sound to the outside (ISO 12354-4), and sound absorption in enclosed spaces (ISO
12354-6).
At first, SONarchitect displays the outdoor noise map, which appears at the top of the tree,
resulting from the sound transmission of all rooms defined as noisy enclosures in the Project
Configuration Form, where you can change the indoor noise level of any room and the
requirements. You can browse the individual contributions of every room and separator by
clicking the results tree. When an element contribution is clicked, the equivalent acoustic
power of the element LW[dB] is displayed in the bar graph below the Results Tree.
© 2010 Sound of Numbers S.L.
Getting started
27
Room emission
Wall emission
Now click the Floor nodes in the Results Tree (let's take a bigger real building, so we can
show you all the different topologies clearer).
© 2010 Sound of Numbers S.L.
28
Getting Started
All rooms in floor 0 are displayed. The horizontal elements of the floor are shown in red or
green. Rooms in green meet all the requirements, while rooms in red fail one or more
requirements. The requirements are configured in the Project Configuration Form, with
different requirements depending on the uses of the receiving and transmitting rooms.
Let us click the first room displayed under floor 0, which is Room 3 (Distributor),
“Distributor” being the identifier chosen for the room by the designer.
The distributor is displayed. Here you have a good example of the kind of arbitrary
© 2010 Sound of Numbers S.L.
Getting started
29
geometries that SONarchitect tackles with ease. Notice that it is red, as it does not meet
several requirements. If the Distributor node in the Result Tree is unfolded, all the
calculation results can be seen according to the different requirements. First appears the
reverberation time requirement; you can click it to see the reverberation time with frequency
in the bar graphs.
Further down there is a set of nodes with the insulation results from rooms adjacent to the
distributor. Click on node “from room 2 (Box 2 0ºD)” and expand it.
Now you are displaying the acoustic insulation between Box 2 (the transmitting room,
always in blue) and the distributor (receiving room, red or green). By browsing through the
child nodes you can inspect every transmission path between the rooms. At first glance a
transmission path in red stands out. This is the result that SONarchitect has determined to
be the dominant transmission path. Click it.
© 2010 Sound of Numbers S.L.
30
Getting Started
SONarchitect plots the Normalized Levels Difference DnT [dB] in the bar graph. It shows a
quite low airborne insulation for the lower frequencies. The 3D model shows the
transmission path. By the representation it becomes evident that it corresponds to the direct
transmission, and that the sound insulation problem is due to the door, which presents a fair
low sound insulation.
To experience another example of complex geometry just browse till “Floor 2” > “Room 30
(Common Area)” > “from room 9 (elevator)”.
© 2010 Sound of Numbers S.L.
Getting started
31
There you will see how slab virtualization allows SONarchitect to deal with multiple floor
rooms, and to rightly compute all the flanking transmission paths between rooms. You will
also see another interesting example in “Floor 0” > “Room 18 (Distributor)” > “Room 45
(Office 3ºG)”
Inspect the transmission paths to experience how SONarchitect really understands the
building geometry.
© 2010 Sound of Numbers S.L.
32
Getting Started
Let us go forth. Browse for the “Floor 3” > “Room 38 (Office 3ºB)” > “from room 39”. Double
click node “from room 39”, and a summary of the acoustic insulation will be displayed
showing the airborne and impact sound insulation between the rooms.
Notice that some information is missing in the Demo version (all in all it is a demo, isn’t it?).
It goes without saying that a full license entitles you to have all fields full of insightful
information. If you click the tiny file icon in the top right corner of the summary, a PDF file
will be generated with a record of all the needed information related to the acoustic
insulation between the room.
By double clicking node “Wall 1” (or by selecting it in the summary combo box) an airborne
sound insulation summary will appear. The same occurs with the “Slab 1” and the impact
sound insulation.
© 2010 Sound of Numbers S.L.
Getting started
You can always click the tiny file icon
of the specific result.
33
in the top right corner to generate a PDF document
Finally, if you double click one of the transmission path nodes, a report of the specific
transmission path will be displayed, with information about the materials of the flanking
elements.
Again some information is missing in the Demo version and PDF generation is not allowed.
Do not you feel as wanting a license? Call us!
With the licensed version, if you are not satisfied with the results, you just go back to 2D,
and change the design, materials, junctions, or uses as many times and as far as you want.
Then, in a matter of seconds, you will get the new results. This iterative process, unfeasible
with most of applications, is fast and easy with SONarchitect, increasing your productivity
and allowing you to optimize your designs in practical time.
2.9
Histograms?
SONarchitect can compute the whole building acoustic performance in a matter of seconds,
and it allows you to see and browse the results in an intuitive and comfortable way, letting
you to improve and optimize the acoustic design of your projects. But, can it do even more?
In Sound Of Numbers we love numbers, and statistics is a smart way of dealing with
numbers. In fact, the whole ISO 12354 computation process comes from Statistical Energy
© 2010 Sound of Numbers S.L.
34
Getting Started
Analysis. What about performing statistics with the statistics? What if we compute the
statistics of the acoustic insulation of the entire building? Could we estimate the probability
distribution of the acoustic insulation?
Yes, we can. You can see the statistics of your building just by pressing
toolbar.
in the Results
The matrix shows every combination of pairings of types of rooms in the building. Clicking
any matrix cell will show the corresponding histogram of acoustic insulation results.
Furthermore, you can click any histogram bar and all rooms within the corresponding levels
will appear in the 3D view. Thus you can localize and also visually inspect the set of the
worst/best/average/in-between performing rooms quickly and easily.
But let us show some of the histograms of real-sized building projects with over 30,000
calculation results.
© 2010 Sound of Numbers S.L.
Getting started
2.10
35
To report or not to report!
With SONarchitect Professional, you can print a PDF file with all the results in the Result
Tree just by pressing the Report button
in the results toolbar. You can configure the
sections you want to include in your report, select the acoustic records of interest, or let
SONarchitect to chose the critical results for you. To justify the complete acoustic
performance of an entire building to your local government or administration, you do not
need to deliver all the records of your building. For large buildings as the displayed above,
this would result in reports well over 30,000 pages long!!.
To justify the compliance of an entire building it is enough to report the worst case records,
and the information proving that the records you are delivering are, precisely, the worst. And
that can be easily done through the histogram. Just by including the building histogram, a
record is shown to be the worst case for a given configuration if it belongs to the extreme
bar in the histogram. At the same time, the histogram also shows the overall acoustic
performance of the building, beyond the insulation level of the worst cases. So, luckily,
reports can be kept about 20-30 pages long!
© 2010 Sound of Numbers S.L.
Hear from you soon...
The Sound of Numbers team