1
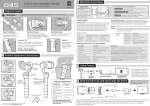
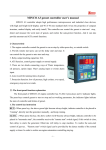
EN
G4 Handheld Gimbal For Smartphone
Suitable for iPhone6 / 5C / 5S / 5 / 4S / 4 and similar ones.
3 Working Mode Instructions
FEIYU-EN-1
1 Beginner Guide
Working Mode Instructions
1. Heading Follow Mode:Camera Pitch and Roll Angles
remain constant, heading follows the handheld position.
Use for switching working modes.
Attention ! Please install the suitable smartphone first before power on the Gimbal.
R
In order to get the best working status ,
please try to keep the smart phone and
pitch axis balance before power on the
gimbal. Please refer to thefollowing:
iPhone5
Insert The Batteries
Function Button
Identify the working mode via
switch to different status of the
indicator light.
Install The Phone
Remove the power
Install the Smart phone
switch cap, insert two
by the quick-release
batteries into the handle. adapter. And make
sure it is fixed well.
0 mm
When the Gimbal is working, you can
press the function button to switch
among the working modes and a special
working condition freely.
Confirm the phone is
installed well, then press
the power button to turn
on the Gimbal.
Standby Mode Press function button for 3 seconds, the motor stop working and the LED of the function button will single flashes this
will indicate that gimbal enter the standby mode. Single press the function button the gimbal will be awaken immediately.
Item
LED Status
Function Explanation
Item
LED Status
Explanation
Single Press
Single Flashes
Heading Follow Mode
Long Press For 1 Second
Single Flashes
Pitch Recover Level
Double Press
Double Flashes
Heading And Pitch Follow Mode
Long Press For 3 Second
Single Flashes
Standby Mode
Three Press
Single Flashes
Inversion Mode
4 Filming Skill
Mode Switching
Power On
Special Working Condition (Inversion Mode) When in any working mode, press the function button for three times in succession,
the Gimbal enter into the inversion mode and switch to the Heading following mode automatically. Invert the Gimbal to capture more
excited scenes easily by switching mode combination. When in inversion working condition press the function button for three times in
succession to reset the Gimbal back to the original state.
Hand Pulling Locking The pitching can be adjust by hand pulling after start the gimbal 8 seconds. During the Heading Follow Mode
pulling the pitching to the desired angle and stay 0.5 second it will lock in the current angle.
iPhone6
5 mm
Standard Installation Method
2. Heading And Pitch Follow Mode:Camera Roll Angle remains
constant. Heading and Pitch follow the handheld position.
( Details of working modes please refer to the
instructions of working modes )
Smooth And Steady Filming: Handheld the Gimbal, keep stable for movement, keep light and steady for walking.
Adjust The Pitching Angle:
Manual Adjust: Switch to heading follow mode or inversion mode,control the pitch angle to the the position you want, and
keep for 0.5 second,the gimbal will lock current angle.
Auto Adjust: Double press the function button to enter into“Heading And Pitch Follow Mode”. Hold the Gimbal at the
desired angle, then press the button once to reengage “Heading Follow Mode” in order to lock the angle of desired pitch.
Remote Control To Adjust: Customer can adjust the gimbal like mode switch or pitch angle by connecting remote control.
Flexible Use Of Inversion Mode: Press the function button for three times in succession, the Gimbal switch to the
inversion mode and help to captured low angle view more easily. If filming with moving forward at a high speed, keep the
handle roughly parallel with the ground will be helpful.
2 Product Appearance Instructions
5 Function Interface Instructions
Pitch Axis
Indicator
Please Remove
The Batteries
Before Upgrading
!
Heading Axis
Roll Axis
Indicator Explanation
Function Interface
If any comments or suggestions please do not hesitate
to e-mail us directly : [email protected]
USB Cable
USB Connector
Attention: Be sure to connect the computer with the USB connector
Function Button
Power Switch
Upgrade........
Function
Interface
Connection Mode
PC
The USB Mini terminal of the cable plug into the function interface , the USB terminal plug
into the USB connector. Please ensure to connect with the USB connector.
LED Status
Explain
Blue light flashes
three times
Full Power
Blue light flashes
twice
Enough Power
Attention : Please be sure to connect the computer with the USB connector.
Blue light flashes
once
Low Power
Blue light keeps
flashing
The heading following speed can be configurate through parameter setting software.User can adjust to the desired following speed mode
according to the requirements of filming scene. Three modes for optional: “SLOW” mode, “NORMAL” mode , “FAST” mode.
Default setting is “FAST” mode.
No Power
The indicator flashes in red light
when in working, it will prompt the
Gimbal at fault.
Firmware Upgrade Instruction
Please visit the official website of Feiyu Tech: www.feiyu-tech.com to download the USB driver, firmware upgrade software and the latest
firmware then unzip the RAR file.Remove the batteries and refer to the connection diagram to connect the gimbal with the computer.
Please refer to the manual of update operation to upgrading,otherwise the Gimbal will be abnormal.
Parameters Configuration
Attention : Please be sure to connect the computer with the USB connector.
Gimbal Calibration
The Gimbal attitude can be calibrate through parameter setting software. User can adjust the pitch and roll in a small angle to achieve more
accuracy filming scene. Please insert the batteries then refer to the connection diagram to connect the gimbal with the computer for caliration.
Attention : Please be sure to connect the computer with the USB connector.
EN
G4 Handheld Gimbal For Smartphone
Suitable for iPhone6 / 5C / 5S / 5 / 4S / 4 and similar ones.
FEIYU-EN-1
8 Battery Extender Accessory (Optional)
G4 Battery extender contents:
Handheld
Function Interface Expansion
Function
Button
Connect remote control to Gimbal in Mini port,
then you can realize control the working
mode and angle by remote control.
Direction
Button
Function Interface
Note: The remote control is optional.
Power
Switch
G4 Battery
Extender
Handheld
Accessory
Rechargeable
Battery
Type: 18650
Charger
Type: 18650
Input: AC 100V-240V
Output: DC 4.2V
G4 Battery Extender Connection Picture
9 Extension Bar Instructions (Optional)
Remote Control
6 Initialize The Gimbal
Battery
Extender
Handheld
Accessory
With the special designed switch, the extension bar can be added directly. Allows to shoot the distance
images more easily. Special design allows for flexible extension.
350mm
Φ23mm
Initialization Instructions
1. Install the smartphone properly.
2. Gimbal placed on stationary flat and keep motionless.
3. Power on the Gimbal.
4. The Gimbal is activate and it will initialize
automatically. Pick up the Gimbal to work normally.
Extension Bar Size
Gimbal needs to be initialized whenever the
following situations appear after power on
1. After power on, the angle of pitch is not level with the horizon line.
Motionless Flat Surface
2. After power on, the angle of roll is not parallel with the horizon line.
3. When the gimbal is in heading static, the angle of heading moves frequently.
7 Standard And Optional Accessories
Standard Accessories
Correct Method For Using USB Data Cable
!
Please refer to following method to proper
usage, otherwise it may cause damage to
the device itself and other equipment.
Battery Charging: The USB Mini terminal of the USB cable
Charger
Rechargeable
Battery
Type: 16340/18350
Input: DC 5V Min 800mA
Output: DC 4.2V
Power Adapter
Type: 18350
European Standard
Connector
USB
USB Mini
USB Cable
plug into the Micro interface on the charger , and the USB
terminal plug to the power adapter, then connect to the
EN Connector according to needed .
Connect The Computer: Remove the batteries, the USB Mini
terminal insert to the function interface on the gimbal and the USB
terminal insert to the USB connector then connect to the computer
for firmware upgrade or parameters configuration (Please
connect the USB cable to the computer with the USB connector,
otherwise the interface of the computer will be damaged ).
Please refer to the instructions of the function interface for
pecific details.
Optional Accessories
Name
Function Description
Remote
Control
Ample buttons can realize the adjustment of
heading & pitch angle, mode switching etc.
Runtime
Extension
Accessory
Extend the capacity space for battery to
make the runtime longer.
Extension
Bar
Spiral design of the extension bar can be
perfect combination with G4 power switch;
Extended length is optional, it will help to
enjoy a different visual easily.
We will keep releasing more FY-G4 accessories. More details
please visit our official website: www.feiyu-tech.com
USB Connector
Extension Bar Diagram
10 Specification
Items
Min
Standard
Max
Working Voltage
6.0V
8.4V
17.0V
Remarks
Handheld In Horizontal (The angle
maybe vary from different smartphone)
Pitch Angle
-160(Down)
0(Horizontal)
+160(Up)
Roll Angle
-50
0(Horizontal)
+50
Heading Angle
-160(Left)
+160
Handheld In Vertical
Heading Angle
-50
+50
Handheld In Horizontal
Pitch Following Rate
Heading Following Rate
2°/ Sec
3°/ Sec
75°/ Sec
150°/ Sec
Static Attitude Tracking Accuracy
0.01
0.02
0.05
Gimbal In Static Mode
Motion Attitude Tracking Accuracy
0.1
0.2
0.5
Motor Overload<2G
800mA
Overload Current Protection
290g
Weight
Size
Without Batteries & Smartphone
Width 38mm / Height 250mm / Length 93mm
11 Attention
DISCLAIMER
FY-G4 handheld gimbal for smartphone is an excellent camera stabilizer,
lightweight and portable. Prohibit any user for any illegal purpose. Users will be
responsible for all behavior of purchase and use products.
The Guilin Feiyu Electronic Technology Co. and our associates are not responsible
for any damages or liabilities caused by the use of this product.
For any unknown sources or using, we will not be any service.
Feiyu Tech reserves the right to amend this manual and the terms and conditions
of use the gimbal at any time.
ATTENTION
Please correct assemble the gimbal according
to the diagram .
Please upgrading firmware and configurate
parameters with the standard configuration
USB date cable.
Please battery charging with the standard
configuration charger.
Please install the camera well before power
on the Gimbal.
Please visit the official website of Feiyu Tech
to get related information: www.feiyu-tech.com