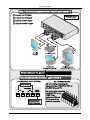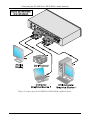
1
Connecting the VS-2DVA 2x1 DVI / XGA / Audio Switcher
5
Connecting the VS-2DVA 2x1 DVI / XGA / Audio Switcher
To connect1 your VS-2DVA 2x1 DVI / XGA / Audio Switcher, as the example
in Figure 2 illustrates, do the following2:
1. Connect an XGA source (for example, a laptop’s digital graphics card) to
the INPUT 1 XGA 15-pin HD connector, and connect its audio to the IN 1
3.5mm mini jack3 (using a separate cable or the Kramer C-GMA/GMA
cable4: VGA HD15M +Audio jack to VGA HD15M +Audio jack).
2. Connect a DVI source (for example, a DVI computer graphics source) to
the DVI INPUT 1 connector, and connect an unbalanced stereo audio
source to the corresponding AUDIO input 3.5mm mini jack3.
3. Connect the XGA 15-pin HD output connector5 to the XGA acceptor (for
example, an analog display) and connect the corresponding AUDIO output
3.5mm mini jack to an unbalanced stereo audio acceptor3.
4. Connect the DVI output connector5 to the DVI acceptor (for example, a
projector) and connect the corresponding AUDIO output 3.5mm mini jack
to an unbalanced stereo audio acceptor3 (for example, the Kramer 903
Personal Stereo Amplifier).
5. Connect6 the contact closure remote control PINS (optional), see section 5.1.
6. Connect6 the 12V DC power adapter (wall transformer) to the 12V DC
socket and connect the transformer to the mains electricity.
1 You do not have to connect all the inputs
2 Switch OFF the power on each device before connecting it to your VS-2DVA. After powering up your VS-2DVA, switch
on the power on each device
3 The audio connections are not illustrated in Figure 2
4 Not supplied. The complete list of Kramer cables is on our Web site at http://www.kramerelectronics.com
5 You do not have to connect both outputs. For example, if you only want to switch DVI, connect only that output of the
VS-2DVA, and leave the XGA output unconnected
6 The connection is not illustrated in Figure 2
5