1
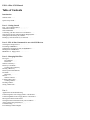
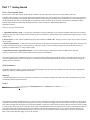
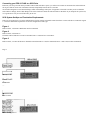
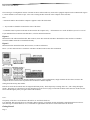
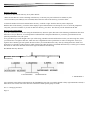
SCSI SP-1/ SP-2
Model SP-l/SP-2 - EPS/EPS-16 PLUS SCSI Interface
Copyright @ 1990 ENSONIQ@ Corp
155 Great Valley Parkway Malvern, PA 19355
All Rights Reserved
This manual is copyrighted and all rights are reserved by ENSONIQ Corp.. This document may not, in whole or in part, be copied.
photocopied. reproduced, translated, or reduced to any electronic medium or machine readable form without prior Mitten consent of
ENSONIQ Corp.
Limited Warranty
What. Is Covered
This warranty covers all defects in material and workmanship for thirty days from the date of purchase from an Authorized
ENSONIQ Dealer or Repair Station. For EPS-16 PLUS only -labor costs are covered only when the SP-2 is installed in conjunction
with an ENSONIQ ME-16 PLUS memory expander.
What Is Not Covered
This warranty does not cover damage to or deterioration of the SP-l/SP-2 or internal circuitry resulting from accident, misuse, neglect,
attempted unauthorized repair or failure to follow operating instructions. Power to the EPS/EPS-16 PLUS must be off prior to
connecting or disconnecting a SCSI device to the EPS/EPS-16 PLUS. Failure to do so will damage the EPS/EPS-16 PLUS and/or the
SCSI device itself. This would invalidate the Warranty.
For EPS-16 PLUS only - if your ENSONIQ SP-2 SCSI interface is connected to an approved third party memory expander and a
problem occurs, labor is not covered. You will have to pay a service fee to have the third party expander and the SCSI interface
removed so that the technician can diagnose the unit.
How To Obtain Warranty Performance
Return your defective SP-l/SP-2 SCSI Interface with this package to an Authorized ENSONIQ Dealer or Repair Station along with
proof of purchase. The defective SP-l/SP-2 will be replaced.
Limitations Of Implied Warranties And Exclusion Of Certain Damages
Any implied warranties, including warranties of merchantability and fitness for a particular purpose are limited in duration to the
length of this warranty.
ENSONIQ's liability, for any defective product, is limited to repair or replacement of the product
ENSONIQ shall not be liable under any circumstance for:
1. Damages based upon inconvenience, loss of use of the SP-l/SP-2, loss of time, interrupted operation, or commercia11oss.
2. Any other damages, whether incidental, consequential, or otherwise, except damages which may not be excluded under applicable
law.
Some states do not allow limitations on how long an implied warranty lasts and/or do not allow the exclusion or limitation of
incidental or consequential damages so the above limitations and exclusions may not apply to you.
The warranty gives you specific legal rights. and you may also have other right which may vary from state to state.
No Claim For Warranty Will Be Honored Without Proof Of Purchase.
*
Technical Support
If you have any questions concerning this unit, please contact your authorized ENSONIQ dealer. For additional technical support, or
to find the name of me nearest authorized ENSONIQ Repair Station, contact ENSONIQ Customer Service at (215) 647-3930,
Monday through Friday between 9:30 AM and 6:30 PM Eastern Standard Time.
EPS-1.6 Plus SCSI Manual
Table of Contents
Introduction
What Is SCSI?
...
Quick Set-up Guide. . .
Part 1 - Getting Started
First, a Few Important Notes. . . . . . . . . . . . .
What About Cables? . . . . . . . . . . . . . . . . .
SCSI Terminators. . . . . . . . . . . . . . . . . .
Connecting your EPS-16 PLUS to a SCSI Drive. . . . . .
SCSI System Set-Ups and Termination Requirements. . . .
Setting the SCSI Priority (ill) Number. . . . . . . . . .
Booting Up with SCSI Drive(s) Connected. . . . . . . .
Part 2 - EPS-16 Plus Commands for use with SCSI Devices
Selecting the Storage Device. . . . . . . . . . . . .
Formatting a SCSI Drive. . . . . . . . . . . . . .
Updating the Operating System on a SCSI Drive. . . . .
Booting from a SCSI Drive. . . . . . . .. . . . . .
SCSI Drive vs. Floppy Drive. . . . . . . . . . . .
Part 3 - Managing Disk Files
File Types………
File Numbers. . . . . .
Directories. . . . . . . .
What is a Directory? . ..
Directory Commands. .
Creating a New Directory
Deleting a Directory. . .
Directory Recommendations
File Paths . . . . . . . .
Bank Files . . . . . . . . .
Macros………..
What is a Macro? . . .
Loading a Macro File. .
Creating a Macro. . . .
Invoking a Macro ...
Saving a Macro File. .
Part 4 Applications and Troubleshooting
Transferring Files from a Floppy Disk to a SCSI Drive. . .
Transferring Banks from a Floppy Disk to a SCSI Drive. . .
Moving Files Between Directories. . . . . . . . . . .
Getting the Best Performance from your SCSI Drive. . . .
Advice About Using SCSI Drives. . . . . . . . . . . .
Troubleshooting . . . . . . . . . . . . . . . . . ..
Error Messages Final Thoughts
Introduction
Congratulations on adding the power of SCSI to your EPS or EPS-16 PLUS. We're sure that once you have experienced the speed with
which you can load sounds from a SCSI hard disk, you'll wonder how you ever did without it. Please read this manual carefully in order to
get the most out of your new SCSI
interface.
Except where noted, all descriptions in this manual apply equally to an EPS or EPS-16 PLUS equipped with a SCSI interface. The EPS-16
PLUS does have a few SCSI-related features not in the original EPS, and these are marked in the text "EPS-16 PLUS only." Otherwise,
wherever the text says "EPS-16 PLUS," BPS owners can substitute "EPS."
What is SCSI?
The great power and flexibility of the EPS-16 PLUS lies in the fact that it is really
a computer disguised as a musical instrument. The Small Computer Systems Interface (SCSI, pronounced "scuzzy") is a standardized
communication protocol for small computers (such as the Macintosh and the EPS-16 PLUS) and peripheral devices (hard disk drives,
CD ROM players, etc.) which allows for quick and efficient transfer of digital information. You may have up to eight SCSI
devices connected on a single SCSI network. These devices can be computers, disk drives, tape backup systems, musical instruments, and
other types of equipment.
Lick Set-up Guide
Here is an overview of what you must do to make your SCSI system work:
1. Obtain a SCSI hard disk on which the Priority/ID number can be set by an external switch (see p. 5).
2. Make sure that the SCSI cable has a Macintosh-type connector (DB-25P) on one end (see below).
3. Make sure your drive has a terminator - either internal or external (see p. 3).
4. Set the Priority/ID to any number from 0 to 6 other than 3 (see p. 5).
5. Connect the drive to the EPS-16 PLUS.
6. power on the devices in the proper order - SCSI drive first, then the EPS-16 PLUS (see p. 6).
7. Press Command, then System-MIDI (System on the EPS) and scroll left to the FORMAT SCSI DRIVE command. Press Enter.
8. Set the LOAD DEVICE=SCSI #; to the same Priority/ID number you selected in step 4. Press Enter.
9. Select and enter a unique name (DISK LABEL) for this device. (EPS-16 PLUS only) This is important mainly for removable drives. Press
Enter. 10. Select an Interleave value (see pp. 7-8).
11. Format the SCSI drive. Respond to the prompts which appear by pressing Enter to automatically install the O.S. and set up subdirectories and default macros (see pp. 8-9).
12. Shut off your EPS-16 PLUS and wait ten seconds. Eject the floppy disk. 13. Turn on your EPS-16 PLUS and wait for the system to boot
from the SCSI drive.
Part 1
- Getting Started
First, a Few Important Notes
Never connect or disconnect the SCSI cable while your EPS-16 PLUS or hard drive is turned on. Serious damage will result.
The EPS-16 PLUS requires a specific file format on any hard disk that it uses, and any drives used with the EPS-16 PLUS must be formatted
exclusively for that purpose. For example, BPS sounds cannot be saved directly to a SCSI hard drive formatted for use with a Macintosh, nor
can the Macintosh store files on a SCSI hard drive formatted for the EPS-16 PLUS. If you are using a SCSI network configuration which
includes a Macintosh and a Macintosh-formatted SCSI drive, make sure that you understand this distinction.
What About Cables'?
There are four types of SCSI cables:
1. Apple/EPS-16 PLUS to SCSI - a 25-pin D-type subminiature connector (DB-25P) on one end and a standard 50-pin male SCSI connector
on the other end. This cable is used to connect an EPS-16 PLUS to a hard drive. Most SCSI hard drive manufacturers supply this type of cable
with the drive.
2. SCSI to SCSI - a cable with the standard 50-pin male SCSI connector on both
drives together.
ends. This type of cable is often used to connect two hard
3. SCSI to SCSI Extension - a cable with a male SCSI connector on one end and a female SCSI connector on the other. These connectors can
be either the standard 50-pin type or the 25 pin D type. This type of cable is used to extend the length of another SCSI cable. We do not
generally recommend the use of long extension cables.
4. Apple/EPS-16 PLUS to Apple/EPS-16 PLUS - a cable with 25-pin D-type subminiature connectors (DB-25P) on both ends.
This type of cable can be used to connect an EPS-16 PLUS directly to a Macintosh.
SCSI cables usually come in standard sizes of two feet and six feet The combined length of all the cables in your SCSI network may be up to
six meters (approximately nineteen feet). However, you should avoid cables that approach this limit. Always use cables that are as short as
possible for your connections.
SCSI Terminators
The SCSI terminator is simply a resistor network on each SCSI signal on the SCSI bus. The terminator prevents reflection or ringing on the
signal lines, allowing reliable high speed data transfers.
Warning!
A system configuration (two or more SCSI devices) must have two terminators. Damage will result if more than two terminators are present.
Terminator placement is described below.
Page 3
EPS-16 Plus SCSI Manual –
The terminator is usually implemented in one of two ways; either externally or internally. The external terminator resembles two 50-pin SCSI
connectors mounted back to back and encased in plastic. This type of terminator is plugged into the SCSI connector of the device and then the
SCSI cable is plugged into the terminator. The internal terminator is simply the resistor network integrated into the SCSI device itself, typically
as resistor packs on the SCSI device controller circuit board. The documentation which accompanies the SCSI device will usually describe the
procedures required for installation and removal of terminators. The SP-l/SP-2 SCSI Interface accessory contains internal termination via
removable resistor packs. Note that the EPS-16 PLUS receives power for its terminator from the external device. Any drives used with the
EPS- 16 PLUS must therefore supply power to the SCSI bus.
Connecting your EPS-16 PLUS to a SCSI Drive
Each time you set up or break down your EPS-16 PLUS and SCSI drive system, you will need to connect or disconnect the SCSI cable from
the 25 pin connector on the rear of the EPS-16 PLUS, and probably from the drive as well. Be
careful when doing this to avoid static discharges which could damage either piece of equipment. Also make sure that you do not bend the
SCSI cable too sharply, which could damage some of the small wires inside the cable and make it unreliable. If you transport the system a lot,
it is a good idea to carry an extra SCSI cable, just in case.
SCSI System Set-Ups and Termination Requirements
There are two general types of system configurations. The first consists of an EPS-16 PLUS with one or more SCSI drives connected. Figures
1-3 show the termination requirements for several configurations of this type.
Figure 1
EPS-16 PLUS, 1 SCSI Drive Both units must be terminated.
Figure 2
EPS-16 PLUS, 2 SCSI Drives
The EPS-16 PLUS and Drive 2 must be terminated. Drive 1 must not have a terminator.
Figure 3
EPS-16 PLUS, 3 or More SCSI Drives The EPS-16 PLUS and Drive 3 must be terminated. Drives 1 and 2 must not have termination.
Page 4
Hard Diskl1
,I,
Hard Disk 2
-~-
EPS-16 PLUS
Part 1- Getting Started
EPS-16 Plus SCSI Manual
The second type of configuration consists of an EPS-16 PLUS with SCSI drive(s) and a SCSI- equipped computer such as a Macintosh. Figures
4, 5 and 6 illustrate several such set-ups. A few notes on using the EPS-16 PLUS with a computer on the SCSI bus:
Note:
. Position the EPS-16 PLUS and the computer at opposite ends of the SCSI chain.
.
Any SCSI drives should be located in the center of the chain.
. Terminators must be present on the EPS-16 PLUS and on the computer only. . All terminators in or on the SCSI drive(s) must be removed.
If your Macintosh has an internal SCSI hard drive, it also has internal termination.
Figure 4
Macintosh n or SE with internal hard disk, EPS-16 PLUS, and 1 EPS-16 PLUS SCSI Drive The hard drive must not have a terminator.
The1vJac andEPS-16 PLUS are terminated internally.
Figure 5
Macintosh with no internal hard disk, EPS-16 PLUS, 2 or More SCSI Drives
Drives 1,2. and 3 must not have a terminators. The Mac* and EPS-16 PLUS must have termination.
*Some computers may not provide internal termination. For these system configurations, simply terminate the drive that is closest to the
computer and use as short a cable as possible between that drive and the computer.
Setting the SCSI Priority (ID) Number
Each device on the SCSI network must be assigned a different priority. The SCSI priority can range from 0 to 7, with 7 being the highest
priority. The priority of a SCSI device becomes important if two devices are trying to control the SCSI bus at the same time. In this case, the
device with the highest priority will gain control of the SCSI bus.
Part 1
The priority of the device is also known as the address or ID of the SCSI device.
It. is important. that each SCSI device be assigned a different priority or ill number insuring predictable communication between devices.
Since the range of valid SCSI ID's is 0 to 7, a maximum of eight distinct SCSI devices can be connected to the network.
Getting Started
Page 5
EPS-16 Plus SCSI Manual
Important!
Warning:
The EPS-16 PLUS has a fixed SCSI ID of 3. The Apple Macintosh has a fixed IDof7. Most other SCSI devices provide a way of changing their
ID. When buying a SCSI drive for use with the EPS-16 PLUS, make sure that there is an external switch provided for changing the ID. Refer to
the manuals of the other SCSI devices in your system to determine how to change their SCSI IDs.
SET THE SCSI ill OF YOUR DRIVE TO ANY NUMBER (0 to 6) EXCEPT3f The ill of your SCSI drive must be different from that of the
EPS-16 PLUS. If. it isn't, the EPS-16 PLUS will never see it.
If you change the SCSI ill of your drive after you format it. your Macros and Banks will no longer work properly. The EPS-16 PLUS will be
able to find the drive but the device ill portion of the file path will be different.
Booting Up with SCSI Drive(s) Connected EPS-16 PLUS with SCSI drive(s):
.
Turn on the SCSI drive(s) first and wait approximately twenty seconds.. . Turn on the EPS-16 PLUS.
. The EPS-16 PLUS will boot from the highest-numbered SCSI device containing the EPS-16 PLUS e.g.. (If none of the EPS-formatted SCSI
drives contains the EPS-16 PLUS e.g.., the EPS-16 PLUS must be booted from a floppy disk.)
EPS-16 PLUS with Scsi drive(s) and a computer:
. Turn on all the SCSI devices between the EPS-16 PLUS and the computer and wait approximately twenty seconds, then turn on the computer
and follow its procedure for booting.
.
Boot the EPS-16 PLUS (see above).
Notes for Macintosh users:
If you have an external SCSI drive for your Macintosh, its SCSI ill may need to be set to 6. Some earlier versions of the Macintosh System
software will try to boot from the highest priority drive that is on the SCSI network. Do not set your EPS-16 PLUS SCSI drive ill higher than
your Macintosh SCSI drive ill.
Note also that the EPS-16 PLUS can be connected directly to the Macintosh (no external hard disk in between) using a 25-pin to 25-pin cable,
so long as both units are terminated (figure 6 below).
Figure 6
Macintosh with or without internal hard disk, EPS-16 PLUS The EPS-16 PLUS can be connected directly to the Mac. Both units must be
terminated.
EPS-16 Plus SCSI Manual
Part 2 - EPS-16 PLUS Commands For Use With SCSI Devices
Selecting the Storage Device
The CHANGE STORAGE DEVICE command is used to select the device which will be used to load and save files. Only one device
can be selected at a time; that is, if you are looking at files on the SCSI drive, you won't see any indication of the files on the floppy
disk in the floppy drive. There are ten selections available in the Change Storage Device command. The first selection is the floppy
disk with an ill of FLOPPY. The next 8 selections are for SCSI devices 0 thru 7.
To change the selected device:
- Press Command, then System-MIDI (System on the EPS).
- Scroll right until the display shows CHANGE STORAGE DEVICE and press Enter.
- The display shows either LOAD DEVICE = SCSI # or LOAD DEVICE=FLOPPY. The last selection, LOAD DEVICE=FLASH,
selects the optional Flashbank memory (EPS-16 PLUS only). Use the Up/Down Arrow buttons to scroll to the ill number of the
desired SCSI device, FLOPPY or FLASH, then press Enter.
It is important to remember to press Enter for the selection to actually take place. The display will show DISK COMMAND
COMPLETED briefly when the SCSI drive has been selected successfully. If the display shows NO VALID LOAD DEVICE or
UNCONNECTED SCSI DEV, then there is some problem with your connection to the SCSI drive (the drive is not turned on, the
cable is disconnected. the drive has a different ill setting, etc.). Check all connections and settings carefully before continuing.
Note for Macintosh users
If the message NOT AN EPS SCSI DEV appears, then the device ill you have selected may be a Macintosh formatted drive. You
cannot select this device as an EPS-16 PLUS storage device, except with the formatting procedure. Be very careful to avoid
inadvertently erasing your Macintosh SCSI drive.
Formatting a SCSI Drive
Formatting a SCSI drive is similar to formatting a floppy disk on the internal disk drive. It prepares the disk to have EPS files saved
to it and loaded from it. It is by nature a destructive process because it erases all the information that was previously on the disk and
replaces it with new information. The foffi1atting procedure should always be performed very deliberately so that you do not
accidentally lose important information by formatting the wrong disk.
Interleave: You will have the option of changing the Interleave number when initiating forn1atting. What does the Interleave number
mean? It attempts to match the speed of the SCSI drive with that of the system accessing it (in this case the system is an EPS-16
PLUS). It is usually expressed as a ratio, the selected number to 1. Some SCSI drives may be able to make inforn1ation available to
the
Part 2
- EPS-16 PLUS Commands
Page 7
EPS-16 Plus SCSI Manual
EPS-16 PLUS at a higher rate than the EPS-16 PLUS can receive it. If the EPS-16 PLUS is not ready to receive the information the
first time it is sent, then the SCSI. Drive must do one full revolution of its disk before it can send the information again. This can
cause the SCSI drive to take a longer time to load.
What number is best? Start out with the default value, INTERLEAVE=O. This will use the default ratio for your particular drive,
which is usually 1 to 1. Therefore, an INTERLEAVE value of '0' or '1' will generally produce the same results. Format the drive and
save a sound to your SCSI drive that is around
1000 blocks. It should take approximately 2 seconds to load. If it takes longer, try reformatting the drive with IN1ERLEAVE=2.
Repeat the process of saving the 1000 block sound and seeing how long it takes to load. If you set the Interleave to a value that is too
high, the load time may be longer. Though the Interleave number has a range of 0 to 10, nOm1ally you should not have to set it
higher than 4. It's a question of trial and error. See what best suits you, or, if you don't want to worry about it, keep INTERLEA
VE=O. For more information, see your SCSI drive user's manual.
To format a SCSI hard disk drive:
. With power of both the EPS-16 PLUS and the SCSI drive off, insert the floppy disk containing the Operating System.
.
Turn on the SCSI drive, wait twenty seconds, then turn on the EPS-16 PLUS.
Note:
Important!
Page 8
The FORMAT SCSI DRIVE command is available only when booting from the floppy disk.;
- Press Command, then System-MIDI (System on the EPS), and scroll right until the display shows FORMAT SCSI DRIVE. Press
Enter.
- The display will show LOAD DEVICE = SCSI #. Use the Up/Down Arrow buttons to select the ill number of the SCSI device to be
formatted. Press Enter.
In a multiple hard drive set-up, make sure that you select the correct SCSI ill number for the drive to be formatted. Otherwise, you
may accidentally format a hard drive containing data that you do not want erased.
. The display will show DISK LABEL=DISKOOO. Use the data entry controls so select a unique name for this disk. (EPS-16 PLUS
only) Press Enter.
. The display will show INTERLEAVE=O. Use the Up/Down Arrow buttons to select the desired ratio. (See the discussion of
Interleave above.)
. Press Enter. The display will show ERASE AND FORMAT DISK? to verify that you are sure that you wish to lose all the data on
the disk. If you press Enter in response to the prompt, the formatting will begin and the display will show a flashing *
FORMATTING * message.
Part 2 -EPS-16 PLUS Commands
EPS-16 Plus SCSI Manual
Note:
The time it takes to format a SCSI drive depends on the size or formatted capacity of that drive (40 Meg, 100 Meg, etc.), and the hard drive
manufacturer's SCSI software implementation.
. If the message UNCONNECIED SCSI DEV or INVALID LOAD DEVICE appears, then there is a problem with your SCSI drive connection
or ill assignment.
. After the formatting is complete, the display will show the prompt COPY OS TO SCSI DRIVE? Press Enter. It is strongly recommended that
you answer "Yes" to this prompt, as it will make the SCSI drive "bootable" and will save you the trouble of transferring the O.S. later. If you
answer "No" then the format procedure will end and you must create your directory structure from scratch.
. The display will show another prompt MUST ERASE MEMORY, OK? Press Enter again if the contents of the memory are expendable. The
display will show INSERT MASTER OS DISK to prompt you to insert a floppy disk which contains the correct version of the EPS O.S. to
install on the SCSI drive. (If you've been following along, the O.S. disk should already be in the drive.)
. Insert the floppy disk and press Enter. The display will briefly show READING OS INTO MEMORY then WRITING OS TO DISK while
the C.S. is copied to the SCSI drive.
. The display will then show the SETUP DEFAULT DIRS? Prompt to ask if you want to have the EPS-16 PLUS automatically create a basic
directory structure and a macro file (refer to the following sections of the manual for more information on these topics). It is recommended that
you respond to this prompt by pressing Enter.
You will see many messages flash across the display as the EPS-16 PLUS creates the directory structure and the macro file. DISK
COMMAND COMPLETED will be displayed when the process is complete. The disk is now ready to load and save files.
. Eject the floppy and switch off the EPS-16 PLUS. Wait ten seconds or so, and then switch the EPS-16 PLUS back on. If you have transferred
the O.S. as suggested, the EPS-16 PLUS should now boot from the SCSI drive, and automatically load the default MACROFIL.E 1.
Updating the Operating System on a SCSI Drive
After you format a SCSI drive, it is strongly recommended that you copy the current version of the EPS/EPS-16 PLUS O.S. to that SCSI drive.
The standard procedure for formatting (described above) allows you to take care of this step semi-automatically, but if you want to update the
version of the O.S. on your drive later, this is the procedure to use. One benefit of booting from a SCSI hard drive is that the EPS-16 PLUS will
never again prompt you with LOAD OS DISK - HIT ENTER when you axe sampling, editing, or sequencing.
Page 9
EPS-16 Plus SCSI Manual
Part 2 - EPS-l 6 PLUS Commands
Note:
The EPS-16 PLUS will automatically and invisibly load any Operating System instructions from the SCSI drive as needed to do these
functions.
The O.S. can only be copied to a floppy disk or a SCSI drive if the O.S. was originally installed during the formatting process. Attempting to
copy the O.S. to a formatted disk that already has files saved to it, but does not contain the O.S., will result in an error message.
The Copy O.S. Command allows the O.S. to be copied to either a floppy disk, flashbank (EPS-16 PLUS only) or a SCSI drive. The source of
the EPS-16 PLUS O.S. to be copied is always the floppy disk in the internal drive. The destination is the currently selected device as selected
by the Change Storage Device command (explained earlier).
To copy the EPS-16 PLUS O.S. to a SCSI Drive, Floppy Disk or Flash bank:
- If the destination device is not currently selected, select the Connect device using the Change Storage Device Command as described
previously.
- Press Command, then System-MIDI (System on an EPS).
- Scroll right until the display shows Copy O.S. TO DISK and press Enter. - The display shows MUST ERASE MEMORY, OK? Press Enter.
- The display shows INSERT MASJER OS DISK. Insert a floppy disk with the BPS-16 PLUS O.S. to be copied into the internal floppy disk
drive and press Enter.
- The BPS-16 PLUS willautomatical1y copy the O.S. from the floppy disk to the device selected. If the floppy disk is the destination device,
then insert the floppy disk you want the BPS O.S. copied onto when you are prompted and press Enter.
Booting from a SCSI Drive
If you have successfully formatted your SCSI drive using the procedure described on the preceding pages, or if you have just copied the O.S. to
the SCSI drive, then you may boot from the SCSI drive. Turn off the EPS-16 PLUS, and wait about ten seconds before turning it on again (with
no floppy disk in the internal drive). The EPS-16 PLUS should now look for the O.S. on a SCSI drive and boot from it.
The EPS-16 PLUS will always look for the O.S. first on a floppy disk. If there is no floppy disk in the drive, it will then look to for a Flashbank
containing the O.S. (EPS-16 PLUS only). If it finds neither, it looks for the O.S. on a SCSI device. The EPS-16 PLUS SCSI device with the
highest priority (ill) will be the device from which the EPS-16 PLUS boots. This device becomes the default Storage Device. If file number 5 in
the root directory is a Macro file, then that Macro file will automatically be loaded at boot up.
The only difference is that the FORMAT SCSI DRIVE command disappears from the list of System Commands when you have booted from a
SCSI drive. This is intended to protect you from accidentally erasing your EPS-16 PLUS SCSI drive.
Page 10
Part 2 -EPS-16 PLUS Commands
EPS-16 Plus SCSI Manual
SCSI vs. Floppy Drive
Almost all the commands that apply to floppy drives also apply to hard drives. Commands such as updating the O.S. and saving or deleting
files work the same way for hard drives, except faster. Saving riles is somewhat faster and loading is much faster. You have to make sure that
you have the correct device selected for the function that you want to do. Only one device can be selected at anyone time; for example, if you
are looking at files on the hard drive, you won't see any indication of files on the disk in the floppy drive. To access files on other storage
devices, you must select a new device using the CHANGE STORAGE DEVICE command. Make sure to press Enter to initiate the command
and that the EPS-16 PLUS then briefly displays COMMAND COMPLETED. Now, whenever you press Load and one of the Page buttons, you
will be seeing the files for that device.
Another important distinction is that while SCSI drives are much faster and more convenient than floppies, they are also very sensitive and
fragile. To be safe it is always wise to make sure that you have copies of important files on floppies as well as on your hard drive. If you
assume that the hard drive could fail at any time, and take the necessary precaution of making backups of your files, then you will be prepared
in case it ever does malfunction and you have to rebuild your drive. Refer to the section on backing up your drive for more information on this
topic.
EPS-16 Plus SCSI Manual
Part 3 - Managing Disk Files
File Types
When you press the Load button and one of the Page buttons, Instrument, Seq-Song, System-MIDI, or Effects, the EPS-16 PLUS displays any
files of the particular type indicated that are available on the currently selected storage device. For example, on the instrument Page, you will
see it list of any instruments or Bank Files which are present The following chart shows which pages contain the different file types, and which
indicator lights will be illuminated on the display for each type.
EPS-16 PLUS File Types:
MODE/Page LOAD/Instrument
LOAD/Seq.Song
LOAD/System.~I.
LOAD/Effects
File Types
Instruments Banks
Sequences Songs
Directories
Macro Files
System Exclusive Data Effect Files
Indicators
CMD + INST
CMD + INST+ BANK LOAD + SEQ
CMD +SEQ + SONG LOAD +SYSTEM
LOAD + SYSTEM + MACRO
LOAD + MIDI LOAD
On the original EPS, the four Page buttons used in LOAD mode are Instrument, Seq.Song, MIDI and System.
EPS File Types:
MODE/Page LOAD/Instrument
LOAD/Seq.Song
LOAD/MIDI LOAD/System
File Numbers
File Types
Instruments Banks
Sequences Songs
System Exclusive Data Directories
Macro Files
Indicators
CMD + INST
CMD +INST+BANK
CMD + SEQ
CMD +SEQ + SONG
CMD +:MIDI
LOAD + SYS1EM
LOAD +SYS1EM + MACRO
Associated with each file in a given directory is a number indicating its position in that directory. File numbers are not assigned or organized
according to file type, but by the order in which they are saved. For example, file #1 may be an Instrument, file #2 may be a sequence, file #3
may be another Instrument, and so on, depending on the order in which they were created. There is a limit of thirty- eight (38) files that can be
grouped together at once. When using floppy disks, this number is not as important, since it is rare to be able to fit the maximum number of
files on one disk. SCSI drives, however, have the capacity to hold thousands of files, and it becomes desirable to organize the files into distinct
groups called Directories.
Page 12
Part 3 - Managing Disk Files
EPS-16 Plus SCSI Manual
Directories
What is a Directory?
A directory is a group of up to thirty-eight (38) files. These files can be any combination of file types. One possible fIle type is
another directory, so you c create a directory within a directory (called a sub-directory). If you do not crea any sub-directories, you
will be limited to the thirty-eight files of the Root (or Main) directory. The Root directory is the default top level directory selected
when you change storage devices or boot up. If you save a sound without selecting a sub-directory first, it will be saved in the Root
directory. If you are familiar with the Macintosh, sub-directories are similar to folders.
As explained above, the EPS-16 PLUS will only allow you to scroll through a list of up to thirty-eight files at anyone time without
changing directories. However, anyone (or more) of these files may be a directory, which may cont up to thirty-eight more files.
Every time you create a directory, you are makin~ space for thirty-eight more files on yom SCSI drive. You eventually create a treelike structure with the root directory as the trunk, and the various levels of sub-directories conceptually similar to the branches of
the tree. For example:
Sample Directory Structure
In this example, files 1,2, and 3 in the FACTORY SNDS directory are Instrument Files which would be displayed by pressing Load,
then Instrument. Also located within this directory is File 4. File 4 is a Sub- Directory called PERCUSSION. If you press Enter
while this Directory is displayed, you will enter the sub-directory and will no longer be able to see PIANO or BASS when you press
the Instrument button; instead, you will see POWER DRUMS and LA TIN SOUNDS. This means that the directory named
PERCUSSION is currently selected and you are viewing the files contained in i There are several EPS-16 PLUS operations and
commands for creating directories and moving up and down through the directory structure which you will need to use.
Part 3
- Managing Disk Files
EPS-16 Plus SCSI Manual
Directory Commands
To Enter or Move Down into a Directory from the Front Panel:
- Press Load then System-MIDI (System on an EPS), and use the Up/Down Arrow buttons to find the name of the directory you wish to enter.
- Press Enter. This will open the new directory and allow you to view the contents of that directory.
- The display will show EXIT TO <dir name> where Irdjr name" is the name of the parent directory which you came down from.
- You can also enter a directory by sending the EPS-16 PLUS a Program Change. Refer to "Receiving Program Changes" when MIDI IN
MODE = MUL11 or MONO B in the Musicians Manual.
Note:
Pressing the right or left arrow keys when this EXIT TO <dir name> (which is file 0 in the directory) is displayed will show you the name of
the current directory that you are located in.
Once you have entered a directory from the LOAD/System.: Midi page (LOAD/System on an EPS), you will not see any file names (except
Macro, System Exclusive Files and other directories) until you press one of the Page select buttons, Instrument, or Seq.Song. Remember to
select the file type you are seeking before concluding that you have not found the Correct directory.
To Exit from or move back Up from a Directory:
- Press Load, then System-MIDI(System on an EPS), and use the Up/Down Arrow buttons until the EPS-16 PLUS displays EXIT TO <dir
name> (where <dir name> is the name of the directory above the currently selected directory).
SHORTCUT: Press Load then 00 to go directly to the EXIT TO entry. - Press Enter. Depending on how many directories within directories
you have, you may need to press Enter a few times to return to the Root Directory level.
- You can also exit from a directory by sending the EPS-16 PLUS: MIDI Program Change #1. Refer to "Receiving Program Changes" when
MIDI-IN MODE = MULTI or MONO B in the Musicians Manual.
Creating a New Directory
- Press Command, then System-MIDI (System on an EPS), and scroll to the CREATE DIRECTORY command. Press Enter.
- The display shows DIRNAME = NEWDIRECTORY. You may edit the name of the directory to be created by using the Data Entry slider
and the Arrow buttons. The name you choose should in some way reflect the files which will be contained in the directory (see the
Directory Recommendations section below).
- Once you have chosen a name, pressing Enter will create a new sub-directory in the current directory. The display will show DISK
COMMAND COMPLETED .
Page 14
Part 3 -Managing Disk Files
EPS-16 Plus SCSI Manual
Deleting a Directory
A directory is deleted in the same way as any other disk file:
- Make sure that there are no files remaining in the directory. A directory may not be deleted if it contains any files.
- Press Load then System-MIDI (System on an EPS) and scroll to the name of the directory you wish to delete.
To check the number of files still contained in the directory, scroll left or right. while the directory name is displayed.
With the name of the directory you wish to delete displayed, press and hold down Load, then press Cancel. You will be prompted to
verify that. you wish to continue. If you wish to delete the directory, press Enter. The directory will be deleted from the disk.
Directory Recommendations
If you have formatted your SCSI drive using the default directory structure option, then some of the following considerations have been
taken care of for you. However, it is still important to understand the concepts described here if you wish to get maximum use and
optimum performance from your system.
It is a good idea to give some thought to how you will be using your EPS-16 PLUS and SCSI drive before you start saving files, so that
you will not have to reorganize files later, which can cause a degradation of drive performance as well as creating more work. Try to
organize files of similar types into separate directories where you can find them more easily. Start by creating directories which cover
broad areas. It is possible to make a directory which contains only other directories. The default Root Directory is of this type. It contains
directories for each of the main EPS-16 PLUS file types and looks like the following:
EPS Default Directory Structure
Root Directory
FACTORYSNDS
MYSEOUENCES
5 - MACROFILE 1
You could start saving different instruments into the SOUNDS d1rectory but you would be limited to thirty-eight instruments. Instead, it
makes more sense to first create more directories which will contain specific groups of sounds.
Part 3
- Managing Disk Files
Page 15
EPS-16 Plus SCSI Manual - -- - - -
Make sure that you are in the directory you think you are in before creating more subdirectories or saving new files (see the Enter
Directory description). This will save you confusion later when looking for your files.
File Paths
It is helpful to have an understanding of how the EPS-16 PLUS keeps track of all the files that can be on the hard disk. Please refer to the
Sample Directory Structure Diagram on p. 13. If we were to describe the location of the factory sound CHOICE DRUMS on your SCSI
drive, we might say:
"The CHOICE DRUMS instrument file is in the PERCUSSION directory, within the Factory SNDS directory, which is in the SOUNDS
directory, which is on the SCSI 1 storage device."
If we read the description from right to left, starting with the DEVICE, it becomes:
SCSI 1..S0UNDS..FACTORY SNDS..PERCUSSION..CHOICE DRUMS
This description of the location of the file is called a file path. This is the path that the computer will follow to find the file. If you use an
IBM PC running under MS-DOS, you may already be familiar with file paths. On a Macintosh, the file path would correspond to a list of
the folders you would open in order to locate the file.
Bank Files
You may already be familiar with the concept of using Bank Files to load a group of instruments, presets, and/or sequences with a single
command. The demos on the factory disks are a good example of Bank Files. If you are not familiar with Bank Flies, please refer to the
Musicians Manual for an explanation.
Understanding the use of Bank Files is very important if you want to get the most from your EPS-16 PLUS, SCSI drive system.
Banks are particularly useful in conjunction with SCSI drives because they can vastly simplify the process of loading a set of files which
may come from many different directories. Every time you load an Instrument or a Song file, the EPS-16 PLUS remembers the file path
that was used to find the file. When you save a bank, the EPS-16 PLUS saves the file path for every loaded Instrument and the currently
loaded Song, according to where it was loaded from.
When you load the Bank file, the EPS-16 PLUS will know where to find each Instrument and Song file, even if you have multiple SCSI
drives, and regardless of which directory the bank file is loaded from. This allows you to keep all of your Bank files in one directory or
group of directories, as described in a preceding section. The Bank file resides in whatever directory you are in when you save the Bank
to disk.
Part 3 -Managing Disk Files
EPS-16 Plus SCSI Manual
Macros
What Is a Macro?
It may have occurred to you that with the large number of files that a hard drive can contain, it would be nice to be able to get directly to
a directory or specific file quickly rather than having to scroll through all your files. Macros allow you to do this. In the EPS-16 PLUS, a
macro is a shortcut command that allows you to get to a file or directory on your hard drive (or floppy) with just two or three button
presses.
Complete understanding and utilization of Macros is very important to the effective use of your SCSI drive. Spend time to make sure that
these concepts are clear to you, and that you set up Macros to get you to all the directories and files that you use often.
Organizing your files in directories makes it easier to locate an individual file, but moving up and down through directories can become
tedious if you are working with a specific set of files that are in different directories. Macros allow you to assign a number (1-28) to an
individual file location. You use or invoke the macro by holding down Load while entering the macro number (using the Ten Key Pad),
and when you release Load, the EPS-16 PLUS will automatically go to the connect directory for the requested file and display its name.
The group of up to twenty-eight contently defined macros may be stored as a Macro File. These Macro Files appear along with
Directories on the LOAD/System.1flDI Page (LOAD/System on an EPS). You can have many macro files on disk, but the only macros
that are in effect are the macros from the most recently loaded macro file~ Only one can be loaded in at a time, giving you access to
twenty-eight macros. The best place to save these files is in the root directory. The default Macro File created by the formatting
procedure is located in the Root Directory of the SCSI drive, and is called MACROFILE 1. A Macro file having this or any other name
will be automatically loaded at boot up if it is found as file number 5 in the Root Directory. If you want to use other macros, the first
thing you should do is load the desired Macro file after you boot from the SCSI drive.
The Macro file created by the formatting procedure, named MACROFILE 1, contains macros pre-defined for getting to the various
directories in the default directory structure, as follows:
Part 3
- Managing Disk Files
Page 17
EPS-16Plus SCSI Manual
Note:
All Macro operations are performed with the Load button held down, and take effect when the Load button is released.
Loading a Macro File
- Press Load then System-MIDI (System on an EPS), and scroll to the Macro File that you wish to load.
- Press Enter to load a new set of twenty-eight macros into the EPS-16 PLUS.
Creating a Macro
. Find the file or directory to which you want to assign a macro. Press and hold the Load button, type any number from 1 to 28, while
still holding Load, press Enter, then release Load. The macro assignment will remain in effect until another macro file is loaded or the
EPS-16 PLUS is rebooted.
Invoking a Macro
.
Press and hold the Load button, type and release the number of the desired macro. When you release the Load button, the EPS-16
PLUS will go to the file that is assigned to the macro. If the file is a directory, you will need to press Enter to actually enter the directory.
If no file is assigned to the macro, the macro number will be displayed, and nothing else will happen.
Saving a Macro File
. First, invoke Macro 0 (zero) to get back to the proper directory for the currently loaded macro file.
(Macro 0 is a special macro which is always automatically assigned to the currently loaded Macro File and cannot be reassigned. It is
used to allow you to easily get back to the directory where the Macro File that you last loaded is located. This makes saving your
modified Macro Files easier.)
. Press Command, then System. MIDI (System on an EPS), and scroll to the SAVE MACRO FILE command and press Enter. The name
of the current Macro File will be displayed.
. The display will show FIL.E NAME = MACROFILE 1. If you want to create a new Macro file, edit the name of the file, and press
Enter when you are ready. The new Macro file will be saved in the same directory as the old Macro file(s).
. If you wish to update the old file, just press Enter. When the EPS-16 PLUS displays DELETE OLD VERSION? press Enter only if
you wish to replace the old macro file with the new set of macros. This will save your newly defined set of macros into the Macro File
which was last loaded.
You can have as many different Macro files as you want by giving them different names. You may also save them into any directory,
although it is a good idea to save them in the root directory so that they are easy to load when you boot up. Remember that macros can
take you to any file or directory, no matter how far down the file path. Also remember that you must resave the Macro file any time you
add new macros and want them to be there the next time you boot the EPS-16 PLUS.
Page 18
Part 3
- Managing Disk Files
EPS-16 Plus SCSI Manual
A good example of the use of macros would be to assign Macro 11 to a directory consisting solely of Bank files. Now, whenever you
want to save your current group of instruments (and any saved Song file) as a Bank, simply invoke Macro 11 which selects your Bank
directory, and then use the SAVE BANK command, (press Command, then Instrument, and scroll to SAVE BANK). This save you
from having to locate your bank directory each time. Another useful application of macros is the transfer of files from floppy disks onto
your SCSI drive.
Part 4 - Applications and Troubleshooting
Transferring Files from a Floppy Disk to a SCSI Drive
. To load a sound from floppy disk, you must use the CHANGE STORAGE DEVICE command to select the floppy drive, or use Macro
1 from the default Macro File.
.
Load the instrument file from the floppy disk into one of the eight instruments. . Now, use the CHANGE STORAGE DEVICE
command or a Macro to change to a directory on the
SCSI drive. Make sure that you have entered the directory.
Before you save the file to me SCSI drive, you must make sure that you are in the proper directory. For example, move down into
SOUNDS, then down into FACTORY SNDS. Or you can use default Macro 2 to automatically take you to the FACTORY SNDS
directory. Press Enter to enter this directory. You
may want to define a macro that takes you directly into the directory you have selected for instrument files on your SCSI drive instead of
using me default macro. This is probably the best approach.
. To save this file, press Command, then press Instrument and scroll to the SA VB INSTRUMENT command. Shortcut: to get to this
command, press Command then double-click on the Instrument button.
Repeat this procedure for each sound you wish to transfer. You may want to load and save a few instruments at one time for
convenience. After you move your sounds over to the SCSI drive, try loading one. Notice that the files load almost instantaneously from
the SCSI drive. Once you get the hang of moving around in directories, you can decide for yourself how you want to organize your
directories.
Transferring Banks from a Floppy Disk to a SCSI Drive
.
Load the Bank (including Song, if applicable) from the floppy disk.
. Use the CHANGE STORAGE DEVICE command to select the appropriate SCSI drive.
.
Locate the directory you wish to save the instruments to and press Enter.
. Press Command, then Instrument, and scroll to SAVE INSTRUMENT. Select the first instrument to be saved and press Enter twice.
(See Important Notice below.)
.
Repeat the above steps for all the Primary Instruments.
. If the Bank includes a song, locate the directory you wish to save the song to and press Enter.
.
Press Command, then Seq.Song, scroll to SAVE SONG + ALL SEQS, and press Enter twice.
. Locate the directory you wish to save the Bank to and press Enter.
.
Press Command, then Instrument and scroll to SAVE BANK. Press Enter twice.
Page 20
Part 4 -Applications and Troubleshooting
EPS-16 Plus SCSI Manual
Important Note about Transferring Banks
When saving instruments that will be used as part of a Bank, it is imperative that only Primary Instruments be saved to the SCSI drive
and 1lQ! copies of those Primary Instruments. The following will help you detem1ine which Instrument track locations contain Primary
Instruments. If a bank contains instrument copies, those copies will be the last. group of sounds to be loaded into memory. Therefore,
while loading the Bank, write down the Instrument track location numbers as they are loaded. If a Song/Sequence file is also used in this
Bank, there will be a short pause while the sequencer is being loaded, followed by the Creation of any instrument copies. It is before this
pause that all Primary Instruments are loaded. If no song is used by the Bank, the instrument copies will be Created immediately
following the Primary Instruments.
If you follow these steps, you will successfully transfer your Banks from floppy to SCSI drive.
Moving Sounds Between Directories
To copy an instrument File from one directory to another:
.
Load the file into one of the instrument track locations and select it.
. Use the SAVE
.
Change to the destination directory.
INSTRUMENT command to save the instrument file to the new directory. .
. To be safe, you may want to load in the newly saved sound just to make sure that it was saved correctly. You may then go back and
delete the file from the original directory.
A few notes on moving files:
.
A similar procedure can be used for all of the other types of files as well.
. Use caution when moving files that are used by a Bank. A bank remembers the 'File Path' to get to a particular file, not the file itself. If
you need to move a file used by a bank, first load the Bank that uses the file. Then save the file to its new location, and resave the Bank.
You may then delete the old copy of the file.
Getting the Best Performance from your SCSI Drive
There are things you can do to keep your drive running at top speed The speed of a drive is very dependent upon how quickly it can
locate the information contained in a file and transfer it to the device which has requested it.. SCSI drives can be very fast, but there are
things you can do to optimize their performance and keep them moving as fast as the can go.
The main problem to avoid is disk fragmentation, which is a condition that occurs when files become broken into separate parts spread
out over different areas of the disk. The drive will have to move its heads frequently to find the various pieces of the file, and this slows
down loading. The condition develops gradually as files are saved, ~ replaced with new versions of different sizes and so on. The drive
tries to use the disk efficiently by filling in gaps when they are
Pa114
- Applications and Troubleshooting
Page 21
EPS-16 Plus SCSI Manual
found, but eventually this results in fragmentation. The following are techniques you can use to minimize fragmentation, and procedures that
will eliminate it
. Once you format your SCSI. drive, it is strongly suggested that you create air your sub-directories before you save any files to prevent the
disk from becoming unnecessarily fragmented.
. Only save finished work to your hard drive. Deleting files and replacing them causes the disk to become fragmented. Work on your files
using a floppy, then save it to the hard drive when it is complete.
. If the disk becomes fragmented, the files will take a longer time to load because parts of a single file may be located in a number of places on
the disk rather than in a contiguous block. The more fragmented a drive (or file) gets, the longer it will take to load.
Advice About Using SCSI Drives
Your SCSI DRIVE is an extremely valuable and fragile piece of sensitive computer equipment Be especially careful when transporting your
drive to avoid shocks, temperature and humidity extremes, and proximity to magnetic fields. Be careful about static discharges when handling
and connecting your drive. Do not move or bump your drive while it is running. Read the owners manual that came with it for additional
advice.
To avoid big disappointment later, the most important thing is to keep your files backed up. Always save files you care about in two places,
with one of them being a floppy disk. The floppy will serve as your backup in case your hard disk goes on an unexpected vacation, which they
sometimes like to do. Everyone who works with hard disks is eventually faced with the big crash. Be prepared. Have fun, enjoy the
convenience and speed but be realistic about the reliability. Always assume that it will break when you least expect it
The next most important thing is to understand and use Macros and Banks effectively. They allow you to minimize the confusion that can occur
when managing large amounts of information with limited ability to see the big picture.
Try to form a mental image of your directory structure, and use the system logically. It is a very good idea to keep a written record of where
your files are on your SCSI drive, including the directory structure. As you add or delete flies, update your written record as well. This will
help prevent your "losing" a file because you can't remember what directory it is in.
Part 4 -Applications and Troubleshooting
EPS-16 Plus SCSI Manual
Troubleshooting
Error Messages
These are some messages that may appear while you are using the EPS-16 PLUS with SCSI. The meanings of the messages are described
below.
UNCONNECTED SCSI DEV
What to do:
A SCSI device that was detected by the EPS-16 PLUS at boot up is no longer connected or turned on
Check your- SCSI connections. If your SCSI drive has a changeable ID number, make sure it matches the SCSI Device Number you have
chosen in the CHANGE STORAGE DEVICE Command.
INVALID LOAD DEVICE
What to do:
No SCSI device with this ID was connected to the network when the EPS-16 PLUS booted up.
Use the CHANGE STORAGE DEVICE Command to verify that. you are using the correct SCSI Device number.
NOT AN EPS SCSI DEV
What to do:
The SCSI device selected is not an EPS formatted storage device, and cannot be used by the EPS-16 PLUS.
You may choose to reformat the SCSI drive for use with the EPS-16 PLUS. Use caution as this will erase all previously saved data on the SCSI
drive.
DISK HAS BEEN CHANGED
What to do:
The disk (or cartridge) has been ejected from the drive since the last time the drive was accessed by the EPS-16 PLUS.
Reinsert the disk or cartridge, press Load, then Instrument, and continue.
DISK DRIVE NOT READY
What to do:
This message usually occurs when the EPS-16 PLUS is trying to access the floppy drive or a removable SCSI drive when there is no disk or
cartridge in the drive.
If this message occurs, insert a floppy disk or cartridge in the drive, then use the CHANGE STORAGE DEVICE Command to select the
appropriate SCSI ill number (or press Load, then Instrument). This event may take place because of improperly saved files. Refer to the section
on "Transferring Banks from a Floppy Disk to a SCSI Drive."
P an4
- Applications and Troubleshooting
Page 23
EPS-16 Plus SCSI Manual
DRIVE NOT RESPONDING
What to do:
If encountered while using a SCSI drive, this error may indicate a problem with your SCSI cables. The cable from the EPS-16 PLUS to the
drive may be too long, or the system may not have proper termination.
Check all connections and make sure that you are using the correct cables. Make sure you have the proper termination. If this message appears
repeatedly while files are being saved to the disk, then it is likely that you are invisibly losing sectors of your disk. Correct the problem before
continuing to use the disk.
Final Thoughts
The main problems that you are likely to encounter are the hard disk problems described above and cable problems. These are some additional
recommendations that we can make to eliminate many problems:
.
Use the shortest cable possible when connecting SCSI devices.
. Be sure to use proper termination. Refer to the SCSI Terminators section of this manual.
. If you need to use an extension cable between your EPS-16 PLUS and your SCSI device(s), use high quality shielded SCSI extension cables
only. You should be careful to avoid running SCSI cables across power cables and other sources of powerful electromagnetic fields.
.
It is required that the SCSI device supply power to the internal termination in
the EPS-16 PLUS. Most SCSI drives we have tested do provide power to the SCSI bus. Check your SCSI device manual for further
information.
. Some SCSI drives may have their Device ill number set internally. Refer to the SCSI drive's manual or manufacturer for more information.
Remember, most of the problems we encounter are with cabling or with systems that are not terminated properly. If you encounter a problem,
make sure you have checked these things carefully before assuming that your SP-l/SP-2 or your SCSI drive are at fault