1
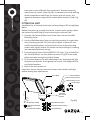
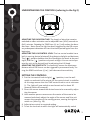
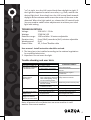
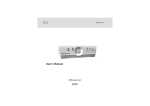
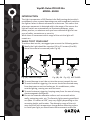
Vap WL Delux PIR LED Alu
MODEL: 89438
INTRODUCTION
The Light incorporates a PIR (Passive Infra Red) sensing device which
continuously scans a preset operating zone and immediately switches
the light on when it detects movement in that area. This means that
whenever movement is detected within the range of the sensor the
light will switch on automatically to illuminate pathways, steps,
patios, porches, or whatever area you have selected to light for reasons of safety, convenience or security.
While there is movement within range of the unit the light will
remain on.
WHILE TO FIT YOUR LIGHT
To achieve best results, we suggest you account the following points:
■ Ideally the Light should be mounted 1.8 to 2.5 meters (6 to 8ft)
above the area to be scanned (refer Fig.1A).
130°
2.5M
2M
6M
10M
Fig.1(A) Detection Range
Fig.1(B) OK Fig.1(C) NOT GOOD
■ To avoid damage to unit-do not aim the sensor towards the sun.
■ To avoid nuisance triggering, the sensor should be directed away
from heat sources such as barbecues, Air-conditioners, other
outside lighting, moving cars and flue vents.
■ To avoid nuisance triggering, keeping away from the area of strong
electromagnetic disturbance.
■ Do not aim towards reflective surfaces such as smooth white
walls, swimming pools, etc. The Security light scanning specifications (Max. 10 meters at 130°) may vary slightly depending on the
mounting height and location. The detection range of the unit
may also alter with temperature change.Before selecting a place
to install your light you should note that movement across the
scan area is more effective than movement directly toward or
away from the sensor. (refer Fig.1B). If movement is made walking
directly towards or away from the sensor and not across, the
apparent detection range will be substantially reduced. (refer Fig.
1C)
FITTING THE UNIT
Installation by a licensed electrician and according to IEC wiring Regulation.
Before commencing any electrical work, ensure mains supply cables
are isolated by switching off and removing the relevant fuse.
1. Unscrew the Terminal Box Cover Screw then remove the Wall
Mounting Cover
2. Use the Wall Mounting Cover to mark the position of screw holes
onto mounting surface. Drill the wall to depth of about 45 mm
and fit the plastic plugs, and then fix the Cove to the mounting
surface with rightly screws. Be careful to avoid drilling or screwing
into concealed electrical wiring.
3. Connecting the Power Cable (H05RN-F 3G 1mm², not included) to
the Terminal Block, see the relative symbol in Fig.2B. Ensure the
cable must pass through the Cable Gasket.
4. Fit the lamp body to the Wall Mounting Cover. Adjusting the light
direction you desired, then tighten the screws. Not forget the flat
and locked washers.
5. Switch the main power on.
Important: loosen the lock nuts and screws and outdoor wall light
before making any adjustments.
Lamp Body
Terminal Block
Wall Mounting Screws
235 mm
Wall Mounting Cover
Plastic plugs
195 mm
210
mm
Terminal
Box Cover
Screws
N
Blue(Power Cable)
Yellow/Green(Power
Cable)
Brown(Power Cable)
Yellow/Green(Lamp Wire)
L
Fig.2(B)
Blue(PIR/Lamp Wire)
Brown(PIR Wire)
2
UNDERSTANDING THE CONTROLS (referring to the Fig.3)
Fig.3 KNOB
ADJUSTING THE DURATION TIME: The length of time that remains
switched on after activation can be adjusted from (10±5) seconds to
(4±1) minutes. Rotating the TIME from (+) to (-) will reduce the duration time. Note: Once the light has been triggered by the PIR sensor
any subsequent detection will start the timed period again from the
beginning.
ADJUSTING THE LUX CONTROL LEVEL: The Lux control module has a
built-in sensing device (photocell) that detects daylight and darkness.
The (
) position denotes that the Floodlights can work at day and
night, and the (
) position only work at night. You can set to operate the unit at the desired level by adjusting the LUX knob.
ADJUSTING THE SENSITIVITY: The sensitivity means the Maximum
distance which PIR Sensor can be triggered by movement body. Turning the SENS knob from (+) to (-) will decrease the sensitivity.
SETTING THE CONTROLS
1. Put the Lux control knob to light (
) position, turn the wall
switch on and wait half a minute for the control circuit to stabilize.
At this stage ensure that the TIME control knob is set at minimum
(-). The light will now switch on and remain on for about 30
seconds (within 60 seconds).
2. Direct the sensor toward the desired area to be scanned by adjusting the sensor.
3. Have another person move across the center of the area to be
scanned and slowly adjust the angle of the sensor until the unit
sensors the presence of the moving person, causing the Light to
switch on. (refer Fig. 1B).
4. Adjust time control to required setting.
5. To set the Lux level at which the Light will automatically switch
3
“on” at night, turn the LUX control knob from daylight to night. If
the Light are required to switch on earlier, e. g. Dusk, wait for the
desired light level, then slowly turn the LUX control knob towards
daylight while someone walks across the center of the area to be
detected. When the Light switch on, release the LUX control knob.
You may need to make further adjustments to achieve your ideal
light level setting.
TECHNICAL DETAILS:
Voltage:
Wattage:
Detection range:
Duration time:
Weatherproof:
Power Cable:
220-240 V ~ 50 Hz
27X0.5W LED
130º and Max. 10 meters adjustable
from (10±5) seconds to (4±1) minutes adjustable
IP44
3G, 1.0mm² flexible cable
User manual - Install instruction should be revised.
1. The lamp has to be installed according to the national regulations
by a qualified electrician.
2. Important: Do not invert the light.
Trouble shooting and user hints
PROBLEM
Light does not switch on
when there is movement
in the detection area.
Light switches on for no
apparent reason
(false trigger)
Light remains on.
Light switches on during
daylight hours.
When setting controls in
daylight the detection
distance becomes shorter.
POSSIBLE CAUSE
1. no mains voltage
SUGGESTED REMEDY
Check all connections,
and Fuses/switches
2. nearby lighting is too bright.
Redirect sensor or relocate
the unit
3. controls set incorrectly
Readjust sensor angle or
control knob
1. heat sources such as air-con,
Adjust direction of sensor head
Vents, heater flues, barbecues, away from these sources.
other outside lighting, moving
cars are activating sensor.
2. animals/birds e.g. possums or Redirecting sensor head may help.
domestic animals.
3. reflection from swimming pool, Redirect sensor.
or reflective surface.
1.continuously false triggered
Redirecting sensor head may help
2. time is set too long.
Reduce time
1.LUX control knob is set to
Turn the LUX control knob to
daylight position.
desired light level setting.
1.interference by sunlight
Re-test at night.
Note: all passive infra red detectors are more sensitive in cold
weather than warm weather.
4