1
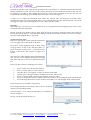
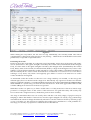
CONFERENCE SYSTEM™
Close Talk Conference System
Quick Start Programming and Setup Guide
Date:
2014-05-02
Version: 1.03
Close Talk Conference System™ c/o Apodosis AB, Landsvägen 51, S-172 65, Sundbyberg, Sweden
Tel: +46-(0)8-7645227, www.close-talk.com www.closetalk.se
[email protected]
Page: 1 of 15
CONFERENCE SYSTEM™
Introduction
This document is a step-by step instruction on how to program the Close Talk Central Unit to suit the
customer’s needs. Instructions here will be direct, without in-depth explanations and as so, it will not
contain instructions for how to operate the Central Unit, please refer to the Central Unit User Manual for
how to use the front panel and how to find and alter unit parameters. Be sure to have the Central Unit
User Manual available as a parameter and programming reference.
This is also not a general system installation instruction; it will assume that the system hardware is
installed and operating correctly. However, there will be an instruction on how to use the Close Talk
Install test and measurement software to verify and document the system operation.
Below is a series of questions to be asked the actual users of the system, make sure that the chairman (if
any), secretary, technical manager, members of the board, …, i.e. one or more of the persons that will be
in charge of the system and its usage is present. With the proper skill to use the Central Unit front panel
and how to alter parameters, this setup guide should be possible to complete within an hour.
This instruction assumes a factory reset Central Unit, if the CU contains old programming, please doublecheck all the current Central Unit parameters against the user manual defaults settings before proceeding.
Programming the system logic
This section deals with setting up the system logical functionality such as speaker queues, chairman
functionality and power management.
1:
Ask the users:
“Do you need Chairman functionality, i.e. a delegate unit for a chairman that is guaranteed
to always have access to an active microphone?”
If the answer is “No”, make sure the CU parameter Chairman Unit 1 and 2 is set to 00000000 and go to step
2, otherwise proceed.
1:1:
Select a suitable Delegate Unit to use as a Chairman Unit. Turn it over and note the serial number.
Program that serial number into the CU parameter Chairman Unit 1. Tip! Mark the chairman Delegate
Unit with a sign or a sticker for easy finding, it is now a dedicated chairman unit.
1:2:
Ask the users:
“There is a limit of three active microphones in the system, when there are no available
microphones; the chairman can acquire a microphone in three ways:”
1: By “stealing”, i.e. one regular user looses the microphone and has to re-activate
manually. Set the CU Chairman parameter to Steal Channel
2: By “borrowing”, i.e. one regular user looses the microphone temporarily while the
chairman speaks and then gets it back automatically. Set the CU Chairman
parameter to Borrow Channel
3: By “owning”, i.e. the chairman has a dedicated microphone channel. This will
reduce the available channels for regular users to 2 active microphones but it also
means that the chairman will never interrupt another speaker. Set the Chairman
parameter to Own Channel
1:3:
Ask the users:
“Will the chairman require priority override, i.e. to be able to shut every other microphone off
and have an exclusive microphone?”
If the answer is “Yes”, set the CU parameter Chairman R. Key to Enabled, otherwise to Disabled. With this
setting enabled, the chairman can shut all other microphones off to get an exclusive microphone by
pressing the right key on the delegate unit. The activity LED on the Delegate Unit shines green instead of
Close Talk Conference System™ c/o Apodosis AB, Landsvägen 51, S-172 65, Sundbyberg, Sweden
Tel: +46-(0)8-7645227, www.close-talk.com www.closetalk.se
[email protected]
Page: 2 of 15
CONFERENCE SYSTEM™
yellow in this mode and no other microphones can be activated for as long as this mode is active. Once
the chairman shuts down the microphone with the right key, normal microphone activation is back.
Tip! The Chairman Delegate Unit supports going directly from normal to priority override and back. By
pressing the right and left key directly on the DU it is easy to switch between modes. Start by activating
the normal mode by the left key (yellow LED lights), go directly to override by pressing the right key
(yellow LED shuts of and green lights) and then back to normal by pressing the left key directly.
2:
Ask the users:
“How many simultaneously active microphones do you need? Note that there is a system limit
of three active microphones.”
Set the CU parameter Number of speakers to the required number 1-3. Note that if the Chairman parameter
(see step 1:2) is set to Own Channel, the choices are 2 or 3 because the dedicated chairman channel is
implicitly counted.
3:
Ask the users:
“Will you require a special “priority unit”? A “priority unit” is special Delegate Unit that
has microphone priority like a chairman and that will never loose the microphone activation
automatically. This type of unit is suitable for use on a speaker platform.”
This is a special use parameter. If a Delegate Unit that never looses microphone activation is needed,
select a suitable Delegate Unit, turn it over and note the serial number. Program that serial number into
the CU parameter Priority Unit. Mark the priority Delegate Unit with a sign or a sticker for easy finding.
If this function is not required, make sure the Priority Unit parameter is set to 00000000.
4:
Ask the users:
“Do you want the Delegate Unit to power off automatically when inactive? You can choose
between 1 and 59 minutes and the power-off timer is reset every time a microphone is
activated. This is very convenient but can also be a source of confusion, if the timer is set to a
short time and no-one activates a microphone, all delegate units will power-off, possibly in the
middle of an active conference or during a lunch break.”
Program the desired power-off time into the CU parameter Delegate Off. To disable the power-off timer,
set this setting to 0.
Note: There are several ways for a Delegate Unit to shut off:
•
•
•
•
•
Pressing the right key for two seconds
Removing the unit out of IR signal range for two minutes
Turning the central unit power off (then takes two minutes for the Delegate Unit to shut off)
The Central Unit Delegate Off timer function
By a low battery
5:
Ask the users:
“Do you want the Delegate Unit to automatically shut down an active microphone if no-one is
speaking into it?”
Program the desired shut-down time into the CU parameter Delegate Silent. To disable the shut-down
timer, set this setting to 0.
Note: In a noisy environment the microphone may pick up enough sound so that it never shuts down,
even though no-one is actively speaking into it.
Close Talk Conference System™ c/o Apodosis AB, Landsvägen 51, S-172 65, Sundbyberg, Sweden
Tel: +46-(0)8-7645227, www.close-talk.com www.closetalk.se
[email protected]
Page: 3 of 15
CONFERENCE SYSTEM™
Finally, explain to the customer:
•
The Central Unit contains an automatic first-in-first-out speaker queue, as soon as there is a free
channel the next unit will get the microphone activated automatically
•
When a Delegate Unit is waiting in the speaker queue the yellow LED lamp will blink slowly
•
When the microphone is active the yellow LED will be on (also green for Chairman)
•
Remember to turn off the microphone when done speaking to free the audio channel
•
If the customer requires more powerful meeting control tools; suggest the PC-software Close
Talk Control
Programming the system audio
This section deals with setting up the system audio. Programming the system audio correctly is critical
for system operation and customer satisfaction. However, it will not cover connecting the system to
external audio equipment using the Central Unit audio ports. It also assumes that the outgoing audio will
use the delegate unit's speakers only; it may be possible to follow these instructions using an external PA
or sound system although beyond the scope of this document.
Introduction
A block diagram of the system audio chain can be found in section 6 of the Central Unit User Manual.
The audio path from the Delegate Unit's microphone over the infrared link to the Central Unit uses fixed
levels and cannot be adjusted. In the Central Unit the incoming audio on the infrared channels are mixed
to a single channel and sent to the Line and Tele output ports where the Tele output level is fixed and the
Line output level can be adjusted. It is also processed and sent back, via the Central Unit Insert connector,
to the Delegate Units on the outgoing infrared audio channel. The level of the outgoing microphone
audio is regulated using the central unit parameter Delegate volume, the levels of the outgoing Line and
Tele signals are regulated using the Line In and Tele In parameters..
IMPORTANT!
Although the parameter is called Delegate volume it should not be used to adjust the Delegate Unit's
speaker audio level. Use one of the two scenarios below to achieve maximum signal to noise ratio:
-
If the Delegate Unit's speaker audio shall contain the incoming delegate microphone audio and
possible incoming audio on the Line and Tele ports, leave this setting at the default 38 (34 for
units with serial number lower than 2000, see central unit manual)
or
-
If the Delegate Unit's speaker audio shall only contain the incoming audio on the Line and/or
Tele port, set this parameter to 0
1:
Ask the users:
“Will you always be using the system with the same seating setup, the same number of
delegate units and in the same room?”
If the answer is Yes to all the conditions, it is recommended to effectively turn off the delegate unit's
volume knob for the speaker audio level by setting the central unit parameter Speaker Volume to an equal
value for the low and high level (see manual).
If the answer is No to one or more of the conditions, it is recommended to program the delegate unit
volume knob to a small adjustment span so it can be used to adapt the audio level according to the room,
seating and number of delegate units by programming the Speaker Volume parameter low and high level.
Delegate unit speaker sound level adjustment procedure
1.
2.
Place all the delegate units on their respective place, turn the volume knob fully left (important)
and turn them on (green light on)
Set the central unit Delegate Volume parameter in edit mode and set the left setting to 22
Close Talk Conference System™ c/o Apodosis AB, Landsvägen 51, S-172 65, Sundbyberg, Sweden
Tel: +46-(0)8-7645227, www.close-talk.com www.closetalk.se
[email protected]
Page: 4 of 15
CONFERENCE SYSTEM™
3.
4.
5.
6.
7.
8.
9.
10.
Activate the microphone on one delegate unit (make sure all other microphones are off), have a
person speak into the microphone at a normal speaking voice and at a distance of 10cm/4" from
the microphone
While the person is speaking, slowly increase the Delegate Volume left setting upwards until the
users consider the audio level good
When the audio level is good, press Enter to move to the right setting on the Delegate Volume
parameter and set this equal to the left setting and then press Enter to store the setting and exit
edit mode. The base speaker audio level is now set
Activate a second delegate unit microphone. If there is no feedback problem, go to step 8
If there is feedback with two activated microphones, adjust the left 2: setting of the Micro.
Compens. parameter in -2db steps until the feedback stops and store the setting
Activate a third (if required, otherwise go to 10) microphone. If there is no feedback, go to 10
If there is feedback with three activated microphones, adjust the right 3: setting of the Micro.
Compens. parameter in -2db steps until the feedback stops and store the setting
Turn off all active microphones
The base audio programming is now done. If the user question in the beginning was answered yes, go on
to the last paragraph in this section, otherwise proceed.
Programming the speaker audio level for different room and user numbers
In the previous procedure we programmed a suitable audio level for using all the delegate units and by
that established a base audio level with the volume knob effectively disabled. In this procedure we will
now program a suitable audio level for a lower number of delegate units, used in the same or another
room and/or setup.
The built-in delegate unit speakers are capable of surprisingly high sound levels but the total sound level
is also depending on the seating arrangement, number of delegate units and room type. If the question in
the beginning of this section was answered no, i.e. the system will be used in different setup scenarios
with varying number of delegate units, it is recommended to use the delegate unit speaker knob to set the
proper sound levels for the different setups.
1.
2.
3.
4.
5.
6.
7.
Place the lowest number of delegate units ever expected to be used simultaneously in a realistic
seating arrangement and turn them on. Make sure only these units are on (green light lit)
Turn the volume knob fully right on all the active delegate units
Set the central unit Delegate Volume parameter in edit mode, move the caret to the right setting by
pressing Enter once
Activate the microphone on one delegate unit (make sure all other microphones are off), have a
person speak into the microphone at a normal speaking voice and at a distance of 10cm/4" from
the microphone
If the speaker audio level is considered too low, slowly increase the Delegate Volume right setting
until the desired sound level has been achieved and then press Enter to store the setting
Verify that there is no feedback with two and (if required) three active microphones
Turn off all active microphones
The delegate unit volume knob is now programmed to allow the level to be adjusted according to the
setup and number of delegate units. When using all the units turn the volume knob fully to the left, when
using half the units set it to mid point and when using the minimum number of units, fully to the right.
Instruct the users:
•
To never adjust the delegate unit volume knob themselves (unless a headphone is inserted in the
unit)
•
Speak approximately 10cm/4" from the microphone in a normal speaking voice
•
The microphone is only active when the yellow light is on
•
Remember to turn the microphone off after speaking
Close Talk Conference System™ c/o Apodosis AB, Landsvägen 51, S-172 65, Sundbyberg, Sweden
Tel: +46-(0)8-7645227, www.close-talk.com www.closetalk.se
[email protected]
Page: 5 of 15
CONFERENCE SYSTEM™
2:
Ask the users:
“Will you be using headphones?”
If the answer is No, go to step 3, otherwise continue.
The delegate unit senses when a headphone is connected to the unit. The volume knob is now used to
regulate the headphones volume level and the unit's speaker is turned off. The parameter Headphones vol.
in the central unit is now used to set the adjustment span of the volume knob. When the headphones are
disconnected the speaker is turned back on and the volume knob will revert to the programmed speaker
volume level automatically.
1.
2.
3.
4.
5.
6.
7.
Insert a headphone into the delegate unit connector and turn the volume knob fully left
Set the central unit Headphones Vol. parameter in edit mode and the caret on the left setting
Activate the microphone on one delegate unit (make sure all other microphones are off), have a
person speak into the microphone at a normal speaking voice and at a distance of 10cm/4" from
the microphone
Start listening to the headphones and slowly adjust the left setting on the central unit to the
desired minimum level and then press Enter to move to the right setting
Turn the delegate unit volume knob fully right
Continue speaking into the microphone and adjust the central unit right setting until a desired
maximum headphones audio level has been achieved. Then press Enter to store the parameter
Turn all microphones off
The Delegate Unit uses a mini-tele (3.5mm) stereo plug.
3:
The central unit contains a simple two band shelving tone control that can be used to modify the "colour"
of the delegate unit sound. Please not that this setting will only affect the delegate unit microphone
audio, it will not affect the signals from the Line and Tele audio input ports.
Setting the tone control is a matter of taste but it is common to add some "warmth" to the microphone
audio by programming +2 or +4 to the central unit EQ Low parameter, the EQ High parameter is usually
set to 0.
External audio systems
If the Line and Tele In ports are used they are usually set to "unity gain" (see Central Unit User Manual),
i.e. a level suitable for most external audio equipment that ensures good signal to noise ratio. Since the
Line Out port level can be adjusted it is suitable to connect directly to an external PA or amplifier but it is
generally recommended to use a parametric or graphical equalizer in-between to adjust the sound to local
conditions and wishes. A suitable EQ setting is to add 2-3db lower shelving at 200Hz, a small +1db peak
at 5kHz and to apply maximum damping on all frequencies above 9kHz.
Important user information
Please inform the users and maintenance persons about the following:
•
•
•
•
•
•
When the Delegate Units are not in use, store them in a dry, cool and "dark" (not in direct
sunlight) place
It is recommended to always keep the Delegate Units connected to the chargers when not in use
The expected battery life is 2 years (according to battery manufacturer data sheet) but 3-5 years
is common if properly maintained
There is no short time limit on battery charging. However, if the units are not used for a
prolonged time (more than a few months), fully charge the units and then disconnect the
chargers
Powered-off Delegate Units with fully charged batteries in good condition can be stored
without charging 3-6 months after which it is recommended to charge them again
Do not open the products or change settings unless instructed to by the installer
Close Talk Conference System™ c/o Apodosis AB, Landsvägen 51, S-172 65, Sundbyberg, Sweden
Tel: +46-(0)8-7645227, www.close-talk.com www.closetalk.se
[email protected]
Page: 6 of 15
CONFERENCE SYSTEM™
•
•
•
•
•
•
•
•
•
The system consumes very little energy, an example system with one Central Unit, six
Transceivers and 30 Delegate Units consumes approximately 36W (Central and Transceivers)
plus 27x0.81 + 3x2=28W (all Delegate Units powered on, three active microphones), total 64W
There are five ways for the Delegate Unit's to shut off: by pressing the right button for two
seconds, by removing the unit from IR signal range or by turning the Central Unit power off for
more than two minutes, by inserting the charger plug, by the Delegate Off function (see earlier)
and a low battery. If using the PC software Close Talk Control, all units can be shut off remotely
When a Delegate Unit has a low battery the green LED to the right will start to blink slowly.
When this happens the microphone cannot be activated anymore and the unit is listen-only
Inform them about your local warranty or about the Close Talk Conference System one year
factory warranty
Inform them that the warranty does not include mechanical damage to the products, the
Delegate Unit batteries or if the products have been tampered with or tried to be repaired
without Close Talk Conference Systems prior approval
To always contact their local installer/supplier in case of service needs and to never send any
products to back the manufacturer without prior approval from Close Talk Conference System
Close Talk Conference System receives about 5 service events per year, world-wide! Properly
maintained the system will provide service for many years
Do not use Plasma displays in the same room as the system. Plasma displays emit large
amounts of noise and will disturb the system. This is a limitation of all IR system
manufacturers, not just Close Talk Conference System
Occasionally users are frustrated with having to activate the microphone to speak. Explain
that a conference system is not only a microphone system, it is also a meeting order enforcement
system; enhancing meeting quality, preventing people from speaking over each other and
forcing participants to think before speaking
Care and maintenance
Please inform the maintenance persons about the following:
•
•
•
•
•
•
•
Use a soap-water damp cloth to clean the units, never use detergents or solvents. Make sure that
fluids do not enter into the products
Charge regularly to maximize battery life
Run Close Talk Install regularly to verify system operation or to trouble-shoot
Do not use the microphone as a carrying handle! This is the absolute most common service
event and is not covered by warranty
If not used for a longer time it is recommended to turn off the entire system (central and
delegate units)
Do not install, cover or place products (including power supplies) in excessively warm
environments (max 40 degrees Celsius, out of direct sunlight), overheating is the second most
common service event
Do not open or try to repair any product unless explicitly instructed to do so by Close Talk
Conference System
Close Talk Conference System™ c/o Apodosis AB, Landsvägen 51, S-172 65, Sundbyberg, Sweden
Tel: +46-(0)8-7645227, www.close-talk.com www.closetalk.se
[email protected]
Page: 7 of 15
CONFERENCE SYSTEM™
System and Delegate Unit signal test using Close Talk Install
Close Talk Install is a powerful software tool to secure and trouble-shoot the system. It can measure
infrared signal levels from every delegate unit, report its battery levels and do endurance tests. It is
recommended to do a full system signal test after installation to check that the transceiver infrastructure
is installed and operating correctly and that every delegate unit has full contact with the system. Print or
export (save) the measurement results for future reference, the results can be used as proof-of-operation
during hand-over and also later for trouble-shooting and maintenance.
Close Talk Install is a free software tool available for download at www.close-talk.com (international) and
www.closetalk.se (Swedish).
Installation requirements:
•
Windows XP, Vista, 7 Home or Professional 32 and 64 bit
•
Windows 8.x is pending final testing but should work
•
One RS-232 port. USB-RS232 adapters work but make sure that the drivers are the most current,
they are the correct drivers for the operating system and that they installed correctly
•
One DSUB-9 female to female null-modem cable. This type of cable is available from wellstocked computer dealers or can easily be built, see schematic in the Central Unit User
Manual
•
Installation must be done as computer Administrator! Right-click the installation file and choose
"Run as" or "Run as Administrator"
Overview
After installation, run Close Talk Install by double-clicking the desktop icon or by using the start menu.
The program opens as shown below:
Figure 1
The main window components are:
1.
The menu bar. Used to exit, select printer, select RS-232 COM-port number and to edit the test
unit list
Close Talk Conference System™ c/o Apodosis AB, Landsvägen 51, S-172 65, Sundbyberg, Sweden
Tel: +46-(0)8-7645227, www.close-talk.com www.closetalk.se
[email protected]
Page: 8 of 15
CONFERENCE SYSTEM™
2.
3.
4.
The test control area. Use to set test parameters, start and stop and to export the test results
The main test result and test unit list area
The test status line
Establishing contact with the system
Make sure that the PC is connected to the Central Unit serial port
correctly using the null-modem cable. Click File->Settings or the
Program settings icon to open the COM-port selection as Figure 2 shows.
Select the correct COM-port number and click OK.
Figure 2
Select Only CU as shown in Figure 3 and then click the Start button. If
the message No contact with the Central Unit is shown, recheck all connections and settings and try again.
Figure 3
If contact with the Central Unit has been established, Close Talk Install will start showing results in the CU
Levels box as shown above as well as the current Central and Delegate Unit firmware versions. The levels
under Audio 1-3 and Data noise are shown as raw voltage, the actual voltage levels that the Central Unit is
seeing, and represents the level of the noise floor for the transceiver infrastructure. As in Figure 3 they
should be almost equal with Audio 2 noise slightly higher, this is an indication of properly installed
transceiver system. These voltages will vary with the number of connected transceivers. They are also
inverted, meaning that they will decrease with more transceivers connected. The values in Figure 3 is with
one transceiver connected. They also vary slightly with temperature, a normal system warm-up time is 20
minutes for optimal performance.
Watch how the numbers slowly fluctuate over time to get at feeling for a normal system. Experiment
placing a hand over a transceiver, slowly moving it closer to about 5cm in front of the transceiver. Watch
the levels drift away. If this behaviour shows at an installation it is a clear sign that one or more
transceivers are obstructed and/or overloaded. Temporarily disconnect all transceivers and see what the
base noise level is for the Central Unit alone. The Unit setting selects between raw noise level voltage and
EMF as microvolt seen by the FM-receiver system. The microvolt setting is normally only used by the
factory, this document will assume that the Raw setting is selected.
Close Talk Conference System™ c/o Apodosis AB, Landsvägen 51, S-172 65, Sundbyberg, Sweden
Tel: +46-(0)8-7645227, www.close-talk.com www.closetalk.se
[email protected]
Page: 9 of 15
CONFERENCE SYSTEM™
Figure 4
Test time sets a maximum running time for the test to auto-stop. Timeout is the time in seconds that the
program will wait for a Delegate Unit to respond before declaring a No contact. Samples is the number of
individual measurements used to form the final mean measurement result, leave it at 4. Offline is the
maximum number of times a Delegate Unit is declared a No contact before the unit is permanently
removed from the test run.
Figure 5
Close Talk Conference System™ c/o Apodosis AB, Landsvägen 51, S-172 65, Sundbyberg, Sweden
Tel: +46-(0)8-7645227, www.close-talk.com www.closetalk.se
[email protected]
Page: 10 of 15
CONFERENCE SYSTEM™
Click the Stop button. The status line at the bottom shows Finishing test... while the current measurement
finishes and then Test done. The Print, Export and Clear buttons are activated. The current results can now
be printed or exported as RTF (simple Word format) or Excel. The Clear button will clear the test run
results but before clicking Clear, click the Mute levels tab as shown in Figure 5.
A Mute level is simply the threshold level where the Central Unit will mute the incoming audio
transmission due to low signal strength. This is to prevent the familiar inter-station FM-radio noise from
entering the system when a Delegate Unit looses contact with the system.
Warning!
The mute levels are factory-set to an optimal level, do not experiment with changing these values or the
system may become inoperable!
Finally, click the Clear button. The program shuts down the connection with the Central Unit and goes
back to the state in Figure 1. Note that after clicking Clear the measurement results are lost forever unless
they have been printed and/or exported!
Testing Delegate Units
Before we can test the actual Delegate Units there
are a few preparations that needs to be done.
First, place all the Delegate Units at their actual
usage positions in the room and turn them on.
Next, click Edit->Delegate units... or the Edit test list
button on the menu. The window in Figure 6 is
shown.
This is the list of the Delegate Units included in the
test. The list can be edited manually by inserting
and removing lines as shown in the bottom status
bar.
The top toolbar contains list editing tools where:
•
•
•
•
•
•
•
Figure 6
Exit is used to close the unit list window
Delete is used to remove a line in the list
Clear table does as it suggests, it removes all lines in the table
Add list opens a dialog to import a database from Close Talk Control
Remote is used to build a list using the Delegate Units (see later)
Test none changes the inclusion status in the Test column to No. No Delegate Units will be tested
Test all changes the inclusion status in the Test column to Yes. All Delegate Units will be tested
There are three ways to build a unit test list:
First, simply edit the list manually; enter a line for each unit
and the corresponding unit ID.
Second, import a Close Talk Control database (if available) as
shown in Figure 7.
Finally, use the powerful Remote tool.
Figure 7
Close Talk Conference System™ c/o Apodosis AB, Landsvägen 51, S-172 65, Sundbyberg, Sweden
Tel: +46-(0)8-7645227, www.close-talk.com www.closetalk.se
[email protected]
Page: 11 of 15
CONFERENCE SYSTEM™
Using Remote tool to build a unit test list
With the Remote tool a unit test list can easily and quickly be made by a single person, even with large
numbers of Delegate Units.
This tool requires contact with the Central Unit and that
all the Delegate Units to be tested are in IR signal range
and turned on.
Click the Remote button. If the No contact with Central
Unit message is shown, trouble-shoot the connections
before proceeding. Otherwise, the toolbar expands as
shown in Figure 8.
Close Talk Install is now in contact with the system and is
waiting for Delegate Units to report in.
The first way is to manually press buttons on the
Delegate Units, one by one. Set the Expected field to 0
Figure 8
and uncheck Auto-add and Clear list. Then click the Start
button.
By pressing the Delegate Unit's buttons, one by one, they will report their ID numbers and build the test
unit list. When all units have been reported to the program click the Done button and the list is ready.
This function can also be auto-completed by entering the total number of Delegate Units in the Expected
field before starting. When the expected number of individual units have been reported to the list the
function will be done automatically.
By checking the Clear list check box the current test list will be cleared (all current lines removed) when
starting. This is an easy way to start fresh with a new list.
Finally the most powerful feature, especially for a
single person and a large amount of units. By
checking the Auto-add check box, the program will
send a key-press command remotely and
simultaneously to all the Delegate Units that are
within signal range, i.e. all units will start reporting
in their ID:s directly when the Start button is
clicked.
Figure 9
With large amounts of Delegate Units this may take some time and a warning is shown as in Figure 9.
The system is surprisingly effective in handling transmission conflicts so the list keeps filling at a regular
pace, even at numbers of over 150 delegates.
The most powerful and recommended setting is to check the Auto-add function, specify the number of
Delegate Units in the Expected field and also check the Clear list setting for an easy and effective list
construction.
As soon as the list is ready, click Exit to return to the main window.
Close Talk Conference System™ c/o Apodosis AB, Landsvägen 51, S-172 65, Sundbyberg, Sweden
Tel: +46-(0)8-7645227, www.close-talk.com www.closetalk.se
[email protected]
Page: 12 of 15
CONFERENCE SYSTEM™
Running the Delegate Unit test
Figure 10
Figure 10 shows the main window with a test unit list. First select which units to test by under Test units
choosing All or Selected. With All selected the Test Yes/No column in the test list is ignored and all units in
the list are included. With Selected only the units with Yes selected in the list will be included. Click Start
to start the test.
Note!
The signal level test for the Delegate Units depends on them not being disturbed! Do not have people
walking around the room, lifting, leaning over or pressing the Delegate Unit's buttons during the test.
Now, each unit will transmit on all four channels, in turn.
Watch the red LED lamp on the microphones light up four
times each, one after another.
Watch the bottom status field where the current unit and
channel measured is shown.
The list starts to fill with results as in Figure 12. Double-click
on a line that has data to show details as Figure 11 shows.
The test will run the list over and over until the Stop button is
clicked or the test time runs out.
Figure 11
Close Talk Conference System™ c/o Apodosis AB, Landsvägen 51, S-172 65, Sundbyberg, Sweden
Tel: +46-(0)8-7645227, www.close-talk.com www.closetalk.se
[email protected]
Page: 13 of 15
CONFERENCE SYSTEM™
Figure 12
When clicking the Stop button, the test will not stop immediately, the currently tested unit will be
completed first as the bottom status line shows Test finishing.... When the test is finished the result can be
printed and/or exported as explained earlier.
Evaluating the results
Figure 12 shows the result table. ID is the units serial/ID number, Status shows if the unit is still online,
CU A1-3/Data Mean is the signals strengths received by the Central Unit (transmitted from the Delegate
Unit), DU A&D Mean is the signal strengths received by the Delegate Unit (transmitted by the Central
Unit), Battery Mean is the current (last measurement) battery voltage in the Delegate Unit, Contact is the
number of successful measurements on that unit and No contact is the number of failed measurements for
that unit. Ideally the No contact counter should be 0 for all units but an occasional 1-2 for a few units is
nothing to worry about, only when a unit regularly goes offline or several or all units have No contact
counts should it be investigated.
As mentioned earlier the results are shown in raw voltage and they are inverted, i.e. the stronger the
infrared signal, the lower the measured voltage level. Theoretically any signal level results lower that the
mute level (default is 0.547V) is considered OK but experience shows that signal levels of 0.234 to 0.400 is
most common in a system using a normal amount of transceivers. If the level approaches 0.450 to 0.500,
consider adding more transceivers for that area/position.
With these results it is quite easy to find a trouble unit or a faulty transceiver. The most critical usage
position for a Delegate Unit is in the corners of the transceiver area grid where they will usually only
have contact with a single transceiver, check these positions extra carefully.
Also keep in mind that these tests are usually done with the room fairly empty of people. It may be
tempting to reduce the number of transceivers since the signal strength's are usually very good but keep
in mind that the situation changes dramatically when the room fills with users that may stand in groups
or lean over tables. Do the transceiver estimation thoroughly before installation to avoid problems in a
later stage, it is usually very expensive to add transceivers after the fact.
Close Talk Conference System™ c/o Apodosis AB, Landsvägen 51, S-172 65, Sundbyberg, Sweden
Tel: +46-(0)8-7645227, www.close-talk.com www.closetalk.se
[email protected]
Page: 14 of 15
CONFERENCE SYSTEM™
In conclusion
Close Talk Install is an effective tool to both keep track of the systems health and to troubleshoot a faulty
system. Making regular measurements, maybe once every 3 months or maybe even before every meeting,
will keep the system updated and healthy. Save the results for later reference.
Remember to charge the units after a lengthy test! Also restart the Central Unit after a lengthy test before
resuming regular system usage.
Close Talk Conference System™ c/o Apodosis AB, Landsvägen 51, S-172 65, Sundbyberg, Sweden
Tel: +46-(0)8-7645227, www.close-talk.com www.closetalk.se
[email protected]
Page: 15 of 15