1
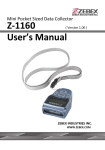
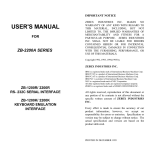
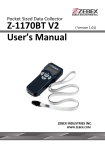
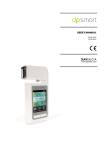
su Portable Data Collector Series Z-900XBT User’s Manual ZEBEX INDUSTRIES INC. WWW.ZEBEX.COM ( Version 1.0) ZEBEX INDUSTRIES INC. Revision History Changes to the original manual are listed below: Version Date Description of Version 1.0 11/01/2014 Initial release Data Collector Series User’s Manual 11/01/2014 Important Notice No warranty of any kind is made in regard to this material, including, but not limited to, implied warranties of merchantability or fitness for a particular purpose. We are not liable for any errors contained herein or incidental or consequential damages in connection with furnishing, performance or use of this material. No part of this document may be reproduced, transmitted, stored in a retrieval system, transcribed, or translated into any language or computer language in any form or by any means electronic, mechanical, magnetic, optical, chemical, manual or otherwise, without express written consent and authorization. We reserve the right to make changes in product design without reservation and without notification. The material in this guide is for information only and is subject to change without notice. All trademarks mentioned herein, registered or otherwise, are the properties of their various respective owners. Power Supply Use only the type of battery and the charging equipments that came with your scanner. Using any other type of battery and charging equipment may damage the scanner and invalidate the warranty. The main and backup batteries may not be charged to full for shipment. Do not attempt to split or peel the outer casing. Remove the battery if the scanner is not going to be used for a long time. If the battery is left unused for more than 3 months, you need to charge the battery before use. Copyright © 2014. All rights reserved. Guidance for Printing This manual is in A5 size. Please double check your printer setting before printing it. i Z-900XBT Table of Contents IMPORTANT NOTICE .................................................................................................... I Power Supply ............................................................................................................... i INTRODUCTION .............................................................................................................1 FEATURES .........................................................................................................................1 PC SYSTEM REQUIREMENT...............................................................................................1 PACKAGE CONTENTS ........................................................................................................1 OVERVIEW ........................................................................................................................2 DEVICE INFORMATION................................................................................................3 BATTERY ...........................................................................................................................3 MEMORY ..........................................................................................................................3 KEYPAD ............................................................................................................................3 LCD SCREEN ....................................................................................................................3 LED STATUS .....................................................................................................................3 WIRELESS .........................................................................................................................3 DATA CAPTURE .................................................................................................................4 GETTING STARTED........................................................................................................7 INSERTING BATTERY .........................................................................................................7 CHARGING THE BATTERY ..................................................................................................7 INSTALLATION...................................................................................................................8 POWER ON THE DEVICE ....................................................................................................8 CONNECTING TO PC..........................................................................................................9 Connecting via Cradle .................................................................................................9 Running the Device on PC ...........................................................................................9 Loading Application from PC ....................................................................................10 Loading Lookup table from PC..................................................................................10 Resetting the Device...................................................................................................10 Uploading Data .........................................................................................................10 Working with Menus...................................................................................................11 Menu Description.......................................................................................................11 USING THE DATA COLLECTOR................................................................................13 SCANNING AND KEYING IN DATA ....................................................................................13 Scanning the Barcode Data .......................................................................................13 Keying in Data via keypad .........................................................................................14 WORKING WITH UTILITIES ..............................................................................................15 Settings.......................................................................................................................15 Browse Data...............................................................................................................16 Delete Data ................................................................................................................16 Z-900XBT ii Reader Test.................................................................................................................16 Set Date/Time .............................................................................................................17 Load Application........................................................................................................17 Memory & Power.......................................................................................................17 Calculator ..................................................................................................................17 Load Lookup ..............................................................................................................18 PROGRAM MANAGER......................................................................................................18 Menu Description.......................................................................................................18 Download...................................................................................................................19 Activate ......................................................................................................................20 Upload .......................................................................................................................21 WIRELESS OPERATION..............................................................................................22 DOWNLOAD FILES ..........................................................................................................22 Download ZAC Files..................................................................................................22 Download Lookup Files .............................................................................................24 UPLOAD FILES ................................................................................................................26 Upload ZAC Files ......................................................................................................26 Upload Lookup Files..................................................................................................28 Output to Screen.........................................................................................................30 Output to Record........................................................................................................32 UPDATING FIRMWARE .....................................................................................................34 iii Z-900XBT USER’S MANUAL Introduction Z-9000BT redefines simplicity with more simple features and less complicated options. With wireless connectivity, users can transfer data instantly allowing seamless, real-time reporting and inventory control. Enhanced with the brand new, easy to use ZEBEX Application Creator program, Z-9000BT allows users to achieve maximum efficiency through intuitive settings and user friendly interfaces Features Transflective LCD for a wide working condition No programming background required Wireless connectivity PC System Requirement Windows XP Service Pack 2 or above Microsoft Internet Explorer 5.01 or later Microsoft Framework 2.0 Package Contents Items contain in the package may vary depending on the model of the data collector. 1 Data Collector Cradle Li-ion Battery USB Cable Power Adapter Hand Strap Z-900XBT USER’S MANUAL Overview Refer to the following illustrations to familiarize yourself with the data collector. Scan Window LED Indicator Buzzer LCD Screen Battery Compartment Keypad Battery Lock Hand Strap Hole Description Scan Window Battery Compartment Battery Lock Hand Strap Hole LED Indicator LCD Screen Keypad Battery Contacts Buzzer Z-900XBT Battery Contacts Function Emits a red beam for barcode reading Batteries are stored here Secures the battery compartment Used to attach hand straps Indicates reading status: Red for scanning error such as wrong data type or no data match and green for good read Display various data when a program is being run A total of 21 keys are provided to the power and other function keys For charging battery Emits audible indication sounds 2 USER’S MANUAL Device Information Battery Main Battery: Li-ion battery pack 3.7V 1150mA Battery Life: 150 hrs (Laser/CCD version, based on one scan per 5 secs) Backup battery: Lithium battery 3.0V 15mAh Charging current: 500mA (MAX) Auto charger off timer: 6.2 hrs Memory 8MB FLASH ROM 4MB SRAM (with ability to data retentions) Keypad 21 keys alpha / numeric (include Power and SCAN key) with white back light LCD Screen LCD type: 128 x 128 graphic mono FSTN LCD LCD backlight: LED White View Area: 43.0 x 42.8mm Font size: 8 * 15 pixels Characters by lines: 16 characters by 8 lines LED Status 1 green color LED and 1 red color LED for indications Wireless RF wireless compatible with SPP/HID profile mode 3 Z-900XBT USER’S MANUAL Data Capture This table gives the default settings of the symbologies. Symbology Z-900XBT Default Codabar Enable Code 39 Enable Code 93 Enable Code 128 Enable Code 11 Disable Italian Pharmacode Disable Chinese Post Code Disable Interleaved 2 of 5 Enable EAN / UPC Enable MSI Disable Telepen Parameter Disable Industrial 2 of 5 Disable Standard 2 of 5 Disable Matrix 2 of 5 Disable GS1 Databar Disable 4 USER’S MANUAL Symbology Code ID Default Codabar N Code 39 M Code 93 L Code 128 K Code 11 O Chinese Post Code H Interleaved 2 of 5 I EAN-13 F UPC-A A UPC-E E EAN-8 FF MSI P Industrial 2 of 5 D Standard 2 of 5 S Matrix 2 of 5 G GS1 Databar RS GS1 Databar Expanded RX GS1 Databar Limited 5 RL Z-900XBT USER’S MANUAL Symbology Codabar Code 11 Industrial 2 of 5 Standard 2 of 5 Matrix 2 of 5 Barcode Length Maximum:32 Minimim:6 Maximum:62 Minimim:3 Code 39 Code 93 Code 128 Maximum:62 Minimim:3 Maximum:62 Minimim:3 Chinese Post Code Maximum:16 Minimim:10 Maximum:32 Interleaved 2 of 5 MSI Minimim:4 Maximum:32 Minimim:4 GS1 Databar GS1 Databar Limited GS1 Databar Expanded Z-900XBT Maximum:14 Minimim:14 Maximum:48 Minimim:6 6 USER’S MANUAL Getting Started Refer to the following illustrations to learn the basics of the data collector in this section. Inserting Battery 1. Push the lock lever to unlock the battery lock. 2. Remove the battery cover from the data collector. 3. Insert the battery with the top side in first then the side with battery contact. The battery is held in place by a small lock on the bottom of the compartment. Push the battery in until it clicks into place. 4. Slide the battery cover back on to secure the battery. Charging the Battery 7 1. Place Z-900XBT on the cradle. 2. Connect the power adapter to the cradle and to a wall outlet. 3. Battery status on the LCD screen indicates that your battery is charging. Z-900XBT USER’S MANUAL Installation Follow the instructions below to install ZAC driver on your computer. 1. Connect the device to your computer via USB cradle. 2. A window appears in the bottom right-hand corner of Windows that says “Found new hardware”. In a few seconds a "Found New Hardware Wizard" window opens up. Double click the found new hardware icon to pull up the window if it does not appear automatically. Select "No, not this time" to continue. 3. Click "Next" to continue installation. 4. Click “Install from a list or specific location (Advanced)” and click “Next”. 5. Check the “Include this location” option and use “Browse” to locate the driver in your computer. Click “Next” to go to the next step. 6. Click “Next” and “Finish” when the installation is done. Power on the Device Press and hold the power button to turn the power on or off. Z-900XBT 8 USER’S MANUAL Connecting to PC To use the software supplied with the data collector, it must be connected to a PC. To connect wirelessly, please see the Wireless Operation section. Connecting via Cradle To connect the data collector to a PC via cradle: 1. Place the data collector on the cradle and connect the cradle to PC using the USB cable. 2. The PC should auto-detect the device as a COM device and ask for the driver when connecting the first time. Please download and install the driver from ZEBEX website. The system should assign a COM port to the device after the driver installation. 3. Connect the power adapter to the cradle when necessary. Make sure the unit is turned on after the cable is connected. Check the COM and LPT section in the device manager for the assigned COM port. The data collector should appear as a virtual com device. Running the Device on PC 9 1. Install and run ZAC on your PC. 2. Make sure the virtual COM port driver is installed. 3. Run any connection program on ZAC. For more details please see the ZAC User’s Manual. 4. Check the device manager on your PC for the COM port and set the same value in ZAC Setting to connect the device. Z-900XBT USER’S MANUAL Loading Application from PC 1. Follow the previous instructions to connect the data collector. 2. Select “3.Utilities/6.Application” on the data collector. 3. Select “Send Application” in ZAC. Loading Lookup table from PC 1. Follow the previous instructions to connect the data collector. 2. Select “3.Utilities” and “9.Load Lookup” on the data collector. 3. Select “Send Lookup” in ZAC. Resetting the Device 1. Press and hold the and buttons then press the Power button. 2. Release the Power button when you see the reset message on the screen. 3. All settings will reset to the default values. Uploading Data 1. Follow the previous instructions to connect the data collector. 2. Select “2. Upload” from the menu screen to start uploading data. 3. Select the data to be uploaded in the next screen and press enter or press ESC to exit. 4. Select Transfer/Direct-Link Data Transfer in Zac to start upload. Z-900XBT 10 USER’S MANUAL Working with Menus Press the or buttons or the number keys to move the cursor to the desired option. Press the Enter key to enter the menu option. Press ESC to go to the previous screen. Menu selection Keypad/USB/Battery status (Battery) Menu Screen Menu Description Menu Collect Description Select this option to start recording data. You can scan barcodes or enter the data manually. Select this option to: Upload Data file Upload Upload lookup file Upload all files 1 by 1 Upload all files as append 11 Z-900XBT USER’S MANUAL Select this option for: 1. Settings 2. Browse Data 3. Delete Data 4. Reader Test Task Utility 5. Set Date/Time 6. Load Application 7. Memory & Power 8. Calculator 9. Load Lookup (when lookup is available this option becomes option 8 and calculator becomes option 9) Z-900XBT 12 USER’S MANUAL Using the Data Collector Refer to the following section to learn how to use the data collector. Scanning and Keying in Data The keypad includes alphanumeric, assorted characters, navigation and function buttons. Up/Down buttons Scan button ESC button Back space button Enter button Function button Alpha (α) button Scanning the Barcode Data 1. Power on the device and select “1.Collect” to enter scanner mode. Press and hold the yellow SCAN button. A light beam will be activated and shoot out from the window at the lower front end of the data collector. Please see the Run Task section in the User’s Manual for more details. 2. Aim the beam at the barcode to be scanned. A beep will be given and the beam will disappear if the data scanned has been successfully decoded by the data collector. The decoded message will then be displayed in the LCD. 3. The scanned data will be stored as soon as the SCAN button is released, and the next barcode is ready to be scanned. 13 Z-900XBT USER’S MANUAL Keying in Data via keypad Inputting Numerical Data To input numerical data, press the corresponding keys. To save the input data, press Enter after the data is input. To delete the data, press the Back space button. Inputting an alphabetical character To input an alphabetical character, first find the appropriate key. The following table displays the numerical keys and their corresponding alphabetical characters. Press the key, and the numerical character corresponding to the key will be displayed. Pressing the α key to switch between alphabetical and numeric entry. A “1” or “A” or “a” appears on the screen indicating the current mode. When in the alphabetical entry modes “A” or “a”, press the keys repeatedly until the desired character is approached. Keypad 2 3 4 5 6 7 8 9 0 1 . Z-900XBT A D G J M P T W / Space + % B E H K N Q U X * C F I l O R V Y Corresponding Characters a b c d e f g h i j k l m n o S p q t u v Z w x r s y z $ # 14 USER’S MANUAL Working with Utilities Select “3.Utilities” from the menu screen to begin working with included utilities. The utilities menu includes the following options: Settings Settings allow you to manage and view the system parameters. Use the or buttons to move the cursor and press enter to select the value. Setting Upload Port Download Port Baud Rate Backlight Data Deletion Entry Option Buzzer View Settings Cursor Mode 15 Value Cradle-USB BT SPP Master BT SPP Slave Cradle-USB BT SPP Master BT SPP Slave 9600 19200 38400 57600 115200 Turn B/L off, Turn B/L on Manual Automatic No No Prompt Show Count Show Data Key Click Barcode Read Warning Beep System parameters Disable Cursor Fixed Cursor Blink Cursor Function View the communication setting for uploading View the communication setting for downloading View the baud rate for connection Turn the backlight on or off Decide data deletion mode Decide what to show after an entry. You can also set the prompt time by entering a number In Key Click, select tone1~5 or mute for the key sound and select one to three beeps or mute for the Barcode Read and Warning Beep All the system parameters set are displayed here Decide the cursor mode for data input Z-900XBT USER’S MANUAL Browse Data Inputted data and the data in lookup can be viewed here. 1. Select “3.Utilities” and “2.Browse Data” from the menu. 2. Select “Date File” or a “Lookup” to view the information. 3. In “Date File”, press the function key + “8” to edit data and press the function key + “9” to delete data. Delete Data Use this option to delete inputted data. 1. Select “3.Utilities” and “3.Delete Data” from the menu. 2. Select “Date File” or a “Lookup” to delete data. 3. Select “All data” to delete all inputted data or “Last one” to delete the last inputted data. 4. Select “Cancel” to exit. Reader Test Use this option to identify the type of the barcode scanned. 1. Select “3.Utilities” and “4.Reader Test” from the menu. 2. Press the scan button to scan a barcode. 3. The barcode information displays on the screen. Z-900XBT 16 USER’S MANUAL Set Date/Time Use this option to set the date and time for the device. 1. Select “3.Utilities” and “5.Set Date/Time” from the menu. 2. Press “1” to enter the calendar screen or “2” to enter the time screen. 3. Use the numeric keys or the or keys to set the correct date and time. Load Application This option enables you to load the settings you configured on ZAC to the device. 1. Follow the previous instructions to connect the data collector. 2. Select “3.Utilities” and “6.Load Application” on the data collector. 3. Select “Send Application” in ZAC. Memory & Power Use this option to display the memory and battery information. 1. Select “3.Utilities” and “7.Memory & Power” from the menu. 2. The memory and battery information displays on the screen. Calculator Use this option to use the data collector as a calculator. 1. Select “3.Utilities” and “8.Calculator” (or when lookup is available, select 9.Calculator). 2. Use the numeric keys to enter numbers, - key to toggle between +,-,x,÷, enter key for =, BS for back space, and ESC to exit. 17 Z-900XBT USER’S MANUAL Load Lookup Use this option enables you to load lookup table to the device from ZAC 1. Follow the previous instructions to connect the data collector. 2. Select “3.Utilities” and “9.Load Lookup” on the data collector. 3. Select “Send Lookup” in ZAC. Program Manager Press the numeric key ”8” and power button at the same time to enter Program Manager. Program Manager 1.Download 2.Activate 3.Upload Z9000PM _VXX.XX ESC.Exit Menu Description Menu Description Download Download ZEBEX OS / Customer Program to the device Activate Activate ZEBEX OS / Customer Program Upload Upload ZEBEX OS / Customer Program to PC Z-900XBT 18 USER’S MANUAL Download Use this option to download ZEBEX OS / Customer Program to the device. Must be used along with “Boot Load Utility Rev x.xx.exe”. Download 1,z9000_fw_x xxx 2,----3,----4,----5,----- Where system font is stored A,z9000_fw_x xxx F,SystemFont 000 ESC.Exit Select where .bin is saved Location where .bin can be executed 1. Execute “Boot Load Utility Rev x.xx.exe” and set the appropriate settings. Press “Start Boot Load” to begin download. 2. When downloading the .bin file, select 1~5 or A to store the file. After the selection, connection can only be made when you place the device on the cradle. 3. If you selected 1~5 in step 2, you must also select “2.Activate” to begin the download procedure. 4. If you selected A in step 2, the download procedure begins right away. It is not necessary to select “2.Activate” to begin the download procedure. The procedure can not be undone once it begins. 19 Z-900XBT USER’S MANUAL Activate Use this option to activate ZEBEX OS / Customer Program to the device. Activate 1,z900XBT_fw_x xxx 2,----3,----4,----5,----A,z900XBT_fw_x xxx Select where program is activated Program currently running ESC.Exit 1. Select an available option from 1-5 and press Enter for detailed information. 2. Press F3 to activate once in the detailed information screen. 3. Press ESC to exit Program Manager after activation to begin using ZEBEX OS / Customer Program. Z-900XBT 20 USER’S MANUAL Upload Use this option to upload ZEBEX OS / Customer Program to PC.. Upload 1,z900XBT_fw_x xxx 2,----3,----4,----5,----A,z900XBT_fw_x xxx Select where to upload the file File currently running ESC.Exit When uploading the .bin file, select 1~5 or A to store the file. After the selection, connection can only be made when you place the device on the cradle. 21 Z-900XBT USER’S MANUAL Wireless Operation Power on the device and look for the blinking antenna logo. The logo indicates the support of BT connection. Download Files Download ZAC Files 1. To set the device to BT mode, select “3.Utilities”, “1.Settings”, “2.Download Port” from the device menu and select SPP Master or SPP Slave modes. Download Program Or lookup file via: 1, Cradle-USB 2, BT SPP Master 3, BT SPP Slave [ Enter ]: Select [ ESC ]: Cancel 2. I. For BT SPP Master mode, please select “3.Utilities”, “1.Settings”, next page, “4.Bluetooth Menu”, ”2.Connect Set”, “5.Connect to MAC” and enter the host MAC address. II. For BT SPP Slave mode, no additional action is necessary. Select “3.Utilities”, “6.Load Application” and wait for the device to connect. An error message may appear if you fail to enter the correct MAC address in SPP Master mode. Z-900XBT 22 USER’S MANUAL 3. Select “Search Devices” from the IVT program on your PC to find BT devices. Search Devices Turn ON Wireless Property 4. When the data collector is found, right click it and select “Search Services”. 5. Enter the pin code to complete the pairing process. 6. Right click on the data collector in IVT program and select “Connect Serial BT Device” to connect the device to the host. 7. The antenna logo will stop blinking upon connection with signal bars showing by its side. 8. Select “Transfer” and “Send Application” in ZAC. Select the correct COM port then select “Start Download” to begin sending files. 23 Z-900XBT USER’S MANUAL Download Lookup Files 1. To set the device to BT mode, select “3.Utilities”, “1.Settings”, “2.Download Port” from the device menu and select SPP Master or SPP Slave modes. Download Program Or lookup file via: 1, Cradle-USB 2, BT SPP Master 3, BT SPP Slave [ Enter ]: Select [ ESC ]: Cancel I. For BT SPP Master mode, please select “3.Utilities”, “1.Settings”, next page, “4.Bluetooth Menu”, ”2.Connect Set”, “5.Connect to MAC” and enter the host MAC address. II. For BT SPP Slave mode, no additional action is necessary. 2. Select “3.Utilities”, “8.Load Lookup” and wait for the device to connect. An error message may appear if you fail to enter the correct MAC address in SPP Master mode. 3. Select “Search Devices” from the IVT program on your PC to find BT devices. Search Devices Turn ON Wireless Property Z-900XBT 24 USER’S MANUAL 4. When the data collector is found, right click it and select “Search Services”. 5. Enter the pin code to complete the pairing. 6. Right click on the data collector in IVT program and select “Connect Serial BT Device” to connect the device to the host. 7. The antenna logo will stop blinking upon connection with signal bars showing by its side. 8. Select “Transfer” and “Send Lookup” in ZAC. Select the correct COM port then select “Start Download” to begin sending files. 25 Z-900XBT USER’S MANUAL Upload Files Upload ZAC Files 1. To set the device to BT mode, select “3.Utilities”, “1.Settings”, “1.Upload Port” from the device menu and select SPP Master or SPP Slave modes. Upload data or lookup file via: 1, Cradle-USB 2, BT SPP Master 3, BT SPP Slave [ Enter ]: Select [ ESC ]: Cancel 2. I. For BT SPP Master mode, please select “3.Utilities”, “1.Settings”, next page, “4.Bluetooth Menu”, ”2.Connect Set”, “5.Connect to MAC” and enter the host MAC address. II. For BT SPP Slave mode, no additional action is necessary. Select “Search Devices” from the IVT program on your PC to find BT devices. Search Devices Turn ON Wireless Property Z-900XBT 26 USER’S MANUAL 27 3. When the data collector is found, right click it and select “Search Services”. 4. Enter the pin code to complete the pairing. 5. Right click on the data collector in IVT program and select “Connect Serial BT Device” to connect the device to the host. 6. The antenna logo will stop blinking upon connection with signal bars showing by its side. 7. Select “Transfer” and “Receive Application” in ZAC. Select the correct COM port and enter the password. Finally, select “Start Upload” to begin sending files. 8. You may check the files on your PC when uploading is done. Z-900XBT USER’S MANUAL Upload Lookup Files 1. To set the device to BT mode, select “3.Utilities”, “1.Settings”, “1.Upload Port” from the device menu and select SPP Master or SPP Slave modes. Upload data or lookup file via: 1, Cradle-USB 2, BT SPP Master 3, BT SPP Slave [ Enter ]: Select [ ESC ]: Cancel I. For BT SPP Master mode, please select “3.Utilities”, “1.Settings”, next page, “4.Bluetooth Menu”, ”2.Connect Set”, “5.Connect to MAC” and enter the host MAC address. II. For BT SPP Slave mode, no additional action is necessary. 2. Select “2.Upload”, “ALL (Append)” and wait for the device to connect. An error message may appear if you fail to enter the correct MAC address in SPP Master mode. 3. Select “Search Devices” from the IVT program on your PC to find BT devices. Search Devices Turn ON Wireless Property Z-900XBT 28 USER’S MANUAL 4. When the data collector is found, right click it and select “Search Services”. 5. Enter the pin code to complete the pairing. 6. Right click on the data collector in IVT program and select “Connect Serial BT Device” to connect the device to the host. 7. The antenna logo will stop blinking upon connection with signal bars showing by its side. 8. Select “Transfer” and “Direct-Link Data Transfer” in ZAC. Select the correct COM port and the file and select “Start Upload” to begin sending files. 29 Z-900XBT USER’S MANUAL Output to Screen 1. Open ZAC and select “Output screen” from the Record Action menu in Form. 2. Download this file to your data collector (See Download ZAC files section). 3. To set the device to BT mode, select “3.Utilities”, “1.Settings”, “1.Upload Port” from the device menu and select SPP Master or SPP Slave modes. Upload data or lookup file via: 1, Cradle-USB 2, BT SPP Master 3, BT SPP Slave [ Enter ]: Select [ ESC ]: Cancel I. For BT SPP Master mode, please select “3.Utilities”, “1.Settings”, next page, “4.Bluetooth Menu”, ”2.Connect Set”, “5.Connect to MAC” and enter the host MAC address. II. For BT SPP Slave mode, no additional action is necessary. Z-900XBT 30 USER’S MANUAL 4. Select “Search Devices” from the IVT program on your PC to find BT devices. Search Devices Turn ON Wireless Property 5. When the data collector is found, right click it and select “Search Services”. 6. Enter the pin code to complete the pairing. 7. Right click on the data collector in IVT program and select “Connect Serial BT Device” to connect the device to the host. 8. The antenna logo will stop blinking upon connection with signal bars showing by its side. 9. Select “1.Collect” from the data collector menu. When you are done entering data, press enter and wait for connection to establish. An error message may appear if you fail to enter the correct MAC address in SPP Master mode. 10. When connection is established, data will transfer to the PC. 31 Z-900XBT USER’S MANUAL Output to Record 1. Open ZAC and select “Output record” from the Record Action menu in Form. 2. Download this file to your data collector (See Download ZAC files section). 3. To set the device to BT mode, select “3.Utilities”, “1.Settings”, “1.Upload Port” from the device menu and select SPP Master or SPP Slave modes. Upload data or lookup file via: 1, Cradle-USB 2, BT SPP Master 3, BT SPP Slave [ Enter ]: Select [ ESC ]: Cancel I. For BT SPP Master mode, please select “3.Utilities”, “1.Settings”, next page, “4.Bluetooth Menu”, ”2.Connect Set”, “5.Connect to MAC” and enter the host MAC address. II. For BT SPP Slave mode, no additional action is necessary. Z-900XBT 32 USER’S MANUAL 4. Select “Search Devices” from the IVT program on your PC to find BT devices. Search Devices Turn ON Wireless Property 5. When the data collector is found, right click it and select “Search Services”. 6. Enter the pin code to complete the pairing. 7. Right click on the data collector in IVT program and select “Connect Serial BT Device” to connect the device to the host. 8. The antenna logo will stop blinking upon connection with signal bars showing by its side. 9. Select “1.Collect” from the data collector menu. When you are done entering data, press enter and wait for connection to establish. An error message may appear if you fail to enter the correct MAC address in SPP Master mode. 10. When connection is established, data will transfer to the PC. 33 Z-900XBT USER’S MANUAL Updating Firmware 1. 2. Power off the unit. Press 8 and the Power key at the same time to enter Program Manager. Program Manager 1.Download 2.Activate 3.Upload Z9000PM _VXX.XX ESC.Exit 3. Select “1. Download “ and press Enter to enter the Download screen. Download 1,----2,----3,----4,----5,----A, fw_x xxx F,SystemFont 000 ESC.Exit 4. Select an empty slot to to store the file and press Enter. Please remember the slot number you selected for later use. Z-900XBT 34 USER’S MANUAL 5. The “Please Plug The USB Cable” screen appears. Connect the cradle to the computer and plug in the power adapter; place the unit in the cradle when ready. Please install the Z-900XBT driver if necessary. 6. On your computer, please open the Boot Load Utility (default path: Start>All Programs>ZEBEX>ZAC>Boot Load Utility). 7. Check the Device Manager on your computer for the COM port your data collector is using. 8. Select the same COM port in Boot Load Utility. 35 Z-900XBT USER’S MANUAL 9. Select “Load File” then select the firmware file stored on your computer. 10. Select “Start Boot Load" to transfer the file to Z-900XBT. You will hear a beep sound when the transfer is done. The Download screen appears on the Z-900XBT screen. Press ESC to exit the screen when ready. Z-900XBT 36 USER’S MANUAL 11. Select “2. Activate” then select the file slot you selected in step 4 and press enter. Program Manager 1.Download 2.Activate___________ 3.Upload Z9000PM _VXX.XX ESC.Exit Activate 1,z900XBT_fw_x xxx_____ 2,----3,----4,----5,----A,z900XBT_fw_x xxx ESC.Exit 12. Press FN and 3 at the same time to activate the file. __ Information. _ File attribute/// Name: fw_xxxxxx Size: 352K CD~ 1970/01/02 CT~ 00:39:27 F3. Activate 13. A message appears on the screen “Are you sure to activate file?” Use the up/down arrow keys to select “YES” then press enter to begin update. 14. The screen will return to the Activate screen when the update is done. Upgrade Warning Incorrect operation may cause dysfunction or damage to the unit. Please choose the correct firmware file. Do not remove power or reboot the system until the firmware upgrade procedure is complete to avoid possible damage to the unit. 37 Z-900XBT