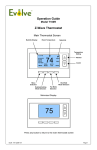
1
Hallowell Acadia: Combined Heating and Cooling System Last Revised 2/28/2008 INSTALLATION MANUAL Hallowell.International 110 Hildreth Street • Bangor, ME 04401 t: (207) 990.5600 • f: (207) 990.5602 • [email protected] • www.gotohallowell.com 50-00394-C Q uic k St a r t G u i d e OUTSIDE CONDENSER UNIT Note! This is intended as a quick reference for use dur- ing setup of a Hallowell Acadia. This is NOT to be considered a complete installation manual. Prior to setup of a Hallowell Acadia it is necessary to read ALL of the included installation manual. Ensure that jumper between W2 and W/E is NOT installed on the thermostat. Ensure proper clearances are observed around the unit, making sure to provide appropriate space for accessibility. NOTE TO INSTALLER: THIS MANUAL SHOULD BE LEFT WITH THE EQUIPMENT USER. Please Check ( Ensure condenser is placed on appropriate snow stands (not blocks) per climate region with a minimum of 12” clearance. ) as Completed AIR HANDLER Ensure coil drainage holes are not obstructed. Ensure both 7/8” vapor and 3/8” liquid lines are fully insulated. Install indoor air handler, ensuring proper duct sealing, insulation & distribution. Ensure both 7/8” vapor and 3/8” liquid service valves are open (open/back seated). Ensure appropriate electrical disconnect size is installed. Install air filter. Ensure system has been properly evacuated to 500 microns. Ensure condensate drain is installed properly. Ensure transformer is wired appropriately for applied line voltage. For correct wiring, see Line Voltage diagram in Appendix B. Unit is factory wired for 230VAC. Place thermostat in a location where it will not be exposed to direct airflows from doors, windows, etc. Run 10-conductor (minimum), 18 AWG control wiring from thermostat to air handler, and from air handler to outside condenser unit. Ensure the 10 conductor, 18AWG, control harness has been correctly wired between the thermostat, indoor air handler, and outdoor unit, following color codes and schematics provided in the install manual, Appendix B. Connect control wiring following color codes provided in the install manual, Appendix B. Ensure electrical disconnect is properly sized for outdoor unit. Disconnect leads from the transformer provided in air handler from the air handler control board 24 VAC and Common terminals. After applying power, ensure electrical ratings are within specifications. Connect 24VAC and 24C provided from outdoor unit to the ¼” terminals labeled COM and 24VAC on the indoor AHU control board (seen in Appendix A, FIG1). Verify control board heartbeat is active. Ensure initial charge is added as a liquid to 3/8” service valve port. FINAL CHARGE (if required) is to be added through ¼” charging port. Set airflow jumpers in air handler in accordance with Appendix A. Ensure all electrical connections are weather tight. THERMOSTAT Ensure all cabinet and electrical fasteners are secure.Shipping vibration can loosen connections. Install thermostat in a location where it will not be directly exposed to conditioned air, or drafts from doors and/or windows. Ensure control wiring is not chaffing/grommet is installed. D A N G E R Outdoor condenser unit is heavy. Take appropriate precautions and use appropriate equipment to move and install. Configure thermostat settings as indicated in the install manual, Appendix A. www.gotohallowell.com ii Installe r S e t u p Ch e c k l i s t charge section. Use superheat/sub cooling charging procedure and appropriate charging tables in installation instructions or on unit labels. Check refrigerant connections for leaks. Suction Pressure: Outdoor Temperature: °F Discharge Pressure: psig Indoor Temperature: °F Superheat at outdoor coil: °F Sub cooling at outdoor unit: °F Check factory tubing to ensure tubes are not rubbing against each other or any sheet metal. Pay close attention to feeder tubes on both indoor and outdoor coils. Ensure wire ties are tight. Check factory wires and wire connections to ensure terminations are secured properly. See wiring label on unit for proper wiring identification. Check wire routing to ensure wires are not in contact with sheet metal edges. Check wire routing around fan motor to ensure wires will not come in contact with fan blades. Check field wiring for proper support, terminations, and grounding. Check unit charge and adjust accordingly. Run unit in cooling, heating. Before leaving job, ensure that all panels and covers are securely fastened and that service valve stem caps are tightened. Ensure all work areas are clean. Leave user’s manual with owner. Remove from literature packet and place in customer file at dealership. Date Installed: NOTE: read the entire installation instruction manual before starting the installation. Customer Name: Address: City, State: Zip Code: Outdoor Unit Model No.: Outdoor Unit Serial No.: Accessories: Accessories: Home Phone No.: ( ) Business Phone No.: ( ) Indoor Coil Model No.: Indoor Coil Serial No.: Air Handler Model No.: Air Handler Serial No.: Check the following items when they apply to this installation: Dual Fuel Hydronic Other Check equipment for shipping damage. Note Damages: Locate and level unit on specified pad and snow legs. See Instructions under install on a solid, level mounting pad and clearance. Elevate unit to ensure proper drainage and snow clearances. Check for proper indoor TXV size. TXV shipped with indoor unit must be used. Check for proper duct sizing, sealing, and installation. Check that duct work is insulated and all registers are open and not blocked. Ensure proper line set sizes are used and are properly insulated. See Installation Instructions under make piping connections section and refrigerant connections. Install filter dryer. Install proper wire size and fuse/circuit breaker. Consult NEC and/or local codes for recommended wire size and fuse/circuit breaker. Connect power and control wiring connections. See installation instructions under make electrical connections section and 24-v circuit connection figures. Power Supply Voltage: Volts Control Voltage: Volts Open 7/8” and 3/8” service valves Ensure that both 7/8” and 3/8” line sets are fully insulated. Evacuate line set and indoor and outdoor unit per Installation Instructions. Piping connections section. Add initial charge: See installation instructions under check Installer Note Section: www.gotohallowell.com iii Co nte nt s CONTENTS Owners Manual 1 Description of Operation 3 Performing Routine Maintenance 5 Regular Dealer Maintenance 6 Troubleshooting 7 Installation & Start-Up Instructions 8 Step 1 Check Equipment and Job Site 8 Step 2 Install 8 Step 3 Clearance Requirements 9 Step 4 Indoor Expansion Device 9 Step 5 Piping Connections 10 Step 6 Electrical Connections 11 Step 7 Start Up 12 Step 8 Check Charge 13 Step 9 Final Checks 14 Appendix A 15 Appendix B 20 Appendix C 24 Appendix D 26 www.gotohallowell.com iv O wne r s M a n u a l The Acadia ing to control the system by other means—for instance, switching the electrical supply power ON and OFF—may cause damage to the unit. Recognize safety information, symbols and words: DA N G E R Will identify serious hazards which will • You may find that you can maintain greater personal comfort by running the fan continuously. Air pockets can form due to the structure of the house, placement of registers, etc. These air pockets may be too cool or warm for your liking. Continuous fan operation minimizes any temperature differences. Also, systems equipped with electronic or mechanical air cleaners and/or humidifiers offer the added benefits of having the air continuously cleaned year-round and humidified during the winter season. • A system equipped with a heat or energy recovery ventilator offers the advantage of exhausting stale air from the home and allowing fresh air in from the outdoors while minimizing heat loss.NING result in severe personal injury or death. C AUTION Will identify unsafe practices which would result in minor personal injury or product and property damage. NOTE is used to highlight suggestions which will result in enhanced installation, reliability, or operation. IDENTIFYING YOUR SYSTEM Take the time to familiarize yourself with the type of system you have. This knowledge will be of use in understanding the basic operation of your new heat pump. The type of heat pump you have purchased is a split system multi-stage all climate model. TYPICAL SPLIT-SYSTEM INSTALLATION Your heat pump will remove humidity from your home during the cooling season. After a few minutes of operation, you should be able to see water trickle from the condensate drain of the indoor cooling coil. Check this occasionally to be sure the drain system is not clogged. Of course, don’t expect to see much drainage if you live in a very dry environment. The split-system type has an indoor and an outdoor unit, each of which contains a coil. These units are interconnected by refrigerant tubes. Each unit has a rating plate affixed to it which provides necessary information for specific identification of a unit. You should familiarize yourself with the product, model, and serial numbers listed on each rating plate. Record them for future reference on the last page of this booklet. During the heating cycle, air from your registers may seem cooler than you might first expect. This is because your heat pump delivers a constant flow of air at around 95°F to 130°F instead of in sudden bursts of hot air as with a conventional furnace. This air may feel cool because it is slightly less than your skin temperature. However, it is sufficiently warm to keep you comfortable. IMPORTANT FACTS To better protect your investment and to eliminate unnecessary service calls, familiarize yourself with the following facts: • Your heat pump system should never be operated without a clean air filter properly installed. Plan to inspect the filter periodically. • A clogged air filter will increase operating costs by reducing efficiency and could potentially impact system durability. • Supply-air and return-air registers should not be blocked. Drapes, furniture, and toys are some of the items commonly found obstructing registers. Restricted airflow lessens the unit’s efficiency and life span. • • The outdoor unit must have unrestricted airflow. Do not cover the unit, lean anything against it, or stand on it. Do not allow grass clippings, leaves, or other debris to accumulate around or on top of the unit. Maintain a 12-in. minimum clearance between the outdoor unit and tall grass, vines, shrubs, etc. • Ice or frost will tend to form on the outdoor coil during the winter heating operation. Your heat pump is designed to automatically melt the ice. When in this defrost cycle, it is normal for steam or fog to rise from the outdoor unit. Do not be alarmed! • Do not operate your unit in cooling mode when outdoor temperatures are below 50°F. • It is not recommended that your unit be operated in heating mode when outdoor temperatures are above 82°F. OPERATING YOUR HEAT PUMP The operation of your heat pump system is controlled by the indoor thermostat. You simply adjust the thermostat and it maintains the indoor temperature at the level you select. Most thermostats for heat pump systems have three controls: a TEMPERATURE control selector, a FAN control, and a SYSTEM or MODE control. The temperature control selector is set of buttons that allows you to establish the temperature that you wish to maintain for your personal comfort. Your Your Hallowell indoor thermostat is the control center for your heat pump system. You should familiarize yourself with its proper operation and comfort settings. Attempt- www.gotohallowell.com thermostat has two temperature control selectors: one for setting the temperature desired during cooling operation, and one for setting the temperature desired during heating operation. The FAN control offers 2 options for controlling the blower: AUTO and ON. When set to AUTO, the blower runs only when the heat pump is operating. When set to ON position, the blower runs continuously. Typically, the SYSTEM or MODE control on your thermostat offers the following selections: COOL, OFF, HEAT, AUTO, and EMERGENCY HEAT. Your thermostats will have a separate switch for EMERGENCY HEAT. The heat pump will not operate when the SYSTEM or MODE control is set to OFF. With the SYSTEM or MODE control set to COOL, your heat pump will provide cooling when the indoor temperature rises above the level you wish to maintain. With the SYSTEM or MODE control set to HEAT, your heat pump will provide warmth whenever the indoor temperature falls below the level that you have selected. The AUTO selection found on some thermostats provides for automatic changeover between cooling and heating. With the SYSTEM or MODE control set to AUTO, cooling operation is activated when the indoor temperature rises above the thermostat cooling temperature setting, or heating operation is activated when the indoor temperature drops below the thermostat heating setting. • 5-MINUTE TIME DELAY—Unit will delay operation upon initial start-up or short-cycling of the indoor thermostat. • 2-MINUTE TIME DELAY—When changing capacity from low to high, or high to low, there is a 2-minute time delay. During the capacity change delay, the outdoor fan will continue to run. During this time, the discharge air from your ducting may be lower than desired. This is normal and is not a cause for alarm. The discharge air temperatures will rise when the unit has settled into its new heating/cooling capacity. COOLING MODE When operating in cooling mode, your heat pump will run in cooling mode until the indoor temperature is lowered to the level you have selected. On extremely hot days, your heat pump will run for longer periods at a time and have shorter off periods than on moderate days. The following are typical conditions that add extra heat and/or humidity to your home. Your heat pump will work longer to keep your home comfortable under these conditions: Depending on your typical winter heating needs, your home comfort system may include a supplementary heating source. The EMERGENCY HEAT setting (EHEAT) provides for convenient selection between the two heating appliances. Your heat pump will operate when the SYSTEM or MODE control is set to HEAT. With the SYSTEM or MODE control set to EHEAT, the heat pump will turn off and the supplementary heat source will be activated. In certain geographic areas and in certain applications, supplemental heat is not required. Any questions regarding your application should be directed to your dealer. Your thermostat may be either a PROGRAMMABLE or NONPROGRAMMABLE unit. A NON-PROGRAMMABLE thermostat does not allow the temperature settings to be varied throughout the day or week without physically changing the settings. A PROGRAMMABLE thermostat allows various daily temperature changes to be preset. During the winter, for example, you may wish to “set back” the temperature of your home at night, then have the temperature return to normal prior to waking up. The home’s temperature can then be lowered again during the day when no one is at home, but again be at peak comfort level when your family returns home. During the summer, the opposite changes might be programmed. When properly used, the programming can result in energy savings on your home’s heating and cooling. If you wish to program your accessory electronic indoor thermostat, please refer to thermostat owner’s manual. • Entrance doors are frequently opened and closed. • Laundry appliances are being operated. • A shower is running. • More than the usual number of people are present in the home. • More than the normal number of electric lights are in use. • Drapes are open on the sunny side of the home. HEATING MODE With the SYSTEM or MODE control of your indoor thermostat set to HEAT, your heat pump will run in heating mode until room temperature is raised to the level you have selected. Of course, your heat pump will have to operate for longer periods to maintain a comfortable environment on cooler days and nights than on moderate ones. SUPPLEMENTAL HEAT Your heat pump is your primary heating source. Your system may also be equipped with a supplemental heating source such as electric, gas, or oil. On extremely cold days and nights, your system will automatically turn on the supplemental heat in order to maintain the level of comfort your have selected. DEFROST MODE When your heat pump is providing heat to your home and the outdoor temperature drops below 45°F, moisture may begin to freeze on the surface of the outdoor coil. If allowed to build up, this ice would impede airflow across the coil and reduce the amount of heat absorbed from the outside air. So, to maintain energy-efficient operation, your heat pump has an automatic defrost mode. FOR MULTI-STAGE UNIT INSTALLATIONS: Your heat pump system has several special features built in to protect the unit. www.gotohallowell.com Descrip t i o n o f O p e rat i o n Defrost will start at the preset time only if the ice is sufficient to interfere with normal heating operation. After the ice is melted from the outdoor coil, or after a maximum of 8 minutes in defrost mode, the unit automatically switches back to normal heating operation. The fan will resume normal operation. Do not be alarmed if steam or fog appears at the outdoor unit during defrost mode. Water vapor from the melting ice may condense into a mist in the cold outside air. During certain weather conditions such as heavy snow and freezing rain it is not uncommon for ice to build up on the outdoor unit grill. This is normal for these weather conditions. Do not attempt to remove the ice from the outdoor unit grill. This condition will not affect the proper function of the unit and will clear overtime. input signal from the thermostat. During Defrost Mode, the outdoor fan does not run, with the exception of a 10 second purge to allow for removal of water droplets from the outdoor coil at the end of the defrost cycle. REVERSING VALVE OPERATION The thermostat controls the heat pump mode (heat or cool) using the O input signal on the controller. The controller will energize the reversing valve, placing the unit into Cooling mode whenever the O input signal is energized. The controller will also energize the reversing valve through the integrated defrost logic. MODES OF OPERATION The Hallowell Acadia System has 4 modes of heating, and 2 modes of cooling. Each mode of is assigned a level of capacity for the entire system. Descriptions of these modes, as well as the conditions under which each is selected are explained in this section. During Defrost Mode any supplemental heating system installed will be brought online to maintain the thermostat setpoint. At the completion of a defrost cycle, the supplemental heating will be taken offline, and the outdoor unit will run for 3 minutes, regardless of a call from the thermostat for heating. Depending on the outdoor conditions at the time of a defrost, this may result in lower than normal discharge air temperatures until normal operation is resumed. This is normal operation, and is not cause for alarm. The 4 modes of operation for the Acadia system are: EMERGENCY HEAT MODE The emergency heat (EHEAT) setting on your electronic thermostat can be used to turn off your heat pump and use only the supplemental heating source (if equipped). The EMERGENCY MODE will be displayed while your system is operating in EHEAT mode. Emergency heat is not normally used. There may be situations, however, when it is necessary, such as when your heat pump requires servicing. If the electricity to your heat pump has been off for more than 30 minutes, switch your thermostat to EHEAT mode before restarting your heat pump. Leave the system in EHEAT mode for an amount of time equal to the power outage. It is not necessary to exceed 12 hrs. If you cannot determine how long the power has been off, leave the system in EHEAT mode for 8 hrs. Mode Capacity M1 Single cylinder primary compressor M2 Two cylinders primary compressor M3 Primary and booster compressors M4 Primary and booster compressors with 1st stage auxiliary heat HEATING MODE OPERATION The appropriate system mode of operation for heating is determined by a combination of the Y1 and Y2 input calls from the thermostat, and the outdoor air temperature (ODT) sensed by the outdoor unit. The outdoor air temperature is broken into 7 temperature ranges, called Bins, labeled A through G. These temperature Bins and subsequent system operations are assigned as follows: System Heating Modes NOTE: Read this entire instruction manual before starting the installation. DESCRIPTION OF OPERATION The Hallowell Acadia is a multi-stage heat pump, capable of operating efficiently in a wide range of temperatures and conditions. A multi-stage thermostat is used in conjunction with sensors built into the outdoor unit to safely and efficiently provide the appropriate level of heating/cooling capacity for the given situation. Heating Call at Thermostat Y1 Y2 BIN A: ODT < -30 W1 W1 BIN B: -30 < ODT < 15 M3 M4 BIN C: 15 < ODT < 25 M2 M3 BIN D: 25 < ODT <34 M2 M2+W1 BIN E: 34 < ODT <41 M2 M2 BIN F: 41 < ODT <62 M1 M2 M1 M1 BIN G: 62 < ODT Y1 = Stage One call at thermostat. Y2 = Stage Two call at thermostat. Under normal operation, the system operates as follows. OUTDOOR FAN OPERATION The outdoor fan will continuously operate with any Y1 or Y2 www.gotohallowell.com COOLING MODE OPERATION unit to continue running in M2 for 3 minutes, regardless of the state of inputs from the thermostat. This may result in lower than usual discharge air temperatures from the indoor air handler for a short period of time until the correct heating mode can be re-established. The appropriate system mode of operation for cooling is determined by the level of demand from the thermostat, Y1 and Y2, and the outdoor air temperature. Cooling mode is limited to operation when the outdoor air temperature is above 50 °F to ensure correct operation of all components in the system. System operating modes are identical to those used in heating. The table below illustrates the cooling operating modes utilized as the outside air temperature varies and calls from the thermostat change. BUILT-IN SAFETY FEATURES The Hallowell Acadia has many built-in features to protect the system from damage from a variety of problems. The unit will self-monitor its operating conditions and attempt to solve operating problems on its own before needlessly alerting the home owner of any potential problems. If the unit determines maintenance is required it will alert the home owner by sending a TROUBLE code to the thermostat while simultaneously engaging emergency heat, if necessary. System Cooling Modes Outside Air Temperature Cooling call at Thermostat < 49F > 50F Y1 N.A. M1 Y2 N.A. M2 Y1 = Stage One call at thermostat. Y2 = Stage Two call at thermostat. N.A. = Not available, compressors for cooling should not be running at this point. High pressure/ Low pressure switch: If system refrigerant pressures reach unsafe high or low levels the Hallowell Acadia will automatically stop running for 10 minutes to allow pressures to return to safe levels. After this time-out the Acadia will begin operation again in its last mode. MODE TRANSITIONS Inter stage temperature sensor: If the inter stage temperature reaches a level that is too high the Hallowell Acadia will automatically stop running for 10 minutes to allow this temperature to return to a safe level. After this time-out the Acadia will begin operation again in its last mode. When the thermostat calls for additional heating or cooling capacity (Y1 to Y2), the Acadia requires that the new capacity call exist for a period of 3 minutes to ensure the compressors are not being cycled unnecessarily. An anti-short-cycle lockout is also built into the system to ensure the system does not turn on and off too frequently causing unnecessary wear to the components. During heating or cooling operation, if it is necessary for the unit to switch from M1 to M2, or from M2 to M1, the compressor will shut off for a period of 2 minutes before coming online in the new mode of operation. This is a delay that is engineered into the system to allow pressures to equalize and ensure the compressors start efficiently. If the outdoor air temperature changes Bins the Acadia requires the air temperature to remain in the new Bin for a period of 5 minutes before potentially changing modes. If the thermostat reduces the call from Y2 to Y1 the system will also stage back, allowing more continuous operation in the more efficient mode. 3 minute anti-short cycle: The Hallowell Acadia has a built-in timer which prevents needless cycling of the compressors and maximizes the life of the unit. The compressors may not be turned on within 3 minutes of turning off. Minimum / Maximum operating temperature monitor: A temperature monitor is built in to the Hallowell Acadia which ensures the optimum performance of the unit. In cooling mode the unit may not operate if the temperature is below 50 °F and in heating mode it may not operate if the temperature is above 82 °F. Internally fused control circuits: The Hallowell Acadia control board has an on-board replaceable fuse to protect the board and control circuit in the event of a power surge. This precaution ensures the safety of the unit and minimizes the maintenance expenses. DEFROST MODE OPERATION The Hallowell Acadia is specifically designed to limit the accumulation of frost or ice that may cause poor performance or unnecessary wear to the unit. To accomplish this, during normal operation when the control senses a buildup of ice on the outdoor coil, a defrost cycle is initiated. During this defrost cycle it is normal for an installed auxiliary heating method to turn on to assist in supplemental heating. A defrost cycle is terminated if the system has either A) run in defrost for 8 minutes, or B) reached a safe and dry coil temperature. During a defrost cycle it is also normal for the fan on the outdoor unit to turn off, assisting in ice and frost removal. At the completion of a defrost cycle, to prevent damage to the outdoor unit, it is necessary for the outdoor Circuit breaker protected system transformer: The transformer in the Hallowell Acadia has an internal circuit breaker to add additional protection to the components in the unit, as well as the air handler in the home of the owner. Advanced defrost algorithms: The Hallowell Acadia has a proprietary control system to monitor and control defrosts, only engaging a defrost mode when necessary. This additionally prevents unnecessary cycling of the www.gotohallowell.com Routi n e M a i nte n a n ce compressors, and maximizes unit runtime keeping the home comfortable, and operating costs low. use any sharp objects that could potentially puncture piping or the coil. CHECK THE AIR FILTER NOTE: If the system is not entering defrost mode at the appropriate times, a jumper is provided on the control board to initiate a Manual Defrost. Once put in place, the jumper will cause the system to go into a defrost cycle every 45 minutes regardless of the actual need for defrost. This is intended as a back-up method to be used only when absolutely necessary, such as while awaiting new temperature sensors. See Figure 4 in Appendix A for jumper location. A dirty air filter will cause excessive strain on the compressor and blower motor. This can cause the components to overheat and automatically shut down. In the worst case, the components will fail and need to be replaced. To avoid inefficient or failed operation of your unit, CHECK THE FILTER(S) EVERY 3 TO 4 WEEKS. Replace filter(s) when necessary. Disposable filters should be replaced by similar, new filters of the same dimensions. Reusable, permanent filters should be washed in a solution of cold water and mild detergent, then rinsed and thoroughly dried. THE FILTER MUST BE COMPLETELY DRY BEFORE BEING REINSTALLED. To avoid prolonged shutdown of your unit while a filter is drying, you should have an extra filter on hand. This allows you to rotate between the two with minimal downtime for your comfort system. Extra filters may be purchased from your dealer. There are no filters in the outdoor unit of a split system. INDOOR AIR HANDLING UNIT Any Hallowell approved indoor air handling unit (AHU) in your Hallowell Acadia system is designed to alter the airflow leaving it based upon the heating or cooling capacity required by the entire system. As a result, the system will have an increased airflow leaving the ductwork during different operating modes, both in heating and cooling, providing you with the most comfortable & efficient air delivery. FOR MULTI-STAGE UNIT INSTALLATIONS: Your system includes an indoor fan coil unit; the filter is located in the unit where it connects with the return-air duct or plenum. Remove the filter cover plate by sliding latches toward center of plate. Lift filter to clear lower flange. Filter is spring-loaded and will pop out. Reinstall filter, being certain to secure filter behind lower flange. When reinstalling cover plate, secure plate behind upper flange then slide tabs outward.ARN 2-MINUTE TIME DELAY: When changing capacity from low to high, or high to low, there is a 2-minute time delay. During the capacity change delay, the outdoor fan will continue to run. During this time, the discharge air from your ducting may be lower than desired. This is normal and is not a cause for alarm. The discharge air temperatures will rise / fall when the unit has settled into its new heating/cooling capacity. PERFORMING ROUTINE MAINTENANCE The indoor fan coil unit may be located in the attic. In this instance the filter may be located behind the return air grill. Access the filter by removing the return air grill. If your system includes a high efficiency or electronic air cleaner, refer to air cleaner User’s Manual for proper filter cleaning or replacement. With the proper maintenance and care, your heat pump will operate economically and dependably. Maintenance can be accomplished easily by referring to the following directions. However, before performing maintenance, consider these important safety precautions. INDOOR COIL If the indoor coil has only been operated with a clean filter in place, it should require minimal cleaning. If coil cleaning is required, call your dealer for service. It may be necessary to clean the coil with a detergent solution and rinse it with water. This could require the removal of the coil. You should not attempt this yourself. • Disconnect all electrical power to the indoor air handler before removing access panels to perform any maintenance. Disconnect power to both the indoor and outdoor units. D A N G E R There may be more than one electrical disconnect switch. Electric shock can cause personal injury or death. OUTDOOR COIL If grass clippings, leaves, shrubbery, and debris are kept away from the outdoor unit, minimal care should be sufficient to keep the system functioning properly. For proper drainage, debris must be removed periodically from the base pan. However, if the outdoor coil becomes dirty, use a vacuum cleaner or shop vac with soft brush attachment to clean the exterior surface. Vacuum coil surface using an up and down motion. Be careful not to bend or damage fins. If dirt is deep in the coil, contact your dealer for service. The outdoor fan motor may have to be disconnected and the top panel re- C AUTION Although special care has been taken to minimize sharp edges in the construction of your unit, be extremely careful when handling parts or reaching into the unit. Failure to follow this caution could result in minor personal injury or product and property damage. C AUTION Unit is under high pressure: Do not www.gotohallowell.com Deale r M a i nte n a n ce ful suggestions over the phone or save valuable time through knowledgeable preparation for the service call. moved to gain access to the coil for thorough cleaning. Do not attempt this yourself. REGULAR DEALER MAINTENANCE OUTDOOR COIL—SEA COAST If your unit is located near the ocean, special maintenance is required. Ocean mist/breeze carries salt, which is corrosive to most metals. Although your new unit is made out of galvanized metal and is protected by top-grade paint, you should take the precaution of additional maintenance which consists of periodically washing the unit. By washing all exposed surfaces and coil, you will be adding additional life to your unit. Please consult your installing contractor or service contact for proper intervals and procedures for your geographic area. In addition to the routine maintenance that you perform, your home comfort system should be inspected regularly by a properly trained service technician. The inspection (preferably twice each year, but at least once every year) should include the following: • Routine inspection of air filter(s). Replacement or cleaning as required. • Inspection and cleaning of the blower wheel, housing, and motor as required. Your split-system outdoor unit should be maintained at a level position. If its support should shift or settle so that the unit is no longer level, you should correct the condition. Re-level it promptly to assure water drains out of the unit. If you notice that water or ice collects beneath the unit, arrange for it to be drained away from the unit. Heat pumps installed in snow-belt areas should be elevated with support feet or a snow stand. • Inspection and, if required, cleaning of indoor and outdoor coils. • Inspection of the indoor coil drain pan, plus the primary and secondary drain lines. If supplied, the auxiliary drain pan and line should be inspected at this time. Service should include cleaning if required. • A check of all electrical wiring and connections. BEFORE YOU REQUEST A SERVICE CALL CHECK FOR THESE EASILY SOLVED PROBLEMS: • Check the indoor and outdoor disconnect switches. Verify that circuit breakers are ON. • A check for secure physical connections of individual components within unit. • Operational check of the heat pump system to determine actual working condition. Necessary repair and/or adjustment should be performed at this time. UNIT SUPPORT • Check for sufficient airflow. Check the air filter(s) for any accumulations of dirt. Check for blocked return-air or supply air registers. Be sure registers are open and unobstructed. • Check the settings on your indoor thermostat. If you desire cooling, make sure that the temperature control selector is set below room temperature and the SYSTEM or MODE control is set to COOL or AUTO. If you require warmth, make sure that the temperature control selector is set above room temperature and the SYSTEM or MODE control is set to HEAT or AUTO. The FAN control should be set to ON for continuous blower operation or AUTO if you wish blower to function only while your heat pump is operating. • Check note concerning special features and time delays in “Operating Your Heat Pump” section. If your comfort system still fails to operate, place the thermostat in Emergency Heat mode (if heating is required) and contact your servicing dealer for troubleshooting and repairs. Do NOT shut off power to the unit as this will hamper troubleshooting efforts. Specify your apparent problem, and state the model and serial numbers of your equipment. (You should have them recorded on the last page of this booklet.) With this information, your dealer may be able to offer helpwww.gotohallowell.com Trou b l e s h o o t i n g TROUBLESHOOTING resistance, be sure to unplug the temperature sensors from the control board, with the system power shut off. See Figure 10 in Appendix B for temperature sensor plug location. Your Hallowell Acadia has been designed from the ground up utilizing industry-proven components from only the best manufacturers to give you years of trouble-free operation. Resistance Vs Temperature Temperature (°F) Resistance (Ω) In the event, however, that your Hallowell Acadia fails to operate in the correct manner, please take the following steps prior to contacting your installer. -40 84.21 -30 86.41 -20 88.61 1. Ensure the thermostat does not display a TROUBLE or MAINTENANCE REQUIRED indicator. If either of these are displayed, contact your installer immediately, and do NOT shut off power to the unit. -10 90.81 0 93.01 10 95.2 Check to ensure the unit has power by verifying that all appropriate disconnects and/or fuses/breakers are in the ON position. 20 97.38 30 99.57 40 101.74 50 103.9 60 106.06 70 108.22 80 110.38 90 112.53 100 114.68 110 116.82 120 118.97 130 121.1 2. 3. Verify the thermostat is not in the OFF setting. CONTROL ERROR CODES In the event of a failure in the outdoor unit, the control has a built in diagnostic LED for troubleshooting purposes. Appendix A, Figure 4 shows the location of the diagnostic LED on the Acadia control board. During normal operation this LED fades on, and blinks off continuously. If for any reason the unit has encountered an error condition, the error may be diagnosed using the error table below. Status Indicator Sequence System Status Tolerances Fade In, Fast OFF Normal Operation 1 Flash, OFF for 3 Seconds Control Board Watchdog Reset 2 Flashes, OFF for 3 Seconds Temperature ± Tolerance Power Brownout Reset °F °F Ω 3 Flashes, OFF for 3 Seconds System Pressure Safety -100 1.1 0.3 5 Flashes, OFF for 3 Seconds System Pressure and Current Safety 0 0.7 0.2 6 Flashes, OFF for 3 Seconds System Temperature Sensor Fault 32 0.6 0.1 Control Board Hardware Fault 100 0.7 0.2 7 Flashes, OFF for 3 Seconds If the Hallowell Acadia has encountered an operational error, the outdoor unit will shut down for a period of 10 minutes, after which it will attempt to restart in its last known operating mode. If the unit is able to restart and run for 30 continuous minutes without an error, all error codes will be cleared and normal operation shall continue. If, however, this attempt to restart fails, the outdoor unit will shut down for another 10 minutes. If a third error occurs within 30 minutes of the original error, the unit will shut down all operation and activate a MAINTENANCE REQUIRED output. This should cause a TROUBLE indicator to be displayed on the thermostat, signifying the need to contact a qualified installer or technician. SAFETY CONSIDERATIONS In the event the Acadia system does not change modes of operation correctly, or is displaying the temperature sensor fault code, using a multi-meter and the table below check for appropriate resistance on each temperature sensor. While checking Follow all safety codes. Wear safety glasses, protective clothing, and work gloves. Improper installation, adjustment, alteration, service, maintenance, or use can cause explosion, fire, electrical shock, or other conditions which may cause death, personal injury, or property damage. Consult a qualified installer, service agency, or your distributor for more information, or assistance. The qualified installer or agency must use factory-authorized kits or accessories when modifying this product. Refer to the individual instructions packaged with the kits or accessories when installing. Use quenching cloth for brazing operations to protect sys- www.gotohallowell.com Ins t a l l at i o n or glue and completely surrounds the Vapor, and the Liquid tubes separately. tem components. Have fire extinguisher available. Read these instructions thoroughly and follow all warnings or cautions included in literature and attached to the unit. Consult local building codes and National Electrical Code (NEC) for special requirements. 11. Maximum line set length is 50’, consult factory if other. 12. Maximum vertical rise 10’, consult factory if other. IMPORTANT: Maximum liquid-line size is 3/8–in O.D. for all residential applications. The 3/8-in tube must be insulated separately from the Vapor line. Recognize safety information, symbols and words: DA N G E R Will identify serious hazards which will result in severe personal injury or death. C AUTION USE ONLY R410A RATED SERVICE EQUIPMENT C AUTION Will identify unsafe practices which would result in minor personal injury or product and property damage. C AUTION Only install the factory-supplied heat pump (bi-flow) liquid line filter drier on the liquid line at the indoor unit. This is to help prevent heat loss during heating operation. The filter drier must be insulated. Obtain replacement bi-directional R410A rated filter driers from your local supply distributor. NOTE is used to highlight suggestions which will result in enhanced installation, reliability, or operation. INSTALLATION RECOMMENDATIONS NOTES: 1. 2. 3. 4. 5. INSTALLATION: Position unit away from windows, patios, decks, etc. where the unit’s operational sound may disturb customer. Step 1—Check Equipment and Job Site Ensure that vapor and liquid tube diameters are appropriate to capacity of unit and that both lines are well insulated. D A N G E R Outdoor condenser unit is heavy. Take necassary precautions and use appropriate equipment to move and install. Run refrigerant tubes as directly as possible by avoiding unnecessary turns and bends, keeping tubes the shortest length possible to reduce refrigerant charge amount and increase efficiency. UNPACK UNIT Move to final location. Remove carton, taking care not to damage unit. When passing refrigerant tubes through the wall, seal the opening with RTV or other pliable silicon-based caulk and insulate. INSPECT EQUIPMENT File claim with shipping company prior to installation if shipment is damaged or incomplete. Avoid direct tubing contact with water pipes, duct work, floor joists, wall studs, floors, walls, brick, or other construction material. 6. Do not suspend refrigerant tubing from joists and studs with a rigid wire or strap which may come in direct contact with tubing. 7. When necessary, use hanger straps which conform to shape of tubing insulation. 8. Isolate hanger straps from insulation by using metal sleeves bent to conform to shape of insulation. 9. Insulate both the 7/8”vapor line and the 3/8” liquid lines separately so both will have their own insulation. The Acadia uses waste heat on the 3/8” liquid line at lower temperatues. That is why we must insulate. Step 2—Install on a Solid, Level Mounting Pad or Foundation Rack See Appendix D, Figure 14 for appropriate mounting configurations of the outdoor unit. ELEVATE UNIT NOTE: Accumulation of water and ice in base pan may cause equipment damage. Elevate unit per local climate and code requirements to provide clearance above estimated snowfall level and ensure adequate drainage of the unit. Use snow stands in areas where prolonged freezing temperatures are encountered. Ensure that outdoor coil drainage holes are not obstructed by snow stand. Ensure the mounting pad will not shift or swell from seasonal frost heaves. 10. Ensure that tubing insulation is pliable, sealed with tape www.gotohallowell.com • The unit must be placed on a secure, and level mounting pad or rack to prevent movement due to frost or ice build-up and to allow for proper system drainage. age the refrigerant lines, and insulation. NOTE: On rooftop applications, locate unit at least 12 in. above roof surface. • The unit must be set above the average snowfall line in the area of installation. • Due to icing on the outdoor coil, unit must be mounted so that run off of water during defrost will not cause a safety problem when water refreezes. Note: Do not set unit so that defrost condensate will run across sidewalk. 48 in 12 in 12 in • Ensure the unit is not placed directly under roof drains or eaves. • Unit must be mounted on stands to allow water to drain-out during a defrost and so that ice build up will not interfere with unit operation. 12 in 30 in Step 4—Check Indoor Expansion Device and Install in Air Handling Unit • Be sure that the mounting of the snow legs are on support rails of system and not on base pan so it will allow the water to drain out of unit during defrost. For proper unit operation, reliability, and performance the units must be installed with a balance port, bi-directional heat pump TXV specifically designed to operate with R410A. Do not install an air handler with evaporator coils having capillary tube or orifice metering devices. C AUTION Do not block drainage holes under out- door coil. Ice buildup will damage coil. AIR HANDLER INSTALLATION NOTE: On rooftop applications, mount on level platform or frame. Place unit above a load-bearing wall and isolate unit and tubing set from structure. Arrange supporting members to adequately support unit and minimize transmission of vibration to building. Consult local Codes governing rooftop applications. NOTE: In the event the air handler was installed prior to the rest of the system, it is recommended that all air handler settings and wiring be double checked at this point. Air handlers used with multi-stage units must be capable of operating with a minimum of 2 blower speeds. On variable speed units, ensure jumpers are placed for recommended air flow requirements. All air handling units must be installed as specified by the manufacture’s installation instructions. However, the following recommendations should be considered to minimize noise and service problems: C AUTION Do not allow POE lubricant to come into contact with roofing material. POE may deteriorate certain types of synthetic roofing. NOTE: Unit must be level to within ±3°. Step 3—Clearance Requirements • • Ensure that all air registers are in the fully open position. When installing, allow sufficient space for airflow clearance, wiring, refrigerant piping, and service. • Allow 30-in. of clearance at the service end of unit, and 48 in. above unit for proper airflow. Allow a minimum of 12 in. on all remaining sides. • Maintain a distance of 24 in. between units in multiunit applications. • Position the units so that water, snow, or ice from roof or eaves cannot fall directly on unit. • Cover piping to insure that snow and ice will not dam- • Insulate and seal all ductwork. • Ensure ductwork does not come in contact with structural building members. • Utilize flex connections at the main ductwork supply. IMPORTANT: An air filter must be installed upstream of the return side of the air handler. www.gotohallowell.com TO HELP RETAIN HEAT IN THE LIQUID LINE. NOTE: Improper installation of equipment may result in undesirable noise levels in living area. Precautions During Line Installation Hallowell air handlers come from the factory with bi-flow TXV’s specifically designed for R-410A. Installation is required. NOTE: Both 7/8” vapor line and 3/8” liquid must be insulated. IMPORTANT: If matching the outdoor unit with anything other than the Hallowell factory air handler an R-410A rated TXV must be installed. NO OTHER TYPE OF METERING DEVICE MAY BE USED! Contact the factory for any questions about sizing or applications. IMPORTANT: KEEP LINES CLEAN OF DEBRIS AND MOISTURE. • Install the lines with as few bends as possible reducing 90 bends where possible. Care must be taken not to damage the couplings, or kink the tubing. Use ACR, hard drawn copper tubing where no appreciable amount of bending around obstruction is necessary. If soft copper must be used, care must be taken to avoid sharp bends which may cause a restriction. • The lines should be installed so that they will not obstruct service access to the coil, air handling system, or air filter. • Care must also be taken to isolate the refrigerant lines to minimize noise transmission from the equipment to the structure. • The vapor line must be insulated with a minimum of ½” foam rubber insulation. The liquid line must also be insulated with a minimum of ½” foam rubber insulation. • Use PVC or other suitable piping as a conduit for all underground installations. • Pack fiberglass insulation and a sealing material such as permagum, or RTV around refrigerant lines where they penetrate a wall to reduce vibration and to retain some flexibility. • Use only long radius 90° for any hard drawn copper. IMPORTANT: The TXV should be mounted as close to the indoor coil as possible. NOTE: If you are using the Hallowell air handler and/ or TXV kit see Appendix A Hallowell TXV kit installation instructions. Step 5—Make Piping Connections C AUTION Relieve pressure and, or recover all refrigerant before system repair or final unit disposal to avoid personal injury or death. NOTE: Outdoor unit is charged with nitrogen. If no nitrogen is relieved from outdoor unit, contact factory before going further. Additional steps may be required if system has lost factory nitrogen charge. The whole system, when installed, must be evacuated to 500 microns to eliminate contamination and moisture in the system. NOTE: OUTDOOR UNIT MUST BE CONNECTED TO FACTORY-APPROVED INDOOR UNIT. IF NOT USING A HALLOWELL AIR HANDLER CONTACT FACTORY TO VERIFY INSTALLED UNIT. SWEAT CONNECTION C AUTION Purge line sets with nitrogen before These outdoor units are carefully evaluated and listed with specific indoor coils and fans for proper system performance, efficiency and reliability. brazing occurs to prevent internal oxidation contaminants into system. REFRIGERANT TUBING & FILTER DRIER To prevent damage to unit or service valves, observe the following: NOTE: Filter drier should be placed at air handler in conditioned space to prevent heat loss. Acadia uses waste heat off the liquid line. Installation of filter drier is required in the 3/8” liquid line at the air handler unit. Connect the liquid line from the AHU to the filter drier. Connect the other end of the filter drier to the 3/8” service valve on the outdoor unit. Note: BI-flow filter drier is required. IMPORTANT: INSULATE FILTER DRIER AFTER INSTALLATION. • Use a brazing shield. • Wrap service valves with wet cloth or use a heat sink material. • During brazing, purge lines with nitrogen to prevent oxidation internally within the piping. • Braze sweat connections using industry accepted methods and materials. www.gotohallowell.com 10 not supply power to unit with compressor terminal box cover removed. LEAK TESTING Leak test all joints on indoor/outdoor units, and refrigerant tubing. Open both service valves by turning center stem fully CCW until stem reaches the top of valve. IMPORTANT: Keep wiring color coded according to system drawings for easy troubleshooting and standardization. For color code reference, see Figures 7-10 in Appendix B. NOTE: Ensure service valves are opened and nitrogen purge removed before evacuation. C AUTION Be sure field wiring complies with local and national fire, safety, and electrical codes, and voltage to system is within limits shown on unit rating plate. Contact local power company for correction of improper voltage. See unit rating plate for recommended circuit protection device. NOTE: Outdoor unit is charged with nitrogen that must be released before evacuation. NOTE: Both 7/8in vapor line and 3/8in liquid must be completely insulated after leak testing. NOTE: Operation of unit on improper line voltage constitutes abuse and could affect unit reliability. See unit rating plate. Do not install unit in system where voltage may fluctuate above or below permissible limits. EVACUATE REFRIGERANT TUBING, INDOOR COIL, AND OUTDOOR UNIT Use all service ports and open all flow-control devices. Do not leave system open to atmosphere any longer than the minimum time required for installation. POE oil in compressors is extremely susceptible to moisture absorption. Always keep ends of tubing sealed during installation and free of debris. NOTE: Use copper conductors only between disconnect switch and unit. NOTE: Install branch circuit disconnect of adequate size per NEC to handle unit starting current. Locate disconnect within sight from and readily accessible from unit, per Section 440-14 of NEC. The Acadia 42C46H requires 45A time delay fuses. The Acadia 36C35H requires 35A time delay fuses. Refrigerant system must be evacuated and held at 500 Microns for a minimum of 15 minutes to provide thorough free air test. IMPORTANT: Never open system under vacuum to atmosphere without first breaking vacuum with nitrogen. ROUTE GROUND AND POWER WIRES The vacuum method requires a vacuum pump capable of achieving a minimum vacuum of 500 microns and a micron gauge for indication. Remove access panel to gain access to unit wiring. Extend wires from disconnect through power wiring hole provided and into unit control box. Size wires per NEC. The vacuum method is the most effective way of assuring a system is free of air and moisture. NOTE: The unit cabinet must have an uninterrupted or unbroken ground to minimize personal injury if an electrical fault should occur. The ground may consist of electrical wire or metal conduit when installed in accordance with existing electrical codes. FINAL TUBING CHECK IMPORTANT: Check to be certain factory tubing on both indoor and outdoor units have not shifted during shipment. Ensure tubes are not rubbing against each other or any sheet metal. Pay close attention to feeder tubes and service port stems. Check insulation on vapor and liquid lines, and make sure it is sealed properly with tape or glue. D A N G E R Failure to follow this warning can result in an electric shock, fire, or death. CONNECT GROUND AND POWER WIRES Step 6—Make Electrical Connections Connect ground wire to ground connection in control box for safety. Connect power wiring to indicated L1 and L2 connections using appropriately sized wire nuts. For clarification see the line voltage drawing in FIG 6 Appendix B. The 75VA transformer located in the outdoor unit is factory pre-wired for a 240VAC input. If the unit is being connected to supply voltages other than 240VAC, consult the wiring diagram in Fig 6 Appendix B. Use 18 AWG, 10 minimum conductor wire harness for control connections between the thermostat, air handler, and outdoor unit. A minimum 10 conductor 18 AWG wire harness must be used to prevent incorrect wiring of the unit. D A N G E R To avoid personal injury or death, do www.gotohallowell.com 11 ROUTE CONTROL WIRING • If electric heat is installed in AHU, be sure the air handler unit is properly configured for electric heat. If using factory supplied air handling unit see Fig 1 Appendix A. To route control wires to interior of heat pump unit it is necessary to pierce ½” rubber grommet and slide control wires into electrical cabinet of outdoor unit. While routing control wires in the heat pump unit, avoid routing across, or around the control board, as this may generate unwanted interference. • Set Electric Heat air flow tap to be the same as normal airflow. If using factory supplied air handling unit see Fig 3 Appendix A. CONNECT CONTROL WIRING • Using the table in Fig 5 of Appendix A, program the thermostat for proper operation with the Hallowell ACHP. NOTE: System is supplied with a 75VA transformer with control 3.7 amp breaker. • It is essential to place the jumpers as indicated on the thermostat to allow correct operation. IMPORTANT: Make sure to adjust voltage leads to transformer if power is other than 240V. • Ensure the jumpers on the outdoor unit control board are in the “off” position to allow normal operation. IMPORTANT: Disconnect red and black leads from the air handler control transformer. Using 18 AWG, color-coded, insulated (35C minimum) 10 or 12 conductor wire, connect the control wiring between the heat pump system components (as shown in Fig 10 Appendix B). If the distance between the thermostat and the heat pump unit is more than 100 feet (as measured by the control wiring) 16 AWG wire should be utilized to avoid unnecessary voltage drop. All wiring must be NEC Class 1 and must be separated from incoming power leads. The outdoor unit provides a maximum of 75 VA 24v for control power. To ensure correct operation of the system, the 40VA transformer located in the Indoor Air Handler must be disconnected from the supply, and properly insulated to prevent possible shorts. FINAL WIRING CHECK IMPORTANT: Check factory wiring and wire connections to ensure terminations are secured properly. Check wire routing to ensure wires are not in contact with tubing, sheet metal, etc. Step 7—Start-Up NOTE: The minimum outdoor operating ambient in cooling mode is 50°F, and the maximum outdoor operating ambient in cooling mode is 125°F. The minimum allowed heating operation is - 40° F. Following color codes provided in Fig 7-10, Appendix B, make connections to the thermostat, air handler, and outdoor unit. Connections may be made using either ¼” female disconnects, or using strip-wire connections with the screw terminals provided. To prevent compressor damage or personal injury, observe the following: C AUTION • Do not overcharge system with refrigerant. NOTE: Ensure supplied thermostat and indoor air handlers are installed and properly wired. • Do not operate unit in a vacuum or at negative pressure. NOTE: Ensure the air handler jumpers are placed in their appropriate position and that all wiring follows color code instructions. • Do not disable low-pressure switch. • Wear safety glasses, protective clothing, and gloves when handling refrigerant. CONFIGURING YOUR HEAT PUMP COMPONENTS To prevent personal injuries wear safety glasses, protective clothing, and gloves when handling refrigerant and observe the following: • Minimum air flow for the 42C is 1200cfm in a Y2 call. Set control jumpers in the air handler accordingly. If using factory supplied air handling unit see Fig 2 Appendix A. EQUIPMENT. • Minimum air flow for the 36C is 900cfm in a Y2 call. Set control jumpers in the air handler accordingly. If using factory supplied air handling unit see Fig 2 Appendix A. USE ONLY R410A RATED REFRIGERANT IMPORTANT: KEEP EQUIPMENT AND HOSES CLEAR OF DEBRIS AND MOISTURE. C AUTION ENSURE BOTH 7/8 AND 3/8 SERVICE www.gotohallowell.com 12 VALVES ARE OPEN. 6. IMPORTANT: Do not vent refrigerant to atmosphere. Recover during system repair or final unit disposal. NOTE: Do not allow temperature settings to be reached until charge is complete. Open doors and windows if necessary while charging to ensure this condition. Be sure the set point is above indoor ambient and is set high enough to energize desired 2nd stage operation. Follow these steps to properly start up the system: 1. Close electrical disconnects to energize system and ensure system control heart beat and thermostat energizes. NOTE: Depending on outdoor conditions, initial charge may be reduced to be added after system start-up through ¼” charging port. 7. NOTE: The outdoor unit is equipped with crank case heaters which operate when low sump temperatures occur, ensuring separation of oil and refrigerant. Ensure the crank case heaters are energized before admitting initial charge. If power has been lost, or unit has been de-energized for 4 hours or more after charge has been admitted, allow the crank case heaters to energize for a minimum of 12 hours. Not following warnings may result in compressor chattering and permanent damage to compressors. 2. Ensure proper stage is operating by reviewing system thermostat requirements for a second stage call, and the indicator lights provided on the outdoor unit control board show desired operation. See Appendix A for description of operation. Ensure system diagnostic output LED is energized and beating. See Appendix A Figure 4. Step 8—Check Charge UNIT CHARGE With unit operating, charge system (if necessary) with liquid R410A using a commercial type R410A rated metering device manifold and hose assembly. Charge with refrigerant into suction line charging port. Check charge in heating mode only. Adjust the charge in heating using the following procedure. After evacuation is complete, for a line set of 10 feet or less, admit an initial charge amount of 12lb of liquid R-410A to the 3/8” service valve port. The line set distance is the distance between the outdoor unit and indoor unit followed along the refrigerant lines. For line sets over 10 feet add .6oz of liquid R410A per additional foot. For example, if your line set was 20 feet; 20 – 10 = 10 additional feet. NOTE: Unit is to be charged in high capacity only (2nd stage thermostat call). Note: Above 60° F charge unit using the line set method see Fig 11 Appendix C. You may have to return in heating season and double check charge amount for optimal efficiency. 10 feet x .6oz/foot = 6oz.; so total charge with a 20 foot line set would be 12lb 6oz. See Line Set Chart in Fig 11 Appendix C. 3. Set room thermostat 10 degrees or more above or below desired room temperature allowing second stage operation while charging. HEATING CHECK CHARGE PROCEDURE The thermostat must be setup at this time to properly work with your Hallowell Acadia. See the tables in Fig 5 of Appendix A. 1. Operate unit a minimum of 30 minutes before checking charge. 2. Measure liquid service valve pressure by attaching an accurate R410A rated gauge to 3/8” service port. 4. Set thermostat to Fan ON, ensure air flow and jumpers are placed properly, test emergency heat settings. 3. 5. Set Fan to Auto or ON as desired, then set room thermostat to COOL or HEAT. Wait for appropriate time delay(s). Operate unit for 30 minutes after initial charge continuously ensuring the thermostat setting will not be satisfied. Measure liquid line temperature by attaching and insulating an accurate thermistor type or electronic thermometer to the liquid line near the outdoor coil. 4. Refer to charging table for required sub cooling temperatures. 5. To obtain required sub cooling temperature at a specific liquid line pressure, add refrigerant if liquid line temperature is higher than indicated, or reclaim refrigerant if temperature is lower. NOTE: While waiting, inspect line set security and insulation. This is a good time to double check the installation procedure. www.gotohallowell.com 13 NOTE: For every 1 lb of additional refrigerant added, allow a minimum of 30 minutes for the system to settle before taking another sub cooling indication. You must ensure that you will have a 2nd stage call on the thermostat. Set the thermostat well above indoor air temp and open doors and windows if needed. Sub cooling for Heating Mode to establish charge Outdoor Temperature/ Subcooling at the 3/8in Service valve 0°F and Below 2430°F Use Amp Meter on Outdoor unit to insure both compressors are on 0-30°F 3036°F Use Amp Meter on Outdoor unit to insure both compressors are on 30-45°F 1525°F Use Amp Meter on Outdoor unit to insure only the Primary compressor is on 45-62°F 1015°F Use Amp Meter on Outdoor unit to insure only the Primary compressor is on 62°F and above 510°F Use Amp Meter on Outdoor unit to confirm that primary 1cyl is operating amp draw will be low If only Primary compressor is running use the 30-45° temp range on chart. Step 9—Final Checks IMPORTANT: Before leaving job, be sure to do the following: 1. Ensure that all wiring and tubing is secure in unit before adding panels and covers. Securely fasten all panels / covers and ensure all fasteners remain tight. 2. Tighten service valve stem caps to 1/12-turn past finger tight. 3. Leave manual with owner. Explain system operation and periodic maintenance requirements outlined in manual. 4. Fill out Dealer Installation Checklist and place in customer file. CARE AND MAINTENANCE For continuing high performance and to minimize possible equipment failure, periodic maintenance must be performed on this equipment. Frequency of maintenance may vary depending upon geographic areas, such as coastal applications. Pay close attention to cleanliness of indoor / outdoor coils and proper duct circultion and sealing. • Your servicing dealer may offer an economical service contract that covers seasonal inspections. Ask for further details. www.gotohallowell.com 14 Ap p e n d i x A Settings Figure 1 Factory Supplied Air Handler Control Board HEAT ENABLE HUM OUT EAC JUMPER RELAY OUTPUT RELAY OUTPUT LED2 EAC 8 7 6 5 4 12 10 2 9 1 11 DELAY 3 16 14 D D COOL 13 B C C A B A 15 ADJUST COM HEAT P6 P12 NO X/L HUM O W1 W2 Y1 Y/Y2 G R INDICATOR LED P13 JM1 F1 24VAC COM FUSE HP YES MODE HUM STAT MODE JUMPER A/ C P3 BLACK P IN HT2 AIRFLOW AND COMFORT SETTING JUMPERS HUM STAT JUMPER AIRFLOW (CFM) K3 RED HT3 LIMIT LIM HEAT COM PWR TEST LED1 HT1 P5 HUM_OUT NO HEAT HEAT SPARE R G 36C/35H Jumper Settings: Heat D Delay A Cool B Adjust B Y/Y2 Y1 W2 W1 O HUM X/L COM 42C/45H Jumper Settings: Heat D Delay A Cool D Adjust B SPARE JUMPER Hallowell TXV kit installation instructions: 1. Ensure coil has not been exposed to atmospheric pressure for more than 15 minutes. 2. Remove indoor coil inlet cover at the distributor body inlet. Use back-up wrench to prevent damage. 3. Install the TXV to distributor using a back up wrench to prevent damage. Tighten finger tight then turn nut ¼ turn more. 4. Connect equalizer tube of TXV to 1/4-in. equalizer fitting on vapor line. Be sure to remove the Schrader valve located in the fitting on the coil. 5. Install the indoor coil inlet tube. Use back-up wrench to prevent damage. 6. Attach TXV bulb to horizontal section of suction line using bulb strap and insulate. 7. Proceed with remainder of unit installation. 8. Refer to Air Handler installation manual for further installation of unit. www.gotohallowell.com 15 Figure 2 Air Flow Chart For Air Handler: HIGH SPEED COOLING AND HEAT PUMP AIRFLOW (CFM) Model JUMPER SETTINGS 36C 48D Cool Adjust CFM m3/min CFM m3/min 1230 34.8 2020 57.2 A B 1007 28.5 1759 49.8 B B 1202 34.0 1989 56.3 A A 903 25.6 1607 45.5 B A 1076 30.5 1790 50.7 A C 965 27.3 1502 42.5 C B 814 23.0 1439 40.7 B C 714 20.2 1306 37.0 D B 868 24.6 1368 38.7 C A 646 18.3 1218 34.5 D A 799 22.6 1246 35.3 C C 604 17.1 1090 30.9 D C Note: • • • • • Both the COOL and ADJUST tap must be set for the cooling airflow (CFM). Fan only airflow (CFM) = 63% of high speed cooling. Low speed cooling used only with two stage outdoor units. (Speed is preset to 65% of cooling speed). When operating in both heat pump and electric heat models, the airflow (CFM) will be whichever is greater. Airflow (CFM) indicator light (LED2) flashes one for every 100 CFM. (i.e.: 12 Flashes is 1200 CFM). Figure 3 Electric Heat Airflow Adjustment Taps For Factory Supplied Air Handler ELECTRIC HEAT AIRFLOW (CFM) MODEL TAP SELECTIONS 36C 48D HEAT 724 1318 A 657 1142 B 593 927 B 520 673 D www.gotohallowell.com 16 PRIMARY ONE OUTPUT LED PRIMARY TWO OUTPUT LED BOOSTER OUTPUT LED REVERSING VALVE OUTPUT LED OUTDOOR FAN OUTPUT LED DIAGNOSTIC OUTPUT LED www.gotohallowell.com SPARE J3 CTS ITS J1 1 2 3 4 5 6 AUXILLARY HEAT (W1) OUTPUT LED SYSTEM MALFUNCTION (X/L) (MAINTENANCE REQUIRED) OUTPUT LED SPARE 24VAC BS 24VAC HPS 24VAC HIGH SPEED INDOOR FAN (Y2O) OUTPUT LED 1 2 3 4 5 6 7 8 9 MANUAL DEFROST JUMPER JMP 2 Hallowell Proprietary Control 24C RV 24C BE 24C 2CYL 24C 1CYL 24C ODF 24VAC 24C W/E Y1 Y2 O W1 X/L Y2O OATS 1 2 3 4 5 6 7 8 9 10 17 J2 1 2 3 4 5 6 7 8 J4 Figure 4 Control Jumpers Figure 5 Thermostat Settings MENU REFERENCE NUMBER FACTORY DEFAULT SETTING CORRECT SETTING COMMENTS 1 MS 2 HP 2 Selects appropriate control style (2 stage heat pump) 2 (GAS) ELE Indoor blower control (furnace or thermostat) 3 DAYS (7) Customer Preference 7 day, 5 day plus weekend, or no program 4 PS (4) Customer Preference Program setpoints during each day 5 COOL OFF HEAT AUTO COOL OFF HEAT (EMER) AUTO System switchover or operating mode with heating, cool, auto changeover, or off 6 E (ON) ON Pre-stage heating/cooling steps to reach desired temp at given time 7 Cr HEAT (FA) SL Cycle rate of heating mode 8 Cr COOL (FA) SL Cycle rate of cooling mode 9 Cr EMER (FA) FA Cycle rate of emergency heat 10 CL (OFF) ON Compressor lockout (anti short-cycle) 11 dL (ON) ON Display backlight 12 0 (ROOM TEMP) Pre-Calibrated Adjust display temp to actual temp 13 °F Customer Preference ° F or ° C displayed 14 b (ON) Customer Preference Keypad beeper on/off 15 HEAT (99) 80 ° F or lower Heating mode upper limit 16 COOL (45) 65 ° F or higher Cooling mode lower limit 17 KEYPAD LOCKOUT (L) Customer Preference Keypad lockout function 18 KEYPAD LOCKOUT (OFF) Customer Preference Turn keypad lockout on/off 19 FA HEAT (ON) ON Heat 2nd stage cycle rate 20 FA COOL (ON) ON Cool 2nd stage cycle rate 21 CHANGE FILTER (OFF) ON (720 hours) Indoor air filter change timer 25 – 1975 hours 25 hour steps 22 CHANGE HUMIDIFIER (OFF) ON (IF APPLICABLE) Humidifier pad change timer 25 – 1975 hours 25 hour steps www.gotohallowell.com 18 1) Controlled System Type: This control can be adapted for many uses; however operation of the Hallowell ACHP requires the HP2 setting. 15) Heat Temperature Limit: The highest allowable temperature for Heating mode may be changed here. The allowable range for the Hallowell ACHP is 62 ° F to 80 ° F. When this is active, the “temperature limit” icon is displayed to the left of the setpoint temperature, and if an attempt is made to adjust the setpoint above the limit, the “temperature limit” icon will flash. 2) Indoor Fan Operation: GAS or Electric (ELE) fan operation. The system requires the thermostat to energize the indoor fan. If a separate heating system controls the fan, select GAS. 16) Cool Temperature Limit: The lowest allowable temperature for Cooling mode may be changed here. The allowable range for the Hallowell ACHP is 65 ° F to 85 ° F. When this is active, the “temperature limit” icon is displayed to the left of the setpoint temperature, and if an attempt is made to adjust the setpoint below the limit, the “temperature limit” icon will flash. 3) Programming: This control can be setup to run individual programs for each day of the week, or a 5-day block with separate weekend parameters. 4) Program Setpoints: This control can be programmed with 2 or 4 setpoints during the day. 17) Keypad Lockout: A keypad lockout is available to prevent undesired temperature and mode changes. This is a three stage lockout, consisting of: Keypad Lockout and L: Total lockout, preventing any tem• perature and/or mode changes. Keypad Lockout and P: Partial lockout, allowing temperature • changes within the set temperature limits. Temperature Limit/Keypad Lockout: Prevention of chang• ing the set temperature limits. 5) System Switch Configuration: This control can be setup to run in Heat mode, Cooling mode, Heat and Cool with auto changeover, and Emergency Heating mode. 6) Energy Management Recovery: This control can make use of Energy Management Recovery (EMR) strategies, in which the system will be brought online early to ensure the program setpoint is reached at the specified time. Heating will start 5 minutes early for each 1 ° required to reach the setpoint. This setting is bypassed if the system is in 0-day programming. 18) Keypad Lockout Combination: This menu item is used to select the 3 digit key-code to disable the keypad lockout, and to turn the lockout On or Off. Use the and keys to select your keypad lockout combination (000 is not a valid lockout combination). When finished, press to exit the menu. The system mode key will remain active for 10 seconds allowing a mode change. 7, 8, 9) Cycle Rate Selection: Recommended: SL; Slow cycle, cycles heat at approximately 1.2 °F. Cooling mode cycles at 1.7 F. Hallowell recommends these settings to optimize the system for efficiency by minimizing unit cycling. If a faster recovery rate is desired (heat .6 °F, cool 1.2 °F) select FA. Choosing FA will yield reductions in efficiency and increased unit cycling. In the event the combination is lost, press and hold the menu button for 20 seconds to unlock the thermostat. 19, 20) Fast Second Stage: This should be set to FA Heat/Cool ON When in run mode, and with the Fast Heat (FA Heat ON) enabled, if the Heat setpoint is manually raised by 3° F or more above the actual temperature, the 2nd stage shall energize immediately. If FA Heat is Off, the 2nd stage will not energize until the setpoint is 1° F or more above the actual temperature for 10 minutes. For FA Cool, the operation is the same, only for a cooling operation. 10) Compressor Lockout: This control has a built in 5 minute timer between cooling cycles. This lockout should be ON to help prevent compressor shortcycling. 11) Display Backlight: When this option is turned ON, the display backlight will remain illuminated continuously, improving low-light visibility. When this option is turned OFF, the display backlight will illuminate briefly after any keypress. 21) Filter Replacement Run Time: This provides a reminder to change the air handler filter as a function of indoor fan runtime. This should be set to 725 hours (once a month), unless otherwise recommended. 12) Temperature Display Adjustment: This option is used to adjust the displayed temperature to match your previous thermostat. The range of adjustment is 4 ° higher or lower. 22) Humidifier Pad Replacement Run Time: This provides a reminder to change the humidifier pad (if so equipped), based on heating mode run time. 13) Degree Readout: Select the desired temperature readout, F ° or C °. 14) Beeper On/Off: Turn the keypress beeper On or Off. www.gotohallowell.com 19 Ap p e n d i x B Wiring Diagrams Figure 6 Line Voltage 208/230 VAC L1 L2 #10 BLUE PRI. 1 #10 BLUE #16 White #10 BLUE #10 Brown S PPR PRC PRI. 2 PCP 2 1 PSC C R 5 #16 White #10 BLUE #10 Yellow BOOSTER BCP #10 Brown #16 White C R #10 Brown S #10 BLUE BSC BOOSTER #10 Red #10 BLUE 5 2 BRC 1 #10 Red BPR #16 White ODF ODF OF M #16 Black #16 Red #16 Brown #16 Brown FRC #16 Black CCH #16 Black CCH #16 White #16 Orange 24VAC TA www.gotohallowell.com 20 #10 Red G Figure 7 Proprietary Control BRN Outdoor Fan Contactor YEL Primary Compressor 1 Cylinder Contactor Reversing Solenoid Coil Interstage Temp. Sensor WHT Booster Compressor Contactor Economizer Solenoid RED/YELLOW BLUE Primary Compressor 2 Cylinder Contactor BLUE Coil Temp. Sensor BLK/WHITE ORG J1 Outdoor Air Temp. Sensor J4 1 2 3 4 5 6 7 8 9 10 OATS CTS ITS 24C RV 24C BE 24C 2CYL 24C 1CYL 24C ODF SPARE 1 2 3 4 5 6 7 8 24VAC 24C W/E Y1 Y2 O W1 X/L Y2O 1 2 3 4 5 6 7 8 9 ORG RED WHT 240 208 Com 24 VAC BLK Red to White - 208VAC Org to White - 240VAC 75 VA POWER SUPPLY LOCATED IN OUTSIDE CONDENSOR WHT YEL BLU ORG TAN BRN PNK J3 Blue HOT Yellow NEUTRAL To Air Handler (Blue goes to Thermostat) www.gotohallowell.com 21 SPARE 24VAC BS 24VAC HPS 24VAC J2 Hallowell Proprietary Control 1 2 3 4 5 6 NOTE: DISCONNECT RED AND BLACK LEADS FROM 40VA POWER SUPPLY IN AIR HANDLER UNIT. POWER IS SUPPLIED FROM OUTSIDE CONDENSOR POWER SUPPLY. RED Spare High Pressure Switch Low Pressure Switch Figure 8 Air Handling Unit 40 VA POWER SUPPLY LOCATED IN AIR BLK DISCONNECT RED AND BLACK LEADS FROM 40VA POWER SUPPLY INTERNAL TO AIR HANDLER UNIT. Hallowell Air Handling Unit AVG***3XH21 COM BLK RED To Outdoor Unit RED 24 R RED G GRN PNK Y / Y2 YEL Y1 YEL W2 PNK TAN W1 ORG O ORG HUM BRN XL BRN C BLK To Thermostat 1st Stage Auxillary Heat Relay 2nd Stage Auxillary Heat Relay BLU WHT Figure 9 Thermostat To Air Handler GRN BRN ORG BLUE YEL WHT BLK PINK (Blue goes to Outdoor Unit) RED Field Jumper Installed RH 24 VAC Hot (Heat) RC 24 VAC Hot (Cool) C 24 VAC Common W2 Heat Mode 3rd Stage Emergency Mode 2nd Stage WE Y1 Y2 O X/L G Indoor Fan Fault Energized on Heat and Emergency Heat and Cool Mode Indicator call for Heat Cool Mode Cool Mode Mode Energizes or System or Cool. 1st Stage 2nd Stage 1st Stage Reversing Malfunction Optional for (Compressor) (Compressor) Valve Emergency Switch Heat. White Rodgers 90 Series Blue Universal Thermostat 1F951206 www.gotohallowell.com 22 www.gotohallowell.com ORG J4 NEUTRAL Yellow Blue HOT 24 VAC 1 2 3 4 5 6 7 8 9 J3 Interstage Temp. Sensor SPARE 24VAC BS 24VAC HPS 24VAC J1 1st Stage Auxillary Heat Relay RED BLK WHT BRN BLK C ORG XL BLU 2nd Stage Auxillary Heat Relay BRN O HUM W1 TAN Y1 W2 WHT ORG YEL PINK Y / Y2 G YEL RED GRN 24 R COM PNK BLK RED Hallowell Air Handling Unit AVG***3XH21 DISCONNECT RED AND BLACK LEADS FROM 40VA POWER SUPPLY INTERNAL TO AIR HANDLER UNIT. Low Pressure Switch High Pressure Switch Spare Outdoor Air Temp. Sensor Coil Temp. Sensor BLK/WHITE BLUE RED/YELLOW 40 VA POWER SUPPLY LOCATED IN AIR Hallowell Proprietary Control 75 VA POWER SUPPLY LOCATED IN OUTSIDE CONDENSOR Red to White - 208VAC Orange to White - 240VAC ORG RED WHT 240 208 Com DISCONNECT RED AND BLACK LEADS FROM 40VA POWER SUPPLY IN AIR HANDLER UNIT. POWER IS SUPPLIED FROM OUTSIDE CONDENSOR POWER SUPPLY. NOTE: Reversing Solenoid Coil WHT RED Economizer Solenoid Booster Compressor Contactor BLUE ITS Primary Compressor 2 Cylinder Contactor SPARE BRN CTS YEL BLK 1 2 3 4 5 6 Outdoor Fan Contactor 24C RV 24C BE 24C 2CYL 24C 1CYL 24C ODF 24VAC 24C W/E Y1 Y2 O W1 X/L Y2O WHT YEL BLU ORG TAN BRN PNK OATS 1 2 3 4 5 6 7 8 9 10 23 J2 1 2 3 4 5 6 7 8 Primary Compressor 1 Cylinder Contactor RED RC BLK C PINK W2 WHT WE YEL Y1 BLUE Y2 ORG O BRN X/L G GRN White Rodgers 90 Series Blue Universal Thermostat 1F95- Indoor Fan Heat Mode Fault Energized on 24 VAC 24 VAC 24 VAC 3rd Stage Emergency Heat and Heat and Cool Mode Indicator call for Heat Cool Mode Cool Mode Energizes Hot (Heat) Hot (Cool) Common Mode or Cool. Emergency 1st Stage 1st Stage 2nd Stage Reversing or System Optional for (Compressor) (Compressor) Valve Malfunction Mode Emergency Switch 2nd Stage Heat. RH Field Jumper Installed Figure 10 Entire Control Ap p e n d i x C R410A/Charging Charts Figure 11 Hallowell Acadia Line Chart Hallowell ACHP Line Set Charging Chart Line set length in feet Initial charge of R410A Line set length in feet Initial charge of R410A 0-10 12lbs 11 12lbs - 0.6oz 31 12lbs - 12.6oz 12 12lbs - 1.2oz 32 12lbs - 13.2oz 13 12lbs - 1.8oz 33 12lbs - 13.8oz 14 12lbs - 2.4oz 34 12lbs - 14.4oz 15 12lbs - 3.0oz 35 12lbs - 15oz 16 12lbs - 3.6oz 36 12lbs - 15.6oz 17 12lbs - 4.2oz 37 13lbs - 0.2oz 18 12lbs - 4.8oz 38 13lbs - 0.8oz 19 12lbs - 5.4oz 39 13lbs - 1.4oz 20 12lbs - 6.0oz 40 13lbs - 2.0oz 21 12lbs - 6.6oz 41 13lbs - 2.6oz 22 12lbs - 7.2oz 42 13lbs - 3.2oz 23 12lbs - 7.8oz 43 13lbs - 3.8oz 24 12lbs - 8.4oz 44 13lbs - 4.4oz 25 12lbs - 9.0oz 45 13lbs - 5.0oz 26 12lbs - 9.6oz 46 13lbs - 5.6oz 27 12lbs - 10.2oz 47 13lbs - 6.2oz 28 12lbs - 10.8oz 48 13lbs - 6.8oz 29 12lbs - 11.4oz 49 13lbs - 7.4oz 30 12lbs - 12oz 50 13lbs - 8.0oz Figure 12 Hallowell Acadia Charging Chart Hallowell ACHP Charging Chart Sub-cooling Liquid line temp 3/8” service valve psig 7/8” Service Valve psig Charging port psig 60-50°F 12-15°F 90-100°F 326-390psi 330-400psi 110-160psi 50-40°F 13-18°F 80-90°F 288-354psi 290-365psi 87-142psi 40-30°F 18-25°F 75-85°F 280-340psi 282-350psi 69-118psi 30-20°F 30-35°F 70-80°F 316-390psi 318-400psi 140-170psi 20-10°F 30-36°F 70-80°F 316-400psi 318-410psi 110-140 psi 10-0°F 30-36°F 70-80°F 316-400psi 318-410psi 90-110 psi 0- neg10°F 20-30°F 70-80°F 276-366psi 278-376psi 70-110 neg10neg20°F 20-30°F 70-80°F 276-366psi 278-376psi 60-100 psi neg 20neg30°F 15-30°F 70-80°F 255-366psi 255-376psi 50-90 psi Check subcooling in 2nd stage of heating operation only www.gotohallowell.com 24 Figure 13 Pressure Temperature Chart R410A psig F° psig F° psig F° psig F° psig F° psig F° psig F° psig F° psig F° 40 -7 82 22 124 42 192 67 276 90 360 109 444 125 528 138 41 -6 83 23 125 43 194 68 278 91 362 109 446 125 530 138 0 -61 42 -5 84 23 126 43 196 68 280 91 364 110 448 125 532 139 1 -59 43 -4 85 24 127 44 198 69 282 92 366 110 450 126 534 139 2 -56 44 -4 86 24 128 44 200 70 284 92 368 111 452 126 536 139 3 -54 45 -3 87 25 129 45 202 70 286 93 370 111 454 126 538 140 4 -52 46 -2 88 25 130 45 204 71 288 93 372 111 456 127 540 140 5 -50 47 -1 89 26 131 45 206 72 290 94 374 112 458 127 542 140 6 -48 48 0 90 26 132 46 208 72 292 94 376 112 460 127 544 140 7 -46 49 0 91 27 133 46 210 73 294 95 378 113 462 128 546 141 8 -45 50 1 92 27 134 47 212 73 296 95 380 113 464 128 548 141 9 -43 51 2 93 28 135 47 214 74 298 96 382 113 466 128 550 141 10 -41 52 3 94 28 136 47 216 74 300 96 384 114 468 129 552 142 11 -40 53 3 95 29 137 48 218 75 302 97 386 114 470 129 554 142 12 -38 54 4 96 29 138 48 220 76 304 97 388 114 472 129 556 142 13 -37 55 5 97 30 139 49 222 76 306 97 390 115 474 130 558 142 14 -35 56 6 98 30 140 49 224 77 308 98 392 115 476 130 560 143 15 -34 57 6 99 31 142 50 226 77 310 98 394 116 478 130 562 143 16 -33 58 7 100 31 144 51 228 78 312 99 396 116 480 131 564 143 17 -31 59 8 101 32 146 51 230 78 314 99 398 116 482 131 566 144 18 -30 60 8 102 32 148 52 232 79 316 100 400 117 484 131 568 144 19 -29 61 9 103 33 150 53 234 80 318 100 402 117 486 132 570 144 20 -27 62 10 104 33 152 54 236 80 320 101 404 117 488 132 572 144 21 -26 63 10 105 34 154 54 238 81 322 101 406 118 490 132 574 145 22 -25 64 11 106 34 156 55 240 81 324 101 408 118 492 132 576 145 23 -24 65 12 107 35 158 56 242 82 326 102 410 119 494 133 578 145 24 -23 66 12 108 35 160 56 244 82 328 102 412 119 496 133 580 146 25 -22 67 13 109 36 162 57 246 83 330 103 414 119 498 133 582 146 26 -20 68 14 110 36 164 58 248 83 332 103 416 120 500 134 584 146 27 -19 69 14 111 37 166 59 250 84 334 104 418 120 502 134 586 146 28 -18 70 15 112 37 168 59 252 84 336 104 420 120 504 134 588 147 29 -17 71 16 113 38 170 60 254 85 338 104 422 121 506 135 590 147 30 -16 72 16 114 38 172 61 256 85 340 105 424 121 508 135 592 147 31 -15 73 17 115 38 174 61 258 86 342 105 426 121 510 135 294 147 32 -14 74 17 116 39 176 62 260 86 344 106 428 122 512 136 596 148 33 -13 75 18 117 39 178 63 262 87 346 106 430 122 514 136 598 148 34 -12 76 19 118 40 180 63 264 87 348 107 432 122 516 136 600 148 35 -11 77 19 119 40 182 64 266 88 350 107 434 123 518 137 36 -10 78 20 120 41 184 65 268 88 352 107 436 123 520 137 37 -10 79 20 121 41 186 65 270 89 354 108 438 124 522 137 38 -9 80 21 122 42 188 66 272 89 356 108 440 124 524 137 39 -8 81 21 123 42 190 67 274 90 358 109 442 124 526 138 www.gotohallowell.com 25 Ap p e n d i x D Outdoor Unit Mounting Figure 14 Outdoor Unit Mounting Slab Mounting Be sure drainage holes on base pan are not obstructed Minimum of 12" ACHP 10 - 15", depending on amount of average snow fall Solid mounting pad, level to within +/- 3 degrees Water drainage Wall Mounting Be sure drainage holes on base pan are not obstructed Minimum of 12" *Note* ACHP ACHP 36C35H Unit weighs 350 lbs (159kg) ACHP 42C46H Unit weighs 400 lbs (181kg) Be sure sure support is of sufficient strength 10 - 15", depending on amount of average snow fall www.gotohallowell.com 26 Limited Warranty Hallowell Acadia Heat Pumps for Residential Use* 3. FOR THE RECORD Record the model, product, and serial numbers of your new equipment in the spaces provided on the last page of this manual. This information, along with the other ready-reference facts requested will be necessary should you ever require information or service. The outdoor coil should become defective because of a manufacturing defect within 5 years from the date of original purchase. ANY FREIGHT CHARGES, SERVICE CALLS AND LABOR COSTS, REFRIGERANT AND/OR ANY OTHER ITEM THAT IS DIRECTLY SPECIFIC TO THE INSTALLATION OR REPAIR OF THE DEFECTIVE PART ARE NOT INCLUDED IN THIS LIMTED WARRANTY. INSTALLATION DATA ANY PART OF THE HALLOWELL ACADIA THAT IS REPLACED WILL BE WARRANTED ONLY FOR THE UNEXPIRED PORTION OF THE WARRANTY TERM APPLYING TO THE ORIGINAL PRODUCT. Date Installed Dealer Name This limited warranty will not cover any failure of the Hallowell All Climate Heat Pump if it is damaged while in possession of the purchaser, damaged caused by unwarranted usage, and/or damaged from failure to correctly maintain the Hallowell All Climate Heat Pump as set forth in the Owner’s Manual (see Proper Maintenance section) that is accompanied with the original purchase. Address City FAILURE TO INSTALL THE HALLOWELL ACADIA BY AN AUTHORIZED HALLOWELL INTERNATIONAL SERVICE AGENT AND/OR AS SPECIFIED IN THE OWNER’S MANUAL WILL VOID THE TERMS OF THIS LIMITED WARRANTY. HALLOWELL INTERNATIONAL IS NOT RESPONSIBLE FOR ANY DAMAGE CAUSED BY IMPROPER INSTALLATION. State Zip Telephone SPLIT-SYSTEM THIS LIMITED WARRANTY AND LIABILITY SET FORTH ARE IN LIEU OF ALL OTHER WARRANTIES AND LIABILITIES, WHETHER IN CONTRACT OR IN NEGLIGENCE, EXPRESS OR IMPLIED, IN LAW OR IN FACT, INCLUDING BUT NOT SPECIFICALLY LIMITED TO IMPLIED WARRANTIES OF MERCHANTABILITY AND FITNESS FOR PARTICULAR USE, AND IN NO EVENT SHALL HALLOWELL INTERNATIONAL BE LIABLE FOR ANY INCIDENTAL OR CONSEQUENTIAL DAMAGES, INCLUDING BUT NOT LIMITED TO ADDITIONAL UTILITY EXPENSES OR DAMAGES TO PROPERTY. Outdoor Unit: Product No. Model No. Some states do not allow limitations on how long an implied limited warranty lasts or do not allow the exclusion or limitation of incidental or consequential damages, so the above limitation or exclusion may not apply to you. This limited warranty gives you specific legal rights and you may also have other rights which will vary from state to state. Serial No. Indoor Unit or Coil: Product No. Model No. Hallowell International will not be held responsible in the event of any/all of the following: Serial No. 1. Damage or repairs as a result of floods, winds, lightning, fires, accidents or any other conditions beyond the control of Hallowell International. 2. Damage or repairs due to faulty installation or application. 3. Damage, repairs or installation due to a non-authorized Hallowell International service agent. 4. The use of components non-compatible with the Hallowell All Climate Heat Pump. 5. Applications other than of air-to-air residential heating and cooling are not allowed without specific written authorization from an officer at Hallowell International. Failure to obtain this authorization before installation will void the terms of this limited warranty. Failure to conduct normal or routine maintenance as described in the Owner’s Manual. 6. Damage of repairs in result of improper use, operation or service. 7. Products installed outside the United States or Canada. Within 5 years of the date of original purchase of the Hallowell All Climate Heat Pump, a replacement part will be provided, without charge for the part only, in the event of the following terms: ANY MODIFICATIONS TO THE EQUIPMENT OR INSTALLATION PROCEDURES AS LAID OUT IN THE OWNER’S MANUAL WILL VOID THIS LIMITED WARRANTY WITHOUT THE WRITTEN CONSENT OF AN OFFICER OF HALLOWELL INTERNATIONAL. 1. Any internal operating part of the Hallowell Acadia failing because of a manufacturing defect under normal use and maintenance within 5 years from the date of original purpose. Replacement parts will be provided by Hallowell International through an authorized service provider in your area. If you need assistance regarding this limited warranty, please contact your local service agent. 2. Compressor failure occurring because of a manufacturing defect within 5 years from the date of original purchase. This limited warranty is offered for a period of 5 YEARS by Hallowell International to the original purchaser and to any owner thereafter of the property to which the Hallowell Acadia is originally manufactured. This limited warranty applies to Hallowell International products which are installed, purchased and maintained for use within the United States and Canada only. * This limited warranty is valid only for residential use of the Hallowell Acadia and is not applicable when used for a commercial application without written authorization. A commercial application is any use where the owner utilizes the product for other than personal, family or single household purposes. www.gotohallowell.com 27 INSTALLATION MANUAL Visit our website for more information: w w w.gotohallowell.com