1
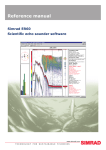
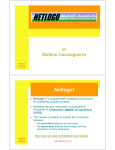
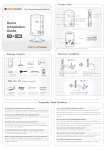
User’s Manual… …and Tutorial November ’99, V0.9.5 E-Slate User’s Manual and Tutorial V0.9.5 1993-‘99 Computer Technology Institute, R&D Unit “Applied Information Systems” COMPUTER TECHNOLOGY INSTITUTE 2 November ‘99 E-Slate User’s Manual and Tutorial V0.9.5 Contents 1 Overview................................................................................................ 4 2 Launching E-Slate .................................................................................. 4 3 Creating a Microworld ............................................................................ 5 4 Embedding components ......................................................................... 5 5 Inter-connecting components ................................................................ 8 6 Customizing the components ............................................................... 13 6.1 Component UI................................................................................... 13 6.2 Component Properties........................................................................ 14 6.3 Component event handlers ................................................................. 15 7 Navigating around a Microworld .......................................................... 18 8 Fine tuning a Microworld’s appearance ................................................ 21 9 Saving a Microworld............................................................................. 22 10 Navigating among Microworlds ......................................................... 22 11 Registering new components ............................................................ 22 Appendix A : E-Slate scripting interface .................................................... 24 Appendix B’: Scripting interface common to all E-Slate components ......... 25 Appendix C : Overview of the E-Slate scripting mechanism ....................... 27 COMPUTER TECHNOLOGY INSTITUTE 3 November ‘99 E-Slate 1 User’s Manual and Tutorial V0.9.5 Overview In conventional terms E-Slate is an application1 (authoring tool) for creating, editing and “running” E-Slate Microworlds2 made up of E-Slate components (itself being a top-level component). Within the context of the broader E-Slate environment, E-Slate is the OS desktop equivalent: just as desktops provide the “living space” for applications, documents and folders, E-Slate provides the space for other E-Slate components to perform within. E-Slate “brings into life” components: • by either loading files which hold the persistent state of previously saved Microworlds, or • by creating “fresh” components through the Component menu command. Once within E-Slate, components are “expressed” (i.e. perform their intended function, establish inter-component connections, can be scripted, etc) and at the same time are amenable to direct manipulation operations affecting their layout (moving, resizing, drag-dropping, etc), appearance (e.g. hiding/showing), behavior (e.g. scripting) and even existence (e.g. destruction). In that sense ESlate is both an “authoring” and runtime environment, with no sharp distinction between the two modes. It is rather the Microworld’s editing status that defines whether E-Slate is just running or both running and editing the Microworld. The editing status is in turn specified by the authoring rights of the current user: author or end-user. 2 Launching E-Slate E-Slate may be used either as a desktop application or as an applet within a Java enabled browser. In the former case the user may indicate a Java VM of choice to be used as the runtime by selecting one of the –installed- VMs listed in a dialog box as shown below. This dialog appears at the initial launch of E-Slate and the selection indicated there is taken as the default for all subsequent sessions. An alternative Java VM may be selected at any time by holding down the CTRL key when launching the E-Slate application, -which causes the dialog to re-appear. 1 Should not be confused with the broader E-Slate learning environment which is described in http://E-Slate.cti.gr. 2 A Microworld is a piece of software implementing a particular educational activity plan. An educational activity is a concrete “part of” an educational scenario (which sets the broader educational context and may consist of more than one activities). Each activity is performed according to an activity plan which, among other things, involves the creation and use of software (the Microworld). Depending on its nature, generality and level of abstraction, a Microworld may be used by more than one activities which may even belong to different scenarios. COMPUTER TECHNOLOGY INSTITUTE 4 November ‘99 E-Slate 3 User’s Manual and Tutorial V0.9.5 Creating a Microworld Upon launching E-Slate creates a new Microworld by default. New Microworlds may be created by selecting the Microworld->New menu command, or existing ones may be loaded through the Microworld->Open command. 4 Embedding components Any component appearing in the Component->New sub-menu may be selected for embedding in the current Microworld. In the example depicted in these figures, a new MapViewer component is created… COMPUTER TECHNOLOGY INSTITUTE 5 November ‘99 E-Slate User’s Manual and Tutorial V0.9.5 …and a specific Map (Europe with country and major city data) is opened from the component’s File menu… COMPUTER TECHNOLOGY INSTITUTE 6 November ‘99 E-Slate User’s Manual and Tutorial V0.9.5 Components can be dragged around in the Microworld’s space by grabbing their top bar (light brown for the active component, light-green for the non-active ones), just like windows on the desktop. Each component has a –unique- name which appears on the top-left side of its bar. To alter this name, click on it by holding the CTLR key pressed, edit it and then press Return. On the top-right side there are six(!) buttons with the following functionality (from left to right): • Plugs: presents a drop-down a menu containing the component’s Plugs (see 5 on how to use them). • Help: brings up the help facility to provide help and instructions on the component’s use. • Info: brings up a dialog box which presents information regarding the component’s development and related copyright issues. • Hide: hides the component from the Microworld’s display (it may be shown back again through the component-bar, see 7) • Maximize: enlarges the component’s view to the full Microworld window extent (toggle). • Destroy: deletes the component and any established connections with other components. It is up to the component to prompt the user for storing its content before destruction (if/where appropriate). The visibility and functioning of the components’ toolbar may be customized by users as described in section 6.1. Continuing our example, a DatabaseView component is embedded in the Microworld under construction and placed next to the map. As can be seen, it is initially empty of content (“no open database”). COMPUTER TECHNOLOGY INSTITUTE 7 November ‘99 E-Slate 5 User’s Manual and Tutorial V0.9.5 Inter-connecting components A fundamental characteristic of E-Slate components is that they are designed to be inter-connected with other components so that they may synchronize their behavior and work in tight synergy. To create a link between the two components do the following: • of the source component. Its Plug menu Click on the PlugView button appears. Each plug has a jigsaw puzzle shape, a color and a label describing its role. To select a specific plug, click on it (the menu then disappears). In the snapshot below the Database Map plug is selected, in order to “link” the map’s feature attribute database (holding country and city attributes) to the DatabaseView component so that the database is rendered and manipulated in a tabular format by the DatabaseViewer. Note that some Plugs are “composite”, that is they have sub-Plugs. This is a way to organize Plugs that have a parent-child conceptual relationship into manageable hierarchies. SubPlugs are accessed through sub-menus that appear by passing the mouse over the little black arrows below the parent Plugs. COMPUTER TECHNOLOGY INSTITUTE 8 November ‘99 E-Slate • User’s Manual and Tutorial V0.9.5 To link that selected plug to the “corresponding plug” of some other button of the latter, and select (click on) its component, click on the corresponding plug. The general rule is that two plugs can be connected if they have the same color and complementary shapes (male-female). As soon as the link is established, the contents of the map’s database are rendered by the DatabaseViewer. COMPUTER TECHNOLOGY INSTITUTE 9 November ‘99 E-Slate User’s Manual and Tutorial V0.9.5 Note that after a successful connection, the plugs' icons change in shape to reflect their new connectivity state. Now that the two components share a common database, any change of some sort triggered by one of the components is automatically propagated to the other (e.g. changing a city’s name in the corresponding DatabaseViewer cell will be reflected on the MapViewer’s display). This synchronized behavior can be terminated by disconnecting the two plugs: it is achieved by following exactly the same steps (notice the change in plugs' shapes again, which go back to normal). In just the same manner components can be connected in practically unlimited configurations through their corresponding plugs. Descriptions of the available plugs for each component can be found in the individual components’ documentation pages. A summary of all available plug types (regardless of color and label) with their corresponding meanings is given in the table below. The terminology used for the various parts of a plug is as shown in the inset. COMPUTER TECHNOLOGY INSTITUTE 10 Plug Socket Pin November ‘99 E-Slate User’s Manual and Tutorial Can be connected to any other plug with a free socket. Once connected, it is "locked" to that connection until disconnected. In the meantime, it cannot be connected to a second plug, and it turns to to denote that. V0.9.5 Can be connected to any other plug with a free pin. Once connected, it is "locked" to that connection until disconnected. In the meantime it cannot be connected to a second plug, and it turns to to denote that. Can be connected to any other plugs with free pins. The first time it gets connected it turns to Can be connected to any other plugs with free sockets. The first time it gets connected it turns denoting that although one connection is already established, it can accept further connections. denoting that although one connection is to already established, it can create further connections. Can be connected to plugs with free sockets or pins. Depending on the connections it Can be connected to plugs with free sockets or pins. Depending on the connections it respectively turns to or or pins and sockets can handle just one connection. or or . Both respectively turns to pins and sockets can handle many connections. . Both Can be connected to plugs with free sockets or pins. The socket can handle just one connection while the pin many. Depending on the connections it respectively turns to or or connections it respectively turns to or . Can be connected to plugs with matching shape. Once connected, it is "locked" to that connection until disconnected. In the meantime, it cannot be connected to a second plug, and it turns to Can be connected to plugs with free pins or sockets. The pin can handle just one connection while the socket many. Depending on the or . Can be connected to plugs with matching shape and handle more than one such connections. After a first connection is established, it turns to . to denote that. In addition to the method of inter-connecting components as described above, there’s a complementary way to achieve this. By selecting the Tools->PlugEditor… menu item (also available as a right-click pop-up menu in the Microworld’s working area), the Plug Editor window pops-up, presenting a different view of the current Microworld: each component appears as window-frame depicting its plugs and their hierarchical relationships in a tree structure. Inter-component connections may now be established (or broken) by dragging a source Plug onto a target Plug. COMPUTER TECHNOLOGY INSTITUTE 11 November ‘99 E-Slate User’s Manual and Tutorial V0.9.5 Plug hierarchies may be expanded/collapsed by clicking on the +/- boxes left to the corresponding Plugs as shown in the next snapshot. COMPUTER TECHNOLOGY INSTITUTE 12 November ‘99 E-Slate 6 User’s Manual and Tutorial V0.9.5 Customizing the components Components may be customized in terms of their UI, properties and behavior. 6.1 Component UI A component’s bar and its rightmost buttons may be customized as follows: • The visibility of the bar’s buttons may be set to shown or hidden mode, on a Microworld-wide or on a per component basis through the Microworld->Properties… or Component->Settings… menu commands respectively. The next snapshot shows how to hide the DatabaseViewer’s bar. • In a similar manner the visibility of the whole component’s bar may be defined by the Microworld->Properties… and or Component->Control bar visible (toggle) menu commands respectively. In the next snapshot, all component bars are hidden. COMPUTER TECHNOLOGY INSTITUTE 13 November ‘99 E-Slate User’s Manual and Tutorial V0.9.5 Finally, components may be configured to allow for resizing or not (by dragging their edges) and for moving around the screen or not (by dragging their bar), through the menu items Component->Resizable… and Component->Frozen… respectively (toggles). 6.2 Component Properties A component’s properties may be manipulated (set to specific values) through the Property Editor. To launch the editor, activate the desired component (either by clicking on it or by selecting it through the Component->Components menu item) and select the Tools->Property Editor… menu item. In the next snapshot, the property editor is launched to edit the MapViewer’s properties. The meaning and use of each component’s properties is described in their corresponding manuals. In the MapViewer example, the component may be set to show or hide its menubar, show or hide its various buttons, set the tooltip text of these buttons, etc. COMPUTER TECHNOLOGY INSTITUTE 14 November ‘99 E-Slate User’s Manual and Tutorial V0.9.5 6.3 Component event handlers Components may implement callback handlers written in one of the supported scripting languages (currently, Logo and Java) for various events. Handlers are called upon firing of the corresponding events. Scripts are edited and bound to specific events through the Event Editor which is launched (for the active component) through the Tools->Event editor… menu item. Let’s see how this works with reference to a Button component which is embedded in our example Microworld. COMPUTER TECHNOLOGY INSTITUTE 15 November ‘99 E-Slate User’s Manual and Tutorial V0.9.5 The Events dialog is launched and a Logo event handler editor is opened for the button on the right of the event’s label ActionPerformed event by clicking on the (first in the list of available events). The example script is a very simple one consisting of a single Logo command: LoadMicroworld (parenthesis, according to the Logo syntax, denote that no argument is provided here although LoadMicroworld accepts as input argument a specific Microworld filename that is to be opened). LoadMicroworld is a primitive belonging to COMPUTER TECHNOLOGY INSTITUTE 16 November ‘99 E-Slate User’s Manual and Tutorial E-Slate’s scripting interface (recall that and thus E-Slate ’s scripting mechanism handler (implemented by the E-Slate encountered in the stream of commands V0.9.5 E-Slate is an E-Slate component itself) forwards the execution to the primitive’s component) whenever the primitive is while interpreting a script. Once this script is bound to the ActionPerformed Button event, it is called to be executed every time some button-related action is performed (e.g. ButtonPressed, etc). As a result, pressing the Button results in E-Slate initiating the loading of a new Microworld (just as if it had been triggered by the corresponding menu item). Any other command belonging to E-Slate ’s scripting interface may be issued to E-Slate for execution (refer to Appendix A for a full reference of its scripting interface), or any other command belonging to the scripting interface of the components participating in a specific Microworld (refer to Appendix C for an overview of the use of E-Slate ’s scripting mechanism). Apart from Logo, event scripts may be written in Java itself. To do so, click on the button and write any Java script within the editor that pops up (see next snapshot). The script is compiled on-the-fly and is called whenever the corresponding event is fired. Java and Logo scripts can be used in parallel (for the same or different events), and become part of the component’s persistent state (i.e. they are saved and recalled together with the component). To take the example a step further, let’s see how we may give a more appropriate look&feel to the Button’s functionality, by changing its look to reflect the underlying action: we edit the Button’s properties to change its icon (by means of an icon editor) and transparency/border characteristics. COMPUTER TECHNOLOGY INSTITUTE 17 November ‘99 E-Slate User’s Manual and Tutorial V0.9.5 And here’s the result: 7 Navigating around a Microworld Because of the easiness of embedding more and more components within a Microworld, it is not difficult to end up with cluttered screens. And although that it is possible for components to overlap (like windows on a desktop), this is usually COMPUTER TECHNOLOGY INSTITUTE 18 November ‘99 E-Slate User’s Manual and Tutorial V0.9.5 not desirable. There are two ways to handle this “crowded” situations: hiding components whenever not needed and/or extending the Microworld’s working area as much as required (horizontally and/or vertically). Components may be hidden by: • Clicking on their Hide bar button (if visible). • Setting their Visible property to False through the property editor. • By manipulating the Microworld’s component bar which appears just below the menu bar, by clicking the button (toggle). All Microworld components appear on this bar as buttons (much like the Windows taskbar) which can be clicked to activate or hide/show the corresponding components. COMPUTER TECHNOLOGY INSTITUTE 19 November ‘99 E-Slate User’s Manual and Tutorial V0.9.5 To extend a Microworld’s working area, just drag a component outside the Microworld’s window borders. The working area will auto-scroll to that direction to fit the intended extension. At the same time, vertical and/or horizontal scrollbars appear as required. The next snapshot depicts a Microworld that spans an area larger than the screen. The Microworld->Pack menu item resets the size of the Microworld’s working area to the minimum bounding box enclosing all components. COMPUTER TECHNOLOGY INSTITUTE 20 November ‘99 E-Slate 8 User’s Manual and Tutorial V0.9.5 Fine tuning a Microworld’s appearance The layout of components may be aligned by chosing to snap to a grid of some suitable step value during drag or resize operations. The grid can be selected from the Tools->Grid… menu item. Once components are in place the look of a Microworld may be set by choosing a suitable background (a simple color or image, similar to defining a background for a web-page). This is done by selecting the Microworld->Interface menu item and setting the various values in the dialog that comes up. The next snapshot depicts the process of selecting an image for background tiling…. …and the next snapshot depicts the resulting Microworld look. COMPUTER TECHNOLOGY INSTITUTE 21 November ‘99 E-Slate 9 User’s Manual and Tutorial V0.9.5 Saving a Microworld The persistent state of Microworlds may be stored in files and be reloaded sometime later. Use the menu command Microworld->Save/SaveAs/Load to achieve the corresponding action. 10 Navigating among Microworlds E-Slate maintains a history of the sequence of Microworlds as they are loaded, and allows for navigating along this history through back/forward commands (available under the Microworld->Go menu item). 11 Registering new components E-Slate provides a simple component registry mechanism through which new components may be added to (or released from) the repertoire of “known” components (those appearing under the Component->New menu item) which can be instantiated and participate in a Microworld. The registry is initiated from the Tools->E-Slate options… menu which brings up a dialog presenting the list of registered components. For each component the following three attributes are kept: its name (this is what appears in the Component->New menu item), the corresponding Java class that instantiates it (and in essence implements it) and a flag denoting its availability (or not) across E-Slate’s sessions. To add a new component to the list of components that are available to the user, all that is needed is to provide a component name and a Java class (within the scope of the current Java VM’s class path) to the dialog appearing when “Add” is pressed. COMPUTER TECHNOLOGY INSTITUTE 22 November ‘99 E-Slate COMPUTER TECHNOLOGY INSTITUTE User’s Manual and Tutorial 23 V0.9.5 November ‘99 E-Slate User’s Manual and Tutorial V0.9.5 Appendix A : E-Slate scripting interface E-Slate implements the following scripting primitives which may be used within ESlateLogo scripts (through either the Logo component or as components' eventHandlers) to achieve the indicated actions. Refer to Appendix C for an overview of the scripting mechanism. Finally note that primitive names are not case sensitive. CLEARMICROWORLD: The equivalent of the Microworld->RemoveAll menu action, that is, removes all components from the current Microworld. PACKMICROWORLD: The equivalent of the Microworld->Pack menu action, that is, it resets the size of the Microworld's working area to the size of the minimum bounding box enclosing all components. SAVEMICROWORLD: The equivalent of the Microworld->Save menu action, that is, it saves the current Microworld to the same file it was loaded from, overriding its contents. SAVEMICROWORLDAS: The equivalent of the Microworld->SaveAs menu action, that is, it saves the current Microworld to a file specified by the user in the Save dialog that pops up. LOADMICROWORLD: The equivalent of the Microworld->Load menu action, that is, it prompts the user with a Load dialog for specifying a new Microworld file to open. CLOSEMICROWORLD: The equivalent of the Microworld->Close menu action. SETMICROWORLDBACKGROUND <red>, <green>, <blue>: Sets the color of the Microworld's background to the indicated RGB color value. CREATECOMPONENT <x>: The equivalent of selecting to create component <x> from the Component->New menu item (see also here). SHOWPLUGEDITOR: The equivalent of the Tools->PlugEditor… menu action, that is, it opens the Plug Editor window refer here for more). CLOSEPLUGEDITOR: The equivalent of closing the Plug Editor window. PLUGEDITORVISIBLE: Returns TRUE or FALSE depending on if the Plug Editor window is activated or not. SETMICROWORLDNAME <nameString>: indicated value. Sets the Microworld's name to the MICROWORLDNAME: Returns the name of the current Microworld. MICROWORLDFOLDER: Returns the full path name of the folder containing the current Microworld (NULL if a newly created Microworld has not been saved yet). COMPONENTCOUNT: Returns the number of components contained in the current Microworld. BACK: The equivalent of the Microworld->Back menu action, that is, it closes the current Microworld and opens the previous in the history list Microworld (if any). FORWARD: The equivalent of the Microworld->Forward menu action, that is, it closes the current Microworld and opens the next Microworld in the history list (if any). COMPUTER TECHNOLOGY INSTITUTE 24 November ‘99 E-Slate User’s Manual and Tutorial V0.9.5 Appendix B’: Scripting interface common to all E-Slate components The following are component primitives supported by all E-Slate components (in addition to context specific primitives supported by each component as described in their corresponding documentation). See the description in Appendix C for the Tell, Ask and Each commands on how to instruct specific components to execute their primitives. Finally note that primitive names are not case sensitive. Primitives related to a component's behavior within E-Slate MOVE <xLocation>, <yLocation>: Moves a component to the location specified by the arguments of the command. LOCATION: Returns the coordinates of the top-left corner of a component in the coordinate space of E-Slate. The coordinates are returned in the form of a two element Logo list. MAXIMIZE: Maximizes a component. HIDE: Hides a component. RESTORE: Restore a component from the maximized or invisible state. SETRESIZABLE: Enables component resizing. SETUNRESIZABLE: Disables component resizing. RESIZABLE: Returns TRUE if a component is resizable. Returns FALSE if the component which receives the command is unresizable. SETTITLEON: Displays the component's title bar. SETTITLEOFF: Hides the component's title bar. CLOSECOMPONENT: Removes one or more component's from the current microworld. The component's to be removed from the microworld, are the ones which execute this command, i.e. the components specified by the last TELL command. ACTIVATECOMPONENT: Activates component. DEACTIVATECOMPONENT: Deactivates (deselects) component. SETCOMPONENTSIZE: Resizes one or more components. COMPONENTSIZE: Returns the size of a component. The size is reported as a twoelement Logo list. <xLocation>, <yLocation>, <width>, <height>: SETCOMPONENTBOUNDS Relocates and resizes one or more components in the current microworld COMPONENTBOUNDS: Returns the current bounds component's bounds are returned as a Logo word. of SETRENAMINGALLOWEDFROMBAR <yes|no>. component from the menu bar is allowed. whether Sets the component. The renaming the RENAMINGALLOWEDFROMBAR: Returns whether renaming the component from the menu bar is allowed. SHOWHELP: The equivalent of clicking on a component's displays help for the component. COMPUTER TECHNOLOGY INSTITUTE 25 bar button, that is, November ‘99 E-Slate User’s Manual and Tutorial SHOWINFO: The equivalent of clicking on a component's displays the "about" information for the component. V0.9.5 bar button, that is, SHOWPLUGVIEW: The equivalent of clicking on a component's is, opens the component's plug view window. bar button, that Primitives regarding to components' plugging PLUGS: Returns a list of the names of the component's plugs. Each of these names is of the form name1.name2...nameN, where name1 is the name of the top level plug and the renaming names are the names of the sub-plugs in the path leading to the plug. CONNECT <plug1> <targetComponent> <plug2>: Connects plug <plug1> of the component to plug <plug2> of <targetComponent>. Each plug is specified as a string containing plug names separated by periods, starting from a top level plug, following subplugs, until the desired plug is reached. Example: CONNECT "|Data Base.Table1| "Chart "Table DISCONNECT <plug1> <targetComponent> <plug2>: Same disconnecting instead of connecting the two plugs. ExampleQ: as above, DISCONNECT "|Data Base.Table1| "Chart "Table DISCONNECTPLUG <plug>: Similar to Disconnect, except that only a plug is specified, without a corresponding targetComponent and plug. The specified plug is disconnected from all the plugs to which it is connected. Example: DISCONNECTPIN "|Data Base.Table1| CONNECTED <plug1> <targetComponent> <plug2>: Returns whether plug <plug1> of the component is connected to plug <plug2> of <targetComponent>. Each plug is specified as a string containing plug names separated by periods, starting from a top level plug, following sub-plugs until the desired plug is reached. Example: CONNECTED "|Data Base.Table1| "Chart "Table COMPUTER TECHNOLOGY INSTITUTE 26 November ‘99 E-Slate User’s Manual and Tutorial V0.9.5 Appendix C : Overview of the E-Slate scripting mechanism Apart from their ability to plug to each other, E-Slate components provide the ability to respond to commands or scripts of a Logo-based programming language, issued through either a components’ event handler or through the ESlate Logo component. The ability to define a component's behavior through primitives of some “immediate” language is also referred as scripting and provides an alternative, powerful way of expression that works in parallel to the components' plug-mechanisms. The standard Logo does not provide any support for object-oriented concepts such as entities that can have their own readable and settable properties or callable actions. In addition, even in Logo implementations with object oriented extensions (like ObjectLogo and the Atari Logo), there is no notion of objects existing outside of the Logo interpreter and being manipulated via Logo commands. The need to add scripting capability to E-Slate components led to the design of E-Slate ’s own component oriented primitives and supporting mechanism. A Java-based Logo kernel developed by Daniel Azuma in his TurtleTracks3 project was adopted as the basis of E-Slate Logo, which was suitably customized and extended according to the needs of E-Slate scripting environment. The new component-oriented primitives were influenced by relevant designs found in the above versions of Logo and in an older implementation of this mechanism (described here). These are: TELL, ASK and EACH. In the description that follows, this terminology is used: • Command: an action (that usually sets a property) but doesn’t return a result • Operation: a function (usually gets a property) that returns a result. • Primitive: a command or a function that is implemented in the Logo system. • Primitive Group: implementations. • Parent component of a primitive/command/operation: the component that has registered the specific primitive/command/operation to the Logo Engine (this is done “on-the-fly”). If more than one instances of the specific component type are present, they are all regarded as parents. a TurtleTracks package of primitive definitions/ E-Slate Logo primitives 1. TELL <component-list>. It is used to specify an ordered list of E-Slate components (designated by their unique names) to which primitives will be addressed. This TELL list is valid until a new TELL command provides a new one (even an empty one). Note that: A component command will be sent for further execution to each parent component, if any, appearing in the TELL list, sequentially from left to right (non-parent components are ignored). A component operation will be sent to just the first parent component, if any, on the TELL list, traversing it from left to right (the rest of parent components, if any, will be ignored). This is so, for two reasons: a) most, if not all operations are expected to return just one value (word), not a list of 3 TurtleTracks is a Java implementation of a Logo interpreter/kernel, developed by Daniel Azuma ([email protected]) in his TurtleTracks project (http://www.ugcs.caltech.edu/~dazuma/turtle/). COMPUTER TECHNOLOGY INSTITUTE 27 November ‘99 E-Slate User’s Manual and Tutorial V0.9.5 values (which would be the case if an operation was executed in all parent components), and b) to avoid possible side-effects. Until a TELL command is issued for the first time, all commands/operations are forwarded to all participating parent components. Examples TELL [Turtle3 FORWARD XCOR Turtle1 Turtle2 Vector1 :SomeName] FORWARD 10 Notice that the component-list is enclosed in square brackets and that each component is separated by spaces (commas could be used as well). What’s more, every component name that is given as a string constant is prefixed by a [“] character (a token), and the variable “SomeName” is prefix with a [:] character (these are standard LOGO language conventions). In this example we are addressing (talking to) five components which have the names Turtle3, Turtle1, Turtle2, Vector1, and whatever value the SomeName variable evaluates to at the time this TELL command is executed. All component primitives encountered by the Logo interpreter from now on, will try to identify their parent components in this Tell list, and will be sent for execution to each component in turn (in the order appearing in the list). Executing the component command FORWARD 10 (instruct a Turtle to move by 10 steps forward), will result in the component named Turtle3 moving forward 10 steps, the component Turtle1 moving forward 10 steps and the component Turtle2 doing the same (in that specific order). The component that has a name equal to the value of the variable SomeName will do the same action if it happens to be a Turtle component (or one that emulates a Turtle!). The component Vector1 which was on the TELL vector will just be ignored. Executing the command FORWARD XCOR (XCOR is a standard Logo operation that returns the X coordinate of a turtle), with the same TELL vector as before being active, we’ll have the FORWARD command start executing and ask for a parameter. This will invoke the XCOR operation which will execute only on the first Turtle component on the TELL vector (if none, the XCOR implementation must throw a LanguageException containing the error message that will be shown to the user). After receiving the result from XCOR, the FORWARD command shall execute sequentially on each Turtle on the TELL vector (traversing that vector from left to right). The TELL vector will remain active, and accessible by component primitives, until it is replaced by the execution of a new TELL command. TELL [Turtle3 Thrust1 Turtle4 Thrust5] FORWARD VECTORANGLE In this case we have components of two different types on the TELL vector, namely two Turtle components called Turtle3 and Turtle4, and two Vector components called Thrust1 and Thrust5. Then we execute the command FORWARD which is executed only by the Turtle components Turtle3 and Turtle4 (in that order), after it is fed as a parameter the result of the VECTORANGLE operation on the Thrust1 component. Remember: Thrust1 is the first Vector component from the left side of the TELL list; the Thrust5 component is ignored (the VECTORANGLE operation attempts to find the first Vector component on the TELL list). The FORWARD command will get the result from the VECTORANGLE operation and then try to execute on all Turtles in the TELL list (from left to right). So, it will execute first on Turtle3 and then on Turtle4, ignoring the Thrust1 and Thrust5 components (as they are not Turtles). COMPUTER TECHNOLOGY INSTITUTE 28 November ‘99 E-Slate User’s Manual and Tutorial V0.9.5 Notice that in order to get the angle property of a Vector component we define a primitive called VECTORANGLE, not a primitive called (just) ANGLE, because that could lead to naming conflicts among components that needed to provide primitives for manipulating an “angle” attribute. The only exception to this convention regards the Turtle component, which is registering a set of primitives like FORWARD and BACKWARD (and not FORWARDTURTLE and BACKWARDTURTLE), as these are well known standard Logo turtle primitives and had better be kept that way. Tell [Turtle1 Vector1] [Margarita’s Turtle] Vector2 [Nick’s Turtle] Notice that LOGO is not case sensitive and we have written TELL as Tell and it’s still Ok. In this example we are “talking” to two components that have spaces in their names. The “Margarita’s Turtle” and “Nick’s Turtle” component names are given as lists of tokens that are directly concatenated as they are written, without any pre-evaluation. tell [Turtle\ A [Turtle B] Turtle\ C\ 61] Here we have followed another syntax in order to specify component names containing spaces. We are using the escape character [\] in order to write the component names “Turtle A” and “Turtle C 61”. This is more Logo-like but not very intuitive. TELL [Turtle1 Turtle2 Turtle1] Notice how we are “telling” to the component named Turtle1 twice. When a component-aware primitive gets executed, it will tell Turtle1 for the first time, then tell Turtle2, and then tell Turtle1 again. 2. ASK <component-list> <command-list> This operation is used to setup a temporary TELL list and execute a command list on it, just as it were the normal TELL list. After the execution of this command list, the TELL list that was active before the execution of the ASK command is restored. Any value returned by the command list will be returned by the ASK operation to its caller. That is, if the first primitive in ASK’s command list is an operation, its result will be returned by the ASK operation. However, if the first primitive is a command, nothing shall be returned (a void result). Examples ASK [Turtle1] [FORWARD XCOR] This will ask the component named Turtle1 to execute the command list FD XCOR, that is, move as many steps forward as is the value of the Turtle’s X coordinate. ASK [Turtle1 Turtle2] [FD XCOR] This will ask the two components named Turtle1 and Turtle2 to execute the command list FD XCOR. Since XCOR is a function it will only be executed once (for Turtle1), while FD is a command and will be executed twice, once for each component. As a result, both Turtles will move as many steps forward, as is the value of the X coordinate of the Turtle that is represented by the component named Turtle1. TELL [Turtle1 Turtle3] FORWARD ASK [Turtle2] [XCOR] Here we specify that from now on (and until we provide a new TELL vector via a TELL command) we will be talking to Turtle1 and Turtle3. Then we execute a FORWARD command that gets as a parameter the result of ASKing Turtle2 to COMPUTER TECHNOLOGY INSTITUTE 29 November ‘99 E-Slate User’s Manual and Tutorial V0.9.5 return its X coordinate. After getting the result from Turtle2 (ASK will invoke the XCOR operation on the Turtle2 component), the FORWARD command will execute on both the Turtle1 and Turtle3 components. 3. EACH <command-list> This command is used to execute a command list as many times as the count of components on the active TELL list. The following happen in turn: • The current TELL list is saved • The current TELL list is traversed from left to right in a loop. At each loop step: The active TELL list is temporarily redefined to contain just the component at the current position of the initial TELL list The command-list is executed • The loop ends when it traverses the whole TELL vector from the left to the right, having executed the command list as many times as there were components on the TELL vector • The original TELL list that was active prior to the execution of the EACH command is restored Examples TELL [Turtle1 Turtle3] EACH [PRINT XCOR] This will tell components Turtle1 and Turtle3 to print their X coordinate. The PRINT command will be executed twice and so will the operation XCOR, as if they were placed in the body of the same loop statement (like in a REPEAT). In each loop there will be only one component in the temporary TELL list that the EACH command has set up. The first loop shall have a TELL list containing just the component Turtle1 and the second loop shall have the TELL contain only Turtle2, before each loop gets executed. TELL [Turtle1 Turtle3 Vector1] EACH [FD 10 PRINT ASK [Turtle2] [XCOR+6]] This one should execute the EACH command-list 3 times. The first loop will make Turtle1 move forward 10 steps and will print to the console the sum of the X coordinate of Turtle2 plus the number 6. The second loop will move Turtle3 forward 10 steps and also print Turtle2’s X coordinate plus 6, while the third loop will not move any Turtles, since Vector1 is not a Turtle and it’s ignored by FD. However, the third loop will indeed print Turtle2’s X coordinate plus 6, as the previous loops also did. For all the other primitives refer to the original TurtleTracks documentation as described http://www.ugcs.caltech.edu/~dazuma/turtle/docs/std_data.html COMPUTER TECHNOLOGY INSTITUTE 30 Logo in November ‘99