1
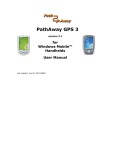
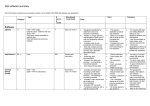
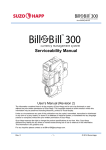
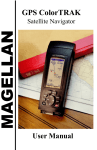
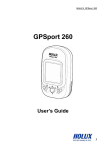
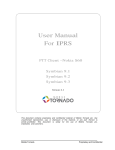
PathAway GPS 5 Express Edition GPS Navigation and Mapping Software version 5.30 for Symbian ™ Handhelds Getting Started Manual Last Updated: July 30, 2010 Table of Contents Table of Contents ...........................................................................................2 Introduction ..................................................................................................3 Installation ....................................................................................................3 Getting Started ..............................................................................................6 Startup/About Screen........................................................................................................ 8 PathAway Register Screen ................................................................................................. 9 Main Map Screen.............................................................................................................. 10 Running on Non-Touch vs Touch Screen devices ............................................................. 11 Navigating with GPS ........................................................................................................ 12 Viewing Maps................................................................................................................... 12 Toggle between Maps and WebMaps................................................................................ 12 Further Information and Instructions .............................................................................. 13 Terminology.................................................................................................14 Dashboard ................................................................................................................. 14 GPS .......................................................................................................................... 14 Icons ........................................................................................................................ 14 Map Data................................................................................................................... 14 Pace ......................................................................................................................... 14 Points........................................................................................................................ 14 Proximity ................................................................................................................... 14 Simulate.................................................................................................................... 15 Routes ...................................................................................................................... 15 Transportation Mode/Activity ........................................................................................ 15 Trips ......................................................................................................................... 15 Tracks ....................................................................................................................... 15 Entering Location Coordinates .......................................................................................... 16 Entering Longitude/Latitude Coordinates............................................................................ 16 Entering UTM Coordinates ............................................................................................ 16 Entering OSGB Coordinates .......................................................................................... 17 Further Information and Instructions .............................................................................. 17 PathAway Manual Page 2 of 17 30-Jul-10 Introduction This manual describes PathAway GPS 5 Express Edition for Symbian. This manual is primarily based on Nokia 3rd Edition models. There are references to 5th Edition devices with Touch-Screen capabilities where appropriate. Installation These instructions assume you have the Nokia Application Installer (or equivalent) on your PC. It is part of the Nokia PC Suite. Install PathAway on Device - Ensure your device is - Download the program by selecting the link to the build you would like to run. - When prompted, choose "Run", to execute the install after downloading - Nokia Application Installer will prompt you for installation. Follow the on-screen instructions to install PathAway. Alternatively you can right-click on the link and choose "Save Target As...". Choose a location on your hard drive, download, then use Nokia Application Installer to install the app. - Once PathAway has been installed successfully, you can find it in the Applications (or Installations) area of your Main Menu on your device. - To Run PathAway, choose the Icon. If PathAway does not run or you find a bug in the program, please download the Debug version and repeat the problem. PathAway will generate a Log of your activities. Once you have reproduced the problem, then send us the PathAwayLog.txt file in the \Data\PathAway folder in your Bug Report. Install PathAway Tutorial Data If you intend to follow the tutorial included with the manual, or would like to see some sample maps, routes, tracks, and points, then you can download and install the PathAwayTutorial.sisx to your device as well. All data will be stored in your C:\Data\PathAway folder in the main memory of your device. If you need to conserve main memory space, you can move the maps to the X:\PathAway folder (where X is a drive letter) of a storage card if available. Once your tutorial data is installed, you can follow the PathAway tutorial for a quick lesson on PathAway’s features. Preparing a Map for use in PathAway With PathAway, you can choose between two different types of maps. Maps you create and load into the application yourself, and maps that are downloaded directly from an internet map service provider (we call this WebMaps). WebMaps are downloaded automatically, so there is nothing you need to do except to choose the type of map to view (in Data->WebMaps dialog). In order to use your own maps, you will need to convert and calibrate them for use with PathAway. Here’s how to do this: To create your own customized map for PathAway, use our PC Tools, PathAway Map Manager. Basic steps are: PathAway Manual Page 3 of 17 30-Jul-10 Run PathAway Map Manager Choose File->Import Map, select your map as a .bmp, jpg, png, or image file. As an example Muskoka.jpg is provided for you. It is located in your C:\Program Files\PathAway GPS 5\Maps folder. Choose a name for the map, 8-bit (256 color), Compressed. Scale Factor 100% Once the map has been converted, it will be displayed on the Map Manager screen. If you opened Muskoka.jpg, it contains a map calibration file (Muskoka.pwm). The calibration points will be displayed on the map, as indicated by orange target icons. To calibrate the map for use, you will need to know the GPS Coordinates (latitude/longitude) of some known points on the map. To begin calibration, choose the "Calibration" button from the top-left Panel. The Muskoka.jpg file is calibrated by 4 known points on the map using Calibration Type "Known Points (Skewed)". This is the recommended and most accurate calibration format. The calibration points are listed 1 through 9. You can traverse through each point using the '>' or '<' buttons on the panel. Calibration Points not being used are blank or zeroed. To mark the known calibration point on the map, select the button "Mark", then click on the point on the map where the known point location is. The Orange Target for the point will be moved to this point, and the X,Y coordinates of the map will be automatically filled in. Enter the longitude and latitude coordinates of the point. By default, the Coordinate Grid is in DD MM.mmm (degrees, and decimal minutes). For this format, you must enter first a N or S for the latitude, E or W for longitude, followed by the degrees, a space, then minutes, period, and decimal minutes. If your coordinates are in anther grid format, then choose it from the list and enter the coordinates accordingly. Once all of the calibration points have been enter, then save the map by choosing, File->Save As. Select a location on your hard drive and choose Ok. Alternatively, you can save the map directly on your device, via the File->Save As command. See the Installing Maps on your Symbian Device instructions below to select the location to save the maps on your device. Installing Maps on your Symbian Device To install maps your Symbian device, you will need to attach your device to your PC via PC-Suite and use Windows File Explorer, to copy your maps to your device. By default, PathAway searches for maps in the C:\Data\PathAway folder in the main Phone Memory. For memory cards, the default path is X:\PathAway (where X is the drive letter) Note: Ensure PathAway is NOT running on the device before installing the maps. In Windows File Explorer: Navigate to the folder where you saved your map. Select the map(s) to copy to the device. Choose "Edit->Copy to Folder...". From the dialog, choose Computer from the Folders List. On this list, your Device should be listed. If it is not listed, then you will need to make sure it is tethered correctly to your PC, and PC-Suite is connected on the device. Select your device. To install maps in the main memory, choose Phone Memory->Data->PathAway. To install to your memory card, choose Memory Card->PathAway. Note, you should run PathAway at least once on the device to create these folders, otherwise you'll need to create them manually on your device using the Tools->File Manager.. Once the maps have been copied, Run PathAway on the device. Goto Options->Data->Maps, select your map from the list and choose Options->Show Map. The map should be displayed on your device. You can verify that the map is calibrated correctly by checking the lat/long coordinates and ensure any Points added are in the correct location. If your map is located within your current location, then verification can be done via the GPS. If your map disappears after acquiring a GPS fix then the map has been calibrated incorrectly, or it's location is not within the your current geographic location. PathAway Manual Page 4 of 17 30-Jul-10 Note: If you are copying to a memory card, and have a memory card reader on your PC, then you can copy the maps directly to the card instead of via PC-Suite. Installing Tracks, Points, and Routes on your Symbian Device PathAway supports direct data files in GPX, KML, or it's own PW format. You can import data into PathAway, by copying your data files onto a folder on your device in the same fashion as described in Installing Maps. To import the Data files in PathAway, from PathAway on the device, you will need to go into the "Options->Data>Tracks/Routes or Point Databases" dialog. Choose the "Options->Import..." dialog, select your data file and choose OK. If the data file contains tracks, points, and or routes, then this data will be shown in the corresponding dialogs. For automatic import of multiple data files, you can place the source data files into an Import folder under the PathAway folder. Ie. C:\Data\PathAway\Import. Then, run PathAway, and the data files will be automatically imported to the database in the PathAway folder. PathAway Manual Page 5 of 17 30-Jul-10 Getting Started Before starting, you should have downloaded and installed the PathAway software, PathAway PC tools, and the sample data and maps in the PathAway Tutorial. PathAway is installed to your Applications section on your handheld. To access the PathAway application, first click on the Applications button or menu. Title Bar Main System Menu Command Bar Once in the Applications screen, find the PathAway Program Icon . You may need to scroll down to find it. To run the PathAway application, select the PathAway Icon to start the application. If the application cannot be found, you will need to run the installation program from your PC again. PathAway Manual Page 6 of 17 30-Jul-10 Select the PathAway icon to run the program. Applications Screen PathAway Manual Page 7 of 17 30-Jul-10 Startup/About Screen If you are running the free time limited trial version, you will first be presented with the Startup/About Registration screen. Tells you how much time you have on your trial Press Options>Try it to run the 15-day trial. After 15-days you will need to purchase a registration key to unlock the program for full use. Check our Website often to ensure you’re running the most upto-date version Options Menu Try it: If you wish to continue running the trial, and there is still time remaining on the trial, then simply press the Try it button. The program will run but will have limited functionality. If the trial time has run out, then the program will not run and you will be required to purchase it in order to continue. Register: If you have purchased, then press the Register button to enter the registration key provided to you. Registering will unlock the program for full unlimited use. If you are about to purchase, and need to find your Owner Name or UID, then press the Register button to view it. Also on this screen is important information you may need to refer to if you are looking for help or where to purchase the application. Program Version: The version number is listed under the PathAway logo. If contacting PathAway Support, you will need to specific this version number. Email: Email address for support questions. Web: Web site for information, support, purchasing, and obtaining updates. Version: Version number of the program you are running. Check our website for the latest versions. If the major version number is the same, then the update is free. Ie. If you have purchased version 5 and the version number is 5.00.43 and a new version 5.20.87 is available then this update is free for you. You can simply install a new version over the current one. All your data will be retained. Build: Identifiers for the version you are running. Include this information if you are contacting us for technical support. PathAway Manual Page 8 of 17 30-Jul-10 PathAway Register Screen When you purchase, you will need to select the Options->Register button from the startup screen. This will call up the PathAway Register Screen where you enter the Registration key you were provided with when you purchased. When you purchase, you are sent a Registration key with your purchase receipt. Enter your registration key here. and press the Register button. This will unlock the program for full and unlimited use. With PathAway, you register by the IMEI of your device. You can obtain your IMEI by viewing this screen, or dialing *#06# on the main screen of your device. Select the Options>Register button to unlock the program for full and unlimited use Registration key: When you purchase, you are given a registration key which is encoded to either your Owner name or your UID. Enter this key into this field and press Register, to unlock full functionality of the program. IMEI of your device. You can obtain your IMEI by viewing this screen, or dialing *#06# on the main screen of your device. Options->Register: IF you have purchased a registration key, then select the Register button to unlock the program for full and unlimited use. Once you select Register, the registration key will be validated and the program unlocked. If the key is invalid, an error message will appear explaining why. PathAway Manual Page 9 of 17 30-Jul-10 Main Map Screen Once you exit the Startup/About screen, you are presented with the main PathAway Map View Screen. When you first run the program, it will be centered on a location of one of the tutorial maps (in Muskoka, Canada). The following illustration shows the primary screen areas of PathAway. The Dashboard Contains vital navigational information. This dashboard item is displaying the current elevation. Tap and hold (non-touch, set Tools->Dashboard Selection mode) on a dashboard item to change what it displays, or set the font size Map Cursor Displays your current position and direction of travel. Map Screen Shows the map and all layers such as points, route, and tracks. Select anywhere on the map to call up the Context Sensitive Menu Main Menu Select here to access the Options menu. PathAway Manual Empty Dashboard Item The tick marks around the map screen are empty or inactive dashboard items. Tap and hold to add a new dashboard item. The Toolbar (Touch only) Tap for quick access to the most common commands Page 10 of 17 30-Jul-10 Running on Non-Touch vs Touch Screen devices Some new Symbian devices employ touch-screen (Touch) capabilities. In most cases, this means you can select areas of the screen by touching, or performing a Tap and Hold to bring up a context menu of the area you have touched. Tap and Hold is employed on the main view Screens. For the convenience in the manual we refer to “Selecting” in a generic way. Selecting Menus Options: For menus on Touch devices, you can Select by tapping on the menu bar, then tapping on the desired menu option. The Touch devices also employ a Toolbar for quick access to the most common functions. For Non-Touch devices, Select is performed by pressing the menu button, then using the scroll bars to highlight an option, then pressing the “Center” button to do the selection. Selecting the Context menu of the screen: For Touch devices, simply tap and hold down in the same place until the menu pops up. You can also scroll the map by holding down and dragging around. For Non-Touch devices, the context menu is activated by pressing the “Center” button. The type of menu is determined by the mode that you have set the directional navigation screens in. Available modes are “Map Zoom”, “Map Scroll”, “Item Selection”, and “Dashboard Selection”. Refer to the Reference manual for a description of how each of these modes operates. Options Menu Contains all available commands for this view. PathAway Manual Back Menu Returns to system Applications menu Page 11 of 17 30-Jul-10 Navigating with GPS Select Options menu, GPS->Use GPS. PathAway will turn on the GPS and start acquiring satellites. The GPS Status Icon (by default bottom center Dashboard Item) will show GPS Status. Once a fix is obtained, the icon will change to a 'lock' icon, and your current location will be centered in the map view. If the location is off the current map being displayed, then a blank (or virtual) map will be shown. You can choose Zoom Map->Map Zoom In or Out to find any available maps within the current location. If View->Map Display->Auto Select Maps is ON, then PathAway will automatically show the map at the current GPS location if there is one within the current location. As you move off the area of the map, PathAway will show the next map if there is one available. PathAway will always keep the current position centered. If you scroll the map manually, PathAway will start a countdown timer and automatically re-center the map to the GPS location after 10 seconds of inactivity. Viewing Maps With PathAway, you can choose between two different types of maps. Maps you create and load into the application yourself, and maps that are downloaded directly from an internet map service provider (we call this WebMaps). Loading your Personal Maps: These maps can be obtained by scanning a paper map, purchasing CDs or DVDs from a third-party, downloading maps from the internet etc. Basically, any image file can be converted to a PathAway navigational map. To convert these maps for use in PathAway you would need to open them into PathAway Map Manager (Desktop app) and calibrate the map to it’s location coordinate bounds. More information on converting maps can be found in the PathAway Map Manager manual. There are also a number of 3rd party applications that support PathAway format. Check http://pathaway.com for links to these sources. Once you have loaded your maps into PathAway, you can select a specific map to view, choose Options->Data->Maps, select the desired map, and choose "Options->Show Map". Using WebMaps: PathAway can be setup to automatically download maps from the internet as you navigate. By default WebMaps is configured to use the community contributed maps from http://www.OpenStreetMap.com. Other sources are also available, and can be chosen from the Data->WebMaps dialog. The portions of the WebMaps are downloaded and cached locally on your device. In this dialog you can also set the location where the WebMap Cache is stored. If you have a high capacity card, then it is recommended to store WebMaps in a location there, so your main memory is not consumed. If you have WebMaps turned on then maps will be automatically downloaded to fill your screen. Zooming in and out will downloaded new maps sections of the requested resolution. Note: If you are simply browsing maps, ensure GPS->Use GPS is turned off so you are not re-centered after the 10 second timeout period. Toggle between Maps and WebMaps If both Maps and WebMaps are active, when viewing Maps, PathAway will not display WebMaps unless there is no map at a desired Zoom Level. To show WebMaps instead of your personal maps, turn Off the Maps via the “View->Show Map” option. Conversely, if you want to view your Personal Maps then turn off “View->Show WebMaps”, and turn on “View->Show Map”. PathAway Manual Page 12 of 17 30-Jul-10 Further Information and Instructions For further information and instructions on using PathAway refer to the following: PathAway Tutorial: Follow the short tutorial to get an overview of PathAway's features. PathAway Reference Manual: Details on all of the features of PathAway PathAway Map Manager Manual (PDF): PathAway manual for Map Manager. Instructions on preparing your own maps for use in PathAway. Advanced Mapping Manual - Advanced mapping user information of converting and calibrating maps including Map Datum and Map Projections support descriptions. Map Projections Manual : Definitions and Parameters of each Projected map type. Map Conversion SDK Manual - Instructions for using the Map Conversion SDK for converting to allow third-party software developers and map producers to convert maps to PathAway format. Data Conversion SDK Manual - Instructions for using the Map Conversion SDK for converting to allow third-party software developers and track, trail, or waypoint producers to convert maps to PathAway format. PathAway Web Site: Visit PathAway.com Support and Links section for further information. The PathAway Forum is also available on the web site to help you connect with others using the program. PathAway Manual Page 13 of 17 30-Jul-10 Terminology Dashboard Customizable Border around navigation map screens. It contains useful travel statistics and information. Dashboard items can be modified via selecting a particular item and bringing up it’s context menu. See Dashboard-Context Menu in the Reference manual. GPS Global Positioning System uses a series of satellites to transmit data to receivers enabling them to accurately pinpoint their location and elevation on earth. Originally developed by the U.S. Department of Defense as a military system, GPS has become a global utility. It benefits users around the world in many different applications, including air, road, marine, and rail navigation, telecommunications, emergency response, oil exploration, mining, and many more. PathAway utilizes connections to GPS devices to provide accurate positioning data. Icons Icons in PathAway can be created and modified by using the PathAway Tools – Icon Manager. Original Icons can be created from a paint program in Jpeg or BMP format and imported into your Icon database. These icons can then be used in PathAway to mark Points. Map Data Map Data refers to a database containing a map. The Map Manager is used to create maps for PathAway The current version runs under Windows 95,98,2000,XP,ME or higher. Original maps can be in Jpeg, BMP, PNG, GIF, or TIF format. You can create your own maps in a Paint program, or acquire the maps through scanning, CD-ROM, or download from the Internet. You must ensure you do not violate copyright rules applied for the maps acquired. In the Map Manager you can enter the Long/Lat coordinates for the top-left and bottom right corners of the map, as well as the color depth. Gray shade, 16 color, 256 color, or 64 million colors (depending on capabilities of your device). Maps can be as large as the user desires providing there is enough memory on the handheld. Maps should be in longitude and latitude format. Meaning the actual curvature of the map is stretched onto a flat surface and all longitude and latitude lines are straight. Pace Pace Monitoring. Monitor your current rate of speed against a pre-defined rate. Points Points are locations marked by the user. Each point can be identified by a name, icon, and description. The icon you choose for your point, will be displayed on the map. In PathAway, points are stored in the Points database. You create multiple points databases to store points. The Points databases can be viewed in the Data->Point Databases Dialog. Often Points are also referred to as waypoints. Proximity While traveling, PathAway will display the points on the map that are in close proximity. If following a track, the distance to the closest point on the track, and the distance to the end of the track are displayed. PathAway Manual Page 14 of 17 30-Jul-10 Simulate Simulates a route by moving the map to points along the route in sequence until the end of the route. Use the simulate to verify routes you’ve created, or to review tracks after they’ve been recorded. Routes Routes can be created by linking points together in a sequence. When following a route, the distance to next point, and time and distance to destination are displayed. Also, the distance and direction off of the route is shown. Transportation Mode/Activity Define your mode of transportation or activity, for easy searching for routes and tracks. Time Estimates can be made by the default vehicle speed or a custom speed you choose. Vehicles are currently defined PC-side. Trips Trips in PathAway are a collection of Routes, Tracks, and Points combined together to provide all the data necessary to navigate for a specific purpose. A trip may be an interesting hiking adventure, a Geocache hunt, a nautical trip, or a guided sightseeing tour. Tracks Tracks can be created by recording GPS movement. These tracks can then be “Followed” to perform as an accurate guide for the travel. PathAway Manual Page 15 of 17 30-Jul-10 Entering Location Coordinates Location coordinates are the values used to represent an exact location on earth. These are defined in a number of ways. The most universal is via longitude and latitude. Other coordinate systems include UTM and USGB. You can setup your default location coordinates in the Tools->Preferences->Coords Dialog. Entering Longitude/Latitude Coordinates The geographical coordinates are specified as the vertical distance from the equator known as latitude, and horizontal distance from the Central meridian over Greenwich England, known as longitude. These coordinates are entered in one of these available formats: Hemisphere Coordinates Latitude coordinates north of the equator are prefixed by 'N' or a positive number. Coordinates in the southern hemisphere are prefixed by 'S' or negative numbers. Examples: Hemisphere-Degrees-minutes: N45 30.500, W79 30.500 * must be a space between degrees and minutes. * no space between hemisphere and degrees Hemisphere-Degrees-minutes-seconds: N45 30 30.0, W79 30 30 * must be a space between degrees, minutes, and seconds. * no space between hemisphere and degrees Decimal degrees: 45.505, -79.505 or N45.505 W79.505 * Latitude positive values specify Northern Hemisphere. * Longitude positive values specify Eastern Hemisphere. * no space between hemisphere and degrees Entering UTM Coordinates Universal Transverse Mercator (UTM) coordinates define two dimensional, horizontal, positions. The sixty UTM zone numbers designate 6 degree wide longitudinal strips extending from 80 degrees South latitude to 84 degrees North latitude. UTM zone characters are letters which designate 8 degree zones extending north and south from the equator. Beginning at 80° south and proceeding northward, twenty bands are lettered C through X, omitting I and O. These bands are all 8° wide except for bond X which is 12° wide (between 72-84 N). There are some zones that are of different size. See the Map Projections manual for more info on UTM. If you have set your preferences to UTM coordinates (see Tools->Preferences->General), the data is entered as follows: Grid Zone: Format: <Zone Number><Zone Letter Designator> Example: 17T, meaning Zone Number 17, Designator T. Northing: Northing or vertical value specified in Metres within the Grid Zone. Example: 5001954 Easting: PathAway Manual Page 16 of 17 30-Jul-10 Easting or horizontal value specified in Metres within the Grid Zone. Example: 0603881 Entering OSGB Coordinates Ordinal Survey of Great Britain (OSGB) coordinates define two dimensional, horizontal, positions within the area of Great Britain. If you have set your preferences to UTM coordinates (see Tools->Preferences->General), the data is entered as follows: Grid Zone: Format: <Two Letter Designator> Example: ST Northing: Northing or vertical value specified in Metres within the Grid Zone. Example: 02115 Easting: Easting or horizontal value specified in Metres within the Grid Zone. Example: 17353 Further Information and Instructions For further information and instructions on using PathAway refer to the following: PathAway Getting Started Manual - Overview of installation and getting started using PathAway. PathAway Tutorial – A walk-through guide of some of the key features in PathAway. PathAway Reference Manual - Details on all of the features of PathAway PathAway Map Manager Manual (PDF) - PathAway manual for Map Manager. Instructions on preparing your own maps for use in PathAway. Advanced Mapping Manual - Advanced mapping user information of converting and calibrating maps including Map Datum and Map Projections support descriptions. Map Projections Manual - Definitions and Parameters of each Projected map type. Map Conversion SDK Manual - Instructions for using the Map Conversion SDK for converting to allow third-party software developers and map producers to convert maps to PathAway format. Data Conversion SDK Manual - Instructions for using the Map Conversion SDK for converting to allow third-party software developers and track, trail, or waypoint producers to convert maps to PathAway format. PathAway Web Site - Visit PathAway.com Support and Links section for further information. The PathAway Forum is also available on the web site to help you connect with others using the program. PathAway Manual Page 17 of 17 30-Jul-10