1
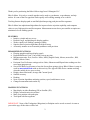
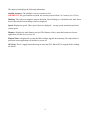
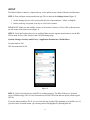
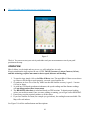
Bike-O-Meter User Manual For BlackBerry Z10 and Q10 Version 2 Date 2013-09-26 1 Thank you for purchasing the Bike-O-Meter App from Cellimagine LLC. Bike-O-Meter 10 is truly a versatile app that can be used as a pedometer, a speedometer, and trip tracker. It is one of the few apps that works equally well walking, running or in a vehicle. Tracking features displays path on satellite/hybrid map using push pins and line segments. Bike-O-Meter has sophisticated algorithms for improved noise rejection capability, and computes values to very high precision and fast response. Measurement errors due to poor satellite reception are minimized even at walking speeds. FEATURES: Intuitive, simple and easy to use Realistic, large, and pleasing tile display graphics Works equally well walking, running or riding Superior noise rejection algorithms for high accuracy Accurately monitor several essential parameters with precision PEDOMETER FUNCTIONS: Pleasing graphics and large display panels English and Metric Units. Can switch Units at any time. Measurement units: Feet, Feet/Sec. Miles, MPH, (English Units), Meters, meters/Sec., KM, KMPH (Metric Units) Persistent User Preference settings such as Units, Odometer and Elapsed time readings are also saved upon program exit. Screen ON/Wake Lock feature to keep the Screen from going to sleep. Bike-O-Meter is setup to work in unattended Mode with no user activity. The App and GPS device continue working when the mobile device goes to sleep. Display shows Maximum, Average and Current Speed. Satellite accuracy. Heading. Noise rejection algorithms minimize position, speed, and distance errors. Change measurement units on the fly. MAPPING FUNCTIONS: Map display in either Roadmap (2D) or Satellite (3D). Display current location in real-time. Mark your position with push-pins. Track path with line segments. IMPORTANT: None of the Trackpoints (Waypoints) or Pushpins can be saved or stored. As soon as you exit the app, all the values will be lost. 2 BIKE-O-METER MAIN SCREEN Heading Satellite Accuracy Speed Distance Elapsed time Average Speed Start/Stop Figure 1 3 The main screen displays the following information: Satellite Accuracy: The satellites accuracy in meters or feet. IMPORTANT: For good satellite reception, the accuracy must be about 3 to 5 meters (9 to 15 feet) Heading: This is the true magnetic compass direction. Since Heading is a calculated value, there has to be movement before true heading values are displayed. Speed: Displays the speed. Three speed values are displayed – average speed, maximum speed and current speed. Distance: Displays the total distance traveled. The Distance value is nonvolatile and saved across application exit and device power off. Elapsed Time: It displays the up-time the Bike-O-Meter App has been running. The elapsed time is preserved across application exit and device power off. GPS Stop: This is a toggle button that stops or starts the GPS. When GPS is stopped all the readings are frozen. 4 MAP VIEW SCREEN Current Location Pushpin Button Location Button Track path Button Roadmap/Satellite Button Delete Button Figure 2 The Map View screen displays current location on the map. The map can be viewed as a Roadmap (2D) or as a Hybrid Satellite (3D). The map view has a toolbar with the following buttons: Roadmap/Satellite Button: This button toggles the map view between the roadmap and satellite view. There is an on screen button that can do the same Location Button: This is a toggle button that displays or hides the current location. The current location is displayed as an animated blue dot as shown in the figure 2. Pushpin Button: Use this button to place a pushpin at the current location. Each time this button is 5 touched, a new pushpin is placed at the current location. Trackpath Button: This is also a toggle button to start or stop tracking your current path. To start tracking your path, touch this button. The current path is marked by drawing a red line segment to mark the path. Delete Button: Touch this button to clear all the pushpins and tracks. 6 SETTINGS VIEW SCREEN Change Units Reset Time Reset Distance Reset All Reset Ave. Speed Figure 3 The Settings screen is used to personalize the App. Preference setting such as measurement units is persistent. Readings like distance travelled, elapsed time are also non-volatile and are saved even if you exit the app or turn off your Z10 device. Units: Here you will setup the measurements units English or Metric. The Reset counters are used to zero out the counters Reset Odometer: Resets the distance travelled and Step count to zero. Reset Elapsed Time: Resets the total running (or elapsed time) to zero Reset Ave. Speed: Resets the average speed to zero. 7 Reset ALL: Resets all the counters to zero. This button is for convenience. IMPORTANT: The user settings such as Units are automatically remembered when exiting the App and restarting it. The Odometer readings and Elapsed Time are also saved while exiting the App and restored back on restarting the App. 8 SETUP The Bike-O-Meter is intuitive, simple and easy to use and has many advanced features and functions. STEP 1: First configure and personalize the app. This is done on the Settings Screen (Figure 3). 1. On the Settings Screen, select your preferred Units of measurement – Metric or English 2. Before each trip, if required, reset any or ALL of the counters. IMPORTANT: Make sure the satellite accuracy is better than 5 meters (16 feet). This is shown on the top left corner of the main screen (Figure 1). STEP 2: Verify the Location Services are enabled. Make sure the App has permissions to use the BB Z10 location services. This is done in the Z10/Q10 settings page Systems Settings->Security and Privacy->Application Permissions->WalkOMeter Location must be ON GPS Location must be ON Figure 4 STEP 3: Verify Location Services and GPS is working properly. The Bike-O-Meter is a location service/GPS based app. The Z10 uses locations services for GPS assist and can quickly obtain a good GPS fix. If you are indoors and have Wi-Fi, you can view the map in either 2D (roadmap) or in satellite view. If you click on the Location button, you current position is highlighted by flashing blue dot. 9 This verifies that your Location service is working properly. Figure 5 That's it. You can now start your activity and either read your measurements or track your path/ position on the map. OPERATION: Bike-O-Meter is real simple and easy to use; we will explain how it works. Keep in mind that the App requires the use of GPS. The GPS accuracy is about 5 meters (16 feet), and this technology requires movement to detect speed, distance and heading. 1. To start the App, simply click on the Bike-O-Meter icon. The main Bike-O-Meter screen shows up. However for the app to work properly, you need a good satellite fix. 2. Go outdoors in clear view of the sky. Make sure that the Satellite accuracy is good – 5 meters (16 feet) or better. 3. As with any GPS based speedometer/odometer, the speed readings and the distance readings will not change unless there is movement. 4. The HEADING (direction) is calculated based on GPS locations. To obtain proper heading values you need movement. Once you start walking or running, you will get correct HEADING. 5. If necessary reset the required counters or all the values. 6. If you lose Satellite fix/count (for example you go indoors), the reading become unreliable. The Map will work indoors. See Figure 3 for all the toolbar buttons and descriptions. 10 IMPORTANT: Wait until and makeMake sure that the Horizontal Accuracy is less than 5 (meters (16 feet) to get accurate readings. As with any GPS based system, only Latitude and Longitude and Elevation values are valid when stationary. All other reading such as Speed, Heading and Distance require movement. Using the MAP and Tracking: 1. Touch the Map tab to get to the map screen 2. Tap on the Location tool button to display your position on the map. A blue animated dot will show your current location. 3. Tap on the Roadmap/Satellite tool button to switch the map to satellite view. You can toggle this button to switch between satellite view (3D) and roadmap (2D). 4. Touch the Pushpin button to drop a pin at the current location. 5. Touch the track button to start tracking your path. A red line is drawn on the map to track your path as you move around. 6. You can turn of tracking by tapping on the Track button (toggle). 7. To remove all pushpins and path tracks, tap on the Trask can tool button. 8. Keep in mind the tracking data is not saved and will be lost. See Figure 3 for all the toolbar buttons and descriptions. Figure 6 Figure 7 11 Contact Us For technical support, user manuals or any other questions, please feel free to contact us. Tel:+1 972-360-7124 Sales: [email protected] Support: [email protected] 12