1
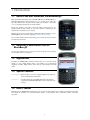
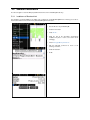
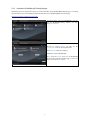
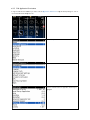
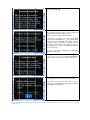
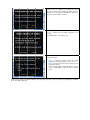
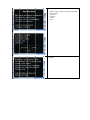
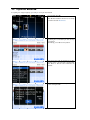
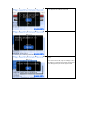
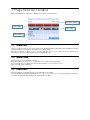
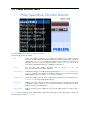
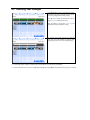
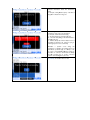
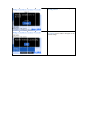
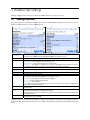
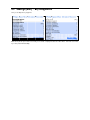
User Manual for
Philips Dictation Recorder for BlackBerry®
Version 1.6.0.0 from 11/18/2009
Table of Content 1 Introduction
1.1 Record and Edit Dictations via BlackBerry®
1.2 Receiving Confirmation Mail via BlackBerry®
1.3 Applications
1.4 Special Features
1.5 Data Transfer
3 3 3 3 3 3 2 Initial Installation (Single User Installation)
2.1 System Requirements
2.1.1 Supported Models
2.1.2 Firmware Version
2.1.3 APN-Settings
2.2 Software Installation
2.2.1 Installation via Download-Link
2.2.2 Installation via BlackBerry® Desktop Manager
2.2.3 Edit Application Permissions
2.3 Initial Start – The Setup Assistant
2.4 Open Setup Assistant
2.5 My Initial Dictation
4 4 4 5 6 7 7 9 10 12 16 17 3 Philips Recorder Elements
3.1 Status Bar
3.2 Button Bar
3.3 Meta Data
3.4 Philips Recorder Menu
3.5 Key Assignment
19 19 19 19 20 22 4 Application
4.1 Recording a Dictation
4.2 Overwriting
4.3 Inserting Text Passages
4.4 Delete Dictations
4.5 BackUp Directory
4.6 Send Dictations
23 23 25 26 27 29 30 5 Send Dictations via DPM
5.1 Dictation Selection
32 32 6 BlackBerry® Settings
6.1 Settings (System)
6.2 Settings (User) - Key Assignment
35 35 36 7 Useful BlackBerry® Tips
7.1 Start Philips Recorder faster with the Camera Quick-Button
7.2 Dictation Recorder Icon on the Opening Screen
37 37 38 8 Troubleshooting
8.1 Where to Save What? – The Directory Structure
8.2 Tunnel Error while sending Dictations
8.3 Keys cannot be used
8.4 BlackBerry® Storm
40 40 41 41 41 1 Introduction
1.1 Record and Edit Dictations via BlackBerry®
Philips SpeechExec Dictation Recorder for BlackBerry® turns your BlackBerry® into a
full-fledged digital dictation device. Dictations are recorded and played by using the
key-control. Furthermore, the system contains digital comfort features - such as the
inserting of dictation passages into an existing dictation.
Record your dictations on the plane as well. The dictation device function is also
available without any radio contact. As soon as the network is available again, the
dictation will be transmitted to your company.
Naturally you can use the normal features of Philips SpeechExec Enterprise on your
BlackBerry® and enter information regarding file number or client name.
As soon as the dictation has been transcribed by your secretary, the text can be made
accessible via e-mail as well.
1.2 Receiving Confirmation Mail via
BlackBerry®
To assure your dictation has been sent, you will receive an optional e-mail confirming
the successful transfer of your dictation.
1.3 Applications
SpeechExec for BlackBerry® is essential if dictations have to be recorded and sent
rapidly or in case a digital dictation device is not available. It is an extraordinary
supplement to Philips´ digital dictation devices with the ergonomically formed slide
switch.
1.4 Special Features
Key Assignment – Define the keys to control recording and playback. The system can
thus be easily adjusted to left-handers.
Compression
– Fast data transfer due to small AMR files. Because this format is
supported by the BlackBerry® hardware, the processing unit is less
stressed.
1.5 Data Transfer
Philips Recorder for BlackBerry® communicates to your web server via Direct TCP and uses a highly secure bidirectional interface.
This enables the verification of a successful dictation transfer. Losing dictations due to connection problems is therefore
impossible.
3
2 Initial Installation (Single User Installation)
With the Philips SpeechExec Dictation Recorder for BlackBerry® Smartphones you can comfortable record and manage speech
notes as well as send dictations wireless from everywhere to your secretary. The Philips Recorder allows the use of the same
comfortable specific features that the most current dictation devices offer.
The installation and operation of the software is very simple and self-explanatory:
•
•
•
•
•
•
Install the software wirelessly through the download-installation-link or via USB through the BlackBerry® Desktop
Manager.
Start the Philips Recorder (to be found in the folder Downloaded)
Use the Setup Assistant
Record a dictation, press the menu button, and the EOL (End Of Letter) button to finish the dictation.
Once you get prompted to send the dictation, select Yes.
Done!
Should you have troubles with the installation, please perform the following detailed installation steps. If you are still unable to send
dictations you can contact [email protected] at any time. For inquiries, please always specify your BlackBerry® model,
firmware version, as well as the provider.
Subsequent you will find the above mentioned steps explained in more detail and with screenshots.
2.1 System Requirements
The Philips SpeechExec Dictation Recorder for BlackBerry® Smartphones works almost on every current BlackBerry®. If
necessary, it is recommended to just update the firmware of older models or to upgrade the memory with a MicroSD card
(available at the local dealer for a few Dollars.)
2.1.1
Supported Models
Below you find a list of supported models. The Philips Recorder for BlackBerry® Smartphones comes in two versions:
•
•
Classic (For models with the BlackBerry® Firmware smaller than 4.7)
Storm (For models with the BlackBerry® Firmware larger or equal to 4.7)
Model
Model Number
Additional Memory Card
Philips Recorder Version
Bold
Curve II
Storm
Curve I
Pearl
8800
90xx
89xx
95xx
83xx
81xx
8800
Optional
Optional
Optional
Recommended
Recommended
Recommended
Classic
Classic
Storm
Classic
Classic
Classic
Please install the appropriate version on your device.
Please Note: There is only little internal memory available with the older devices. Therefore, it is strongly recommended to use
an additional memory card with the above listed devices!
4
2.1.2
2
Firmware Versio
on
As
A with almostt all products nowadays, the fiirmware of youur device should
d always be up--to-date. With the current firm
mware
version,
v
your BlackBerry® dealeer provides you with additional features and co
orrects known eerrors. Thereforee, if you have trroubles
with
w the operation of the Philipps Recorder youu should always first download the
t latest BlackB
Berry® Desktopp Software and update
u
your
y
device this way:
Please check the firmware veersion of your device:
•
•
•
m
button
Press the BlackBerry® menu
O
(wrench)
Select Options
Select About
A
There you find the follow
wing entry: V4.6.0.216 (Platfo
orm
4.0.0.183)
The number of the version should be at least 4.3.x.x
In general it is recommended
d that you updaate the firmwaree of
your BlackBeerry® with the B
BlackBerry® Desktop Software for
the use of muultimedia applicaations.
You find the most current veersion always at::
http://de.blackberry.com/servvices/desktop
On the printing day of this manual the latest BlackBerrry®
Desktop Softtware Version was
w 5.0.
2.1.3
2
APN
N-Settings
By default, yourr APN should bee configured correctly already so
s that you havee access to the Internet. Howeever, if so far yo
ou only
used your BlackkBerry® as a pho
one or changed your
y
provider you might have to configure the APN manually before
b
you will bbe able
to
t send dictations with the Philiips Recorder:
ons.
Press the menu button annd select Optio
Advance
ed Options
TCP/IP
Please entter the informattion that the pro
ovider gave you.
For devicces that are connnected to a BlackBerry® Entterprise
Server the
t
APN is always blackberry.net without
w
authenticaation.
A wrongg APN setup is almost alwaays marked witth the
occurrencce of a “Tunnnel Error” whiile trying to send
s
a
dictation.
2.2 Sofftware In
nstallation
You
Y have the op
ption to install the Philips SpeecchExec Dication Recorder for BlackBerry® in tw
wo ways.
2.2.1
2
Instaallation via Download-Li
D
nk
The
T installation via Download-LLinks works alw
ways great if youu have the curreent BlackBerry®
® firmware. Thiss way you are aable to
download
d
the so
oftware wirelesss with the help of
o the BlackBerrry® Internet Bro
owser:
Installatio
on Procedure:
•
o your BlackBerrry®
Starrt the Browser of
•
Presss the menu buttton
•
Seleect Go To…
•
of the approppriate speechexxec.jad
Enteer the link o
instaallation file (claassic or storm, can be found on
o the
nextt page)
•
Cheeck Set applica
ation permissiions
•
on permissionss as shown on
o the
Editt the applicatio
follo
owing screensho
ots.
•
on.
Finissh the installatio
•
Donne!
The
T links for thee installation of the
t most currennt Philips SpeechhExec Dictation Recorder for BlackBerry® Softtware are:
http://www.speeechshop.net/web
binst/classic/speeechexec.jad (BB OS < 4.7)
http://www.speeechshop.net/web
binst/storm/speeechexec.jad (BB OS >= 4.7)
Please note thatt you need to use
u the second installation link ffor BlackBerry®
® Storm and all models with firm
mware larger orr equal
to
t 4.7 otherwisee the sensitive to
ouch screen is not
n supported.
2.2.2
Installation via BlackBerry® Desktop Manager
Alternatively you can also download the software to your PC and install it with the BlackBerry® Desktop Manager. You can always
download the latest version of the Philips SpeechExec Dictation Recorder for BlackBerry® under the following link:
http://www.speechshop.net/webinst/speechexec.zip
Unpack the bundle, connect the BlackBerry® to your PC,
start the BlackBerry® Desktop Software, and select
Application Loader.
First select Add/Remove Application - Start.
Proceed by selecting Browse and then
speechexec.alx from the just unpacked bundle.
the
file
Select Next to complete the installation.
If applicable, restart the BlackBerry®.
Note: Install the Storm version for the BlackBerry®
Storm and all models with a firmware bigger or equal to 4.7
and do not use the Classic version!
9
2.2.3
2
Edit Application Permissionss
It might be thatt after the instaallation you neeed to edit the Application Pe
ermissions usinng the Desktopp Manager in order to
record dictationns with the Philip
ps Recorder:
Press the menu button, select Options.
Advance
ed Options
Applicattions
Now seleect Philips Reccorder with thee trackball. Do not
push the trackball becauuse the applicatiion should onlyy be
highlighted.
Press the menu button aggain and select Edit
E
Permissio
ons.
Edit the Application Permissions as shown on the
following screenshots.
2.3 Inittial Startt – The Setup A
Assistantt
The
T Setup Assisstant helps you to
t configure the Philips SpeechE
Exec Dictation Recorder
R
for BlacckBerry® in justt a few steps:
Start the Philips Recordeer with the micrrophone symboll (after
wnloads).
installation to be found inn the folder Dow
At the firrst start or an uupdate installatio
on the Setup Asssistant
opens auttomatically and asks you a few
w questions abo
out the
configurattion.
Read the text carefully annd navigate thro
ough the assistannt with
the buttons Next, Previious, and Cance
el.
Confirm the
t Philips licensse agreement (EULA).
If you havve read the liceense contract alrready you could
d jump
to the end
d of the documeent by pressing the
t trackball.
Please staate here, if you w
would like to bee prompted afteer each
dictation to
t add a worktyype.
e, for example
e, a file numb
ber, a
A workttype could be
client na
ame, or any kin
nd of hint for the
t dictation.
This worrktype will theen be shown in the transcrription
software (Philips SpeechE
Exec Transcribe)) of your typist.
On this page please choo
ose the operatingg mode for the Philips
Recorder for BlackBerry®
®.
In the so called Offline Notetaker Mode,
M
you can record
r
and save dictations with your device as well as transferr them
via MicroSSD Memory Carrd or USB to yo
our PC.
However,, you are not able to transmit dictations.
In the Dictation
D
Transmission Mode you use the Philips
Service fo
or transmitting dictations,
d
i.e., your
y
dictations will
w be
transferreed to a server vvia HTTPS, therre it will be converted
to the fille format (e.g., MP3) that is compatible
c
withh your
transcripttion software, annd then will be deployed
d
to youu via email. If a dictation
d
is too large for an e-m
mail deploymentt it will
be sent in
n various parts.
You can try this servicce complimentaary and withouut any
obligation
ns for thirty dayss.
In case yo
ou selected the Dictation Tra
ansmission, youu need
to run a Connection T
Test to check iff your BlackBerrry® is
onfigured correcctly for the dictaation transmissio
on.
already co
Please sellect BIS if you do not have yo
our own BlackB
Berry®
Enterprisee/Professional Seerver and run a connection testt.
f
you need to edit a few more
If the connection test failed
settings on
o your BlackBeerry®. You can find appropriatee hints
in the Apppendix “Troubleeshooting”.
Please note th
hat the Setup
p Assistant will appear every
y time when the
t
software is
i started as lo
ong as not all fields
are
a filled out.
Here you
u indicate to w
what email add
dress your dicttations
should be sent, for exxample, your secretary.
s
If yo
ou use
transcripttion software suuch as Philips SppeechExec Transcribe,
dictationss can be imporrted automaticaally from Outlo
ook or
Lotus Notes into the dicttation software.
Author messages
m
will be sent to the authhor´s email addrress as
soon as a dictation was
w
successfully transmitted to
t the
secretary..
Please add
d the author´s eemail address here.
Please ind
dicate now in what file formaat you would like to
receive thhe dictations:
•
•
•
S – Professio
onal dictation format for Philips
DSS
SpeeechExec Transcription Systems. The least file sizze
MP3
3 – Most univerrsal format that can be played byy most
transscription system
ms
WA
AV – Should onlyy be used if the transcription
t
software
doess not support DSS
D or MP3. The
T files becomee very
largee.
At
A the end you configure your personal
p
settings. These settingss are important so that your seccretary can distiinguish your dicttations
from
f
other authhors right away.
Upcoming Questions arre:
•
•
•
•
•
•
Auuthor´s Initials – Usually your Windows
W
Login Name
N
Co
ompany Name
First Name
Lasst Name
Co
ountry
Staate
Done! Your
Y
system is now configuraated and can bee used
immediaately.
2.4 Op
pen Setu
up Assisttant
You
Y can open the
t assistant anytime again to make changes bby pressing the BlackBerry® menu
m
button onn the Philips Reccorder
interface and there select Settiings (System).
ou can now preess the
In the Philips Recorder ccontrol panel yo
d
menu buttton of the assisttant (setup) again to make the desired
changes.
2.5 My
y Initial Dictation
D
n
If everything was configured pro
operly, you can try
t to record yo
our first dictationn:
Start th
he Philips Record
der.
After thhe initial installaation the Start-Iccon can usually
be foun
nd in the folder Downloads.
Highlighht the record buutton (dot) withh the trackball.
By pressing the recorrd button you start
s
and stop
your dictation.
Alternaatively, you can also
a use the spacce bar.
Once you
y are done w
with the dictationn, press either
the entter button or the menu button and then EOL.
EOL sttands for End Of Letter and
d finishes the
dictatio
on.
Now yo
ou might be askeed for a Worktyp
pe. Enter a meaningful nam
me. Select Y
Yes if you like to
o send the dictattion right away or No iff you like to send
d it at a later tim
me. The dicctation will now be sent. Done! Your secretaryy will receive the dictation shortly. If an errror should occu
ur, copy the me
essage to ease the seaarch for solution
ns. Please alwayys provide that error m
message when yo
ou contact support as well. 3 Philip
ps Reccorder Elemeents
After
A
you have finished
f
the conffiguration of Phiilips Recorder, rreturn to the useer interface.
Dictation Me
eter
Status Ba
ar
Bu
utton Bar
Meta Data
D
3.1 Sta
atus Bar
Here you receivve information on
o your current dictation mode: Paused/Stoppeed, Recording, Playing, Fast Forw
ward/Rewind, Inssert as
well
w as informattion on your possition in the dicttation and the diictation length.
The
T
status bar appears red when
w
you are in recording m
mode and white
e if you are w
working in pausse or playback mode.
Furthermore, it shows your currrent dictation position
p
during playback
p
mode.
3.2 Buttton Barr
The
T button bar contains the Philips Recorder keys.
k
The
T buttons apppear blue when active or oran
nge when seleccted. Otherwisee they appear grey.
To
T press the keyys, there are gennerally two options: either you use the trackball or the key control.
c
Please read on for
f further information.
3.3 Me
eta Data
Below the butto
on bar you will find information on the Meta datta of your dictattion.
You
Y can add additional informaation regarding the
t working ty
ype, category, and commentt, which will classsify your dictations in
more detail and will simplify theeir integration in
nto your SpeechExec workflow.
3.4 Phiilips Reccorder Menu
M
To
T enter the Phhilips Recorder menu,
m
press the BlackBerry® icon.
Navigate througgh the menu via trackball:
EOL
To start
s
a new dicttation, as well ass to save a com
mpleted one, youu have to use EOL (End of Lettter). If
you choose this opttion, Philips Reccorder will ask for
f further dictaation information, which you may add
optio
onally. This dictaation informatio
on simplifies the classification of your dictations,, for you as welll as for
yourr typist. If you have recorded an important dictation, you may prioritize it, so that it can
c be
proccessed first. Leavve the EOL direcctory by confirm
ming the settingss with OK.
Meta Data
You may also enter dictattion informattion
direcctory contains th
he same optionss as the EOL meenu.
Dictation Manager
In thhe Dictation Manager you will find
f
all dictationss including theirr file size, creation date, and dicctation
inforrmation. Select one
o or more dicctations via trackkball and decide how to processs them by pressiing the
BlackkBerry® symbol. It is also possible to send, deleete, and edit dictations.
Category Manager
The Category Manaager offers the option of adding different caategories to you
ur dictations, suuch as
privaate or work or to
t change alread
dy classified categories.
Settings (User)
Philipps Recorder cann be configured according to yo
our demands. Yo
ou can decide whether
w
you wouuld like
to overwrite
o
a passage or delete the rest of a dictation. Furthhermore, the keey assignment can
c be
channged according to your individuaal needs.
Settings (Sysstem)
Heree you will find the system connfiguration. You may decide whhich categories are asked for after
a
a
dictaation.
later,
bby
choosing
Meta
data.
This
Please note: A list
l of dictationss, like the dictattion manager, might
m
contain sevveral pages. Youu can switch pagges by scrolling to the
end
e of the page and pressing Previous or Next.
Please be awaree that command
ds are only applied to the currrent page only. If you select Delete all/ Send
d all, only the shown
dictations
d
will be deleted or sennt!
3.5 Key Assignment
As mentioned before, you have the option to control these buttons either by using the trackball or via key control.
The standard key assignment is as follows and can be changed according to your needs in the user settings menu.
Button
SPACE
O
G
Function
Pause on/off
Switch between Play and Record
Jump 3 seconds forward
F
T
R
V
C
M
Y
Q
ENTER
L
P
I
Jump 3 seconds backwards
Jump 10 seconds forward
Jump 10 seconds backwards
Fast Forward
Fast Rewind
Jump to end of dictation
Jump to beginning of dictation
Meta Data
EOL
Category
Dictation Manager
Insert mode
Please note: If you use a device without a full-fledged keyboard, you will have to rearrange the key assignment.
For the 81xx devices (Pearl) we suggest the following key assignment:
Button
SPACE
E
G
D
T
U
B
C
M
Y
Q
ENTER
L
O
A
Function
Pause on/off
Switch between Play and Record
Jump 3 seconds forward
Jump 3 seconds backwards
Jump 10 seconds forward
Jump 10 seconds backwards
Fast Forward
Fast Rewind
Jump to end of dictation
Jump to beginning of dictation
Meta Data
EOL
Category
Priority on/off
Insert mode
22
4 Applicationn
Please note: Maake sure that the key tones of your
y
BlackBerryy® are switched
d off before youu start your firstt dictation. Otherwise
they
t
might distuurb your recordiing!
4.1 Reccording a Dictattion
Open the
t Philips Recorrder from the Downloads
D
folder.
As show
wn in the picture, the record button
b
appears blue,
active. Now press the pause button by
b using the tracckball
or spacce key to start reecording.
The reccording has startted. The status of your dictation has
changed
d.
The dicctation meter is active.
Now record
r
a test dictation, e. g. „Test 1 2 3 4 5 „.
Press pause
p
again to innterrupt the reco
ording.
Rewind
d to the beginnning of the dictaation by holdingg the
trackbaall on RWD or bby holding the C key.
Releasee the button at
a the beginnin
ng of the dictaation.
Philips Recorder autom
matically switches to play modee and
you will listen to your recording.
The play mode is marrked by the stattus bar and a white
w
dictatio
on bar, indicatingg your current dictation
d
positio
on.
In playy mode you can navigate througgh your dictatio
on or
changee it.
After the
t recording, yyou finish the dictation by choosing
EOL inn the Philips Reccorder menu.
Philips Recorder will prompt, if youu would like to
o add
furtherr Dictation Information.. You may add
information and then cconfirm with OK
K.
After
A
confirmingg, a new dictatio
on is automaticallly created to ennsure a flowing dictation
d
process.
4.2 Overwritin
ng
Record
d another testt dictation. Rew
wind to a ranndom
passagee.
Press Pause
P
and then Record to leavve the play mode.
Releasee Pause. Philipss Recorder will prompt
p
whetherr you
really want
w
to overwrite from this po
osition. Confirm with
Yes an
nd continue reco
ording.
4.3 Inse
erting Text
T
Passsages
If you would
w
like to innsert a forgottenn text passage,
instead
d of overwriting a paragraph, thhen go back to
the corrresponding possition and press pause.
t Insert butto
on. The dictation bar will now
Press the
appearr green, to indiccate insert modee.
r
by ppressing the space key and
Start recording
dictatee the text you w
would like to inseert.
To end the insert m
mode, press Pau
use again and
then select INS. Thee dictation bar appears white
a stops at the end of the inserrted passage.
again and
Note: If the inseert button canno
ot be activated, please check if tthe insert mode has been deactiivated.
Note: Due to teechnical reasons, you can only faast backward/forrward and play within
w
the partiaal text that is going to be inserteed.
4.4 Delete Dicctations
To delete a dictation you have to enter the Philips
der menu and select Dictatio
on Manager.
Record
You will find a list of all your dictationns.
Choosee a dictation by selecting it.
Now press
p
the Black
kBerry® butto
on and choose
the opttion Delete sellected.
Confirm
m the process w
with Delete.
Leave the Dictation Manager by pressing the
BlackB
Berry® button
n and Close.
4.5 BacckUp Diirectory
Open the
t Dictation M
Manager.
Choosee Sent dictatio
ons.
You will see a list of all dictations you
y
have sent.
These dictations will be deleted afteer the defined
time peeriod.
If you press the BlackkBerry® button, you will see
the baackup menu. You might either
e
delete
all/sele
ected dictatio
ons directly or restore
selecte
ed dictations.
By resstoring dictationns you enable them to be
edited.
4.6 Sen
nd Dicta
ations
After recording a dictaation you will bee prompted to
send thhe dictation now
w. If you answer with Yes, you
will be forwarded to thhe dictation list.
Select the
t dictations thhat should be sennt.
Press the BlackBerry
y® button and choose Send
selecte
ed.
ons can also be sent by ch
hanging Send
Dictatio
directlly to Yes withinn the System Settings.
S
While the dictations aare being sent yo
ou will receive
extensive information about the transmission
status.
For example, sending d
dictation (3/10) – The third of
altogetther 10 dictationns is being sent
The fo
ollowing line co
ontains information about the
transm
mission status of the current dicttation.
For example, 3/10/2 m
means the following:
3 – The third dictationn is currently beiing sent
10 – The tenth data paackage of the third dictation is
currenttly being sent
2 – Thhe first attempt tto send the dicttation was not
successsful and thereffore the system
m is trying to
send itt again (here for the second timee)
Wheneever a probblem occurs during the
transm
mission of a dictaation, the windo
ow will be red.
Transm
mission problem
ms might, for exxample, occur
on a train or if the BlackBerry®
B
devvice needs too
much time
t
to connecct to the Internnet. As Philips
Record
der normally ttries to resolvve connection
problems automaticallyy, this is just a hint.
If the Transmission
T
is m
marked as Tran
nsfer finished
successsfully, the dictaation has been sent.
s
5 Send
d Dictaations via
v DP
PM
5.1 Dicctation Selection
S
n
By using Philips Reco
order it is posssible to send
d
from your external
previouusly recorded dictations
memorry card. As your Philips dictatio
on device uses
SD meemory cards youu should use a micro
m
memory
card with
w SD adapter.
B
Insert a memory carrd into your BlackBerry®
device and start Philip
ps Recorder.
Confirm the sending of the dictations on your
memorry card with Yes. A menu baar appears and
you can decide which d
dictations should be sent.
To send
d all dictations at
a once select alll.
Select EOL, if you w
would like to seend dictations
that haave been compleeted and marked by using the
EOL (E
End of Letter) option.
nd selected dictaations use selectt dictations.
To sen
A list will open that shows the dicttations on the
memorry card and youu can choose which
w
one you
would like to send.
Confirm the
dictations.
selecction
by
cho
oosing
copy
A wind
dow appears on your screen sho
owing
Sendin
ng dictation.
You will be informed that the Tran
nsfer finished
successsfully and the dictations will appear in the
dictatio
on manager.
6 BlackkBerryy® Sett
ttings
With
W the settinggs (system) and (user) you can customize
c
the Phhilips Recorder according to your needs.
6.1 Setttings (S
System)
The
T system setttings can be opeened by pressingg the menu buttton of the BlackBerry® in the P
Philips Recorder application. Here you
will
w set up essenntial parameters for the use of Philips
P
Recorderr.
BES for netwo
ork
connection
WLAN
Save data on
Basic path
Minimal free
memory
Font (general)
Font (player)
Upload-Moduss
Delete
Days prior to final
f
deletion
Send directly
If you own
o
a BlackBerrry® Enterprise SServer and use APN
A
blackberry.net for the dataa transfer, choosse Yes.
If you use
u another APN
N and thereforee BIS (BlackBerryy® Internet Servvices), select No
o
Here you
y can setup wh
hether you wantt to use WLAN always, never, or
o only if availabble.
Defines where to savee the dictations:
Memorry Card – saves dictations only on the memory card
Internaal Memory – savves dictations onnly on the internnal memory
Mixed Mode – saves dictations
d
on thee memory card but uses the intternal memory if there is no memory
card avvailable. The nexxt time a memorry card is inserteed the dictationss will be transferrred.
Defines the memory directory
d
of Philips Recorder datta.
Defines the size of spaace left for otherr applications on
n the memory caard and the internal memory.
Font siize for the system and dictation management.
Font siize for the recorrder interface.
Here you
y can configurre your dictationn upload of DPM
M dictation devices.
As a sttandard feature DSS and DS2 (D
DSS Pro) files cann be processed:
•
EO
OL – Transfer dictations
d
that w
were finished usinng EOL
•
All – Transfer all dictations automatically
•
Prrompt – Choosee dictations
Note: Dictations will be buffered in the
t internal memory. If you usse an older device you might have to
split a dictation and traansfer the parts..
Decidee, if the successsfully transmitted dictations should be deletted from the memory
m
card off your
dictatio
on device.
Dictatiions will be filed
d in the folder “ssent dictations”. This option staates how many days
d
the dictatio
ons will
remain
n in this archive folder
f
until theyy get finally deletted.
Please note that if youu use the internnal memory thiss time period shhould not be too
o long and threee days
are usuually sufficient.
If dictaations were finished using EO
OL you will be prompted to ““Send dictationss now?”. In this case
dictatio
ons will be sent immediately.
Philips Recorderr offers the oppportunity for obligatory promptss of certain paraameters, which can
c be used to classify
c
your dicttations
and
a also to backkup crucial actio
ons. This way you can choose whhich of these paarameters should
d be prompted mandatorily
m
and which
are
a not.
6.2 Setttings (U
User) - Key
K Assiignmentt
Here you can seetup the key assignment.
With
W the help of
o the option “Lo
ock insert modee” you are able to
t completely deactivate the “Innsert Mode”. Thhis makes sense if that
key is often presssed unintentionnally.
7 Usefful BlacckBerrry® Tip
ps
7.1 Sta
art Philip
ps Recorrder fastter with the Cam
mera Qu
uickButto
on
Select Options from
m the main menu.
Select Screen/Keyb
board.
Scroll to the botto
om until you reach Right
Side Convenience
C
e Key Opens:.
If you use the stand
dard settings, you will find
the caamera icon there. Change to Philips
Recorrder. Afterwaards, Philips Recorder
R
can
be opeened by using tthis button.
7.2 D
Dictation
n Record
der Icon
n on the Opening
g Screen
n
Oppen the folder Downloads, mark the Philips
Reccorder applicattion (micropho
one) and seleect
Mo
ove To Folder by using the BlaackBerry® butto
on.
Seleect Home
Retturn to the main
m
menu annd mark Philiips
Recorder.
Preess the BlackBeerry® button again and seleect
Mo
ove.
No
ow you can m
move the appplication to yo
our
preeferred location on the main menu. To show tthe
appplication in the Q
QuickStart bar, the icon needs to
be moved to the firrst row (among the first six iconns)
Confirm the correcct position by ussing the trackballl.
If yo
ou leave the maain menu, you wiill find the Philipps
Reccorder applicatio
on in the QuickSStart bar.
8 Troubleshooting
8.1 Where to Save What? – The Directory Structure
The following directories will be created on the
memory card in the root directory:
Dic
|-- Commandos: Folder for commands (only needed
from version 1.5 on)
|-- Dictations: Folder for completed dictations
|-- SentCommandos: Folder for sent commands(only
needed form version 1.5 on)
|-- SentDictations: Folder for already sent
dictations(backup folder)
|-- Skins: Folder for individual skins or buttons
40
8.2 Tunnel
T
Error
E
wh
hile send
ding Dicttations
If during thee transfer “Tunnel Error“ appearrs, there might bbe several reasons:
Inco
orrect APN setttings:
•
•
•
•
•
Open Optio
ons (wrench)
Select Adva
anced Options
Select TCP/IP
Fill in the A
APN data (APN
N, user name and
a
password) given to you by yo
our provider.
Try to send aagain.
BESS or BIS mode:
•
APN settings weere not successfful,
If the new A
you can swittch between BESS and BIS modee in
the Philipss Recorder system settings.
Normally thee BES mode is only
o necessary if an
enterprise or professional server
s
is used, i.e.
in larger com
mpany networks..
No
o data option:
•
Make sure, your
y
BlackBerry® is activated ffor
data transmisssion.
8.3 Keys
K
cannot be used
u
If the applicaation does not start
s
correctly or if the keys or buttons cannot be used, this co
ould mean missinng permissions:
•
•
•
•
•
•
•
Enter the BlackBerry® option menu (w
wrench)
Select “A
Advanced Optio
ons“
Select “A
Applications”
Select “P
Philips Recorderr”
Select thhe menu button
Select “E
Edit Permissionss“
Change “Connection, Innteraction, and User name“ to “Allow“
“
8.4 BlackBer
B
rry® Sto
orm
If you use th
he BlackBerry® Storm, please innstall the Philips SpeechExec Dicctation Recorder version for thee Storm device. If
you would liike to use the sttandard Philips Recorder
R
versionn, proceed as fo
ollows:
•
•
•
•
•
•
Enter the BlackBerry® option menu (w
wrench)
Select “A
Advanced Optio
ons“
Select “A
Applications”
Mark Philips Recorder but
b do not open the application!!
Push thee menu button
Select „D
Disable Compattibility Mode“
Specifications are subject to change without notice.
Author: Frank Krystek
Trademarks are the property of Royal Philips Electronics or their respective owners.
© 2009 Royal Philips Electronics. All rights reserved.
Document version 1.6, 2008/08/16.
42