1
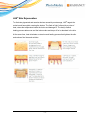
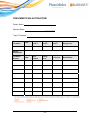
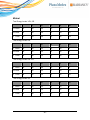
Clinical Training Binder TABLE OF CONTENTS CONSULTATION PROTOCOL....................................................................................................... 1 LHE® TECHNOLOGY ..................................................................................................................... 2 LHE® EXCLUSION CRITERIA (CONTRAINDICATIONS) ............................................................ 6 PRETREATMENT ........................................................................................................................... 8 PERFORMANCE OF TEST AND TEST RESULTS ....................................................................... 9 TREATMENT GUIDELINES ......................................................................................................... 11 AFTER-CARE INSTRUCTIONS ................................................................................................... 15 CLEANING THE LAMP ................................................................................................................ 15 APPENDICES ............................................................................................................................... 16 Consultation Protocol 1. PRIOR TO CONSULTATION The practitioner should gather the following information before treatment: 2. Health Assessment o Assess if the patient is a candidate for treatment. o Assess if there are any issues requiring special attention. Consent - Confirm that o The patient's questions were answered. o The treatment was explained. o The patient was informed of possible risks. o The patient consents/does not consent to be photographed. The practitioner should establish forms for his/her practice, taking into account country and state regulations. FIRST CONSULTATION Review the data and check exclusion and cautionary criteria. The practitioner should: o Explain the technology and how it will address the patient’s issues. o Go over procedures and possible side effects. o Answer any questions. A Consent Form should be signed by patient. Proceed with the Test. o Use the energy tables in APPENDIX II to determine the initial energy level for the application o Check that the appropriate results are obtained. o Document the test. Explain Aftercare Instructions (APPENDIX ). Schedule the next appointment. 3. TREATMENT – Proceed with the treatment starting with the test energy. As treatment proceeds, the energy can be gradually increased to attain the required results. 4. DOCUMENTATION – Mistral will keep track of all treatments. For all other instruments, treatment should be documented using the Treatment Evaluation Form (APPENDIX ) or any other method. Record any pertinent information and recommendations. 1 LHE® TECHNOLOGY How Selective Photothermolysis Works Selective Photothermolysis refers to the precise targeting of a structure or tissue using specific wavelengths of light with the intention of absorbing light into that target area alone. The energy directed into the target area produces sufficient heat to damage the target while allowing the surrounding area to remain relatively untouched. For example Selective Photothermolysis works for hair removal by targeting melanin, a chromophore located in the hair follicle. The light absorbed by the melanin in the hair shaft and hair root is converted to heat. This causes damage to the hair bulb, and once damaged, it can no longer produce healthy hair, thus inhibiting hair regrowth. Light and Heat Energy (LHE®) technology combines a flash of broad-spectrum light and a gentle wave of directed heat to achieve the desired effect. The light/heat combination benefits the patient by enabling lower energy levels, which in turn increases safety and reduces side-effects. -2- LHE® Skin Rejuvenation: To eliminate pigmented and vascular lesions caused by sun damage, LHE® targets the melanin and hemoglobin causing the lesions. The flash of light, followed by a pulse of heat, raises the temperature inside the lesion and damages it. The body's natural healing process takes over and the lesion scabs and drops off or is absorbed in the skin. At the same time, heat stimulates a natural wound healing process that tightens the skin and reduces fine lines and wrinkles. -3- LHE® Hair Removal: In order to inhibit and prevent future hair growth, the hair bulb must be damaged. Raising the temperature inside the follicle until it clots is essential to its destruction. LHE® also uses heat generated by the flash of light to safely achieve this goal. This innovation lowered fluence levels and made treating Skin Types V-VI much safer and more comfortable. -4- LHE® Acne Clearance: LHE® creates an oxygen rich environment that quickly destroys P. acnes bacteria, the main cause of acne breakouts. Light reaches deep into the pore as heat intensifies the process, opening the pores to release the buildup and soothing inflammation. -5- LHE® EXCLUSION CRITERIA (Contraindications) The patient may not be treated if s/he: Is younger than 18 for HR and SR and younger than 12 for AC. Is pregnant or lactating. Has tanned by sun or tanning booth within the last 21 days. Has tattoo/s or permanent makeup in the treatment area. Has abnormal skin conditions due to diseases (e.g. diabetes) or medicinal intake. Has a history of skin disorders such as vitiligo or psoriasis in the treatment area. Has a history of local skin infections. Has been treated with isotretinoin (Accutane) within the past 6 months. Has used any medications, herbal preparations or chemicals that cause photosensitivity within the past 6 weeks. Suffers from epilepsy. Has diseases related to photosensitivity, such as porphyria, polymorphic light eruption, solar urticaria, lupus and other autoimmune diseases. Has a history of herpes outbreaks in the treatment area, unless the patient has consulted his/her physician and received prophylactic treatment prior to treatment. Has a history of skin cancer or areas of potential skin malignancies. Has received chemotherapy or radiation within the past 5 years without his/hers physician's consent. Has used steroids (i.e. for asthma) within the last 3 months. Has an active implant, such as a pacemaker, incontinence device, insulin pump, etc. Has any other condition which, in the practitioner’s opinion, would make it unsafe for treatment. -6- Additional Exclusion Criteria for Hair Removal: The patient may not be treated if s/he: Has used any method of epilation other than shaving in the treatment area within the past 30 days. Has inflammatory skin conditions or open sores. Cautionary Criteria NOTE: Cautionary criteria do not exclude patients from being treated, but indicate that extra care must be applied. Use of Medications/Topicals Menstrual dysfunction Herpes I or II within the treatment area History of keloids or hypertrophic scarring If there is any doubt about the nature of pigmented lesions or spots, consult a dermatologist -7- PRETREATMENT 1. Thoroughly clean the treatment area. Do not use any flammable solutions such as alcohol or acetone. 2. Make sure that the skin's surface is completely dry. 3. Cover moles and pigmented spots with non-flammable white stickers. 4. When treating the face: • Draw back the hair and cover it. • Provide protective eyewear. Hair Removal: Prior to testing or treatment, the hair should be trimmed to a length of 1-2 mm. Topical anesthetics can be applied 1 hour before treatment if required. -8- PERFORMANCE OF TEST AND TEST RESULTS 1. Evaluate the patient’s skin type using the Fitzpatrick Skin Type Classification Scale. a. Differentiate between Asian and Caucasian skin types. b. Use the explanations below as guidelines for determination. 2. Use the Energy Tables to determine the initial energy level for testing. 3. Optimal energy level settings can differ depending on patient, treatment area or application. 4. Check that optimal results have been obtained by observing the treatment area for the desired clinical reaction. -9- APPLICATION RESULTS Hair Removal Darkening/burning of the hair Skin redness around the hair (immediately or 10-15 minutes after pulsing.) Acne Mild redness of the skin that disappears within a few hours after test Pigmented Lesions Redness or darkening of the lesion(s) but not of the surrounding tissues Vascular Lesions Lesion becomes more apparent. Some redness may be observed in the surrounding skin Fine Lines Mild redness on the skin that quickly disappears after the test Table 1: Optimal Test Results 5. Perform 3 to 4 test spots. 6. If the required result is not observed immediately or within 24h of the test, raise the energy by increments of 5 until the desired result is obtained. 7. Some patients may have a delayed reaction. Wait at least 24h before performing treatment (48h for skin Types V-VI) 8. As treatment proceeds, it may be necessary to further raise the energy. 9. A new test must be performed whenever the handpiece is changed. Figure 1: Successful Test Results for Hair Removal - 10 - TREATMENT GUIDELINES Skin Rejuvenation Treatment Guidelines Vascular Lesions Average Treatment Course: 4-8 sessions Average Treatment Course: 1-2 treatments a week Session: Up to four (4) crisscrossed pulses on the same spot based on the observed clinical reaction. Wait a minimum of 1-2 minutes between pulses. o LHE® can be used to treat small, superficial vascular lesions up to 0.5mm appearing on the face. Not indicated for other areas of the body. o Results are individual and often depend on the depth and size of the lesion. o If the lesion becomes more apparent, the energy level is appropriate for treatment. Some redness may also be observed in the surrounding skin, this is normal. o Evaluate the lesion after 2 treatments (not including the test session). If fading is observed, continue treatment as before. If fading is not observed, raise the energy to the maximum level the skin can tolerate without adverse side-effects. o If significant improvement is not observed within 4 treatments, consider early termination of treatment. Pigmented Lesions Average Treatment Course: 2-4 sessions Average Treatment Course: 1-3 weeks apart Session: 2 to 4 crisscrossed pulses on the same lesion, based on the observed clinical reaction. Wait a minimum of 1-2 minutes between pulses. o During or after treatment, redness or darkening of pigmentation should appear on the lesion, but not the surrounding skin. o When treating a well-defined pigmented lesion, treat only the lesion not the surrounding area. The surrounding skin may be covered with a white nonflammable sticker. o Do not perform the next treatment until skin has completely healed. - 11 - Fine Lines and Wrinkles Average Treatment Course: 5-6 sessions Average Treatment Course: 2-3 weeks apart Session: 2 passes in a crisscross pattern over the entire face. Wait a minimum of 3-5 minutes between passes to prevent overheating the skin. o The appropriate energy level for treatment is one that causes only mild redness and disappears quickly after the pulse. o When treating fine lines, wrinkles, and skin texture, treat the entire face. o Use extra caution when treating back of hands, décolleté and the neck area due to bone proximity and skin delicacy. Lower the energy level by 5-10 points. o Maintenance treatments should be performed as needed. - 12 - Hair Removal Treatment Guidelines Set the Energy Level according to test results. Average Treatment Course: 6-10 sessions Average Treatment Frequency: Every 4-8 weeks Session: One complete pass over the treatment area o Set the initial energy level according to test results. o If needed, apply ice (non-humid), such as an ice pack, to the site of the next pulse before applying the pulse to increase patient comfort. o No more than 5% overlapping between adjacent pulses. o The area adaptors can be used when treating small areas. o Perform the next treatment when 30% or more regrowth has occurred. o As treatment progresses, hair will become lighter and thinner. Raise the energy level accordingly. Early Termination: Hair Removal treatment results should be evaluated after 4-7 sessions. If there is not at least 30% reduction, early termination should be considered. IMPORTANT ● When available, the HR V-VI Handpiece should be used for Skin Types V-VI. ● Do not attempt to remove vellus hair. ● Removal of facial hairs requires different considerations and a different protocol. Refer to the user manual. - 13 - Acne Clearance Treatment Guidelines Set the Energy Level according to test results. Average Treatment Course: Minimum of 8 sessions Average Treatment Course: 2 treatments a week over four weeks Session: 2 passes over the treatment area, 5 minutes apart. o Treating the lesions only, administer pulses on the treatment area from right to left allowing no more than 5% overlap between pulses. o After emitting the pulse, remove the handpiece and hold it in the air to cool until the next pulse. o After covering the entire area, wait 5 minutes to allow the skin to cool and repeat the procedure. o For optimal results, the patients should complete a full treatment course of at least eight (8) sessions. o Adaptors: You may wish to use the small area adaptor on single lesions. o Perform maintenance treatments as needed. o The patient should be advised not to use retinoids or medicated topicals during the treatment course. NOTE: During treatment, a slight aggravation of symptoms due to an inflammatory response may occur after 3-4 treatments. This is a natural part of the healing process and will resolve itself within days. - 14 - AFTER-CARE INSTRUCTIONS 1. Apply a cooling or soothing cream after treatment. 2. Skin may have a delayed reaction. If at any time after treatment there are signs of burns or blisters, apply a burn treatment. 3. Avoid bathing in hot water, facial peeling creams and preparations that may irritate the skin for 24 hours after treatment. 4. Avoid sun exposure during treatment and apply sunscreen. 5. Avoid sun exposure for at least 21 days following acne and hair removal treatments and 1 month following Skin Rejuvenation treatments. CLEANING THE LAMP 6. During treatment, especially for hair removal, debris accumulates on the lamp. This may affect performance and the life of the lamp. 7. At the end of each treatment, after turning off the instrument, carefully clean the lamp, either with the special cleaning tool and piece or with an alcohol wipe. 8. Make sure the lamp and reflector are completely dry before the next treatment. - 15 - APPENDICES APPENDIX I – TREATMENT EVALUATION FORM.................................................................... 17 APPENDIX II – TEST ENERGY LEVELS..................................................................................... 19 APPENDIX III – AFTERCARE INSTRUCTIONS.......................................................................... 22 APPENDIX IV – APPOINTMENT GUIDE AND FAQ.................................................................... 26 - 16 - APPENDIX I TREATMENT EVALUATION FORM - 17 - TREATMENT EVALUATION FORM Patient Name: Operator Name: ___________ Type of Treatment: Test Treatment Date Energy Level 1 Energy Level 2 Energy Level 3 Final Treatment Energy Level Date Area Treated Energy Level # of Pulses Notes/Effects 24 hour Observation Treatment Number - 18 - APPENDIX II TEST ENERGY LEVELS - 19 - Mistral Test Energy Levels: VPL, SR I II III IV V VI 1st Pulse 55 50 40 20 10 0 2ndPulse 65 60 50 25 18 10 3rd Pulse 75 70 60 30 25 18 I II III IV V VI 1st Pulse 35 30 25 20 10 0 2ndPulse 40 35 30 25 15 2 3rd Pulse 45 40 35 30 20 5 Test Energy Levels: HR Test Energy Levels: HR V-VI I II III IV V VI 1st Pulse 50 45 40 20 10 0 2ndPulse 55 50 45 25 18 10 3rd Pulse 58 55 50 30 25 15 I II III IV V VI 1st Pulse 35 30 25 20 10 0 2ndPulse 40 35 30 25 15 2 3rd Pulse 45 40 35 30 20 5 Test Energy Levels: AC - 20 - Kona Test Energy Levels: VPL, SR I II III IV V VI 1st Pulse 50 45 40 20 10 0 2nd Pulse 55 50 45 25 18 10 3rd Pulse 58 55 50 30 25 15 I II III IV V VI 1st Pulse 35 30 25 20 10 0 2nd Pulse 40 35 30 25 15 2 3rd Pulse 45 40 35 30 20 5 I II III IV V VI 1st Pulse 45 40 35 30 10 0 2nd Pulse 50 45 40 35 15 2 3rd Pulse 55 50 45 40 20 5 Test Energy Levels: HR Spatouch™ Elite Test Energy Levels – HR - 21 - APPENDIX III AFTERCARE INSTRUCTIONS (for the patient) - 22 - SKIN REJUVENATION AFTER-CARE INSTRUCTIONS What to Expect Since the treated skin has been heated, the area may feel slightly sensitive for 1-24 hours, depending on your skin sensitivity level. The more sun damage treated, the more burning sensation you will feel. Occasionally, crust may form in some spots. Do not pick at the crusting, it will heal within one to two weeks. You may also experience dry skin between treatments. Keep your skin moisturized with a cream or lotion. For optimal results, multiple treatments may be necessary. Avoid sun exposure during your treatment regimen and one month after treatment completion. Results will be more noticeable after the second treatment. Care of the Treated Area To relieve any uncomfortable burning after treatment, apply an ice pack or cool compress. A post treatment preparation (e.g., Biafine or Aloe) can be used to help soothe the area but should not be used on skin with open wounds. Any crusted areas should be treated twice daily with the application of a topical antibiotic ointment such as Neosporin, Bacitracin, or a triple antibiotic ointment. If the skin has blistered or has a superficial burn, please call the office and have a practitioner examine the area. Blistering or superficial burning of the treated area may occur in less than 1% of the treatment population. A topical used for burns such as Biafene or Silverol should be applied. Precautions Avoid sun exposure during your treatment regimen and for three weeks after treatment completion. Wear clothing or sunblock (SPF 30) to protect the treated area from direct sun exposure. Be sure to reapply sunblock throughout the day. It is important to protect the skin from sun exposure. Do not scratch or pick the treated areas. Scratching or picking may leave a scar. Avoid bathing in hot water, facial peeling creams or any preparations that may irritate the skin for 24 hours after treatment. - 23 - HAIR REMOVAL AFTER-CARE INSTRUCTIONS What to Expect Since the treated follicles have been heated, the area may feel slightly sensitive for 1-24 hours, depending on your skin sensitivity level. Occasionally, crust may form in some spots. Do not pick at the crusting, it will heal within one to two weeks. For optimal results, multiple treatments may be necessary. The treatment schedule may vary between 2-8+ weeks between visits, depending on body area and the method used to remove hair prior to light treatments. Results will be more noticeable after the second treatment. You will notice hair surfacing for 2-4 weeks after treatment. Although this may appear to be growing, most of it is not. This process is called “shedding,” and will take time to complete. You can exfoliate the shedding hairs using a damp cloth or a soft loofah. Exfoliating will gently lift the dead hairs out of the follicle, giving you a cleaner look between visits. Surgical or duct tape can also be used to gently lift out hair. NOTE: You can begin exfoliating one week after treatment. Care of the Treated Area To relieve any swelling or warm sensations after treatment, apply an ice pack or cool compress. A post treatment preparation (e.g., Biafine or Aloe) can be used to help soothe the area but should not be used on skin with open wounds. Any crusted areas should be treated twice daily with the application of a topical antibiotic ointment such as Vitamin E ointment, Neosporin, Bacitracin, or a triple antibiotic ointment mixed with hydrocortisone cream. If the skin has blistered or has a superficial burn, please call the office and have a practitioner examine the area. Blistering or superficial burning of the treated area may occur in less than 1% of the treatment population. A topical used for burns such as Biafine or Silverol should be applied. Precautions Avoid sun exposure during your treatment regimen and for three weeks after treatment completion. Wear clothing or sunblock (SPF 30) to protect the treated area from direct sun exposure. Be sure to reapply sunblock throughout the day. It is important to protect the skin from sun exposure. Do not scratch or pick the treated areas. Scratching or picking may leave a scar. Avoid bathing in hot water, facial peeling creams or any preparations that may irritate the skin for 24 hours after treatment. - 24 - ACNE CLEARANCE AFTER-CARE INSTRUCTIONS What to Expect Since the treated skin has been heated, the area may feel slightly sensitive for 1-24 hours, depending on your skin sensitivity level. Occasionally, crust may form in some spots. Do not pick at the crusting, it will heal within one to two weeks During the treatment a slight aggravation of symptoms due to inflammatory response may occur after 3-4 treatments. This is a natural part of the healing process and will resolve itself within days For optimal results, multiple treatments are necessary. Care of the Treated Area To alleviate any uncomfortable burning after treatment, apply an ice pack or cool compress. A post treatment preparation (e.g., Biafine or Aloe) can be used to help soothe the area but should not be used on skin with open wounds. If the skin has blistered or has a superficial burn, please call the office and have a practitioner examine the area. Blistering or superficial burning of the treated area may occur in less than 1% of the treatment population. A topical used for burns such as Biafine or Silverol should be applied. Precautions Avoid sun exposure during treatment regimen and three weeks after the last treatment. Wear clothing or sunblock (SPF 30) to protect the treated area from direct sun exposure. Be sure to reapply sunblock throughout the day. It is important to protect the skin from sun exposure. Do not scratch or pick at the treated area. Avoid bathing in hot water, facial peeling creams or any preparations that may irritate the skin for 24 hours after treatment. Avoid the use of retinoids or medicated topicals during the treatment course. - 25 - APPENDIX IV APPOINTMENT GUIDE AND FAQ (for the patient) - 26 - Photo Rejuvenation APPOINTMENT GUIDE AND FAQ Allow 20 minutes for full face and neck. Schedule 3-6 visits, 2-3 weeks apart. Photo Rejuvenation FAQ 1. How is this better than a regular facial? A traditional facial cannot reach the collagen layer that the light targets. The light and heat from a photofacial is able to create a mild wound healing effect in the collagen layer, forcing the collagen to react and renew. 2. What can I expect for results? LHE® treatments treat fine lines, large pores, pigmented lesions, vascular lesions and create a more even skin tone, giving your skin an overall healthier look. Even if you are young and have no issues with your skin, this type of treatment will help delay the signs of aging. 3. How many treatments will I need? Depending on the amount of skin damage you have, we recommend 3-6 treatment sessions. 4. Are there any side effects? You may experience a sensation similar to that of a mild sunburn. Depending on the amount of sun damage, your skin may react with just mild redness that will subside in an hour or less, or it may take a day or so with minor crusting. Pigmented lesions will get darker after treatment and then form a thin crust before falling off. Telangectasia will look more prominent before it begins to fade. Any adverse effects of a photofacial can be covered with makeup, and will resolve in one to two weeks. 5. Is it painful? There may be discomfort associated with treatment, but most patients find it tolerable. 6. Is the light dangerous? No, the light is similar to a light bulb, only more intense. We do not use harmful rays such as x-rays or UV rays. - 27 - Hair Removal APPOINTMENT GUIDE AND FAQ Hair Removal Sessions* Chin 10 minutes Neck 10 minutes Sides of Face 10 minutes Upper Lip 10 minutes Axilla 15 minutes Bikini 15 - 20minutes Men’s Back 15 - 30 minutes Forearms 20 minutes Upper Thigh 30 minutes (front, back and bikini) Face 20 minutes (chin, neck, upper lip, side of face) * All times are averaged and include treatment preparation, documentation, and cleanup. Hair Removal FAQ 1. Is it permanent? This is long-lasting hair removal. Electrolysis is the only method that can make a permanency claim. However, you will experience a certain percentage of loss, usually between 15-35% of the hair treated each visit. 2. How many treatments will it take? On average, 5- 10 treatments are necessary in areas where the hair has not been removed from below the skin for 2-3 months using wax, tweezing, or electrolysis. People who tweeze should start with frequent treatments for the first 3 months (every 2-3 weeks) in order to treat all of the undergrowth once. 3. Do I have to let the hair grow before it’s treated? The area should be shaved 4-6 days prior to treatment so that it is 1-2 mm long on the treatment date. The clinician will examine the areas of hair growth and may take pictures. 4. Does it hurt? There may be some discomfort associated with treatment, but there are ways of reducing discomfort. 5. Can I go out in the sun before or after a treatment? The skin may be more likely to burn in the sun. It is important to wear sunscreen throughout treatment regimen. We recommended avoiding sun exposure for at least 21 days before and after treatment. - 28 - Acne Clearance APPOINTMENT GUIDE AND FAQ Allow 10-30 minutes for treatment Schedule 8 visits; twice a week over 4 consecutive weeks Acne Clearance FAQ 1. Is it painful? There may be some discomfort during the treatment session. The affected area will feel better immediately following treatment. Lesions will feel less pressure and you will notice a decrease in redness by the next day. 2. If I'm taking Accutane, can you still treat me? Treatment cannot be started until you have been off Accutane for 6 months. 3. How many treatments will it take? On average, 8 treatments are necessary. The treatment area will be re-evaluated one month after the last treatment to determine if more treatments are needed. 4. Can I continue using RetinA with my treatments? No, retinoids and medicated topicals should not be used during the treatment. 5. If I’m taking an antibiotic, will I have to stop? No, the antibiotic may aid in clearing the acne. - 29 -