1
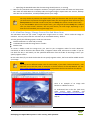
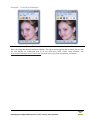
Information:
What is Red Eye?
Red Eyes are usually the result of taking digital pictures of people/ animals in low light
conditions, using the flash. Since the eye contains a number of red-colored Blood Capillaries
(tiny blood vessels), the image gets colored red due to light from the flash reflecting off the
retina. The more the pupils of the eye are dilated, the higher the chances of red eyes. So red
eyes are the resultant of two factors, one feeding on the other: the eye dilates more in low
light conditions and to shoot in low light conditions, you need to use the flash. Together, they
cause the red eyes!
The photos of people with light eyes, blonde hair and lighter skin tones are most likely to look
‘blood-shot’.
A different effect is common when you take pictures of animals. Pets and domestic animals
such as dogs, cats and cattle have a reflective layer in the back of their eyes and behind their
retina, called Tapetum. This enhances their night vision. However, due to its reflective nature,
pictures of animals frequently have white, blue or green effect. Even in conditions where the
red eye effect would not appear in photographs of humans, pictures of animals may exhibit
this effect, which is also usually called the Red Eye effect, even though you get all kinds of eye
colors in animal pictures! Animals such as Siamese Cats have virtually no tapetal layer and
hence their pictures show a similar red eye effect as seen in humans.
Tapetal color (which is perhaps technically a more correct way of naming this effect in
animals) varies with coat colour. It also varies with the angle at which the photograph is
taken – you may even notice that each eye is colored differently, due to the angle of your
shot!
How to avoid Red Eye?
Here is what you can do, to avoid taking pictures with the red eye effect:
Wherever possible, avoid taking flash photos in a dark environment
Use your Camera’s red-eye reduction pre-flash, if it has this feature. It works by flashing
the flash briefly into the eyes of the subject, thus causing the subject’s pupils to contract.
If not (or even if your camera does have a pre-flash!), take multiple pictures!
Make sure that the subject is looking straight into the Camera
Alternatively, make your subjects look elsewhere, so that their pupils are not the focus of
your shots!
Soften the light – maybe even use a flash diffuser, which is available in photographic
equipment shops. Use flash diffusers only when you are taking close-ups, since they
reduce the distance covered by the flash!
Position yourself near a light source – so that when your subjects look at you, they are
looking into a bright light. This will also help you capture more details in your
photograph, apart from reducing chances of red eye!
The brighter the room, the more your subject’s eyes will contract – so take photographs
in bright environments!
Use an anti-red-eye pen – these are available in many photography equipment shops.
You need to draw over the red eyes, to reduce red eye effect.
Use image editing software, like IrfanView!
47
Reshaping your Digital Masterpieces in their entirety, with IrfanView