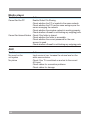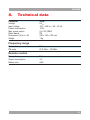
1
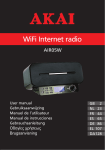
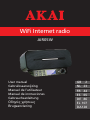
WiFi Internet radio
AIR05W
User manual
Gebruiksaanwijzing
Manuel de l’utilisateur
Manual de instrucciones
Gebrauchsanleitung
Οδηγίες χρήσεως
Brugsanvisning
GB 2
NL 23
FR 44
ES 65
DE 86
EL 107
DA128
Table of contents
1.
2.
3.
4.
5.
6.
7.
8.
9.
Safety............................................................................ 3
1.1
1.2
1.3
Intended use.....................................................................3
Labels in this manual........................................................3
General safety instructions...............................................3
2.1
2.2
Unpacking.........................................................................4
Package contents.............................................................4
3.1
3.2
3.3
3.4
3.5
3.6
Remote control.................................................................5
Connecting to the mains...................................................6
Connecting to the Internet................................................6
Connecting to a PC (Windows XP)...................................7
Connecting to a Mac.........................................................9
Registering the appliance.................................................9
4.1
Wi-Fi Internet Radio........................................................10
5.1
5.2
5.3
5.4
5.5
5.6
5.7
5.8
Quick start.......................................................................12
Internet radio functions...................................................13
Radio functions...............................................................14
Media player functions....................................................14
Clock functions...............................................................16
Deactivating the alarm....................................................17
Setting the SLEEP function.............................................17
Configuration menu operation........................................17
Preparations for use.................................................... 4
Installation.................................................................... 4
Functions.................................................................... 10
Operation.................................................................... 12
Cleaning and maintenance....................................... 18
Troubleshooting......................................................... 19
Technical data............................................................ 21
Disposal of used electrical
and electronic equipment......................................... 22
Copyright notice
Design and specifications are subject to change without notice.
2
AIR05W
1.
Safety
1.1
Intended use
The Wi-Fi Internet Radio plays music from Internet radio stations, shared
folders on a PC or Mac and FM radio. The clock function includes an alarm
and sleep program. Read the manual carefully before first use.
1.2
WARNING
A warning means that injury or death is possible if the instructions
are not obeyed.
CAUTION
A caution means that damage to the equipment is possible.
!
!
i
1.3
A note gives additional information, e.g. for a procedure.
General safety instructions
WARNING
Do not put force on the appliance. The appliance can fall and can
cause serious injury.
CAUTION
Do not spill any liquid on the appliance.
WARNING
Do not insert any objects in the ventilation holes.
CAUTION
Do not block the ventilation holes.
This appliance is double insulated; therefore no earth wire is required.
Always check that the mains voltage corresponds to the voltage
on the rating plate.
!
!
!
!
i
Labels in this manual
3
2.
Preparations for use
2.1
Unpacking
● Unpack the appliance carefully.
● Check the package contents as described below. If any item is missing,
please contact your reseller.
● Remove the labels from the front panel carefully if present.
i
2.2
We recommend that you retain the original carton and packing
materials in case it ever becomes necessary to return your product
for service. This is the only way to safely protect the product against
damage in transit. If you do dispose of the carton and the packing
materials, please remember to recycle with due care to the
environment.
Package contents
The following items are included in the received package:
1 Wi-Fi Internet Radio
1 Remote control
2 Batteries (AAA)
1 AC/DC adaptor + cable
1 Operator manual
i
3.
If any item is missing, please contact your reseller.
Installation
● Put the appliance on a horizontal flat surface.
● Extend the FM antenna.
● Connect the appliance to the mains.
Read the paragraph "Connecting to the mains".
● Install the batteries in the remote control.
Read the paragraph "Remote control".
4
AIR05W
!
CAUTION
● Do not put the appliance near a heat source.
● Do not expose the appliance to direct sunlight.
i
3.1
This appliance is equipped with rubber feet to prevent it from moving.
The feet are made from non-migrating material specially formulated
to avoid leaving any marks or stains on furniture. However, certain
types of furniture polishes, wood preservatives or cleaning sprays
cause the rubber to soften and leave marks or a residue on the
furniture, and potentially risk the surface to become damaged.
To prevent damage to wooden surfaces, we recommend that you
apply self-adhesive pads to the bottom of the rubber feet before
installation.
Remote control
Install batteries
● Remove the battery cover.
● Insert the batteries matching the (+)
and (-) polarity markings.
● Re-install the battery cover.
!
CAUTION
Incorrect installation can cause
battery leakage and corrosion
which will damage the appliance.
Corrosion, oxidation, battery
leakage and any other gradually
acidic defect of this nature will
invalidate the guarantee.
5
3.2
Connecting to the mains
● Connect the female connector on the mains
cable to the DC IN 9 V connection.
● Connect the mains plug to a wall socket.
43
3.3
44
Connecting to the Internet
A wireless access point (e.g. wireless router) is used to connect to the Internet.
The wireless network is identified with an SSID, the name of the network.
If the appliance is used for the first time, set the network name to access the
Internet.
Connecting to the Internet automatically
● Switch on the appliance.
● Press the MENU button (18). Rotate or press the VOLUME dial (11)
or press the UP button (29) or the DN button (28).
● Navigate to CONFIGURE and press the SELECT button (27).
● Navigate to NETWORK CONFIG and press the SELECT button (27).
● Navigate to SCAN FOR NETWORKS and press the SELECT button (27).
● Navigate to the required network name and press the SELECT button (27).
● If necessary, enter the password. Read the paragraph "General functions".
Connecting to the Internet manually
● Switch on the appliance.
● Press the MENU button (18). Rotate or press the VOLUME dial (11)
or press the UP button (29) or the DN button (28).
● Navigate to CONFIGURE and press the SELECT button (27).
6
AIR05W
● Navigate to NETWORK CONFIG and press the SELECT button (27).
● Navigate to ENTER NETWORK NAME and press the SELECT button (27).
● Enter the network name. Read the paragraph "General functions".
● If necessary, enter the password. Read the paragraph "General functions".
3.4
Connecting to a PC (Windows XP)
The appliance can use media files stored on a PC. For Windows Vista, make
sure that the guest account is activated and give the guest account access
to the shared folder.
Connecting to a PC using a shared folder
with simple file sharing
● On the PC, open Windows Explorer.
● Click FOLDER OPTIONS... from the menu TOOLS.
● Click the tab VIEW.
● Enable the option USE SIMPLE FILE SHARING (RECOMMENDED).
● Click OK.
● Open the folder SHARED DOCUMENTS.
● Create a new folder.
● Copy all audio files to the folder.
● Right-click the new folder and click SHARING AND SECURITY.
● Click the tab SHARING.
● Enable the option SHARE THIS FOLDER ON THE NETWORK.
● Enable the option ALLOW NETWORK USERS TO CHANGE MY FILES.
● Click OK.
Connecting to a PC using a shared folder
using password-protected accounts
● On the PC, create an account with a password.
● On the PC, open Windows Explorer.
● Click FOLDER OPTIONS... from the menu TOOLS.
● Click the tab VIEW.
● Disable the option USE SIMPLE FILE SHARING (RECOMMENDED).
● Click OK.
● Open the folder SHARED DOCUMENTS.
● Create a new folder.
● Copy all audio files to the folder.
● Right-click the new folder and click SHARING AND SECURITY.
7
● Click the tab SHARING.
● Enable the option SHARE THIS FOLDER.
● Click PERMISSIONS.
● Select EVERYONE and click REMOVE.
● Click ADD.
● Click ADVANCED... and FIND NOW.
● Select the user account.
● Set the permissions and click OK.
Connecting to a PC using a shared folder
using accounts with no password
● On the PC, open CONTROL PANEL.
● Click ADMINISTRATIVE TOOLS.
● Click LOCAL SECURITY POLICY, LOCAL POLICIES and SECURITY
OPTIONS.
● Click ACCOUNT: LIMIT LOCAL ACCOUNT USE OF BLANK PASSWORDS
TO CONSOLE LOGON ONLY.
● Select DISABLED and click OK.
● Set up a shared folder as described in the previous section. Leave the
password empty.
Connecting to a PC using media sharing (UpnP)
Media sharing uses Windows Media Player 11 or higher as a media server.
The PC needs to be configured to allow the appliance to access the audio files.
● Switch on the appliance.
● On the PC, open Windows Media Player.
● Add the audio files to the library.
● Right-click LIBRARY and click MEDIA SHARING....
● Select UNKNOWN DEVICE and click ALLOW.
● Click OK.
8
AIR05W
3.5
Connecting to a Mac
The appliance can use media files stored on a Mac. To access files stored
on a Mac, Windows File Sharing must be activated.
Setting up Windows File Sharing
● On the Mac, open SYSTEM PREFERENCES.
● Click INTERNET & NETWORK.
● Click SHARING.
● Enable the option PERSONAL FILE SHARING and WINDOWS SHARING
in the SERVICES section.
● Click START for both services.
● Disable FIREWALL in the FIREWALL section.
● Disable INTERNET SHARING in the INTERNET section.
● Open FINDER and click APPLICATIONS and UTILITIES.
● Press and hold CTRL and click DIRECTORY ACCESS.
● Click GET INFO and make sure that READ/WRITE is enabled.
● Click DIRECTORY ACCESS and enable APPLETALK, LDAPv3, SLP
and SMB/CIFS.
● Click SMB/CIFS to configure the workgroup.
● Copy the audio files to DOCUMENTS in FINDER.
● Make sure that the Mac is connected to the wireless network.
3.6
Registering the appliance
You must register online to add Internet radio stations to the radio station list
available on the appliance.
● Get the registration key and the serial number from the configuration menu.
Read the paragraph "Configuration menu operation" further on in this
manual.
● Go to www.reciva.com and click REGISTER from the homepage.
● Follow the instructions to register. A confirmation e-mail will be sent.
● Log on.
● Click MY RADIOS.
● Enter the registration key and the serial number.
● Click ADD RADIO.
.
9
4.
Functions
4.1
Wi-Fi Internet Radio
5
4
3
2
1
6 7 8
1
2
3
4
5
6
10
ON/OFF button
STOP / P1 button
ALARM button
SELECT button
BACK button
PREV button
9
10 11
12
7
8
9
10
11
12
NEXT button
PLAY/PAUSE / P2 button
Display
Remote control sensor
VOLUME dial
Headphone jack
AIR05W
Display
34
35
36
37
38
39
40
41
42
SHIFT mode indicator
INTERNET indicator
MEDIA PLAYER indicator
INTERNET RADIO indicator
REPEAT indicator
SHUFFLE indicator
Wi-Fi strength indicator
ALARM indicator
SLEEP indicator
34 35 36 37
38 39
40 41 42
Remote control
13
14
15
16
17
18
19
20
21
22
23
24
25
26
27
28
29
30
31
32
33
SNOOZE button
SOURCE button
BROWSE/QUEUE button
STOP button
NEXT button
MENU button
PREV button
PLAY/PAUSE button
EQ button
REPEAT button
PLAY MODE button
BACK button
Digit buttons (0-10+)
SHIFT button
SELECT button
DN button
UP button
SLEEP button
ALARM button
MUTE button
ON/OFF button
13
33
32
14
15
31
16
17
18
19
20
21
22
30
29
23
24
28
27
25
26
11
5.
Operation
All functions of the appliance are accessible using the remote control.
All instructions refer to operation with the remote control, unless indicated
otherwise.
i
● The appliance is designed to be operated using the remote control.
For regular use you may find it convenient to switch the appliance to
standby mode after use.
5.1
Quick start
General functions
● To switch on the appliance, press the ON/OFF button (33). To switch back
to the standby mode, press the ON/OFF button (33) again.
● To enter characters, press the DN button (28) or the UP button (29)
or rotate the VOLUME dial (11). Press the SELECT button (27) to confirm
or press the BACK button (24) to erase.
● To select the source mode, press the SOURCE button (14).
● To adjust the volume, press the UP button (29) or the DN button (28).
● To select the sound mode (FLAT, BASS, CLASSICAL, JAZZ, POP, ROCK),
press the EQ button (21).
● To mute or restore sound, press the MUTE button (32).
Internet radio functions
● Switch on the appliance.
● Select the Internet radio mode.
● Select LOCATION or GENRE to choose an Internet radio station.
● Select MY STUFF to choose Internet radio stations that were added
manually through www.reciva.com.
● For extended instructions, read the paragraph "Internet radio functions"
further on in this manual.
12
AIR05W
FM radio functions
● Switch on the appliance.
● Select the tuner mode.
● For extended instructions, read the paragraph "Radio functions" further on
in this manual.
Media player functions
● Switch on the appliance.
● Select the media player mode.
● For extended instructions, read the paragraph "Media player functions"
further on in this manual.
Clock functions
● Read the paragraph "Clock functions" further on in this manual.
5.2
Internet radio functions
Audio playback
During playback, the following functions are available:
● To select a track, press the PREV button (19) or the NEXT button (17)
until the desired track is set.
● To forward or rewind the track, press and hold the PREV button (19)
or the NEXT button (17).
● To pause playback, press the PLAY/PAUSE button (20) once; to resume
playback, press the button again.
● Press the digit buttons to select a preset station (1-10).
● Press the SHIFT button (26) and the digit buttons to select a preset station
(11-20).
Adding Internet radio stations
● Logon to www.reciva.com.
● Browse for a station from the tab LISTEN.
● Click ADD STATION NAME TO MY STATIONS.
● Log off.
13
5.3
Radio functions
During playback, the following functions are available:
● Press the digit buttons to select a preset station (1-10).
● Press the SHIFT button (26) and the digit buttons to select a preset station
(11-20).
● To select preset station 1 or 2, press the P1 button (2) or the P2 button (8)
on the appliance.
● To search for a specific frequency, press the PREV button (19) or the
NEXT button (17) repeatedly until the desired frequency is set.
● To search automatically, press and hold the PREV button (19) or the
NEXT button (17). The appliance searches for the next available station.
Storing preset radio stations
● Search for a specific frequency or select a station.
● To store the frequency or the station as preset station 1, press and hold
digit button 1 until the display shows the confirmation message.
● To store preset station 11, press the SHIFT button (26) and press and hold
digit button 1 until the display shows the confirmation message.
5.4
Media player functions
During playback, the following functions are available:
● To select the previous or next track, press the PREV button (19) or the
NEXT button (17).
● To pause playback, press the PLAY/PAUSE button (20) once; to resume
playback, press the button again.
● To stop playback temporarily, press the STOP button (16) once. Press the
button again to stop playback permanently, or press the PLAY/PAUSE
button (20) to resume playback.
Playing audio from shared folders
● On the appliance, press the SOURCE button (14).
● Select the media player mode.
● Select WINDOWS SHARES.
● Select SCAN FOR PCS to show all available PCs on the network.
● Select the PC.
● Select the folder.
14
AIR05W
● If necessary, enter the account and the password.
● If necessary, browse in the shared folder by selecting BY ALBUM or
BY ARTIST.
Playing audio from shared media
● On the appliance, press the SOURCE button (14).
● Select the media player mode.
● Select WINDOWS SHARES.
● Select UPNP SERVERS.
● Select the folder.
● Press the SELECT button (27) to confirm and start playback.
Repeating and shuffling audio
● On the appliance, press the SOURCE button (14).
● Select the media player mode.
● Select PLAYBACK MODE.
● Select REPEAT or SHUFFLE.
● Press the SELECT button (27).
● Select YES to activate SHUFFLE.
● Press the SELECT button (27) to confirm.
Adding a track to a queue
● Navigate to a desired track and press the SELECT button (27).
● Navigate a desired album and press the SELECT button (27).
● Navigate to ADD TO QUEUE and press the SELECT button (27).
Browsing tracks in a queue
● Press the BROWSE/QUEUE button (15) and press the UP button (29)
or the DN button (28) to browse the list.
● Press the SELECT button (27) to start playback.
Removing tracks from a queue
● Press the BROWSE/QUEUE button (15) and press the UP button (29)
or the DN button (28) to browse the list.
● Press the STOP button (16) to select an unwanted track in the queue.
● Select YES to remove the track.
● To remove all tracks from the queue, select CLEAR QUEUE in the media
player mode.
15
5.5
Clock functions
With the clock function, the following parameters can be set:
-current time and date
-alarm time (incl. alarm mode, snooze time)
Setting the current time and date
● Press the MENU button (18).
● Select CONFIGURE.
● Select SET TIME/DATE.
● Press the UP button (29) or the DN button (28) to set the desired hour.
● Press the SELECT button (27) to confirm.
● Press the UP button (29) or the DN button (28) to set the desired minutes.
● Press the SELECT button (27) to confirm.
● Press the UP button (29) or the DN button (28) to set the desired day.
● Press the SELECT button (27) to confirm.
● Press the UP button (29) or the DN button (28) to set the desired month.
● Press the SELECT button (27) to confirm.
● Press the UP button (29) or the DN button (28) to set the desired year.
● Press the SELECT button (27) to confirm.
Setting the alarm time
● Press the MENU button (18).
● Select ALARM CLOCK.
● Select SET ALARM.
● Select the alarm.
● Press the UP button (29) or the DN button (28) to set the desired hour.
● Press the SELECT button (27) to confirm.
● Press the UP button (29) or the DN button (28) to set the desired minutes.
● Press the SELECT button (27) to confirm.
● Press the UP button (29) or the DN button (28) to set the desired frequency:
ONCE, EVERY DAY, WEEKLY.
● Press the SELECT button (27) to confirm.
● Press the UP button (29) or the DN button (28) to set the desired alarm sound:
BUZZER, FM TUNER or preset station.
● Press the SELECT button (27) to confirm.
16
AIR05W
i
● During a power failure, or when unplugging the appliance, the time settings
are lost.
5.6
Deactivating the alarm
● Press the MENU button (18).
● Select ALARM CLOCK.
● Select SET ALARM.
● Select the alarm.
● To deactivate the alarm, press the UP button (29) or the DN button (28)
to select NO.
● To deactivate all alarms, select DISABLE ALL after selecting SET ALARM.
5.7
Setting the SLEEP function
● Press the SLEEP button (30).
● Select SLEEP TIMER.
● Press the UP button (29) or the DN button (28) to select the desired setting
(15 min - 3 hr).
● Press the SELECT button (27) to confirm.
Snooze alarm
The default snooze time is: 5 minutes.
● To snooze the alarm, press the SNOOZE button (13).
● To stop the alarm, press the ON/OFF button (33) or the SELECT button (27).
5.8
Configuration menu operation
● Press the MENU button (18).
● Press the UP button (29) or the DN button (28) to navigate to CONFIGURE.
● Press the SELECT button (27) to confirm.
● Press the UP button (29) or the DN button (28) to select a setting. If the
selection invokes a subsequent submenu, repeat the previous steps to
select a setting.
● Press the SELECT button (27) to store the setting.
● Press the MENU button (18) to exit.
17
General setup page
● To navigate through the menu, press the UP button (29) or the DN button
(28) or rotate the VOLUME dial (11).
The following menu items can be set:
-NETWORK CONFIG: to configure the network.
-VERSION: to show the version information of the appliance.
-UPGRADE FIRMWARE: to check automatically if new firmware is
available.
-LANGUAGE: to change the language.
-FACTORY RESET: to restore the default settings of the appliance.
-REGISTER: to obtain the registration key for the online registration
at the Reciva Customer Portal. Read the paragraph "Registering the
appliance" in this manual.
-CLOCK SETUP: to set the clock functions. Read the paragraph
"Clock functions" in this manual.
-WIFI STRENGTH: to check the signal strength for the current
connection.
6.
!
Cleaning and maintenance
WARNING
Before performing any cleaning or maintenance, switch off and
unplug the appliance.
● Clean the outside of the appliance with a soft cloth. When the appliance is
very dirty, dampen the cloth slightly with water and a neutral solution.
18
AIR05W
7.
Troubleshooting
Trouble
No sound or
incomplete audio
No power
The operation keys
do not work
Internet radio
Trouble
Cannot connect to Internet
Cannot play a station
Intermittent audio
Radio
Trouble
Noise or sound distorted
on FM broadcasts
Action
Check if the correct source is selected.
Check volume or mute setting.
Check if the random equipment are switched on and set correctly.
Check cables for connection problems.
Check if the power cord has been properly connected to the power outlet.
Internal error.
Reset the appliance.
Action
Check whether the access point is switched on.
Check whether a firewall is not blocking any outgoing ports.
Check whether the correct password is used.
Check whether the appliance is within the wireless range of the access point.
Check the network settings of the appliance.
Check whether the station is still broadcasting.
Check whether the station has reached its maximum number of listeners.
Check whether the radio station link is still operational.
Check whether the Internet connection is fast enough.
Check the bandwith of the wireless network.
Move the appliance closer to the access point.
Action
Station is not tuned properly. Adjust tuning control.
Wire aerial is not positioned correctly. Extend the aerial.
19
Media player
Trouble
Cannot find the PC
Cannot find shared folders
AUX
Trouble
No sound on the
unit system
No picture
20
Action
Enable Global File Sharing.
Check whether the PC is located in the same network.
Check whether the PC has the same workgroup as the server managing the network.
Check whether the wireless network is working properly.
Check whether a firewall is not blocking any outgoing ports.
Check if the folder is shared.
Check whether the folder is accessible.
Check whether the correct password for the user account is used.
Check whether a firewall is not blocking any outgoing ports.
Action
Input source is low. Increase the volume level on the
audio source device.
Check if the TV is switched on and set to the correct
A/V input.
Check cables for connection problems.
Check cables for damage.
AIR05W
8.
Technical data
Parameter
Voltage
Input voltage
Power consumption
Max. power output
Radio bands
Dimensions (W x H x D)
Weight
Value
9 VDC
100 ~ 240 VAC / 50 ~ 60 Hz
12 W
2 x 2 W (RMS)
FM
242 x 140 x 120 mm
1 kg
Frequency range
Parameter
FM radio
Remote control
Parameter
Power consumption
Battery size
Value
87.5 MHz - 108 MHz
Value
3V
AAA
21
9.
Disposal of used electrical and electronic equipment
Z
The meaning of the symbol on the material, its accessory or packaging
indicates that this product shall not be treated as household waste. Please,
dispose of this equipment at your applicable collection point for the recycling
of electrical and electronic equipments waste. In the European Union and
Other European countries which there are separate collection systems for
used electrical and electronic product. By ensuring the correct disposal of
this product, you will help prevent potentially hazardous to the environment
and to human health, which could otherwise be caused by unsuitable waste
handling of this product. The recycling of materials will help conserve natural
resources. Please do not therefore dispose of your old electrical and electronic
equipment with your household waste.
For more detailed information about recycling of this product, please contact
your local city office, your household waste disposal service or the shop
where you purchased the product.
For more information and warranty conditions, please visit: www.akai.eu
22