1
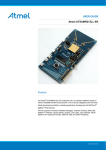
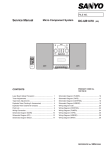
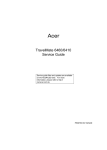
DVD Micro Theatre
MCD288/All Versions
TABLE OF CONTENTS
Page
Technical Specifications .............................................. 1-2
Measurement setup ..................................................... 1-3
Service Aids, Safety Instruction, etc. .................1-4 to 1-5
Lead-free Information & Service Instruction ......1-6 to 1-7
Installation & Preparations & Controls ............1-8 to 1-15
Troubleshooting .............................................1-15 to 1-16
Disassembly Instructions & Service positions ................ 2
Service Test Programs ................................................... 3
Set Block diagram .......................................................... 4
Set Wiring diagram ......................................................... 5
Display Board & AMP Key Board ................................... 6
Tuner Board .................................................................... 7
Power Board .................................................................. 8
Woofer Output Board...................................................... 9
Scart Board................................................................... 10
Set Mechanical Exploded View & Parts List ................. 11
Electrical Parts List ....................................................... 12
Revision List ................................................................. 13
©
Copyright 2007 Philips Consumer Electronics B.V. Eindhoven, The Netherlands
VIDEO CD
CLASS 1
LASER PRODUCT
All rights reserved. No part of this publication may be reproduced, stored in a retrieval system or
transmitted, in any form or by any means, electronic, mechanical, photocopying, or otherwise without
the prior permission of Philips.
Published by SL 0726 Service Audio
Version 1.4
Printed in The Netherlands
Subject to modification
GB
3141 785 30804
1-2
LOCATION OF PCBS
VERSION VARIATIONS:
Type /Versions:
MCD288
Features &
Board in used:
/12
/37
/55
/93
/98
Aux in / CDR in
Line Out
x
x
x
x
x
x
x
x
x
Video Out
Surround Out
Subwoofer Out
Power Booster Out
S-Video Out
Scart Out
x
Matrix Surround
RDS
x
News
x
Dolby Pro Logic (DPL)
Incredible Surround
Karaoke Features
Voltage Selector
ECO Power Standby (VFD Display Off)
x
x
x
x
x
x
ECO6 Tuner Board - Systems Non-Cenelec
ECO6 Tuner Board - Systems Cenelec
USB Direct
x
x
x
1-3
SPECIFICATION
GENERAL:
Mains voltage : 230V ± 10% /12 , 220V ± 10% /93
120V ± 10% / 230V ± 10% /55/96/98
120V ± 10% /37
Mains frequency
: 50/60Hz /55/96/98
: 50Hz /12/93
: 60Hz /37
Power consumption : < 1W at ECO Standby /12/37
< 4W Standby w/Clock on
Clock accuracy
< 35W Active
: < 2 seconds per day
Dimension w/o Boxes : 472(W) x 360(H) x 224(D)mm
TUNER:
FM
Tuning range
: 87.5-108MHz
Grid
IF frequency
: 50kHz/100kHz
: 10.7MHz ± 20kHz
Aerial input
Sensitivity at 26dB S/N
: Pigtail Antenna Wire
: < 22dBf
Selectivity at 300kHz bandwidth
: > 33dB
S/N Ratio stereo input 80dB
: > 55dB
IF rejection
: > 60dB
Image rejection
Distortion at RF=1mV, dev. 75kHz
: > 25dB
: < 3%
-3dB Limiting point
Adjacent Channel Selectivity
: < 23.5dBf
: > 33dB
Channel Separation -400/1K/5K
: 20/26/18dB
COMPACT DISC:
Measurement done at output conn. of the DVD module.
Frequency response within ± 1.0dB : 20Hz - 20kHz
Signal/Noise ratio (A-weighted)
: > 70dBA
Channel Unbalance
Channel Separation (1K)
(16K)
(20K)
by CD10)
S/N Luminance
:
Video Bandwidth
:
Chroma/Luminance Delay
:
Burst/Chroma Ratio
:
Amplitude Output
:
: MPEG AUDIO
MP3-CD Bit Rate
MP3-CD Sampling Frequencies
: 8-320 kbps
: 8k/11.025k/16k/22.05k
Recording Format
/32k/44.1k/48k Hz
: ISO 9660
UDF format not
supported
USB:
Measurement done at speaker terminals across 6Ω load
w/ 500mW output and DSC setting in Jazz Mode.
Frequency response within ± 3dB : 100Hz - 16kHz
Signal/Noise ratio (A-weighted)
: > 60dBA
Mains Operation (Nominal, 6Ω, 10% THD)
: 2 x 20W
Subwoofer Out (8Ω, 10% THD)
: 2 x 50W
: 100Hz-15kHz
: 50Hz-180Hz
: ON/OFF
: Classic, Jazz, Rock, Pop or Flat
: Normal, Concert, Drama, Action or SCI-FI
For DVD
Headphone output at 32KΩ
: 700mV ± 2dB
Input sensitivity
DVD
: -6dB track (Audio Disc1,Trk35)
> 48dB
6Mhz
< 80ns
1.0Vpp(+10/-10%)
< 80ns
MPEG 1 Layer 3 (MP3-CD)
AMPLIFIER:
Output power
S-Bass & Loudness
Digital Sound Control
< ±2dB (Vol 0 _-50dB)
40dB
35dB
30dB
THD Noise (20-20,000Hz) at 1kHz : 0.5%
De-emphasis
: 0 or 15/50 µS (Switched automatically
Channel crosstalk at 1kHz
Channel unbalance at 1kHz
Frequency response within ±3dB
Woofer within −6dB
:
:
:
:
: > 35dB
: ±3dB
1-7
INFORMATION ABOUT LEAD-FREE SOLDERING
Philips CE is producing lead-free sets from 1.1.2005 onwards.
IDENTIFICATION:
Regardless of special logo (not always indicated) one must treat all sets from 1 Jan 2005 onwards, according next rules:
Example S/N:
Bottom line of typeplate gives a 14-digit S/N. Digit 5&6 is the year, digit 7&8 is the week number,
so in this case 2005 wk12
So from 0501 onwards = from 1 Jan 2005 onwards
Important note: In fact also products of year 2004 must be treated in this way as long as
you avoid mixing solder-alloys (leaded/ lead-free). So best to always use SAC305 and the
higher temperatures belong to this.
Due to lead-free technology some rules have to be respected by the workshop during a repair:
•
Use only lead-free solder alloy Philips SAC305 with order code 0622 149 00106. If lead-free solder-paste is required, please contact
the manufacturer of your solder-equipment. In general use of solder-paste within workshops should be avoided because paste is not
easy to store and to handle.
•
Use only adequate solder tools applicable for lead-free solder alloy. The solder tool must be able
o
To reach at least a solder-temperature of 40
o
To stabilize the adjusted temperature at the solder-tip
o
To exchange solder-tips for different applications.
−
is reached and stabilized at the solder joint. Heating-time of the
Adjust your solder tool so that a temperature around
solder-joint should not exceed ~ 4 sec. Avoid temperatures above 400 otherwise wear-out of tips will rise drastically and flux-fluid
will be destroyed. To avoid wear-out of tips switch off un-used equipment, or reduce heat.
Mix of lead-free solder alloy / parts with leaded solder alloy / parts is possible but PHILIPS recommends strongly to avoid mixed
solder alloy types (leaded and lead-free).
If one cannot avoid or does not know whether product is lead-free, clean carefully the solder-joint from old solder alloy and re-solder
with new solder alloy (SAC305).
Use only original spare-parts listed in the Service-Manuals. Not listed standard-material (commodities) has to be purchased at
external companies.
Special information for BGA-ICs:
- always use the 12nc-recognizable soldering temperature profile of the specific BGA (for de-soldering always use the lead-free
temperature profile, in case of doubt)
- lead free BGA-ICs will be delivered in so-called 'dry-packaging' (sealed pack including a silica gel pack) to protect the IC against
moisture. After opening, dependent of MSL-level seen on indicator-label in the bag, the BGA-IC possibly still has to be baked dry.
(MSL=Moisture Sensitivity Level). This will be communicated via AYS-website.
Do not re-use BGAs at all.
•
•
•
•
•
For sets produced before 1.1.2005 (except products of 2004), containing leaded solder-alloy and components, all needed spare-parts
will be available till the end of the service-period. For repair of such sets nothing changes.
•
On our website www.atyourservice.ce.Philips.com you find more information to:
∗
∗
BGA-de-/soldering (+ baking instructions)
Heating-profiles of BGAs and other ICs used in Philips-sets
You will find this and more technical information within the "magazine", chapter "workshop news".
For additional questions please contact your local repair-helpdesk.
SERVICE INSTRUCTION
Safety regulations require that after a repair, the set must be returned in its original condition. Pay in particular attention to
the following points:
·
·
·
·
Route the wire trees correctly and fix them with the
mounted cable clamps.
Check the insulation of the AC Power lead for external
damage.
Check the strain relief of the AC Power cord for proper
function.
Check the electrical DC resistance between the AC Power
Plug and the secondary side (only for sets which have a AC
Power isolated power supply):
1. Unplug the AC Power cord and connect a wire
between the two pins of the AC Power plug.
2. Set the AC Power switch to the "on" position (keep the
AC Power cord unplugged!).
3. Measure the resistance value between the pins of the
AC Power plug and the metal shielding of the tuner or
the aerial connection on the set. The reading should be
larger than 4.5 Mohm (For U.S. it should be between
4.2 Mohm and 12 Mohm).
4. Switch "off" the set, and remove the wire between the
two pins of the AC Power plug.
•
Check the cabinet for defects, to avoid touching of any
inner parts by the customer.
FM wire antenna
To avoid overheating of the system, a safety
circuit has been built in.Therefore, your
system may switch to Standby mode
automatically under extreme conditions. If
this happens, let the system cool down
before reusing it (not available for all versions).
IMPORTANT!
– The type plate is located at the rear of
the system.
– Before connecting the AC power cord
to the wall outlet, ensure that all other
connections have been made.
– Never make or change any
connections with the power switched on.
– High voltage! Do not open.You run the
risk of getting an electric shock.
– The machine does not contain any
user-serviceable parts.
– Modification of the product could
result in hazardous radiation of EMC or
other unsafe operation.
Speaker
(right)
AC power cord
Installation
VIDEO IN
S-VIDEO
IN
TV IN
VIDEO IN
S-VIDEO
IN
TV IN
Speaker
(left)
AUDIO
IN
Note:
– Before installation is finished, it is not
recommended to remove the protective plastic film
attached to the surface of the front panel to avoid
any scratch caused during installation.
AUDIO
IN
3
2
1
Notes:
– Ensure that the speaker cables are correctly
connected. Improper connections may damage the
system due to short-circuit.
– For optimal sound performance, use the
supplied speakers.
– Do not connect more than one speaker to any
one pair of +/- speaker terminals.
– Do not connect speakers with an impedance
lower than the speakers supplied. Please refer to
the SPECIFICATIONS section of this manual.
Connect one end of the 15-pin D-Sub cable
(the other end is fixed on the CONNECT TO
SUBWOOFER terminal on the back of the
main set) to the CONNECT TO MAIN
terminal of the subwoofer by matching the pins.
Fix the two screws on the connectors to ensure
firm connection.
Connect the two front speaker cables to the
SPEAKER OUT terminals: right speaker to "R"
and left speaker to "L".
Place the main set with the front side facing
down on a flat and firm surface. Then remove
the detachable cover on the back of the set to
expose the terminals available for connection.
Step 1: Connecting speakers
Notes:
– This system does not support MW reception.
For better FM stereo reception, connect an
outdoor FM antenna to the FM AERIAL (FM
ANTENNA) terminal.
Connect the supplied FM antenna to the FM
AERIAL terminal. Fully extend and adjust the
position of the antenna for optimal reception.
Step 2: FM antenna connection
Installation
1-8
INSTALLATION
2
TV IN
VIDEO IN
S-VIDEO
IN
TV IN
For the other end, connect the video output
connector (yellow) to the video input jack (or
labeled as A/ V In, CVBS, Composite or
Baseband) on the TV. To hear the sound of this
DVD system through your TV, connect the audio
connectors (white/ red) to the audio input jacks
on the TV.
Connect the end of the supplied AV cord with
only one connector to the AV OUT jack of the
DVD system.
VIDEO IN
S-VIDEO
IN
AUDIO
IN
First connect the 9-pin connector of the
supplied video box to the CONNECT TO
VIDEO BOX jack on the back of the set by
matching the pins.
The supplied video box provides you with more
TV connection options.
IMPORTANT!
– A SCART connection will let you use
features both Audio and Video on the
DVD Player.
Using the video box
2
1
Use component video cables (red/blue/green) to
connect the COMPOENT VIDEO
OUTPUT (Pr/Cr Pb/Cb Y) jack to the
corresponding Component video input jacks (or
labeled as Y Pb/Cb Pr/Cr or YUV) on the TV.
If you are using a Progressive Scan TV (TV must
indicate Progressive Scan or ProScan capability),
to activate TV Progressive Scan, please refer to
your TV user manual. For DVD system
Progressive Scan function, see "PreparationsSetting up Progressive Scan feature".
Note:
– If your TV does not support Progressive Scan, you
will not be able to view the picture.
Press SYSTEM MENU on the remote to exit the
system menu and then DISC to exit progressive
scan.
R
IMPORTANT!
– The progressive scan video quality is
only possible when using Y Pb Pr, and a
progressive scan TV is required.
Using Component Video jacks (Y Pb
Pr)
VIDEO IN
S-VIDEO
IN
TV IN
VIDEO IN
S-VIDEO
IN
TV IN
Installation
Note:
– Ensure that the “TV” indication on SCART cable
is connected to the TV set and “DVD” indication on
SCART cable is connected to the DVD Player.
Use the SCART cable (black) to connect the
DVD Player’s SCART jack (SCART) to the
corresponding Scart input jacks on the TV.
AUDIO
IN
Using SCART jack
1
1
AUDIO
IN
Using AV OUT jack
IMPORTANT!
– You only need to make one video
connection from the following options,
depending on the capabilities of your TV.
– Connect the DVD system directly to
the TV.
Step 3: Connecting TV
Installation
1-9
INSTALLATION
6
5
4
3
2
1
Place the subwoofer on the floor near an AC
outlet.
Note:
– To remove the stand from the set, while pressing
down PRESS4 , pull the stand out from the slots.
Push the stand down into the slots until you hear
a click.
Place the set upright on the desktop with the
support of the stand.
Extend the bracket on the back of each front
speaker as shown so that the front speakers can
stand firmly on the desktop.
Align the side marked PRESS4 of the stand to
the slots at the bottom of the set.
After everything is connected properly,
plug in the AC power cord to the power
outlet.
After finishing all rear connections, mount the
detachable cover on the back of the set until
hearing a click to avoid cable clutter.
R
VCR
(for example)
Connect the system's AUX-IN jack to the
AUDIO OUT jacks on another audio/visual
device (such as a VCR, Laser Disc player or
cassette desk) using a "single-to-double" cinch
cable (with one end providing a 3.5" connector
for connection to the AUX-IN jack while the
other end providing two white/red connectors
for connection to the other device's AUDIO
OUT jacks).
L
AUDIO OUT
Listening to the playback of a non-USB
device
Optional: Connecting additional
equipment
Never make or change any connection with the
power switched on.
Step 5: Connecting the power
cord
Step 4: Placing the set and
speakers
Installation
2
1
R
L
AUDIO IN
For the other end, connect the video output
connector (yellow) to the VIDEO IN jack on the
VCR and the audio connectors (white/ red) to
the corresponding audio input jacks on the VCR.
This will allow you to make analogue stereo
(two channel, right and left) recordings.
Connect the end of the supplied AV cord with
only one connector to the A/V OUT jack of
the DVD system.
VCR
VIDEO IN
Using the VCR for recording DVDs
Connect the COAXIAL (DIGITAL
OUTPUT) jack on the video box to the
DIGITAL IN jack on a digital recording device
(such as DTS Digital Theatre compatible, with
Dolby Digital decoder).
Before starting operation, set the DIGITAL OUT
according to the audio connection. (See
"DIGITAL OUT".)
Recording (digital)
Installation
1-10
INSTALLATION
2
1
2
1
Use a USB cable (not supplied) to connect the
card reader into the
socket on the set.
for the memory card:
Insert the memory card into a card reader (not
supplied).
Insert the other plug of the USB cable to the
USB output terminal of the USB device.
Insert one plug of the USB cable (not supplied)
to the
socket on the set.
for the devices with USB cables:
Insert the USB device's USB plug into the
socket on the set.
By connecting a USB mass storage device
(including USB flash memory, USB flash players
or memory cards) to the Hi-Fi system, you can
enjoy the device's stored music through the
powerful speakers of Hi-Fi system.
IMPORTANT!
– Before connecting the USB plug, first
slide down the movable baffle as shown
on Page 3 to expose the
jack.
Connecting a USB device or memory
card
Installation
1-11
INSTALLATION
2
1
3
1
2
2
1
CAUTION!
– Remove batteries if they are
exhausted or if the Remote Control is
not being used for a long time.
– Do not use old and new or different
types of batteries in combination.
– Batteries contain chemical substances,
so they should be disposed of properly.
Do not put any objects between
the Remote Control and the
DVD Player while operating the
DVD Player.
Aim the Remote Control
directly at the remote sensor
(IR) on the front panel.
Using the Remote Control to operate
the Player
Close the cover.
Insert two AAA batteries following the
indications (+/-) inside the compar tment.
Open the battery compartment.
3
Step 1: Inserting batteries into
the Remote Control
IMPORTANT!
– Make sure to complete the
preparation procedures before operating
the system.
6
5
4
3
1
2
Notes:
– This system only supports 24-hour mode.
– The clock setting will be erased when the system
is disconnected from the power supply.
– The system will exit clock setting mode if no
button is pressed within 30 seconds.
Press CLOCK/RDS to confirm the clock
setting.
Press VOLUME -/+ (VOL +/- on the remote)
to set the minutes.
Press CLOCK/RDS again.
The minute digits flash on the display screen.
Press VOLUME -/+ (VOL +/- on the remote)
to set the hours.
Press and hold CLOCK/RDS on the remote.
“CLOCK SET” is displayed briefly. Then, the
hour digits flash on the display screen.
Go to Standby mode.
Step 2: Setting the clock
–
2
1
AUTO
– If the connected TV is multi system, select this
mode.The output format will be in accordance
with the video signal of the disc.
NTSC
– If the connected TV is NTSC system, select
this mode. It will change the video signal of a PAL
disc and output in NTSC format.
PAL
– If the connected TV is PAL system, select this
mode. It will change the video signal of a NTSC
disc and output in PAL format.
Setting TV SYSTEM
Allows you to select the colour system matching
the connected TV set.
Move to SYSTEM SETUP and press 4.
Move to one of the following and press 3.
Press 2/3/5/4 on the remote control to
toggle through the functions and select your
preferential option.
Turn on the TV set and set it to the correct
Video-In channel.
You may go to channel 1 on your TV set, then
press the channel button repeatedly until you
see the Video In channel.
Or, you can use the TV remote control to
select different video modes.
Or, set TV to channel 3 or 4 if you are using
an RF modulator.
In stop mode or during playback, press
SYSTEM MENU.
IMPORTANT!
– Make sure you have completed all the
necessary connections. (See
"Connections-Connecting TV".)
Step 3: Setting video
preference
Preparations
English
Preparations
–
Press SYSTEM MENU again.
To exit the menu
Note:
The format you select must be available on the
disc. If it is not, the setting for TV Type will not affect
the picture during playback.
16:9 (Wide screen mode)
– If you have a widescreen TV set, use this
setting (you must also set your widescreen TV to
“full size”) available on a disc, then the disc’s own
preference will be used.
4:3 LB (Letterbox mode )
– If you have a conventional TV set and your
DVD is formatted for widescreen viewing, use
this setting. A wide picture with bands displayed
on the upper and lower portions of the TV
screen.
4:3 PS (Pan and Scan mode )
– If you have a conventional TV set and your
DVD is not formatted for widescreen viewing,
use this setting. A wide picture is displayed on
the whole TV screen with a portion
automatically cut off.
Select the aspect ratio of the TV to be
connected.
Setting TV TYPE
1-12
PREPARATIONS
8
7
5
6
4
3
1
2
Press 1 2 to highlight OK in the menu and
press OK to confirm.
Select "TV MODE" to "P-SCAN", then OK to
confirm.
The instruction menu appears on the TV.
Press 1 2 repeatedly to select "VIDEO
SETUP".
Select the correct Video Input channel.
The DVD background screen appears on the
TV.
Press SYSTEM MENU.
Press STANDBY-ON B (STANDBY B on
the remote) to turn on the DVD player.
Turn off your TV progressive scan mode or turn
on interlaced mode (refer to your TV user
manual).
Turn on your TV.
IMPORTANT!
Before enabling the progressive scan
feature, you must ensure:
1) Your TV can accept progressive signals, a
progressive scan TV is required.
2) You have connected the DVD player to your
TV using Y Pb Pr (see “Installation-Step 3:
Connecting TV- Using Component Video jacks”.)
The progressive scan display twice the number
of frames per seconds than interlaced scanning
(ordinary normal TV system). With nearly double
the number of lines, progressive scan offers
higher picture resolution and quality.
Setting up Progressive Scan feature (for
Progressive Scan TV only)
Preparations
2
1
0
9
Press SYSTEM MENU on the remote to exit
the system menu and then DISC to exit
progressive scan.
The DVD blue background screen will appear.
Turn off your TV progressive scan mode or turn
on to interlaced mode (refer to your TV user
manual).
When the distorted sign still appears on
the TV, it may be due to the connected TV
does not accept progressive signals, and
progressive is set by mistake. You must reset the
unit to interlace format.
To deactivate Progressive manually
Press 1 2 to highlight OK in the menu and
press OK to confirm.
The setup is complete now and you can start
enjoy the high quality picture.
Turn on your TV progressive scan mode (refer to
your TV user manual).
The below menu appears on the TV.
There will be a distorted picture on your
TV at this state until you turn on the
progressive scan mode on your TV.
2
1
4.
Move to one of the following and press 3.
Move to LANGUAGE SETUP and press
Press 2/3/5/4 on the remote control to select
your preferred option.
In stop mode or during playback, press
SYSTEM MENU.
You can select your preferred language settings
so that this DVD Micro System will automatically
switch to the language for you whenever you
load a disc. If the language selected is not
available on the disc, the language set by default
will be used instead. But the menu language of
the DVD Micro System cannot be changed once
selected.
Step 4: Setting language
preference
3
4
Press SYSTEM MENU again.
To exit the menu
Repeat steps 2~3 for other settings.
Press 5/4 to select a language and press OK.
If the language selected is not available on the
disc, the original language designated by each
disc will be selected.
When the selected language is not recorded in
the DVD, one of the recorded languages will be
selected automatically (except for OSD).
You can reset all the DVD settings except for
Rating.
MENU LANG (DVD only)
Select the language for the DVD menu.
SUBTITLE LANG (DVD only)
Switches the display language of the subtitle.
Select the language from the displayed list.
AUDIO LANG (DVD only)
Switches the display language of the sound track.
Select the language from the displayed list.
OSD LANGUAGE (On-Screen Display)
Switches the display language on the TV screen.
Select the language from the displayed list.
Preparations
1-13
PREPARATIONS
to switch the system on or to Eco power/normal
standby mode.
iR sensor
infrared sensor for remote control.
DVD/VCD/CD/MP3-CD/USB: enters the
program menu.
Picture CD: during playback, to select a slide
show mode.
Tuner: programs preset radio stations.
Mode Selection
9 ............................. In DISC/USB mode, to stop
playback or clear a program.
......................................... for Demo (on the system
only) to activate/deactivate
the demonstration.
2;........................... In DISC/USB mode, to start or
interrupt playback.
PRESET w/ w
Disc/USB: skips to the previous/next chapter/
title/track.
Tuner: selects a preset radio station.
TUNING 22/33
Tuner
press to tune to a lower/higher radio frequency
gradually.
press and hold, then release the key to start
automatic search for a radio frequency
downward/upward.
Disc/USB
searches fast backward/forward.
to view the current status of the system.
to select the respective sound source : TUNER,
DISC, USB/CARD or AUX.
VOLUME -/+
adjusts the volume upward/downward.
adjusts the hours and minutes in clock/timer
setting mode.
selects a source in timer setting mode.
–
!
Controls on the remote control
USB DIRECT
jack for the external USB mass storage device.
SLIDE OPEN 4
slides down to expose some buttons and jacks
on the front panel.
to switch the system on or to Eco power/normal
standby mode.
Numeric Keypad (0-9)
inputs a track/title/chapter number of the disc.
SOURCE
to select the respective sound source : TUNER,
DISC, USB/CARD or AUX.
SYSTEM MENU (disc mode only)
to enter or exit the system menu bar.
DVD/VCD/CD/MP3-CD/USB: enters the
program menu.
Picture CD: during playback, to select a slide
show mode.
Tuner: programs preset radio stations.
DVD/VCD: enters or exits the disc contents
menu.
VCD2.0: switches the playback control mode on
or off .
–
–
In DISC mode, to select a movement direction in
the disc menu or system menu bar.
selects different slow playback modes for a VCD/
SVCD/DVD.
8 3/4
–
–
–
–
Tuner
press to tune to a lower/higher radio frequency
gradually.
press and hold, then release the key to start
automatic search for a radio frequency
downward/upward.
Disc/USB
searches fast backward/forward.
In DISC mode, to select a movement direction in
the disc menu or system menu bar.
7 2/3
–
–
6 DISC MENU (disc mode only)
–
5
–
4
–
–
–
3 PROGRAM
–
2
–
1 STANDBY y
–
@
–
connects an external non-USB device.
0 AUX-IN
–
* = Press and hold the button for more than three seconds.
ejects a disc from the disc loader.
9 EJECT
– to connect a headphone.
8n
–
–
–
7
–
6 SOURCE
–
5 Display screen
–
–
–
4
–
–
–
3 PROGRAM
–
2
–
Controls on the system
1 ECO POWER/STANDBY ON B
Controls
3
2
&
*
@
#
0
§
≥
≤
%
^
•
(
⁄
!
º
)
9
7
¡
£
6
ª
∞
8
7
8
5
4
™
$
1
1-14
CONTROLS
to exit or confirm the selection.
w/w
Disc: skips to the previous/next chapter/title/
track.
Tuner: selects a preset radio station.
9
In DISC/USB mode, to stop playback or clear a
program.
In DISC/USB mode, to start or interrupt
playback.
adjusts the volume upward/downward.
adjusts the hours and minutes in clock/timer
setting mode.
selects a source in timer setting mode.
selects various repeat modes or the shuffle play
mode for a disc.
LOUDNESS
enables or disables automatic loudness
adjustment.
selects different types of preset sound equalizer
settings (CLASSIC, JAZZ, ROCK, POP or FLAT;
for DVD: NORMAL, CONCERT, DRAMA,
ACTION or SCI-FI).
MUTE
to interrupt or resume sound reproduction.
)
–
for VCD/CD/USB: to repeat a specific section
within the same track.
for DVD: to repeat a specific section in a disc.
AUDIO
for VCD
sets Stereo, Mono-Left or Mono-Right sound
mode.
for DVD
selects an audio language.
ZOOM
DVD/VCD/Picture CD: enlarges or reduces a
picture or active image on the TV screen.
≤
∞
GOTO/STEREO
In DISC mode, to fast search in a disc by
entering a time, title, chapter or track.
FM: sets stereo or mono sound mode.
≥
ejects a disc from the disc loader.
Notes for remote control:
– First, select the source you wish to
control by pressing one of the source select
keys on the remote control (DISC or
TUNER, for example).
– Then select the desired function ( 2;, w ,
w for example).
version)
⁄ SURROUND (unavailable for this
º CH.LEVEL (unavailable for this version)
–
ª0
Standby mode
*– sets the system clock.
Playback mode
– displays the system clock.
For tuner
– displays RDS information.
• CLOCK/RDS
–
–
selects a DVD camera angle.
–
§ ANGLE
–
–
–
selects different levels of brightness for the
display screen.
–
£ DIM
–
–
™ A-B
playback.
* = Press and hold the button for more than three seconds.
displays information on TV screen during
¡ DISPLAY
–
enables or disables bass enhancement.
–
( DBB
–
* DSC
–
&
–
Power-on mode
sets the sleep timer function (auto off).
SLEEP/TIMER
Standby mode
sets time for switching on the system
automatically.
–
selects a subtitle language.
–
^
% SUBTITLE
–
$ MODE
–
–
–
# VOL +/-
–
@ 2;
–
!
–
–
0
–
9 OK
Controls
The aspect ratio of the screen cannot be
changed even though you have set the TV
shape.
Distorted or poor picture.
No picture.
“NO DISC” is displayed.
No power.
Problem
The aspect ratio is fixed on the DVD disc.
The aspect ratio may not be changed for some
TV systems.
Sometimes a slight picture distor tion may appear.
This is not a malfunction.
Clean the disc.
Connect the system to the S-video input of your
TV set.
Select the appropriate video input mode on the
TV set.
Check if the TV set is switched on.
Check the video connection.
Check if the system is securely connected.
If the progressive scan feature is activated but
the connected TV does not support progressive
signals or the cables are not connected
accordingly, see “Preparations-Setting up
Progressive Scan feature” for proper progressive
scan setup or deactivate the progressive scan
feature as below:
1) Turn off your TV progressive scan mode or
turn on to interlaced mode.
2) Press SYSTEM on the remote to exit the
system menu and then DISC to exit progressive
scan.
Check if the disc is inserted upside down.
Wait until the moisture condensed at the lens
has cleared.
Replace or clean the disc, see “Maintenance”.
Use a readable disc or correctly recorded format
MP3-CD.
Check if the AC power cord is properly
connected.
Solution
If a fault occurs, first check the points listed below before taking the system for repair. If
you are unable to remedy a problem by following these hints, consult your dealer or
Philips for help.
WARNING
Under no circumstances should you try to repair the system yourself, as this will
invalidate the warranty. Do not open the system as there is a risk of electric shock.
Troubleshooting
1-15
CONTROLS & TROUBLESHOOTING
Insert a readable disc.
Check the disc type, color system and region
code.
Clean the disc.
Place the disc with the playback side down.
Press SYSTEM MENU to turn off the setup
menu.
Cancel the parental control rating function or
change the rating level.
Moisture has condensed inside the system.
Remove the disc and leave the system turned on
for about an hour.
Disconnect the power plug from the jack, and
insert again.
Multi-language sound or subtitle is not recorded
on the DVD.
Changing the language for the sound or subtitle
is prohibited on the DVD.
Make sure the component is connected
correctly.
Press the correct function button for the input
source.
Adjust the volume.
Disconnect the headphones.
Check that the speakers are connected correctly.
Check if the stripped speaker wire is clamped.
If the system is in pause, slow motion or fast
forward/reverse mode, press PLAY/PAUSE 2;
to resume the normal play mode.
Make sure the MP3-CD was recorded within 32256 kbps bit rate with sampling frequencies at 48
kHz, 44.1 kHz or 32 kHz.
Ensure that the DTS disc also supports Dolby
Digital output.
If the signal is too weak, adjust the antenna or
connect an external antenna for better
reception.
Increase the distance between the System and
your TV set or VCR.
The DVD player does not respond when
buttons are pressed.
The language for the sound or subtitle
cannot be changed when playing a DVD.
No image is output when a function is
selected.
Sound cannot be heard or is of poor
quality
Poor radio reception.
Solution
The DVD player does not start playback.
Problem
Troubleshooting
Check that the RGB/SCART cable is connected
to the correct device (See Connecting TV).
Check if the number of folders exceeds 99 or
the number of titles exceeds 999.
Some files on the USB device are not
displayed.
Power has been interrupted or the power cord
has been disconnected. Reset the clock/timer.
The Clock/Timer setting is erased
No sound and picture
Set the clock correctly.
If recording is in progress, stop it
Point the remote control at the remote control
sensor of the unit.
Reduce the distance to the player.
Remove any possible obstacles.
Replace the batteries with new ones.
Check that the batteries are loaded correctly.
Check the speaker connections and location.
Clean deck parts, see “Maintenance”.
Use only NORMAL tape.
Apply a piece of adhesive tape over the missing
tab space.
Solution
The timer is not working
The remote control does not function.
Left and right sound outputs are
reversed.
Recording or playback cannot be made
Problem
Troubleshooting
1-16
TROUBLESHOOTING
2-1
2-1
DISMANTLING INSTRUCTIONS
Dismantling of the Front Panel assembly
Dismantling of the PCB assemblies and modules
1) Loosen & remove 4 screws A (see figure 1).
2) Place a small flat screw driver in between the front & rear
cabinets and roll the screw driver along the joint as shown
in figure 2.
1) Loosen 4 screws B to remove DVD Loader as shown in
Figure 3.
2) Loosen 2 screws C and 7 screws D to remove the Display
Board as shown in Figure 4.
Figure 3
3) Loosen 2 screws E to remove the AMP Key Board as
shown in Figure 4.
Figure 1
3) Release total 6 catches on left and right side of rear
cabinet to separate it from the rear assembly.
Figure 4
4) Loosen 2 screws F and 4 screws G and 2 screws H to
remove Swing System as shown in Figure 5.
Figure 2
Figure 5
2-2
2-2
Dismantling of the PCB assemblies and modules
Dismantling of the Subwoofer
5) Loosen 3 screws I to remove the Power Board mounting
it to the Rear Cabinet as shown in Figure 5.
4) Loosen 10 screws L to remove subwoofer bottom cover as
shown in Figure 7.
6) Loosen 2 nuts from D-SUB jack on the rear side of the Rear
Cabinet to separate it from the Rear panel.
Figure 5
Dismantling of the Subwoofer
1) Use the flat screw driver prize up 4 rubber pads as shown
in Figure 6.
Service pos A
2) Loosen 4 screws J to remove two subwoofer feet on the
bottom of the subwoofer as shown in Figure 7.
Figure 7
3) Loosen 10 screws K to remove the Subwoofer Output Pan
as shown in Figure 8.
Figure 6
Figure 8
2-3
2-3
Service pos B
Note: After re-assembly, it is very important to ensure all
wires are routed properly to ensure that they do not
touch/obstruct all moving parts.
Service pos C
3-1
3-1
SERVICE TEST PROGRAM
To start service test program
hold 38 & 7 button on
the set depressed while
plugging in the mains cord
Select SYSTEM SETUP
on TV display
Display shows the
MCU version
"MCD288 VXX"
38
To check MPEG software
version hold the System
Menu button on Remote
Control
N
Button pressed?
"9735" Buttons
on RC pressed
sequentially?
Y
Y
TV Display shows
Ver
MCD288/XXXX
Date
mm dd yyyy
Time
hh:mm:ss
Region code x
Display shows the
Production Date
"200X - XX XX"
38
N
Button pressed?
Y
V refers to Version
XX refers to Software version number of the uProcessor
eg. 04
200X - XX XX refers to Date, eg. 2006-02-22
N
4-1
SET BLOCK DIAGRAM
4-1
5-1
SET BLOCK DIAGRAM
5-1
6-1
6-1
LAYOUT DIAGRAM - AMP KEY BOARD
DISPLAY & AMP KEY BOARD
For Version 37, the board is not intented to be repaired on component level.
Circuit Diagram and Printed Circuit Board drawings
are published for orientation only.
In case of defects please replace the entire board.
The Display Board and AMP Key Board can be ordered with codenumber "9940 000 04868" &
"9940 000 04869" for /37.
6-2
LAYOUT DIAGRAM - DISPLAY BOARD
TOP VIEW
6-2
6-3
LAYOUT DIAGRAM - DISPLAY BOARD
BOTTOM VIEW
6-3
6-4
6-4
CIRCUIT DIAGRAM - DISPLAY & KEY BOARD
2
Q304
470p
8050
C305
R309
2.2K
C318
30p
R335
10K
1K
R346
X303
32.768KHz
8050
Q305
R366
E
1
2
3
+5V
REM
R321
.47/0.5
SOURCE
SW312
SW311
PLAY/PAUSE
SW308
PROGRAM
R344 33K
R343 33K
R342 33K
LED304
LED305
E
E
E
E
LED306
100k
COM
LED1
LED2
C337
CN307
3P/2.0
3
2
1
DZ302
J104B
J104C
100K
220uf/16v
R356
100
R357
1K
104P
C312
3.3uf/50v
3
4
5
6
7
ø¶œ†
ø¶œ†
LED101
SD LED
AUX-L
AUX-R
AGND
RO-1
LO-1
1
2
3
4
C333 101/4W
470uf/10v R355
R316
OUT1 Vdd
MUTEOUT2
IN1
BIAS
GND
IN2
8
7
6
5
R326
4.7K
R359
1K
C336
3.3uf/50v
PT2399 IC306
101/4W
9014
Q306
C334
470uf/10v
C335
47uf/16v
C311
47uf/16v
LED102
USB LED
A
12
12
12
12
11
10
9
8
7
6
5
4
3
2
1
ø¶œ†
5
4
3
2
1
`¢
SW104
02
CN103
1
2
3
4
5
6
7
8
9
10
11
12
13
AGND-1
HP-MUTE1
`¢
`¢
NC
NC
NC
NC
GND
SENSE
SD-D1
SD-D0
GND
SD-CLK
SD3V
GND
SD-BS
SD-D3
SD-D2
J104A
PRESET+
B
R301
5.6V
1
13P/2.0
1
2
3
1
2
LED303
USB HOST
J106
vbus
GND
D+
DGND
AUX L
AUX R
AGND-1
HP-L1
HP-R2
R104
100
2
LED302
E
R352
680
R351
680
R350
680
R327
3P/2.0
CN105
J105
SP-2JCK
1
680
LED301
Q307
8050
R367
100
R349
680
C332
1
2
3
4
5
6
7
SW103
PRESET-
SW307
STOP
R341
33K
CLK
STB1
1k
C338
47uf/16v
R348
R347
680
4.7uf/50v
1
2
3
SW102
TU-
K4
K3
K2
K1
C324
2
1
10K
SW101
TU+
C
R339 4.7K
C331
100uf/16v
DM1
DP1
U5V1
GND1
SD3V1
SENSE1
SD_D31
SD_D21
SD_D1-1
SD_D01
SD_BS1
SD_CLK1
GND2
R106
A
+5V
R338 10K
R365
4.7k
KS1
4148
S12
S11
S10
S9
S8
S7
S6
S5
S4
S3
S2
S1
1
2
3
4
5
6
7
8
9
10
11
12
13
C330
104p
R345
S12/KS12
S11/KS11
S10/KS10
S9/KS9
S8/KS8
S7/KS7
S6/KS6
S5/KS5
S4/KS4
S3/KS3
S2/KS2
S1/KS1
Vdd
D303
CN308
10K
R105
22K
VF2
G11
G12
S16
S15
S14
S13
-28V
G6
G7
G8
G9
G10
G5
G4
G3
G2
G1
Vdd
IC305
LED5
uPD16311
LED4(BBE)
LED3(POWER)
LED2(FANCT)
LED1(7507RST)
Vss
OSC
D306
4148
4148
0
G6
G7
G8
S20/G9
S19/G10
VEE
Vdd
S18/G11
S17/G12
S16
S15
S14
S13
100
100
100
100
100
R390
R391
R394
R392
R393
U5V
CN102
4P/2.0
R103
4.7K
SW306
VOLUME+
39
38
37
36
35
34
33
32
31
30
29
28
27
LED307
STADBY
0
R303
R304
S1
26
25
24
23
22
21
20
19
18
17
16
15
14
SW1
SW2
SW3
SW4
DOUT
DIN
IC
CLK
STB
KEY1
KEY2
KEY3
KEY4
R370
1K
40
41
42
43
44
45
46
SD LED 47
USB LED 48
49
50
47K
51
R337
52
+5v
L303
10uH
R102
10K
KS3
R340 10K
C320 C321 C322
C323
15p 15p 47uf/16v 104p
CN101
2P/2.0
R101
REM
GND
Vcc
VF1
VF1
G1
G6
G5
G4
G3
G2
G12
G7
G8
G9
G10
G11
S1
S2
S3
S4
S5
S6
S7
S8
S9
S10
S11
S12
S13
S14
S15
S16
VF2
VF2
VF1
G1
G2
G3
G4
G5
SCL
U5V
SDA
DVD-REM
DVD-ON
DVD-TRIN
DVD-STB
DVD-CLK
DVD-DATA
D305 AN60
ECO POWER
SDA
SCL
TUN-ON
R395 100
R387 100
R386 100
STADBY
MUTE
R389 100
REM
R302
CN304
2P/2.0
AD1
SW305
SW310
STANDBY VOLUME-
OP/CL
C319
30P
8
7
6
5
IC309
SA6208
SW309
C314
104
+12V
R334 10K
X302
4.19MHz
1K
4.7K
4148
C306
470p
IC304
24C01
DATA
CM+
CMR332
1K
AD1
R330
1K
D
C315
47uf/16v
HP-R
HP-L
H-MUTE
MUTE
AGND-1
+12V
M+
R328
10K
R318
68K
4
3
2
1
22
21
20
19
18
17
16
15
14
13
12
PLL-CL
PLL-DA
RDS-Q
RDS-SDA
RDS-SCL
DVD-STB
DVD-CLK
DVD-DI
DVD-DO
DVD-ON
RESET
IC302
2SC9228
4.7K
SDA GND
SCL
A2
TEST
A1
A0
Vdd
D308
100
1K
R333
R308
2.2K
M-
10K
5
6
7
8
47
R323
D302
4148
22K
100
Q303
8550
R329
1K
1
2
3
4
R383
R317
R336
R307
D301
A
DS-STB3
DS-STB2
DS-STB1
DS-DAT
DS-CLK
REMTOE
ROT-A
ROT-B
NC
FAN
0
8550
B
10K
33
32
31
30
29
28
27
26
25
24
23
100
0
R361
Q301
8050
10K
R682
0
R377
S301
REMOTE
R322
10
S3
D304
0
R385 100
CPU+VCC
OUT
GND
IN
R310
R306
34
35
36
37
38
39
40
41
42
43
44
AD1
5P/1.0
100
100
10uH
R331
10K
R362
OPEN-SW
CLOSE-SW
V-GND
M+
M- R364 Q302
0
R363
R382
R384
AN60
+5V
L301
R381
B/EQ-DAT
C/EQ-CLK
STANDBY
MUTE
SUR-MUTE
STEREO
POWER-ON
SDA
SCL
TUN-ON
PLL-CE
SD MMC
WP
STB1
DATA
CLK
REM
CN303
104p
10K
TREBLE/P-DET
BASS/KEY1
KEY2
3834-AD
Vdd
Vss
XT-OUT
XT-IN
TEST
X-IN
X-OUT
C343
100UF/16V
5
4
3
2
1
+5V
300p 300p 300p
C302 C303 C304
100UF/25V
C310
C309
100uf/25v
C342
104p
C341
C
C308
100uf/10v
C345
10uf/50v
R305
.47/0.5
U5V
M-VCC R353
D307
4148
R380
C344
10uf/50v
10uf/50v10uf/50v
C313
C301
1
2
3
4
5
6
7
8
9
10
11
IN
GND
OUT
C307
104p
8
7
1
2
3
4
5
6
7
8
9
10
11
12
13
14
15
16
17
18
19
20
21
22
23
24
25
26
27
28
29
30
31
32
1
2
3
4
5
6
7
8
9
10
11
12
13
14
15
16
17
18
19
20
21
22
1
2
3
4
5
6
7
8
9
10
11
12
13
14
15
16
17
18
19
20
21
22
R319
100
R311
1A
VFD301
MCD288VFD
GND2
SD_CLK
SD_BS
SD_D0
SD_D1
SD_D2
SD_D3
SENSE
SD3V
GND1
US5V
DP
DM
VF2
3.3V
IC303
7805
1A
VF1
-28V
R324
15 0.5W
100
R320
0
GND2
SD_CLK
SD_BS
SD_D0
SD_D1
SD_D2
SD_D3
SENSE
SD3V
GND1
US5V
DP
DM
AGND
AUX-R
AUX-L
H-MUTE
HP-L
HP-R
+12V
AGND
MUTE
WP
SD MMC
V-GND
DVD-REM
VF2
VF1
-28V
DVD-TRIN
STADBY
ECO POWER
SDA
SCL
RDS
TUN-ON
DVD-STB
DVD-CLK
DVD-DATA
DVD-ON
CPU+VCC
V-GND
M-VCC
V-GND
DZ301
6
G1
G6
G5
G4
G3
G2
G12
G7
G8
G9
G10
G11
S1
S2
S3
S4
S5
S6
S7
S8
S9
S10
S11
S12
S13
S14
S15
S16
14P/1.25
IC301
7805
5
CN302
22P/1.25
D
4
3
CN305
CN306
1
2
3
4
5
6
7
8
9
10
11
12
13
1
J107
SD
3
4
5
6
7
8
7-1
7-1
PCB LAYOUT - TOP VIEW
TUNER BOARD
The board is not intented to be repaired on component level.
Circuit Diagram and Printed Circuit Board drawings
are published for orientation only.
In case of defects please replace the entire board.
The board can be ordered with codenumber "9940 000 04875".
7-2
7-2
CIRCUIT DIAGRAM
CN4
4P
1
2
3
4
5
6
7
8
1
2
3
4
CN1
8P
4.7
L3
120nH
C3
C6
22uf/10v
C4
472p
C5
223p
47p
R8
10K
33nH
1
2
3
4
5
6
7
8
L1
U1
TEA5768HL
NECTAR-C
LDE2
LDE1
TIFC
VREF
MPXO
TMUT
VAFL
VAFR
BB202
R9
33K
220
104p
C24
220uf/10v
C25 DZ1
220 R18
C27
5.1V
C26
104p
2.2K
C29
104p
R19
2.2K
C28
C23
1uf/50v
474p
474p
C22
R21
1M
1M
R22
C32
BC847
Q2
+5V0
100p
C31
100p
BC847
Q1
R23
1K
R2
10
C9
223p
1uf/50v
R20
9
10
11
12
13
14
15
16
D2
WREN
BUSE
SWP1
SWP2
XTL1
XTL2
PHFL
PIFL
L2
33nH
CPO
VCO1
VCD2
VCCosc
DGND
VCCD
DATA
CLOCK
24
23
22
21
20
19
18
17
R17
2.2K
R16
R14
32
31
30
29
28
27
26
25
C11
393p
C8
103p
223p
C7
LOOPSW
TAGC
RFI2
RFGD
RFI1
VCCA
AGND
IGAN
R7
100K
18K
D1
BB202
R4
10K
2.2K
R15
R10
10K
+5V0
R1
22
+5V0
R11
27pF
47uf/10v
R12
100K
C2
C30
C1
100p
SCL-1
SDA-1
GND
+12V-1
GND
TUN-L-1
TUN-R-1
RDS-1
RF1
33K
R13
XT1
C10
20p
C12
5p
C13
223p
TUNER.SCH
13MHz
C14
223p
C15
102p
C16 C17 C18 C19 C20 C21
333p 330pF 333p 473p 473p 473p
R24
1K
8-1
POWER BOARD
For Version 37, the board is not intented to be repaired on component level.
Circuit Diagram and Printed Circuit Board drawings
are published for orientation only.
In case of defects please replace the entire board.
The Power Board can be ordered with codenumber "9940 000 04865" for /37.
8-1
8-2
LAYOUT DIAGRAM - POWER BOARD
8-2
8-3
8-3
CIRCUIT DIAGRAM - POWER BOARD
CN210
3300uf/35v
1
2
3
4
5
6
R211
820
AGND
DGND
2
1
REF
TREB-L
LFOUT
SCL
SDA
28
27
25
24
26
R235 +12V
R234 10
10K R224
C277
220uf/16v
DC5V
R209
1A
CN208
4p/2.5
R254
390
R207
4.7K
Q207
9014
D204
5822
Vi
ON
Vo
GND
L206
220uH
R252
2.7K
1
R257
47K
5
2
772
R208
47K
C209
104p
R259
1.5A
IC204
LM2576
Vref
Q208
1
2
3
4
+12V
3
C288
104p
SCL
SDA
R-OUT
L-OUT
+12V
Q209
9014
R210
820
R223
4.7K
Q211
9014
R253
1K
D203
4148
R256
10K
R255
10K
4
3
C211
100p
1K
L204
22uH
C284 C285
104p 1000uf/10v
2
2.2k
R216
R239
2.2K R238
2.2K
8550
Q210
C287
104p
C276
104p
Gnd
C206
220uf/16v
220uf/25v
C201
VOL.SCH
R218
2.2k
Q203
9014
4
D209
4001
C290
D208
5401
47K
R202
R201
47K
R217
1M
C210
100p
+12V1
Vo Vi
C205
22uf/25v
LROUT
23
D206
5401
IC202 7812
+12V
104M
C202
22
RROUT
BOUT-R
21
20
BIN-R
BOUT_L
BIN-L
19
L IN
LOUT
18
17
16
L IN1
15
C289
330uf/35v
DVD-ON
1uf/50v
C213
L
R
CPU+VCC
1
VDD
4
TREB-R
RFOUT
5
6
ROUT
LOUD-R
R IN
2.2uf/50v
8
7
2.2uf/50v
9
R IN3
R IN2
R IN1
LOUD_L
10
12
11
13
L IN3
L IN2
MUTE2
AUX-R
AUX-L
D211
4001
473p
C204
RCA-206V
JCK201
C251
22uf/16v
DGND
1M
R215
R237
8.2K
5401
C217
103P PGND
R219 R220
0
0
1uf/50v
C212
4.7uf/50v
C245
D207
STADBY
104p
C214
R212
470
5401
D205
F201
~16.5v2
AGND1
-28V
ECO POWER
CPU+VCC
~16.5v1
AGND2
VF1
VF2
L-OUT
~16.5v2
R-SP
L-SP
MUTE2
AGND
R-OUT
C248
F2AL250V
C203
104M
4.7uf/50v
C247
R236
8.2K
JP201
~16.5v1
4P
VGV-15P
CN209
272M
C249
M-VCC
272M
C243
104M
C241
104M
C240
BC817
C234
Q202
BC817
12Version
DGND
LIN OUT-R
LIN OUT-L
CVBS
15
14
13
12
11
10
9
8
7
6
5
4
3
2
1
R226
47K
Q201
104M
C237
104M
R221
10K
2.2uf/50v
R203
4.7K
CN204
4
3
2
1
2.2uf/50v
C233
4.7K
R206
C216
4.7uf/50v
8p
CN206
C291
104p
220uf/16v
C215
PT2313
D202
4148
C246
2.2uf/50v
IC203
C231
1uf/50v
D212
4148
R240
150
C242
C230
1uf/50v
2.2uf/50v
C293 R231
680p 22K
LIN OUT-R
LIN OUT-L
MUTE
MUTE2
RDS
TUN-R
TUN-L
AGND
+12V-2
DGND
SDA
SCL
8
7
6
5
4
3
2
1
C294
680p
R232
22K
TUN-L
TUN-R
CN202
22K
R233
C238
C235
104M
4148
D201
10P/2.0
R227
2.2K
R228
2.2K
22K
R229
2.2uf/50v
R/SC
B/U
G/Y
CVBS
DGND
M-L
M-R
AGND
DVD MUTE
SPIDF
RGB-SW
16:9-VS
C232
2.2uf/50v
DVD MUTE
12
11
10
9
8
7
6
5
4
3
2
1
TUN-ON
R205
2.2K
100uf/16v
C292
CN215
2p/2.5
1
2
2P
104M
C208
M-L
4p
RF2-1
1
2
C239
M-R
R204
2.2K
C207
CN201
10P
2p/2.5
CN214
R225
47K
Q205
BC847
1
2
3
4
2
1
R214
4.7k
R213
4.7K
R250
10K
14
R249 1.5K
22K
CN207
CN213
DVD-REM
DVD-CLK
DVD-STB
DVD-DAT A
DGND
DVD-TRIN
DGND
WP
SD MMC
DGND
DM
DP
U5V
SD3V
DGND
SENSE
SD_D3
SD_D2
SD_D1
SD_D0
SD_BS
SD_CLK
10
9
8
7
6
5
4
3
2
1
+12V
R230
47/0.25W
R248
DGND
B/U
G/Y
R/SC
16:9-VS
RGB-SW
M-L
CVBS
SPIDF
M-R
1
2
3
4
5
6
7
8
9
10
11
12
13
14
15
16
17
18
19
20
21
22
1
2
3
4
5
6
7
8
9
10
11
12
13
14
15
16
1
2
3
4
5
6
7
8
9
10
11
12
13
14
15
16
17
18
19
20
21
22
4148
D214
Q204
8550
+12V-2
6p/2.0
22p/1.25
WP
SD MMC
DGND
DVD-REM
VF2
VF1
-28V
DVD-TRIN
STADBY
ECO POWER
SDA
SCL
RDS
TUN-ON
DVD-STB
DVD-CLK
DVD-DAT A
DVD-ON
CPU+VCC
DGND
M-VCC
DGND
H-MUTE
DGND
SD_CLK
SD_BS
SD_D0
SD_D1
SD_D2
SD_D3
SENSE
SD3V
DGND
U5V
DP
DM
AGND
AUX-R
AUX-L
MUTE2
L
R
+12V
AGND
MUTE
R260
R261
0 0
CN205
CN212
7p/2.0
3
CN211
14p/1.25
Q206
9014
9-1
9-1
LAYOUT DIAGRAM - WOOFER TERMINAL BOARD
(9940 000 04873)
WOOFER OUTPUT BOARD
For Version 37, the board is not intented to be repaired on component level.
Circuit Diagram and Printed Circuit Board drawings
are published for orientation only.
In case of defects please replace the entire board.
The Power Board can be ordered with codenumber "9940 000 04871" for /37.
LAYOUT DIAGRAM - WOOFER LAMP BOARD
9-2
LAYOUT DIAGRAM - WOOFER OUTPUT BOARD
9-2
9-3
9-3
6
1
CIRCUIT DIAGRAM - WOOFER OUTPUT BOARD
-Vs
-Vs
IC503
22K
R561
R555
36K
IN1
GND
R554 2uH
4.7/0.25
10
4.7uf/25v
9
8
IN2
7
6
5
-Vs
MUTE
OUTPUT2
4
3
+Vs
L502
2
C522
GND
FL
R556
560
C524
R557
560
562(M)
C523
104(M)
104(M)
C526
8
FR
-VCC
4
R544
7
L-SP
R-SP
TDA7265
5
MUTE1
+Vcc
+Vcc
2.2/1/4W
R551
47K
R538
104M
C520
R552
C521
2.2/1/4W 104M
R540
10K
R523
R537
22K
9014
Q508
C579
47uf/16v
4.7K
MUTE
R565
100K
D501
4148
R539
6.8K
Q510
9014
C1
C?
DGND
PGND
Q506
BUK7535-55A
-Vcc
DB501
KBL808G
R566
22K
C566
22uf/25v
R533
47K
C558
220uf/35v
R529
4.7K
DZ504
12V
C559
104P
Q501
BC847B
NE4558
2.2K
R510 +VCC
C511
104p
R509
240K
Q507
BUK7535-55A
+Vcc
2.7K
DZ502
BZX79-B22V
ECO POWER/STBY
R531
330
F502
~16.8V-1
R515
2.2/0.25W
D503
D505
470uf/35v
104p
VF2
VF1
BC847B
4001 D504
4001
R513
2.2/0.25W
~24v
0
~24v
~6.5v
~6.5v
16.5v1
16.5v2
CN505
GND-1
AGND1-1
AGND2-1
R-SP-1
L-SP-1
~16.5v1-1
~16.5v2-1
VF1-1
VF2-1
-28V-1
0 MUTE2-1
CPU+VCC-1
ECO POWER/STBY
GND1-1
R-1
L-1
CN601
VGV-15P
R602
0
GND-1
AGND1-1
-28V-1
ECO POWER/STBY
CPU+VCC-1
~16.5v1-1
AGND2-1
VF1-1
VF2-1
L-1
~16.5v2-1
R-SP-1
L-SP-1
MUTE2-1
GND1-1
R-1
16
15
14
13
12
11
10
9
8
7
6
5
4
3
2
1
CN602
VGV-15P
R536
POWER
1K
CN506
2P/2.0
3
2
1
16
15
14
13
12
11
10
9
8
7
6R603
50
4R601
3
2
1
+12V
2
1
3P/2.0
CPU+VCC
CN502
7P/2.5
GND
Transformer
7
6
5
4
3
2
1
~24V
0
~24V
~16.5V
~16.5V
~6.5V
~6.5V
~120V/~230V
!
AC IN
!
3
2
1
~16.0V
0
~16.0V
!
1
2
3
C528
C104(M)
D502 4001 C519
4001
R518
10K
~16.8V-2
F4AL250V
3C:4AL250V
104(M)
C525
C517
Q504
LED501
F4AL250V
F501
+28v
R521
R516
680
C510
220uf/25v
470uf/35v
C531
104p C516
-28v
3P/3.95
CN501
3C:4AL250V
C515
C104
104
C504
C560
Q503
BC857B
+VCC
R525
47K
47K
R512
Q505
BC857B
R534
330
R524
22 1/2W
4700uf/35v
C561
Q502
8550
6801/4W
R560
+12V
4700uf/35v
1
-VCC
IC501
Vcc
R520
10K
10k R522
R528
4.7K
8
7
473M
C507
6
+
-
Q509
9014
R502
1k
R517
47K
2.2K
104p
+
Vss
C505
683M
10K
R506
R511
C513
R508
8.2K*
102p
1uf/50V
C502
R541
2.2K
220uf/25v
C512
2
R503
2.2K
4
1M
R501
5
R546
47K C501
R514
680
10uf/25v
C509
R507
8.2K*
R505
1K
3
R
L
R545
47K
C508
473M
C506
334M
+12V
+
AC
AC
-
DZ503
BZX79-B22V
100uf/16v
C503
2
1
CN507
3P/2.0
+Vs
C527
104p
SW-IN
OUT2
OUT1
2uH
10K
MUTE1
16 GND
15 GND
14 GND
13 L-SP
12 R-SP
11 16.5v1
10 16.5v2
9 VF1
8 VF2
7 -28V
6 MUTE
5 CPU+VCC
4 ECO POWER/STBY
3 GND
2 R
1 L
-Vcc
R564
18k
R563
18k
VGV-15P
CN503
R558
4.7/0.25
L501
R559
36K
C581
333(M)
3
R562
22K
R548
0
STBY
R
C518
104(M)
L
1
R547
0
IC504
TDA7264
C580
333(M)
2
OUTPUT1
11
TDA7264
1
2
3
4
5
6
7
9-4
ELECTRICAL PARTS LIST - WOOFER OUTPUT BOARD
C506
C524
C560
C561
DB1
9940 000 04971
9940 000 04972
9940 000 04973
9940 000 04973
9940 000 03502
NONINDUCTIVE CAP. 334J 100V
MYLAR CAP. 5600P 100V K-5
ELEC. CAP. 4700µF 35V
ELEC. CAP. 4700µF 35V
THYRISTOR RS808
!
!
IC1301 9940 000 03767 IC TDA7265 STEREO POWER IC
IC501 9940 000 04669 IC TL072
IC504 9940 000 04976 IC TDA7264
Q502
Q508
Q509
Q510
9940 000 04974
9940 000 02545
9940 000 02545
9940 000 02545
TRANSISTOR 8550-C
TRANSISTOR 9014C
TRANSISTOR 9014C
TRANSISTOR 9014C
Note: Only these parts mentioned in the list are
normal service parts.
9-4
10-1
10-1
LAYOUT DIAGRAM - VIDEO OUTPUT BOARD
SCART & VIDEO OUTPUT
BOARD
CIRCUIT DIAGRAM - VIDEO BOARD
1
2
3
4
5
6
7
8
9
10
CN701
10P
GND
B/U
G/Y
R/SC
16:9-VS
RGB-SW
M-L
CVBS
SPIDF
M-R
The Video Output Board can be ordered with codenumber "9940 000 04874" for /37. The Scart
Board can be ordered with codenumber "9940 000 04985" for /12
JACK703
S-VIDEO
JACK702
RCA3P
LAYOUT DIAGRAM - SCART BOARD
JCK701
RCA-206V
1
2
3
4
6
5
4
3
2
1
In case of defects please replace the entire board.
7
6
5
4
3
2
1
For Version 37 and Version12, the board is not intented to be repaired on component level.
Circuit Diagram and Printed Circuit Board drawings
are published for orientation only.
11-1
11-1
SET MECHANICAL EXPLODED VIEW
17
15
18
15
19
13
20 X4
25
12
14
24
21
23
22
16
26
08
07
11
27
06
05
04
28
03
09
02
01
10
11-2
11-2
MECHANICAL & ACCESSORIES PARTS LIST
ELECTRICAL PARTS LIST- MISCELLANEOUS
01
01
02
03
04
9940 000 04923
9940 000 05011
9940 000 04912
9940 000 04921
9940 000 04914
PUSH-DOOR /12/37
PUSH-DOOR /93/98/55
ADDITIONAL-KEY-PANEL
ADDITIONAL-KEY
FUNTION-KNOB(SOURCE)
9940 000 04877
9940 000 04881
9940 000 04885
9940 000 04886
9940 000 04887
REMOTE CONTROL
WOOFER SPEAKER 8R 50W
D-SUB CABLE 15PIN
AV CABLE (W/D3.5X1 & RCAX3)
9P/10P CONNECT CABLE 2M
05
06
07
08
09
9940 000 04915
9940 000 04916
9940 000 04917
9940 000 04918
9940 000 04919
FUNTION-KNOB(PLAY)
FUNTION-KNOB(STOP)
FUNTION-KNOB(PROGRAM)
FUNTION-KNOB(VOLUME-)
FUNTION-KNOB(VOLUME+)
9940 000 04892
9940 000 04925
9940 000 04926
9965 000 38886
9965 000 38887
FM ANT. L=1.5M
FFC 14P 110 1.25
FFC 22P 110 1.25
LEFT SPEAKER BOX
RIGHT SPEAKER BOX
10
11
12
12
13
9940 000 04903
9940 000 04911
9940 000 04895
9940 000 05004
9940 000 04908
ADDITIONAL-KEY-BRACKET
DISPLAY FRONT LENS
FRONT CABINET /37
FRONT CABINET /12/93/98/55
SPK ARM(L)
14
15
16
17
18
9940 000 04909
9940 000 04922
9940 000 04905
9965 100 00988
9940 000 04899
SPK ARM(R)
STANDBY/OPEN KNOB
FRONT-LENS-BRACKET
DVD MECHANISM KHM-313AAA
OUTPUT-COVER
19
19
20
21
22
9940 000 04896
9940 000 05005
9940 000 04924
9940 000 04894
9940 000 04904
BACK CABINET /37
BACK CABINET /12/93/98
SPK ORIENTATION RUBBER
SLIDE DOOR SPRING(R)
PUSH DOOR BKT
23
24
25
26
27
9940 000 04907
9940 000 04906
9940 000 04893
9940 000 04898
9940 000 05422
SWING ARM
DOOR-LIP
SLIDE DOOR SPRING(L)
FOOT-BACK-COVER
FOOT
28
9940 000 04897
FOOT-FRONT-COVER
9940 000 04882
9940 000 04883
! 9940 000 04884
9940 000 04901
9940 000 04902
9940 000 04913
9940 000 05007
! 9940 000 04987
! 9940 000 05009
! 9940 000 05012
! 9940 000 04878
9940 000 04879
9940 000 05013
TRASFO. EI-76 230V/50 /12
TRASFO. 230V/50HZ /55/98
TRASFO. 230V/50HZ /93
TRASFO. 120V/60 /37
WOOFER SPEAKER BOX ASS'Y
/37/55/93/98
! 9940 000 04888
! 9940 000 05166
! 9965 100 03642
WOOFER SPEAKER BOX ASS'Y/12
AC LINE CORD 1.8m /12/55/98
AC LINE CORD 1.8m /37
AC LINE CORD 1.8m /93
AC LINE CORD 1.8m /05
! 9965 000 38997
AC LINE CORD 1.8m KS /61
! 9940 000 04649
9965 000 38625
ECO POWER TRASFO. /12/37
POWER PLUG ADAPTOR /05
9965 100 03638
SPEAKER BOX (R) ASS'Y /05
9965 100 03639
SPEAKER BOX (L) ASS'Y /05
! 9940 000 03508
! 9965 100 00688
TRASFO. 220V/60 /61
SUBWOOFER FOOT BOTTOM
SUBWOOFER OUTPUT PAN
AC SOCKET 2.5A/250V
SOCKET BOX BOTTOM COVER
SOCKET BOX TOP COVER
SOCKET BOX PANEL /37/55/93/98
SOCKET BOX PANEL /12
Note: Only these parts mentioned in the list are
normal service parts.
9940 000 04862
9940 000 04865
9940 000 04868
9940 000 04869
9940 000 04871
ECO POWER PCB ASS'Y /12/37
POWER PCB ASS'Y
DISPLAY PCB ASS'Y MCD288
AMP KEY PCB ASS'Y MCD288
WOOFER OUTPUT BOARD ASS'Y
9940 000 04873
9940 000 04874
9940 000 04875
9965 100 03641
9965 000 42750
WOOFER TERMINAL BOARD ASS'Y
VIDEO OUTPUT PCB ASS'Y
TUNER BOARD ASSY
TUNER BOARD ASSY /12/05
DVD DECORDER BOARD ASS'Y /12/05
9965 000 42751
DVD DECORDER BOARD ASS'Y /37
9965 000 42752
DVD DECORDER BOARD ASS'Y /55
9965 000 42753
9965 000 42754
9940 000 04985
DVD DECORDER BOARD ASS'Y /93
DVD DECORDER BOARD ASS'Y /98
SCART BOARD ASS'Y /12
9965 100 03644
SCART BOARD ASS'Y /05
9965 100 00828
9965 100 00499
MCU PARTS ASS'Y /12/05
MCU PARTS ASS'Y /55/61
Note: Only these parts mentioned in the list are
normal service parts.
12-1
ELECTRICAL PARTS LIST
- DISPLAY BOARD
ELECTRICAL PARTS LIST
- POWER BOARD
IC301
IC302
IC303
IC304
IC305
9940 000 04953
9940 000 04957
9940 000 04953
9940 000 04951
9940 000 02539
IC LM340T5 7805
CPU 3S9228
IC LM340T5 7805
IC 24C01A-SC27
IC PT6311
C290
CN201
CN204
CN209
CN214
IC306
IC307
IC308
IC309
LED301
9940 000 02524
9940 000 03512
9940 000 04956
9940 000 04954
9940 000 03437
IC PT2309-S(L)
CHIP IC AC6811
IC TDA2579 /12
IC SA6208
LED 3B4SCB01
F201
F501
F502
IC203
IC204
LED302
LED303
LED304
LED305
LED306
9940 000 03437
9940 000 03437
9940 000 03437
9940 000 03437
9940 000 03437
LED 3B4SCB01
LED 3B4SCB01
LED 3B4SCB01
LED 3B4SCB01
LED 3B4SCB01
LED307
Q301
Q302
Q303
Q304
9940 000 02537
9940 000 02518
9940 000 02519
9940 000 02519
9940 000 02518
LED (BLUE)
TRANSISTOR 8050C
TRANSISTOR 8550C
TRANSISTOR 8550C
TRANSISTOR 8050C
Q305
Q306
Q307
S301
SW305
9940 000 02518
9940 000 04949
9940 000 02518
9940 000 02542
9940 000 02543
TRANSISTOR 8050C
TRANSISTOR 9014-C
TRANSISTOR 8050C
IR SENSOR
LIGHT TOUCH SWITCH
SW306
SW307
SW308
SW309
SW310
9940 000 02543
9940 000 02543
9940 000 02543
9940 000 04964
9940 000 04964
LIGHT TOUCH SWITCH
LIGHT TOUCH SWITCH
LIGHT TOUCH SWITCH
LIGHT TOUCH SWITCH
LIGHT TOUCH SWITCH
SW311
SW312
X302
X303
9940 000 02543
9940 000 02543
9940 000 03152
9940 000 04962
LIGHT TOUCH SWITCH
LIGHT TOUCH SWITCH
FILTER FREQ. 4.19MH
CRYSTAL 4.332MHZ /12
Note: Only these parts mentioned in the list are
normal service parts.
9940 000 04932
9940 000 04943
9940 000 04944
9940 000 04939
9940 000 04941
ELE. CAP. 3300µF 35V
S-SOCKET DS-106
AV OUT SOCKET 4P
LEADING-OUT TER. 15P
FM OUTPUT SOCKET
9940 000 02529
9940 000 03433
9940 000 03433
9940 000 04936
9940 000 04935
FUSE F2A L250V
FUSE F6.3A L250V
FUSE F6.3A L250V
IC PT2313
IC LM2576-ADJP
IC502
JCK201
L206
Q203
Q204
9940 000 04937
9940 000 04942
9940 000 04931
9940 000 02545
9940 000 02519
IC 7812
2PIN RCA SOCKET
FIXED INDUCTOR 220µH
TRANSISTOR 9014C
TRANSISTOR 8550C
Q206
Q207
Q208
Q209
R259
9940 000 02545
9940 000 02545
9940 000 02517
9940 000 02545
9940 000 03412
TRANSISTOR 9014C
TRANSISTOR 9014C
TRANSISTOR 2SB772
TRANSISTOR 9014C
FUSE F1.5A/125V
!
!
Note: Only these parts mentioned in the list are
normal service parts.
12-2
ELECTRICAL PARTS LIST
- WOOFER OUTPUT BOARD
C506
C524
C560
C561
DB1
F501
F502
IC1301
IC501
IC504
Q502
Q508
Q509
Q510
!
!
9940 000 04971
9940 000 04972
9940 000 04973
9940 000 04973
9940 000 03502
CAP. 334J 100V
MYLAR CAP. 5600P 100V
ELEC. CAP. 4700µF 35V
ELEC. CAP. 4700µF 35V
THYRISTOR RS808
9940 000 03433
9940 000 03433
9940 000 03767
9940 000 04669
9940 000 04976
FUSE F6.3A L250V
FUSE F6.3A L250V
IC TDA7265
IC TL072
IC TDA7264
9940 000 04974
9940 000 02545
9940 000 02545
9940 000 02545
TRANSISTOR 8550-C
TRANSISTOR 9014C
TRANSISTOR 9014C
TRANSISTOR 9014C
ELECTRICAL PARTS LIST
- SCART BOARD (ONLY FOR /12)
JCK801
9940 000 04983
RCA SOCKET AV-8.4-0.8B
JCK802
9940 000 03511
SCART 21P SOCKET
JCK803
9940 000 04944
AV OUT SOCKET 4P
Q801
9940 000 02545
TRANSISTOR 9014C
Q802
9940 000 02519
TRANSISTOR 8550C
Note: Only these parts mentioned in the list are
normal service parts.
Note: Only these parts mentioned in the list are
normal service parts.
ELECTRICAL PARTS LIST
- ECO POWER BOARD(ONLY FOR /12/37)
ELECTRICAL PARTS LIST
- VIDEO OUTPUT BOARD(FOR /55/93/98)
Q2201
9940 000 02518
REL1201 9940 000 03509
!
9940 000 04649
JACK701 9940 000 04979
RCA SOCKET 2P B/Y
JACK702 9940 000 02553
3PINS RCA SOCKET(R/B/G)
JACK703 9940 000 04982
S-VIDEO OUTPUT SOCKET
TRANSISTOR 8050C
RELAY 10A 240VAC/30VDC
ECO POWER TRASFO.
Note: Only these parts mentioned in the list are
normal service parts.
Note: Only these parts mentioned in the list are
normal service parts.
12-3
ELECTRICAL PARTS LIST
- AMP KEY BOARD
J104
J105
J106
LED101
LED102
9940 000 04966
9940 000 04967
9940 000 04968
9940 000 02537
9940 000 02537
HEADPHONE JACK D3.5
AUX IN JACK CK3511
USB JACK A-TYPE 4P
LED (BLUE)
LED (BLUE)
SW101
SW102
SW103
SW104
9940 000 04965
9940 000 04965
9940 000 04965
9940 000 04965
LIGHT TOUCH SW. KFC-05
LIGHT TOUCH SW. KFC-05
LIGHT TOUCH SW. KFC-05
LIGHT TOUCH SW. KFC-05
Note: Only these parts mentioned in the list are
normal service parts.
ELECTRICAL PARTS LIST
- WOOFER TERMINAL BOARD
CN602
9940 000 04939
LED501 9940 000 03437
LEADING-OUT TER. 15P
LED 3B4SCB01
Note: Only these parts mentioned in the list are
normal service parts.
13 - 1
REVISION LIST
1.0 Manual 3141 785 30800
Initial Service Manual released.
1.1 Manual 3141 785 30801
In this version, the content of Chapter 9 and Chapter 11 are corrected and updated.
Page 9-2: Layout Diagram-Woofer Output Board corrected.
Page 9-3: Circuit Diagram-Woofer Output Board corrected.
Page 9-4: Electrical Parts List added
Page 11-2: Mechanical & Accessories Parts List updated
1.2 Manual 3141 785 30802
In this version, Version /61 added.
Page 11-2: Mechanical & Accessories Parts List updated
1.3 Manual 3141 785 30803
In this version, Version /05 added.
Page 11-2: Mechanical & Accessories Parts List updated
1.4 Manual 3141 785 30804
In this version, DVD Decorder Board has been divided into 5 items as per separate version.
Page 11-2: Mechanical & Accessories Parts List updated