1
PRO–LOK®
CHOOSING THE CORRECT “BODY”PIECE
There may or may not be a “correct” body choice.
Many times it is a matter of user preference. We
recommend that you use the “thin hook” or the
“thin L” whenever possible. Some of the reasons
include the thinner material may provide less
wedging or stress on the vehicle and easier tool
control. It is easier to slightly bend the thin body
if needed. The “rigid body” provides you with a
firm and stronger tool if needed. When you are
faced with a vehicle that requires a little more
length, simply screw the 18” “extension” between
the “handle” and the “body”. NEVER BEND THE
EXTENSION. NEVER BEND THE BODY UNLESS
NEEDED AND NEVER BEND WITHIN 4” OF THE
CONNECTION TO THE HANDLE PIECE.
Instructions
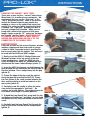
( photo 1)
INSTRUCTIONS:
Lubricate all tools and the area of the door, window,
weather stripping and door frame with a sponge
soaked in liquid soap water prior to inserting the
tool or accessories into the vehicle. This tool must
be used with the AO65 and AO67 wedges.
( photo 2)
1. Gently insert the AO65-A1 Wedge Starter and
Window Protector at the top corner of the door
frame/window glass. Insert the AO65 into the
space created by the AO65-A1, between the door/
window and the frame. Inflate Wedge ( photo 1).
2. Insert the AO67 into the gap created between the
door/window and the vehicle on the vertical edge of
the door/window. Press wedge firmly into the gap
(photo 2).
( photo 3)
3. Protect the edge of the glass and the paint of
the inside door by inserting the AO42-SL Protective Tool Sleeve in the space created between the
door and the vehicle to avoid tool contact on the
glass/paint (photo 3).
4. Carefully screw the handle to either the extension and/or the appropriate “tool body”. Be
cautious not to over tighten. The extension may be
used when extra length is needed (photo 4).
( photo 4)
5. To bend the Long Reach Tool, grasp both the top
and bottom of the desired “tool body” in each hand
and gently bend the long rod section to the desired
curve.
6. Carefully feed the Long Reach Tool through the
edge of the sleeve into the vehicle compartment
(photo 5).
www.pro-lok.com
( photo 5)
©2007
PRO-LOK
®
7