1
Océ User manual
Océ VarioPrint® 2090
User manual
Océ-Technologies B.V.
Copyright
©
2007, Océ-Technologies B.V. Venlo, The Netherlands.
All rights reserved. No part of this work may be reproduced, copied, adapted, or
transmitted in any form or by any means without written permission from Océ.
Océ-Technologies B.V. makes no representation or warranties with respect to the
contents hereof and specifically disclaims any implied warranties of
merchantability or fitness for any particular purpose.
Further, Océ-Technologies B.V. reserves the right to revise this publication and to
make changes from time to time in the content hereof without obligation to notify
any person of such revision or changes.
Edition 2007-2
US
Trademarks
Trademarks
List of Trademarks
Océ, Océ VarioPrint® 2090 are registered trademarks of Océ-Technologies B.V..
Adobe®, Acrobat®, Reader® and Distiller® are registered trademarks of Adobe®
Systems Incorporated.
PostScript® 3™ is a registered trademark of Adobe® Systems Incorporated.
Apple®, Mac® , Mac OS® and Macintosh® are registered trademarks of Apple®
Computer, Inc.
OpenVMS and HP-PCL are trademarks of Hewlett-Packard® Company.
WIN-OS/2® , OS/2® Lotus Notes®, OS 390®, z/OS® are registered trademarks of
International Business Machines Corporation in the United States, other countries,
or both.
Linux® is a registered trademark of Linus Torvalds.
Microsoft®, Windows® , Windows NT®, Windows 98®, Windows 2000®, Windows
XP®, Windows Server 2003® are either registered trademarks or trademarks of
Microsoft® Corporation in the United States and/or other countries.
UNIX® is a registered trademark of The Open Group in the United States and other
countries.
Products in this publication are referred to by their general trade names. In most, if
not all cases, these designations are claimed as trademarks or registered trademarks
of their respective companies.
3
Trademarks
4
Table of Contents
Table of Contents
Chapter 1
Introduction . . . . . . . . . . . . . . . . . . . . . . . . . . . . . . . . . . . . . . . . . . . . . . . . . . . . . .
The Océ VarioPrint® 2090 . . . . . . . . . . . . . . . . . . . . . . . . . . . . . . . . . . . .
About the users of the Océ VarioPrint® 2090 . . . . . . . . . . . . . . . . . . . . .
Notes to the reader . . . . . . . . . . . . . . . . . . . . . . . . . . . . . . . . . . . . . . . . .
Available documentation . . . . . . . . . . . . . . . . . . . . . . . . . . . . . . . . . . . . .
11
12
13
14
15
Chapter 2
Getting to know the Océ VarioPrint® 2090 . . . . . . . . . . . . . . . . . . . . . . . . . . . . .
Concepts and Philosophy . . . . . . . . . . . . . . . . . . . . . . . . . . . . . . . . . . . .
The Configuration . . . . . . . . . . . . . . . . . . . . . . . . . . . . . . . . . . . . . . . . . .
About the paper trays. . . . . . . . . . . . . . . . . . . . . . . . . . . . . . . . . . . . . . . .
About the Staplers . . . . . . . . . . . . . . . . . . . . . . . . . . . . . . . . . . . . . . . . . .
The power modes . . . . . . . . . . . . . . . . . . . . . . . . . . . . . . . . . . . . . . . . . .
The on-line help on the operator panel . . . . . . . . . . . . . . . . . . . . . . . . . .
The 'System information' section . . . . . . . . . . . . . . . . . . . . . . . . . . . . . . .
About the job queue. . . . . . . . . . . . . . . . . . . . . . . . . . . . . . . . . . . . . . . . .
Additional options for the Océ VarioPrint® 2090 . . . . . . . . . . . . . . . . . . .
About the accounting function. . . . . . . . . . . . . . . . . . . . . . . . . . . . . . .
Introduction to the scan-to-file function . . . . . . . . . . . . . . . . . . . . . . . .
Introduction to the scan-to-email function . . . . . . . . . . . . . . . . . . . . . .
About the integrated booklet maker (optional) . . . . . . . . . . . . . . . . . .
The Dual Paper Tray. . . . . . . . . . . . . . . . . . . . . . . . . . . . . . . . . . . . . .
17
18
23
30
31
33
36
38
41
45
45
47
49
51
53
Chapter 3
User environments for the Océ VarioPrint® 2090. . . . . . . . . . . . . . . . . . . . . . . .
Selecting the user environment for the Océ VarioPrint® 2090. . . . . . . . .
The walk-up environment. . . . . . . . . . . . . . . . . . . . . . . . . . . . . . . . . . . . .
The controlled environment . . . . . . . . . . . . . . . . . . . . . . . . . . . . . . . . . . .
55
56
57
59
Chapter 4
Getting started . . . . . . . . . . . . . . . . . . . . . . . . . . . . . . . . . . . . . . . . . . . . . . . . . . . .
Turning the System On . . . . . . . . . . . . . . . . . . . . . . . . . . . . . . . . . . . . . .
Shut down the system . . . . . . . . . . . . . . . . . . . . . . . . . . . . . . . . . . . . . . .
Restarting the system . . . . . . . . . . . . . . . . . . . . . . . . . . . . . . . . . . . . . . .
Load the paper trays . . . . . . . . . . . . . . . . . . . . . . . . . . . . . . . . . . . . . . . .
Install the dual paper tray (optional). . . . . . . . . . . . . . . . . . . . . . . . . . . . .
Configure the accounting settings . . . . . . . . . . . . . . . . . . . . . . . . . . . . . .
The Configuration of the Scan-to-file Function . . . . . . . . . . . . . . . . . . . .
The configuration of the scan-to-email function . . . . . . . . . . . . . . . . . . . .
61
62
64
65
66
68
71
72
73
5
Table of Contents
Chapter 5
Controlling the Océ VarioPrint® 2090 . . . . . . . . . . . . . . . . . . . . . . . . . . . . . . . . .
Enable or disable the automatic wake-up . . . . . . . . . . . . . . . . . . . . . . . .
Enable and disable the wake-up protection . . . . . . . . . . . . . . . . . . . . . . .
Set a protective PIN . . . . . . . . . . . . . . . . . . . . . . . . . . . . . . . . . . . . . . . . .
Lock and unlock the operator panel . . . . . . . . . . . . . . . . . . . . . . . . . . . . .
Lock and unlock the paper trays . . . . . . . . . . . . . . . . . . . . . . . . . . . . . . .
Enable the calendar timer . . . . . . . . . . . . . . . . . . . . . . . . . . . . . . . . . . . .
Set the calendar timer . . . . . . . . . . . . . . . . . . . . . . . . . . . . . . . . . . . . . . .
77
78
79
80
81
83
85
86
Chapter 6
The copy function . . . . . . . . . . . . . . . . . . . . . . . . . . . . . . . . . . . . . . . . . . . . . . . . . 87
Basic copy jobs . . . . . . . . . . . . . . . . . . . . . . . . . . . . . . . . . . . . . . . . . . . . 88
Make a simple copy. . . . . . . . . . . . . . . . . . . . . . . . . . . . . . . . . . . . . . . 88
Stapled copies. . . . . . . . . . . . . . . . . . . . . . . . . . . . . . . . . . . . . . . . . . . 90
Stop the scanning of a copy job . . . . . . . . . . . . . . . . . . . . . . . . . . . . . 93
Giving priority to jobs. . . . . . . . . . . . . . . . . . . . . . . . . . . . . . . . . . . . . . 95
Copy job settings . . . . . . . . . . . . . . . . . . . . . . . . . . . . . . . . . . . . . . . . . . . 98
Types of copy job settings. . . . . . . . . . . . . . . . . . . . . . . . . . . . . . . . . . 98
Correct the settings for a copy job. . . . . . . . . . . . . . . . . . . . . . . . . . . 105
Complex copy jobs . . . . . . . . . . . . . . . . . . . . . . . . . . . . . . . . . . . . . . . . . 106
Combining Subsets into One Document . . . . . . . . . . . . . . . . . . . . . . 106
Concatenation and chapterization. . . . . . . . . . . . . . . . . . . . . . . . . . . 108
Delete scanned subsets . . . . . . . . . . . . . . . . . . . . . . . . . . . . . . . . . . 111
Using tab sheets . . . . . . . . . . . . . . . . . . . . . . . . . . . . . . . . . . . . . . . . 112
Use covers in a copy job . . . . . . . . . . . . . . . . . . . . . . . . . . . . . . . . . . 114
Copy special originals and originals of a non-standard size . . . . . . . 116
Booklets . . . . . . . . . . . . . . . . . . . . . . . . . . . . . . . . . . . . . . . . . . . . . . . . . 118
Create an A5 booklet from A4 originals. . . . . . . . . . . . . . . . . . . . . . . 118
Create an A4 booklet from A4 originals. . . . . . . . . . . . . . . . . . . . . . . 119
Create an A4 booklet from A4 originals, including a cover . . . . . . . . 120
Create an A5 booklet from an A5 booklet . . . . . . . . . . . . . . . . . . . . . 121
Chapter 7
The print function . . . . . . . . . . . . . . . . . . . . . . . . . . . . . . . . . . . . . . . . . . . . . . . .
Printing and the job queue . . . . . . . . . . . . . . . . . . . . . . . . . . . . . . . . . . .
About automatic printing . . . . . . . . . . . . . . . . . . . . . . . . . . . . . . . . . .
Giving priority to jobs. . . . . . . . . . . . . . . . . . . . . . . . . . . . . . . . . . . . .
Stop printing . . . . . . . . . . . . . . . . . . . . . . . . . . . . . . . . . . . . . . . . . . .
Printing and the mailbox. . . . . . . . . . . . . . . . . . . . . . . . . . . . . . . . . . . . .
About the mailbox . . . . . . . . . . . . . . . . . . . . . . . . . . . . . . . . . . . . . . .
Print a job from the mailbox. . . . . . . . . . . . . . . . . . . . . . . . . . . . . . . .
Edit a mailbox job . . . . . . . . . . . . . . . . . . . . . . . . . . . . . . . . . . . . . . .
Remove jobs from the mailbox . . . . . . . . . . . . . . . . . . . . . . . . . . . . .
Using a printer driver . . . . . . . . . . . . . . . . . . . . . . . . . . . . . . . . . . . . . . .
6
123
124
124
127
129
131
131
134
136
140
141
Table of Contents
About the Océ VarioPrint® 2090 printer drivers . . . . . . . . . . . . . . . .
About the bidirectional printer driver . . . . . . . . . . . . . . . . . . . . . . . . .
About the page programmer . . . . . . . . . . . . . . . . . . . . . . . . . . . . . . .
Resolving constraints . . . . . . . . . . . . . . . . . . . . . . . . . . . . . . . . . . . .
Océ Intra Logic® . . . . . . . . . . . . . . . . . . . . . . . . . . . . . . . . . . . . . . . . . . .
About Océ Intra Logic® . . . . . . . . . . . . . . . . . . . . . . . . . . . . . . . . . . .
Océ Intra Logic functions . . . . . . . . . . . . . . . . . . . . . . . . . . . . . . . . .
Creating jobs . . . . . . . . . . . . . . . . . . . . . . . . . . . . . . . . . . . . . . . . . . . . .
Create a print job. . . . . . . . . . . . . . . . . . . . . . . . . . . . . . . . . . . . . . . .
Create a secured print job. . . . . . . . . . . . . . . . . . . . . . . . . . . . . . . . .
Create a print job with an Account ID . . . . . . . . . . . . . . . . . . . . . . . .
Creating booklets from print jobs . . . . . . . . . . . . . . . . . . . . . . . . . . .
Create a folded A4 booklet from an A4 document . . . . . . . . . . . .
Create a folded A5 booklet from an A4 document . . . . . . . . . . . .
Create a folded and stapled A5 booklet with the booklet maker .
Printing the created jobs . . . . . . . . . . . . . . . . . . . . . . . . . . . . . . . . . . . .
Print a secured print job . . . . . . . . . . . . . . . . . . . . . . . . . . . . . . . . . .
Printing a print job with an Account ID . . . . . . . . . . . . . . . . . . . . . . .
Print a folded A4 booklet from the mailbox on the
Océ VarioPrint® 2090 . . . . . . . . . . . . . . . . . . . . . . . . . . . . . . . . . . . .
Print a folded A5 booklet from the mailbox on the
Océ VarioPrint® 2090 . . . . . . . . . . . . . . . . . . . . . . . . . . . . . . . . . . . .
Print a folded A5 booklet with the booklet maker on the
Océ VarioPrint® 2090 . . . . . . . . . . . . . . . . . . . . . . . . . . . . . . . . . . . .
Using special media. . . . . . . . . . . . . . . . . . . . . . . . . . . . . . . . . . . . . . . .
Special paper in a print job . . . . . . . . . . . . . . . . . . . . . . . . . . . . . . . .
My Paper in a print job . . . . . . . . . . . . . . . . . . . . . . . . . . . . . . . . . . .
Covers in a print job . . . . . . . . . . . . . . . . . . . . . . . . . . . . . . . . . . . . .
Create a print job with a pre-printed front cover (PostScript® only) .
Use colored sheets to separate groups of pages in a print job
(PostScript® only) . . . . . . . . . . . . . . . . . . . . . . . . . . . . . . . . . . . . . . .
Use tab sheets in a print job (PostScript® only) . . . . . . . . . . . . . . . .
Print on a tab (PostScript® only) . . . . . . . . . . . . . . . . . . . . . . . . . . . .
Chapter 8
The scan function (optional) . . . . . . . . . . . . . . . . . . . . . . . . . . . . . . . . . . . . . . .
Scan profiles . . . . . . . . . . . . . . . . . . . . . . . . . . . . . . . . . . . . . . . . . . . . .
The scan profiles file . . . . . . . . . . . . . . . . . . . . . . . . . . . . . . . . . . . . .
Download - Scan profiles . . . . . . . . . . . . . . . . . . . . . . . . . . . . . . . . .
Upload - Scan profiles. . . . . . . . . . . . . . . . . . . . . . . . . . . . . . . . . . . .
Configuring the scan function . . . . . . . . . . . . . . . . . . . . . . . . . . . . . . . .
Configure the scan server . . . . . . . . . . . . . . . . . . . . . . . . . . . . . . . . .
Configure the scan job export function . . . . . . . . . . . . . . . . . . . . . . .
Configuring the scan-to-email function . . . . . . . . . . . . . . . . . . . . . . . . .
The configuration of the scan-to-email function . . . . . . . . . . . . . . . .
141
144
146
148
149
149
152
155
155
157
158
160
160
161
162
163
163
165
166
167
168
169
169
171
173
175
176
178
180
181
182
182
189
190
191
191
193
194
194
7
Table of Contents
Configure an LDAP server . . . . . . . . . . . . . . . . . . . . . . . . . . . . . . . .
Upload - Address list . . . . . . . . . . . . . . . . . . . . . . . . . . . . . . . . . . . . .
Download - Address list. . . . . . . . . . . . . . . . . . . . . . . . . . . . . . . . . . .
Scanning on the Océ VarioPrint® 2090 . . . . . . . . . . . . . . . . . . . . . . . . .
Types of scan job settings. . . . . . . . . . . . . . . . . . . . . . . . . . . . . . . . .
Create a scan-to-file job . . . . . . . . . . . . . . . . . . . . . . . . . . . . . . . . . .
Create a scan-to-email job . . . . . . . . . . . . . . . . . . . . . . . . . . . . . . . .
Scanning special originals and non-standard size originals . . . . . . .
Stopping the Scanning of a Scan Job . . . . . . . . . . . . . . . . . . . . . . . .
Check the export status of scan and email jobs . . . . . . . . . . . . . . . .
Troubleshooting. . . . . . . . . . . . . . . . . . . . . . . . . . . . . . . . . . . . . . . . .
196
198
199
200
200
206
208
210
212
213
215
Chapter 9
The accounting function . . . . . . . . . . . . . . . . . . . . . . . . . . . . . . . . . . . . . . . . . . .
The accounting concepts . . . . . . . . . . . . . . . . . . . . . . . . . . . . . . . . . . . .
The accounting log file . . . . . . . . . . . . . . . . . . . . . . . . . . . . . . . . . . . . . .
About the accounting log file . . . . . . . . . . . . . . . . . . . . . . . . . . . . . . .
Download the accounting log files. . . . . . . . . . . . . . . . . . . . . . . . . . .
The account ID file . . . . . . . . . . . . . . . . . . . . . . . . . . . . . . . . . . . . . . . . .
Download the account ID file. . . . . . . . . . . . . . . . . . . . . . . . . . . . . . .
Edit the account ID file . . . . . . . . . . . . . . . . . . . . . . . . . . . . . . . . . . .
Uploading the Account ID File. . . . . . . . . . . . . . . . . . . . . . . . . . . . . .
Restoring the Default Account ID File . . . . . . . . . . . . . . . . . . . . . . . .
Copying and printing with the accounting function . . . . . . . . . . . . . . . . .
Enter and cancel an 'Account ID' . . . . . . . . . . . . . . . . . . . . . . . . . . .
Create a print job with an Account ID . . . . . . . . . . . . . . . . . . . . . . . .
Making a Copy or Print with the Copy Card . . . . . . . . . . . . . . . . . . .
217
218
220
220
225
226
226
227
229
230
231
231
233
235
Chapter 10
Adding supplies. . . . . . . . . . . . . . . . . . . . . . . . . . . . . . . . . . . . . . . . . . . . . . . . . .
Loading the paper . . . . . . . . . . . . . . . . . . . . . . . . . . . . . . . . . . . . . . . . .
Load the standard media and media with special front . . . . . . . . . . .
Load the tab sheets. . . . . . . . . . . . . . . . . . . . . . . . . . . . . . . . . . . . . .
Load a combination of tab sheets and media with special front . . . .
Adding toner and staples . . . . . . . . . . . . . . . . . . . . . . . . . . . . . . . . . . . .
Add the toner. . . . . . . . . . . . . . . . . . . . . . . . . . . . . . . . . . . . . . . . . . .
Replacing Stapler Cartridges 1 and 2 (standard on-line staplers). . .
Replacing Stapler Cartridge 3 (optional off-line stapler) . . . . . . . . . .
Replacing Stapler Cartridges 4 and 5 (optional booklet maker) . . . .
237
238
238
240
243
245
245
248
250
251
Chapter 11
Error handling . . . . . . . . . . . . . . . . . . . . . . . . . . . . . . . . . . . . . . . . . . . . . . . . . . .
Handling Contradictions . . . . . . . . . . . . . . . . . . . . . . . . . . . . . . . . . . . . .
Handling Errors . . . . . . . . . . . . . . . . . . . . . . . . . . . . . . . . . . . . . . . . . . .
About Paper Jams . . . . . . . . . . . . . . . . . . . . . . . . . . . . . . . . . . . . . . . . .
About the staple jams. . . . . . . . . . . . . . . . . . . . . . . . . . . . . . . . . . . . . . .
253
254
256
258
260
8
Table of Contents
Appendix A
Overview and tables . . . . . . . . . . . . . . . . . . . . . . . . . . . . . . . . . . . . . . . . . . . . . .
Product specifications . . . . . . . . . . . . . . . . . . . . . . . . . . . . . . . . . . . . . .
Originals that can be used . . . . . . . . . . . . . . . . . . . . . . . . . . . . . . . . . . .
Materials that can be used. . . . . . . . . . . . . . . . . . . . . . . . . . . . . . . . . . .
261
262
263
264
Appendix B
Miscellaneous . . . . . . . . . . . . . . . . . . . . . . . . . . . . . . . . . . . . . . . . . . . . . . . . . . . 269
Reader's comment sheet . . . . . . . . . . . . . . . . . . . . . . . . . . . . . . . . . . . . 270
Addresses of local Océ organisations . . . . . . . . . . . . . . . . . . . . . . . . . . 272
9
Table of Contents
10
Chapter 1
Introduction
11
The Océ VarioPrint® 2090
The Océ VarioPrint® 2090
Definition
The Océ VarioPrint® 2090 is a high-volume, black and white print, copy and scan
system that can operate in different user environments, such as environments where
many users share a Océ VarioPrint® 2090 and environments where one or more
dedicated operators work with the machine. These operators then do all the copy,
print and scan tasks.
In addition to the print and copy features, Océ offers several optional functions for
your system, like a dual paper tray, the scan-to-file and scan-to-email functions, an
integrated booklet maker and an accounting function. You can also use applications
like Océ Intra Logic® to use your printer in an even more efficient way.
Attributes
■
■
■
■
■
■
12
The print speed is 91 A4-sized (Letter) pages per minute, 1-sided and 2-sided.
The print speed for A3 (Tabloid 11x17) is 45 pages per minute.
The scan speed is 56 A4-sized pages per minute.
The Océ VarioPrint® 2090 has 3 or 4 front loading paper trays. The number of
paper trays depends on your configuration.
Features like the 'Job queue' and the 'Mailbox' help you to manage your jobs
efficiently.
The 'Copy build wizard' allows you to combine several copied originals into one
document. The 'Scan build wizard' wizard allows you to combine several scanned
images into one digital document.
The 'System manager' and the 'System monitor' enable you to manage the system
and the supplies efficiently.
Chapter 1 Introduction
About the users of the Océ VarioPrint® 2090
About the users of the Océ VarioPrint® 2090
Introduction
Information for operators, key operators, system administrators
For the purpose of this user manual, the following target groups are defined.
Operators (including general users)
■ Key operators
■ System Administrators
■
The target group for the information or task in a section is indicated at the top of that
section.
Tasks of the types of users
[1]
[1] User Tasks
Types of users
Examples of tasks
Operators
■
■
Key operators
■
■
System administrators
■
■
Create print jobs, copy jobs and scan jobs
Process print jobs, copy jobs and scan jobs
Handle errors on the Océ VarioPrint® 2090
Manage the key operator settings in the Océ VarioPrint®
2090 Settings Editor
Configure the Océ VarioPrint® 2090 in the network
Manage the system administrator settings in the Océ VarioPrint® 2090 Settings Editor
13
Notes to the reader
Notes to the reader
Introduction
This manual helps you use the Océ VarioPrint® 2090. The manual contains a
description of the Océ VarioPrint® 2090 and guidelines for its use and operation.
There are also tips given to help you increase your knowledge of the Océ VarioPrint®
2090 and to help you better manage the workflow.
Definition
Attention Getters
Parts of this manual require your special attention. These parts provide important,
additional information or are about the prevention of damage to your properties.
Note, Attention and Caution
The words Note, Attention and Caution indicate these important parts.
■ The word Note comes before additional information about the correct operation
of the Océ VarioPrint® 2090 or before a hint.
■ A part marked with Attention contains information to prevent damage to items,
for example the Océ VarioPrint® 2090 or a file.
■ A part marked with Caution contains information to prevent personal injury.
Safety information
The safety information for this product is included in a separate manual with the title
Safety manual. This manual is part of the documentation set that you received with
your product.
14
Chapter 1 Introduction
Available documentation
Available documentation
The documentation set of the Océ VarioPrint® 2090
Information for operators, key operators, system administrators
Océ delivers the Océ VarioPrint® 2090 with a documentation set.
The documentation set for the Océ VarioPrint® 2090 contains the following items.
[2] Océ VarioPrint® 2090The documentation set
[2]
(1 – 2)
Item
Description
User manual
The User manual describes the workflow of print jobs, copy
jobs and scan jobs.
■ Print from the mailbox
■ Print directly to the Océ VarioPrint® 2090
■ Make simple and advanced copies
■ Convert analog documents into digital documents (scan to
file)
■ Add the supplies
■ Solve possible errors
The manual also contains general information about the system.
■ Configuration, workflow and structure of the Océ VarioPrint® 2090
■ Turn on, turn off and restart the system
■ Product specifications, originals and copy materials to use
Safety manual
The multilingual Safety manual gives information about safety issues.
■ Instructions for safe use
■ Safety data sheets
■ EPA Energy Star®
Security manual
The Security manual contains information about the Common Criteria certified configuration. This manual describes
the elements that are important to administer the Océ Smart
Imager in a certified configuration.
15
Available documentation
[2] Océ VarioPrint® 2090The documentation set
16
(2 – 2)
Item
Description
CD-ROM
The CD-ROM contains a digital copy of the User manual and
the Safety manual.
On-line help
The Océ VarioPrint® 2090 contains the following types of
on-line help.
■ An on-line help on the operator panel.
The on-line help on the operator panel gives experienced
users more information about advanced functions of the
Océ VarioPrint® 2090.
The Help key on the operator panel gives access to this
on-line help.
■ An on-line help in the Océ VarioPrint® 2090 Settings Editor application on the Océ Smart Imager.
The User manual sometimes refers to settings in the Océ
VarioPrint® 2090 Settings Editor.
The Océ VarioPrint® 2090 Settings Editor allows key operators and system administrators to change the default
system settings.
Key operators and system administrators can refer to the
on-line help in the Océ VarioPrint® 2090 Settings Editor
for more information about the settings.
■ An on-line help in the printer driver (PCL and PostScript®) of the Océ VarioPrint® 2090.
Chapter 1 Introduction
Chapter 2
Getting to know the Océ
VarioPrint® 2090
17
Concepts and Philosophy
Concepts and Philosophy
Definition
Information for operators, key operators, system administrators
The Océ VarioPrint® 2090 is a high-volume, black and white system. The system is
based on the successful Océ 31x5. The system includes improvements in
productivity, paper input, document finishing and document output.
The printer supports, by default, PCL6. Adobe® PostScript® (optional) is also
supported.
Introduction
In this section you find an explanation and description of the main concepts and the
philosophy behind the concepts that are applied in the Océ VarioPrint® 2090.
Automatic print jobs and interactive print jobs
The Océ VarioPrint® 2090 allows you to send your print jobs directly to the job
queue. The jobs in the job queue are printed without operator intervention. This type
of printing is called automatic printing.
You can also send your print jobs to the mailbox. You must first select a job in the
mailbox to print the job. You can also edit the settings of the jobs in the mailbox. This
type of printing is called interactive printing.
You can indicate the destination in the printer driver.
The key operator can define various print settings in the Océ VarioPrint® 2090
Settings Editor. The following are examples of the settings:
■ Define the default destination of the print jobs (the mailbox or the job queue).
■ Remove automatic or interactive print jobs from the job queue.
Walk-up environment and controlled environment
You can use the Océ VarioPrint® 2090 in walk-up environments and in controlled
environments.
Walk-up environments are environments where many users use Océ VarioPrint®
2090. Because the Océ VarioPrint® 2090 is not used all the time, certain timers are
active to help you monitor the printer and save energy when the printer is not used
for a longer period. These timers are the announcement timer, the attention needed
timer and the operator panel time-out (see ‘The walk-up environment’ on page 57).
In controlled environments, one or more operators work continuously with the Océ
VarioPrint® 2090. Because of the constant use of the Océ VarioPrint® 2090, the
announcement timer, the attention needed timer and the operator panel time-out are
18
Chapter 2 Getting to know the Océ VarioPrint® 2090
Concepts and Philosophy
not needed and are therefore not active (see ‘The controlled environment’ on
page 59).
The mailbox
The mailbox is what makes the Océ VarioPrint® 2090 everybody's personal
printer. The mailbox is a user-specific storage area for print jobs. You (each user)
can print these mailbox print jobs from any networked location at any time.
Note: In controlled environments the number of mailboxes is limited.
Cost reduction
The philosophy of the mailbox brings a number of benefits for the user. For example,
all jobs are grouped by user. This means that you do not need any banner pages when
you print a job on the system. The mailbox also reduces the paper mess near the
system, because you print on demand.
Flexibility
The mailbox offers you flexibility. You can change the settings locally on the
operator panel before you print your job. In the printer driver, you can also indicate
that you want to print a secured print job on the system (PIN code is needed to start
the job).
Efficiency
The mailbox offers you efficiency. You can send your print job at any time, and print
later. Send a job once and print many. You can make proof prints, which enable you
to check the print before you print many. The system allows you to give priority to
mailbox jobs.
The user manual gives you detailed information about the workflow of a job to the
mailbox (see ‘Print a job from the mailbox’ on page 134).
Next job
Whether it is an analog or digital job, the comprehensive job queue system (called
the Factory) increases the daily production on the system. The job queue enables you
to prepare jobs in advance. The jobs are created and sent to the job queue while other
jobs are prepared to be printed.
Next job preparation is independent from print production. Scanning, printing and
processing is done at the same time, which keeps the system active and enables the
processing of a wide variety of jobs.
19
Concepts and Philosophy
Set Logic®
Océ Set Logic® enables you to handle hardcopy originals on the Océ VarioPrint®
2090 in an effective way. Océ Set Logic® allows you to define subsets within the
document (page programming).
The Océ VarioPrint® 2090 allows you to combine different originals or subsets into
one analog or digital document, for example a report or book.
■ Different original size.
■ 1-sided and 2-sided originals.
■ Different paper types.
You can change 1-sided originals into 2-sided documents. If the result is a document
with an odd number of pages, the Océ VarioPrint® 2090 detects this. An odd number
of pages can result in an empty page between the subsets. You have two options for
this empty page, concatenation and chapterization
■ Concatenation
You decide to print the next subset on the empty page (do not keep the empty
page).
■ Chapterization
You decide to keep the empty page and start the next subset on a new sheet (a new
chapter starts on a new sheet).
Océ Image Logic®
The system detects and adjusts photos and fine lines on the original with the unique
Océ Image Logic® technology. The Océ VarioPrint® 2090 processes even complex
originals with only one push of a button into prints of excellent quality.
The paper trays
For the Océ VarioPrint® 2090 a complete new paper unit is introduced. The
following table shows the changes and advantages of this new concept.
[3]
20
Feature
Description
Refill during run
No loss of productivity when you reload the paper trays.
Paper tray linking
Print long runs without reload of the paper trays (you can link
trays that contain the same paper type).
Front loading
The paper trays are easy to access at the front of the system
(less floor space required).
Chapter 2 Getting to know the Océ VarioPrint® 2090
Concepts and Philosophy
Feature
Description
Uniform paper input
All the trays have the same orientation of the paper. This system simplifies the task of loading the paper trays. You also
avoid misprints because the paper is always loaded the same
way.
■ Face down
■ Header up
Flexible paper
trays
All the trays can contain the same variety of media types.
■ 90 degrees rotation allows you to feed the paper in both
short edge feed (SEF) as well as long edge feed (LEF), the
information on the prints and copies can always be read.
■ Air separation in the trays makes the paper trays suitable
for special paper.
The finisher
The Océ VarioPrint® 2090 has two general output destinations, the finisher and the
upper output. The finisher has 4 output trays, the lowest tray of which is the bulk tray.
■ Jobs that only use long edge feed (LEF) paper (A4 or Letter Std) go into the
finisher.
■ Other jobs and jobs that need multiple sheet sizes go into the upper output.
Offset stacking
If the sets in a job have more than one page, the sets are offset stacked. For stapled
sets, offset stacking increases the capacity and stacking quality of the output sets.
Behavior of the output trays of the finisher
The key operator can define the deposit behavior of the 4 output trays of the finisher
in the Océ VarioPrint® 2090 Settings Editor.
■ Deliver the output from top to bottom.
The print jobs are delivered to the output trays in a top to bottom manner. The
print jobs are first sent to the highest output tray. When the first output tray is full,
the print jobs are sent to the next tray below. This behavior continues until all the
print jobs are delivered.
This option may be preferred in a central environment. The capacity of the output
trays is used in an optimal way. The system remains productive as long as
possible without the intervention of an operator.
■ Deliver the output bottom up.
The Océ VarioPrint® 2090 sends the print jobs to the first output tray located
above the bulk tray. If this output tray is full, the Océ VarioPrint® 2090 sends the
print jobs in a bottom up manner to the next output tray located above the tray
that is full. This behavior continues until the highest output tray is also full. When
21
Concepts and Philosophy
the three highest trays are full, the print jobs are sent to the lowest tray, which is
the bulk tray.
This option may be preferable in a decentralized environment. The output is
delivered in a more logical order. The documents are sorted in the order in which
they were produced. The documents are placed face down into the output trays.
The user can find the documents more quickly and easily.
22
Chapter 2 Getting to know the Océ VarioPrint® 2090
The Configuration
The Configuration
Introduction
Information for operators, key operators, system administrators
The Océ VarioPrint® 2090 allows you to copy and print your jobs. You can add the
optional scan-to-file function.
The basic screen of the operator panel always shows the message 'Select Print, Copy
or Wizards'. If your system has the optional scan-to-file function, the basic screen
shows the message 'Select Print, Copy, Scan or Wizards'.
The 'Print' and 'Print from mailbox...' keys give access to the mailbox of the Océ
VarioPrint® 2090.
The Océ VarioPrint® 2090 has the following functional units:
■ The printer
■ The Scanner
■ The operator panel
■ The controller.
23
The Configuration
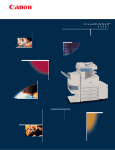
The printer
[1]
[1] The printer
[4]
24
Part
Description
Function (for example)
A
Left front door
Access to the toner unit
B
Top left cover of the
printer. The top right
cover of the printer is
situated under the finisher
Access to the paper path to solve paper jams
C
Finisher
Receive the printed documents
D
Upper output
Receive the erroneous prints, the clean job sheets
and formats other than A4 or letter-standard
E
Finisher front door
Access to the staplers and the finisher areas labeled D and E
F
Paper trays
Contain the paper. Open the paper trays to add
the paper
G
Front doors
Access to the areas inside the system labeled A,
B and C. Open the front doors to handle errors
Chapter 2 Getting to know the Océ VarioPrint® 2090
The Configuration
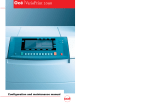
The scanner
[2]
[2] The Scanner
[5]
Part
Description
Function (for example)
A
Top left cover of the
scanner
Access to the original section. You can handle
original errors here
B
Automatic document
feeder
Feed the originals
C
Original receiving tray Hold the scanned originals
D
Cover handle
Access to the glass plate. Open the scanner cover
to copy or scan from the glass plate
25
The Configuration
The operator panel
[3]
E
F
G
D
C
B
A
P
H
I
1
2
O
3
4
5
N
6
7
8
9
0
M
J
K
C
L
[3] The operator panel
[6]
Part
Description
Function (for example)
A
'Wizards'
There are two wizards, the 'Copy build' wizard
and the 'Scan build' wizard.
■ 'Copy build' wizard: combines several different, hardcopy originals into one document.
■ 'Scan build' wizard: combines several different, hardcopy originals into one digital document.
B
'Scan'
Provide access to the scan-to-file and
scan-to-email functions.
■ Scan to file allows you to use the scanner to
turn a hardcopy document into a digital file.
■ Scan to email allows you to scan a hardcopy
document and then attach the scanned document to an email message. You can send this
email message.
Note: You can use scan to file and
scan to email only if you have valid licenses.
C
26
'Copy'
Access the copy functions of the Océ VarioPrint® 2090.
Chapter 2 Getting to know the Océ VarioPrint® 2090
The Configuration
Part
Description
Function (for example)
D
'Print'
Provide access to the 'Print from mailbox...'
function.
E
Contrast key
The contrast key allows you to increase the difference between the colors on the screen. In this
way, the screen on the operator panel becomes
clearer.
F
Screen
G
Function keys
Move through the sections to define original and
print settings.
27
The Configuration
Part
Description
Function (for example)
H
'System' key
Open the 'System monitor' and the 'System manager' (during normal operation the 'System monitor' is not on the screen).
The LED next to the key indicates that the 'System information' view is active. To close the
'System information' view, either press the 'System' key again or press 'Close' (the rightmost key
at the top of the screen).
The 'System monitor' includes the following
items.
■ Message area for text messages
■ Paper level icons for all the paper trays
■ Media type information for each paper tray
■ A lock, if tray locking is configured in the
Océ VarioPrint® 2090 Settings Editor
■ Warnings for low supply levels:
- Toner
- Staples in staplers 1 and 2
- Staples in stapler 3 (optional off-line stapler)
- Staples in staplers 4 and 5 (optional booklet
maker)
The 'System manager' displays the following
functions:
■ 'Lock UI' , if configured in the Océ VarioPrint® 2090 Settings Editor
■ Shut down the system
■ Lock or unlock the paper trays (if configured
in the Océ VarioPrint® 2090 Settings Editor).
■ The 'Toner refill' key.
Note: The 'Toner refill' key is active
only when the level of toner is low.
28
I
'Help' key
Access the on-line help function.
J
Confirm key
Select a mailbox or a scan profile.
K
Scroll wheel
Use the scroll wheel to navigate through lists like
the list of mailboxes and the list of scan profiles,
and to change certain settings.
L
Correction key
Reset the number of copies or prints to 1.
Chapter 2 Getting to know the Océ VarioPrint® 2090
The Configuration
Part
Description
Function (for example)
M
Start key
■
■
N
Stop key
■
■
■
Send a print job or copy job to the job queue.
Start a scan job.
Stop the current print job.
Press one time to stop the job after a complete set.
Press two times to stop the job as soon as possible, within a set.
O
Numeric keys
The numeric keys have the following functions.
■ Enter PIN codes and account IDs
■ Enter the number of copies and prints
■ Navigate through the on-line help.
P
Function keys
■
■
Define original and print settings.
React to the messages on the operator panel
29
About the paper trays
About the paper trays
Introduction
Information for operators, key operators
Depending on your configuration, the Océ VarioPrint® 2090 has 3 or 4 front-loading
paper trays. All the paper trays can handle the same variety of copy materials (see
‘Materials that can be used’ on page 264). You can add the media to the paper trays
while the printer is running. When a paper tray is empty, the Océ VarioPrint® 2090
automatically switches to another paper tray that contains the same media.
The paper trays
You can check the status of the paper trays on the operator panel. You can find the
information in the 'System monitor' of the 'System information' section (see ‘The
'System information' section’ on page 38).
You can also check the LED on the paper tray to see which paper tray is empty. The
LEDs on the paper trays are off when the trays are full. When a paper tray runs
empty, the LED blinks.
How you must load the media, for example face down, depends on the media type
and the destination of your print job.
The following table shows where you can find more information about how to load
the media.
[7]
[7] Load the media
Media types
More information
Standard media
Media with special front
(see ‘Load the standard media and media with special front’ on page 238)
Tab sheets
(see ‘Load the tab sheets’ on page 240)
A combination of tab sheets and media
with special front
(see ‘Load a combination of tab sheets
and media with special front’ on
page 243)
Note: The key operator can lock the paper trays. When the lock is enabled, you must
first unlock the paper trays (see ‘Load the standard media and media with special
front’ on page 238). Then you can load the media.
30
Chapter 2 Getting to know the Océ VarioPrint® 2090
About the Staplers
About the Staplers
The available staplers of the Océ VarioPrint® 2090
Information for operators, key operators
The following staplers are available on your Océ VarioPrint® 2090.
■ 2 on-line staplers in the finisher (standard)
■ 1 off-line stapler (if your Océ VarioPrint® 2090 is equipped with the optional
off-line stapler)
■ 2 on-line staplers in the booklet maker (if your Océ VarioPrint® 2090 is equipped
with the optional booklet maker)
Each stapler can staple a maximum of 80 sheets or a paper stack of up to 8.25 mm.
The number of 80 sheets was defined for Océ Red Label paper of 80 g/m2 (20 lb.
bond).
When a stapler runs out of staples, the 'System monitor' on the operator panel shows
the
icon. The highlighted number below the icon indicates which stapler is
empty.
[8]
[8] Locations of the staplers
Number
Stapler
1
Below the top cover of the finisher, at the back of the printer
2
Behind the front door of the finisher
3 (optional off-line Behind the front door of the finisher
stapler)
4 (optional booklet Inside the booklet maker - front side
maker)
5 (optional booklet Inside the booklet maker - back side
maker)
If a stapler runs empty when you start a job or during a job, a warning message
appears. When a job stops because of a lack of staples, you can do the following.
■ Refill the staplers.
■ Cancel the job.
■ Continue the job without staples (not possible for the optional booklet maker).
The system automatically detects the refill of the staplers. The warning message
disappears.
31
About the Staplers
Note: Use staples of type S3 for staplers 1, 2 and 3. For staplers 4 and 5, inside the
optional booklet maker, use staples of type S23.
32
Chapter 2 Getting to know the Océ VarioPrint® 2090
The power modes
The power modes
Introduction
Information for operators, key operators, system administrators
The main power modes of the Océ VarioPrint® 2090 include the following:
■ Off
■ Low power mode
■ Sleep mode.
The low power and sleep modes are the energy-saving modes of the Océ VarioPrint®
2090.
Note: The key operator can change the settings in the Océ VarioPrint® 2090
Settings Editor. The on-line help in the Océ VarioPrint® 2090 Settings Editor
contains more information about how to change the settings.
OFF
The Océ VarioPrint® 2090 is completely turned off.
You can not reach the system through the network.
You must press the power switch to turn on the system (see ‘Turning the System
On’ on page 62).
Low power mode
When the printer is in low power mode, the power consumption is decreased to a
lower level.
The operator panel on the printer displays a screen saver with the text 'Energy save
mode' .
You can not disable the low power mode.
The system goes into low power mode in the following situation:
[9]
[9] System Goes into the Low Power Mode
When
1
The Océ VarioPrint® 2090 was not used for a predefined period of time
Note: This time is defined in the Océ VarioPrint® 2090 Settings Editor. The key operator can set a time between 1 and 240
minutes in increments of 1 minute. The factory default is 15
minutes.
33
The power modes
The system returns from the low power mode in the following situations:
[10]
[10] System Returns from the Low Power Mode
When
1
You press a key on the operator panel
2
You send a print job.
Sometimes the system remains in the low power mode when you send a
print job. This event can occur when the print job is forced to the mailbox.
Note: The system needs 30 seconds to warm up.
Sleep mode
When the system is in sleep mode, the power consumption is decreased to a very low
level.
The operator panel on the printer is off. The On/Off button on the printer is amber.
The system goes into sleep mode in the following situations:
[11]
[11] System Goes into the Sleep Mode
When
1
The Océ VarioPrint® 2090 is not used for a predefined time
Note: This time is defined in the Océ VarioPrint® 2090 Settings Editor. The key operator can set a time between 1 and 240
minutes in increments of 1 minute. The factory default is 90
minutes.
2
You press the On/Off button
on the printer
The system returns from the sleep mode in the following situations.
[12]
[12] System Returns from the Sleep Mode
(1 – 2)
When
1
34
You press the On/Off button
on the printer
Chapter 2 Getting to know the Océ VarioPrint® 2090
The power modes
[12] System Returns from the Sleep Mode
(2 – 2)
When
2
An automatic print job (AP) arrives in the job queue.
Sometimes the system remains in sleep mode when you send an automatic
print job. This event occurs in the following situations:
■ A PIN code protects the sleep mode
■ The automatic print job is forced to the mailbox (defined in the Océ
VarioPrint® 2090 Settings Editor)
3
You send a print job (only when the setting 'Automatic wake-up' in the
Océ VarioPrint® 2090 Settings Editor is enabled)
Note: The system needs a couple of minutes to warm up.
35
The on-line help on the operator panel
The on-line help on the operator panel
Introduction
Information for operators
The operator panel has an on-line help. The on-line help contains information that
helps you to improve the productivity of your system. The on-line help describes the
more advanced functions of your system.
About the on-line help
You must press the 'Help' key on the operator panel to access the on-line help. When
the on-line help is open, the green LED at the right-hand side of the 'Help' key is on.
The on-line help uses the whole screen of the operator panel. The other settings are
hidden.
The on-line help is always available, even when an error occurs.
When the on-line help is open, only one other item is displayed, the 'Stopping
scanning' key. No error messages or other messages are displayed. You must close
the on-line help to read the messages.
The sections in the on-line help
[4]
[4] The on-line help
The following table describes the sections in the on-line help.
[13]
[13] The sections in the on-line help
36
Section
Description
Title bar
The title bar ('On-line help').
'Close' function key
Press the function key 'Close' to quit the on-line help.
Chapter 2 Getting to know the Océ VarioPrint® 2090
(1 – 2)
The on-line help on the operator panel
[13] The sections in the on-line help
(2 – 2)
Section
Description
Left-hand
pane
The left-hand pane displays a numbered overview of the operator
panel. Below the operator panel, the screen displays the icons for
paper, toner and staples.
Right-hand
pane
The right-hand pane contains the information. The bookmark indicator displays the current position within the topic.
Navigate through the on-line help
[14]
[14] Navigating Through the On-line Help
Key
Function
Help key
Access and quit the on-line help.
Note: You can also press the 'Close' function key
to quit the on-line help.
Numeric keys
The numbers in the left-hand pane of the on-line help match
the numeric keys on the operator panel. Press the matching
key on the operator panel to get more information about the
supplies or the functions of the keys.
Note: Press the 0 numeric key to return to the
start section.
Scroll wheel
Use the scroll wheel to scroll through the information.
'Close' function
key
Quit the on-line help. This key is available in all the topics.
Note: You can also press the 'Help' key to quit the
on-line help.
37
The 'System information' section
The 'System information' section
Introduction
Information for operators
You can use the 'System' key to access the 'System information' section. The 'System
information' section contains two sections. The left-hand pane displays the 'System
manager'. The right-hand pane displays the 'System monitor'.
The following tables give an overview of the items in the 'System information'
section.
[15]
[15] The items of the 'System manager' section
Section
Function
'System' section
■
■
■
'Toner refill' section
If configured, lock the operator panel (Lock UI)
Shut down the system
If configured, lock and unlock the paper trays.
Confirm the refill of the toner.
[16]
[16] The items of the 'System monitor'
38
Section
Function
The warning section
The warning section is the left-hand part of the 'System monitor'. This part contains information about the level of the staplers, the toner level and the number of prints that you can
make until the next service
The paper section
The paper section is the right-hand part of the 'System monitor'. This part contains the following information:
■ Media types in the paper trays
■ Media levels in the paper trays
■ An indication of the paper trays that are used for the current job
■ If tray locking is configured, an open or closed padlock.
Chapter 2 Getting to know the Océ VarioPrint® 2090
The 'System information' section
The Icons in the Warning Section
[17]
[17] The Icons in the Warning Section
Icon
Description
The staplers contains sufficient staples. No number below the
icon is highlighted
A stapler is empty. The highlighted number below the icon indicates which stapler is empty.
The numbers indicate the following staplers:
■ 1 - Below the top cover of the finisher, at the back of the printer
■ 2 - Behind the front door of the finisher
■ 3 - Behind the front door of the finisher (off-line stapler, optional)
■ 4 - Inside the booklet maker - front side (if your system has the
optional booklet maker)
■ 5 - Inside the booklet maker - back side (if your system has the
optional booklet maker)
The toner level is OK
The toner reservoir is empty
Maintenance is required soon.
The operator panel indicates the number of prints you can make,
with an accuracy of 1,000 prints, for example "4,000".
This indicates that preventive maintenance is required within the
next 4,000 prints.
Maintenance is required within the next 1,000 prints.
The system stops when service is required now (0 prints).
The icons in the paper section
[18]
[18] The Icons in the Paper Section
Icon
(1 – 2)
Description
or
The horizontal lines are an indication of the level of the media in
the paper trays. Each horizontal line indicates approximately 100
sheets (80 g/m2, 20 lb bond)
or
The paper tray is empty
or
The plate inside the paper tray moves up or down.
For example, before or after you load the paper
39
The 'System information' section
[18] The Icons in the Paper Section
Icon
Description
or
The paper tray contains more paper than the maximum allowed
amount of paper.
Remove the excess sheets
or
The paper tray contains a paper size or paper orientation that the
printer cannot process. The paper is not supported
or
The icons indicate the feed direction of the paper (short-edge feed
or long-edge feed)
The paper tray contains covers
The paper tray contains tab sheets
The paper tray contains inserts
The paper tray contains 'My Paper'
The paper tray contains special paper
The paper trays are locked
The paper trays are unlocked
The icons indicate the paper trays used for the current job
40
(2 – 2)
Chapter 2 Getting to know the Océ VarioPrint® 2090
About the job queue
About the job queue
Introduction
Information for operators
The job queue is a summary of the job queue manager. If the job queue manager
contains one or more jobs, the job queue is visible on the left-hand side of the
operator panel. The job queue and the job queue manager allow you to manage the
print jobs and the copy jobs. The Océ VarioPrint® 2090 handles multiple tasks which
makes the machine a highly productive system. As soon as you start a print job or a
copy job with the Start key on the operator panel, the jobs are sent to the job
queue. The job queue allows you to check the status of your jobs.
If you want to access the full information of the job queue, you must open the job
queue manager view with the 'Queue management'softkey
under the screen, on
the left-hand side of the operator panel. This key is only visible when there are jobs
in the job queue.
Job queue view
[5]
[5] Job queue view
41
About the job queue
The job queue view gives summarized job information and allows you to check the
following information about the jobs.
[19]
[19] Job queue information
Information displayed in
the job queue
Status icon
Description
The status icon can have different forms:
The form of a printer
■ The form of a scanner
■ The form of two arrows that are drawn like a
circle. Each arrow points at the other arrow
■ The form of a warning triangle.
■ The form of a flag.
■
The icon in the form of a printer indicates that the
job is printing
The icon in the form of a scanner indicates that a
job is scanned
The icon of the two arrows indicates that the system is ripping a job.
The icon in the form of a warning triangle indicates
that there is a problem, for example the stapler runs
empty (for example run-time contradiction, start
contradiction).
The icon in the form of a flag indicates that a priority job now prints.
Number of originals
The number of pages of the original document is
indicated.
Progress indication
The progress of the pages that are printed is counted. The total number of pages is displayed.
Estimated duration
The estimated duration of the jobs is indicated in
minutes. The time is cumulative. For example,
00:03 indicates that the job will be printed in about
3 minutes from now.
Note: The time-to-finish estimate in the
collapsed queue is the total time it takes
to finish all the jobs, including the current job.
Collapsed jobs
42
The bottom line indicates if there are more jobs,
that are not displayed. These jobs are collapsed. To
access these collapsed jobs, you must open the job
queue manager.
Chapter 2 Getting to know the Océ VarioPrint® 2090
About the job queue
Job queue manager view
[6]
[6] Job queue manager view
The job queue manager view gives more detailed job information than the job queue
view. The table below describes the information that is visible in the job queue
manager.
[20]
[20] Job queue manager information
Information in
the job queue
manager
Description
Paper trays
The four columns represent the paper trays. A bullet in the
column indicates that the job uses the indicated paper tray.
Note: The operator panel only displays the column with paper tray 4 if your Océ VarioPrint®
2090 has four paper trays. Otherwise, only three
paper tray columns are displayed.
Finishing
This column indicates the type of finishing (number of staples or booklet, if your system has the optional booklet maker)
Messages
Displays a warning if there is run-time contradiction or a start
contradiction
43
About the job queue
The job queue manager also allows you to manage the jobs in the job queue manager.
You can access the jobs with the scroll wheel at the right-hand side of the operator
panel. The table below describes the functions in the job queue manager.
[21]
[21] Job queue manager functions
Function
Description
'Delete'
This function allows you to delete jobs from the job queue.
Note: You can not use this function to delete a job
that is currently being printed
'Move to top'
The function allows you to give priority to a job (see ‘Giving
priority to jobs’ on page 95). The selected job is printed when
the current print job is ready
'Interrupt' + 'Move The function allows you to give priority to a job. The selected
to top'
job is printed when a set of the current print job is ready
44
Chapter 2 Getting to know the Océ VarioPrint® 2090
About the accounting function
Additional options for the Océ
VarioPrint® 2090
About the accounting function
Introduction
Information for operators, system administrators
The Océ VarioPrint® 2090 has an accounting function that is available on the
operator panel.
The system administrator must enable the accounting function in the Océ
VarioPrint® 2090 Settings Editor.
Note: The system administrator can refer to the on-line help of the Océ VarioPrint®
2090 Settings Editor for more information about how to enable the accounting
function.
The principles of accounting
Accounting is the allocation of costs for all types of jobs to an account. An account
can for example represent a customer, a user, a department or a project. You can use
the accounting function to charge the costs of the jobs. The accounting information
of a job is registered in an accounting record. This record is saved in an accounting
log file on the Océ Smart Imager.
Accounting log file
Every processed job is logged in an accounting log file. An accounting log file
provides detailed information per job, for example the user name or the number of
copies and prints (see ‘About the accounting log file’ on page 220). The system
administrator can retrieve the accounting log file from the Océ Smart Imager and
access the data in an application such as Microsoft® Excel. You can use the data to
generate periodical cost reports.
Account ID file
The account ID file is a database that contains a list of predefined accounts. Each
account in an account ID file consists of four data fields (record ID, account ID,
account name and comment). You can edit the account ID file, for example to add,
delete or change accounts (see ‘Edit the account ID file’ on page 227).
45
About the accounting function
The use of accounting
Reprographic departments often process the jobs for a particular customer in
succession. The consecutive processing of these jobs is called a session. Sessions are
the basis of accounting.
When you start your first job of the day, you must first enter the account ID for your
first customer. Then you can start to process the jobs. The account ID remains valid
until you enter a new account ID or you press the 'Reset account ID' key.
You can enter an account ID in the printer driver and send the job to the mailbox.
Make sure that you cancel the current account ID of the session before you print the
job from the mailbox. Otherwise, the current account ID of the session overrules the
account ID that is indicated in the printer driver.
Note: Automatic print jobs that do not have a valid account ID are automatically
sent to the mailbox. You must enter a valid account ID to print the job.
The tasks of the system administrator for the accounting function
The system administrator can define a number of accounting settings in the Océ
VarioPrint® 2090 Settings Editor. The following table displays the main settings in
relation to accounting.
[22]
[22] System Administrator Tasks for Accounting
Person responsible
Tasks
System administrator
■
■
■
■
■
46
Enable the 'Account ID' setting.
Enable the account ID check.
When an account ID file is uploaded to the Océ VarioPrint® 2090 Settings Editor and the account ID check is
enabled, the system checks the validity of the account IDs
that are entered on the operator panel.
Upload the account ID file to the Océ Smart Imager.
Download the account ID file from the Océ Smart Imager
to make changes in the file.
Download the accounting log files.
Chapter 2 Getting to know the Océ VarioPrint® 2090
Introduction to the scan-to-file function
Introduction to the scan-to-file function
Introduction
Information for operators, system administrators
The scan-to-file function is optional for the Océ VarioPrint® 2090.
The scan-to-file function provides a way to convert the information of a physical
document into a digital document. The Océ VarioPrint® 2090 supports the Adobe®
Portable Document Format (PDF) and the TIFF format for scan jobs. You can only
use this scan-to-file function if you installed a valid license.
When you scan a document to file, the generated file is exported to a folder or digital
storage area on a scan server. The export mechanism is normally FTP. You can get
the file from this destination folder on the scan server.
Definition
When you scan a document to file, you must first select a scan profile. A scan profile
is a combination of the following preset settings for scan jobs.
■ The destination for the resulting file
■ The resolution
■ The file format.
Your company can use many scan profiles. For example, each department can have
a scan profile to archive the files, a scan profile to display the files on screen and a
scan profile to print the files. An example of a scan profile is 'Purchasing, 300 dpi,
TIFF'.
When you use a scan profile, your document is scanned with the resolution defined
in the scan profile. The generated file has the format and the location indicated in the
scan profile. The file name, scan resolution and file format are fixed. You cannot
change these items on the operator panel.
There are some settings that you can change, but only for the current scan job. You
can change the settings for 'Original', 'File' and 'Image'(see ‘Types of scan job
settings’ on page 200).
The 'Info' tab only displays an overview of the main settings and the file name of the
scan job.
47
Introduction to the scan-to-file function
You can select a scan profile on the base of three items. These items were included
when the scan profile was defined in the Océ VarioPrint® 2090 Settings Editor. You
cannot change these items on the operator panel.
[23]
[23] The contents of a scan profile
Item
Definition
Name
The name can indicate a departmental directory or a department.
Resolution
The resolution indicates the number of dots per inch. You can select 300 dpi or 600 dpi.
File format
Select the TIFF format, if you require a general format, compatible with a range of graphical applications.
Remember that a TIFF file can be large in size.
Select the PDF format, if you require a format that is compatible
with the Acrobat® applications.
A PDF is a file with compressed graphics and text. This format
matches all print systems and is common in the Internet environment.
Tasks for system administrators to maintain the scan-to-file function
The system administrator must do the following to enable and maintain the
scan-to-file function:
■ Configure the scan server.
■ Configure the export function for the scan jobs.
■ Create the scan profiles.
■ Download the scan profiles from the Océ VarioPrint® 2090 Settings Editor to
change the settings of the scan profile.
■ Upload the scan profiles to the Océ VarioPrint® 2090 Settings Editor after the
settings are changed.
■ Install the scan server to which the files are sent.
Note: See the on-line help of the Océ VarioPrint® 2090 Settings Editor for more
information about the above tasks of the system administrator.
48
Chapter 2 Getting to know the Océ VarioPrint® 2090
Introduction to the scan-to-email function
Introduction to the scan-to-email function
Introduction
Information for operators, system administrators
The scan-to-email function is a part of the optional scan-to-file function on the Océ
VarioPrint® 2090. Scan to email runs on the GX270 platform and more recent
platforms.
Definition
Scan to email allows you to scan a document and attach this scanned document to an
email. The email is then automatically sent to the indicated email address. Like in
the scan-to-file function, the format of the generated document is Adobe® Portable
Document Format (PDF) or Tagged Image File Format (TIFF).
The difference between scan to file and scan to email is the following. A document
that was generated with the scan-to-file function, is stored on an image server. You
can get the document from the image server. A document that was generated with
the scan-to-email function, is attached to an email message. This email message is
automatically sent to a mail server and, from that mail server, to an indicated email
address. If the Océ VarioPrint® 2090 cannot send the email message, the message
with the attached document is not saved, but removed after an indicated time.
Scan-to-email profiles
When you start a scan-to-email job, you must first select a scan-to-email profile. A
scan-to-email profile is similar to a scan profile (see ‘Introduction to the scan-to-file
function’ on page 47).
Scan-to-email profiles are stored in a scan job ticket file (SJT), which is uploaded to
the Océ Smart Imager. An SJT file can contain scan profiles and scan-to-email
profiles at the same time.
User codes
The scan-to-email function includes user codes. A user code is a unique number, for
example a telephone number or a salary number, that is mapped to an email address.
The combination of this user code and the matching email address is stored on an
LDAP server or entered in an address list file.
You need a user code to start a scan-to-email job. When you press the Start key ,
you are asked to enter the code.
49
Introduction to the scan-to-email function
Attributes of the scan-to-email function
You must configure the following items to use scan to email.
■ An SMTP server. This server is the mail server (see ‘The configuration of the
scan-to-email function’ on page 194)
■ An LDAP server (see ‘Configure an LDAP server’ on page 196), an address list
file (see ‘Download - Address list’ on page 199) or both items. The server or list
contains the mapping to email addresses
■ The address mapping function on the Océ VarioPrint® 2090 Settings Editor.
Note: Refer to the on-line help of the Océ VarioPrint® 2090 Settings Editor for more
information about the configuration of the scan-to-email function.
50
Chapter 2 Getting to know the Océ VarioPrint® 2090
About the integrated booklet maker (optional)
About the integrated booklet maker (optional)
Introduction
The Océ VarioPrint® 2090 can create booklets. There are three ways to create
booklets.
1. Select the 'Booklet' function in the 'Layout' section on the operator panel. This
function is available on each Océ VarioPrint® 2090, also on systems that do not have
an integrated booklet maker. The printer then produces sorted prints that you must
fold, cut and staple by hand to get booklets.
2. Select the 'Booklet' function in the 'Finishing' section on the operator panel. This
function is only available if your Océ VarioPrint® 2090 has the optional integrated
booklet maker. The printer then produces sorted, folded and stapled booklets
(finished booklets).
3. Select 'Layout' on the 'Job' tab of your printer driver. Select 'On' for the 'Booklet'
option. You can then send your job to the mailbox or directly to the job queue.
The following illustration shows the integrated booklet maker on top of the Océ
VarioPrint® 2090.
[7]
[7] The integrated booklet maker
51
About the integrated booklet maker (optional)
Illustration of the integrated booklet maker
The next illustration shows the output of the integrated booklet maker.
[8]
[8] The output side of the integrated booklet maker
52
Chapter 2 Getting to know the Océ VarioPrint® 2090
The Dual Paper Tray
The Dual Paper Tray
Introduction
If you need more paper than the standard paper trays can hold, you can use a dual
paper tray instead of a standard bulk tray. A dual paper tray is an optional
high-capacity paper tray, in which the paper compartment is divided into two parts.
Each of the two parts can hold one stack of A4 LEF paper or Letter LEF paper.
Note: The installation of the dual paper tray takes caution (see ‘Install the dual
paper tray (optional)’ on page 68).
The dual paper tray compared with the standard bulk tray
A standard bulk tray can contain up to 1,700 sheets.
A dual paper tray can contain 2 stacks of paper (A4 LEF or Letter LEF). The total
capacity of a dual paper tray is about 3,400 sheets.
53
The Dual Paper Tray
54
Chapter 2 Getting to know the Océ VarioPrint® 2090
Chapter 3
User environments for the Océ
VarioPrint® 2090
55
Selecting the user environment for the Océ VarioPrint® 2090
Selecting the user environment for the Océ VarioPrint® 2090
Introduction
You can set the user environment in which you want to operate your Océ VarioPrint®
2090 in the Océ VarioPrint® 2090 Settings Editor. You can choose between 'Walk-up'
(see ‘The walk-up environment’ on page 57) and 'Controlled' (see ‘The controlled
environment’ on page 59).
Before you begin
1.
2.
3.
4.
Open your web browser.
Enter the URL of the Océ Smart Imager in your web browser.
Select the 'Key Operator' mode.
Enter the required PIN or password.
How to select the user environment
1.
2.
3.
4.
Click the 'Settings' tab.
Click 'System' .
Click 'User environment'.
Select 'Walk-up' or 'Controlled'.
Note: The default value is 'Walk-up'.
5. Click 'Apply' .
6. Restart the Océ Smart Imager to activate the change.
56
Chapter 3 User environments for the Océ VarioPrint® 2090
The walk-up environment
The walk-up environment
Introduction
A walk-up environment is found at offices where many users share a printer or more
printers. User send print jobs to a Océ VarioPrint® 2090 series printer and walk up
to the machine to make a copy, a scan or a print or to get a previously sent print job.
The key word in walk-up environments is sharing.
This sharing means that sometimes the printer is used heavily and at other times the
printer is used sparingly or not at all. The Océ VarioPrint® 2090 was developed to
meet the requirements of this irregular use. Three timers help you control the printer
and decrease energy consumption when the printer is not used for a long period.
These timers are the attention needed timer, the operator panel time-out and the
announcement timer.
The attention needed timer
The attention needed timer controls the time that the screen of the operator panel
shows error messages related to runtime contradictions (see ‘Handling
Contradictions’ on page 254). After 120 seconds, the messages disappear.
The operator panel time-out
The operator panel time-out controls the time that the system is idle before the
operator panel is reset. You can set a value for the operator panel time-out in the Océ
VarioPrint® 2090 Settings Editor. If the operator panel is not used for a period that
exceeds the time that you entered, the following happens:
■ The screen is reset to the initial screen.
■ Not ready jobs, which are jobs that are defined but not started, are deleted.
Note: To start a job, you need to press the Start key , so that the job is sent to
the job queue.
■ The Océ VarioPrint® 2090 is reset to the default print, copy and scan settings.
■ The accounting session is closed.
■ The list of mailboxes is sorted. The user who last sent an interactive or automatic
print job, is selected.
■ The count-down starts. This count-down controls the time after which the system
goes into the low power mode and sleep mode.
The announcement timer
In walk-up environments, automatic print jobs are not visible in the job queue.
Automatic print jobs are printed after the interactive print jobs and start when there
are no more interactive print jobs in the job queue. The situation can occur, however,
that you have to print an urgent job from the mailbox and find that a large automatic
57
The walk-up environment
print job was started just before your job. You then need to stop the automatic print
job, which can be inconvenient.
To prevent situations like the one above, automatic print jobs are announced with
announcement messages (see ‘About automatic printing’ on page 124). These
announcement messages are shown for a certain number of seconds. You can see that
the number of seconds counts back in the message: 'Automatic printing will start in
... seconds'. While the announcement message is visible, a press on any key will
delay the automatic print job. The automatic print job is then printed when your
interactive print job is ready, if there are no other interactive print jobs.
The announcement timer determines how long the announcement messages are
shown and thus how the automatic print jobs are delayed when there are no more
interactive print jobs in the job queue. You can set the announcement timer in the
Océ VarioPrint® 2090 Settings Editor. See the online help of the Océ VarioPrint®
2090 Settings Editor for more information.
58
Chapter 3 User environments for the Océ VarioPrint® 2090
The controlled environment
The controlled environment
Introduction
A controlled environment is mainly found at print rooms where one or more
dedicated operators work with the Océ VarioPrint® 2090. These operators do all the
tasks, from printing and copying to scanning.
In controlled environments, the work load of the Océ VarioPrint® 2090 is fairly
constant. Because an operator is always present to monitor the machine
continuously, some timers that control the printer activity are not needed. The
following timers are therefore not active.
The attention needed timer
The attention needed timer controls the time that the screen of the operator panel
shows error messages related to runtime contradictions. Normally, messages that
show runtime contradictions disappear after 120 seconds. In controlled
environments, these messages remain visible until the operator takes action to
correct the contradictions.
The operator panel time-out
The operator panel time-out controls the time that the system is idle before the
operator panel is reset. This timer is not active, which has the following
consequences:
■ The navigation is not reset. The selected screen and settings are valid and visible
until the operator changes the settings.
■ A job that is defined but not printed is visible until the job is printed or deleted.
■ The default print, copy and scan settings are not reset. The last used settings are
reset only when 'Cancel' or 'Default' is pressed.
■ Accounting sessions are closed only when the 'Cancel' key or the 'Reset account
ID' key is pressed.
■ The list of mailboxes is not sorted. Because only one or more dedicated operators
use the system, there is no need to highlight the user who last sent a job. This user
is only highlighted at start-up and when a selected user is removed from the list
of mailboxes.
■ The Océ Smart Imager now determines after how much time the system goes into
the low power mode and sleep mode.
The announcement timer
The announcement timer controls the time that announcement messages are shown
(see ‘About automatic printing’ on page 124). This timer is not active in controlled
environments, because automatic print jobs are visible in the job queue, just like
interactive print jobs. Automatic print jobs appear in the job queue under the waiting
59
The controlled environment
interactive print jobs. Automatic print jobs start to print when there are no more
interactive print jobs.
Note: Automatic print jobs do not start when you set or change the settings of an
interactive print job. Interactive print jobs come before automatic print jobs, even
when these interactive print jobs are not in the job queue yet. The exception to this
rule are automatic print jobs that were moved to top. These automatic print jobs can
come before interactive print jobs.
60
Chapter 3 User environments for the Océ VarioPrint® 2090
Chapter 4
Getting started
61
Turning the System On
Turning the System On
Introduction
Task for operators
The system has the following switches and buttons (see the illustration for the correct
location).
■ Power switch
You can find the power switch behind the middle front door of the printer, under
the operator panel. The power switch cuts and connects the power to the complete
system.
■ On/Off button with amber and green LED
.
The On/Off button allows you to toggle the status of the system between the
stand-by mode and the sleep mode. This action is only possible if the power
switch is in the '1' position and the start-up phase was done. After the start-up
phase, the screen of the operator panel displays the message 'Select Print, Copy,
Scan or Wizards'.
Note: If your system does not have the optional scan-to-file functionality, the screen
of the operator panel displays the message 'Select Print, Copy or Wizards'.
[9]
[9] Turning the System On
In the table below you will find the status indicators of the LED in the On/Off button
and the status indicators of the LEDs on the right-hand side of the operator panel.
62
Chapter 4 Getting started
Turning the System On
Note: When the system is in the sleep mode, you must wake up the system to process
the jobs (see ‘The power modes’ on page 33).
[24]
[24] System State Indicators
Power state
On/Off button
LEDs on the
right-hand side of
the operator panel
Off
Off
Off
Controller initializing
Amber flashing
Green (in turns)
Sleep mode
Safety sleep mode
Fatal error
Permanent error
Amber
Off
Low power mode
System initializing
System warming up
Stand-by mode
Process an automatic or interactive
print job
Operator recoverable error
Run-time contradiction
Green
Off
Amber
Off
■
■
■
■
■
■
■
■
■
■
■
Machine recoverable error
How to turn on the Océ VarioPrint® 2090
1. Press the power switch
.
The system starts up. The following occurs:
■ The LEDs on the operator panel blink.
■ The screen of the operator panel is off / black.
■ The amber LED in the On/Off button
blinks.
2. Wait until the system asks you to press the On/Off button
3. Press the On/Off button
.
The LED in the On/Off button
.
changes from amber to green.
63
Shut down the system
Shut down the system
Introduction
Task for operators
Follow the shut-down procedure described in this section before you use the power
switch on the Océ VarioPrint® 2090. This procedure makes the system shut down
in a controlled way.
Note: To save energy, you can also put the Océ VarioPrint® 2090 into sleep mode
(see ‘Sleep mode’ on page 34).
How to shut down the Océ VarioPrint® 2090
1. Press the 'System' key on the operator panel to open the 'System information' section.
2. Press the key for 'System' to select 'Shut down' .
3. Press the Start key
to start the shut-down procedure.
The operator panel displays the message 'Are you sure you want to shut down?'.
4. Press the key for 'Yes' .
The printer starts to shut down.
Wait for the message 'When the flashes, you can turn off the system.
Press Close to continue'.
5. Press the key for 'Close' to continue the shut-down procedure. The following occurs:
■ The LED in the On/Off button
changes from green to amber.
■ The screen of the operator panel goes off.
■ - The LED next to the 'System' goes off.
6. Press the power switch
.
Note: The Océ VarioPrint® 2090 shuts down when the job queue is empty or when
all the jobs in the job queue are stopped (no running jobs in the job queue).
64
Chapter 4 Getting started
Restarting the system
Restarting the system
Introduction
Task for key operators, system administrators
When you change settings in the Océ VarioPrint® 2090 Settings Editor, the software
may ask you to restart the system. A restart activates the newly changed settings.
If you restart the system, the following occurs:
■ The Océ VarioPrint® 2090 Settings Editor changes become active
■ The jobs in the mailbox are saved
■ The job number of new copy jobs and scan jobs is set to 1.
You must restart the system in the Océ VarioPrint® 2090 Settings Editor. Follow the
procedure below to restart the system.
How to restart the system
Start the Océ VarioPrint® 2090 Settings Editor in your web browser.
Click 'Service' .
Click 'Control' .
Click 'Restart' .
The screen displays 'Restart the Océ Smart Imager'.
5. Click 'OK' .
The system restarts.
The screen of the operator panel displays the message 'When the light next to the
System key on the operator panel is off, you can turn off the system. Press Close to
continue.'.
1.
2.
3.
4.
Note: The system waits until all active jobs are finished .
6. Press the key for'Close' on the operator panel.
The printer goes into the sleep mode.
on the printer to wake up the system.
The LED in the On/Off button changes from amber to green.
7. Press the On/Off button
65
Load the paper trays
Load the paper trays
Introduction
Depending on your configuration, the Océ VarioPrint® 2090 has 3 or 4 front-loading
paper trays. All the paper trays can handle the same variety of copy materials. You
can add the media to the paper trays while the Océ VarioPrint® 2090 is running.
To load the paper trays, follow the procedure below.
Note: Some media types require a special loading procedure. Examples of these
media types are tab sheets and sheets with special front (see ‘Load the tab sheets’ on
page 240) and (see ‘Load a combination of tab sheets and media with special front’
on page 243).
How to load the standard media in the paper tray
1. Press the button on the front side of the paper tray to open the paper tray.
[10]
[10] Opening the Paper Tray
2.
3.
4.
5.
66
The LED of the paper tray blinks rapidly while the plate inside moves down.
Wait until the paper tray opens.
Take the media from the pack.
Hold each pack of media at the short sides.
Bend the pack.
Chapter 4 Getting started
Load the paper trays
6. Put the media face down and header up into the paper tray.
[11]
[11] Loading Standard Media
7. Adjust the paper guides.
Based on the position of the paper guides, the Océ VarioPrint® 2090 can identify the
paper size.
8. Close the paper tray.
67
Install the dual paper tray (optional)
Install the dual paper tray (optional)
Introduction
Task for operators, key operators
The dual paper tray is an optional high-capacity paper tray. You can use a dual paper
tray instead of a standard bulk tray. A standard bulk tray can contain up to 1,700
sheets. A dual paper tray can contain 2 stacks of paper (A4 LEF or Letter LEF). The
total capacity of a dual paper tray is about 3,400 sheets.
The following procedures describe how to replace the bulk trays with dual paper
trays, and the other way round.
Note: Do not fill the dual paper tray above the maximum levels as indicated on the
2 stickers inside the paper tray. Put the left-hand paper stack fully against the left
edge. Put the right-hand paper stack fully against the right edge.
Before you begin
Make sure that the paper tray you want to replace is empty.
Note: When the dual paper trays are installed for the first time, a number of
adjustments are required. Therefore, Océ service technicians will do the initial
installation.
Caution: The bulk trays and the dual paper trays are heavy. Always remove
and install the bulk trays and the dual paper trays with 2 persons.
How to remove a bulk tray or dual paper tray
1. Press the button on the front side of the paper tray to open the paper tray.
The rails on both sides of the paper tray contain 2 red stickers with an arrow.
2. Slide the paper tray out until you see the first red sticker.
A spring-lock is situated next to the sticker.
68
Chapter 4 Getting started
Install the dual paper tray (optional)
3. Press the spring-lock of the right-hand rail to release the spring-lock.
[12]
[12] Release the first spring-lock
4. Slide the paper tray just a little bit from the spring-lock.
5. Repeat the steps 3 and 4 for the left-hand rail.
6. Slide the paper tray further out until you see the second red sticker.
A spring-lock is situated next to the sticker.
7. Put a screwdriver into the rear hole of the right-hand rail to press the spring-lock.
[13]
[13] Release the second spring-lock
69
Install the dual paper tray (optional)
8. Slide the paper tray just a little bit from the spring-lock.
9. Repeat the steps 7 and 8 for the left-hand rail.
10. Remove the paper tray.
Remember that 2 persons are required to remove the paper tray.
[14]
[14] Remove the paper tray with 2 persons
How to install a bulk tray or dual paper tray
1. Take the paper tray.
Note: Remember that 2 persons are required to install a paper tray.
2. Slide the rails of the paper tray into the rails of the printer.
Push the paper tray far enough into the rails to prevent that the paper tray can drop.
3. Close the paper tray.
The rails of the paper tray are automatically locked in the spring-locks.
You can now load the media into the paper tray.
Note: Remember not to load more paper than indicated on the stickers inside the
paper tray.
70
Chapter 4 Getting started
Configure the accounting settings
Configure the accounting settings
Introduction
The accounting function is an optional function that enables you to store copy and
print information in a file. The information in the file is used to account jobs to
relevant persons, projects, customers or departments.
Accounting settings
Select the 'Settings' tab in the Océ VarioPrint® 2090 Settings Editor. Select the
options 'Accounting' and 'Configure' to access the accounting settings.
[25]
Setting
Description
'Identification'
■
■
'Verification'
■
■
Disabled. You can start the jobs that you create without the use
of an account number.
Enabled. The Océ VarioPrint® 2090 will ask you to enter an
account number before the job is started. The number you enter is a sequence of 1 to 10 digits.
You can specify the account ID in the Océ job ticket (in the
printer driver) when you create a job or you can enter the
number on the operator panel of the Océ VarioPrint® 2090.
Disabled. The Océ VarioPrint® 2090 accepts any account
number as a correct entry, even though the number is not listed
in the account ID file on the Océ Smart Imager.
Enabled. The account number you enter is only accepted by
the Océ VarioPrint® 2090 if the number is listed in the account
ID file on the Océ Smart Imager. If the number is not present
in the account ID file, the job is not accepted.
Note: You can only use this setting if the 'Identification' setting is enabled.
'Field separator'
This setting allows you to select the character used in the account
log files to separate the information.
■ Comma (,)
■ Semi-colon (;).
'Copy Count
Device'
Enable the setting to indicate that the Océ VarioPrint® 2090 is
configured with a copy count device.
71
The Configuration of the Scan-to-file Function
The Configuration of the Scan-to-file Function
Introduction
Information for system administrators
The scan-to-file function is an optional function that enables you to scan analogue
or physical documents and create digital files. You must configure the following
items to make this scan-to-file function operational.
1. The scan server
2. The scan settings in the Océ VarioPrint® 2090 Settings Editor
3. The settings for the Scan Job Ticket (SJT).
Scan-to-file Function
The table below shows the actions that are necessary to configure the items in the list.
[26]
[26] Scan-to-file Function
Step
Action
1
■
■
■
2
■
■
3
■
■
72
Define a scan server on the network to store the scan jobs
Create an FTP account (a user name, a password and a destination directory) on the scan server
Share the destination directory under the FTP root on the scan server.
Access the scan-to-file settings and the scan server settings in the Océ
VarioPrint® 2090 Settings Editor.
Define the settings for the scan server (see ‘Configure the scan server’
on page 191).
Access the settings for the scan job ticket in the Océ VarioPrint® 2090
Settings Editor.
Define the settings for the Scan Job Ticket (see ‘The scan profiles file’
on page 182).
Chapter 4 Getting started
The configuration of the scan-to-email function
The configuration of the scan-to-email function
Introduction
Information for system administrators
The scan-to-email function is a part of the optional scan-to-file function. You must
have a valid license for the scan-to-file function to use the scan-to-email function.
You must do the following:
■ Configure the Océ VarioPrint® 2090 Settings Editor
You must configure the mail server and the recipient search. For the recipient
search, you can configure an LDAP server or use an address list file.
■ Upload a scan job type (SJT) file to the Océ Smart Imager (see ‘The scan profiles
file’ on page 182).
The SJT file can contain both scan-to-file profiles and scan-to-email profiles. There
is no difference in format between the two types of profile. The prefix selector string
described in the table below and the application selector string in a profile render a
job a scan-to-file job or a scan-to-email job. These two strings must be identical.
Note: You must enter values for all settings described in the tables. Otherwise, the
scan-to-email function will not work correctly.
Configure the mail server
[27]
[27] Mail server settings
(1 – 2)
Mail server settings
Description
'Port'
Default: 25
'Address/host name'
The address of the mail server. You must enter one server
address. This address can be a host name of 32 characters
or an IP-address.
Default: Empty
'User name'
The user name gives you access to the server. This user
name can be any name of up to 20 characters (a-z, A-Z ,
0-9, _).
Default: Empty
73
The configuration of the scan-to-email function
[27] Mail server settings
(2 – 2)
Mail server settings
Description
'Port'
Default: 25
'E-mail address of
sender'
Enter the email address of the system that sends the email
message, for example your controller. You can use the
characters a-z, A-Z, 0-9, @, ., _
Do not start an email address with a number.
Default: Empty
'Prefix selector string'
Identify the scan jobs that are sent to email. The prefix
separates the scan-to-email jobs from the scan-to-file
jobs. You can use up to 8 characters (a-z, A-Z , 0-9, _).
The prefix selector string must be identical to the application selector string in the scan-to-email profiles.
Default: Email
Configure the recipient search - LDAP server
The recipient search is the source that contains the list of user codes and email
addresses. This source can be the LDAP server or an address list file. When you have
no LDAP server, you must upload an address list file.
[28]
[28] Recipient search settings - LDAP server
74
(1 – 2)
Recipient search settings - LDAP server
Description
'Address/host name'
Enter the address of one LDAP server. This address can
be a host name of 32 characters or an IP address.
Default: Empty
'User name'
The user name gives you access to the server. This user
name can be any name of up to 20 characters (a-z, A-Z ,
0-9, _).
Default: Empty
'Port'
Default: 389
'Password'
The password can be any word of up to 20 characters
(a-z, A-Z, 0-9, _). Each character that you enter is shown
as an *.
Default: Empty
Chapter 4 Getting started
The configuration of the scan-to-email function
[28] Recipient search settings - LDAP server
(2 – 2)
Recipient search settings - LDAP server
Description
Search database
Define the path to the search base. The search base is the
area in which an email address is searched. The search
base can be any data file that contains at least unique
identifiers for the users and email addresses. The search
is from top to bottom only. You must enter the top node
of the search base to enter the data in the file.
Default: Empty
User identifier
This attribute is the field that is compared with the code
that is entered on the operator panel.
Default: Empty
'E-mail address attribute'
An email address is connected to a unique user identifier.
When a search is done on the server, the first email address that is connected to the entered user identifier, is returned. See 'Email address of the sender' above for the
format requirements.
Default: Empty
Configure the recipient search - Address list file
[29]
[29] Recipient search settings - Address list file
Recipient search set- Description
tings - Address list file
When you have no LDAP server, you can use an address
list file to search for recipients. When an address list file
is available, this file is always used. You can upload and
download the address list file to the Océ Smart Imager.
The address list file is a comma-separated values (csv)
file. The address list file must contain a user identifier
column and an email address column. The user identifier
must be a unique number of up to 20 digits (0-9). See
'Email address of the sender' above for the format requirements of the email address.
Note: The name of the address list file must
always be ral.csv. Other file names are not accepted. The header of the user identifier column must always be ruid. The header of the
email address column must always be address.
75
The configuration of the scan-to-email function
76
Chapter 4 Getting started
Chapter 5
Controlling the Océ
VarioPrint® 2090
77
Enable or disable the automatic wake-up
Enable or disable the automatic wake-up
Introduction
When the system has not been active for a while, the system goes into the sleep
mode. If the automatic wake-up is enabled, the system wakes up automatically when
new jobs arrive. If the automatic wake-up function is disabled, you must press the
On/Off button at the machine to wake up the system. By factory default, the
automatic wake-up function is disabled.
Before you begin
1.
2.
3.
4.
Open your web browser.
Enter the URL of the Océ Smart Imager in your web browser.
Select the 'Key operator' mode or the 'System administrator' mode.
Enter the required PIN or password.
How to enable the automatic wake-up function
1. Click the 'Settings' tab.
2. Click 'Power management' .
3. Click the check box for 'Enabled' in the 'Automatic wake-up' field.
A check mark indicates that the automatic wake-up function is enabled.
4. Click 'Apply' .
How to disable the automatic wake-up function
1. Click the 'Settings' tab.
2. Click 'Power management' .
3. Uncheck the check box for 'Enabled' in the 'Automatic wake-up' field.
An empty check box indicates that the automatic wake-up function is disabled.
4. Click 'Apply' .
78
Chapter 5 Controlling the Océ VarioPrint® 2090
Enable and disable the wake-up protection
Enable and disable the wake-up protection
Introduction
After the automatic wake-up function is enabled (see ‘Enable or disable the
automatic wake-up’ on page 78), you can enable or disable the protection for the
automatic wake-up. This protection limits the automatic wake-up behavior of the
printer. If the protection is not active, the system wakes up when an automatic print
job arrives. No user intervention is needed and all users can use the printer.
If the automatic wake-up protection is active, only users who know the PIN
(Personal Identification Number) can use the machine. The printer is then protected
from unauthorized use.
Note: The PIN used for the automatic wake-up protection and the operator panel
lock is the same (see ‘Set a protective PIN’ on page 80) .
Before you begin
1.
2.
3.
4.
Open your web browser.
Enter the URL of the Océ Smart Imager in your web browser.
Select the 'Key operator' mode or the 'System administrator' mode.
Enter the required PIN or password.
How to enable the automatic wake-up protection
1. Click the 'Settings' tab.
2. Click 'Power management' .
3. Click the check box for 'Enable' in the 'Protect wake-up and lock Local User
Interface' field.
4. Click 'Apply' .
How to disable the automatic wake-up protection
1. Click the 'Settings' tab.
2. Click 'Power management' .
3. Uncheck the check box for 'Enable' in the 'Protect wake-up and lock Local User
Interface' field.
4. Click 'Apply' .
79
Set a protective PIN
Set a protective PIN
Introduction
The automatic wake-up protection and the operator panel lock on the Océ
VarioPrint® 2090 use the same PIN (Personal Identification Number). After you
enabled the 'Automatic wake-up' (see ‘Enable or disable the automatic wake-up’ on
page 78) and the 'Protect wake-up and lock Local User Interface' function (see
‘Enable and disable the wake-up protection’ on page 79), you need to set this PIN
in the Océ VarioPrint® 2090 Settings Editor.
Before you begin
1.
2.
3.
4.
Open your web browser.
Enter the URL of the Océ Smart Imager in your web browser.
Select the 'Key operator' mode or the 'System administrator' mode.
Enter the required PIN or password.
How to set a PIN
1.
2.
3.
4.
80
Click the 'Settings' tab.
Click 'Power management' .
Enter a number from of maximum 5 digits in the 'PIN' text box.
Click 'Apply' .
Chapter 5 Controlling the Océ VarioPrint® 2090
Lock and unlock the operator panel
Lock and unlock the operator panel
Introduction
The Océ VarioPrint® 2090 Settings Editor contains the setting 'Protect wake-up and
lock Local User Interface'. This feature is an electronic lock for the automatic
wake-up and the operator panel, which works with a PIN. When you enable this
setting, only persons who know the PIN are able to unlock the operator panel and use
the machine.
Before you begin
Make sure that a PIN is set in the Océ VarioPrint® 2090 Settings Editor (see ‘Set a
protective PIN’ on page 80).
Lock the operator panel
1. Press the 'System' key.
The following screen appears.
[15]
[15] Lock the operator panel
2. Press the key for 'System' to select 'Lock UI'.
3. Press the Start key
.
The operator panel is locked. The following screen appears and you can use the Océ
VarioPrint® 2090 only after you enter the PIN.
[16]
[16] Operator panel locked
81
Lock and unlock the operator panel
Unlock the operator panel
Enter the PIN.
The operator panel is unlocked and ready for use again.
Note: To lock the operator panel again, you have to do the procedure described
above.
82
Chapter 5 Controlling the Océ VarioPrint® 2090
Lock and unlock the paper trays
Lock and unlock the paper trays
Introduction
Task for key operators
The Océ VarioPrint® 2090 Settings Editor contains the setting 'Paper tray locking'.
This is an electronic lock on the paper trays. You can define in the Océ VarioPrint®
2090 Settings Editor that the setting 'Paper tray locking' must be 'On' or 'Off'.
When the setting 'Paper tray locking' is enabled ('On'), a PIN is required each time
the paper trays are opened, for example to load paper. Remember to lock the paper
trays after you load the paper.
The PIN that you need to open the paper trays, is used for two more things:
Access the key operator settings in the Océ VarioPrint® 2090 Settings Editor.
■ Protect the 'Automatic wake-up' and lock the operator panel (see ‘Enable and
disable the wake-up protection’ on page 79).
■
Note: See the on-line help of the Océ VarioPrint® 2090 Settings Editor for more
information about the 'Paper tray locking' and the access to the key operator
settings.
How to unlock the paper trays
1. Press the 'System' key.
The following screen appears.
[17]
[17] Unlocking the Paper Trays
2. Press the key for 'System' to select 'Unlock trays' .
3. Press the Start key
.
A dialog box appears.
4. Enter the PIN.
All the paper trays are unlocked.
83
Lock and unlock the paper trays
How to lock the paper trays
1. Press the 'System' key.
The following screen appears.
[18]
[18] Lock the paper trays
2. Press the key for 'System' to select 'Lock trays' .
3. Press the Start key
.
All the paper trays are locked.
84
Chapter 5 Controlling the Océ VarioPrint® 2090
Enable the calendar timer
Enable the calendar timer
Introduction
The Océ VarioPrint® 2090 has a timer that enables you to have your system ready
when you start your working day. This timer is the 'Calendar timer'. When this timer
is enabled, you can set the wake-up time of the system. The system will then wake
up at the indicated time. The factory default is 08:00.
You can set a wake-up time for 'Monday - Friday', 'Saturday' and 'Sunday' separately.
Note that the system needs some time to warm up.
The 'Calendar timer' setting is located in the Océ VarioPrint® 2090 Settings Editor.
Before you begin
1.
2.
3.
4.
Open your web browser.
Enter the URL of the Océ Smart Imager in your web browser.
Select the 'Key operator' mode or the 'System administrator' mode.
Enter the required PIN or password.
How to enable the calendar timer
1. Click the 'Settings' tab.
2. Click 'Calendar timer'.
3. Click the check box for 'Enabled' for the timers you want to enable.
A check mark indicates that the 'Calendar timer' function is enabled.
4. Click 'Apply'.
How to disable the calendar timer
1. Click the 'Settings' tab.
2. Click 'Calendar timer'.
3. Uncheck the check box for 'Enabled' for the timers you want to disable.
An empty check box indicates that the 'Calendar timer' function is disabled.
4. Click 'Apply'.
85
Set the calendar timer
Set the calendar timer
Introduction
You can set a wake-up time for 'Monday - Friday', 'Saturday' and 'Sunday'. The
system will then wake up automatically at the indicated time. Note that the system
needs some time to warm up.
Before you begin
Log on to the Océ VarioPrint® 2090 Settings Editor (see ‘Enable the calendar timer’
on page 85).
Note: Make sure that the 'Calendar timer' function is enabled.
How to define the system wake-up time
1.
2.
3.
4.
86
Click the 'Settings' tab.
Click 'Calendar timer'.
Enter the wake-up time in the 'Wake-up time hh:mm' text box.
Click 'Apply'.
Chapter 5 Controlling the Océ VarioPrint® 2090
Chapter 6
The copy function
87
Make a simple copy
Basic copy jobs
Make a simple copy
Introduction
Task for operators
You can use the Océ VarioPrint® 2090 to copy different types of jobs. This procedure
describes how to make a simple 1:1 copy, for example from A4 (Letter) to A4
(Letter).
After the originals are scanned, you can use the 'Copy' function for a new job. The
system remembers the settings of the previous job.
Before you begin
When you start a copy job:
■ Remove all staples from your originals with the staple remover.
■ Remove any paper clips.
■ Make sure that the originals in the automatic document feeder have the same size.
■ Make sure that the originals are not curled.
Illustration
[19]
[19] Use the 'Copy' template
How to make a simple copy
1. Put the originals face down and in readable form into the automatic document feeder
or on the glass plate.
2. Adjust the original guides.
3. Press the function key 'Copy'.
88
Chapter 6 The copy function
Make a simple copy
Note: If your system has an enabled accounting function, you must first enter your
account ID (see ‘The accounting concepts’ on page 218).
4. Enter the number of copies with the numeric keys.
5. Press the Start key
.
89
Stapled copies
Stapled copies
Introduction
Task for operators
The finisher of the Océ VarioPrint® 2090 has two staplers to staple sets. The finisher
can also have an off-line stapler.
You can staple documents as follows.
■ 1 staple in portrait direction
■ Two staples in portrait direction
■ 1 staple in landscape direction.
Select the correct document type to create a document with a landscape staple.
[20]
[20] Staple function
The screen displays a dialog if your set is too thick to staple. The stapler cannot
handle sets of more sheets than 80 sheets or sets thicker than 8.25 mm. The number
of 80 sheets was defined for Océ Red Label paper of 80 g/m2 (20 lb bond). If you see
the dialog described above, you can do the following.
■ Continue without staples.
■ Cancel the job.
If one of the staplers is empty or runs empty, the screen displays a dialog. You can
do the following.
■ Continue without staples.
■ Refill the staplers.
■ Cancel the job.
90
Chapter 6 The copy function
Stapled copies
Before you begin
1. Remove any staples or paper clips.
2. Check that the originals in the automatic document feeder are the same size.
3. Check that the originals are not curled.
Illustration
[21]
[21] Settings for 1 staple
How to staple the copies
Put the originals face down and in readable form into the automatic document feeder.
Use the original guides to align the original.
Select the function key for 'Copy'.
Use the 'Finishing' function key to define the number of staples.
Define the required settings in the other 3 sections ('Paper', 'Layout' and 'Extra') (see
‘Types of copy job settings’ on page 98).
6. Enter the number of copies.
7. Press the Start key
.
1.
2.
3.
4.
5.
Stapling a landscape oriented document
1. Follow the steps 1-3 from the previous paragraph.
Note: You can only use 1 staple for a landscape oriented document.
2. Select the 'Layout' section.
3. Set the 'Original document type' setting to landscape.
4. Set the 'Copy document type' setting to landscape. This setting allows you to
describe the orientation and binding edge of the copy.
Note: If you change the settings, the left part of the operator panel shows the result
of these changes.
5. Define the required settings in the sections 'Paper' and 'Extra'(see ‘Types of copy job
settings’ on page 98).
91
Stapled copies
6. Use the function key 'Finishing' in the section 'Basic' to add a staple to your
document.
7. Enter the number of copies.
8. Press the Start key
.
92
Chapter 6 The copy function
Stop the scanning of a copy job
Stop the scanning of a copy job
Introduction
Task for operators
When you make a copy, the Océ VarioPrint® 2090 first scans the originals. You can
use the automatic document feeder and the glass plate to scan originals. When you
use the automatic document feeder, the originals are first separated and then
scanned. The originals on the glass plate are scanned at once. Whether you use the
glass plate or the automatic document feeder, you can always stop the scanning
process.
When the scanning process starts, the status area displays the message 'Busy...' and
a softkey with the label 'Stopping scanning' appears. You can stop the scanning
process with this 'Stopping scanning' key. If you use the automatic document feeder
and press the 'Stopping scanning' key, the scanner first scans the originals that were
already separated and then stops.
The screen displays the message that the scanning stopped followed with the
question if you want to cancel the job. You can select one of two options.
■ 'Yes'
■ 'No'
Note: When the Océ VarioPrint® 2090 makes a scan, you can always stop the
process. The 'Stopping scanning' is always visible, even in the on-line help. Other
messages and keys are not visible in the on-line help, except the 'Close' key.
You can also delete document parts that were already scanned when you use the
'Copy build wizard' or the 'Scan build wizard'(see ‘Delete scanned subsets’ on
page 111)
Illustration
[22]
[22] Stop scanning
93
Stop the scanning of a copy job
How to stop scanning
Press the 'Stopping scanning' key while the scanner scans the originals.
Result
■
■
■
94
The scanning of the originals stops.
A question about whether you want to cancel the job appears. Select 'Yes' to
cancel or 'No' to resume the job.
If you select 'Yes', the job is removed from the job queue.
Chapter 6 The copy function
Giving priority to jobs
Giving priority to jobs
Introduction
Task for operators
The job queue contains jobs that are waiting to be printed. The job on top of the job
queue is the current job that is printed.
You can interrupt the current job to give priority to an urgent job. Depending on the
urgency of the job, you can select 'Move to top' or 'Interrupt'. You can move more
than 1 job. You must move the jobs one job at a time.
Use 'Interrupt' + 'Move to top' for jobs with the highest priority.
Note: A flag indicates an urgent job. A job gets a flag when the job was moved
to top and another job was interrupted for this job.
[30]
[30] Job priority
If you select
Then
'Move to top'
The current print job is finished first. Then the urgent job is
printed.
'Interrupt' + 'Move The current print job stops after the set that is currently printto top'
ed. Then the urgent job is printed.
When the urgent job is ready, the interrupted print job is resumed.
In walk-up user environments only interactive print jobs and copy jobs appear in the
job queue. Automatic print jobs are not visible in the job queue. Therefore, the
following actions are possible on interactive print jobs and copy jobs only:
■ 'Move to top'
■ 'Interrupt'
■ 'Interrupt' + 'Move to top'.
Note: You can use the
printing’ on page 129).
key to stop an automatic print job temporarily (see ‘Stop
In controlled user environments all copy jobs and all print jobs appear in the job
queue, the interactive print jobs and the automatic print jobs. Therefore, the three
actions mentioned above are possible on all print and copy jobs.
95
Giving priority to jobs
Before you begin
Make sure that the urgent copy job or print job is sent to the job queue.
You can use the Next job function (see ‘Concepts and Philosophy’ on page 18) to
prepare your urgent job while the printer proceeds with the current job.
Illustration
[23]
[23] Giving priority to jobs
How to use the 'Move to top' function
1. Press the Job queue manager key
.
Note: The job queue manager is visible only when the job queue contains one or
more jobs.
2. Use the scroll wheel to scroll to the urgent job.
3. Press the key for 'Move to top' .
Result
■
■
The urgent job moves to the place below the current print job.
The urgent job is printed after the current print job.
How to use the 'Interrupt' function
1. Press the Job queue manager key
.
Note: The job queue manager is visible only when the job queue contains one or
more jobs.
2. Press the 'Interrupt'
key.
3. Use the scroll wheel to scroll to the urgent job.
4. Press the key for 'Move to top' .
96
Chapter 6 The copy function
Giving priority to jobs
Result
■
■
■
■
■
The urgent job moves to the place below the current job.
The current job stops after the set that is currently printed.
The urgent job moves to the top. The interrupted job moves to the place below
the urgent job.
The urgent job is printed.
After the urgent job is printed, the interrupted job is resumed.
97
Types of copy job settings
Copy job settings
Types of copy job settings
Introduction
Information for operators
When you create a copy job, you define the job settings in the job editor on the
operator panel. The job settings allow you to describe the originals and the copies.
There are four sections available for defining job settings. Press the function keys on
the operator panel to access the following sections:
■ 'Basic'
■ 'Paper'
■ 'Layout'
■ 'Extra'.
Graphical information
The right-hand side of the job editor displays graphic information about the copy job
settings for copy jobs (and mailbox jobs). The information is described in the table
below: (Please note that some information is fixed for mailbox jobs and variable for
copy jobs.)
[24]
[24] Graphical feedback
[31]
[31] Graphical information
(1 – 2)
Number
Graphical information
1
Title of the mailbox job
Note: Copy jobs have no title.
98
2
Staple indication: 0, 1 or 2 staples
3
1-sided or 2-sided
4
Document orientation
Chapter 6 The copy function
Types of copy job settings
[31] Graphical information
(2 – 2)
Number
Graphical information
5
Document type
6
Document size (variable for copy jobs only)
7
Margin shift
8
Subset number (for copy jobs and scan jobs only)
9
Number of copies
The settings in the 'Basic' section
The following table describes the settings.
[32]
[32] The settings in the 'Basic' section
Settings
Description
'Original'
The setting describes if the originals must be scanned '1-sided' or '2-sided'.
'Copy'
This setting describes if the copies must be '1-sided' or '2-sided'.
'Finishing'
This setting allows you to set the number of staples. You can
set 0, 1 or 2 staples. You can set 'Booklet' if your Océ VarioPrint® 2090 is equipped with the optional booklet maker.
Note: The position of 1 staple depends on the selected original document type (landscape stapling
possible).
'Zoom'
The setting has the following options:
'Automatic'. This function resizes the information on the
original to fit on a copy with a different paper size. The automatic function uses fixed conversion values.
■ Manual setting. The zoom range is between 25% and
400%.
■
Note: The settings of the 'Basic' section for a copy job are not the same as the
settings of the 'Basic' section for a print job. The 'Basic' section for a print job has
less options (see ‘Edit a mailbox job’ on page 136).
99
Types of copy job settings
The settings in the 'Paper' section
[25]
[25] The 'Paper' section
The following table describes the settings.
[33]
[33] The settings in the 'Paper' section
Settings
Description
'Paper'
This setting allows you to indicate the paper tray. The setting
also indicates the paper in the paper tray and the orientation
of the paper in the paper tray.
'Covers'
You can use the setting to define the use of covers for your
document.
■ 'Front & back'
■ 'Back'
■ 'Front'
■ 'No'
You must indicate to the system in which paper tray you put
the covers.
The settings in the 'Layout' section
[26]
[26] The 'Layout' section
100
Chapter 6 The copy function
Types of copy job settings
The following table describes the settings.
[34]
[34] The settings in the 'Layout' section
(1 – 3)
Settings
Description
'Original document type'
The setting allows you to indicate how the information is displayed on
the original. A figure at the right-hand side on the operator panel presents
the display of the information.
You have the following options (use the scroll wheel to access the 2 topmost options, the values Portrait, book or Landscape, book are displayed
by default.)
■ Landscape, book
■ Portrait, book
■ Landscape, calendar
■ Portrait, calendar
Note: You can only change this setting for a copy job or scan
job. The value is fixed for a print job.
101
Types of copy job settings
[34] The settings in the 'Layout' section
(2 – 3)
Settings
Description
'Layout'
The setting allows you to print more than 1 image on a sheet.
You have the following options:
■ 'Booklet'
The system prints 2 images per side of the sheet. The system automatically prints your job 2-sided. The system shuffles the pages so that a
booklet is created when you fold the copies.
■ 'Same-up'
The Océ VarioPrint® 2090 prints one and the same image 2 times next
to each other. By default, the system keeps the size of the originals.
For example, when you put A4 originals into the automatic document
feeder, the system sets the size of the prints to A3. When you cut the
A3 sheets in two, you get 2 identical A4 copies of your document. To
decrease your A4 originals to A5 prints, you can use the zoom function or select another media type.
Same-up jobs require one media type for the prints. Therefore, when
you use the 'Copy build' wizard on the operator panel or the page programmer in the printer driver, you cannot select more than one media
type for the prints.
■ '2-up'
The system prints 2 images per sheet. When you select '1-sided', the
next 2 images are printed on a new sheet. When you select '2-sided',
the next 2 images are printed on the rear of the sheet.
■ 'Normal'
Your job is copied with no special layout settings.
Note: When you select 'Booklet' or '2-up' the system copies
the images, when possible, 1:1. For example, when you copy
A4 originals, the images are printed on A3.
102
Chapter 6 The copy function
Types of copy job settings
[34] The settings in the 'Layout' section
(3 – 3)
Settings
Description
'Copy document
type'
The setting allows you to select the binding edge of the copies. A figure
at the right-hand side of the operator panel displays the result after you
select a value for a particular binding edge.
You have the following options:
■ The portrait copy turns on the long edge.
■ The landscape copy turns on the short edge.
■ The portrait copy turns on the short edge.
■ The landscape copy turns on the long edge.
Note: It can occur that the original document type and the
copy document type that you select, have a different content
orientation. For example, the original is a portrait document
and the copy is a landscape document. When this situation occurs, the system resizes the information on the portrait original to fit on the landscape copy.
The settings in the 'Extra' section
[27]
[27] The 'Extra' section without 'Sort' option
[28]
[28] The 'Extra' section with 'Sort' option
103
Types of copy job settings
The following table describes the settings.
[35]
[35] The settings in the 'Extra' section
Settings
Description
'Orientation'
You can use the setting when you scan the original from the
glass plate and the original is small enough to make a scan in
two directions (A3 can only be scanned in 1 direction on the
glass plate).
Note: This setting is read-only for originals that
you put in the automatic document feeder.
'Original type'
You can use the setting to select the required image quality
for the following types of information.
■ 'Photo', for originals that mainly contain pictures or images.
■ 'Text', for originals that mainly contain text.
■ 'Mixed', for originals that contain a combination of text
and pictures.
Note: The system scans the originals with the optimal settings for each image type.
'Exposure'
You can use the setting to change the brightness of the images.
■
, to make the lightest possible copies
■
, to make lighter copies
■
, to make a 1:1 copy
■
, to make darker copies
■
, to make the darkest possible copies
'Margin shift'
This setting allows you to indicate the distance between the
information on the sheet and the binding edge. If you increase
the margin shift, the information on the sheet is shifted away
from the binding edge of the copy.
'Sort'
■
■
'By page'. The output is sorted in the order 111, 222, 333.
'By set'. The output is sorted in the order 123, 123, 123.
Note: The setting is only visible when the key operator enables the setting 'Display expert settings'
in the Océ VarioPrint® 2090 Settings Editor. When
the setting is enabled, the 'Extra' contains 5 settings. Then the graphical feedback at the
right-hand side is not visible.
104
Chapter 6 The copy function
Correct the settings for a copy job
Correct the settings for a copy job
Introduction
Task for operators
You can define or change the settings of a copy job until you press the Start key .
When you create a copy job you open the job editor. Select the required job settings
in the job editor.
When you change the value of a setting, the 'Close' key in the lower right-hand side
of the screen changes into the 'Default' key. You can use the 'Default' key to correct
your settings. If you press this key, all settings are reset to the default values. You can
then set new values.
If you want to reset the number of copies or prints only, you can also use the Cancel
key . This key does not reset the other settings.
How to correct the quantity setting for a copy job
1. Press the Cancel key
to reset the quantity setting (number of prints).
2. Use the numeric keys to enter a new value.
3. Press the Start key
to send the job to the job queue.
How to correct the settings in the copy job sections
1. Press the 'Default' key to reset the values in the 4 sections of the job editor. This
action changes all the copy job settings back to the default values.
2. Use the function keys above the operator panel to access the 4 copy job sections.
3. Use the function keys below the operator panel to define the settings for each section.
4. Press the Start key
to send the job to the job queue.
105
Combining Subsets into One Document
Complex copy jobs
Combining Subsets into One Document
Introduction
Task for operators
The Océ VarioPrint® 2090 allows you to create your documents and make a report,
a manual or a brochure. Combined (built) documents can include different parts such
as a title page, the table of contents, the various chapters and the appendices. You can
scan some parts of the document 1-sided and other parts 2-sided. You can print the
different parts of a document on cover material and separation sheets. You can insert,
for example, pre-printed paper and blank pages.
Subsets
A subset is a number of pages to process in a defined way, for example print on red
paper. If the required processing method changes, a new subset begins. When you
process pages of a document in different ways, you must divide the document into
subsets.
The 'Copy build wizard'
Use the 'Copy build wizard' to combine different subsets.
When you use the 'Copy build wizard', you can define different settings for each
separate subset. There are also settings that apply to the complete document:
■ The staple settings.
■ The number of copies.
Remember that you can not use the 'Copy build wizard' for digital documents in the
mailbox. You can only combine hardcopy originals into a copy-build job. These
originals are scanned with the automatic document feeder or glass plate. After the
scanning process, the subsets are combined into one document.
The automatic document feeder
Use the automatic document feeder to copy a set of originals. You can put a
maximum of 75 originals into the automatic document feeder. This number refers to
A4 originals of 80 g/m2 (20 lb. bond).
■ The originals must be the same size.
■ The originals must not be smaller than 140 x 203 mm (5 x 8 inches).
■ The originals must not be larger than 297 x 432 mm (11 x 17 inches).
■ The weight of the originals can be between 60 and 170 g/m2.
106
Chapter 6 The copy function
Combining Subsets into One Document
Note: Make sure that the size is one of the supported standard formats if you use the
automatic document feeder.
The glass plate
Use the glass plate to scan fragile originals and originals that do not fit into the
automatic document feeder (see ‘Originals that can be used’ on page 263).
Before you begin
1. Divide your documents into subsets.
2. Arrange the different subsets in the required order.
How to combine the subsets into 1 document
1. Put your first subset into the automatic document feeder, or put the first original on
the glass plate.
2. Press the function key 'Wizards'.
3. Press the function key 'Copy build'.
4. Press 'Add' to scan the first subset.
The job editor appears. Here you can define the settings for this subset.
Note: The 'Finishing' setting and the number of copies apply to the complete,
combined document. Océ advises to use the 'Job settings' key to set the number of
copies and the finishing, which includes the number of staples. The 'Job settings' key
becomes active after you scanned the first subset.
5. Define the settings for the original and the copy in the 'Basic', 'Paper', 'Layout' and
'Extra' sections on the operator panel (see ‘Types of copy job settings’ on page 98).
Note: If necessary, use the 'Default' key to correct the settings (see ‘Correct the
settings for a copy job’ on page 105).
6. Press the Start key
7.
8.
9.
10.
.
The first subset is scanned.
Put the following subset into the automatic document feeder, or put the next original
on the glass plate.
Scan the following subsets as described in the steps 4 - 6 above.
You can also remove a scanned subset. Press the 'Delete' key to delete the subset that
was last scanned.
After you scanned the last subset, you can use the 'Job settings' key to define the
finishing of the combined document and the number of copies.
Press the Start key after you defined the settings for the complete document.
The job is sent to the job queue.
107
Concatenation and chapterization
Concatenation and chapterization
Introduction
Information for operators
The 'Copy build wizard' of the Océ VarioPrint® 2090 combines different originals,
the subsets, into one document. For example a report or a book. You can change
1-sided originals into 2-sided documents. If the combination of your originals results
in an odd number of pages, an empty page can separate your subsets.
The Océ VarioPrint® 2090 detects this odd number of pages that results from the
copy-building process. The system allows you to delete the empty page or keep the
empty page. The concatenation and chapterization functions allow you to indicate
how the system must combine the subsets.
Note: You can use concatenation and chapterization only for originals fed through
the automatic document feeder. If you use the glass plate, the screen will not display
the message 'Start subset on new sheet?
Yes, use new sheet.
No, continue on back of last sheet'.
About concatenation and chapterization
When you use the 'Copy build wizard' to combine subsets, an odd number of pages
can occur. When the system detects an odd number of pages, you can start the next
subset on the rear of the last sheet, or on a new sheet. You can also indicate if you
want to use this setting for the whole document or only for this subset.
Concatenation
You decide to print the next subset on the empty page (do not keep the empty page).
The subsets are combined without an empty page, like the links of a chain.
Chapterization
You decide to keep the empty page and start the next subset on a new sheet (a new
chapter starts on a new sheet). An empty page separates the subsets, just like the
chapters of a book.
108
Chapter 6 The copy function
Concatenation and chapterization
The following figure shows an example of concatenation.
[29]
[29] Concatenation
The following figure shows an example of chapterization.
[30]
[30] Chapterization
Use concatenation and chapterization
When the system detects an empty page, the operator panel displays the following
message.
[31]
[31] Start subset on a new sheet
[36]
[36] Concatenation and chapterization settings
(1 – 2)
If you select...
Then
'Yes, use new sheet'
The first subset has an empty rear sheet, which is not
used. The next subset starts on a new sheet. This is called
chapterization.
109
Concatenation and chapterization
[36] Concatenation and chapterization settings
110
(2 – 2)
'No, continue on back
of last sheet'
The next subset starts on the rear of the last sheet of the
previous subset. There is no empty page between the two
subset. This is called concatenation.
'Whole document'
The next subsets all have the same setting.
'This subset'
The setting is used for this subset only.
Chapter 6 The copy function
Delete scanned subsets
Delete scanned subsets
Introduction
Task for operators
The 'Copy build wizard' of the Océ VarioPrint® 2090 includes a feature that allows
you to delete subsets that were already scanned. This feature is the 'Delete' key. This
key appears after the first subset is scanned. When you press the 'Delete' key, the Océ
VarioPrint® 2090 removes the last scanned subset. You can delete as many document
subsets as needed, one by one.
Illustration
[32]
[32] Delete a subset
How to delete subsets
1. Press the 'Delete' key.
The subset that was scanned last is deleted.
Note: The screen of the operator panel displays no warning. The subset is deleted
immediately.
2. Press the 'Delete' key until all required subsets are deleted.
111
Using tab sheets
Using tab sheets
Introduction
Task for operators
You can create a document that contains for example plain paper and tab sheets. If
you want to include the plain paper sheets and the tab sheets into one and the same
document, you must use the 'Copy build wizard' to create the document.
Note: One paper tray must be configured as tab sheets tray in the Océ VarioPrint®
2090 Settings Editor.
Before you begin
Make sure that one of the paper trays contains tab sheets (see ‘Load the tab sheets’
on page 240).
Illustration
[33]
[33] Print on tab sheets
Print on tab sheets
1. Press the function key 'Wizards'.
2. Press the function key 'Copy build'.
3. Press 'Add' to scan the first subset.
The job editor opens. Define the settings for this subset. To print this subset on tab
sheets, do steps 4 - 7. If you do not want to use tab sheets for this subset, move
directly to step 7.
4. Press the upper 'Paper' function key.
5. Press the lower 'Paper' function key to select the paper tray that contains the tab
sheets.
A new section 'Tab sheet layout' appears on the right-hand side of the screen.
112
Chapter 6 The copy function
Using tab sheets
6. Press the function key 'Tab sheet layout' to select which part of the tab sheet must be
printed.
When you select
the text is printed on the tab of the sheet.
When you select
the text is printed on the sheet.
7. Press the Start key
.
You can now press the 'Add' to add the next subsets or press the Start key
the document.
to finish
113
Use covers in a copy job
Use covers in a copy job
Introduction
The Océ VarioPrint® 2090 has a feature that allows you to include a front cover, back
cover or both in your copy jobs, for example to make a booklet with covers. This
feature was built in such a way that you can indicate at the operator panel that you
want to use covers. There is no need to use the 'Copy build wizard'.
You must do the following steps to create a document with covers.
First, load the cover material into a paper tray.
■ Next, indicate in the Océ VarioPrint® 2090 Settings Editor that the paper tray that
contains the cover material is a cover tray.
■ Create a copy job at the operator panel and indicate that you want to use covers.
■
Before you begin
After you loaded the paper tray with the cover material, access the Océ VarioPrint®
2090 Settings Editor. Click the following in succession: 'Settings', 'Paper', 'Printer'
and finally 'Paper tray content'. In the 'Paper tray content' section, you can set the
contents for each paper tray. Put a check mark in the check box 'Covers' for the paper
tray that contains the cover material.
Note: The on-line help of the Océ VarioPrint® 2090 Settings Editor contains more
information about how to set the contents of the paper trays.
Note: The following procedure describes a basic copy job with covers. The other
settings keep the default values. If necessary, you can change the other settings for
your job.
Create a copy job with covers
1. Put the originals face down and in readable form into the automatic document feeder
2.
3.
4.
5.
6.
114
or on the glass plate.
Press the function key 'Copy'.
The 'Basic' settings section opens.
Press the function key 'Paper'.
Press the function key 'Covers' 1-3 times to select 'Front', 'Back' or 'Front & back'.
Enter the number of copies with the numeric keys.
Press the Start key .
Chapter 6 The copy function
Use covers in a copy job
Create a booklet with covers
1. Put the originals face down and in readable form into the automatic document feeder
or on the glass plate.
2. Press the function key 'Copy'.
The 'Basic' settings section opens.
3. Press the 'Finishing' function key several times to select 'Booklet'.
Note: Refer to the 'Booklet' section of this manual to learn how to create booklets
in various paper sizes.
4.
5.
6.
7.
Press the function key 'Paper'.
Press the 'Covers' function key to select and then 'Front', 'Back' or 'Front & back'.
Enter the number of copies with the numeric keys.
Press the Start key .
Result
Your document with covers is now created. The Océ VarioPrint® 2090 calculates
when to switch between the paper trays to get the different paper types. If a needed
paper type is not present in the paper trays, the Océ VarioPrint® 2090 displays a
message to put this paper into the paper trays.
115
Copy special originals and originals of a non-standard size
Copy special originals and originals of a non-standard size
Introduction
Task for operators
Special originals can cause problems in the automatic document feeder. Use the
glass plate to copy special originals. When you use the glass plate, you must use the
'Copy build wizard' to make 2-sided copies.
Special originals include the following:
Pages from a bound original like a book or a magazine
■ Damaged or curled originals
■ Originals of a non-standard size.
■
When the original is put on the glass plate, the sheet size and the orientation of the
original are not automatically detected. The Océ VarioPrint® 2090 uses a number of
rules to calculate the size and the orientation. These rules are the following:
■ The sheet size of the original and the default sheet size of the print are the same,
standard sizes.
■ The default sheet orientation is a vertical orientation.
■ The zoom value for the print is 'Automatic' .
For example, the default size of the paper in the paper trays is A4 paper. The Océ
VarioPrint® 2090 then calculates that the original on the glass plate is an A4 original
with portrait orientation.
To copy an original of a non-standard size and orientation, you must manually set
the sheet orientation to vertical (portrait) or horizontal (landscape).
Make sure that the original fits into the following ranges:
■ The minimum size for the short edge is 10 mm. The maximum size for the short
edge is 297 mm.
■ The minimum size for the long edge is 10 mm. The maximum size for the long
edge is 432 mm.
You can not use the 'Automatic' setting for zoom to copy an original of a
non-standard size and orientation to a different size. Then you must adjust the zoom
setting by hand.
116
Chapter 6 The copy function
Copy special originals and originals of a non-standard size
The increase and decrease factor for the 'Zoom' value
You can increase and decrease the values for 'Zoom' setting in 'Large increments' and
'Small increments'. If you use 'Large increments', the zoom factor is set to one of the
following standard values when you turn the scroll wheel.
[37]
[37] Zoom values in large steps
For Europe
For the USA
25
25
35
32
50
50
71
65
100
79
141
100
200
129
283
200
400
259
400
If you use 'Small increments', the zoom value is increased or decreased with 1% with
every turn of the scroll wheel.
The selected zoom value is displayed in the percentage field, with additional
information like A4 -> A3.
How to copy special originals from the glass plate
1. Put the original on the glass plate, in the upper left corner. Make sure that the original
2.
3.
4.
5.
6.
7.
8.
9.
is in readable form, that is face down and in horizontal orientation or vertical
orientation.
Press the function key 'Copy'(see ‘Types of copy job settings’ on page 98).
Press the function key 'Zoom' to select 'Large increments' or 'Small increments'.
Use the scroll wheel to select the required zoom factor.
Press the function key 'Layout'.
Press the 'Original document type' function key to select vertical or horizontal.
This setting describes how the information is mapped on the original.
Press the function key 'Extra'.
Press the 'Orientation' function key to define the way in which the original is put on
the glass plate.
Press the Start key to send the copy job to the job queue.
117
Create an A5 booklet from A4 originals
Booklets
Create an A5 booklet from A4 originals
Introduction
Task for operators
This procedure describes how to create a folded and stapled A5 booklet. The
originals are A4. To create A5 booklets, the system requires A4 media.
Before you begin
Make sure that one of the paper trays contains A4 media. The feed direction must be
SEF, short edge feed.
Create an A5 booklet from A4 originals
1. Put the originals into the automatic document feeder.
2. Press the 'Copy' function key.
3. Press the function key 'Finishing' to select 'Booklet'.
In the 'Layout' section, the system automatically sets the 'Layout' setting to 'Booklet'.
.
4. In the 'Paper' section, press the function key 'Paper' to select A4
5. Use the numeric keys to enter the number of prints.
6. Press the Start key
.
118
Chapter 6 The copy function
Create an A4 booklet from A4 originals
Create an A4 booklet from A4 originals
Introduction
Task for operators
This procedure describes how to create a folded and stapled A4 booklet. The
originals are A4. To create A4 booklets, the system requires A3 media.
Before you begin
Make sure that one of the paper trays contains A3 media.
Create an A4 booklet from A4 originals
1. Put the originals into the automatic document feeder.
2. Press the function key 'Copy'.
3. Press the function key 'Finishing' to select 'Booklet'.
In the 'Layout' section, the system automatically sets the 'Layout' setting to 'Booklet'.
4. In the 'Paper' section, press the function key 'Paper' to select A3.
5. Use the numeric keys to enter the number of prints.
6. Press the Start key
.
119
Create an A4 booklet from A4 originals, including a cover
Create an A4 booklet from A4 originals, including a cover
Introduction
Task for operators
This procedure describes how to create a folded and stapled A4 booklet that also
contains a cover. The originals are A4. To create A4 booklets, the system requires
A3 media.
Before you begin
■
■
Make sure that one of the paper trays contains A3 media.
Make sure that one of the paper trays contains covers.
Create an A4 booklet from A4 originals, including a cover
1. Put the originals into the automatic document feeder.
2. Press the function key 'Copy'.
3. Press the function key 'Finishing' to select 'Booklet'.
In the 'Layout' section, the system automatically sets the 'Layout' setting to 'Booklet'.
4. In the 'Paper' section, press the function key 'Paper' to select A3.
5. In the 'Paper' section, press the function key 'Covers' to select the required cover
('Front', 'Back' or 'Front & back').
6. Use the numeric keys to enter the number of prints.
7. Press the Start key
.
120
Chapter 6 The copy function
Create an A5 booklet from an A5 booklet
Create an A5 booklet from an A5 booklet
Introduction
Task for operators
This procedure describes how to create a folded and stapled A5 booklet. The
originals are A5 booklets. To create A5 booklets, the system requires A4 media.
Before you begin
Make sure that one of the paper trays contains A4 media.
Create an A5 booklet from an A5 booklet
1.
2.
3.
4.
5.
6.
7.
Put the originals into the automatic document feeder.
Press the function key 'Copy'.
Press the function key 'Finishing' to select 'Booklet'.
In the 'Layout' section, press the function key 'Layout' to select 'Normal'.
In the 'Paper' section, press the function key 'Paper' to select A4.
Use the numeric keys to enter the number of prints.
Press the Start key .
121
Create an A5 booklet from an A5 booklet
122
Chapter 6 The copy function
Chapter 7
The print function
123
About automatic printing
Printing and the job queue
About automatic printing
Introduction
Information for operators
The Océ VarioPrint® 2090 allows you to print your jobs in two ways, the interactive
way and the automatic way. You must put a check mark in the box 'Mailbox' in your
printer driver to make your job an interactive print job. Your job then goes into the
mailbox. In order to print your job, you must start the job at the operator panel.
The automatic print jobs are also created in the printer driver. To create an automatic
print job, you must leave the box 'Mailbox' empty. Your automatic print job then goes
into the job queue.
Note: In the Océ VarioPrint® 2090 Settings Editor, the key operator can define that
all new jobs are sent to the mailbox, not to the job queue. When the setting 'To
mailbox' is enabled, automatic print jobs become interactive print jobs. You must
start all print jobs from the mailbox (see ‘Print a job from the mailbox’ on page 134).
Automatic printing in walk-up environments
In walk-up environments, the printing of automatic print jobs starts when all three
following conditions are met:
■ All the interactive jobs are finished.
■ The time out of the operator panel has expired.
■ At least one automatic print job is present.
When all conditions in the bulleted list above are met, the display shows the
following message 'Automatic printing will start in ... seconds'. Because automatic
print jobs are not visible in the job queue in walk-up environments, the printing of
automatic print jobs is announced through a message.
After the time displayed in the message expires, the printing of your automatic print
job starts. When there are more automatic print jobs, all the jobs are printed
automatically, one job after the other job. The display does not announce all
automatic print jobs separately. Only the first automatic print job is announced.
Because automatic print jobs are not visible in the job queue in walk-up
environments, you cannot give priority to automatic print jobs in the job queue.
Interactive print jobs always come before automatic print jobs, even when interactive
print jobs are defined but have not arrived at the job queue yet.
124
Chapter 7 The print function
About automatic printing
Note: The key operator can disable the announcement timer in the Océ VarioPrint®
2090 Settings Editor. Then automatic printing starts without an announcement.
Automatic printing in controlled environments
In controlled environments, the printing of automatic print jobs starts when the
following two conditions are met:
■ All the interactive jobs are finished.
■ At least one automatic print job is present.
The announcement timer is not active in controlled environments. Automatic print
jobs start without an announcement message. In controlled environments, automatic
print jobs appear in the job queue, under the interactive print jobs. Because automatic
print jobs are visible in the job queue, you can give priority to automatic print jobs
over interactive print jobs. You can also interrupt and delete automatic print jobs.
Stop automatic print jobs
When you do not put a check mark in the box 'Mailbox' in your printer driver, you
create an automatic print job. Your job goes straight into the job queue.
When an automatic print job is printed, the operator panel displays the following
screen.
[34]
[34] Automatic printing
You can always interrupt an automatic print job to start an urgent copy job or print
job. In order to stop an automatic print job in a walk-up user environment, press
'Close' or any other key. The automatic print job then moves into the mailbox. When
all conditions described in the bulleted list of the introduction are met again, the
announcement of your automatic print job appears again. The automatic print job
continues after the time displayed in the message expires.
In order to stop an automatic print job in a controlled environment, press 'Interrupt'.
Then select the job you want to print and press 'Move to top'. After the urgent job is
125
About automatic printing
printed, the automatic print job continues. Because the automatic print job remains
visible in the job queue, the job does not move into the mailbox.
126
Chapter 7 The print function
Giving priority to jobs
Giving priority to jobs
Introduction
Task for operators
The job queue contains jobs that are waiting to be printed. The job on top of the job
queue is the current job that is printed.
You can interrupt the current job to give priority to an urgent job. Depending on the
urgency of the job, you can select 'Move to top' or 'Interrupt'. You can move more
than 1 job. You must move the jobs one job at a time.
Use 'Interrupt' + 'Move to top' for jobs with the highest priority.
Note: A flag indicates an urgent job. A job gets a flag when the job was moved
to top and another job was interrupted for this job.
[38]
[38] Job priority
If you select
Then
'Move to top'
The current print job is finished first. Then the urgent job is
printed.
'Interrupt' + 'Move The current print job stops after the set that is currently printto top'
ed. Then the urgent job is printed.
When the urgent job is ready, the interrupted print job is resumed.
In walk-up user environments only interactive print jobs and copy jobs appear in the
job queue. Automatic print jobs are not visible in the job queue. Therefore, the
following actions are possible on interactive print jobs and copy jobs only:
■ 'Move to top'
■ 'Interrupt'
■ 'Interrupt' + 'Move to top'.
Note: You can use the
printing’ on page 129).
key to stop an automatic print job temporarily (see ‘Stop
In controlled user environments all copy jobs and all print jobs appear in the job
queue, the interactive print jobs and the automatic print jobs. Therefore, the three
actions mentioned above are possible on all print and copy jobs.
Before you begin
Make sure that the urgent copy job or print job is sent to the job queue.
You can use the Next job function (see ‘Concepts and Philosophy’ on page 18) to
prepare your urgent job while the printer proceeds with the current job.
127
Giving priority to jobs
Illustration
[35]
[35] Giving priority to jobs
How to use the 'Move to top' function
1. Press the Job queue manager key
.
Note: The job queue manager is visible only when the job queue contains one or
more jobs.
2. Use the scroll wheel to scroll to the urgent job.
3. Press the key for 'Move to top' .
Result
■
■
The urgent job moves to the place below the current print job.
The urgent job is printed after the current print job.
How to use the 'Interrupt' function
1. Press the Job queue manager key
.
Note: The job queue manager is visible only when the job queue contains one or
more jobs.
2. Press the 'Interrupt'
key.
3. Use the scroll wheel to scroll to the urgent job.
4. Press the key for 'Move to top' .
Result
■
■
■
■
■
128
The urgent job moves to the place below the current job.
The current job stops after the set that is currently printed.
The urgent job moves to the top. The interrupted job moves to the place below
the urgent job.
The urgent job is printed.
After the urgent job is printed, the interrupted job is resumed.
Chapter 7 The print function
Stop printing
Stop printing
Introduction
Task for operators
Press the Stop key one time if you want to stop a print job at the end of a set. Press
the Stop key two times to stop within a set (end of page).
After you press the Stop key, the printing stops and a dialog is displayed. Then you
can cancel or resume the job.
You can use the Stop key for example if you made a mistake in the job definition.
Illustration
[36]
[36] Stop printing
Stop key behavior
[39]
[39] Stop key behavior
If you want to stop a job at the
Then press the Stop key
End of a set
One time
End of a page
Two times
...
129
Stop printing
Result
After the printer stops printing, the system asks if you want to cancel the job. You
have two options, as shown in the table.
[40]
[40] Stop key dialog
130
Option
Result
'Yes'
The job is canceled. If the job is stored in the mailbox, you
can print the job again. If you stopped printing at the end of a
page, you must remove the partial set from the output trays.
The Océ VarioPrint® 2090 prints the next job in the job
queue.
'No'
The Océ VarioPrint® 2090 continues to print the job.
Chapter 7 The print function
About the mailbox
Printing and the mailbox
About the mailbox
Introduction
Information for operators
A mailbox is a digital storage area (not intended for archiving purposes) for print
jobs from the network. This digital storage area is on the hard disk of the Océ Smart
Imager.
When you print a document from your desktop, there are 2 options.
1. The print job is sent to the mailbox of the Océ VarioPrint® 2090 (interactive
printing).
2. The print job is sent to the job queue of the Océ VarioPrint® 2090 (automatic
printing).
If the job is sent to the mailbox, you can access the job on the operator panel of the
Océ VarioPrint® 2090. You have a personal user area in the mailbox where you can
find your print jobs.
In the Océ VarioPrint® 2090 Windows and Mac printer drivers you can change the
name of your personal mailbox.
The mailbox allows you to do the following.
■ Edit the job settings for multiple print jobs.
■ Start to print one or more jobs.
■ Delete one or more jobs.
When you start a job from the mailbox, you send a copy of the mailbox job to the
job queue. The original job remains in the mailbox. You can reuse the mailbox job
as many times as required. Each time you start a job from the mailbox, you create a
copy of the print job that is sent to the job queue.
To remove a job from the mailbox, you must delete the job.
If you delete the mailbox job, the jobs that are started to the job queue are not
automatically deleted as well. You must delete these jobs separately.
Note: The key operator can clear the mailboxes periodically. The key operator can
define the storage time of jobs in the mailbox in the Océ VarioPrint® 2090 Settings
Editor.
131
About the mailbox
Job order in the mailbox
The screen at the operator panel of the Océ VarioPrint® 2090 contains a list of the
mailboxes of all users who recently sent a job to the mailbox. This list is the user list.
The user who last sent a print job to the Océ VarioPrint® 2090 is highlighted in the
user list on the operator panel.
When you open your mailbox on the operator panel, you see all your jobs. All new
(or not printed) jobs that you sent from your desktop are highlighted. You can scroll
through the list of jobs with the scroll wheel on the right-hand side of the display. To
select a job, just scroll to the job.
If you send a job to the job queue, the job gets a check mark . This check mark
indicates that the job is 'Done' (printed before).
Mailbox information
The mailbox header contains the following information.
[41]
[41] Information in the header of the mailbox
Nr.
Header information
1
The user name.
2
The total number of jobs in the mailbox.
3
The number of jobs that you select.
The mailbox of the Océ VarioPrint® 2090 displays the following job information.
[42]
[42] Presentation of the jobs in the mailbox
Nr.
Job information
1
A check mark to indicate that the job is sent to the job queue.
2
The file name of the job.
3
The date and time the job arrived in the mailbox.
[37]
[37] Example of a personal mailbox
132
Chapter 7 The print function
About the mailbox
Graphical information
The right-hand side of the job editor displays graphic information about the job
settings for mailbox jobs, copy jobs and scan jobs. The information is described in
the table below: (Please note that some information is fixed for mailbox jobs and
variable for the other jobs.)
[43]
[43] Graphical information
Nr.
Graphical information
1
Staple indication, 0, 1 or 2 staples
2
1-sided or 2-sided
3
Document orientation
4
Document type
5
Document size (variable for copy jobs only)
6
Margin shift
7
Number of prints
[38]
[38] Graphical feedback in the job editor
133
Print a job from the mailbox
Print a job from the mailbox
Introduction
Task for operators
If you send a print job from your desktop to the Océ VarioPrint® 2090, the job goes
to the job queue or to the mailbox. A job that goes to the job queue is called an
automatic print job (AP). A job that goes to the mailbox on the Océ VarioPrint® 2090
is called an interactive print job (IP).
Before you begin
■
■
■
Create a print job on your desktop.
Select the job settings in the printer driver.
Send the print job through the network to the mailbox on the Océ VarioPrint®
2090.
How to print a job from the mailbox
1. Press the 'Print' function key.
You now see a list of mailboxes, the user list.
Note: This user list contains only the mailboxes of the users who recently sent a
print job to the mailbox. In walk-up environments, the user list contains several users
(see ‘The walk-up environment’ on page 57). In controlled environments, the user
list contains only one name or a few names (see ‘The controlled environment’ on
page 59).
2. Use the scroll wheel at the right-hand side of the operator panel to scroll through the
user list. Then use the 'Confirm' key on the scroll wheel to select your user name (the
name of your mailbox) from the list.
[39]
[39] Select your user name
3. Press the 'Print from mailbox...' function key.
4. Use the scroll wheel at the right-hand side of the operator panel display to scroll
through the list of your jobs. To select a job, just scroll to the job.
134
Chapter 7 The print function
Print a job from the mailbox
Note: You can press the function keys 'Select all' or 'Select new' to make a selection.
5. Press the Start key
.
Result
A copy of the mailbox job is sent to the job queue of the Océ VarioPrint® 2090. The
mailbox job gets a check mark . This check mark indicates that the job has been sent
to the job queue. The job remains in the mailbox and you can use the job again until
you delete the job.
135
Edit a mailbox job
Edit a mailbox job
Introduction
Task for operators
When you start a job from the mailbox, a copy of this mailbox job is sent to the job
queue. You can change the settings of that job in the job editor before you send the
job to the job queue. Your changes are not applied to the original job that you sent to
the mailbox. The changes you make in the job editor are applied to the job that is sent
to the job queue.
Options
You access the job settings through the 'Edit...' function. The job settings are
accessible in the following four sections.
■ 'Basic'
■ 'Paper'
■ 'Layout'
■ 'Extra'
Use the numeric keys to define the number of prints. The number of prints is
displayed at the right-hand side of the screen. You can change the number of prints
for a job when that job is selected in the mailbox. You do not have to press the
function key 'Edit...' first.
Note: If you select more than one job in the mailbox and you edit a setting, that
setting is changed in all the selected jobs. For example, if you select several jobs that
have different numbers of prints, the Océ VarioPrint® 2090 displays the number of
prints as 'XXXX'. If you then enter a number, this number of prints will apply to all
the selected jobs.
When to do
If you want to check or change the job settings of a print job or define the number of
prints before you start a print job, you can access the job settings in the mailbox.
After you have checked and changed the settings in the 4 sections, you can press the
Start key to send the modified job to the job queue.
Note: You can select more than 1 job in the mailbox to edit. If you select several
jobs, of which at least 1 job contains more than 1 subset, the job editor becomes
read-only. You cannot edit the settings.
136
Chapter 7 The print function
Edit a mailbox job
Illustration
[40]
[40] Edit a mailbox job
How to edit a mailbox job
1. Open the mailbox to access your print job (see ‘Print a job from the mailbox’ on
page 134).
2. Press the 'Edit...' function key.
The job editor opens with the settings of the initial mailbox job.
3. If necessary, follow the procedures described below.
These procedures help you to change the values of the print job settings.
Change the settings in the 'Basic' section
1. Press the function key 'Basic' (only necessary if the section is not displayed after you
pressed the function key 'Edit...').
[41]
[41] The 'Basic' section
2. Press the function key 'Print'.
You can define that the print is '1-sided' or '2-sided'.
3. Press the function key 'Finishing'.
You can set the number of staples. Select 'No staples', '1 staple' or '2 staples' for the
print job.
If your Océ VarioPrint® 2090 has the optional integrated booklet maker, you also see
the option 'Booklet' for the setting 'Finishing'.
137
Edit a mailbox job
Note: The 'Print job identification' section displays the file name and the user name.
You can not change this information for a print job.
Change the settings in the 'Paper' section
1. Press the function key 'Paper'.
[42]
[42] The 'Paper' section
2. Press the function key 'Paper' to select the paper tray for the print job.
3. Press the function key 'Covers' to define the use of covers.
Change the settings in the 'Layout' section
1. Press the function key 'Layout'.
[43]
[43] The 'Layout' section
2. Press the function key 'Print document type'.
You can set the binding edge of the print. This setting defines if the document flips
over the long edge or the short edge of a sheet. This setting also allows you to select
the orientation of the print. You can select landscape or portrait. You can only set 1
staple for documents that flip over the short edge of a sheet.
Note: The 'Original document type' section displays an indication of how the
information is oriented on the original, in landscape or portrait direction. You can
not change this information for a print job.
138
Chapter 7 The print function
Edit a mailbox job
Change the settings in the 'Extra' section
1. Press the function key 'Extra'.
[44]
[44] The 'Extra' section
2. Press the function key 'Margin shift'.
You can indicate the distance between the information on the sheet and the binding
edge. When you increase the margin shift, the information on the sheet is shifted
away from the binding edge of the print.
3. Press the function key 'Sort'.
When you select 'By page', the output is sorted in the order 111, 222, 333.
When you select 'By set', the output is sorted in the order 123, 123, 123.
Note: The setting 'Sort' is only visible when the key operator enables the 'Display
expert settings' in the Océ VarioPrint® 2090 Settings Editor.
139
Remove jobs from the mailbox
Remove jobs from the mailbox
Introduction
Task for operators
The jobs in the mailbox are not automatically deleted after they are sent to the queue.
If a mailbox job is not needed any more, you must manually remove the job. The key
operator can also use the Océ VarioPrint® 2090 Settings Editor to remove the jobs.
Illustration
[45]
[45] Delete a job from the mailbox
How to remove jobs from the mailbox
1. Open the mailbox to access your print jobs (see ‘Print a job from the mailbox’ on
page 134).
2. Use the scroll wheel to scroll through the print jobs in the mailbox. To select a job,
just scroll to the job.
Note: If you want to select more than 1 job, you can use the function keys 'Select all'
and 'Select new'.
3. Press the function key 'Delete'. The selected jobs are removed from the mailbox.
Note: If you want to delete a job from the job queue, you must open the job queue
manager and manually delete the job from the job queue with the 'Delete' function
key. This action is only possible for jobs in the job queue that were not started yet. If
the job in the job queue is currently printed, you must first use the Stop key .
Please note that if you delete a job from the mailbox, this action does not affect the
jobs in the job queue.
140
Chapter 7 The print function
About the Océ VarioPrint® 2090 printer drivers
Using a printer driver
About the Océ VarioPrint® 2090 printer drivers
Introduction
Information for operators
You need a printer driver to send your jobs from your work station to the Océ
VarioPrint® 2090. The printer driver allows you to define the print job settings on
your work station. Click 'Properties' in your print window to access the specific Océ
VarioPrint® 2090 features in the printer driver. You can use the printer driver to
define a large number of settings for layout, paper, finishing and image.
Note: The User's Manual only contains a short description of the printer drivers.
Please refer to the on-line help of the printer driver for detailed information about
the settings in the printer driver.
Available printer drivers
[44]
[44] Available printer drivers
Operating system
■
■
■
Microsoft Windows 2000®
Microsoft Windows XP®
Microsoft Windows Server
2003®.
Available printer drivers
Océ provides the following Universal Printer
Drivers (UPD).
■ HP® PCL6
■ Adobe® PostScript®3™
Both drivers are based on Microsoft® driver core
technology to guarantee an optimal integration
with the operating system of your work station.
Apple® Macintosh® Mac OS®
10.3 and higher
■
■
■
■
Microsoft Windows
95/98/ME
Microsoft Windows NT4,
Older Mac OS® versions
Linux®
■
■
Mac OS® printer driver
This driver allows you to do page programming and to use the Océ VarioPrint® 2090
mailbox.
PPD file
The PostScript Printer Description (PPD) file
adds the Océ VarioPrint® 2090 characteristics to a general Adobe® PostScript® 3™
printer driver, which translates the print jobs
into PostScript® files.
141
About the Océ VarioPrint® 2090 printer drivers
Important features of the printer drivers
The following table describes some important features of the printer driver.
[45]
[45] Features of the printer driver
(1 – 2)
Feature
Description
Templates
A template is a set of default settings that describe a print job.
A template is based on the characteristics of a specific printer.
Templates help you to define a print job in a quick and easy
way. You must not define all the settings again when you print
a job.
Bidirectional information
The UPD printer driver for Microsoft Windows 2000®, Windows XP® and Windows Server 2003® provides you with
feedback from the printer (see ‘About the bidirectional printer driver’ on page 144).
Preview window
The preview window at the right-hand side of the printer driver provides graphical feedback about the result of the print
job. When you change a setting that affects the preview, the
setting and the preview are immediately changed.
Below the graphical feedback, the preview window displays
a summary of the most used settings. These settings are links
to the corresponding sections of the printer driver.
Note: The preview window summary does not display all the settings.
142
Chapter 7 The print function
About the Océ VarioPrint® 2090 printer drivers
[45] Features of the printer driver
Feature
(2 – 2)
Description
Contradiction han- When you define settings that cannot be combined, a start
dling
contradiction occurs. The last setting you define, overrules all
the other settings that have a conflict with the setting.
When you define a setting that overrules other settings, the
'Message pane' (at the bottom right-hand side) shows the
changed settings.
The 'Message pane' also shows an 'Undo' option. You can use
the 'Undo' option to undo the latest change that caused the
start contradiction.
All the settings that are overruled are marked as follows.
■ The names of the settings become red
■ A red dot is placed in front of the setting. The red dot
shows the previous value of the setting.
After you correct or accept the settings, the messages in the
message area and the red indications disappear.
'Show settings before printing'
You can enable the option 'Show settings before printing' in
the 'Printer' tab of your printer driver. You can also make this
setting your default setting in the 'Printing preferences' of the
Océ VarioPrint® 2090 printer driver.
When the setting is enabled, the printer driver appears when
you click the print icon in the toolbar of your application. The
standard template is automatically selected. You can change
various settings, including the selection of another template.
The settings that you cannot change, are disabled.
Note: You can disable the 'Show settings before
printing' option in the 'Printer' tab of the printer
driver or in the 'Printing preferences' of the printer driver.
143
About the bidirectional printer driver
About the bidirectional printer driver
Introduction
Information for operators
For the Océ VarioPrint® 2090, a bidirectional UPD printer driver (PS and PCL) is
available.
The printer driver is intended for the following operating systems:
Microsoft Windows 2000®
■ Microsoft Windows XP®
■ Microsoft Windows Server 2003®.
■
The bidirectional printer driver provides feedback from the printer. The printer driver
does not only send information to the printer (the print file), but can receive
information from the printer as well.
The communication between the printer and the printer driver has several
advantages. For example, you can get information about the printer status or the
available media.
The 'Printer' tab of the printer driver provides the following feedback:
Types of feedback
[46]
[46] The feedback
Type of information
(1 – 2)
Description
Status information A dynamic icon and a text show the status of the printer.
■ Name and location of the printer
■ Status of the connection
144
Tray information
Displays the status of the trays. The paper level in the paper
tray is indicated in numbers.
When a paper tray is out of paper or almost out of paper, an
arrow is shown in the tray icon and the icon becomes orange.
When the paper tray is locked you see an icon of a lock in the
paper type column.
Toner status
The toner level is displayed If the dots in the toner level icon
are light gray, the Océ VarioPrint® 2090 is almost out of toner.
Staple status
The icon displays the staple supply. The icon turns orange
when the staple supply is low and when the Océ VarioPrint®
2090 is out of staples.
Chapter 7 The print function
About the bidirectional printer driver
[46] The feedback
Type of information
(2 – 2)
Description
Printer and Océ in- The name of the printer is displayed. The name is also disformation
played when the printer is not connected.
Below the name of the printer, 2 links are added.
■ 'About'
Information about the printer driver
■ www.oce.com
A link to the web site of Océ, where you can find printer
driver updates and other information
Picture
A picture of your printer is displayed
Preferences for
your mailbox and
settings
■
■
■
You can change the name of the mailbox
You can click a link to your mailbox in Océ Intra Logic®.
You must enable this option in the 'Properties' of the printer driver
You can enable and disable the 'Show settings before
printing' option
145
About the page programmer
About the page programmer
Introduction
Information for operators
The page programmer is available in the Océ VarioPrint® 2090 PostScript® printer
driver. The page programmer enables you to define the required paper for your job
page by page.
The page programmer is only available when the setting 'Enable page programmer'
in the 'Properties' of your printer driver is enabled.
You can find the page programmer in the 'Special pages' section of the 'Job' tab in
the printer driver.
General information
The page programmer enables you to define different media types for your
document. For example, you can create a document that contains covers, plain paper,
tab sheets and inserts. You can also staple each subset separately.
If you have a small document, you can use the page programmer without printing the
document first.
If you have a large document, printing the document first can give you a better
overview of the document. When you have a printed document, it is easier to define
the required media for each page.
You can program a maximum of 100 subsets. If you define more than 100 subsets,
the boxes for the page range are disabled. You can not add subsets.
When you click 'OK', the system automatically stores the changed settings in a
template. Then you can use these page program settings for other jobs.
Note: The on-line help of the Océ VarioPrint® 2090 printer driver contains more
information about the buttons, icons and settings of the page programmer.
The tab caption editor
When you use tab sheets, you can define a text for the tabs. For each page that you
defined as 'Print on tab' in the page programmer, you can define a text in the tab
caption editor.
Click the yellow icon for 'Open tab caption editor' in the toolbar of the page
programmer to access the tab caption editor.
146
Chapter 7 The print function
About the page programmer
The tab caption editor enables you to define the following:
[47]
[47] The tab caption editor
Option
Description
'Set size'
Select a value in the 'Set size' drop-down list to set the number
of tab sheets that fit on one page in vertical direction. You can
select a value within the range 1 to 20.
Top/Bottom indent You can define the top and bottom indent. This option can be
used for indented tab sheets. You can enter a value between 0
and 50 mm. The value of the setting can be set in mm or in
inches.
'Alignment'
Click one of the three options to define the alignment of the
text on the tab:
■ 'Top' starts the caption at the top of the tab.
■ 'Center' places the caption in the center of the tab.
■ 'Bottom' places the caption at the bottom of the tab.
'Rotation'
Click one of the three options to define the reading direction
of the caption on the tab:
■ 'Vertical' prints the text vertically.
■ '90 degrees clockwise' prints the text rotated.
■ '90 degrees counter-clockwise' prints the text rotated.
'Margin'
Use this option to define the horizontal margin of the text on
the tab. You can select from -5 to 10 mm.
'Font'
Select a font for the text on the tab
Note: The on-line help of the Océ VarioPrint® 2090 printer driver contains more
information about the settings of the tab caption editor.
147
Resolving constraints
Resolving constraints
Introduction
The 'Message pane' shows information about problems that occur if you set
conflicting settings.
A constraint message appears when you make settings that conflict.
Example
You can not print a booklet 1-sided. The printer driver shows a red bullet in front of
the conflicting settings (1-sided and booklet) and the settings are displayed in red. In
the 'Message pane' you can click the 'Undo' link to solve the constraint.
How to resolve constraints
1. Click 'Undo' in the 'Message pane'. The setting that has caused the conflict is
corrected and the previous setting is restored.
Or
2. Select another (option of a) setting manually that will remove the message.
148
Chapter 7 The print function
About Océ Intra Logic®
Océ Intra Logic®
About Océ Intra Logic®
Definition
Information for operators
Document and device control @ your desktop
Maximize the efficiency, optimize the device usage and simplify management and
support.
Print and copy from and to every networked machine. Océ Intra Logic® provides
convenient desktop access to these functions.
The Océ Intra Logic application is a web-based application that allows you to
exchange information with the machines on the network.
Illustration
[46]
[46] Océ Intra Logic
The concepts of Océ Intra Logic®
The application provides the following easy-to-use functions that you can execute
from your computer.
■ Change the settings for a print job.
■ Gather jobs during the day and print all the jobs in one session.
■ Make a personal scan profile.
149
About Océ Intra Logic®
■
■
■
Control your scan jobs.
Monitor the machine status.
Know which paper is loaded.
The main tabs are the 'Printing' tab, the 'Scanning' tab and the 'Corporate' tab.
Illustration
[47]
[47] Océ Intra Logic Screen
The 'Printing' tab
The 'Printing' tab allows you to perform the following tasks:
■ Cancel your print jobs in the print queue.
■ Change the settings of the print jobs in your mailbox.
■ Print the print jobs that are in your mailbox.
■ Import print files into your mailbox.
The 'Scanning' tab
Océ Intra Logic uses two sections to store the scan jobs, the 'Public scans' section
and the 'Personal scans' section. To send a scan job to the 'Personal scans' section,
you must use your personal scan profile.
The scan jobs that are in the 'Public scans' section can be viewed or copied to your
'Personal scans' section.
When the scan jobs are in the 'Personal scans' section, you can perform the following
tasks:
■ View your scan jobs.
■ Save your scan jobs.
■ Delete your scan jobs.
150
Chapter 7 The print function
About Océ Intra Logic®
■
■
Convert your scan jobs into another document type.
Send your scan jobs.
The 'Corporate' Tab
The 'Corporate' tab provides easy access to links and documents.
The 'Corporate' tab has two sections, links and documents.
151
Océ Intra Logic functions
Océ Intra Logic functions
Introduction
Information for operators
Océ Intra Logic® is an easy-to-use intranet application that is used to make more
efficient use of the printer. This application allows you to do the following:
■ Know which paper is loaded.
■ See whether the machine is available or not available.
■ Gather jobs, the whole day and print all the jobs in one session.
■ Get information about problems (for example that the machine is out of paper).
■ Program difficult jobs.
Only relevant information is offered to the user, for example the user is informed
when there is a paper jam or paper empty situation for a job.
152
Chapter 7 The print function
Océ Intra Logic functions
Next to the items listed above, you can use Océ Intra Logic to change job settings for
jobs on the Océ VarioPrint® 2090. In the figure below you see an example of job
settings in Océ Intra Logic.
[48]
[48] Océ Intra Logic job settings
Job settings overview
The following table gives an overview of the job settings you can change in Océ Intra
Logic. In the table you see a Yes when a setting is applicable. You see a No when the
setting does not influence the Océ VarioPrint® 2090.
[48]
[48] Océ Intra Logic job settings
Setting label
(1 – 2)
Change in mailbox via Océ Intra Logic
General
Number of copies
Yes
AP/IP
No
153
Océ Intra Logic functions
[48] Océ Intra Logic job settings
(2 – 2)
Setting label
Change in mailbox via Océ Intra Logic
Security Code
No
Basic
Original sides
No
Print sides
Yes
Staple
Yes
Zoom
No
Paper
Paper size
No (read-only)
Paper tray
No
Paper type
Yes
Cover
Yes
Orientation (jobs from
glass plate only)
No
Document type
No
Image type (analog originals only)
No
Lay out print
154
Lay out Booklet
No (read-only)
Document type
Yes
Margin shift front
No
Margin shift back
No
Chapter 7 The print function
Create a print job
Creating jobs
Create a print job
Introduction
Information for operators
If you want to print a document from your desktop application, you can define the
print settings before you send the job to the Océ VarioPrint® 2090. The settings that
you define are set in the printer driver dialog box.
Note: The printer driver allows you to define up to seven different types of paper for
a print job.
How to start a print job
1. Select the print option in your application.
2.
3.
4.
5.
The print window of your application appears.
Select the page range if necessary.
Select the number of prints.
Select the name of the printer, for example Océ VarioPrint® 2090.
Select 'Properties' to access the settings in the printer driver.
How to define the print settings in the Windows printer driver
1. Select the template that matches the settings you want to use.
2. Click 'OK' .
The window of the printer driver closes.
3. Click 'OK' in the application window.
The document is sent to the Océ VarioPrint® 2090.
Note: When a correct template is not available, you can also define the settings in
the 'Properties' section. The new template is saved for future use. Click the 'Settings'
bar or a short-cut link in the 'Preview' window to access the print settings.
Note: You can also activate the 'Show settings before printing' dialog in the
'Printing Preferences'. When the option is enabled, the printer driver pops up
automatically after you press the 'OK' button in the print window of your
application. You do not need the 'Properties' section to select the correct template or
to define the settings.
155
Create a print job
Result
The print job arrives in your personal mailbox on the Océ VarioPrint® 2090 or is
printed automatically. This depends on your settings. When the print job arrives in
the mailbox, you can access the print job on the operator panel to check the settings
you defined in the printer driver or start the print job (see ‘Print a job from the
mailbox’ on page 134).
156
Chapter 7 The print function
Create a secured print job
Create a secured print job
Introduction
Task for operators
The Océ VarioPrint® 2090 allows you to protect sensitive information in a print job.
If you want to print a job that contains sensitive information you can set a protective
PIN code. This PIN code is set in the printer driver. The PIN code has a length of 1-5
digits. After you send the print job to the Océ VarioPrint® 2090, you can not change
the PIN code of the print job. The secured print job goes to the mailbox on the Océ
VarioPrint® 2090. Enter the correct PIN code to print this job.
Remember the following security guidelines while you print a secured job.
Use at least 4 digits to define the security code in the printer driver.
■ Complete the job on the Océ VarioPrint® 2090 as soon as possible. Do not wait
until the following day.
■ Delete the job immediately after you have printed the job on the Océ VarioPrint®
2090.
■
How to create a secured print job
1. Select the print option in your application.
The print window of your application appears.
2. Select the Océ VarioPrint® 2090 printer.
3. Select 'Properties' to access the settings of the printer driver.
The 'Job' tab is opened automatically.
4. Select a template or define the settings.
5. Click the 'Security' check box.
A check mark indicates a secured print job.
A pop-up window appears.
6. Enter a PIN code that contains 1-5 digits.
Note: You can not change the PIN code after you send the print job to the printer.
7. Click 'OK' after you have defined all the settings.
The printer driver window closes.
8. Click 'OK' to close the print window of the application.
The print job is sent to the mailbox on the Océ VarioPrint® 2090.
157
Create a print job with an Account ID
Create a print job with an Account ID
Introduction
Task for operators
The Océ VarioPrint® 2090 allows you to charge the costs for print jobs and copy jobs
to the users or customers (see ‘The accounting concepts’ on page 218). The Océ
VarioPrint® 2090 allows you to define an 'Account ID' in the printer driver.
Note: You can only enter an 'Account ID' when the accounting function is enabled
in the printer driver.
How to enable the Account ID in the printer driver
1. In your Windows® operating system, click 'Start'.
2. Click 'Settings' .
3. Click 'Printers' .
Note: In Windows XP®, click 'Printers and faxes'.
4.
5.
6.
7.
8.
9.
Right-click the Océ VarioPrint® 2090 printer.
Click 'Properties' .
Select the Océ VarioPrint® 2090 tab.
Check the 'Enable accounting' box.
Click 'Apply' .
Click 'OK' .
How to create a print job with an Account ID
1. Select the print option in your application.
The print window of your application appears.
2. Select the Océ VarioPrint® 2090 printer.
3. Select 'Properties' to access the settings of the printer driver.
The 'Job' tab opens automatically.
Select a template or define the settings.
Select 'Account' .
Enter the values for 'Account ID', 'Cost center' and 'Custom'.
Click 'OK' after you have defined all the settings.
The printer driver window closes.
8. Click 'OK' to close the print window of the application.
The print job is sent to the mailbox.
4.
5.
6.
7.
Note: When the accounting function is enabled, you must enter an 'Account ID'
before you print your job. If you do not enter an 'Account ID', you cannot print your
158
Chapter 7 The print function
Create a print job with an Account ID
job. If you print from your desktop application without an 'Account ID', the driver
will automatically ask you for an 'Account ID'. If you print through the printer icon
in your desktop application, you must enable 'Show settings before printing' to make
the driver ask you for an 'Account ID'.
159
Create a folded A4 booklet from an A4 document
Creating booklets from print jobs
Create a folded A4 booklet from an A4 document
Purpose
A folded A4 booklet is printed on A3 size sheets. The printer prints 2 A4 images side
by side on the A3 sheet and reshuffles the page order to make a booklet. After you
fold the A3 sheets the result is an A4 booklet with pages in the correct booklet order.
Note: The availability of the settings and options depends on the printer model you
use.
Note: When you define the job settings, the situation can occur that some job
settings cause a constraint.
How to create a folded A4 booklet from an A4 document
1. In your application, click File - Print...
The print window opens.
2. Select the required printer and click 'Properties'.
The document properties window opens.
3. Define the job settings in the available toolbars.
Note: You cannot set a staple when you create a booklet this way.
4. Click the 'Layout' settings bar.
At '1-sided or 2-sided', select '2-sided'.
At 'Booklet', select 'On'.
At 'Booklet', select 'A3'.
5. Click the 'Paper' settings bar.
At 'Document size', select A4 if required. The printer driver uses the same document
size as the one that you selected in the software application.
6. Click 'OK' to confirm your print job settings.
7. Click 'OK' to send the print job to the printer.
160
Chapter 7 The print function
Create a folded A5 booklet from an A4 document
Create a folded A5 booklet from an A4 document
Purpose
A folded A5 booklet is printed on A4 size sheets. The printer reduces the A4 images
into A5 images, reshuffles the page order to make a booklet and puts 2 images side
by side on one sheet. After you fold the A4 sheets the result is an A5 booklet with
pages in the correct booklet order.
Note: The availability of the settings and options depends on the printer model you
use.
Note: When you define the job settings, the situation can occur that some job
settings cause a constraint.
How to create a folded A5 booklet from an A4 document
1. In your application, click File - Print...
The print window opens.
2. Select the required printer and click 'Properties'.
The document properties window opens.
3. Define the job settings in the available toolbars.
Note: You cannot set a staple when you create a booklet this way.
4. Click the 'Layout' settings bar.
At '1-sided or 2-sided', select '2-sided'.
Select 'Booklet'.
At 'Booklet', select 'A4'.
5. Click the 'Paper' settings bar.
At 'Document size', select A4 if required. The printer driver uses the same document
size as the one that you selected in the software application.
6. Click 'OK' to confirm your print job settings.
7. Click 'OK' to send the print job to the printer.
161
Create a folded and stapled A5 booklet with the booklet maker
Create a folded and stapled A5 booklet with the booklet
maker
Purpose
Create a print job to print an A5 booklet. An A5 booklet is printed on A4 size sheets.
The booklet maker folds the A4 sheets in the middle and adds a staple.
Use an A4 size digital document as the starting point. The printer driver reduces the
A4 images to A5 images, reshuffles the page order to make a booklet and puts 2
images side by side on one sheet.
Note: When the print job is printed with the booklet maker on the Océ VarioPrint®
2090 the booklet is automatically folded and stapled.
Before you begin
1. Select 'Print' from the 'File' menu of your application or click the 'Print' button in the
toolbar.
The print window appears.
2. Select the Océ VarioPrint® 2090 printer driver in case there is more than one printer
available.
3. Click the 'Properties' button.
Note: The booklet maker is an optional finishing device. Make sure that the booklet
maker option is enabled or set to auto detect. You can find this setting in the Océ
VarioPrint® 2090 tab in the properties window of the printer driver. If the Océ
VarioPrint® 2090 has no booklet maker, you cannot create a booklet in this manner.
How to create a print job for a folded A5 booklet with the booklet maker
1. Click the 'Job tab'.
2. Click the 'Layout' toolbar. Set the document to 2-sided, Portrait, Long Edge binding.
3. Click the 'Finishing' toolbar. Set a booklet staple and set the output destination to
booklet maker.
4. Click 'OK' to confirm the settings.
162
Chapter 7 The print function
Print a secured print job
Printing the created jobs
Print a secured print job
Introduction
Task for operators
The Océ VarioPrint® 2090 allows you to protect sensitive information in a print job.
If you want to print a job that contains sensitive information, you can set a protective
PIN (see ‘Create a secured print job’ on page 157). This PIN is set in the printer
driver or in Océ Intra Logic®. The PIN has a length of 1-5 digits. After you send the
print job to the Océ VarioPrint® 2090, you can not change the PIN of the print job.
The secured print job goes to the mailbox. You can open the job editor to modify the
job settings. You do not need to enter the PIN to change the job settings. When you
press the Start key , a message appears. Enter the PIN to continue.
Remember the following security guidelines while you print a secured job.
Use at least 4 digits to define the security code in the printer driver.
■ Complete the job on the Océ VarioPrint® 2090 as soon as possible. Do not wait
until the following day.
■ Delete the job immediately after you have printed the job on the Océ VarioPrint®
2090.
■
Note: You do not need a PIN to remove a secured print job from the mailbox (see
‘Remove jobs from the mailbox’ on page 140).
How to print a secured print job
1. Press the key for 'Print'(see ‘Print a job from the mailbox’ on page 134).
2. Select your job.
3. Press the Start key
.
A dialogue box appears that asks you to enter the PIN.
4. Use the numeric keys to enter the PIN (enter 1-5 digits).
Note: You can not set or change a PIN of a print job on the operator panel of the
Océ VarioPrint® 2090.
163
Print a secured print job
Result
The following situations can occur after you enter the PIN.
■ Correct PIN
The dialog box disappears and the print job is sent to the job queue.
■ Wrong PIN
The print job is not started and the dialog box remains open.
Note: If you edit a secured print job and then enter the wrong PIN, the job is not
started. The dialog box that asks you to enter the PIN remains open. After your
second try, the screen displays a message that the PIN is invalid. As long as the PIN
is not correct, the display does not return to the mailbox view. Press the key for
'Cancel' to return to the mailbox view.
164
Chapter 7 The print function
Printing a print job with an Account ID
Printing a print job with an Account ID
Introduction
Task for operators
The Océ VarioPrint® 2090 allows you to charge the costs for print jobs and copy jobs
to the users or customers. The Océ VarioPrint® 2090 allows you to define an
'Account ID' in the printer driver (see ‘Create a print job with an Account ID’ on
page 158).
Note: Make sure that you cancel the 'Account ID' of the current session before you
print the job (see ‘Enter and cancel an 'Account ID'’ on page 231). The session ID
always cancels the 'Account ID' that you define in the printer driver (see ‘The
accounting concepts’ on page 218).
How to print a job with an Account ID
1. Press the key for 'Print'(see ‘Print a job from the mailbox’ on page 134).
2. Select your job.
3. Press the Start key
.
The job is printed.
165
Print a folded A4 booklet from the mailbox on the Océ VarioPrint® 2090
Print a folded A4 booklet from the mailbox on the Océ
VarioPrint® 2090
When to do
The print jobs go to the mailbox when the workflow settings prevent direct printing.
You must start the print job on the operator panel of the Océ VarioPrint® 2090.
How to print the folded A4 booklet from the mailbox on the Océ VarioPrint® 2090
1. Access the mailbox on the operator panel.
2. Select the print job.
3. Click the green start key on the operator panel of the Océ VarioPrint® 2090 to start
the print job. The job is printed on A3 size sheets.
4. Fold the sheets in the middle over the short edge of the media to create an A4
booklet.
166
Chapter 7 The print function
Print a folded A5 booklet from the mailbox on the Océ VarioPrint® 2090
Print a folded A5 booklet from the mailbox on the Océ
VarioPrint® 2090
When to do
The print jobs go to the mailbox when the workflow settings prevent direct printing.
You must start the print job on the operator panel of the Océ VarioPrint® 2090.
How to print the folded A5 booklet from the mailbox on the Océ VarioPrint® 2090
1. Access the mailbox on the operator panel.
2. Select the print job.
3. Click the green start key on the operator panel of the Océ VarioPrint® 2090 to start
the print job. The job is printed on A4 size sheets.
4. Fold the sheets in the middle over the short edge of the media to create an A5
booklet.
167
Print a folded A5 booklet with the booklet maker on the Océ VarioPrint® 2090
Print a folded A5 booklet with the booklet maker on the Océ
VarioPrint® 2090
When to do
You have created a print job with the printer driver. The Océ VarioPrint® 2090 has
an integrated booklet maker to finish the booklets automatically.
How to print a folded A5 booklet with the booklet maker
1. Access the mailbox on the operator panel.
2. Select the print job.
3. Click the green start key on the operator panel of the Océ VarioPrint® 2090 to start
the print job. The job is printed on A4 size sheets.
4. The booklet maker folds the sheets over the short edge of the media and adds the
staples in the middle to create an A5 booklet. The stapled booklets are delivered to
the finisher.
168
Chapter 7 The print function
Special paper in a print job
Using special media
Special paper in a print job
Introduction
Task for operators
Special paper can be any kind of paper that you choose to use in a print job.
You can create a print job with special paper on your PC. You must indicate in the
'Paper' settings on the 'Job' tab of the printer driver that you want to use special paper.
You can use up to three different types of special paper ('Special 1', 'Special 2',
'Special 3'.)
Note: The key operator can define default paper trays for the special paper in the
Océ VarioPrint® 2090 Settings Editor.
How to create a job with special paper
1. Select the print option in your application.
The print window of your application appears.
2. Select the Océ VarioPrint® 2090 printer.
3. Select 'Properties' to access the settings of the printer driver.
The 'Job' tab is opened.
4. Select a template or define the settings, for example for 'Layout' and 'Finishing'.
5. Select 'Paper' .
Note: You can also click the short-cut link after 'Media' in the 'Preview pane'.
6. Click the 'Edit' button to access the 'Define media types' window.
7. Select 'Special 1', 'Special 2' or 'Special 3' in the 'Media type' box.
8. Click 'OK' after you finished.
The printer driver window closes.
9. Click 'OK' to send the job to the Océ VarioPrint® 2090.
Note: You can use the page programmer to define more than one type of 'Special'
paper in one print job (see ‘About the page programmer’ on page 146).
Note: You can rename the 'Special 1', 'Special 2' and 'Special 3' paper names
according to your requirements. This makes the use of special paper easier. For tab
sheets and inserts, specific media names are available.
169
Special paper in a print job
How to print a job on special paper
1. Load the paper into a paper tray (see ‘Load the standard media and media with
2.
3.
4.
5.
6.
7.
8.
special front’ on page 238).
Press the function key 'Print'.
Use the scroll wheel and the 'Confirm' key to select your user name.
Press the function key 'Print from mailbox...'.
Select the print job and check the settings if necessary.
Use the numeric keys to define the number of prints.
Press the Start key .
A message appears 'Job needs Special. Please indicate the tray'.
[49]
[49] Indicate the 'Special' tray
Note: If 1 of the paper trays is already configured for 'Special', the message box will
not appear. The print job starts and takes paper from the paper tray that is
configured for 'Special' by the key operator.
9. Indicate the correct paper tray on the operator panel.
10. Press the function key 'OK' to continue.
Note: When the paper trays contain the required paper, the Océ VarioPrint® 2090
can also print the jobs on special paper automatically. When the paper trays do not
contain the required paper, the job is always printed from the mailbox.
170
Chapter 7 The print function
My Paper in a print job
My Paper in a print job
Introduction
Task for operators
The Océ VarioPrint® 2090 allows you to use your personal paper for print jobs. This
function is called 'My Paper'.
The operator panel displays the following icon for a 'My Paper' job: .
'My Paper' refers to paper that is not available as the standard paper in the paper
trays. To use this personal paper type, you must load the paper tray when the Océ
VarioPrint® 2090 starts the print job with 'My Paper'. When you define a print job in
for example the printer driver or in Océ Intra Logic®, you can indicate to print the
job on 'My Paper'.
How to create a print job with 'My Paper'
1. Select the print option in your application.
The print window of your application appears.
2. Select the Océ VarioPrint® 2090 printer.
3. Select 'Properties' to access the settings of the printer driver.
The 'Job' tab is opened.
4. Select a template or define the settings, for example for 'Layout' and 'Finishing'.
5. Select 'Paper' .
Note: You can also click the short-cut link 'Media type' in the 'Preview pane'.
6.
7.
8.
9.
Click the 'Edit' button to access the 'Define media types' window.
Select 'My Paper' in the 'Media type' box.
Click 'OK' to confirm your settings.
Click 'OK' to send the job to the Océ VarioPrint® 2090.
How to print a job on 'My Paper'
1. Load the paper in one of the trays (see ‘Load the standard media and media with
2.
3.
4.
5.
6.
7.
special front’ on page 238).
Press the function key 'Print'.
Use the scroll wheel and the 'Confirm' key to select your user name.
Press the function key 'Print from mailbox...'.
Select the print job and check the settings if necessary.
Use the numeric keys to define the number of prints.
Press the Start key .
171
My Paper in a print job
8. A message appears 'Job needs My Paper. Please indicate the tray'.
[50]
[50] Indicate the tray
9. Indicate the correct paper tray on the operator panel.
10. Press the function key 'OK' to continue.
The job starts to print.
After the job is ready, the operator panel displays a message that asks you to remove
the remaining 'My Paper' from the paper tray.
172
Chapter 7 The print function
Covers in a print job
Covers in a print job
Introduction
Task for operators
The Océ VarioPrint® 2090 allows you to use covers at the front side or back side of
your document or at both sides. When you define a print job in for example the
printer driver or in Océ Intra Logic®, you can indicate the use of covers.
You can do one of the following.
■ Indicate that a paper tray contains covers.
■ Load the covers in a paper tray that the Océ VarioPrint® 2090 indicates when the
print job with the covers starts to print.
Note: The key operator can define a default paper tray for covers in the Océ
VarioPrint® 2090 Settings Editor.
Note: In the Océ VarioPrint® 2090 Settings Editor, you can configure inserts as
covers. When you select covers, the system uses the inserts as covers.
How to create a print job with covers
1. Select the print option in your application.
The print window of your application appears.
2. Select the Océ VarioPrint® 2090 printer.
3. Select 'Properties' to access the settings in the printer driver.
The 'Job' tab is opened automatically.
4. Select a template or define the settings, for example for 'Layout' and 'Finishing'.
5. Do one of the following:
■ If you use the PostScript® version of the Océ VarioPrint® 2090 printer driver,
select 'Special pages'. Continue with step 6.
■ If you use the PCL version of the Océ VarioPrint ® 2090 printer driver, select
'Paper'. Continue with step 6.
6. Check the check box for 'Front', 'Back', or both check boxes in the 'Covers' section.
7. Click 'OK' to confirm your settings.
8. Click 'OK' to send the job to the mailbox.
How to print a job with covers
1. Load the covers in a paper tray (see ‘Load the standard media and media with
special front’ on page 238).
2. Press the function key 'Print'.
173
Covers in a print job
3.
4.
5.
6.
7.
Use the scroll wheel and the 'Confirm' key to select your user name.
Press the function key 'Print from mailbox...'.
Select the print job and check the settings if necessary.
Use the numeric keys to define the number of prints.
Press the Start key .
A message appears 'Job needs covers. Please indicate the tray'.
[51]
[51] Indicate the 'Covers' tray
8. Indicate the correct paper tray on the operator panel.
9. Press the function key 'OK' to continue.
The job starts to print.
Note: When the paper trays contain the required paper, the Océ VarioPrint® 2090
can also print the jobs on covers automatically. When the paper trays do not contain
the required paper, the job is always printed from the mailbox.
174
Chapter 7 The print function
Create a print job with a pre-printed front cover (PostScript® only)
Create a print job with a pre-printed front cover (PostScript®
only)
Purpose
Create a print job where you use pre-printed sheets as a front cover for the document.
The pre-printed cover is already printed and needs to be added to the print job.
Before you begin
1. Select 'Print' from the 'File' menu of your application or click the 'Print' button in the
toolbar.
The print window appears.
2. Select the Océ VarioPrint® 2090 printer driver in case there is more than one printer
available.
3. Click the 'Properties' button.
How to create a print job with a pre-printed front cover
1. Click the 'Job' tab.
2. Define the job settings in the available toolbars.
3. Click the 'Special pages' toolbar.
Note: Make sure that when you use the Covers option in the 'Special pages' toolbar,
you set the media type to Insert media.
4. Select the page programmer.
5. Define the page ranges in the 'Special page range(s)' box. Each page range can have
its own media type, processing and finishing settings.
6. Select the first page range and use the 'Add sheet before' button. A blank sheet is
added to the print job. This blank sheet is not part of the digital document, the page
program now contains the sheets defined in the digital document plus the sheet you
add before the page range.
7. Set the media type to Insert. You must always use this media type for pre-printed
media or media that cannot tolerate heat.
8. Click 'OK' to confirm your settings.
Note: It is not possible to add a pre-printed back cover after the last page range in
the page programmer.
175
Use colored sheets to separate groups of pages in a print job (PostScript® only)
Use colored sheets to separate groups of pages in a print
job (PostScript® only)
Purpose
Use the page programmer to add (unprinted) colored pages between the pages of a
print job. You can use the colored sheets to split up sections of a print job. Inserts
always remain unprinted.
There are 2 methods to create a print job with colored separation sheets.
■ You can choose to add blank pages between the page ranges in the page
programmer. If the digital document is 10 pages long, then the printed result will
be 10 sheets plus the number of added blank pages.
■ You can also choose to create blank pages in your digital document. If the digital
document is 10 pages long, the printed document is still 10 pages long.
Before you begin
1. Select 'Print' from the 'File' menu of your application or click the 'Print' button in the
toolbar.
The print window appears.
2. Select the Océ VarioPrint® 2090 printer driver in case there is more than one printer
available.
3. Click the 'Properties' button.
How to add blank sheets in a print job
Click the 'Job' tab.
Define the job settings in the available toolbars.
Click the 'Special pages' toolbar.
Select the 'Page programmer' .
Define a page range for each separate chapter of the document in the 'Special pages'
box. Each page range can have its own media type, processing and finishing settings.
6. Use the 'Add sheet before' or 'Add sheet after' buttons to insert blank sheets to
separate 2 page ranges. Blank pages are never printed on.
7. Choose a colored media type for the blank pages.
8. Click 'OK' to confirm your settings.
1.
2.
3.
4.
5.
How to define separation sheets in a print job
1.
2.
3.
4.
176
Click the 'Job' tab.
Define the job settings in the available toolbars.
Click the 'Special pages' toolbar.
Select the 'Page programmer' .
Chapter 7 The print function
Use colored sheets to separate groups of pages in a print job (PostScript® only)
5. Define the page ranges for the chapters and the separation pages in the 'Special
pages' box. Each page range can have its own media type, processing and finishing
settings.
6. The page ranges that serve as a separation sheet are 1-sided and use a colored media
type. Use the 'Force to Front' button to make sure that each page starts on the front
side of the sheet.
7. The page ranges that contain the chapters with information are 2-sided. Use the
'Force to Front' button to make sure that each page starts on the front side of the
sheet.
8. Click 'OK' to confirm your settings.
177
Use tab sheets in a print job (PostScript® only)
Use tab sheets in a print job (PostScript® only)
Introduction
You can use tab sheets in a print job to create printed sets of documents that need no
further post-processing, because the printed materials are already sorted and
separated by tab sheets.
You can create the following print jobs with tab sheets.
[49]
Tab sheet
Description
Use pre-printed
tab sheets.
Select the media type 'Tab Insert' if you want to use tab sheets
that are already printed. These tab sheets remain unprinted by
the Océ VarioPrint® 2090.
Print on tab sheet
labels.
Select the media type 'Print on tab'. The Océ VarioPrint®
2090 can print texts on the labels.
Print on tab sheets. Select the media type 'Tab' to print information on the tab
sheet.
Purpose
Create a print job with more than 2 chapters that are separated by tab sheets on which
you print a customized text.
Before you begin
1. Select 'Print' from the 'File' menu of your application or click the 'Print' button in the
toolbar.
The print window appears.
2. Select the Océ VarioPrint® 2090 printer driver in case there is more than one printer
available.
3. Click the 'Properties' button.
Note: Make sure that the media types are available in the paper trays.
How to create a print job with pre-printed tab sheets
1. Click the 'Job' tab.
2. Define the job settings in the available toolbars.
3. Click the 'Special pages' toolbar.
178
Chapter 7 The print function
Use tab sheets in a print job (PostScript® only)
4. Select the 'Page programmer' .
5. Define a page range for each separate chapter of the document in the 'Special page
range(s)' box. Each page range can have its own media type, processing and finishing
settings.
6. Use the 'Add sheet before' or 'Add sheet after' buttons to insert blank sheets to
separate 2 page ranges. Blank pages are never printed on.
Note: When you select the back cover to add a sheet, the 'Add sheet before' and 'Add
sheet after' buttons can become grayed out. Follow the link to Back cover at the
bottom of this page to make the buttons available for the back cover.
7. Choose the media type 'Tab Insert' for the inserted blank pages.
8. Click 'OK' to confirm your settings.
How to create a print job with printed tab sheet labels
1. Repeat steps 1 - 4 of the previous procedure.
2. Divide the document into page ranges. Each chapter is a page range and each tab
sheet is a page range.
Note: Do not use 'Add sheet before' or 'Add sheet after' because the inserted pages
cannot be printed on.
3. Set the media type settings, the finishing settings and the process settings for the
chapters.
4. Select the media type 'Print on tab' for the page ranges that contain a tab sheet.
5. Select the Tab caption editor in the page programmer toolbar. A secondary window
appears.
6. Create the text captions with the create button in the tab captions toolbar.
7. Define the texts and the settings of the texts in the tab captions.
8. Click 'OK' to confirm your tab caption settings and repeat this action to confirm the
page program settings.
How to create a print job with printed tab sheets
1. Repeat steps 1 - 4 of the previous procedure.
2. Divide the document into page ranges. Each chapter is a page range and each tab
sheet is a page range.
3. Select the media type 'Tab' for the page ranges that contain a tab sheet. The
information in the digital document will be printed on the tab sheet.
Note: The tab label cannot be printed on.
4. Click 'OK' to confirm your settings.
179
Print on a tab (PostScript® only)
Print on a tab (PostScript® only)
Before you begin
Access the Page Programmer.
Note: The tab caption editor is always accessible, even if there are no tabs present
in your print job.
How to print on a tab
1. Click the 'Open tab caption editor' button in the toolbar of the Page list of the Page
2.
3.
4.
5.
programmer.
Define the 'Set size'.
Enter the text in the 'Caption' box.
Set the alignment, rotation and margin of the text on the tab.
Select a font and font size.
Note: If the check box is selected the drop down list contains true type fonts
available on the user's system instead of the standard printer fonts.
6. Click 'Add' to define a caption for another tab and repeat the previous steps (you can
define a maximum of 100 tab captions).
7. Click 'OK' to confirm or 'Cancel' to reject the settings.
Note: Make sure that you select the 'Print on tab' media when you define pages (in
your page program) to print on the tab label. The Page Programmer will
automatically select the corresponding 'Print on tab' media for each next tab
caption.
Use the toolbar options to make changes in the tab captions
1.
2.
3.
4.
180
Select an item in the caption list.
Use the Bold or Italics buttons to change the emphasis of the text.
Use the arrow up and down buttons to reposition the tab captions in the list.
Use the Delete button to remove a tab caption.
Chapter 7 The print function
Chapter 8
The scan function (optional)
181
The scan profiles file
Scan profiles
The scan profiles file
Introduction
Information for system administrators
The scan profiles contain the default settings for your scan jobs. The scan profiles
are templates that you can access in the 'Scan' section of the operator panel. The scan
profiles are stored in a file on the Océ Smart Imager. The file is called sjt.csv.
The sjt.csv file contains information about the default settings of a scan profile. For
example the scan profile name that is displayed on the operator panel and the format
of the file that the system will create. To change the settings of a scan profile
permanently, you must first download the sjt.csv file from the Océ Smart Imager (see
‘Download - Scan profiles’ on page 189). Then you can open the file in for example
Microsoft® Excel and change the settings. You can also add new scan profiles.
Note: The sjt.csv file can contain a maximum of 99 scan profiles.
After you changed and saved the file, you must upload the file to the Océ Smart
Imager (see ‘Upload - Scan profiles’ on page 190). The changed file overwrites the
previous file.
Note: For each scan job, you can change a number of scan profile settings on the
operator panel. First select a scan profile, then press the function key 'Edit...'. The
changes on the operator panel are only valid for the current scan job. You cannot
change a scan profile on the operator panel permanently. To change the settings of
a scan profile permanently, you must download, edit and upload the sjt.csv file.
182
Chapter 8 The scan function (optional)
The scan profiles file
The record fields of the sjt.csv file
[50]
[50] The fields of the sjt.csv file
(1 – 5)
Field name
(header)
Description
dispname*
Display name
Use this field to enter a name for the scan profile. The name of the
scan profile is displayed on the operator panel. The name can be
any name between 1 and 40 characters. You can use all alphanumeric characters except <CR>, <LF>, <,> and <;>.
format*
File format
Use this field to define the format and the compression of the scan
jobs. You can enter one of the following values.
■ TIFF G31D_MH
TIFF CCITT Group 3 1D modified Huffman compressed images
■ TIFF G42D_Fax
TIFF CCITT.T6 Group 4 2D compressed images
■ PDF G31 D_MH
PDF version 1.3 with Group 3 1D modified Huffman compressed images
■ PDF G42D_Fax
PDF version 1.3 with Group 4 2D compressed images.
ilc*
Image Logic characteristics
Use this field to define the optimal scan result for a defined purpose. You can enter one of the following values.
■ 1
Resolution: 600 dpi. This value optimizes your scan job for
printing on Océ Copy Press systems
■ 2
Resolution: 300 dpi. This value optimizes your scan job for
viewing and archiving purposes
■ 3
Resolution: 600 dpi at 85 lpi. This value optimizes your scan
job for printing on for example Océ Demandstream® systems
■ 4
Resolution: 600 dpi at 106 lpi. This value optimizes your scan
job for printing on for example Océ Demandstream® systems.
183
The scan profiles file
[50] The fields of the sjt.csv file
(2 – 5)
Field name
(header)
Description
prefix*
File name prefix
Use this field to define the scan job type, for example 'Memo', 'Archive' or 'Email'. The string can have a length of maximum 8 characters (a-z, A-Z, 0-9, _). The prefix is a fixed part of the file name.
Note: You can leave this field empty. However, the
field name is required.
minnr*
maxnr*
Number of digits required to identify a scan job
Use these fields to define the minimum and the maximum number
of digits the user must enter to use the scan function. The entered
digits are stored in the file name. The numeric strings can have a
length of maximum 20 digits. When both fields are 0, the system
does not ask for an input.
Note: The 'maxnr' must be equal to or larger than the
'minnr'.
name_nr_title
*
Title of the user dialog
Use this field to define a title for the dialog that appears when the
user must enter digits to use the scan function. The title explains
to the user which digits are required. You can enter a title of maximum 40 characters. You can use all the alphanumeric characters
except <CR>, <LF>, <,> and <;>.
Note: You can leave this field empty. However, the
field name is required.
cfname*
184
File name feedback
Use this field to activate a dialog that displays the file name of
your scan job. This dialog can be useful when you do not use a
numbering system for your scan jobs. You can write down the file
name of your scan job.
The date and time in the file name are used as a reference. The operator panel displays a dialog with the same title as for the 'Title
of the user dialog' described above. Below the title, the name of
the scan job is displayed.
You can define the following.
■ y
Enter 'y' (yes) to show the dialog.
■ n
Enter 'n' (no) to hide the dialog.
Chapter 8 The scan function (optional)
The scan profiles file
[50] The fields of the sjt.csv file
(3 – 5)
Field name
(header)
Description
subfolder
Subfolder
Use this field to define the path to a subfolder on the scan server
where the files will be stored. When this field is empty, the files
will be stored in the folder on the scan server that is configured as
the root folder.
The maximum number is 150 subfolders.
postfix
File name postfix
Use this field to add a postfix to the file name of your scan job.
For example, when the prefix is 'Email', you can add a default
email address as a postfix. The string can have a length of maximum 30 characters. You can use all the alphanumeric characters
except / \ : * " < > <CR> and <LF>. The postfix is a fixed part of
the file name.
OrigOrientation
Orientation of the originals
Use this field to define the orientation and binding of the originals
in the scanner. You can define the following.
■ portrait book
■ portrait calendar
■ landscape book
■ landscape calendar
Note: When you leave this field empty, the system uses
the default orientation and binding. You can also define the orientation and binding on the operator panel.
OrigDuplex
Original 1-sided or 2-sided
Use this field to define whether the originals in the scanner are
1-sided or 2-sided. You can define the following.
■ on
The originals are 2-sided
■ off
The originals are 1-sided
Note: When you leave this field empty, the system uses
the default value. You can also define the value on the
operator panel.
185
The scan profiles file
[50] The fields of the sjt.csv file
(4 – 5)
Field name
(header)
Description
OrigKind
Type of the originals
Use this field to define the type of originals in the scanner. You
can define the following.
■ photo
■ text
■ auto
■ mixed
Note: When you leave this field empty, the system uses
the default type of originals. You can also define the
type of originals on the operator panel.
OrigZoom
Zoom of the originals
Use this field to define the zoom factor for the originals in the
scanner (25%-400%).
Note: When you leave this field empty, the value is set
to 100%. You can also define the zoom factor on the
operator panel.
186
Chapter 8 The scan function (optional)
The scan profiles file
[50] The fields of the sjt.csv file
(5 – 5)
Field name
(header)
Description
OrigFormat
Media size of the originals
Use this field to define the media size and the feed direction of the
originals in the scanner. An example of the notation is: A4 lef.
You can define the following media sizes.
■ A5
■ Statement 5.5x8.5
■ B5
■ Letter 8.5x11
■ A4
■ Foolscap
■ Folio
■ Legal 8.5x14
■ B4
■ A3
■ US Gov 8x10.5
■ Tabloid 11x17
■ Commercial
■ Letter Gov 8.5x10
■ Legal Gov 8.5x12
■ Letter 8.25x10
■ Legal 8.5x13
You can define the following feed directions.
■ sef (short-edge feed)
■ lef (long-edge feed).
Note: When you leave the fields for the media format
or the feed direction empty, the system uses the default
values. You can also define the media format and the
feed direction on the operator panel.
DestFormat
Media size of the files
Use this field to define the media size of the resulting scan files.
You can select a media size from the range that is described
above.
Note: When you leave this field empty, the media size
of the output is the same as the media size of the originals. You can also define the media size of the output
on the operator panel.
187
The scan profiles file
Note: All the fields marked with * are required in the sjt.csv file. Some required
fields may be empty, as described in the table above, but at least the field name must
be present in the sjt.csv file. All other fields are optional.
188
Chapter 8 The scan function (optional)
Download - Scan profiles
Download - Scan profiles
Introduction
The Océ VarioPrint® 2090 offers a range of standard scan profiles on the operator
panel of the system. The scan profiles are located on the Océ Smart Imager in the
sjt.csv (Scan Job Ticket).
To access or edit one or more scan profiles, you must download the scan profiles file
from the Océ Smart Imager and save the file on your workstation.
To make the scan profiles file available on the operator panel of the Océ VarioPrint®
2090, you must upload the file again.
Note: The scan profiles file can also contain scan to e-mail profiles.
Note: You can create a maximum of 99 active profiles in a scan profiles file.
Download the scan profiles
In order to download the scan profiles file, you need to access the 'Settings' tab in the
Océ VarioPrint® 2090 Settings Editor. Select 'Scan-to-file', 'Scan profiles' and
'Download' to display the setting.
Right-click the link and use the 'Save as...' option in the pop-up menu to save the file
to a destination of your choice.
or
Click the link, the scan profiles file will be saved to a location on your local disk for
example. The sjt.csv file can now be opened and edited in a suitable application (e.g.
Microsoft® Excel).
189
Upload - Scan profiles
Upload - Scan profiles
Introduction
The scan profiles on the Océ VarioPrint® 2090 are located on the Océ Smart Imager.
If you need to update one or more scan profiles, you must first download and change
the sjt.csv file.
Next, upload the changed file with the scan profiles to the Océ Smart Imager.
Note: The scan profiles file can also contain scan to e-mail profiles.
Note: You can only upload a scan profiles file if the file has the name sjt.csv.
Upload the scan profiles file
In order to upload the scan profiles file, access the 'Settings' tab in the Océ
VarioPrint® 2090 Settings Editor. Select 'Scan-to-file', 'Scan profiles' and 'Upload' to
display the setting.
If you click 'Browse' you can navigate to the location of the sjt.csv file on the
network. You can click 'Upload' to start the process. The changed sjt.csv file will
overwrite the existing sjt.csv file on the Océ Smart Imager.
Note: If you restore the factory default scan profiles, the sjt.csv file on the Océ Smart
Imager is overwritten by the factory defaults file.
190
Chapter 8 The scan function (optional)
Configure the scan server
Configuring the scan function
Configure the scan server
Introduction
Task for system administrators
When you use the scan-to-file function, the generated file is sent to a predefined
location, the scan server. The scan server is a designated server in your network that
stores the scan-to-file jobs that you create on the Océ VarioPrint® 2090.
Purpose
When the scan server on the network is defined, you must configure a number of
scan server settings in the Océ VarioPrint® 2090 Settings Editor.
You must configure the following settings to access the scan server.
■ 'Job export'
■ 'Host name'
■ 'User name'
■ 'Password'
■ 'Destination directory'.
You can do a connection test to check the settings on the scan server. Perform this
connection test when a communication problem with the scan server occurs.
Before you begin
Start the Océ VarioPrint® 2090 Settings Editor in your web browser in the system
administrator mode.
How to define the scan server settings
1.
2.
3.
4.
Select 'Settings' in the title bar of the Océ VarioPrint® 2090 Settings Editor.
Click 'Scan-to-file' .
Click 'Scan server' .
Click the check box to enable the 'Job export', the export of scanned files from the
export buffer.
Note: For more information about the 'Job export'(see ‘Configure the scan job
export function’ on page 193).
5. Enter the host name.
6. Enter the user name.
191
Configure the scan server
7. Enter the password.
8. Enter the destination directory.
9. Click 'Apply' to confirm the settings.
How to test the connection to the scan server
1.
2.
3.
4.
192
Select 'Settings' in the title bar of the Océ VarioPrint® 2090 Settings Editor.
Click 'Scan-to-file' .
Click 'Connection test' .
Click 'OK' .
Chapter 8 The scan function (optional)
Configure the scan job export function
Configure the scan job export function
Introduction
Task for system administrators
When you scan an analog document on the Océ VarioPrint® 2090, the document is
exported to and saved on the scan server. The connection to the scan server is
established through a scan job export. If the scan-to-file function is active, you must
enable the 'Job export' setting.
The capacity of the export buffer is limited. The situation can occur that the
maximum capacity of the export buffer is reached. The Océ VarioPrint® 2090
displays an error message when the export buffer is full.
The export buffer keeps the jobs for 48 hours. After 48 hours, the jobs are deleted.
When to do
In some maintenance or error situations, there must be an option to disable the scan
job export function. For example when you must reset scan server settings or
network settings. You can put the export of scan jobs on hold. The scan jobs remain
in the export buffer.
Before you begin
Start the Océ VarioPrint® 2090 Settings Editor in your web browser in the system
administrator mode.
How to enable and disable the scan job export
Select 'Settings' in the title bar of the Océ VarioPrint® 2090 Settings Editor.
Click 'Scan-to-file' .
Click 'Scan server' .
Click the check box for 'Job export'.
A check mark indicates that the 'Job export' is enabled.
An empty check box indicates that the 'Job export' is disabled.
5. Click 'Apply' to confirm the setting.
1.
2.
3.
4.
193
The configuration of the scan-to-email function
Configuring the scan-to-email function
The configuration of the scan-to-email function
Introduction
Information for system administrators
The scan-to-email function is a part of the optional scan-to-file function. You must
have a valid license for the scan-to-file function to use the scan-to-email function.
You must do the following:
Configure the Océ VarioPrint® 2090 Settings Editor
You must configure the mail server and the recipient search. For the recipient
search, you can configure an LDAP server or use an address list file.
■ Upload a scan job type (SJT) file to the Océ Smart Imager (see ‘The scan profiles
file’ on page 182).
■
The SJT file can contain both scan-to-file profiles and scan-to-email profiles. There
is no difference in format between the two types of profile. The prefix selector string
described in the table below and the application selector string in a profile render a
job a scan-to-file job or a scan-to-email job. These two strings must be identical.
Note: You must enter values for all settings described in the tables. Otherwise, the
scan-to-email function will not work correctly.
Configure the mail server
[51]
[51] Mail server settings
194
(1 – 2)
Mail server settings
Description
'Port'
The mail server port.
Default: 25
'Address/host name'
The address of the mail server. You must enter one server
address. This address can be a host name of 32 characters
or an IP-address.
Default: Empty
'User name'
The user name gives you access to the server. This user
name can be any name of up to 20 characters (a-z, A-Z ,
0-9, _).
Default: Empty
Chapter 8 The scan function (optional)
The configuration of the scan-to-email function
[51] Mail server settings
(2 – 2)
Mail server settings
Description
'E-mail address of
sender'
Enter the email address of the system that sends the email
message, for example your controller. You can enter a
maximum of 30 characters. You can use the characters
a-z, A-Z, 0-9, @, ., _
Do not start an email address with a number.
Default: Empty
'Prefix selector string'
Identify the scan jobs that are sent to email. The prefix
separates the scan-to-email jobs from the scan-to-file
jobs. You can use up to 8 characters (a-z, A-Z , 0-9, _).
The prefix selector string must be identical to the application selector string in the scan-to-email profiles.
Default: Email
195
Configure an LDAP server
Configure an LDAP server
Introduction
After you configure the mail server, you must set up a method to link the code that
is entered at the operator panel to the email address of a recipient. This method, the
address mapping method, enables the search for the email addresses. You can use
two different items in this search, an LDAP server or an address list file.
If you use an LDAP server, you must configure the following settings in the Océ
VarioPrint® 2090 Settings Editor. Refer to the on-line help of the Océ VarioPrint®
2090 Settings Editor for more information about the configuration of an LDAP
server for the scan-to-email function.
Configure the LDAP server settings
[52]
196
Function
Description
'LDAP server'
When you use an LDAP server, you must enable the
LDAP server. A check mark indicates that the LDAP
server is enabled.
'Port'
Enter the number of the port of the LDAP server. This
port number can be a number between 1 and 65535.
'Address/host name'
Enter the address of the LDAP server. This address can
be a host name of up to 32 characters (a-z, A-Z , 0-9, _)
or an IP address.
'User name'
The user name gives you access to the LDAP server. This
user name can be any name of up to 256 characters (a-z,
A-Z , 0-9, _).
'Password'
The password gives you access to the LDAP server. The
password can be any word of up to 256 characters (a-z,
A-Z, 0-9, _). Each character that you enter is shown as an
*.
Chapter 8 The scan function (optional)
Configure an LDAP server
Recipient search settings
[53]
Function
Description
Search database
Define the path to the search database. The search database is the area in which an email address is searched.
The search database can be any data file that contains at
least unique identifiers for the users and email addresses.
The search is from top to bottom only. You must enter the
top node of the search database to enter the data in the
file.
'User identification'
Define the field of the search base that contains the
unique user identifiers. This field contains the user data
that is compared with the code that is entered on the operator panel.
'E-mail address attribute'
Define the field that contains the email addresses that are
stored in the database. An email address is connected to
a unique user identifier. When a search is done on the
server, the first email address that is connected to the entered user identifier, is returned.
197
Upload - Address list
Upload - Address list
Introduction
If you do not have an LDAP server, you can use an address list file to search for
recipients. The address list is a comma separated file (ral.csv). You must download
the address list file to your local computer to be able to change the address list file
(see ‘Download - Scan profiles’ on page 189). After you change the address list file,
you must upload the file to the Océ Smart Imager.
Upload the address list file
1.
2.
3.
4.
5.
6.
7.
198
Select 'Settings' .
Select 'Scan to e-mail' .
Select 'Address mapping' .
Select 'Address list' .
Select 'Upload' .
Click 'Browse' to go to the location where the ral.csv file is stored.
Select the file, then click 'Upload'.
Chapter 8 The scan function (optional)
Download - Address list
Download - Address list
Introduction
If you do not have an LDAP server, you can use an address list file to search for
recipients. The address list is a comma separated file (ral.csv). You must download
the file to change the data of the address list, or to add new data to the file. After you
make the changes, you must upload the address list file to the Océ Smart Imager to
be able to use the file (see ‘Upload - Scan profiles’ on page 190).
Note: If the LDAP server is the active search database, you cannot use the data in
the ral.csv file.
Download the address list file
1.
2.
3.
4.
5.
6.
Select 'Settings' .
Select 'Scan to e-mail' .
Select 'Address mapping' .
Select 'Address list' .
Select 'Download' .
Right-click the link and use the 'Save as...' option in the pop-up menu to save the file
to a destination of your choice.
or
Click the link. The address list file is saved on your local PC. The file can now be
opened and edited in a suitable application, for example Microsoft® Excel.
199
Types of scan job settings
Scanning on the Océ VarioPrint® 2090
Types of scan job settings
Introduction
Information for operators
You can redefine some of the settings when you select a scan profile on the operator
panel of the Océ VarioPrint® 2090. A scan profile contains two types of settings.
■ Fixed settings. These settings are the destination, the resolution and the file
format of the scan job.
■ Settings that you can change, such as the settings for 'Original', 'File' and 'Image'.
After you select a scan profile, you can press the function key 'Edit...' to change the
settings for the current job. Your changes are not saved to the scan profile. Only the
system administrator can change the default settings of a scan profile permanently
(see ‘The scan profiles file’ on page 182).
Note: You can check the main properties of the scan job in the 'Info' section.
The settings in the 'Original' section
[52]
[52] The 'Original' section
200
Chapter 8 The scan function (optional)
Types of scan job settings
The following table describes the settings.
[54]
[54] The settings in the 'Original' section
(1 – 2)
Settings
Description
'Original'
This setting describes whether the originals are scanned
'1-sided' or '2-sided'.
'Original document type'
This setting allows you to specify the layout of the information on the original. A figure shows the layout of the information.
You have the following options:
■ Landscape, book
■ Portrait, book
■ Landscape, calendar
■ Portrait, calendar
The portrait, book and landscape values are displayed. Use
the scroll wheel to access the two other options at the top.
Note: You can only change this setting for a copy
job or scan job. The setting is fixed for a print job.
201
Types of scan job settings
[54] The settings in the 'Original' section
Settings
Description
'Original sheet
size'
■
(2 – 2)
This setting has the following options:
'Automatic'. When you use the automatic document feeder, sensors determine the size. When you use the glass
plate, the size is determined by the size of the required image divided by the zoom factor.
■ 'Width' / 'Height'. You can define the size of a non-standard size original on the glass plate with the scroll wheel.
Note: You can define the size of an original in a
scan profile. The system uses that value for scan
jobs from the glass plate. You can change the size
for the current job in the 'File' section. The system
does not use the value in the scan profile for jobs
from the automatic document feeder. The size that
the sensors detect always overrules the size in the
scan profile.
'Orientation'
You can use this setting if you scan the original from the glass
plate and the original is small enough to make a scan in 2 directions (A3 can only be scanned in 1 direction on the glass
plate).
Note: This setting is read-only for originals that
you put in the automatic document feeder.
The settings in the 'File' section
[53]
[53] The 'File' section
Note: The table below also displays the values of the 'Zoom' setting. The zoom
values are preset values, as explained in the table. The scroll wheel at the right-hand
202
Chapter 8 The scan function (optional)
Types of scan job settings
side of the screen enables you to scroll through the preset values, in either small or
large steps.
To use small steps, slowly turn the scroll wheel a little, in such a way that you hear
one click at each turn of the wheel.
To use large steps, turn the scroll wheel a little faster in a controlled manner, so that
you hear several clicks at each turn of the wheel.
The following table describes the settings.
[55]
[55] The settings in the 'File' section
Settings
Description
'Page size'
The setting allows you to define the size of the bitmap that results from the scan-to-file job. You can select one of the following standard sizes:
■ A3 (US: Tabloid)
■ A4 (US: Letter)
■ A5 (US: Legal).
You can also select a non-standard size from the scroll box.
Use the scroll wheel to select a size.
'Zoom'
The setting has the following options:
'Automatic'. This function resizes the information on the
original to fit on a bitmap with a different paper size. The
automatic function uses fixed conversion values.
■ 'Small increments'. If you select 'Small increments', you
can set the zoom factor manually in steps of 1% at a time.
Use the scroll wheel to select a value.
■ 'Large increments'. If you select 'Large increments', you
can select the following preset zoom values.
Europe: 25, 35, 50, 71, 100, 141, 200, 283, 400.
USA: 25, 32, 50, 65, 79, 100, 129, 200, 259, 400.
Use the scroll wheel to select a value.
■
Note: The zoom values above are all percentages.
203
Types of scan job settings
The settings in the 'Image' section
[54]
[54] The 'Image' section
The following table describes the settings.
[56]
[56] The settings in the 'Image' section
Settings
Description
'Original type'
You can use the setting to select the required image quality
for the following types of information.
■ 'Photo', for originals that mainly contain pictures or images.
■ 'Text', for originals that mainly contain text.
■ 'Mixed', for originals that contain a combination of text
and pictures.
Note: The system automatically uses the optimal
settings for each image type.
'Exposure'
204
You can use the setting to change the brightness of the images.
■
, to create the lightest possible images
■
, to create lighter images
■
, to create 1:1 images
■
, to create darker images
■
, to create the darkest possible images
Chapter 8 The scan function (optional)
Types of scan job settings
The information in the 'Info' section
[55]
[55] The 'Info' section
The 'Info' section contains the following information for the scan job.
The file name.
The file format.
The resolution.
The scan profile that you used.
205
Create a scan-to-file job
Create a scan-to-file job
Introduction
You can scan an analogue document and turn the document into a digital file with
the scan-to-file function on the Océ VarioPrint® 2090. The procedure to create a
scan-to-file job is almost the same as the method you use to create a copy job. In
order to make the procedure quick and simple you can use the predefined scan
profiles on the operator panel.
Note: When you have started a scan-to-file job, you must wait until the scan process
is finished. After the scan process is completed, you can create a new scan-to-file job.
Purpose
You can turn analogue documents into digital files for archiving purposes and print
on demand. You can use this method also to make the documents suited for digital
processing.
Before you begin
The fastest way to scan a set of originals of the same, standard paper size is to place
the set in the automatic document feeder. You can put a maximum of 75 sheets (80
g/m2 or 20 lb bond) in the automatic document feeder.
Note: You must scan originals of a non-standard size on the glass plate.
Note: To select a scan profile, turn the scroll wheel. Then just scroll to the scan
profile of your choice.
Create a simple scan-to-file job
1.
2.
3.
4.
Put the originals face down in the automatic document feeder or on the glass plate.
Select 'Scan' .
Select one of the scan profiles from the list.
Select 'Edit...' to access the job settings for the scan-to-file job.
Note: You cannot edit all settings. The fixed settings are grayed out. If there is no
need to change the scan-to-file settings, you can ignore this step and continue with
the next step.
5. Press the Start key
206
to start the scan-to-file job.
Chapter 8 The scan function (optional)
Create a scan-to-file job
Note: If you do not use the 'Edit...' function, you can use the Start key
scan-to-file job.
to start the
Create a combined scan-to-file job with the scan build function
1. Divide your document in different parts.
2.
3.
4.
5.
The document is either too large to scan as 1 set or contains sheets of a different size
or paper type.
Put the first set of originals face down into the automatic document feeder or on the
glass plate.
Select 'Wizards' .
Select 'Scan build' .
Select one of the profiles from the list with scan profiles.
Note: You can only select 1 scan profile for all the parts to come.
6. Select 'Edit...' .
7. Press the function key 'Add'.
8. Define the settings for this part. When you are done, press the Start key
.
The first subset is scanned.
Note: If you do not require different settings, you can press the Start key
directly.
9. Repeat steps 7 and 8 until all parts are scanned.
10. When you have finished, press the Start key
.
207
Create a scan-to-email job
Create a scan-to-email job
Introduction
Task for operators
When you create a scan-to-email job, you must first select a scan-to-email profile.
This profile contains a number of settings with preset values. You can use the values
of the selected profile but you can also change certain setting values of this profile.
You can also use the Scan-build function to create a scan-to-email job. Scan build
allows you to create one digital document of several different sets of originals. This
document is then attached to an email message.
Before you begin
■
■
■
■
■
Remove all staples from your originals.
Remove the paper clips.
Make sure that the originals in the automatic document feeder have the same size.
Make sure that the automatic document feeder does not contain more than 75
sheets (80 g/m2 or 20 lb bond).
Make sure that the originals are not curled.
Note: To select a scan profile, turn the scroll wheel. Then just scroll to the scan
profile of your choice.
Create a simple scan-to-email job
1.
2.
3.
4.
Put the originals face down in the automatic document feeder or on the glass plate.
Select 'Scan'.
Select one of the scan profiles from the list.
Select 'Edit...' to access the job settings for the scan-to-email job.
Note: You cannot edit all settings. The fixed settings are grayed out. If there is no
need to change the scan-to-email settings, you can ignore this step and continue with
the next step.
5. Press the Start key
to start the scan-to-email job.
The Océ VarioPrint® 2090 creates a digital document from the scanned originals.
This digital document is attached to an email message. The email message is then
sent to the mail server.
Note: If you do not use the 'Edit...' function, you can start the scan-to-email job
immediately.
6. Enter the user code.
7. Confirm the user code.
208
Chapter 8 The scan function (optional)
Create a scan-to-email job
Create a combined scan-to-file job with the scan build function
1. Divide your document in different subsets.
2.
3.
4.
5.
The document is either too large to scan as 1 set or contains sheets of a different size
or paper type.
Put the first set of originals face down into the automatic document feeder or on the
glass plate.
Select 'Wizards' .
Select 'Scan build' .
Select one of the profiles from the list with scan profiles.
Note: You can only select 1 scan profile for all the subsets to come.
6. Select 'Edit...' .
7. Press the function key 'Add'.
8. Define the settings for this subset. When you are done, press the Start key
Note: If you do not require different settings, you can press the Start key
9.
10.
11.
12.
.
directly.
Enter the user code.
Confirm the user code.
Repeat steps 7 and 8 until all parts are scanned.
When you have finished, press the Start key .
The Océ VarioPrint® 2090 creates one digital document from the scanned sets of
originals. This digital document is attached to an email message. The email message
is then sent to the mail server.
209
Scanning special originals and non-standard size originals
Scanning special originals and non-standard size originals
Introduction
Task for operators
Special originals can cause problems in the automatic document feeder. Use the
glass plate to scan special originals.
Special originals include the following:
Pages from a bound original like a book or a magazine
■ Damaged or curled originals
■ Originals of a non-standard size.
■
When the original is put on the glass plate, the sheet size and the orientation of the
original are not automatically detected. The Océ VarioPrint® 2090 uses a number of
rules to calculate the size and the orientation. These rules are the following:
■ The sheet size of the original and the default page size of the file are the same,
standard sizes.
■ The default sheet orientation is a vertical orientation.
■ The zoom value for the file is 'Automatic'.
For example, the default page size of the file is A4 size. The Océ VarioPrint® 2090
then calculates that the original on the glass plate is an A4 original with portrait
orientation.
To scan an original of a non-standard size and orientation, you must manually set the
sheet orientation to vertical (portrait) or horizontal (landscape).
Make sure that the original fits into the following ranges:
The minimum size for the short edge is .39 inches. The maximum size for the
short edge is 11.7 inches.
■ The minimum size for the long edge is .39 inches. The maximum size for the long
edge is 17 inches.
■
You can not use the 'Automatic' setting for zoom to scan an original of a
non-standard size and orientation to a different size. Then you must adjust the zoom
setting by hand.
Scanning special originals from the glass plate
1. Put the original on the glass plate, in the upper left corner. Make sure that the original
is in readable form. The readable form is face down and in horizontal orientation or
vertical orientation.
210
Chapter 8 The scan function (optional)
Scanning special originals and non-standard size originals
Note: Put the original in the upper left corner of the glass plate.
Press the 'Scan' function key (see ‘Types of scan job settings’ on page 200).
Use the scroll wheel to select a scan profile.
Press the 'Edit...' function key.
Define the settings for the original in the 'Original' section.
Press the function key 'File'.
Define the page size of the file.
You can select a default page size. You can also define a page size in the percentage
box.
8. Press the function key 'Image' to define the image type and exposure.
9. Press the Start key
to export the scan job to file.
2.
3.
4.
5.
6.
7.
211
Stopping the Scanning of a Scan Job
Stopping the Scanning of a Scan Job
Introduction
Task for operators
You can use the automatic document feeder and the glass plate to scan originals.
When you use the automatic document feeder, the originals are first separated and
then scanned. The originals on the glass plate are scanned at once. Whether you use
the glass plate or the automatic document feeder, you can always stop the scanning
process.
When the scanning process starts, a function key with the label 'Stopping scanning'
appears on the screen of the operator panel. If you press the 'Stopping scanning'
function key, the scanning process will stop. If you use the automatic document
feeder and press the 'Stopping scanning' key, the scanner first scans the originals that
were already separated and then stops.
The screen displays the message that the scanning stopped followed with the
question if you want to cancel the job. You can select one of two options.
■ 'Yes'
■ 'No'
Note: When the Océ VarioPrint® 2090 makes a scan, you can always stop the
process. The 'Stopping scanning' function key is always visible, even in the on-line
help. Other messages and keys are not visible in the on-line help, except the 'Close'
key.
You can also delete document parts that were already scanned when you use the
'Copy build wizard' or the 'Scan build wizard'(see ‘Delete scanned subsets’ on
page 111).
How to stop scanning
Press the 'Stopping scanning' key while the scanner scans the originals.
Result
■
■
■
212
The scanning of the originals stops.
A question about whether you want to cancel the job appears. Select 'Yes' to
cancel or 'No' to resume the job.
If you select 'Yes', the job is removed from the job queue.
Chapter 8 The scan function (optional)
Check the export status of scan and email jobs
Check the export status of scan and email jobs
Introduction
Task for system administrators
Jobs that you scan on the Océ VarioPrint® 2090 go to the scan job export buffer. Then
the system sends the jobs to the scan server. If a scan-to-file job is not available on
the scan server, you can check the status of the scan job in the scan job export buffer.
You can check a number of details for the last exported scan-to-file or scan-to-email
job in the Océ VarioPrint® 2090 Settings Editor. These details are the following:
[57]
[57] The export status of a scan job
Information
Description
'Number of email and export jobs in
buffer:'
The total number of email messages and
jobs in the export buffer
'Status of the last export:'
Indication whether the export has failed
or succeeded
'Host name'
Host name of the scan server
'User name'
User name defined to access the scan
server
'Destination:'
Target directory on the scan server
'File name:'
Name of the scan job.
[58]
[58] Mail server properties
Information
Description
'Address/host name'
The IP address or host name of the mail server.
'User name'
The user name by which you get access to the server.
'E-mail address attribute'
String used to differ scan-to-email jobs from scan-to-file
jobs.
Before you begin
Start the Océ VarioPrint® 2090 Settings Editor in your web browser in the system
administrator mode.
213
Check the export status of scan and email jobs
How to check the export status of a scan job
1. Select 'Service' in the title bar of the Océ VarioPrint® 2090 Settings Editor.
2. Click 'Status' .
3. Click 'Scan job export status' .
214
Chapter 8 The scan function (optional)
Troubleshooting
Troubleshooting
Introduction
Information for operators
The operator panel of the Océ VarioPrint® 2090 can display an error message when
you try to scan a document. An error can occur when a combination of settings is a
not possible combination or the limit of the system capacity is reached.
Handle the error messages
The following errors are OREs, Operator Recoverable Errors. The table describes
the possible error messages for scan jobs. The table also describes how you must
react to each message.
[59]
[59] Messages and actions
Message
Action
Maximum of 500 images imported.
The system memory is full. You can not
Press Close to finish the job. Start a new scan more images for this job.
job to scan the rest of the document.
Start the job. Scan the remaining originals as a new job.
'Please wait, scanning will continue
soon...'
The system needs time to process the information and send the information to
the scan server. No user interaction is required.
'Spool memory is almost full. No
scan-to-file job can be started'
The maximum memory capacity on the
Océ Smart Imager is reached. Use the
Océ VarioPrint® 2090 Settings Editor to
empty the export buffer of the scan job.
Correct the incorrect scan results
After you start the scan job, the job is scanned and the digitized result is sent to the
scan server. The file is stored in a designated directory. The file is stored under the
predefined name.
There is no message on the operator panel to inform you that the file was stored
successfully. You can access the status information on the Océ Smart Imager through
the Océ VarioPrint® 2090 Settings Editor.
Incorrect images
215
Troubleshooting
When you open the files in the designated directory on the scan server, the situation
can occur that the scan results are not correct. The table below displays the problems
that can occur and offers solutions.
[60]
[60] Incorrect images
Description of the
problem
Explanation and solution of the problem
All the pages are upside down
The originals were put in the wrong direction into the automatic document feeder or on the glass plate.
Scan the originals again and make sure the originals are
correctly placed.
Every second page is
upside down
The used 'Original document type' settings do not correspond with the orientation of the information on the originals.
Scan the originals again and select the correct 'Original
document type' setting.
All the pages are positioned sideways
There is more than 1 explanation for this problem.
■ A wrong orientation was selected
■ The original feed direction was confused with the orientation of the information on the original
■ The application you use does not process the
TIFF/PDF file in the right way.
Scan the originals again and select the correct 'Original
document type' setting. If the problem remains, the application you use can be the cause of the problem. Check the
results in another application.
The information on the This problem can occur when the size of the original and
page is too large or too the selected size of the target scan are not the same. The
small
problem can also be caused by a (manual) change in the
zoom factor.
Scan the originals again and check the size of the 'Original' and the 'Scan' on the operator panel.
The information on the Change the 'Exposure' settings to influence the result.
page is too light or too
dark
216
Chapter 8 The scan function (optional)
Chapter 9
The accounting function
217
The accounting concepts
The accounting concepts
Definition
Accounting is an option on the Océ VarioPrint® 2090 that stores job (copy, scan and
print) information in a log file. The information in the log file is used to assign jobs
to the relevant persons, departments, projects and customers, who are each assigned
accounts.
The accounting function on the Océ VarioPrint® 2090 uses an account ID file, which
contains the identification numbers for all accounts and an accounting log file. The
account ID file is used to identify and verify the accounts. The accounting log file
stores information about all jobs that were done for each account.
You can use various levels of accounting. On the lowest level, the identification is
disabled, which means that you do not have to enter an account number before you
start a job. If the identification is enabled, the system asks you to enter an account
number before you can start a job. Next, you can disable and enable the verification
of account numbers. If the verification is disabled, the Océ VarioPrint® 2090 does
not check the correctness of the entered account numbers. The entered account
numbers are used in the account log files only to allocate jobs to the corresponding
accounts. If verification is enabled, the entered account number is checked for
correctness. Thus, you must enter a correct account number before you can start any
jobs.
The accounting function on the Océ VarioPrint® 2090 also has a feature that allows
you to omit the names of the jobs in the account log files. This feature, the job name
suppression, helps you to protect confidential information.
Accounting terms
[61]
[61] The parts of the accounting function
218
(1 – 2)
Term
Description
Account ID file
Consists of:
The account ID file is a .csv file. The account ID file has 3
data fields: Account ID, Account name and Comment.
■
Account ID
A sequence of 1 to 10 digits that identifies a user, department,
project or customer. The account ID is attached to a job.
■
Account name
A name (string of a maximum of 40 characters) that matches
a defined account ID. The name is used for feedback to the
user on the operator panel.
■
Account comment
A comment field (string of a maximum of 255 characters)
that helps the system administrator to maintain the account
ID's.
Chapter 9 The accounting function
The accounting concepts
[61] The parts of the accounting function
(2 – 2)
Term
Description
Accounting log
file
Every processed job is logged in the accounting log file. The
accounting log file provides detailed information on the use
of the machine and the functionality (scan; print or copy) of
the job (see ‘About the accounting log file’ on page 220).
The .acl file remains active for 24 hours. The file is converted
to a .csv file and added to a list. The Océ Smart Imager can
store a maximum of 99 log files. The oldest file is removed
when the limit is reached.
Account ID verifi- The check that the entered account ID is present in the accation
count ID file. If the account ID is not present in the account
ID file, the account ID is not accepted.
.CSV file
Comma Separated Value file. A .csv file is a file in which a
special character separates the fields. This special character is
either a comma (,) or a semi-colon (;).
Both the account ID file and the accounting log file are comma separated value files.
219
About the accounting log file
The accounting log file
About the accounting log file
Introduction
Information for system administrators
An accounting log file consists of data records. The data records contain information
about the use of the Océ VarioPrint® 2090. For each job on the Océ VarioPrint®
2090, a new data record is added to the current accounting log file. Each data record
in an accounting log file contains 53 fields.
The first record of an accounting log file is the header record. This record acts as the
heading of a table. The header record always starts with 4300. Every subsequent data
field starts with 4301. Records of type 4301 hold the actual accounting information
for each job.
The Océ Smart Imager stores all the jobs into a temporary accounting log file (.acl
file). Every night at midnight, the system converts this information into a permanent
accounting log file (.csv file). At the same time, a new temporary accounting log file
is created that remains active for 24 hours.
You can download the .csv file. Then you can import the file into, for example,
Microsoft® Excel or Microsoft® Access.
The following table describes the fields of the data records in an accounting log file.
Note: The Océ Smart Imager can store a maximum of 99 accounting log files. The
oldest file is removed when the limit is reached.
The fields of the accounting log file
[62]
[62] The fields of the accounting log file
220
(1 – 4)
Field name
Specification
Description
<recordtype>
4301
A number that identifies a data record
<jobid>
A number with a
maximum length of
9 digits
When a new job starts, the Océ Smart Imager creates a unique job identification number
Chapter 9 The accounting function
About the accounting log file
[62] The fields of the accounting log file
Field name
<jobtype>
Specification
Description
Possible entries:
COPY
■ IP
■ AP
■ SCAN
■ SCAN2MBX
■ MBXCOPY
■ SYSTEM
Describes the type of job.
■ COPY: Direct copy job
■ IP: Interactive print job (a job that was
printed from the mailbox)
■ AP: Automatic print job (a job that was
directly printed from the network, not
from the mailbox)
■ SCAN: A scan-to-file job
■ SCAN2MBX: A job that was scanned to
the mailbox
■ MBXCOPY: A copy job that was printed
from the mailbox
■ SYSTEM: A test print that was started in
the service mode or service copy mode.
■
<date>
(2 – 4)
<YYYY>-<MM>-< The date on which the job was finished or
DD>
cancelled
Note: When you open the file in
Microsoft® Excel, the date format
changes into the date format that
is defined in Microsoft® Excel
<time>
<hh>:<mm>:<ss>
The time on which the job was finished or
canceled
Note: When you open the file in
Microsoft® Excel, the time format
changes into the time format that
is defined in Microsoft® Excel
<result>
Possible entries:
■ Done
■ Abrt
Information about the status of the job.
■ Done: The job was finished correctly.
■ Abrt: The operator or the Océ Smart Imager stopped or cancelled the job (for example in case of an error)
<username>
A text string with a
maximum length of
255 characters
The user name that is defined for the job
<jobname>
A text string with a
maximum length of
255 characters
The name of the job (only for automatic or
interactive print jobs). Otherwise, the field is
empty
221
About the accounting log file
[62] The fields of the accounting log file
Field name
222
Specification
(3 – 4)
Description
<departmentname>
This field is always empty
<costcentre> A text string with
maximum length of
40 characters
The name of a department or user as defined
in the 'Cost center' field of the 'Account' tab
of the Océ VarioPrint® 2090 printer driver.
This field is empty when the attribute is not
available
<custom>
Information as defined in the 'Custom' field
of the 'Account' tab of the Océ VarioPrint®
2090 printer driver. In the 'Custom' field, the
user can add additional information about
the account settings.
This field is empty when the attribute is not
available
A text string with
maximum length of
255 characters
<accountjobnumber>
This field is always empty
<accountid> A number with a
maximum length of
10 digits
The account ID as defined in the 'ID' field of
the 'Account' tab of the Océ VarioPrint®
2090 printer driver, or on the operator panel.
This field is empty when the attribute is not
available
<nofscana4> Maximum 5 digits
The number of scanned letter-like sheets, including custom sized sheets of which at least
one dimension is equal to or less than 10
inches
<nofscana3> Maximum 5 digits
The number of scanned tabloid-like sheets,
including custom sized sheets of which all
dimensions are larger than 10 inches
<nofripa4>
This field is always empty
<nofsripa3>
This field is always empty
<nofsinglestaples>
Maximum 5 digits
The number of times that a single staple was
used in a job. This number does not include
the staples from the off-line stapler
<nofdoublestaples>
Maximum 5 digits
The number of times that two single staples
were used in a job. This number does not include the staples from the off-line stapler
Chapter 9 The accounting function
About the accounting log file
[62] The fields of the accounting log file
(4 – 4)
Field name
Specification
Description
<noffinishedsets>
Maximum 5 digits
The number of finished sets. A set is finished after the last sheet is sent to the output
destination
<outputdestination>
Possible entries:
■ FINISHER
■ OEM
■ SPECIAL
The output destination to which the job was
sent.
■ FINISHER: Finisher
■ OEM: External finisher
■ SPECIAL: Upper output
<nofprinteda Maximum 5 digits
4>
The number of printed letter-standard sized
sheets (copy jobs or print jobs)
<nofprinteda Maximum 5 digits
3>
The number of printed tabloid sized sheets
(copy jobs or print jobs)
<nofsimplex(1-6)>*
Maximum 5 digits
The number of 1-sided sheets of a certain
paper type (1-6) used in a job
<nofduplex(1-6)>*
Maximum 5 digits
The number of 2-sided sheets of a certain
paper type (1-6) used in a job
<paperformat(1-6)>*
A text string with a
maximum length of
80 characters
The format of the paper type (1-6)
<papertype(1-6)>*
Possible entries:
■ PLAIN
■ INSERT
■ TAB
■ TRANS
■ SPEC_1
■ SPEC_2
■ SPEC_3
■ COVER
■ MYPAPER
Description of the type of paper (1-6).
■ PLAIN: Standard paper
■ INSERT: Non-processed sheets
■ TAB: Tab sheets
■ TRANS: Transparencies
■ SPEC_1: Special 1
■ SPEC_2: Special 2
■ SPEC_3: Special 3
■ COVER: A special front or back page
■ MYPAPER: Paper defined by the user
<paperweight(1-6)
>*
Maximum 3 digits
The weight of the paper type (1-6) in grams
Note: * (1-6) refers to the type of paper (1, 2, 3, 4, 5, 6) that is used. The paper
characteristics of the first paper type in a job are logged in the fields ending on '1'.
The characteristics of the next, different paper type are logged in the fields ending
on '2', and so on. For example, <papertype2> and <paperweight2> both correspond
to the second type of paper in a job. If you use less than 6 paper types, the remaining
223
About the accounting log file
fields are empty. If you use more than 6 paper types, these paper types are logged as
if they were paper type 6. The maximum number of paper types per job is 6.
224
Chapter 9 The accounting function
Download the accounting log files
Download the accounting log files
Introduction
Task for system administrators
The accounting log file on the Océ Smart Imager contains the relevant job
information. You can access the accounting log file through the Océ VarioPrint®
2090 Settings Editor. You can download the file to a location of your choice. You can
use for example Microsoft® Excel to open the file.
How to download the accounting log files
Select 'Settings' in the title bar of the Océ VarioPrint® 2090 Settings Editor.
Click 'Accounting' .
Click 'Log files' .
Right-click one of the links in the right-hand pane.
The file opens.
5. Use the 'Save as...' option to download the file to a local destination on your network.
1.
2.
3.
4.
Note: The .acl file is the current accounting log file that the system uses to store the
accounting information. The file remains active for 24 hours. The file is converted at
0.00 hours to a .csv file. The .csv file is added to the list of links. The Océ Smart
Imager can store a maximum of 99 log files. The oldest file is removed when the limit
is reached.
225
Download the account ID file
The account ID file
Download the account ID file
Introduction
The account ID file is a comma separated file (CSV) that contains the valid account
IDs and (optional) the matching account names that you need to enter on the operator
panel of the Océ VarioPrint® 2090.
When to do
If you want to check and/or change the account numbers that are stored in the
account ID file, you can download the file to a local destination on your PC.
Download the account ID file
1.
2.
3.
4.
5.
Select the 'Settings' tab in the Océ VarioPrint® 2090 Settings Editor.
Select 'Accounting'.
Select 'ID file'.
Select 'Download'.
Right-click the link and use the 'Save as...' option in the pop-up menu to save the file
to a destination of your choice.
Result
After the download of the account ID file is completed, you can open and edit the
file in an application of your choice, for example Microsoft® Excel (see ‘Edit the
account ID file’ on page 227). After you made the changes, you can upload the file
again to the Océ Smart Imager (see ‘Uploading the Account ID File’ on page 229).
226
Chapter 9 The accounting function
Edit the account ID file
Edit the account ID file
Introduction
Information for system administrators
The account ID file is a .csv file. The name of the default account ID file is
account-id.csv. You must download the account ID file from the Océ Smart Imager
to add, delete or edit records (see ‘Download the account ID file’ on page 226).
Each record in the account ID file contains the following data fields:
Record ID
■ Account ID
■ Account name
■ Comment.
■
The setting 'Field separator' in the Océ Smart Imager determines the type of field
separator. The field separator of the file can be a comma or a semicolon. Do not use
both a comma and a semicolon as a field separator in one file.
When you use double quotes in a field, the system replaces the double quotes with
two double quotes. Otherwise, the system cannot identify the field with certainty.
Note: An account ID file can contain a maximum of 2,000 records.
Example of an account ID file
When you right-click the link of your account ID file, for example account-id.csv,
a dialogue box appears. You can now save or open the file.
When you open the file, the screen shows the contents of the account ID file, as
shown in the table below.
227
Edit the account ID file
The information in the account ID file
[63]
[63] Account ID file information
Column
Data field
Entry
Description
A
Record ID
4311 (mandatory for each
new record)
Always start each new record with
4311.
1234567890
(for example)
A sequence of 1 to 10 digits that is attached to a job that identifies a user, department, project or customer.
Note: The first record of the
account ID file starts with
4310. This record contains
general information. Do not
change or delete the first
record.
B
Account ID
C
Account name Department X After you enter the account ID on the
(for example) operator panel, the system checks the
account ID file for a matching account
name. This name is displayed on the operator panel.
If the account ID file does not contain a
matching account name, the operator
panel only displays the account number.
The account name field can contain a
maximum of 40 characters.
D
Comment
Maximum
monthly print
volume:
20,000 (for example)
The system administrator can use the
comment field for additional information. A comment field can contain a
maximum of 255 characters.
After you change the account ID file, you must save the file. Then you can upload
the account ID file to the Océ Smart Imager (see ‘Uploading the Account ID File’ on
page 229).
The new file overwrites the file that is currently in use.
228
Chapter 9 The accounting function
Uploading the Account ID File
Uploading the Account ID File
Introduction
When you start to use the accounting function (optional), you need to upload the
account ID file.
You can create account IDs. The account IDs are numbers that represent for example
departments, customers, persons or projects for which you want to collect
accounting information. The account IDs are listed in the account ID file.
Purpose
To add new accounting IDs or to change the existing IDs, you need to change the
account ID file. You can upload the new file to the Océ Smart Imager.
Note: If you want to use the information in the account ID file, you must enable the
Verification setting in the Accounting section.
Before you begin
If you want to change an existing account ID file, you must first download the file to
a local destination on your PC. After you have made the changes you can upload the
file.
Uploading the Account ID File
1.
2.
3.
4.
5.
6.
Select the 'Settings' tab in the Océ VarioPrint® 2090 Settings Editor.
Select 'Accounting'.
Select 'ID file'.
Select 'Upload'.
Click 'Browse' to find the account ID file on the network.
Click 'Upload' to start the upload of the file.
Result
The account ID file is now uploaded to the Océ Smart Imager.
Note: The new file overwrites the existing file.
229
Restoring the Default Account ID File
Restoring the Default Account ID File
When to do
To return to the start situation, you can restore the factory default account ID file.
This file is stored on the Océ Smart Imager and can not be edited.
Note: The information of the current account ID file is removed and cannot be
recovered.
It is recommended that you maintain a customized account ID file available on a
location on your PC in the event you need a backup of the customized file.
Note: You can only restore the default account ID file with this function. The factory
defaults of the Key Operator and the System Administrator do not influence the
account ID file.
Restore the factory default account ID file
1.
2.
3.
4.
5.
Select the 'Settings' tab in the Océ VarioPrint® 2090 Settings Editor.
Select 'Accounting'.
Select 'ID file'.
Select 'Default'.
Click 'OK' to restore the factory default account ID file.
Result
The default account ID file overwrites the current account ID file.
230
Chapter 9 The accounting function
Enter and cancel an 'Account ID'
Copying and printing with the
accounting function
Enter and cancel an 'Account ID'
Introduction
Task for operators
You can enter the 'Account ID' with the function key on top of the operator panel
before you start to process your job. When you press a key first, a forced dialog
appears that asks you to enter the 'Account ID'.
Note: When the setting 'Verification' in the 'Account settings' section in the Océ
VarioPrint® 2090 Settings Editor is enabled, the system checks the validity of the ID.
How to enter an 'Account ID' with the function key
1. Press the function key 'Enter Account ID'.
The following screen appears.
[56]
2. Enter the 'Account ID' for the job (1 - 10 digits).
[57]
3. Press the key for 'Confirm' .
231
Enter and cancel an 'Account ID'
You can start to process your jobs.
[58]
How to enter an 'Account ID' after a forced dialog
[64]
[64] Enter an 'Account ID' after a forced dialog
When
■
■
■
Then
You select the 'Copy' template
You press the 'Edit...' key in the mailbox
You press the Start key in the
mailbox
before you enter an 'Account ID'
A dialog box appears.
Enter the 'Account ID' (1 - 10 digits).
Press the key for 'Confirm' .
The system continues to process the job.
How to cancel an 'Account ID'
[65]
[65] Cancel an 'Account ID'
Option
The current 'Account ID' is canceled when
1
You press the Account ID function key. This function key now displays the
account ID that was last entered.
In the following screen you can enter a new account ID or select 'Reset Account ID'. If you enter a new account ID, the system will use this new account ID. To reset the system quickly to the start situation, select 'Reset
Account ID'. The account ID is then reset immediately.
2
A timeout of the operator panel has occurred when no key was pressed for
a certain period.
Note: The key operator can define the timeout in the Océ VarioPrint® 2090 Settings Editor.
232
Chapter 9 The accounting function
Create a print job with an Account ID
Create a print job with an Account ID
Introduction
Task for operators
The Océ VarioPrint® 2090 allows you to charge the costs for print jobs and copy jobs
to the users or customers (see ‘The accounting concepts’ on page 218). The Océ
VarioPrint® 2090 allows you to define an 'Account ID' in the printer driver.
Note: You can only enter an 'Account ID' when the accounting function is enabled
in the printer driver.
How to enable the Account ID in the printer driver
1. In your Windows® operating system, click 'Start'.
2. Click 'Settings' .
3. Click 'Printers' .
Note: In Windows XP®, click 'Printers and faxes'.
4.
5.
6.
7.
8.
9.
Right-click the Océ VarioPrint® 2090 printer.
Click 'Properties' .
Select the Océ VarioPrint® 2090 tab.
Check the 'Enable accounting' box.
Click 'Apply' .
Click 'OK' .
How to create a print job with an Account ID
1. Select the print option in your application.
The print window of your application appears.
2. Select the Océ VarioPrint® 2090 printer.
3. Select 'Properties' to access the settings of the printer driver.
The 'Job' tab opens automatically.
Select a template or define the settings.
Select 'Account' .
Enter the values for 'Account ID', 'Cost center' and 'Custom'.
Click 'OK' after you have defined all the settings.
The printer driver window closes.
8. Click 'OK' to close the print window of the application.
The print job is sent to the mailbox.
4.
5.
6.
7.
Note: When the accounting function is enabled, you must enter an 'Account ID'
before you print your job. If you do not enter an 'Account ID', you cannot print your
233
Create a print job with an Account ID
job. If you print from your desktop application without an 'Account ID', the driver
will automatically ask you for an 'Account ID'. If you print through the printer icon
in your desktop application, you must enable 'Show settings before printing' to make
the driver ask you for an 'Account ID'.
234
Chapter 9 The accounting function
Making a Copy or Print with the Copy Card
Making a Copy or Print with the Copy Card
Introduction
Task for operators
You can use the Océ VarioPrint® 2090 in combination with a separate copy count
device. The key operator must enable the copy count device in the Océ VarioPrint®
2090 Settings Editor.
You can use the copy count device as a prepaid credit system or a post-paid debit
system. The prepaid system requires copy cards with credit units. The post-paid
system uses an account number.
Prepaid system
The prepaid system uses a copy card that contains credit units. When you make a
print, this print is subtracted from the credit value on your card. If the card runs out
of credit units during a print job or copy job, the system stops printing and displays
a message. You must add credit units or insert a new card.
Post-paid system
The post-paid system uses an account number that you must enter at the start of a job.
How to make a copy with the copy card
1. Insert the copy card into the copy count device.
2. Select a job from the mailbox. You can also create a copy job with the Start key
3. Press the Start key
. The job is sent to the job queue.
.
Note: If you run out of credit units during a job, the system stops the job and asks
you to refill the credits on your card or insert a new card.
235
Making a Copy or Print with the Copy Card
236
Chapter 9 The accounting function
Chapter 10
Adding supplies
237
Load the standard media and media with special front
Loading the paper
Load the standard media and media with special front
How to load the standard media in the paper tray
1. Press the button on the front side of the paper tray to open the paper tray.
[59]
[59] Opening the Paper Tray
2.
3.
4.
5.
238
The LED of the paper tray blinks rapidly while the plate inside moves down.
Wait until the paper tray opens.
Take the media from the pack.
Hold each pack of media at the short sides.
Bend the pack.
Chapter 10 Adding supplies
Load the standard media and media with special front
6. Put the media face down and header up into the paper tray.
[60]
[60] Loading Standard Media
7. Adjust the paper guides.
Based on the position of the paper guides, the Océ VarioPrint® 2090 can identify the
paper size.
8. Close the paper tray.
239
Load the tab sheets
Load the tab sheets
Introduction
Task for operators, key operators
When you print on tab sheets, the sheets can have the following destinations.
The finisher
■ The upper output
■ The external finisher (if configured).
■
Note: You can not use tab sheets in combination with the optional booklet maker.
Depending on the destination of the print job, you must load different sets of tab
sheets.
The following table shows the types of tab sheets that are required for the
destinations.
[66]
[66] Types of tab sheets
Destination
■
■
Finisher
Upper output
External finisher
Type of tab sheet
Reverse collated tab sheets
In reverse collated tab sheets, the highest number is on
top of the set. The lowest number is at the bottom (for example 5, 4, 3, 2, 1)
Straight collated tab sheets
In straight collated tab sheets, the lowest number is on
top of the set. The highest number is at the bottom (for
example 1, 2, 3, 4, 5)
How to load tab sheets when you print to the finisher and the upper output
1. Take a pack of reverse collated tab sheets.
Note: The tab sheets, in reverse collated tab sheets, are counted down from the last
number to 1.
2. Complete steps 1 - 5 of the procedure for standard media.
240
Chapter 10 Adding supplies
Load the tab sheets
3. Put the tab sheets face down and header down into the paper tray.
[61]
[61] Loading Tab Sheets (destination: finisher and upper output)
4. Continue with steps 7 and 8 of the procedure for standard media.
How to load tab sheets when printing to the external finisher
1. Press the button on the front side of the paper tray to open the paper tray.
[62]
[62] Opening the Paper Tray
The LED of the paper tray blinks rapidly while the plate inside moves down.
2. Wait until the paper tray opens.
3. Take a pack of straight collated tab sheets.
4. Hold each pack of media at the short sides.
241
Load the tab sheets
5. Bend the pack.
6. Put the tab sheets face down and header down into the paper tray.
[63]
[63] Loading Tab Sheets (destination: external finisher)
7. Adjust the paper guides.
Based on the position of the paper guides, the Océ VarioPrint® 2090 can identify the
paper size.
8. Close the paper tray.
242
Chapter 10 Adding supplies
Load a combination of tab sheets and media with special front
Load a combination of tab sheets and media with special
front
Introduction
Task for operators, key operators
You create complex documents that contain tab sheets and media with a special
front.
Depending on the destination, you must load different sets of tab sheets.
The following table shows the types of tab sheets that are required for the
destinations.
[67]
[67] Types of tab sheets
Destination
■
■
Output
Upper output
External finisher
Type of tab sheet
Reverse collated tab sheets
In reverse collated tab sheets, the highest number is on
top of the set. The lowest number is at the bottom (for example 5, 4, 3, 2, 1)
Straight collated tab sheets
In straight collated tab sheets, the lowest number is on
top of the set. The highest number is at the bottom (for
example 1, 2, 3, 4, 5)
How to load a combination of tab sheets and sheets with special front
1. Press the button on the front side of the paper tray to open the paper tray.
[64]
[64] Opening the Paper Tray
The LED of the paper tray blinks rapidly while the plate inside moves down.
2. Wait until the paper tray opens.
3. Take the media from the pack.
Note: Hold each pack of media at the short sides.
4. Bend the pack.
5. Put the tab sheets face down and header down into the paper tray.
243
Load a combination of tab sheets and media with special front
Note: Use the correct set for the destination of your print job. See the Introduction
to this chapter.
6. Adjust the paper guides.
Based on the position of the paper guides, the Océ VarioPrint® 2090 can identify the
paper size.
7. Close the paper tray.
8. Open another paper tray.
9. Put the media with a special front face down and header down into the paper tray.
[65]
[65] Loading Media with a Special Front
10. Adjust the paper guides.
11. Close the paper tray.
244
Chapter 10 Adding supplies
Add the toner
Adding toner and staples
Add the toner
Introduction
Task for operators, key operators
When the toner level of the Océ VarioPrint® 2090 is low, a refill is needed. To inform
you of low toner level, the operator panel displays a toner warning icon . The
softkey that allows access to the 'System information' section
is also visible, in
the top of the screen. When you press the softkey, the 'System information' section
opens. The toner level indication in the 'System information' section is highlighted
when the toner level is low or all the toner is used.
Attention: Only use Océ F3/F11 toner.
Attention: Never add more than 2 bottles at a time.
Attention: The Océ VarioPrint® 2090 must be switched on to add the toner.
Attention: If you spill toner, refer to the Safety data sheets in the Océ
VarioPrint® 2090 Safety manual for information about the removal and cleaning.
245
Add the toner
How to access the toner reservoir
1. Open the left front door of the Océ VarioPrint® 2090.
[66]
[66] Open the front door
2. To open the reservoir, turn the screw of the toner reservoir counter-clockwise with a
screwdriver or coin.
3. Pull the cover of the toner reservoir towards you.
4. Remove the cover of the toner reservoir.
Attention: Add toner only when the operator panel displays the toner warning
icon together with the 'System information' softkey . You can add toner
even if the Océ VarioPrint® 2090 is running.
How to add the toner
1. Shake the toner bottle well (see the instructions on the bottle).
2. Remove the screw cap from the bottle.
Note: Do not remove the seal from the bottle.
246
Chapter 10 Adding supplies
Add the toner
3. Check the ridge first to put the bottle into the right position. Then push the toner
bottle into the toner reservoir. Remember that you can not rotate the bottle when the
bottle is in the toner reservoir.
[67]
[67] Push the bottle into the reservoir
4.
5.
6.
7.
8.
Remove the bottle when the bottle is empty. Be careful, do not spill toner.
Put the cap back on the empty toner bottle.
Close the cover of the toner reservoir.
Close the left front door.
Press the 'System information' softkey
on the operator panel.
[68]
[68] Confirm the toner refill
9. Press the key for 'Toner refill' to select 'Confirm refill' .
10. Press the key for 'Close' .
247
Replacing Stapler Cartridges 1 and 2 (standard on-line staplers)
Replacing Stapler Cartridges 1 and 2 (standard on-line
staplers)
Attention: When you open the front door and the top cover of the finisher, check
that the jaws of the staplers are open. If the jaws are not completely open, you
must close the top cover and the front door of the finisher. Wait 15 seconds. The
Océ VarioPrint® 2090 opens the jaws of the staplers. Now you can remove the
stapler cartridge.
Attention: Do not remove the stapler cartridge if the jaws are (partly) closed. If
you did remove the stapler cartridge when the jaws were open, save the stapler
cartridge. The service technician repairs the stapler cartridge at the next service
visit.
Illustration
[69]
[69] Location of the on-line staplers (only stapler 2 is visible - stapler 1 is located at the
left-hand side of stapler 2)
248
Chapter 10 Adding supplies
Replacing Stapler Cartridges 1 and 2 (standard on-line staplers)
How to replace the stapler cartridges of the staplers 1 and 2
1. Open the front door of the finisher.
2. Open the top cover of the finisher.
3. Check that the staplers are correctly aligned.
Note: The staplers must be extended to the maximum position. If the staplers are not
in the correct position, you cannot access stapler 1. Follow the procedure below if
the staplers are not correctly aligned (see ‘How to align the staplers correctly’).
4. Tilt the stapler cartridge forward.
5. In the same movement, remove the stapler cartridge from the stapler.
6. Remove the loose staples if necessary.
Note: Make sure that no staples fall into the finisher.
7.
8.
9.
10.
Take a new cartridge, type S3.
Remove the packing material.
Slide the stapler cartridge into the stapler.
Press until the stapler cartridge clicks into place.
Note: If the new stapler cartridge does not fit, put back the old stapler cartridge and
call service.
11. Close the top cover of the finisher.
12. Close the front door of the finisher.
How to align the staplers correctly
1. Close the top cover of the finisher if the staplers are not in the correct position.
2. Pull stapler 2 toward you until the stapler cannot go any further.
3. Open the top cover of the finisher again.
Note: You can access stapler 1 when the stapler cartridge is tilted upward.
249
Replacing Stapler Cartridge 3 (optional off-line stapler)
Replacing Stapler Cartridge 3 (optional off-line stapler)
Illustration
[70]
[70] Location of the off-line stapler
How to replace the stapler cartridge of stapler 3
1. Open the front door of the finisher.
2.
3.
4.
5.
The stapler cartridge is located in the left lower-hand corner of the finisher.
Tilt the stapler cartridge forward.
In the same movement, remove the stapler cartridge from the stapler.
Remove the stapler cartridge from the stapler.
Remove the loose staples if necessary.
Note: Make sure that no staples fall into the finisher.
6. Take a new cartridge, type S3.
7. Remove the packing material.
8. Slide the stapler cartridge into the stapler.
Note: The correct position of the off-line stapler cartridge is upside down.
9. Press until the stapler cartridge clicks into place.
Note: If the new stapler cartridge does not fit, put back the old stapler cartridge and
call service.
10. Close the front door of the finisher.
250
Chapter 10 Adding supplies
Replacing Stapler Cartridges 4 and 5 (optional booklet maker)
Replacing Stapler Cartridges 4 and 5 (optional booklet
maker)
How to replace the stapler cartridges of the staplers 4 and 5
1. Open the top right cover of the booklet maker.
2. Use the handle of the top left cover to lift the top left cover.
3.
4.
5.
6.
7.
8.
9.
10.
Staplers 4 and 5 are located next to each other.
Tilt the stapler cartridge forward.
In the same movement, remove the stapler cartridge from the stapler.
Take a new cartridge, type S23.
Remove the packing material.
Slide the stapler cartridge into the stapler.
Press until the stapler cartridge clicks into place.
Close the top left cover of the booklet maker.
Close the top right cover of the booklet maker.
251
Replacing Stapler Cartridges 4 and 5 (optional booklet maker)
252
Chapter 10 Adding supplies
Chapter 11
Error handling
253
Handling Contradictions
Handling Contradictions
Introduction
Task for operators, key operators
Three types of contradictions can occur on the Océ VarioPrint® 2090.
■ Specification contradictions
Specification contradictions refer to combinations of settings that are not
possible combinations.
For example, you cannot make a 2-sided scan from the glass plate. Change the
original setting from 2-sided to 1-sided.
■ Start contradictions
Start contradictions refer to errors that occur when the required resources for a
job are not available.
For example, a job needs staples, but the staplers are empty. An alarm bell is
displayed. This alarm bell indicates that a certain supply is not available, for
example staples or toner.
■ Run-time contradictions
Run-time contradictions occur when the system has not enough supplies, for
example paper, while the system prints a job. A run-time contradiction also
occurs when the output is full. The active or current job stops. The operator panel
displays a message.
Correcting a specification contradiction
[68]
[68] Correct a specification contradiction
254
Step
Action
Remarks
1
Press the Start key
or use the 'Copy build
wizard'.
The system checks the settings that you selected.
If the settings do not match, the system can not
print your job. A pop-up message appears.
2
Change the settings ac- For example, change the 'Original' settings from
cording to the specifi- 2-sided to 1-sided, to make a copy from the glass
plate.
cations of the Océ
VarioPrint® 2090.
3
Press the Start key
two times or use the
'Copy build wizard'.
Chapter 11 Error handling
If the job has the correct settings, the job is processed. If you do not correct the settings, the system corrects the specification contradiction.
Handling Contradictions
Correcting a start contradiction
1. Read the error message on the screen.
2. Add the needed resources. The job starts if there are no more contradictions.
Correcting a run-time contradiction
1. Add the required supplies.
2. The job starts if there are no more contradictions.
255
Handling Errors
Handling Errors
Introduction
Task for operators, key operators
If an error occurs, the Océ VarioPrint® 2090 stops.
There are three types of errors that can occur on the Océ VarioPrint® 2090.
■ ORE (operator recoverable error)
You must correct the error, for example a paper jam, before the scanning process
or the printing process can continue. After you correct the error, the Océ
VarioPrint® 2090 checks that all activities to correct the error are done. If there
are no more activities, the system continues with the active job. If you must do an
additional activity, the system remains in the stand-by mode.
■ MRE (machine recoverable error)
The operator panel displays a message that an MRE has occurred. After this
message the system goes to sleep mode. You only need to turn on the system
again. Follow the instructions on the screen.
■ PE (permanent error)
If the system has a permanent error, the Océ VarioPrint® 2090 stops. An error
screen indicates that service is required. Only an Océ service technician can
correct the error and remove the message.
Note: The scan process and the print process are separate processes. If one of the
processes has an ORE, the other process continues.
The error screen
Screen messages or error screens A message shows you which areas you must
inspect to find the error. A picture shows you how to correct the error. After you
correct the error, the error screen disappears and the Océ VarioPrint® 2090 starts to
process.
The error screen of an ORE is divided into two sections, a left-hand pane and a
right-hand pane.
The right-hand pane shows the part of the Océ VarioPrint® 2090 where the error
occurred. The screen gives you instructions for the area that you must inspect. If
necessary, open doors or covers to access these areas.
The left-hand pane shows all the actions to take. The Océ VarioPrint® 2090 traces
your actions and marks the steps on the screen. After you have checked all the
indicated areas and after you have corrected the problems, the error screen
disappears.
256
Chapter 11 Error handling
Handling Errors
Illustration
[71]
[71] The error screen
How to handle errors
1. Read the message on the operator panel.
Wait for more instructions.
The Océ VarioPrint® 2090 stops the feeding of sheets from the input tray of the
automatic document feeder when a scan error occurs.
If possible, the sheets in the paper path are flushed. Error sheets go to the upper
output tray.
2. Follow the instructions on the operator panel.
Note: Follow the steps in the order that is displayed on the screen. The system keeps
track of the actions and recovers from this error.
257
About Paper Jams
About Paper Jams
Introduction
Information for operators, key operators
The media and originals normally move through the Océ VarioPrint® 2090 without
any problems. A sheet that gets stuck can cause a paper jam.
If there is a paper jam, the operator panel displays an error message. The operator
panel gives you an instruction to clear the error. The graphics on the screen indicate
which part of the Océ VarioPrint® 2090 has a paper jam.
The operator panel guides you through a sequence of steps to correct the problem. If
paper jams occur in more than one location, the operator panel continues to give the
instructions until all the paper jams are corrected.
When the error is cleared, follow the instructions on the display. The job continues.
All the prints and copies are moved correctly into the finisher or system output.
If the print is still not correct, check the following:
The originals must be aligned to the right in the automatic document feeder
■ The original guides must not be too tight or too loose
■ The originals must not be too heavy, too curled or too damaged. If necessary,
make the originals flat or make new originals on the glass plate.
■ The originals must not be stapled. If necessary, remove any staples. Separate the
originals after you remove the staples.
■
The cause of the problem can be also in the paper compartment. Check the
following:
■ The paper is curled. Reload the paper upside down.
■ The paper does not leave the paper tray because the guides are too tight. Loosen
the guides.
■ The paper does not leave the paper tray because a sheet is folded or damaged.
Remove this sheet.
The green labels on several of the handles, covers and other parts of the Océ
VarioPrint® 2090 indicate the parts described in the instructions on the operator
panel. Lift, press or open these parts to remove the paper jam.
For example, the operator panel instructs you to open cover C1. A picture on the
screen shows the exact location of cover C1 behind the open right-hand door. If you
open the door, you find a cover with a green label 'C1' at the indicated position.
Follow the instructions on the operator panel in the correct order.
258
Chapter 11 Error handling
About Paper Jams
Note: If the key operator locked the paper trays, you can not clear the paper jams
in these sections. Call the key operator to unlock the paper trays.
Possible locations of the paper jams
Paper jams can occur in various stages of the print process.
[69]
[69] Possible Locations of Paper Jams
Location
Description
Automatic document feeder
Open the top cover of the automatic document feeder to correct the paper jam.
Note: Also check the glass plate for originals.
Paper trays
Open the paper trays if the LED blinks rapidly. Check for paper jams.
Paper input module
■
■
Open the front doors of the Océ VarioPrint® 2090.
Check the four paper path covers marked with the labels
C1-C4.
Note: You can only open cover C2 when C1 is
closed.
Paper path
Open the front doors of the Océ VarioPrint® 2090 to access
the areas marked with the labels A1 and B1-B3.
Note: A small lamp illuminates when the paper
path cover A1 opens.
Finisher
There are 3 global areas in the finisher that you must check
for paper jams.
■ Open the top covers that are left of the copy receiving unit
and below the output trays of the finisher.
■ Open the front door of the finisher to access the covers
marked with the labels D1-D2. Also check the internal error tray.
■ Open the front door and the top cover to access the paper
path covers marked with the labels E1-E3.
Note: Remove any paper from the upper output
when you open the top cover of the finisher.
Upper output
Check the upper output for paper jams.
259
About the staple jams
About the staple jams
Introduction
Information for operators, key operators
All the staplers can staple sets of 80 sheets of paper and sets of a maximum of 8.25
mm. The number of 80 sheets was defined with Océ Red Label paper of 80 g/m2 (20
lb bond). When a staple error occurs, the operator panel shows a message. Follow
the instructions on the screen to correct the problem.
General Information
When a stapler error occurs, replace the stapler cartridge (see ‘Replacing Stapler
Cartridges 1 and 2 (standard on-line staplers)’ on page 248).
Remove any loose staples. Make sure that no staples fall into the Océ VarioPrint®
2090. Keep the stapler cartridge which caused the problems. Give the stapler
cartridge to the Océ service technician.
Note: After you correct the problem, the situation can occur that the stapler does
not staple the next two or three sets.
260
Chapter 11 Error handling
Appendix A
Overview and tables
261
Product specifications
Product specifications
Introduction
This table describes the main specifications of the Océ VarioPrint® 2090.
[70]
Part
Specification
Process
Paper Logic, for reliable productivity through constant
feed of materials from the paper trays
Image Logic, for high copy quality
Bin Logic, for intelligent use of flexible output trays
Print speed
Scan speed
91 Letter pages a minute (1-sided and 2-sided)
56 8.5 X 11 pages a minute
Resolution
Scan: 600 x 400 dpi
Print: 600 x 600 dpi
Warm-up time
< 14 minutes
Zoom
Min.: 25%
Max.: 400%
Auto-detectable sizes
in the paper trays
■
■
■
■
■
■
■
■
262
A4 LEF
A4 SEF
A3 SEF
B4
Letter 8.5 x 11 LEF
Letter 8.5 x 11 SEF
Legal 8.5 x 14 SEF
Tabloid 11 x 17 SEF
Network connection
Switchable 10/100 Mbit/s Ethernet TCP/IP interface
Platforms
Platforms that support lpr/lpd over an Ethernet TCP/IP
connection, for example
■ Windows® 2000/NT®/ME/XP
■ Unix®
■ OS/2®
■ OpenVMS®
■ Mac®
PDL support
Adobe® PostScript®3™
HP® PCL6
Toner
Océ F3/F11
Appendix A Overview and tables
Originals that can be used
Originals that can be used
Introduction
The table below describes the main requirements for the originals that are suitable
for the Océ VarioPrint® 2090.
Originals that can be used
[71]
Originals
Original sizes
Specifications
Glass platen
Max. 11 x 17 inches
Automatic doc- Min. 140 x 203 mm
ument feeder
Max. 11 x 17 inches
Original weight
Glass platen
Max. 10 kg
Automatic doc- 75 sheets of 80 g/m2 (20 lb bond)
ument feeder
Original type
Glass platen
Any type of original
Automatic doc- Not damaged, 1-sided and 2-sided
ument feeder
originals with a light curl
Note: Do not put transparent originals into the automatic document feeder.
263
Materials that can be used
Materials that can be used
Introduction
The Océ VarioPrint® 2090 has three or four paper trays that you can refill during a
print job. The trays should be filled one tray at a time. The paper trays have auto-size
detection. The paper trays open to the front side. Each tray can handle a variety of
copy materials.
The following tables describe the capacities for the paper trays and the requirements
for the paper in the paper trays.
264
Appendix A Overview and tables
Materials that can be used
Materials that can be used
[72]
[72] The Four tray Configuration
Tray
Size
Tray capacity
1
Letter-standard
A3
B4
8.5 x 27.94 cm
8.5 x 35.56 cm
11 x 43.18 cm
Oversize up to 12 x 18 inches
600 sheets of 80 g/m2 (20 lb. bond)
2
Letter-standard
A3
B4
8.5 x 27.94 cm
8.5 x 35.56 cm
11 x 43.18 cm
Oversize up to 12 x 18 inches
600 sheets of 80 g/m2 (20 lb. bond)
3
Letter-standard
A3
B4
8.5 x 27.94 cm
8.5 x 35.56 cm
11 x 43.18 cm
Oversize up to 12 x 18 inches
1700 sheets of 80 g/m2 (20 lb. bond)
4
Letter-standard
A3
B4
8.5 x 27.94 cm
8.5 x 35.56 cm
11 x 43.18 cm
Oversize up to 12 x 18 inches
1700 sheets of 80 g/m2 (20 lb. bond)
265
Materials that can be used
[73]
[73] The Three Tray Configuration
Tray
Size
Tray capacity
1
Letter-standard
A3
B4
8.5 x 27.94 cm
8.5 x 35.56 cm
11 x 43.18 cm
Oversize up to 12 x 18 inches
1700 sheets of 80 g/m2 (20 lb. bond)
2
Letter-standard
A3
B4
8.5 x 27.94 cm
8.5 x 35.56 cm
11 x 43.18 cm
Oversize up to 12 x 18 inches
1700 sheets of 80 g/m2 (20 lb. bond)
3
Letter-standard
A3
B4
8.5 x 27.94 cm
8.5 x 35.56 cm
11 x 43.18 cm
Oversize up to 12 x 18 inches
1700 sheets of 80 g/m2 (20 lb. bond)
[74]
[74] The Dual Paper Tray
266
Size
Tray capacity
A4 LEF
3,400 sheets of 80 g/m2 (20 lb. bond)
Letter LEF
3,400 sheets of 80 g/m2 (20 lb. bond)
Appendix A Overview and tables
Materials that can be used
The information in the table below refers to all paper trays.
[75]
[75] Requirements for the copy materials
Excellent
Good
Materials:
Materials:
■ Océ brand paper
■ Océ Green or Gray
■ Plain paper of compaLabel
rable, excellent quality ■ Plain paper of good,
■ Thermo plotter
but varying quality
■ Light curling paper
(comparable to Océ
Yellow, Blue Label)
Weight:
70 g/m2 -170 g/m2
■
Weight:
■ 60 g/m2 -70 g/m2
■ 170 g/m2 -200 g/m2
Do not use
Materials:
■ Paper with extreme
properties (e.g. heavily contaminated paper
with glue, dust, talc,
wax-paper, with different properties front
and backside (chromolux))
■ Machine coated paper
Weight:
■ < 60 g/m2 and > 200
g/m2
All paper trays are best for the following media.
■ Transparencies with back sheets.
■ Punched paper.
Note: Use paper of more than 170 g/m2 only for covers.
267
Materials that can be used
268
Appendix A Overview and tables
Appendix B
Miscellaneous
269
Reader's comment sheet
Reader's comment sheet
Questions
Have you found this manual to be accurate?
O Yes
O No
Were you able to operate the product, after reading this manual?
O Yes
O No
Does this manual provide sufficient background information?
O Yes
O No
Is the format of this manual convenient in size, readability and arrangement (page
layout, chapter order, etc.)?
O Yes
O No
Could you find the information you were looking for?
O Always
O Most of the times
O Sometimes
O Not at all
What did you use to find the required information?
O Table of contents
O Index
Are you satisfied with this manual?
O Yes
O No
Thank you for evaluating this manual.
If you have other comments or concerns, please explain or suggest improvements
overleaf or on a separate sheet.
Comments:
-------------------------------------------------------------------------------------------------------------------------------------------------------------------------------------------------------------------------------------------------------------------------------------------------------------------------------------------------------------------------------------------------------------------------------------------------------------------------------------------------------------------------------------------------------------------
270
Appendix B Miscellaneous
Reader's comment sheet
Date:
This reader's comment sheet is completed by:
(If you prefer to remain unknown, please do fill in your occupation)
Name:
Occupation:
Company:
Phone:
Address:
City:
Country:
Please return this sheet to:
Océ-Technologies B.V.
For the attention of ITC User Documentation.
P.O. Box 101,
5900 MA Venlo
The Netherlands
Send your comments by E-mail to: [email protected]
For the addresses of local Océ organisations see: http://www.oce.com
271
Addresses of local Océ organisations
Addresses of local Océ organisations
[76]
272
Océ-Australia Ltd.
P.O. Box 363
Ferntree Gully MDC
Vic 3165
Australia
http://www.oce.com.au/
Océ-Österreich GmbH
Postfach 95
1233 Vienna
Austria
http://www.oce.at/
Océ-Belgium N.V./S.A.
J. Bordetlaan 32
1140 Brussel
Belgium
http://www.oce.be/
Océ-Brasil Comércio e Indústria Ltda.
Av. das Nações Unidas, 11.857
Brooklin Novo
São Paulo-SP 04578-000
Brasil
http://www.oce-brasil.com.br/
Océ-Canada Inc.
4711 Yonge Street, Suite 1100
Toronto, Ontario M2N 6K8
Canada
http://www.oce.ca/
Océ Office Equipment (Beijing) Co., Ltd.
Xu Mu Cheng
Chaoyang District
Beijing 100028
China
http://www.oce.com.cn/
Océ-Czech Republic ltd.
Hanusova 18
140 21 Praha 4
Czech Republic
http://www.oce.cz/
Océ-Danmark a/s
Vallensbækvej 45
2605 Brøndby
Denmark
http://www.oce.dk/
Océ Finland OY
Valkjärventie 7 D, PL 3
02130 Espoo
Finland
http://www.oce.fi/
Océ-France S.A.
32, Avenue du Pavé Neuf
93161 Noisy-le-grand, Cedex
France
http://www.oce.fr/
Océ-Deutschland GmbH
Solinger Straße 5-7
45481 Mülheim/Ruhr
Germany
http://www.oce.de/
Océ-Hong Kong and China head office
12/F 1202 The Lee Gardens
33 Hysan Avenue
Causeway Bay
Hong Kong
http://www.oce.com.hk/
Appendix B Miscellaneous
Addresses of local Océ organisations
Océ-Hungaria Kft.
1241 Budapest
Pf.: 237
Hungary
http://www.oce.hu/
Océ-Ireland Ltd.
3006 Lake Drive
Citywest Business Campus
Saggart
Co. Dublin
Ireland
http://www.oce.ie/
Océ-Italia S.p.A.
Strada Padana Superiore 2/B
20063 Cernusco sul Naviglio (MI)
Italia
http://www.oce.it/
Océ Japan Corporation
3-25-1, Nishi Shinbashi
Minato-Ku
Tokyo 105-0003
Japan
http://www.ocejapan.co.jp/
Océ-Belgium S.A.
Rue Astrid 2/A
1143 Luxembourg-Belair
http://www.oce.lu/
Océ Malaysia Sdn. Bhd.
#3.01, Level 3, Wisma Academy
Lot 4A, Jalan 19/1
46300 Petaling Jaya
Selangor Darul Ehsan
Malaysia
http://www.ocemal.com.my/
Océ-Mexico S.A. de C.V.
Prolongación Reforma 1236,
4to Piso
Col. Santa Fé, Del. Cuajimalpa
C.P. 05348
México, D.F.
México
http://www.oceusa.com/
Océ-Norge A.S.
Postboks 4434 Nydalen
Gjerdrums vei 8
0403 Oslo
Norway
http://www.oce.no/
Océ-Poland Ltd. Sp.z o.o.
ul. Bitwy Warszawskiej 1920 r. nr. 7
02-366 Warszawa
Poland
http://www.oce.com.pl/
Océ-Lima Mayer, S.A.
Av. José Gomes Ferreira, 11 Piso 2 - Miraflores
1497-139 Algés
Portugal
http://www.oce.pt/
Océ Singapore Pte Ltd.
190 MacPherson Road
#03-00 Wisma Gulab
Singapore 348548
Océ Printing Systems (PTY) Ltd.
P.O.Box 629
Rivonia 2128
South Africa
273
Addresses of local Océ organisations
Océ España SA
Business Park Mas Blau
Osona, 2 08820 El Prat de Llobregat
Barcelona
Spain
http://www.oce.es/
Océ-Svenska AB
Sollentunavägen 84
191 27 Sollentuna
Sweden
http://www.oce.se/
Océ-Schweiz AG
Sägereistrasse 10
CH8152 Glattbrugg
Schweiz
http://www.oce.ch/
Océ (Thailand) Ltd.
B.B. Building 16/Floor
54 Asoke Road
Sukhumvit 21
Bangkok 10110
Thailand
Océ-Nederland B.V.
P.O.Box 800
5201 AV 's-Hertogenbosch
The Netherlands
http://www.oce.nl/
Océ (UK) Limited
Océ House
Chatham Way
Brentwood, Essex CM14 4DZ
United Kingdom
http://www.oce.co.uk/
Océ North America Inc.
5450 North Cumberland Avenue
Chicago, IL 60656
USA
http://www.oceusa.com/
Note: The web site http://www.oce.com gives the current addresses of the local Océ
organizations and distributors.
Note: The addresses of local Océ organizations for information about the Wide
Format Printing Systems and the Production Printing Systems can be different from
the addresses above. Refer to the web site http://www.oce.com for the addresses you
need.
274
Appendix B Miscellaneous
Index
Index
A
Access the toner reservoir . . . . . . . . . . . . . . . . 246
Account ID . . . . . . . . . . . . . . . . . . . . . . . . . . . . 218
Cancel . . . . . . . . . . . . . . . . . . . . . . . . . . . . 232
Enter . . . . . . . . . . . . . . . . . . . . . . . . . . . . . . 231
Forced dialog . . . . . . . . . . . . . . . . . . . . . . . 232
Function key . . . . . . . . . . . . . . . . . . . . . . . . 231
Start print job . . . . . . . . . . . . . . . . . . . . . . . 165
Account ID file . . . . . . . . . . . . . . . . . . . . . . . . . . 45
Download . . . . . . . . . . . . . . . . . . . . . . . . . . 226
Upload . . . . . . . . . . . . . . . . . . . . . . . . . . . . 229
Account name . . . . . . . . . . . . . . . . . . . . . . . . . . 218
Accounting
Copy count device . . . . . . . . . . . . . . . . . . . . 71
Download log file . . . . . . . . . . . . . . . . . . . . 225
Field separator . . . . . . . . . . . . . . . . . . . . . . . 71
Fields of the accounting log file . . . . . . . . . 220
Identification . . . . . . . . . . . . . . . . . . . . . . . . 71
Job name suppression . . . . . . . . . . . . . . . . 218
Principles . . . . . . . . . . . . . . . . . . . . . . . . . . . 45
Printer driver . . . . . . . . . . . . . . . . . . . . . . . . 46
Restore factory default account ID file . . . 230
Terms . . . . . . . . . . . . . . . . . . . . . . . . . . . . . 218
Upload account ID file . . . . . . . . . . . . . . . . 229
Verification . . . . . . . . . . . . . . . . . . . . . . . . . . 71
Accounting log file . . . . . . . . . . . . . . . . . . . 45, 218
Description of the fields . . . . . . . . . . . . . . . 220
General information . . . . . . . . . . . . . . . . . . 220
Accounting settings . . . . . . . . . . . . . . . . . . . . . . 71
Add
Staples to stapler 3 . . . . . . . . . . . . . . . . . . . 250
Staples to staplers 1 and 2 . . . . . . . . . . . . . 249
Staples to staplers 4 and 5 . . . . . . . . . . . . . 251
Toner . . . . . . . . . . . . . . . . . . . . . . . . . . . . . 246
Add the media . . . . . . . . . . . . . . . . . . . . . . 66, 238
Add the paper . . . . . . . . . . . . . . . . . . . . . . . 66, 238
Address list file
Download . . . . . . . . . . . . . . . . . . . . . . . . . . 199
Upload . . . . . . . . . . . . . . . . . . . . . . . . . . . . 198
Automatic printing
Concept . . . . . . . . . . . . . . . . . . . . . . . . . . . . 18
Workflow . . . . . . . . . . . . . . . . . . . . . . . . . . 124
Automatic wake-up
Disable . . . . . . . . . . . . . . . . . . . . . . . . . . . . . 78
Enable . . . . . . . . . . . . . . . . . . . . . . . . . . . . . . 78
Lock . . . . . . . . . . . . . . . . . . . . . . . . . . . . . . . 79
Available documentation . . . . . . . . . . . . . . . . . . 15
B
Basic section
Copy . . . . . . . . . . . . . . . . . . . . . . . . . . . . . . . 99
Original . . . . . . . . . . . . . . . . . . . . . . . . . . . . 99
Print . . . . . . . . . . . . . . . . . . . . . . . . . . . . . . 137
Print job identification . . . . . . . . . . . . . . . . 137
Staple . . . . . . . . . . . . . . . . . . . . . . . . . . 99, 137
Zoom . . . . . . . . . . . . . . . . . . . . . . . . . . . . . . 99
Blank sheets . . . . . . . . . . . . . . . . . . . . . . . . . . . 176
Booklet
Finishing . . . . . . . . . . . . . . . . . . . . . . . . . . . . 51
Layout . . . . . . . . . . . . . . . . . . . . . . . . . . . . . 51
Booklet creation
printer driver . . . . . . . . . . . . . . . . . . . . . . . . . 51
Booklet with covers . . . . . . . . . . . . . . . . . . . . . 115
C
Calendar timer . . . . . . . . . . . . . . . . . . . . . . . 85, 86
Cancel
Copy job . . . . . . . . . . . . . . . . . . . . . . . . . . . . 93
Print job . . . . . . . . . . . . . . . . . . . . . . . . . . . 129
Scan job . . . . . . . . . . . . . . . . . . . . . . . . . . . 212
Chapterization . . . . . . . . . . . . . . . . . . . . . . . 20, 108
Clear
Paper jam . . . . . . . . . . . . . . . . . . . . . . . . . . 258
Staple jam . . . . . . . . . . . . . . . . . . . . . . . . . . 260
Combine analog documents . . . . . . . . . . . . . . . 106
Combine subsets
Create 1 document . . . . . . . . . . . . . . . . . . . 106
Concatenation . . . . . . . . . . . . . . . . . . . . . . . 20, 108
Configuration of the scan function . . . . . . . . . . . 72
Configure scan server . . . . . . . . . . . . . . . . . . . . 191
Configure scan to email . . . . . . . . . . . . . . . 73, 194
Configure the accounting settings . . . . . . . . . . . 71
Confirm refill of toner . . . . . . . . . . . . . . . . . . . 246
Contradiction
Run-time . . . . . . . . . . . . . . . . . . . . . . . . . . . 255
Specification . . . . . . . . . . . . . . . . . . . . . . . . 254
275
Index
Start . . . . . . . . . . . . . . . . . . . . . . . . . . . . . . . 255
Controlled environment
Concept . . . . . . . . . . . . . . . . . . . . . . . . . . . . . 18
Explained . . . . . . . . . . . . . . . . . . . . . . . . . . . 59
Select . . . . . . . . . . . . . . . . . . . . . . . . . . . . . . 56
Timers . . . . . . . . . . . . . . . . . . . . . . . . . . . . . . 59
Copy
Non-standard size originals . . . . . . . . . . . . 117
Originals of a non-standard size . . . . . . . . . 116
Special originals . . . . . . . . . . . . . . . . . . . . . 117
Copy build
Chapterization . . . . . . . . . . . . . . . . . . . . . . . 108
Concatenation . . . . . . . . . . . . . . . . . . . . . . . 108
Concept . . . . . . . . . . . . . . . . . . . . . . . . . . . . . 20
Create a document . . . . . . . . . . . . . . . . . . . 107
Deleting subsets . . . . . . . . . . . . . . . . . . . . . 111
Empty page between subsets . . . . . . . . . . . 108
Keep empty page . . . . . . . . . . . . . . . . . . . . 108
Copy card . . . . . . . . . . . . . . . . . . . . . . . . . . . . . 235
Copy count device . . . . . . . . . . . . . . . . . . . . . . . 235
Copy job
Basic section . . . . . . . . . . . . . . . . . . . . . . . . . 99
Booklet with covers . . . . . . . . . . . . . . . . . . 115
Cancel . . . . . . . . . . . . . . . . . . . . . . . . . . . . . . 93
Covers . . . . . . . . . . . . . . . . . . . . . . . . . . . . . 114
Extra section . . . . . . . . . . . . . . . . . . . . . . . . 103
Layout section . . . . . . . . . . . . . . . . . . . . . . . 100
Paper section . . . . . . . . . . . . . . . . . . . . . . . . 100
Settings . . . . . . . . . . . . . . . . . . . . . . . . . . . . . 98
Stop . . . . . . . . . . . . . . . . . . . . . . . . . . . . . . . . 93
Tab sheets . . . . . . . . . . . . . . . . . . . . . . . . . . 112
Copy job settings
Correct . . . . . . . . . . . . . . . . . . . . . . . . . . . . 105
Correct
Copy job settings . . . . . . . . . . . . . . . . . . . . 105
Run-time contradiction . . . . . . . . . . . . . . . . 255
Specification contradiction . . . . . . . . . . . . . 254
Start contradiction . . . . . . . . . . . . . . . . . . . . 255
Correction key . . . . . . . . . . . . . . . . . . . . . . . . . . 105
Covers . . . . . . . . . . . . . . . . . . . . . . . . . . . . . . . . 173
Booklets . . . . . . . . . . . . . . . . . . . . . . . . . . . 115
Copy job . . . . . . . . . . . . . . . . . . . . . . . . . . . 114
Create
A4 booklet from A4 originals . . . . . . . . . . . 119
A4 booklet from A4 originals, with cover . 120
A5 booklet from A4 originals . . . . . . . . . . . 118
A5 booklet from A5 booklet . . . . . . . . . . . . 121
Print job . . . . . . . . . . . . . . . . . . . . . . . . . . . 155
Print job with Account ID . . . . . . . . .158, 233
Print job with covers . . . . . . . . . . . . . . . . . . 173
Print job with My Paper . . . . . . . . . . . . . . . 171
276
Print job with special paper . . . . . . . . . . . . 169
Secured print job . . . . . . . . . . . . . . . . . . . . . 157
Create a folded A4 booklet from an A4 document .
160
Create a folded A5 booklet from an A4 document .
161
Create a folded A5 booklet with the booklet maker
162
Create a job with a pre-printed front cover . . . . 175
CSV file . . . . . . . . . . . . . . . . . . . . . . . . . . . . . . . 218
D
Data field
Account ID . . . . . . . . . . . . . . . . . . . . . . . . . 228
Account name . . . . . . . . . . . . . . . . . . . . . . . 228
Comment . . . . . . . . . . . . . . . . . . . . . . . . . . . 228
Record ID . . . . . . . . . . . . . . . . . . . . . . . . . . 228
Default Account ID File . . . . . . . . . . . . . . . . . . 230
Default key . . . . . . . . . . . . . . . . . . . . . . . . . . . . 105
Delete
Copy job . . . . . . . . . . . . . . . . . . . . . . . . . . . . 93
Mailbox jobs . . . . . . . . . . . . . . . . . . . . . . . . 140
Print job . . . . . . . . . . . . . . . . . . . . . . . . . . . . 129
Print jobs . . . . . . . . . . . . . . . . . . . . . . . . . . . 140
Scan job . . . . . . . . . . . . . . . . . . . . . . . . . . . . 212
Subsets . . . . . . . . . . . . . . . . . . . . . . . . . . . . 111
Delivery of output . . . . . . . . . . . . . . . . . . . . . . . . 21
Deposit behavior . . . . . . . . . . . . . . . . . . . . . . . . . 21
Documentation set . . . . . . . . . . . . . . . . . . . . . . . . 15
Download
Address list file . . . . . . . . . . . . . . . . . . . . . . 199
Scan Job Ticket . . . . . . . . . . . . . . . . . . . . . . 189
Scan profiles . . . . . . . . . . . . . . . . . . . . . . . . 189
Scan profiles file . . . . . . . . . . . . . . . . . . . . . 189
Scan to e-mail profiles . . . . . . . . . . . . . . . . 189
Download the account ID file . . . . . . . . . . . . . . 226
Dual paper tray . . . . . . . . . . . . . . . . . . . . . . . . . . 53
E
Edit a mailbox job . . . . . . . . . . . . . . . . . . . . . . . 137
Edit the account ID file . . . . . . . . . . . . . . . . . . . 227
Enable Account ID . . . . . . . . . . . . . . . . . .158, 233
Error recovery . . . . . . . . . . . . . . . . . . . . . . . . . . 257
Error screens . . . . . . . . . . . . . . . . . . . . . . . . . . . 256
Export scan jobs . . . . . . . . . . . . . . . . . . . . . . . . 193
Export status
Scan-to-email jobs . . . . . . . . . . . . . . . . . . . 213
Scan-to-file job . . . . . . . . . . . . . . . . . . . . . . 213
Export status of a scan job
Index
Check . . . . . . . . . . . . . . . . . . . . . . . . . . . . .
Extra section
Exposure . . . . . . . . . . . . . . . . . . . . . . . . . .
Margin shift . . . . . . . . . . . . . . . . . . . . 103,
Orientation . . . . . . . . . . . . . . . . . . . . . . . . .
Original type . . . . . . . . . . . . . . . . . . . . . . .
Sort . . . . . . . . . . . . . . . . . . . . . . . . . . . . . . .
Sort by page . . . . . . . . . . . . . . . . . . . . . . . .
Sort by set . . . . . . . . . . . . . . . . . . . . . . . . .
214
103
139
103
103
103
139
139
Info section . . . . . . . . . . . . . . . . . . . . . . . . . . . . 205
Information in the mailbox . . . . . . . . . . . . . . . . 132
Insert tab sheets . . . . . . . . . . . . . . . . . . . . . . . . 178
Install paper tray
Bulk tray . . . . . . . . . . . . . . . . . . . . . . . . . . . . 70
Dual paper tray . . . . . . . . . . . . . . . . . . . . . . . 70
Interactive printing
Concept . . . . . . . . . . . . . . . . . . . . . . . . . . . . 18
Workflow . . . . . . . . . . . . . . . . . . . . . . . . . . 134
Interrupt jobs . . . . . . . . . . . . . . . . . . . . . . . 95, 127
Introduction to the printer . . . . . . . . . . . . . . . . . . 12
F
File section
Page size . . . . . . . . . . . . . . . . . . . . . . . . . . . 202
Zoom . . . . . . . . . . . . . . . . . . . . . . . . . . . . . 202
Fill the paper trays . . . . . . . . . . . . . . . . . . . 66, 238
Finisher . . . . . . . . . . . . . . . . . . . . . . . . . . . . . . . . 21
G
General information . . . . . . . . . . . . . . . . . . . . . . 12
H
Handle errors . . . . . . . . . . . . . . . . . . . . . . . . . . 257
How to add blank sheets in a print job . . . . . . . 176
How to create a print job with pre-printed front cover
. . . . . . . . . . . . . . . . . . . . . . . . . . . . . . . . . . . . . . 175
How to create a print job with pre-printed tab sheets
178
How to create a print job with printed tab labels 179
How to create a print job with printed tab sheets 179
How to define separation sheets in a print job . 176
How to...
Create a print job for a folded A5 booklet with
the booklet maker . . . . . . . . . . . . . . . . . . . . 162
Print a folded A4 booklet . . . . . . . . . . . . . . 166
Print a folded A5 booklet . . . . . . . . . . . . . . 167
Print a folded A5 booklet with the booklet maker
. . . . . . . . . . . . . . . . . . . . . . . . . . . . . . . . . . . 168
Resolve constraints . . . . . . . . . . . . . . . . . . 148
I
Icons
Paper section . . . . . . . . . . . . . . . . . . . . . . . . 39
Warning section . . . . . . . . . . . . . . . . . . . . . . 39
Image Logic . . . . . . . . . . . . . . . . . . . . . . . . . . . . 20
Image section
Exposure . . . . . . . . . . . . . . . . . . . . . . . . . . 204
Image type . . . . . . . . . . . . . . . . . . . . . . . . . 204
J
Job name suppression . . . . . . . . . . . . . . . . . . . . 218
Job queue . . . . . . . . . . . . . . . . . . . . . . . . . . . . . . 41
Job queue manager
Delete jobs . . . . . . . . . . . . . . . . . . . . . . . . . . 43
Functions . . . . . . . . . . . . . . . . . . . . . . . . . . . 43
Interrupt . . . . . . . . . . . . . . . . . . . . . . . . . . . . 43
Job information . . . . . . . . . . . . . . . . . . . . . . 43
Move to top . . . . . . . . . . . . . . . . . . . . . . . . . 43
View . . . . . . . . . . . . . . . . . . . . . . . . . . . . . . . 43
Job queue view . . . . . . . . . . . . . . . . . . . . . . . . . . 41
K
Keys on the operator panel . . . . . . . . . . . . . . . . . 26
L
Layout section
Copy document type . . . . . . . . . . . . . . . . . 100
Copy layout . . . . . . . . . . . . . . . . . . . . . . . . 100
Original document type . . . . . . . . . . . 100, 138
Print document type . . . . . . . . . . . . . . . . . . 138
LEDs . . . . . . . . . . . . . . . . . . . . . . . . . . . . . . . . . . 62
Loading tab sheets . . . . . . . . . . . . . . . . . . . . . . 240
Loading the Paper Trays . . . . . . . . . . . . . . . 66, 238
Locations of the paper jams . . . . . . . . . . . . . . . 259
Lock
Automatic wake-up . . . . . . . . . . . . . . . . . . . 79
Lock operator panel . . . . . . . . . . . . . . . . . . . . . . 81
Lock the paper trays . . . . . . . . . . . . . . . . . . . . . . 84
Low power mode . . . . . . . . . . . . . . . . . . . . . . . . 33
M
Machine recoverable error . . . . . . . . . . . . . . . . 256
Mailbox . . . . . . . . . . . . . . . . . . . . . . . . . . . . . . . 131
Basic settings . . . . . . . . . . . . . . . . . . . . . . . 136
277
Index
Concept . . . . . . . . . . . . . . . . . . . . . . . . . . . . . 19
Delete jobs . . . . . . . . . . . . . . . . . . . . . . . . . 140
digital storage area . . . . . . . . . . . . . . . . . . . 131
Edit a mailbox job . . . . . . . . . . . . . . . . . . . . 137
Extra settings . . . . . . . . . . . . . . . . . . . . . . . 136
Graphical information . . . . . . . . . . . . . . . . . 133
header information . . . . . . . . . . . . . . . . . . . 132
information . . . . . . . . . . . . . . . . . . . . . . . . . 132
information in the mailbox . . . . . . . . . . . . . 132
job information . . . . . . . . . . . . . . . . . . . . . . 132
job order in the mailbox . . . . . . . . . . . . . . . 132
Layout Settings . . . . . . . . . . . . . . . . . . . . . . 136
Paper Settings . . . . . . . . . . . . . . . . . . . . . . . 136
Printing a Job . . . . . . . . . . . . . . . . . . . . . . . 134
Secured print job . . . . . . . . . . . . . . . . . . . . . 163
start a job . . . . . . . . . . . . . . . . . . . . . . . . . . 131
Make a simple copy . . . . . . . . . . . . . . . . . . . . . . 88
Materials that can be used . . . . . . . . . . . . . . . . . 264
My Paper . . . . . . . . . . . . . . . . . . . . . . . . . . . . . . 171
System key . . . . . . . . . . . . . . . . . . . . . . . . . . 26
Wizards key . . . . . . . . . . . . . . . . . . . . . . . . . . 26
Operator panel LEDs . . . . . . . . . . . . . . . . . . . . . . 62
Operator panel lock . . . . . . . . . . . . . . . . . . . .38, 81
PIN . . . . . . . . . . . . . . . . . . . . . . . . . . . . . . . . 80
Operator recoverable error . . . . . . . . . . . . . . . . 256
Original section
Orientation . . . . . . . . . . . . . . . . . . . . . . . . . 200
Original . . . . . . . . . . . . . . . . . . . . . . . . . . . . 200
Original document type . . . . . . . . . . . . . . . 200
Original sheet size . . . . . . . . . . . . . . . . . . . . 200
Original sizes . . . . . . . . . . . . . . . . . . . . . . . . . . . 263
Original type . . . . . . . . . . . . . . . . . . . . . . . . . . . 263
Original weight . . . . . . . . . . . . . . . . . . . . . . . . . 263
Originals that can be used . . . . . . . . . . . . . . . . . 263
Output destinations . . . . . . . . . . . . . . . . . . . . . . . 21
Output trays
Behavior . . . . . . . . . . . . . . . . . . . . . . . . . . . . 21
Bottom up . . . . . . . . . . . . . . . . . . . . . . . . . . . 21
Top down . . . . . . . . . . . . . . . . . . . . . . . . . . . . 21
N
Network connection . . . . . . . . . . . . . . . . . . . . . 262
Next job . . . . . . . . . . . . . . . . . . . . . . . . . . . . . . . . 19
O
Océ Intra Logic . . . . . . . . . . . . . . . . . . . . . . . . . 149
Function overview . . . . . . . . . . . . . . . . . . . 152
Get information . . . . . . . . . . . . . . . . . . . . . . 152
job settings . . . . . . . . . . . . . . . . . . . . . . . . . 153
Offset stacking . . . . . . . . . . . . . . . . . . . . . . . . . . 21
On/Off button . . . . . . . . . . . . . . . . . . . . . . . . . . . 62
On-line help
Help key . . . . . . . . . . . . . . . . . . . . . . . . . . . . 36
Navigation . . . . . . . . . . . . . . . . . . . . . . . . . . . 37
Numeric keys . . . . . . . . . . . . . . . . . . . . . . . . 37
Sections . . . . . . . . . . . . . . . . . . . . . . . . . . . . . 36
Operator panel components
Confirm key . . . . . . . . . . . . . . . . . . . . . . . . . 26
Contrast key . . . . . . . . . . . . . . . . . . . . . . . . . 26
Copy key . . . . . . . . . . . . . . . . . . . . . . . . . . . . 26
Correction key . . . . . . . . . . . . . . . . . . . . . . . 26
Function keys . . . . . . . . . . . . . . . . . . . . . . . . 26
Help key . . . . . . . . . . . . . . . . . . . . . . . . . . . . 26
Numeric keys . . . . . . . . . . . . . . . . . . . . . . . . 26
Print key . . . . . . . . . . . . . . . . . . . . . . . . . . . . 26
Scan key . . . . . . . . . . . . . . . . . . . . . . . . . . . . 26
Scroll wheel . . . . . . . . . . . . . . . . . . . . . . . . . 26
Start key . . . . . . . . . . . . . . . . . . . . . . . . . . . . 26
Stop key . . . . . . . . . . . . . . . . . . . . . . . . . . . . 26
278
P
Page programmer
Concept . . . . . . . . . . . . . . . . . . . . . . . . . . . . 146
Tab caption editor . . . . . . . . . . . . . . . . . . . . 146
Paper jams . . . . . . . . . . . . . . . . . . . . . . . . . . . . . 258
Automatic document feeder . . . . . . . . . . . . 259
Finisher . . . . . . . . . . . . . . . . . . . . . . . . . . . . 259
Paper input module . . . . . . . . . . . . . . . . . . . 259
Paper path . . . . . . . . . . . . . . . . . . . . . . . . . . 259
Paper trays . . . . . . . . . . . . . . . . . . . . . . . . . . 259
Upper output . . . . . . . . . . . . . . . . . . . . . . . . 259
Paper section
Covers . . . . . . . . . . . . . . . . . . . . . . . . .100, 138
Paper . . . . . . . . . . . . . . . . . . . . . . . . . .100, 138
Paper trays
Capacity . . . . . . . . . . . . . . . . . . . . . . . . . . . 265
Concept . . . . . . . . . . . . . . . . . . . . . . . . . . . . . 20
Install bulk tray . . . . . . . . . . . . . . . . . . . . . . . 70
Install dual paper tray . . . . . . . . . . . . . . . . . . 70
Load . . . . . . . . . . . . . . . . . . . . . . . . . . . . . . . 66
Lock . . . . . . . . . . . . . . . . . . . . . . . . . . . . . . . 84
Remove bulk tray . . . . . . . . . . . . . . . . . . . . . 68
Remove dual paper tray . . . . . . . . . . . . . . . . 68
Requirements . . . . . . . . . . . . . . . . . . . . . . . 265
Tray linking . . . . . . . . . . . . . . . . . . . . . . . . . . 20
Unlock . . . . . . . . . . . . . . . . . . . . . . . . . . . . . . 83
PDL support . . . . . . . . . . . . . . . . . . . . . . . . . . . 262
Permanent error . . . . . . . . . . . . . . . . . . . . . . . . . 256
PIN . . . . . . . . . . . . . . . . . . . . . . . . . . . . . . . . . . . 80
Index
Platforms . . . . . . . . . . . . . . . . . . . . . . . . . . . . . 262
Post-paid system . . . . . . . . . . . . . . . . . . . . . . . . 235
Power mode
Low power mode . . . . . . . . . . . . . . . . . . . . . 33
Off . . . . . . . . . . . . . . . . . . . . . . . . . . . . . . . . 33
Sleep mode . . . . . . . . . . . . . . . . . . . . . . . . . . 34
Power state indicators . . . . . . . . . . . . . . . . . . . . . 62
Power switch . . . . . . . . . . . . . . . . . . . . . . . . . . . 62
Prepaid system . . . . . . . . . . . . . . . . . . . . . . . . . 235
Pre-printed tab sheets . . . . . . . . . . . . . . . . . . . . 178
Print a folded A4 booklet from the mailbox on the
Océ VarioPrint‚ 2090 . . . . . . . . . . . . . . . . . . . . 166
Print a folded A5 booklet from the mailbox on the
Océ VarioPrint‚ 2090 . . . . . . . . . . . . . . . . . . . . 167
Print a folded A5 booklet with the booklet maker .
168
Print job
Cancel . . . . . . . . . . . . . . . . . . . . . . . . . . . . 129
Delete . . . . . . . . . . . . . . . . . . . . . . . . . . . . . 140
From mailbox . . . . . . . . . . . . . . . . . . . . . . . 134
Resume . . . . . . . . . . . . . . . . . . . . . . . . . . . . 129
Stop . . . . . . . . . . . . . . . . . . . . . . . . . . . . . . 129
With Account ID . . . . . . . . . . . . . . . . 158, 233
With covers . . . . . . . . . . . . . . . . . . . . . . . . 173
With My Paper . . . . . . . . . . . . . . . . . . . . . . 171
With security . . . . . . . . . . . . . . . . . . . . . . . 157
With special paper . . . . . . . . . . . . . . . . . . . 169
Print jobs from the mailbox . . . . . . . . . . . . . . . 131
Print on a tab . . . . . . . . . . . . . . . . . . . . . . . . . . 180
Print speed . . . . . . . . . . . . . . . . . . . . . . . . . . . . 262
Printer components
Finisher . . . . . . . . . . . . . . . . . . . . . . . . . . . . 24
Upper output . . . . . . . . . . . . . . . . . . . . . . . . 24
Printer driver
Bidirectional information . . . . . . . . . . . . . . 144
booklet creation . . . . . . . . . . . . . . . . . . . . . . 51
Define Account ID . . . . . . . . . . . . . . . 158, 233
Define print job . . . . . . . . . . . . . . . . . . . . . 155
Define secured print job . . . . . . . . . . . . . . . 157
Features . . . . . . . . . . . . . . . . . . . . . . . . . . . 142
Feedback . . . . . . . . . . . . . . . . . . . . . . . . . . 144
Versions . . . . . . . . . . . . . . . . . . . . . . . . . . . 141
Priority
Interrupt . . . . . . . . . . . . . . . . . . . . . . . . 95, 127
Move to top . . . . . . . . . . . . . . . . . . . . . 95, 127
Product specifications . . . . . . . . . . . . . . . . . . . 262
R
Refill
Off-line stapler . . . . . . . . . . . . . . . . . . . . . . 250
Stapler 3 . . . . . . . . . . . . . . . . . . . . . . . . . . . 250
Staplers 1 and 2 . . . . . . . . . . . . . . . . . . . . . 249
Staplers 4 and 5 . . . . . . . . . . . . . . . . . . . . . 251
Staplers in booklet maker . . . . . . . . . . . . . . 251
Staplers in finisher . . . . . . . . . . . . . . . . . . . 249
Toner reservoir . . . . . . . . . . . . . . . . . . . . . . 246
Remove jobs from the mailbox . . . . . . . . . . . . 140
Remove paper tray
Bulk tray . . . . . . . . . . . . . . . . . . . . . . . . . . . . 68
Dual paper tray . . . . . . . . . . . . . . . . . . . . . . . 68
Requirements for the copy materials . . . . . . . . 265
Resolution . . . . . . . . . . . . . . . . . . . . . . . . . . . . . 262
Resolve constraints . . . . . . . . . . . . . . . . . . . . . . 148
Restarting the system . . . . . . . . . . . . . . . . . . . . . 65
Restoring Factory Default Account ID File . . . 230
Resume
Copy job . . . . . . . . . . . . . . . . . . . . . . . . . . . . 93
Print job . . . . . . . . . . . . . . . . . . . . . . . . . . . 129
Scan job . . . . . . . . . . . . . . . . . . . . . . . . . . . 212
Run-time contradictions . . . . . . . . . . . . . . . . . . 254
S
Scan
Correct the scan results . . . . . . . . . . . . . . . 215
Error messages . . . . . . . . . . . . . . . . . . . . . . 215
Handle error messages . . . . . . . . . . . . . . . . 215
Non-standard size originals . . . . . . . . . . . . 210
Originals of a non-standard size . . . . . . . . . 210
Special originals . . . . . . . . . . . . . . . . . . . . . 210
Scan function
Configuration . . . . . . . . . . . . . . . . . . . . . . . . 72
Scan job
File section . . . . . . . . . . . . . . . . . . . . . . . . . 202
Image section . . . . . . . . . . . . . . . . . . . . . . . 204
Info section . . . . . . . . . . . . . . . . . . . . . . . . . 205
Original section . . . . . . . . . . . . . . . . . . . . . 200
Stop . . . . . . . . . . . . . . . . . . . . . . . . . . . . . . 212
Scan job export
Configure . . . . . . . . . . . . . . . . . . . . . . . . . . 193
Disable . . . . . . . . . . . . . . . . . . . . . . . . . . . . 193
Enable . . . . . . . . . . . . . . . . . . . . . . . . . . . . . 193
Scan job export status
Check . . . . . . . . . . . . . . . . . . . . . . . . . . . . . 214
Information . . . . . . . . . . . . . . . . . . . . . . . . . 213
Scan job Ticket
Download . . . . . . . . . . . . . . . . . . . . . . . . . . 189
Scan job ticket
Upload . . . . . . . . . . . . . . . . . . . . . . . . . . . . 190
Scan profiles file
Download . . . . . . . . . . . . . . . . . . . . . . . . . . 189
279
Index
Fields . . . . . . . . . . . . . . . . . . . . . . . . . . . . . 183
Sjt.csv . . . . . . . . . . . . . . . . . . . . . . . . . . . . . 182
Scan server
Configure . . . . . . . . . . . . . . . . . . . . . . . . . . 191
Connection test . . . . . . . . . . . . . . . . . . . . . . 192
Destination directory . . . . . . . . . . . . . . . . . 191
Host name . . . . . . . . . . . . . . . . . . . . . . . . . . 191
Job export . . . . . . . . . . . . . . . . . . . . . . . . . . 191
Password . . . . . . . . . . . . . . . . . . . . . . . . . . . 191
User name . . . . . . . . . . . . . . . . . . . . . . . . . . 191
Scan speed . . . . . . . . . . . . . . . . . . . . . . . . . . . . . 262
Scan to email
Configuration . . . . . . . . . . . . . . . . . . . .73, 194
Create job . . . . . . . . . . . . . . . . . . . . . . . . . . 209
Definition . . . . . . . . . . . . . . . . . . . . . . . . . . . 49
Download address list file . . . . . . . . . . . . . . 199
E-mail address attribute . . . . . . . . . . . . . . . 197
Job . . . . . . . . . . . . . . . . . . . . . . . . . . . . . . . . 208
LDAP server settings . . . . . . . . . . . . . . . . . 196
Recipient search settings . . . . . . . . . . . . . . 197
Search database . . . . . . . . . . . . . . . . . . . . . . 197
Simple job . . . . . . . . . . . . . . . . . . . . . . . . . . 208
Upload address list file . . . . . . . . . . . . . . . . 198
User identifier . . . . . . . . . . . . . . . . . . . . . . . 197
Scan to file
Combined job . . . . . . . . . . . . . . . . . . . . . . . 207
Create job . . . . . . . . . . . . . . . . . . . . . . . . . . 206
Scan build job . . . . . . . . . . . . . . . . . . . . . . . 207
Scan to email . . . . . . . . . . . . . . . . . . . . . . . 209
Simple job . . . . . . . . . . . . . . . . . . . . . . . . . . 206
Scanner components
Automatic document feeder . . . . . . . . . . . . . 25
Cover handle . . . . . . . . . . . . . . . . . . . . . . . . . 25
Original receiving tray . . . . . . . . . . . . . . . . . 25
Scanner cover . . . . . . . . . . . . . . . . . . . . . . . . 25
Scanner top left cover . . . . . . . . . . . . . . . . . . 25
Secured print job
Create . . . . . . . . . . . . . . . . . . . . . . . . . . . . . 157
PIN code . . . . . . . . . . . . . . . . . . . . . . . . . . . 157
Print . . . . . . . . . . . . . . . . . . . . . . . . . . . . . . 163
Set Logic . . . . . . . . . . . . . . . . . . . . . . . . . . . . . . . 20
Settings
Correct . . . . . . . . . . . . . . . . . . . . . . . . . . . . 105
Shut-down procedure . . . . . . . . . . . . . . . . . . . . . 64
Sjt.csv file . . . . . . . . . . . . . . . . . . . . . . . . . . . . . 182
Sleep mode . . . . . . . . . . . . . . . . . . . . . . . . . . . . . 34
Special originals . . . . . . . . . . . . . . . . . . . .117, 210
Special paper . . . . . . . . . . . . . . . . . . . . . . . . . . . 169
Specification contradictions . . . . . . . . . . . . . . . 254
Specification of originals to be used . . . . . . . . . 263
Staple
280
Landscape . . . . . . . . . . . . . . . . . . . . . . . . . . . 91
Off-line . . . . . . . . . . . . . . . . . . . . . . . . . . . . . 90
Portrait . . . . . . . . . . . . . . . . . . . . . . . . . . . . . 90
Staple jam . . . . . . . . . . . . . . . . . . . . . . . . . . . . . 260
Staplers
Available staplers . . . . . . . . . . . . . . . . . . . . . 31
Booklet maker . . . . . . . . . . . . . . . . . . . . . . . 251
Numbers . . . . . . . . . . . . . . . . . . . . . . . . . . . . 31
Off-line stapler . . . . . . . . . . . . . . . . . . . . . . 250
On-line staplers . . . . . . . . . . . . . . . . . . . . . . 249
Replace stapler cartridge 3 . . . . . . . . . . . . . 250
Replace stapler cartridges 1and 2 . . . . . . . . 249
Replace stapler cartridges 4 and 5 . . . . . . . 251
Start a print job . . . . . . . . . . . . . . . . . . . . . . . . . 155
Start contradictions . . . . . . . . . . . . . . . . . . . . . . 254
Start to print a job . . . . . . . . . . . . . . . . . . . . . . . 131
Stop
Copy job . . . . . . . . . . . . . . . . . . . . . . . . . . . . 93
Print job . . . . . . . . . . . . . . . . . . . . . . . . . . . . 129
Scan job . . . . . . . . . . . . . . . . . . . . . . . . . . . . 212
Stop key behavior . . . . . . . . . . . . . . . . . . . . . . . 129
Stop printing . . . . . . . . . . . . . . . . . . . . . . . . . . . 129
Stop scanning . . . . . . . . . . . . . . . . . . . . . . .94, 212
Subsets . . . . . . . . . . . . . . . . . . . . . . . . . . . . . . . . 106
Combine . . . . . . . . . . . . . . . . . . . . . . . . . . . 107
Delete . . . . . . . . . . . . . . . . . . . . . . . . . . . . . 111
System information
System manager . . . . . . . . . . . . . . . . . . . . . . 38
System monitor . . . . . . . . . . . . . . . . . . . . . . . 38
System manager
Lock operator panel . . . . . . . . . . . . . . . . . . . 38
Lock paper trays . . . . . . . . . . . . . . . . . . . . . . 38
Shut down . . . . . . . . . . . . . . . . . . . . . . . . . . . 38
Unlock paper trays . . . . . . . . . . . . . . . . . . . . 38
System monitor icons . . . . . . . . . . . . . . . . . . . . . 39
T
Tab caption editor . . . . . . . . . . . . . . . . . . . . . . . 146
Tab sheets
Copy job . . . . . . . . . . . . . . . . . . . . . . . . . . . 112
Pre-printed . . . . . . . . . . . . . . . . . . . . . . . . . 178
Print on sheets . . . . . . . . . . . . . . . . . . . . . . . 179
Print on tab labels . . . . . . . . . . . . . . . . . . . . 179
Tab sheets in print job . . . . . . . . . . . . . . . . . . . . 178
Toner
Access the toner reservoir . . . . . . . . . . . . . . 246
Add . . . . . . . . . . . . . . . . . . . . . . . . . . . . . . . 246
Tray locking
Lock paper trays . . . . . . . . . . . . . . . . . . . . . . 84
Unlock paper trays . . . . . . . . . . . . . . . . . . . . 83
Index
Turn on the system . . . . . . . . . . . . . . . . . . . . . . . 63
Types of copy job settings . . . . . . . . . . . . . . . . . 98
Types of scan job settings . . . . . . . . . . . . . . . . . 200
Small steps . . . . . . . . . . . . . . . . . . . . . . . . . 117
U
Unlock operator panel . . . . . . . . . . . . . . . . . . . . 81
Unlocking the Paper Trays . . . . . . . . . . . . . . . . . 83
Upload
Address list file . . . . . . . . . . . . . . . . . . . . . 198
Scan Job Ticket . . . . . . . . . . . . . . . . . . . . . 190
Scan profiles file . . . . . . . . . . . . . . . . . . . . 190
Scan to e-mail profiles . . . . . . . . . . . . . . . . 190
Upload account ID file . . . . . . . . . . . . . . . . . . . 229
Upload the scan profiles file . . . . . . . . . . . . . . . 190
Urgent job
Interrupt . . . . . . . . . . . . . . . . . . . . . . . . 95, 127
Move to top . . . . . . . . . . . . . . . . . . . . . 95, 127
Use colored sheets in a print job . . . . . . . . . . . 176
Use colored sheets to create separate groups of pages
in a print job . . . . . . . . . . . . . . . . . . . . . . . . . . . 176
Use tab sheets in a print job . . . . . . . . . . . . . . . 178
User environment
Select . . . . . . . . . . . . . . . . . . . . . . . . . . . . . . 56
User interface
Lock . . . . . . . . . . . . . . . . . . . . . . . . . . . . . . . 81
Unlock . . . . . . . . . . . . . . . . . . . . . . . . . . . . . 81
Users
Key operators . . . . . . . . . . . . . . . . . . . . . . . . 13
Operators . . . . . . . . . . . . . . . . . . . . . . . . . . . 13
System administrators . . . . . . . . . . . . . . . . . 13
W
Wake-up
PIN . . . . . . . . . . . . . . . . . . . . . . . . . . . . . . . . 80
Walk-up environment
Concept . . . . . . . . . . . . . . . . . . . . . . . . . . . . 18
Explained . . . . . . . . . . . . . . . . . . . . . . . . . . . 57
Select . . . . . . . . . . . . . . . . . . . . . . . . . . . . . . 56
Timers . . . . . . . . . . . . . . . . . . . . . . . . . . . . . 57
Warm-up time . . . . . . . . . . . . . . . . . . . . . . . . . . 262
Wizards
Copy build . . . . . . . . . . . . . . . . . . . . . . . . . 106
Z
Zoom . . . . . . . . . . . . . . . . . . . . . . . . . . . . . . . .
Automatic . . . . . . . . . . . . . . . . . . . . . . . 99,
Large steps . . . . . . . . . . . . . . . . . . . . . . . . .
Manual . . . . . . . . . . . . . . . . . . . . . . . . . 99,
262
202
117
202
281
Index
282