1
Océ
VarioPrint 2090
Configuration and maintenance manual
o
VarioPrint 2090
3
4
A
B
C
5
2
D
6
1
7
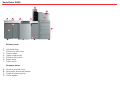
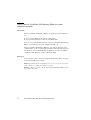
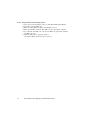
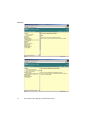
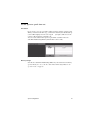
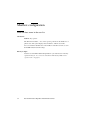
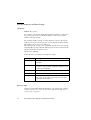
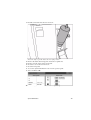
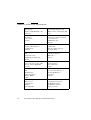
Printer parts
1
2
3
4
5
6
7
Left front door
Printer top left cover
Output trays
Upper output tray
Finisher front door
Paper trays
Front doors
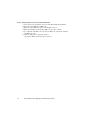
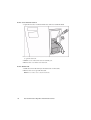
Scanner parts
A
B
C
D
Scanner top left cover
Automatic document feeder
Original receiving tray
Cover handle
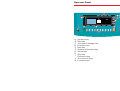
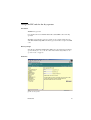
Operator Panel
D
E
C
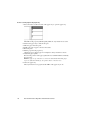
Printer ready to copy or print.
?
F
douma
G
linp
rach
Copy
B
Print from mailbox...
K
I
A
H
C
1
2
3
4
5
6
J
A
B
C
D
E
F
G
H
I
J
K
Set-build key
Start key
Job queue manager key
Function keys
Help key
System information key
Arrow keys
Stop key
Correction key
The numeric keys
Function keys
7
8
9
0
o Printing for Professionals
CONF. AND MAINT. MAN. GB
*1060002608*
1 Piece
Made in : The Netherlands
Océ- Technologies B.V.
Océ VarioPrint
2090
Configuration and
maintenance manual
Océ Technologies B.V.
Trademarks
Products in this manual are referred to by their trade names. In
most, if not all cases, these designations are claimed as trademarks
or registered trademarks of their respective companies.
Copyright
© 2003, Océ-Technologies B.V. Venlo, The Netherlands
All rights reserved. No part of this work may be reproduced, copied, adapted,
or transmitted in any form or by any means without written permission from
Océ.
Océ-Technologies B.V. makes no representation or warranties with respect to
the contents hereof and specifically disclaims any implied warranties of
merchantability or fitness for any particular purpose.
Further, Océ-Technologies B.V. reserves the right to revise this publication and
to make changes from time to time in the content hereof without obligation to
notify any person of such revision or changes.
Code number 1060002609
Edition 2003-04
GB
Notes for the reader
Definition
This manual helps you to use the Océ VarioPrint 2090. The manual contains a
description of the Océ VarioPrint 2090 and guidelines to use and operate the
Océ VarioPrint 2090. There are also tips to increase your knowledge of the Océ
VarioPrint 2090 and to help you manage the workflow even better.
Note, Attention and Caution
Some parts of this manual require your special attention. These parts provide
important, additional information or are about the prevention of damage to
your properties. The words 'Note', 'Attention' and 'Caution' indicate these
important parts.
■
■
■
The word 'Note' comes before additional information about the correct
operation or the Océ VarioPrint 2090 or a tip.
A part marked with 'Attention' contains information to prevent damage to
items, for example the Océ VarioPrint 2090, an original or a file.
A part marked with 'Caution' contains information to prevent personal
injury. Caution is found only in manuals that describe physical products.
Safety information
The safety information for this product is included in the separate booklet with
the title 'Safety manual'. This booklet is part of the information set that you
received for the product.
3
4
Océ VarioPrint 2090 Configuration and maintenance manual
Contents
Notes for the reader 3
Chapter 1
Introduction
Available documentation 8
Access the Océ VarioPrint 2090 Settings Editor 9
Access the Océ VarioPrint 2090 Settings Editor in key operator mode 9
Access the Océ VarioPrint 2090 Settings Editor in system administrator mode 12
Change the PIN code for the key operator 15
Change the PIN code for the system administrator 17
Restore the factory default settings 19
Chapter 2
System configuration
Energy save settings 24
Set the EPA timers 24
Disable the EPA sleep mode timer 27
Adjust the Océ VarioPrint 2090 29
Activate and change the wake-up PIN code 29
Set the date and time 31
Change the key operator name/location 33
Change the key operator telephone number 35
Change the Océ telephone number 37
Define the system location 39
Set the operator panel time-out 41
Set the operator language 43
Originals configuration 45
Define the paper size detection defaults 45
Set the default scan mode (1 or 2-sided) 47
Prints configuration 49
Set the default staple mode 49
Set the default paper tray 51
Define the content of the paper trays 52
Mailbox configuration 54
Show the host name in the user list 54
Allow remote printing from the user mailbox 56
Remove all print jobs from the mailbox 58
Set the automatic mailbox cleanup 60
Job queue management 62
Allow automatic printing 62
Remove all IP jobs from the job queue 64
Contents
5
Chapter 3
Printer configuration
Adjust the network and printer properties 68
Change the TCP/IP settings 68
Change the SNMP settings 75
Enable/disable the LPR/LPD 79
Enable/disable FTP 81
Test the network connection 83
Read the MAC address 86
Upgrade the controller software 88
Adjust the PostScript settings 90
Chapter 4
System maintenance
Get system information 94
Read the counters 94
Read the serial number 98
Display the software version 100
Print and save the configuration report 106
Print and save the system log file 109
Set and download the trace log file 112
Show the last 10 errors and warnings 115
Add consumables 117
Load the paper trays 117
Add the toner 119
Add the staples 122
Appendix A
Miscellaneous 127
Reader's comment sheet 128
Addresses of local Océ organisations 130
6
Océ VarioPrint 2090 Configuration and maintenance manual
Océ VarioPrint 2090
User manual
Chapter 1
Introduction
7
Available documentation
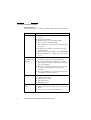
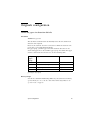
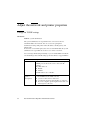
Documentation set
The documentation set for the Océ VarioPrint 2090 consists of the following.
[1] Documentation set
Document
Description
Job manual
■
■
■
■
■
■
Configuration
and maintenance
manual
■
■
■
Safety manual
■
■
■
Quick reference
card
■
■
Describes the workflow of print and copy jobs for the
operator.
Print from the mailbox.
Print directly to the Océ VarioPrint 2090.
Copy on the Océ VarioPrint 2090.
The manual also contains general information about
the system.
Configuration, workflow and structure of the Océ
VarioPrint 2090.
Turn on, turn off and restart the Océ VarioPrint 2090.
Product specifications, originals and copy materials
to use.
Describes the configuration and maintenance tasks
for the key operator and system administrator.
The system configuration (settings for originals,
prints, mailbox, job queue, and settings to reduce the
power consumption).
The printer configuration (settings for the network
connection, software upgrade and PostScript
defaults).
The system maintenance (system information, add
consumables and solve problems).
Gives information on safety issues. The manual
includes the following.
Instructions for safe use.
Safety data sheets.
EPA Energy Star®
On this card you find the following instructions.
How to print from the mailbox of the Océ VarioPrint
2090.
How to copy on the Océ VarioPrint 2090.
[1] Documentation set
8
Océ VarioPrint 2090 Configuration and maintenance manual
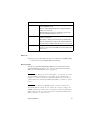
Access the Océ VarioPrint 2090 Settings
Editor
Access the Océ VarioPrint 2090 Settings Editor in key operator
mode
Introduction
The Océ VarioPrint 2090 Settings Editor is an application that is available to
you if you are responsible for special administrative tasks on the Océ
VarioPrint 2090.
To access the key operator mode of the Océ VarioPrint 2090 Settings Editor,
you need the special key operator PIN code.
The Océ VarioPrint 2090 Settings Editor is a web based application on the
controller that you can access through a standard web browser. The supported
web browsers are for example MS Internet Explorer 4.0, 5.0, 5.5 and 6.0 in
combination with Windows 9x, NT4 or Windows 2000.
When to do
You can use the options of the Océ VarioPrint 2090 Settings Editor to change
some of the default printer settings.
Note: If the initial network configuration is not correct, no person can connect
to the controller to change the settings or to print.
Note: More than one session of the Océ VarioPrint 2090 Settings Editor can be
active at the same time.
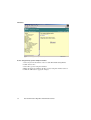
Introduction
9
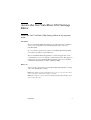
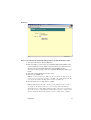
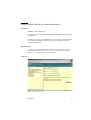
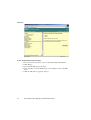
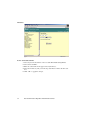
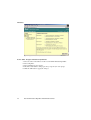
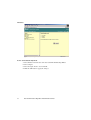
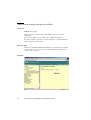
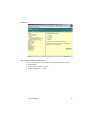
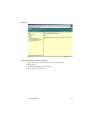
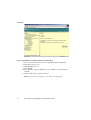
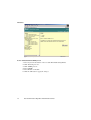
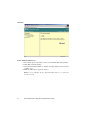
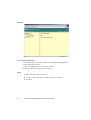
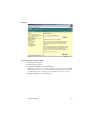
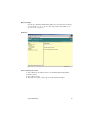
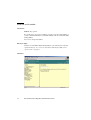
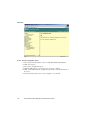
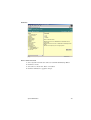
Illustration
[1] Logon screen Océ VarioPrint 2090 Settings Editor
[1] Logon screen Océ VarioPrint 2090 Settings Editor
How to access the Océ VarioPrint 2090 Settings Editor in key operator mode
1 Start your web browser (e.g. Internet Explorer).
2 Enter the URL to connect to the Océ VarioPrint 2090 Settings Editor in the key
operator mode, URL = http://<hostname>/kos (The host name describes the
Océ VarioPrint 2090 name on the TCP/IP network).
You now see the logon page of the Océ VarioPrint 2090 Settings Editor. (see
figure)
Note: A URL (Uniform Resource Locator) is the address of a file (resource)
accessible on the Internet. The type of resource depends on the Internet
application protocol. The URL contains the name of the protocol required to
access the resource, a domain name that identifies a specific computer on the
Internet, and a hierarchical description of a file location on the computer.
3 Select the key operator mode to enter.
4 Enter the special PIN code.
Note: If you enter an incorrect PIN code, an encrypted code appears on the
logon screen. If you do not remember your PIN code, call the Help desk. The
encrypted code enables the Help desk to return your PIN code.
5 Press 'Enter' or click'Send' .
Note: You can view the settings for the system administrator when you logged
on as key operator. Select 'View settings for SA' to activate the view mode for
SA settings (you can not change settings).
10
Océ VarioPrint 2090 Configuration and maintenance manual
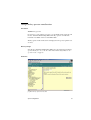
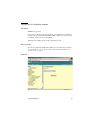
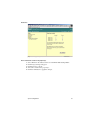
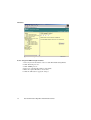
Result
The following illustration shows the result of an incorrect PIN code. See step
4 in the procedure above.
[2] Incorrect PIN code
[2] Incorrect PIN code
Introduction
11
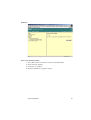
Access the Océ VarioPrint 2090 Settings Editor in system
administrator mode
Introduction
The Océ VarioPrint 2090 Settings Editor is an application that is available to
you
■
■
if you are responsible for the network configuration.
if you provide maintenance to the Océ VarioPrint 2090.
To access the system administrator mode of the Océ VarioPrint 2090 Settings
Editor, you need the special system administrator PIN code.
The Océ VarioPrint 2090 Settings Editor is a web based application on the
controller that you can access through a standard web browser. The supported
web browsers are for example MS Internet Explorer 4.0, 5.0, 5.5 and 6.0 in
combination with Windows 9x, NT4 or Windows 2000.
When to do
You can use the options of the Océ VarioPrint 2090 Settings Editor to change
some of the default printer settings.
Note: If the initial network configuration is not correct, no person can connect
to the controller to change the settings or to print.
Note: More than one session of the Océ VarioPrint 2090 Settings Editor can be
active at the same time.
12
Océ VarioPrint 2090 Configuration and maintenance manual
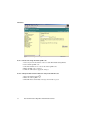
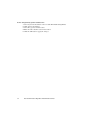
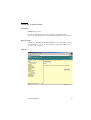
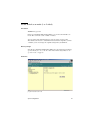
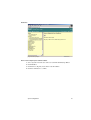
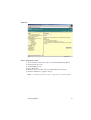
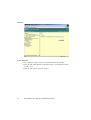
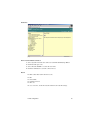
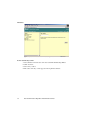
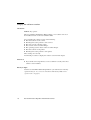
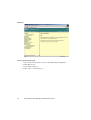
Illustration
[3] Logon screen Océ VarioPrint 2090 Settings Editor for the system administrator
[3] Logon screen Océ VarioPrint 2090 Settings Editor for the system administrator
How to access the Océ VarioPrint 2090 Settings Editor in system administrator mode
1 Start your web browser. (Internet Explorer)
2 Enter the URL to connect to the Océ VarioPrint 2090 Settings Editor in the
system administrator mode, URL = http://<hostname>/sas (The host name
describes the Océ VarioPrint 2090 name on the TCP/IP network).
You now see the logon page of the Océ VarioPrint 2090 Settings Editor, (see
figure) .
3 Select the system administrator mode to enter.
4 Enter the special PIN code.
Note: If you enter an incorrect PIN code, an encrypted code appears on the
logon screen. If you do not remember your PIN code, call the Help desk. The
encrypted code enables the Help desk to return your PIN code.
5 Press the 'Enter' key or click 'Send' to confirm.
Note: A URL (Uniform Resource Locator) is the address of a file (resource)
accessible on the Internet. The type of resource depends on the Internet
application protocol. The URL contains the name of the protocol required to
access the resource, a domain name that identifies a specific computer on the
Internet, and a hierarchical description of a file location on the computer.
Introduction
13
Note: You can view the settings for the key operator when you logged on as
system administrator. Select'View settings for KO' to activate the view mode
for KO settings (you cannot change settings).
14
Océ VarioPrint 2090 Configuration and maintenance manual
Change the PIN code for the key operator
Introduction
Task for: key operator
Océ supplies the Océ VarioPrint 2090 with a default PIN code for the key
operator.
The PIN code for the key operator consists of 0 to 5 digits. Enter the Océ
VarioPrint 2090 Settings Editor in the key operator mode to assign a new PIN
code.
Before you begin
Start the Océ VarioPrint 2090 Settings Editor in your web browser in the key
operator mode (see ‘Access the Océ VarioPrint 2090 Settings Editor in key
operator mode’ on page 9).
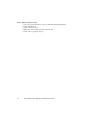
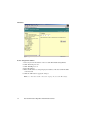
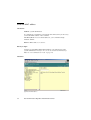
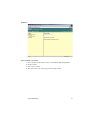
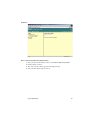
Illustration
[4] PIN code key operator
[4] PIN code key operator
Introduction
15
How to change the PIN code for the key operator
1 Select 'System' in the title bar of the Océ VarioPrint 2090 Settings Editor.
2 Select 'Key operator PIN code'.
3 Enter the current PIN code in the 'Current PIN code' box.
4 Enter the new PIN code in the 'New PIN code' box. (maximum 5 digits)
5 To confirm the new PIN code, enter the new PIN code again in the 'Confirm
new PIN code' box.
6 Click the 'OK' button to apply the changes.
Use this new PIN code the next time you log on.
16
Océ VarioPrint 2090 Configuration and maintenance manual
Change the PIN code for the system administrator
Introduction
Task for: system administrator
Océ supplies the Océ VarioPrint 2090 with the default PIN code for the system
administrator.
The PIN code for the system administrator consists of 0 to 5 digits. Enter the
Océ VarioPrint 2090 Settings Editor in the system administrator mode to
assign a new PIN code.
Before you begin
Start the Océ VarioPrint 2090 Settings Editor in your web browser in the
system administrator mode (see ‘Access the Océ VarioPrint 2090 Settings
Editor in system administrator mode’ on page 12).
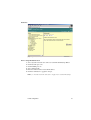
Illustration
[5] PIN code system administrator
[5] PIN code system administrator
Introduction
17
How to change the PIN code for the system administrator
1 Select 'System' in the title bar of the Océ VarioPrint 2090 Settings Editor.
2 Select 'System administrator PIN code'.
3 Enter the current PIN code in the 'Current PIN code' box.
4 Enter the new PIN code in the 'New PIN code' box (0 to 5 digits).
5 To confirm the new PIN code, enter the new PIN code again in the 'Confirm
new PIN code' box.
6 Click the 'OK' button to apply the changes.
Use this new PIN code the next time you log on.
18
Océ VarioPrint 2090 Configuration and maintenance manual
Restore the factory default settings
Introduction
Task for: key operator, system administrator
Océ defines the default settings of the Océ VarioPrint 2090. These settings are
the factory default settings. Examples of factory default settings are the default
PostScript settings for the system administrator or the energy save settings for
the key operator.
You can adapt the factory settings, according to your company or department
requirements.
These changed settings are the company settings.
Use this procedure to change the settings back to the factory defaults for the
key operator and for the system administrator. (System administrator mode
includes all network settings)
When to do
Use these options to restore the factory defaults for the key operator or the
system administrator of the Océ VarioPrint 2090 copier/printer.
Before you begin
Start the Océ VarioPrint 2090 Settings Editor in your web browser in key
operator mode or system administrator mode (see ‘Access the Océ VarioPrint
2090 Settings Editor in key operator mode’ on page 9) or (see ‘Access the Océ
VarioPrint 2090 Settings Editor in system administrator mode’ on page 12).
Note: A restart of the Océ Smart Imager is required to apply the new settings.
Note: If you restore the network default settings, you change the initial network
settings. You might not be able to reach the Océ VarioPrint 2090 with these new
settings after a restart of the Océ Smart Imager.
Attention: Remember that after you install the factory defaults back to your
Océ VarioPrint 2090 copier/printer, you loose ALL the previous
copier/printer settings.
Introduction
19
Illustration
[6] Restore the key operator factory defaults
[6] Restore the key operator factory defaults
[7] Restore the system administrator factory defaults
[7] Restore the system administrator factory defaults
20
Océ VarioPrint 2090 Configuration and maintenance manual
How to restore the factory default settings
1 Select 'System' in the title bar of the Océ VarioPrint 2090 Settings Editor.
2 Click 'Restore defaults' and select 'Restore factory defaults'.
3 Click the 'OK' button to apply the changes.
Introduction
21
22
Océ VarioPrint 2090 Configuration and maintenance manual
Océ VarioPrint 2090
User manual
Chapter 2
System configuration
23
Energy save settings
Set the EPA timers
Introduction
Task for: key operator
The Océ Smart Imager can request the system to go to the energy save mode.
■ The system can go into sleep mode.
■ The Océ Smart Imager can not go into sleep mode.
Low power mode time
The interval between the last print action of the system and the moment the
Océ VarioPrint 2090 turns to low power mode.
The Océ VarioPrint 2090 turns to low power mode when the 'Low power mode
timer' expires (period of no print activity). The default value of the low power
mode timer is 15 minutes. You can not manually put the Océ VarioPrint 2090
into low power mode.
If the system is in low power mode, the Océ Smart Imager activates the system
when a new automatic print job starts or you start a copy or interactive print
job. This process can take several minutes.
You can scan a job when the system is in low power mode or is warming up.
Sleep mode time
The interval between the last action of the system and the moment the Océ
VarioPrint 2090 turns to sleep mode.
When the 'Sleep mode timer' expires, the Océ VarioPrint 2090 turns into sleep
mode. You can put the Océ VarioPrint 2090 into sleep mode manually.
The default value of the sleep mode timer is 60 minutes.
You can change the factory default settings of both EPA timers to values from
1 to 240 minutes.
When to do
Change the timer settings when the factory settings cause problems to the
productivity.
24
Océ VarioPrint 2090 Configuration and maintenance manual
Before you begin
Start the Océ VarioPrint 2090 Settings Editor in your web browser in the key
operator mode (see ‘Access the Océ VarioPrint 2090 Settings Editor in key
operator mode’ on page 9).
Note: The time of the 'Sleep mode timer' must be longer than or equal to the
'Low power mode timer'.
Illustration
[8] The low power mode timer
[8] The low power mode timer
System configuration
25
[9] The sleep mode timer
[9] The sleep mode timer
How to set the Low power mode timer
1 Select 'System' in the title bar of the Océ VarioPrint 2090 Settings Editor.
2 Click 'Timers'.
3 Select 'Low power mode timer'.
4 Enter the time in minutes in the 'Low power mode timer' box (default is 15
minutes).
5 Click the 'OK' button to apply the changes.
How to set the Sleep mode timer
1 Select 'System' in the title bar of the Océ VarioPrint 2090 Settings Editor.
2 Click 'Timers'.
3 Select 'Sleep mode timer'.
4 Enter the time in minutes in the 'Sleep mode timer' box (default is 60 minutes).
5 Click the 'OK' button to apply the changes.
26
Océ VarioPrint 2090 Configuration and maintenance manual
Disable the EPA sleep mode timer
Introduction
Task for: key operator
The operator can disable the EPA sleep mode. The Océ VarioPrint 2090 does
not go into sleep mode after this action. You can still put the system into sleep
mode manually (see 'Turn off the Océ VarioPrint 2090' in the Job manual).
When to do
Disable the EPA mode when the factory settings cause problems to the
productivity.
Before you begin
Start the Océ VarioPrint 2090 Settings Editor in your web browser in the key
operator mode (see ‘Access the Océ VarioPrint 2090 Settings Editor in key
operator mode’ on page 9).
System configuration
27
Illustration
[10] Disable the EPA sleep mode timer
[10] Disable the EPA sleep mode timer
How to disable the EPA sleep mode timer
1 Select 'System' in the title bar of the Océ VarioPrint 2090 Settings Editor.
2 Click 'Energy'.
3 Select 'Disable EPA sleep mode timer'.
4 Select 'Disable' to turn off the EPA mode. Select 'Enable' to turn on the EPA
mode.
5 Click the 'OK' button to apply the changes.
28
Océ VarioPrint 2090 Configuration and maintenance manual
Adjust the Océ VarioPrint 2090
Activate and change the wake-up PIN code
Introduction
When the system is in safety sleep mode, the operator panel is off. The system
goes to the safety sleep mode in the following situations.
■ When you press the power switch
.
■ When the power returns after a mains failure.
If you activate the wake-up PIN code, to get the system out of safety sleep
mode. If you do not select 'Activate wake-up PIN code', the system asks for a
PIN code before the system can wake up.
When you activate the wake-up PIN code, you can change this PIN code
(Minimum 1 digit, maximum 5 digits).
Before you begin
Start the Océ VarioPrint 2090 Settings Editor in your web browser in the key
operator mode (see ‘Access the Océ VarioPrint 2090 Settings Editor in key
operator mode’ on page 9).
System configuration
29
Illustration
[11] Activate and change the wake-up PIN code
[11] Activate and change the wake-up PIN code
How to activate and change the wake-up PIN code
1 Select 'System' in the title bar of the Océ VarioPrint 2090 Settings Editor.
2 Select 'Wake-up PIN code'.
3 Check the 'Enable' box to activate the wake-up PIN code.
4 Enter the PIN code you prefer.
5 Click the 'OK' button to apply the changes.
How to wake-up the Océ VarioPrint 2090 from sleep mode with PIN code
1 Press the On/Off button
.
2 Enter the wake-up PIN code.
3 The LED in the On/Off button changes from amber to green.
30
Océ VarioPrint 2090 Configuration and maintenance manual
Set the date and time
Introduction
Task for: key operator
The Océ VarioPrint 2090 Settings Editor allows you to change the date and
time on the copier/printer. The status report function and the log function use
this information in the report that you print or upload. This procedure shows
you how to use a remote workstation to change the date and time of the
copier/printer.
When to do
The copier/printer date or time is not your current local date and time.
Before you begin
Start the Océ VarioPrint 2090 Settings Editor in your web browser in the key
operator mode (see ‘Access the Océ VarioPrint 2090 Settings Editor in key
operator mode’ on page 9).
System configuration
31
Illustration
[12] Set the date and time
[12] Set the date and time
How to set the date and time
1 Select 'System' in the title bar of the Océ VarioPrint 2090 Settings Editor.
2 Select 'Date and Time'.
3 Enter the current time in the upper text box (hh:mm:ss).
4 Select the month, day and year in the drop-down list box below the time text
box.
5 Click 'OK' to apply the changes.
32
Océ VarioPrint 2090 Configuration and maintenance manual
Change the key operator name/location
Introduction
Task for: key operator
If you have to contact the key operator, you can find his name and location in
the Océ VarioPrint 2090 Settings Editor. The key operator can make this
information available on the Océ VarioPrint 2090.
The key operator name and location are displayed on the operator panel in case
of errors.
Before you begin
Start the Océ VarioPrint 2090 Settings Editor in your web browser in the key
operator mode (see ‘Access the Océ VarioPrint 2090 Settings Editor in key
operator mode’ on page 9).
Illustration
[13] Enter the key operator name/location
[13] Enter the key operator name/location
System configuration
33
How to change the key operator name/location
1 Select 'System' in the title bar of the Océ VarioPrint 2090 Settings Editor.
2 Click 'Service information'.
3 Select 'Key operator name/location'.
4 Enter the name and the location in the textbox.
5 Click the 'OK' button to apply the changes.
34
Océ VarioPrint 2090 Configuration and maintenance manual
Change the key operator telephone number
Introduction
Task for: key operator
If the Océ VarioPrint 2090 needs key operator support, the system asks you to
call the key operator. When you are the key operator, the Océ VarioPrint 2090
Settings Editor allows you to enter the telephone number.
This telephone number appears in the configuration report.
When to do
The telephone number of the key operator changes or a new key operator is in
charge, change the telephone number in the Océ VarioPrint 2090 Settings
Editor.
Before you begin
Start the Océ VarioPrint 2090 Settings Editor in your web browser in the key
operator mode (see ‘Access the Océ VarioPrint 2090 Settings Editor in key
operator mode’ on page 9).
System configuration
35
Illustration
[14] Enter the key operator telephone number
[14] Enter the key operator telephone number
How to change the key operator telephone number
1 Select 'System' in the title bar of the Océ VarioPrint 2090 Settings Editor.
2 Click 'Service info'.
3 Select 'Key operator telephone number'.
4 Enter the telephone number in the 'Key operator telephone number' text box.
5 Click the 'OK' button to apply the changes.
36
Océ VarioPrint 2090 Configuration and maintenance manual
Change the Océ telephone number
Introduction
Task for: key operator
If you have to call the local Océ department, you can find the Océ telephone
number in the Océ VarioPrint 2090 Settings Editor. The key operator can enter
the number of the nearest Océ department.
This telephone number appears in the configuration report.
Before you begin
Start the Océ VarioPrint 2090 Settings Editor in your web browser in the key
operator mode (see ‘Access the Océ VarioPrint 2090 Settings Editor in key
operator mode’ on page 9).
Illustration
[15] Enter the Océ telephone number
[15] Enter the Océ telephone number
System configuration
37
How to change the Océ telephone number
1 Select 'System' in the title bar of the Océ VarioPrint 2090 Settings Editor.
2 Click 'Service info'.
3 Select 'Océ telephone number'.
4 Enter the telephone number in the 'Océ telephone number' text box.
5 Click the 'OK' button to apply the changes.
38
Océ VarioPrint 2090 Configuration and maintenance manual
Define the system location
Introduction
Task for: key operator
You can describe the location of the system (for example My place).
You can use this information to see the differences between several systems.
Before you begin
Start the Océ VarioPrint 2090 Settings Editor in your web browser in the key
operator mode (see ‘Access the Océ VarioPrint 2090 Settings Editor in key
operator mode’ on page 9).
Illustration
[16] Location of the system
[16] Location of the system
System configuration
39
How to define the system location
1 Select 'System' in the title bar of the Océ VarioPrint 2090 Settings Editor.
2 Click 'Identification'.
3 Select 'System location'.
4 Enter the location in the 'System location' text box.
5 Click 'OK' to apply the changes.
40
Océ VarioPrint 2090 Configuration and maintenance manual
Set the operator panel time-out
Introduction
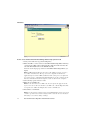
If you create a copy job, you make settings for that job at the operator panel.
When you wait for some time (e.g. you leave the machine), the default start-up
screen will be displayed on the screen again (see figure). This reset of the
screen is called 'Operator panel time-out'.
You can set the value for the 'Operator panel time-out' timer in the Océ
VarioPrint 2090 Settings Editor (default value is 30 seconds).
[17] The default start-up screen
[17] The default start-up screen
Before you begin
Start the Océ VarioPrint 2090 Settings Editor in your web browser in the key
operator mode (see ‘Access the Océ VarioPrint 2090 Settings Editor in key
operator mode’ on page 9).
System configuration
41
Illustration
[18] Set the operator panel time-out
[18] Set the operator panel time-out
How to set the operator panel time-out
1 Select 'System' in the title bar of the Océ VarioPrint 2090 Settings Editor.
2 Click 'Timers'.
3 Select 'Operator panel time-out'.
4 The time-out entry field appears in the right window.
5 Enter the required value.
6 Click the 'OK' button to apply the changes.
42
Océ VarioPrint 2090 Configuration and maintenance manual
Set the operator language
Introduction
Task for: key operator
You can select the language of the Settings Editor and the text on the operator
panel of the Océ VarioPrint 2090. The default language is UK-English.
Use the Océ Settings Editor to select a language. You can select one of the 14
available languages.
Note: There is no language setting available on the screen of the operator
panel. You can only change the language through the Océ Settings Editor.
When to do
■
If the language on the screen is not the preferred language in your company,
you change this language.
Before you begin
Start the Océ VarioPrint 2090 Settings Editor in your web browser in the key
operator mode (see ‘Access the Océ VarioPrint 2090 Settings Editor in key
operator mode’ on page 9).
System configuration
43
Illustration
[19] Set the the operator language
[19] Set the the operator language
How to set the operator language
1 Select 'System' in the title bar of the Océ VarioPrint 2090 Settings Editor.
2 Click 'Language'.
3 Click 'Operator language'.
4 Select the language of your choice.
5 Click the 'OK' button to apply the changes.
Note: The language in the Settings Editor is changed immediately as well.
44
Océ VarioPrint 2090 Configuration and maintenance manual
Originals configuration
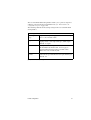
Define the paper size detection defaults
Introduction
Task for: key operator
The automatic document feeder automatically detects the size and the feed
direction of the originals.
However, the automatic detection can not detect a difference between some
paper sizes (e.g. Legal Standard and Legal).
In a paper group, you find 2 paper sizes. The automatic detection can not
decide what paper size to select within a paper group. You define what paper
size the scanner must select in such case. See the following table.
[2] Ambiguous paper groups
Amiguous
paper
group
Paper sizes
Default
1
B5, Letter Government
B5
2
Letter Standard, Legal Government
Letter Standard
3
Legal, Legal Standard
Legal Standard
4
US Government, Commercial
US Government
[2] Ambiguous paper groups
Before you begin
Start the Océ VarioPrint 2090 Settings Editor in your web browser in the key
operator mode (see ‘Access the Océ VarioPrint 2090 Settings Editor in key
operator mode’ on page 9).
System configuration
45
Illustration
[20] Define paper size detection preferences
[20] Define paper size detection preferences
How to define the paper size detection preferences
1 Select 'Scanner' in the title bar of the Océ VarioPrint 2090 Settings Editor.
2 Select 'Originals'.
3 Select 'Ambiguous paper groups'.
4 Check the radio buttons of the paper sizes you prefer (1 in each group).
5 Click the 'OK' button to apply the changes.
46
Océ VarioPrint 2090 Configuration and maintenance manual
Set the default scan mode (1 or 2-sided)
Introduction
Task for: key operator
In the Océ VarioPrint 2090 Settings Editor you can select the default scan
mode. The scan mode can be 1-sided or 2-sided.
You can change this default setting for each job on the operator panel.
The default scan mode is 1-sided. This indicates that the original is scanned
1-sided if you do not change the original setting in the job definition.
Before you begin
Start the Océ VarioPrint 2090 Settings Editor in your web browser in the key
operator mode (see ‘Access the Océ VarioPrint 2090 Settings Editor in key
operator mode’ on page 9).
Illustration
[21] Set the default scan mode
[21] Set the default scan mode
System configuration
47
How to set the default scan mode
1 Select 'Scanner' in the title bar of the Océ VarioPrint 2090 Settings Editor.
2 Select 'Originals'.
3 Select 'Default for original sides'.
4 Select '1-sided' or '2-sided'.
5 Click 'OK' to apply the changes.
48
Océ VarioPrint 2090 Configuration and maintenance manual
Prints configuration
Set the default staple mode
Introduction
When you create a job on the system, you can define to use 1, 2 or no staples.
You can define the default staple mode in the Océ VarioPrint 2090 Settings
Editor.
The operator panel selects this default staple mode for the 'Basic', 'Staple'
setting of a new job. You can change this staple settting for every job.
Before you begin
Start the Océ VarioPrint 2090 Settings Editor in your web browser in the key
operator mode see Access the Océ VarioPrint 2090 Settings Editor.
System configuration
49
Illustration
[22] Set the default staple mode
[22] Set the default staple mode
How to set the default staple mode
1 Select 'Printer' in the title bar of the Océ VarioPrint 2090 Settings Editor.
2 Select 'Output'.
3 Select the staple mode to use for default.
4 Click the 'OK' button to apply the changes.
50
Océ VarioPrint 2090 Configuration and maintenance manual
Set the default paper tray
Introduction
Task for: key operator
When in a job on the system no paper tray is indicated, the system uses the
default paper tray. You can define this default paper tray in the Océ VarioPrint
2090 Settings Editor.
The system will for default search in the following order:
■ the lowest tray that contains normal A4
■ the lowest tray that contains normal Letter
■ the lowest tray (bulk)
The system gets the list of possible paper trays from the Océ VarioPrint 2090
Settings Editor.
Before you begin
Start the Océ VarioPrint 2090 Settings Editor in your web browser in the key
operator mode (see ‘Access the Océ VarioPrint 2090 Settings Editor in key
operator mode’ on page 9).
How to set the default paper tray
1 Select 'Printer' in the title bar of the Océ VarioPrint 2090 Settings Editor.
2 Click 'Default paper tray'.
3 Select the paper tray to use for default.
4 Click the 'OK' button to apply the changes.
System configuration
51
Define the content of the paper trays
Introduction
Task for: key operator
Each paper tray can contain three types of paper. The paper types are shown at
the operator panel when you select a paper tray.
You can define the contents of each tray.
■ Normal paper (tray 3 is always used for normal paper)
or any combination of:
■ Special
■ Covers
The first two paper types can be assigned to an entire job (i.e. for a job to be
printed on special paper).
The paper type cover enables you to configure a paper tray for cover material.
If such a tray is configured, the system will use paper from that tray for the
covers.
Note: When no special paper types have been assigned to a tray, the tray
contains the paper type normal. It is possible to configure more than one tray
for any of these four paper types. At least one of the trays must contain normal
paper.
Before you begin
Start the Océ VarioPrint 2090 Settings Editor in your web browser in the key
operator mode (see ‘Access the Océ VarioPrint 2090 Settings Editor in key
operator mode’ on page 9).
52
Océ VarioPrint 2090 Configuration and maintenance manual
Illustration
[23] Define the paper tray content
[23] Define the paper tray content
How to define the content of the paper trays
1 Select 'Printer' in the title bar of the Océ VarioPrint 2090 Settings Editor.
2 Click 'Tray(s) with special paper'.
3 Click 'Paper tray content'.
4 Select the content for the paper trays.
5 Click the 'OK' button to apply the changes.
System configuration
53
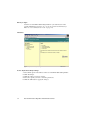
Mailbox configuration
Show the host name in the user list
Introduction
Task for: key operator
The 'Print from mailbox...' area on the operator panel shows the mailboxes of
printer users. The system displays these mailboxes with the user name.
You can extend the identification of the mailbox with the host name as set in
the TCP/IP related network settings.
Before you begin
Start the Océ VarioPrint 2090 Settings Editor in your web browser in the key
operator mode (see ‘Access the Océ VarioPrint 2090 Settings Editor in key
operator mode’ on page 9).
54
Océ VarioPrint 2090 Configuration and maintenance manual
Illustration
[24] Show the host name in the user list
[24] Show the host name in the user list
How to show the host name in the user list
1 Select 'System' in the title bar of the Océ VarioPrint 2090 Settings Editor.
2 Click 'Mailbox'.
3 Click 'Host name in the user list'.
4 Click the 'OK' button to apply the changes.
System configuration
55
Allow remote printing from the user mailbox
Introduction
Task for: key operator
The key operator can allow users to print mailbox jobs from a remote
workstation.
You can, for example, use Océ Intra Logic to submit the print jobs.
If you do not allow to print from a remote workstation, you must submit the
print jobs on the operator panel.
Before you begin
Start the Océ VarioPrint 2090 Settings Editor in your web browser in the key
operator mode (see ‘Access the Océ VarioPrint 2090 Settings Editor in key
operator mode’ on page 9).
Illustration
[25] Allow remote printing
[25] Allow remote printing
56
Océ VarioPrint 2090 Configuration and maintenance manual
How to allow remote printing from the user mailbox
1 Select 'System' in the title bar of the Océ VarioPrint 2090 Settings Editor.
2 Click 'Mailbox'.
3 Click 'Remote printing from user mailbox'.
4 Click the 'OK' button to apply the changes.
System configuration
57
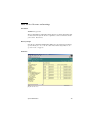
Remove all print jobs from the mailbox
Introduction
Task for: key operator
To restart the system with an empty mailbox, you can remove all current jobs.
Do this for example if the system crashes because of a damaged job that you
sent to the mailbox.
Use the Océ VarioPrint 2090 Settings Editor to remove all print jobs from the
mailbox.
Note: The system clears the mailbox, which indicates that the print jobs are
removed, whether they are printed or not.
When to do
A service technician can ask you to clear the mailbox for example to delete a
damaged print job.
Before you begin
Start the Océ VarioPrint 2090 Settings Editor in your web browser in the key
operator mode (see ‘Access the Océ VarioPrint 2090 Settings Editor in key
operator mode’ on page 9).
58
Océ VarioPrint 2090 Configuration and maintenance manual
Illustration
[26] Remove all print jobs from the mailbox
[26] Remove all print jobs from the mailbox
How to remove all print jobs from the mailbox
1 Select 'System' in the title bar of the Océ VarioPrint 2090 Settings Editor.
2 Click 'Mailbox'.
3 Click 'Remove all print jobs from the network mailbox'.
4 Click the 'OK' button to confirm.
System configuration
59
Set the automatic mailbox cleanup
Introduction
Task for: key operator
You can delete a job from the mailbox in the 'Print from mailbox...' function on
the operator panel of the Océ VarioPrint 2090 (See 'remove jobs from the
mailbox' in the Job manual).
The automatic mailbox cleanup is another method to remove jobs from the
mailbox. Users of the system can forget to remove their jobs from the mailbox.
The mailbox jobs can use a lot of disk space.
When the automatic cleanup starts at midnight, all jobs that are stored in the
network mailbox for longer than the defined period, are removed automatically
(all jobs whether they are printed or not).
Default value: 'Infinitely'.
In the table below, you find the selectable time settings.
[3] Automatic mailbox cleanup
Setting
Description
'Until tonight'
The system removes all jobs from the mailbox at
midnight.
'For 1 day'
The system removes all jobs older than 24 hours. A job
that arrives at 08.30 hours on Monday will be removed
on Tuesday at midnight.
'For 1 week'
The system removes all jobs older than 7 days.
'For 1 month'
The system removes all jobs older than 1 month.
'Infinitely'
The jobs are not removed automatically. The operator or
key operator must remove the jobs that are no longer
required from the mailbox.
[3] Automatic mailbox cleanup
Before you begin
Start the Océ VarioPrint 2090 Settings Editor in your web browser in the key
operator mode (see ‘Access the Océ VarioPrint 2090 Settings Editor in key
operator mode’ on page 9).
60
Océ VarioPrint 2090 Configuration and maintenance manual
Illustration
[27] Automatic mailbox cleanup
[27] Automatic mailbox cleanup
How to set the automatic mailbox cleanup
1 Select 'System' in the title bar of the Océ VarioPrint 2090 Settings Editor.
2 Click 'Mailbox'.
3 Click 'Automatic mailbox cleanup'.
4 Click the 'OK' button to confirm.
System configuration
61
Job queue management
Allow automatic printing
Introduction
The 'Stop automatic printing' function enables you to hold automatic print jobs
that are in the job queue. You access the 'Automatic printing' function in the
Océ VarioPrint 2090 Settings Editor.
If you set the queue mode to continue (do not select 'Stop'), the print jobs go to
the job queue of the Océ VarioPrint 2090. The system processes those jobs in
sequence.
In 'Stop' mode, the Océ VarioPrint 2090 continues to receive the print jobs.
The system processes those jobs, but does not print. A counter appears in the
job queue area on the operator panel to display the number of waiting print
jobs.
If you set the 'Stop' mode and a print job is already in the job queue, that job
is not printed either.
You can still make copies, scans and prints from the mailbox when the job
queue is set to the 'Stop' mode.
When to do
You need to copy your jobs with a high priority or you need to do some system
maintenance. Put the Océ VarioPrint 2090 job queue in the 'Stop' mode. The
system is active, but the operator is in control.
Before you begin
Start the Océ VarioPrint 2090 Settings Editor in your web browser in the key
operator mode (see ‘Access the Océ VarioPrint 2090 Settings Editor in key
operator mode’ on page 9).
62
Océ VarioPrint 2090 Configuration and maintenance manual
Illustration
[28] Allow automatic printing
[28] Allow automatic printing
How to allow automatic printing
1 Select 'Print station' in the title bar of the Océ VarioPrint 2090.
2 Click 'Automatic printing'.
3 Click 'Stop' or 'Continue'.
4 Click the 'OK' button to apply the changes.
System configuration
63
Remove all IP jobs from the job queue
Introduction
All waiting interactive print jobs (mailbox jobs) will be removed from the job
queue.
For example, when a Permanent Error occurs, the machine is not available until
the service technician has corrected the problem. The service technician can
ask you to remove all waiting IP jobs.
(The owner of the IP jobs is not at the system anymore and prints the jobs on
another available machine.)
When to do
Remove the interactive print jobs for example to prevent that confidential jobs
are printed when the owner is not at the Océ VarioPrint 2090.
Before you begin
Start the Océ VarioPrint 2090 Settings Editor in your web browser in the key
operator mode (see ‘Access the Océ VarioPrint 2090 Settings Editor in key
operator mode’ on page 9).
64
Océ VarioPrint 2090 Configuration and maintenance manual
Illustration
[29] Remove all IP jobs from the job queue
[29] Remove all IP jobs from the job queue
How to remove all IP jobs from the job queue
1 Select 'Print station' in the title bar of the Océ VarioPrint 2090.
2 Click 'Queues'.
3 Click 'Remove all IP jobs from the queue'.
4 Click 'OK' to remove the jobs.
System configuration
65
66
Océ VarioPrint 2090 Configuration and maintenance manual
Océ VarioPrint 2090
User manual
Chapter 3
Printer configuration
67
Adjust the network and printer properties
Change the TCP/IP settings
Introduction
Task for: system administrator
The system administrator is responsible for the connection of the Océ
VarioPrint 2090 to the network. You can set several copier/printer
identification settings, like printer name, IP address, default gateway and
Subnet mask.
If customers can send their print jobs to the Océ VarioPrint 2090, the system
administrator is responsible also for the access of these customers.
You can change the IP settings manually or you can enable DHCP to make the
Océ Smart Imager detect the IP settings (your network has to support DHCP).
Identification setting
Enable DHCP
You can select the method to receive the IP settings. The
DHCP protocol allows the server to detect the IP
settings.
Possible values are
■ 'Enable'
■ 'Disable'
Default value is set to 'Enable'.
Host name
(printer
description)
68
The host name describes the Océ VarioPrint 2090 name
on the TCP/IP network. Make sure that:
■ you use not more than 15 characters.
■ you select the characters from the list: a-z; A-Z; 0-9; -.
■ if you use a hyphen, put the hyphen in the name, not
at the begin or at the end.
Océ VarioPrint 2090 Configuration and maintenance manual
Identification setting
IP address
The physical address of the Océ Smart Imager connected
to the TCP/IP network.
The Océ Smart Imager must have a unique IP address
within your network.
The IP address has four sets of numbers separated by
periods. Default IP address is 192.1.1.1
Subnet mask
A method to divide the networks into smaller groups, or
subnets (segments).
The mask is a binary pattern that matches the IP address.
The Océ Smart Imager compares the subnet mask with a
network address number. Default value is 255.255.255.0
Default gateway
The physical address on this subnet of the default
gateway connected to the TCP/IP network. Default value
is 192.1.1.2
Note: To activate the new IP settings you must restart the Océ VarioPrint 2090.
When to do
■
Before you try to print, make sure that you complete these TCP/IP settings
to connect to the Océ VarioPrint 2090 to the network.
Before you begin
Start the Océ VarioPrint 2090 Settings Editor in your web browser in the
system administrator mode (see ‘Access the Océ VarioPrint 2090 Settings
Editor in system administrator mode’ on page 12).
Attention: If you change any of the settings above, you can only access the
Océ Smart Imager through these new settings. If you make the wrong
settings, you cannot reach the Océ VarioPrint 2090 on the network (you
cannot start the Océ VarioPrint 2090 Settings Editor). You have to call for
service.
Attention: If you change the TCP/IP settings, you must restart the Océ
VarioPrint 2090 to activate the new settings. If you do not complete all
TCP/IP settings before this restart, you cannot reach the Océ VarioPrint
2090 on the network (you cannot start the Océ VarioPrint 2090 Settings
Editor). You have to call for service.
Printer configuration
69
Illustration
[30] Enable DHCP
[30] Enable DHCP
How to enable DHCP for automatic detection of the IP settings
1 Select 'System' in the title bar of the Océ VarioPrint 2090 Settings Editor.
2 Click 'Network protocols'.
3 Click 'TCP/IP protocol'.
4 Select 'DHCP'.
5 Select 'Enable' to apply the DHCP protocol or 'Disable' to do the IP settings
manually.
6 Click the 'OK' button to apply the changes.
Note: For the host name standards, see the table in this paragraph.
70
Océ VarioPrint 2090 Configuration and maintenance manual
Illustration
[31] Change the host name
[31] Change the host name
How to change the host name
1 Select 'System' in the title bar of the Océ VarioPrint 2090 Settings Editor.
2 Click 'Network protocols'.
3 Click 'TCP/IP protocol'.
4 Select 'Host name'.
5 Enter the name to describe the Océ VarioPrint 2090 on the network.
6 Click the 'OK' button to apply the changes.
Note: (see ‘Test the network connection’ on page 83) to test the IP settings.
Printer configuration
71
Illustration
[32] Change the IP address
[32] Change the IP address
How to change the IP address
1 Select 'System' in the title bar of the Océ VarioPrint 2090 Settings Editor.
2 Click 'Network protocols'.
3 Click 'TCP/IP protocol'.
4 Select 'IP address'.
5 Enter the 'IP address' to change the physical address of the Océ VarioPrint 2090
on the network.
6 Click the 'OK' button to apply the changes.
Note: (see ‘Test the network connection’ on page 83) to test the IP settings.
72
Océ VarioPrint 2090 Configuration and maintenance manual
Illustration
[33] Change the Subnet mask
[33] Change the Subnet mask
How to change the Subnet mask
1 Select 'System' in the title bar of the Océ VarioPrint 2090 Settings Editor.
2 Click 'Network protocols'.
3 Click 'TCP/IP protocol'.
4 Select 'Subnet mask'.
5 Enter the Subnet mask to match the IP address.
6 Click the 'OK' button to apply the changes.
Note: (see ‘Test the network connection’ on page 83) to test the IP settings.
Printer configuration
73
Illustration
[34] Change the default gateway address
[34] Change the default gateway address
How to change the default gateway address
1 Select 'System' in the title bar of the Océ VarioPrint 2090 Settings Editor.
2 Click 'Network protocols'.
3 Click 'TCP/IP protocol'.
4 Select 'Default gateway'.
5 Enter the IP address of the default gateway.
6 Click the 'OK' button to apply the changes.
74
Océ VarioPrint 2090 Configuration and maintenance manual
Change the SNMP settings
Introduction
Task for: system administrator
SNMP (Simple Network Management Protocol) is a standard protocol used to
monitor, troubleshoot and control other SNMP-compliant devices that are
attached to the network.
You maintain the connection of the Océ VarioPrint 2090 to the network. You
can define to use the SNMP protocol ('Enable') or not, the 'SNMP community
name', the 'System description' and up to three 'SNMP manager IP addresses'
to receive notifications of SNMP alerts.
The 'SNMP community name' has a maximum length of 20 characters.
In the context of SNMP, the 'Community name' defines security
characteristics.
■ read permission: use the 'community name''public'
■ write permission: use the 'community name''oce_operator'
To define the 'System description', enter a user friendly description of the
system to present itself with on the network, to be used by for example
IntraLogic (available in future release).
Specify SNMP manager IP addresses, either by IP address or by host name
(max. length 32 characters).
Before you begin
Start the Océ VarioPrint 2090 Settings Editor in your web browser in the
system administrator mode (see ‘Access the Océ VarioPrint 2090 Settings
Editor in system administrator mode’ on page 12).
Attention: If you change the SNMP settings, you must restart the Océ
VarioPrint 2090 to activate the new settings.
Printer configuration
75
Illustration
[35] Enable SNMP protocol
[35] Enable SNMP protocol
How to enable/disable the SNMP protocol
1 Select 'System' in the title bar of the Océ VarioPrint 2090 Settings Editor.
2 Click 'Network protocols'.
3 Click 'SNMP protocol'.
4 Select 'SNMP'.
5 Select 'Enable' or 'Disable'.
6 Click the 'OK' button to apply the changes.
76
Océ VarioPrint 2090 Configuration and maintenance manual
Illustration
[36] The SNMP community name
[36] The SNMP community name
How to change the SNMP community name
1 Select 'System' in the title bar of the Océ VarioPrint 2090 Settings Editor.
2 Click 'Network protocols'.
3 Click 'SNMP protocol'.
4 Select 'SNMP community name'.
5 Enter the required name.
6 Click the 'OK' button to apply the changes.
How to change the SNMP system description
1 Select 'System' in the title bar of the Océ VarioPrint 2090 Settings Editor.
2 Click 'Network protocols'.
3 Click 'SNMP protocol'.
4 Select 'System description'.
5 Enter the required name.
6 Click the 'OK' button to apply the changes.
Printer configuration
77
Illustration
[37] The SNMP manager IP addresses
[37] The SNMP manager IP addresses
How to change the SNMP manager IP address
1 Select 'System' in the title bar of the Océ VarioPrint 2090 Settings Editor.
2 Click 'Network protocols'.
3 Click 'SNMP protocol'.
4 Select one of the three IP addresses entry fields.
5 Enter the required IP address or host name.
6 Click the 'OK' button to apply the changes.
78
Océ VarioPrint 2090 Configuration and maintenance manual
Enable/disable the LPR/LPD
Introduction
Task for: system administrator
LPR/LPD is a platform-independent print protocol that runs over TCP/IP. The
use has spread into the desktop environment and is a de-facto industry standard
to send print jobs to network connected printers.
LPR - Line Printer Remote . LPR refers to the process that sends jobs to the
printer or print queue. The LPR software enables you to send the print jobs to
the LPD printer or print server.
LPD - Line Printer Daemon . LPD refers to the process that accepts print jobs
from the line printer daemon client (that is the LPR client). The print server
waits for the client to send print jobs.
You can define to use the LPD protocol or not (enable, disable).
Note: See test the network connection , to test the LPR print path.
When to do
You must enable or disable the LPD protocol. To define the print function of
the Océ VarioPrint 2090, enter your LPD setting before you print.
Before you begin
Start the Océ VarioPrint 2090 Settings Editor in your web browser in the
system administrator mode (see ‘Access the Océ VarioPrint 2090 Settings
Editor in system administrator mode’ on page 12).
Printer configuration
79
Illustration
[38] Enable the LPD network printing
[38] Enable the LPD network printing
How to enable the LPD protocol
1 Select 'Print option' in the title bar of the Océ VarioPrint 2090 Settings Editor.
2 Click 'LPD network printing'.
3 Select the radio button 'Enable' or 'Disable' to make printing from the network
possible or not.
4 Click the 'OK' button to apply the changes.
Note: If you select Disable, the Océ VarioPrint 2090 cannot receive print jobs
from the network.
80
Océ VarioPrint 2090 Configuration and maintenance manual
Enable/disable FTP
Introduction
Task for: system administrator
FTP (File Transfer Protocol) is a platform independent data transfer protocol.
The FTP protocol enables the transfer of files through the network between the
Océ Smart Imager and the service laptop of the Océ service technician.
You can define to use the FTP protocol or not (enable,disable). FTP is by
default enabled.
Note: If the network security policy of your company does not allow FTP, you
can disable the FTP setting in the Océ Settings Editor.
When to do
When a service technician performs maintenance, the service technician must
be able to retrieve information from the Océ Smart Imager through FTP.
Before you begin
Start the Océ VarioPrint 2090 Settings Editor in your web browser in the
system administrator mode (see ‘Access the Océ VarioPrint 2090 Settings
Editor in system administrator mode’ on page 12).
Printer configuration
81
Illustration
[39] Enable FTP
[39] Enable FTP
How to enable FTP
1 Select 'FTP' in the title bar of the Océ VarioPrint 2090 Settings Editor
2 Select the radio button 'Enable' or 'Disable' to make access through the network
possible or not.
3 Click the 'OK' button to apply the changes.
82
Océ VarioPrint 2090 Configuration and maintenance manual
Test the network connection
Introduction
Task for: system administrator
There are 2 methods to test the connection of the Océ VarioPrint 2090 to the
network.
■ Method: PING (Packet INternet Groper) An Internet utility to detect if the
physical IP address is reachable. PING tests a network connection (PING
sends a packet and waits for a response) and detects errors.
■ Method: LPR (LPR - Line Printer Remote) LPR refers to the process that
sends the jobs to the printer or print queue. The LPR software enables you
to send the print jobs to the LPD printer.
The system administrator can perform these tests to check the network
connection.
Before you begin
Start the Océ VarioPrint 2090 Settings Editor in your web browser in the
system administrator mode (see ‘Access the Océ VarioPrint 2090 Settings
Editor in system administrator mode’ on page 12).
Printer configuration
83
Illustration
[40] Test the LPR print path
[40] Test the LPR print path
How to test the LPR print path
1 Select 'Print option' in the title bar of the Océ VarioPrint 2090 Settings Editor.
2 Click 'Network Connection'.
3 Select 'Test LPR print path' to activate the test mode.
4 Click the 'OK' button to start the connection test.
Result
Possible values that return after the tests
■
■
84
test OK , a single page print job with the character 'A' is printed.
test failed.
Océ VarioPrint 2090 Configuration and maintenance manual
Illustration
[41] Test the TCP/IP connection
[41] Test the TCP/IP connection
How to test the TCP/IP connection
1 Select 'System' in the title bar of the Océ VarioPrint 2090 Settings Editor.
2 Click 'Network protocols'.
3 Select 'Test the TCP/IP' to activate the test mode.
4 Click the 'OK' button to start the connection test.
Result
Possible values that return after the test are:
■
■
■
■
OK
unreachable
transmission error
time out
In case of an error, check the network and the local network settings.
Printer configuration
85
Read the MAC address
Introduction
Task for: system administrator
To configure the controller in your network environment, it may be necessary
to know the MAC address of the controller.
The MAC (Media Access Control) address is your controller's unique
hardware number.
Note: The MAC address is read-only.
Before you begin
Start the Océ VarioPrint 2090 Settings Editor in your web browser in the
system administrator mode (see ‘Access the Océ VarioPrint 2090 Settings
Editor in system administrator mode’ on page 12).
Illustration
[42] Read the MAC address
[42] Read the MAC address
86
Océ VarioPrint 2090 Configuration and maintenance manual
How to read the MAC address
1 Click 'Network protocols and MAC address'.
2 Select 'MAC address'.
3 The MAC address of your Océ VarioPrint 2090 appears in the right window.
Printer configuration
87
Upgrade the controller software
Introduction
Task for: system administrator
The system administrator takes care of the upgrade of the controller software.
You will receive a new software CD-ROM from your Océ representative. The
CD-ROM will go through the upgrade process automatically.
When to do
To install new releases or updates of the controller software, use the procedure
below.
Before you begin
Start the Océ VarioPrint 2090 Settings Editor in your web browser in the
system administrator mode (see ‘Access the Océ VarioPrint 2090 Settings
Editor in system administrator mode’ on page 12).
88
Océ VarioPrint 2090 Configuration and maintenance manual
Illustration
[43] Upgrade the controller software
[43] Upgrade the controller software
How to upgrade the controller software
1 Click 'Software upgrade'.
2 Click 'Upgrade software'.
3 Insert the CD-ROM into the CD-ROM drive.
Note: If the check box is selected, the upgrade is performed via the CD-ROM.
If the checkbox is not selected, the upgrade file is uploaded from the desktop to
the Smart Imager. The upgrade is performed after the upload is complete.
4 Click the 'OK' button to start the upgrade.
Printer configuration
89
Adjust the PostScript settings
Introduction
Task for: system administrator
The Océ Smart Imager of the Océ VarioPrint 2090 includes the Adobe
PostScript ®3™ interpreter, that supports the PostScript ® 3™ Page
Description Language (PDL).
The PostScript ® 3™ interpreter supports all standard paper sizes that the Océ
VarioPrint 2090 can handle.
Define the default settings for the PostScript ®3™ interpreter in the system
administrator mode of the Océ VarioPrint 2090 Settings Editor.
If you change the PostScript settings in a print job, these settings will be reset
to the default PostScript settings defined in the Océ VarioPrint 2090 Settings
Editor at the end of a job.
The controller supports the 136 Adobe PostScript ® 3™ core fonts which are
standard on the system. The application can use additional fonts if you
download those fonts as part of the job data stream.
90
Océ VarioPrint 2090 Configuration and maintenance manual
The Océ VarioPrint 2090 Settings Editor enables you to generate and print a
summary of the downloaded and installed fonts. (see ‘Print and save the
configuration report’ on page 106)
The following table lists the PostScript settings in the Océ VarioPrint 2090
Settings Editor:
[4] Explanation PostScript settings
PostScript settings
PostScript error
page
To print PostScript error pages or not when a PostScript
error occurs. Default: enable.
Staple
To staple jobs or not. Possible values: no staple, corner
staple portrait, corner staple landscape, double staple.
Default: no staples.
Job time out
Setting for the PostScript job time-out. This time-out is
the maximum rasterization time. An error page is
generated when the timer expires. Possible values:
0-65536 seconds. Default: 0 (Off)
Default media
format
Setting for the default paper size in print jobs. Possible
values: Foolscap/ A4/ Folio/ Letter/ Legal small/ Legal.
Default: A4.
[4] Explanation PostScript settings
Printer configuration
91
Before you begin
Start the Océ VarioPrint 2090 Settings Editor in your web browser in the
system administrator mode (see ‘Access the Océ VarioPrint 2090 Settings
Editor in system administrator mode’ on page 12).
Illustration
[44] Example of a PostScript setting
[44] Example of a PostScript setting
How to adjust the PostScript settings
1 Select 'Print option' in the title bar of the Océ VarioPrint 2090 Settings Editor.
2 Click 'PostScript'.
3 Click the setting you need to change.
4 Select the options you need or enter the parameters.
5 Click the 'OK' button to apply the changes.
92
Océ VarioPrint 2090 Configuration and maintenance manual
Océ VarioPrint 2090
User manual
Chapter 4
System maintenance
93
Get system information
Read the counters
Introduction
Task for: key operator
The Océ VarioPrint 2090 Settings Editor enables you to read 3 different
counters. Use this function to display the number of scans and prints that were
made on the Océ VarioPrint 2090. You can, for example, examine the ratio
between the scan clicks and the print clicks.
You can display the day counter only in the Océ VarioPrint 2090 Settings
Editor.
The scan counter records all scan activities from the automatic document
feeder or glass plate of the Océ VarioPrint 2090.
The print counter records all copy jobs and print actions from the local or the
network mailbox.
Note: The Océ VarioPrint 2090 also has a physical print counter. You can find
this print counter at the front side of the Océ VarioPrint 2090, behind the
left-hand door. This door also gives access to the toner refill area. If a service
technician asks you to check the print counter, the service technician refers to
this counter.
94
Océ VarioPrint 2090 Configuration and maintenance manual
Before you begin
Start the Océ VarioPrint 2090 Settings Editor in your web browser in the key
operator mode (see ‘Access the Océ VarioPrint 2090 Settings Editor in key
operator mode’ on page 9).
Illustration
[45] The print counter
[45] The print counter
How to read the print counter
1 Select 'Printer' in the title bar of the Océ VarioPrint 2090 Settings Editor.
2 Click 'Counters'.
3 Select 'Print counter'.
4 The value of the print counter appears in the right-hand window.
System maintenance
95
Illustration
[46] The day counter in the Océ VarioPrint 2090 Settings Editor
[46] The day counter in the Océ VarioPrint 2090 Settings Editor
How to read the day counter
1 Select 'Printer' in the title bar of the Océ VarioPrint 2090 Settings Editor.
2 Click 'Counters'.
3 Select 'Day counter'.
4 The value of the day counter appears in the right-hand window.
96
Océ VarioPrint 2090 Configuration and maintenance manual
Illustration
[47] The scan counter
[47] The scan counter
How to read the scan counter
1 Select 'Scanner' in the title bar of the Océ VarioPrint 2090 Settings Editor.
2 Click 'Counters'.
3 Select 'Scan counter'.
4 The value of the scan counter appears in the right window.
System maintenance
97
Read the serial number
Introduction
Task for: key operator
If you call service, the service technician can ask you for the serial number of
your Océ VarioPrint 2090. You can find this number in the Océ VarioPrint 2090
Settings Editor.
You can not change this number.
Before you begin
Start the Océ VarioPrint 2090 Settings Editor in your web browser in the key
operator mode (see ‘Access the Océ VarioPrint 2090 Settings Editor in key
operator mode’ on page 9).
Illustration
[48] The serial number of the Océ VarioPrint 2090
[48] The serial number of the Océ VarioPrint 2090
98
Océ VarioPrint 2090 Configuration and maintenance manual
How to check the serial numbers
1 Select 'System' in the title bar of the Océ VarioPrint 2090 Settings Editor.
2 Click 'Serial number'.
3 Select 'Serial number'.
4 The serial number of your Océ VarioPrint 2090 appears in the right-hand
window.
System maintenance
99
Display the software version
Introduction
Task for: key operator
The Océ VarioPrint 2090 Settings Editor enables you to read the versions of
the installed software on the Océ VarioPrint 2090.
You can display the software version of the following.
■ The main software of the scanner.
■ The Image Processing software of the scanner.
■ The version of the complete system.
■ The software of the Océ Smart Imager.
■ The operating system software of the Océ Smart Imager.
■ The main software of the printer.
■ The Image Processing software of the printer.
These settings are read-only.
You find the procedures to display the software versions in this chapter.
When to do
■
If you call the service department, a service technician can ask you for these
software version numbers.
Before you begin
Start the Océ VarioPrint 2090 Settings Editor in your web browser in the key
operator mode (see ‘Access the Océ VarioPrint 2090 Settings Editor in key
operator mode’ on page 9).
100
Océ VarioPrint 2090 Configuration and maintenance manual
Illustration
[49] The scanner main software version
[49] The scanner main software version
How to show the scanner main software version
1 Select 'Scanner' in the title bar of the Océ VarioPrint 2090 Settings Editor.
2 Click 'Software versions'.
3 The version of the software appears in the right window.
4 Select 'Scanner main software version'.
System maintenance
101
Illustration
[50] The scanner Image Processing software version
[50] The scanner Image Processing software version
How to show the scanner IP software version
1 Select 'Scanner' in the title bar of the Océ VarioPrint 2090 Settings Editor.
2 Click 'Software versions'.
3 Select 'Scanner IP software version'.
4 The version of the software appears in the right-hand window.
102
Océ VarioPrint 2090 Configuration and maintenance manual
Illustration
[51] The system, the Océ Smart Imager and the operating system software version
[51] The system, the Océ Smart Imager and the operating system software version
How to show the version of the complete system , the Océ Smart Imager or the operating
system software
1 Select 'System' in the title bar of the Océ VarioPrint 2090 Settings Editor.
2 Click 'Software versions'.
3 Select 'System', 'Océ Smart Imager version' or 'Océ Smart Imager operating
system'.
4 The version of the software appears in the right-hand window.
System maintenance
103
Illustration
[52] The printer main software version
[52] The printer main software version
How to show the printer main software version
1 Select 'Printer' in the title bar of the Océ VarioPrint 2090 Settings Editor.
2 Click 'Software versions'.
3 The version of the software appears in the right-hand window.
4 Select 'Printer main software version'.
104
Océ VarioPrint 2090 Configuration and maintenance manual
Illustration
[53] The printer Image Processing software version
[53] The printer Image Processing software version
How to show the printer IP software version
1 Select 'Printer' in the title bar of the Océ VarioPrint 2090 Settings Editor.
2 Click 'Software versions'.
3 Select 'Printer IP software version'.
4 The version of the software appears in the right-hand window.
System maintenance
105
Print and save the configuration report
Introduction
Task for: key operator, system administrator
The configuration report contains the information about the hardware and the
software configuration of the Océ VarioPrint 2090. Also, the report contains
the information about the network settings and the available fonts on your Océ
VarioPrint 2090.
Save the report to store the report in a digital form. The Océ service department
can ask you to send this report. The report can help to solve problems. The Océ
Smart Imager stores the report in PDF format.
The PDF files which are generated out of the Océ Smart Imager generated
PostScript files include a reference to the Aladdin package.
This document is generated with Aladdin Ghostscript, on the basis of the
Aladdin Free Public License.
Continue with the following procedure to receive a configuration report.
When to do
To correct problems or for example to archive current settings, you can print
all the configuration settings of your Océ VarioPrint 2090.
Before you begin
Start the Océ VarioPrint 2090 Settings Editor in your web browser in key
operator mode or system administrator mode (see ‘Access the Océ VarioPrint
2090 Settings Editor in key operator mode’ on page 9) or (see ‘Access the Océ
VarioPrint 2090 Settings Editor in system administrator mode’ on page 12).
106
Océ VarioPrint 2090 Configuration and maintenance manual
Illustration
[54] Print the configuration report
[54] Print the configuration report
How to print the configuration report
1 Select 'System' in the title bar of the Océ VarioPrint 2090 Settings Editor.
2 Click 'Print reports'.
3 Select 'Print configuration report'.
4 Click the 'OK' button to start the print job.
System maintenance
107
Illustration
[55] Save the configuration report
[55] Save the configuration report
How to save the configuration report
1 Select 'System' in the title bar of the Océ VarioPrint 2090 Settings Editor.
2 Click 'Save reports'.
3 Select 'Save configuration report'.
4 Click the 'OK' button to save the report to your local computer.
5 Click on the link 'download configuration report file' to start the download of
the report.
6 Select the download location on your computer to save the file.
108
Océ VarioPrint 2090 Configuration and maintenance manual
Print and save the system log file
Introduction
Task for: key operator, system administrator
The Océ VarioPrint 2090 stores the system log file on the local hard disk of the
key operator's computer or system administrator's computer. The system stores
the errors of users, for example bad input data, incorrect user commands or
missing licences in the system log file.
The messages in the system log file can help to indicate possible causes for the
malfunctions or bad performance of the Océ Smart Imager.
In the following procedure you learn how to print and save (in PDF format) the
system log file.
The PDF files which are generated out of the Océ Smart Imager generated
PostScript files include a reference to the Aladdin package.
This document is generated with Aladdin Ghostscript, on the basis of the
Aladdin Free Public License.
When to do
To find the information about malfunctions or bad performance of your Océ
VarioPrint 2090, you can print the system log file.
Before you begin
Start the Océ VarioPrint 2090 Settings Editor in your web browser in key
operator mode or system administrator mode (see ‘Access the Océ VarioPrint
2090 Settings Editor in key operator mode’ on page 9) or (see ‘Access the Océ
VarioPrint 2090 Settings Editor in system administrator mode’ on page 12).
System maintenance
109
Illustration
[56] Print the system log file
[56] Print the system log file
How to print the system log file
1 Select 'System' in the title bar of the Océ VarioPrint 2090 Settings Editor.
2 Click 'Print reports'.
3 Select 'Print system log'.
4 Click 'OK' to start the print job.
110
Océ VarioPrint 2090 Configuration and maintenance manual
Illustration
[57] Save the system log file
[57] Save the system log file
How to save the system log file
1 Select 'System' in the title bar of the Océ VarioPrint 2090 Settings Editor.
2 Click 'Save reports'.
3 Select 'Save system log'.
4 Click 'OK' to save the file to your local computer.
5 Click on the link 'download system log file' to start the download.
6 Select the download location on your computer to save the file.
System maintenance
111
Set and download the trace log file
Introduction
Task for: key operator, system administrator
The Océ Smart Imager of the Océ VarioPrint 2090 supports a trace function. If
you use this trace function, the Océ Smart Imager generates a trace log file.
You can indicate the mode of the trace function. 'Off' indicates that the Océ
Smart Imager generates no trace log file. Select one of the two other modes
'Basic' or 'Detailed' to make the Océ Smart Imager create a trace log file.
The 'Detailed' mode generates a larger file and contains more information than
the 'Basic' mode. The service department can use this file to correct the
problems of the Océ VarioPrint 2090.
You can generate a copy of the trace log file on your local PC. Océ service
technicians can ask you to generate the trace log file to help them to correct
problems.
The PDF files which are generated out of the Océ Smart Imager generated
PostScript files include a reference to the Aladdin package:
This document is generated with Aladdin Ghostscript, on the basis of the
Aladdin Free Public License.
Note: Restart the Océ Smart Imager to activate the new trace mode.
When to do
When the Océ VarioPrint 2090 causes problems or malfunctions, the service
technician can use the trace log file to find the problem. Run the Océ VarioPrint
2090 in the right trace mode before you call the help desk. Océ service
technicians can ask for this file.
Before you begin
Start the Océ VarioPrint 2090 Settings Editor in your web browser in key
operator mode or system administrator mode (see ‘Access the Océ VarioPrint
2090 Settings Editor in key operator mode’ on page 9) or (see ‘Access the Océ
VarioPrint 2090 Settings Editor in system administrator mode’ on page 12).
112
Océ VarioPrint 2090 Configuration and maintenance manual
Illustration
[58] Set the trace mode
[58] Set the trace mode
How to set the trace mode
1 Select 'System' in the title bar of the Océ VarioPrint 2090 Settings Editor.
2 Click 'Trace mode'.
3 Select the trace mode 'Off', 'Basic' or 'Detailed'.
4 Click the 'OK' button to apply the changes.
System maintenance
113
Illustration
[59] Save the trace log file
[59] Save the trace log file
How to save the trace log file
1 Select 'System' in the title bar of the Océ VarioPrint 2090 Settings Editor.
2 Click 'Save reports'.
3 Select 'Save trace log file'.
4 Select the required session, current or previous.
Note: When the system is restarted, a new trace log file is initiated. You can
select the trace log file of the previous session (before the restart).
5 Click the 'OK' button to save the file to your local computer.
6 Click on the link 'download trace log file'to start the download.
7 Select the download location on your computer to save the file.
114
Océ VarioPrint 2090 Configuration and maintenance manual
Show the last 10 errors and warnings
Introduction
Task for: key operator
The Océ Smart Imager remembers the last 10 errors or the last 10 warnings that
are detected on the system. To solve a problem, a service technician can ask
you to show these errors.
Before you begin
Start the Océ VarioPrint 2090 Settings Editor in your web browser in the key
operator mode (see ‘Access the Océ VarioPrint 2090 Settings Editor in key
operator mode’ on page 9).
Illustration
[60] The last 10 errors
[60] The last 10 errors
System maintenance
115
[61] The last 10 warnings
[61] The last 10 warnings
How to show the last 10 errors and warnings
1 Select 'System' in the title bar of the Océ VarioPrint 2090 Settings Editor.
2 Click 'Service info'.
3 Select 'Last 10 errors' or 'Last 10 warnings'.
116
Océ VarioPrint 2090 Configuration and maintenance manual
Add consumables
Load the paper trays
Introduction
Task for: operator
The Océ VarioPrint 2090 has 4 front loading paper trays. All 4 paper trays can
handle the same variety of copy materials (See Materials that can be used). You
can add paper to the paper trays during a print run. The Océ VarioPrint 2090
will use another paper tray that contains the same copy material.
When to do
You load paper in the paper trays in the following situations.
■ The paper tray is empty.
■ The print job needs a special paper type.
■
■
The print job needs 'My paper'.
The paper tray does not contain the correct paper type.
You can check the status of the paper trays on the operator panel when you
access the 'System information'. You can also check the LED on the paper tray
to see which paper tray is empty. The LEDs on the paper trays are off when
they are full. When the paper tray runs empty, the LED is on.
System maintenance
117
How to load the paper in the paper tray
1 Press the button on the front side of the paper tray to open the paper tray.
[62] Open the paper tray
[62] Open the paper tray
The LED of the paper tray blinks rapidly while the tray inside moves down.
2 Wait for the paper tray to unlock and open.
3 Take the paper from the pack.
4 Hold each pack of paper at the two short sides.
5 Bend the pack.
6 Put the paper into the paper tray.
Oriented paper (company paper for example) is always loaded face down.
7 Adjust the paper guides.
Based on the position of the paper guides the Océ VarioPrint 2090 can identify
the paper size.
Note: The paper type cannot be set on the Océ VarioPrint 2090. The paper
types are defined in Intralogic, the printer driver or another tool.
8 Close the paper tray.
The tray inside moves up again and the LED on the paper tray is off.
118
Océ VarioPrint 2090 Configuration and maintenance manual
Add the toner
Introduction
Task for: operator
When the toner level of the Océ VarioPrint 2090 is low, the operator panel
displays a toner icon
to inform the user of the status of the toner supply. In
the 'System information' section, the toner warning indication is highlighted
when the toner level is low or all toner is used.
When to do
Add the toner if you get the graphical warning and the warning message on the
display of the operator panel.
Before you begin
Follow the instructions on the screen of the operator panel.
Attention: Only add the toner if the Océ VarioPrint 2090 asks you to add
the toner. Only use Océ F11 toner. Never add more than 1 bottle at a time.
Attention: The Océ VarioPrint 2090 must be switched on to add the toner.
Attention: If you spill some toner, refer to 'Safety data sheets' in appendix B
for information about removal and cleaning.
Illustration
[63] Toner level is low warning
[63] Toner level is low warning
System maintenance
119
How to access the toner reservoir
1 Open the front door on the left-hand-side of the Océ VarioPrint 2090.
2 Turn the screw of the toner reservoir anti-clockwise with a screwdriver or coin
to open the reservoir.
3 Pull the cover of the toner reservoir towards you.
4 Remove the cover of the toner reservoir.
How to add the toner
1 Shake the toner bottle well (see the instructions on the bottle).
2 Remove the screw cap from the bottle.
Note: Do not remove the seal from the bottle.
120
Océ VarioPrint 2090 Configuration and maintenance manual
3 Push the toner bottle into the toner reservoir.
4
5
6
7
8
9
Note: You can not rotate the bottle when the bottle is in the toner reservoir.
Check the ridge to put the bottle into the right position.
Remove the bottle when empty. Be careful, do not spill toner.
Put the cap back on the empty toner bottle.
Close the cover of the toner reservoir.
Close the front panel.
Access the 'System information' section on the operator panel.
Select 'Confirm refill'.
10 Close the 'System information' section on the operator panel.
System maintenance
121
Add the staples
Introduction
Task for: operator
The finisher module has 2 on-line staplers, which can staple a maximum of 80
sheets of 80 g/m2 (20 lbs).When 1 or both staplers run out of staples, the Océ
VarioPrint 2090 displays a staple icon on the screen of the operator panel. The
'System monitor 'shows the empty status of the stapler with a graphic
representation .
If the stapler runs empty when you start a job or during a job, a warning
message appears. If a job stops because of a lack of staples, you have the
following choice.
■ Refill the stapler(s).
■ Cancel the job.
■ Continue the job without staples.
Note: The finisher module has an optional off-line stapler, which can staple 70
sheets of 80 g/m2.
When to do
When the staples in the staplers are (almost) used, add the staples.
122
Océ VarioPrint 2090 Configuration and maintenance manual
Illustration
[64] Location of the on-line staplers
[64] Location of the on-line staplers
How to access staplers 1 and 2
1 Open the front door of the finisher.
2 Open the top cover of the finisher.
3 Check if the staplers are aligned correctly.
Note: The staplers must be extended to the maximum position. If the staplers
are not in the correct position, stapler 1 is not accessible.
4 Close the top cover of the finisher if the staplers are not in the correct position.
5 Pull stapler 2 toward you until the stapler cannot go any further.
6 Open the top cover of the finisher again.
Note: Stapler 1 is accessible when the stapler cartridge is tilted upward.
Attention: When you open the front door and the top cover of the finisher,
look if the jaws of the staplers are open. If the jaws are not (completely)
open, you must close the top cover and the front door of the finisher and
wait 15 seconds. The Océ VarioPrint 2090 opens the jaws of the staplers.
Now you can remove the stapler cartridge.
System maintenance
123
Attention: Do not remove the stapler cartridge if the jaws are (partly)
closed. If you did remove the stapler cartridge when the jaws were open,
save the stapler cartridge. The service technician repairs the stapler
cartridge at the next service visit.
Illustration
[65] Location of the off-line stapler
[65] Location of the off-line stapler
How to access stapler 3 (off-line stapler)
1 Open the front door of the finisher.
2 The stapler cartridge is found in the left lower-hand corner of the finisher.
Note: The correct position of the off-line stapler cartridge is upside-down.
124
Océ VarioPrint 2090 Configuration and maintenance manual
How to add the staples
1 Push against the upper part of the stapler cartridge.
2 In the same movement, lift the lower part of the stapler cartridge and pull the
stapler cartridge toward you.
3 Remove the stapler cartridge from the stapler.
4 Remove the loose staples if necessary.
Note: Make sure not to drop any staples in the finisher.
5 Take a new cartridge, type S3.
6 Remove the packing material.
7 Slide the stapler cartridge into the stapler.
8 Press until the stapler cartridge clicks into place.
Note: If the new stapler cartridge does not fit, put back the old stapler cartridge
and call service.
9 Close the top cover of the finisher.
10 Close the front door of the finisher.
System maintenance
125
126
Océ VarioPrint 2090 Configuration and maintenance manual
Océ VarioPrint 2090
User manual
Appendix A
Miscellaneous
127
Reader's comment sheet
Questions
Have you found this manual to be accurate?
O Yes
O No
Were you able to operate the product, after reading this manual?
O Yes
O No
Does this manual provide sufficient background information?
O Yes
O No
Is the format of this manual convenient in size, readability and arrangement
(page layout, chapter order, etc.)?
O Yes
O No
Could you find the information you were looking for?
O Always
O Most of the times
O Sometimes
O Not at all
What did you use to find the required information?
O Table of contents
O Index
Are you satisfied with this manual?
O Yes
O No
Thank you for evaluating this manual.
If you have other comments or concerns, please explain or suggest
improvements overleaf or on a separate sheet.
1060002609
128
Océ VarioPrint 2090 Configuration and maintenance manual
Comments:
------------------------------------------------------------------------------------------------------------------------------------------------------------------------------------------------------------------------------------------------------------------------------------------------------------------------------------------------------------------------------------------------------------------------------------------------------------------------------------------------------------------------------------------------------------------Date:
This reader's comment sheet is completed by:
(If you prefer to remain unknown, please do fill in your occupation)
Name:
Occupation:
Company:
Phone:
Address:
City:
Country:
Please return this sheet to:
Océ-Technologies B.V.
For the attention of ITC User Documentation.
P.O. Box 101,
5900 MA Venlo
The Netherlands
Send your comments by E-mail to: [email protected]
For the addresses of local Océ organisations see: http://www.oce.com
Miscellaneous
129
Addresses of local Océ organisations
130
Océ-Australia Ltd.
P.O. Box 363
Ferntree Gully MDCVIC 3165
Australia
Océ-Italia S.p.A.
Strada Padana Superiore 2/B
20063 Cernusco sul Naviglio (MI)
Italia
Océ-Österreich GmbH
Postfach 95
1233 Vienna
Austria
Océ Systems (Malaysia Sdn. Bhd.)
#3.01, Level 3, Wisma Academy
Lot 4A, Jalan 19/1
46300 Petalig Jaya
Malaysia
Océ-Belgium N.V./S.A.
Avenue J. Bordetlaan 32
1140 Brussels
Belgium
Océ-Nederland B.V.
P.O.Box 800
5201 AV 's-Hertogenbosch
The Netherlands
Océ-Brasil Comércio e Industria
Ltda.
Caixa Postal 3187
01060-970 Sao Paulo, SP
Brazil
Océ Norge A/S
Postboks 53, Grefsen
0409 Oslo 4
Norway
Océ-Canada Inc.
4711 Yonge Street, Suite 1100
Toronto, Ontario M2N 6K8
Canada
Océ-Poland Ltd.
ul. Lopuszaska 53
02-232 Warszawa
Poland
Océ Office Equipment (Beijing) Co
Ltd.
Xu Mu Cheng
Chaoyang District
Beijing 100028
China
Océ-Lima Mayer S.A.
Av. José Gomes Ferreira, 11
Ed. Atlas II Miraflores
1495 Algés
Portugal
Océ-Ceská republika s.r.o.
Hanusova 18
14021 Praha 4
Pankrác,
Czech Republic
Océ (Far East) Pte. Ltd./
Océ (Singapore) Pte. Ltd.,
#03-00 Wisma Gulab
190 MacPherson Road
Singapore 348548
Océ VarioPrint 2090 Configuration and maintenance manual
Océ-Danmark A.S.
Kornmarksvej 6
DK 2605 Brøndby
Denmark
Océ España SA
Business Park MAS BLAU
C/Osona2, 2-3a Planta
08820 El Prat del Llobregat
(Barcelona)
Spain
Océ-France S.A.
32, Avenue du Pavé Neuf,
93161 Noisy-le-grand, Cedex
France
Océ-Svenska AB
P.O.box 1231
S-164 28 Kista
Sweden
Océ-Deutschland GmbH
Postfach 101454
4330 Mülheim an der Ruhr (13)
Deutschland
Océ-Schweiz AG
Sägereistrasse 29
CH8152 Glattbrugg
Switzerland
Océ (Hong Kong China) Ltd.
12/F 1202 The Lee Gardens
33 Hysan Avenue, Causeway Bay
Hong Kong
Océ (Thailand) Ltd.
16th Floor, B.B. Building
54 Asoke Road, Sukhumvit 21
Bangkok 10110
Thailand
Océ-Hungária Kft.
P.O.B. 237
1241 Budapest
Hungary
Océ-USA Inc.
5450 North Cumberland Av.
Chicago, Ill. 60656
U.S.A.
Océ-U.K. Ltd.
Langston Road
Loughton, Essex IG10 3SL
United Kingdom
Océ Ireland Ltd.
3006 Lake Drive
Citywest Business Campus
Saggarl
Co. Dublin
Ireland
Océ Finland OY
P.O. Box 163
FIN-OO181
Finland
OPS (South Africa) (PTY) Ltd.
P.O. Box 629
Rivonia
2128
South Africa
Océ Japan Corporation
3-25-1, Nishishinnbashi
Minato-Ku
105-0003 Tokyo
Japan
Miscellaneous
131
132
Océ VarioPrint 2090 Configuration and maintenance manual
1, 2 or no staples 49
controller software
upgrade 89
counters
day counter 94
physical print counter 94
print counter 94
scan counter 94
cover 52
A
D
activate the wake-up pin code 29
add the paper 117
add the staples 122
add the staples 125
adjust postscript settings 92
allow automatic printing 62
allow remote printing 56
automatic ip detection 70
automatic mailbox cleanup 61
automatic printing
continue 63
stop 63
available documentation 8
date and time 31
day counter 96
default
paper tray 51
staple mode 49
default for original sides 48
default paper tray 51
default scan mode 47
default staple mode 49
default start-up screen 41
define the paper size detection preferences 46
disable sleep mode 27
documentation set 8
download configuration report file 108
download system log file 111
Index
C
change the default gateway address 74
change the host name 71
change the ip address 72
change the pin code 15
change the pin code for the key operator 16
change the snmp community name 77
change the snmp manager address 78
change the snmp system description 77
change the subnet mask 73
change the wake-up pin code 29
check the network 83
cleanup the mailbox 60
clear the mailbox 58
company paper 52
configuration report 106
configure and maintain the system 12
confirm refill of toner 120
connection test 85
Index
E
enable ftp 82
enable lpd 80
enable network printing 80
enable snmp protocol 76
encrypted code 10
encrypted pin code 13
epa timers 24
F
fill the paper trays 117
for 1 day 60
for 1 month 60
for 1 week 60
ftp (file transfer protocol) 81
133
show the scanner main software version 101
test the lpr print path 84
test the tcp/ip connection 85
the océ varioprint 2090 from sleep mode with
pin code 30
upgrade the controller software 89
H
host name in user list 54
how to
access the toner reservoir 120
activate the wake-up pin code 30
add the toner 120
adjust the postscript settings 92
allow automatic printing 63
allow remote printing from the user mailbox
57
change the default gateway address 74
change the host name 71
change the ip address 72
change the key operator name/location 34
change the snmp community name 77
change the snmp manager ip address 78
change the snmp system description 77
change the subnet mask 73
change the wake-up pin code 30
check the serial numbers 99
define the content of the paper trays 53
define the system location 40
enable dhcp for automatic detection of the ip
settings 70
enable ftp 82
enable the lpd protocol 80
enable/disable the snmp protocol 76
load the paper in the paper tray 118
print the system log file 110
read the day counter 96
read the mac address 87
read the print counter 95
read the scan counter 97
remove all ip jobs from the job queue 65
save the system log file 111
save the trace log file 114
set the automatic mailbox cleanup 61
set the date and time 32
set the default scan mode 48
set the operator language 44
set the operator panel time-out 42
set the trace mode 113
show the host name in the user list 55
show the printer ip software version 105
show the printer main software version 104
show the scanner ip software version 102
134
I
identification
system location 40
incorrect pin code 10
infinitely 60
ip jobs 64
K
key operator mode 9
key operator name/location 33
key operator telephone number 35
L
language panel 43
last 10 errors 115
last 10 warnings 115
local date 31
local time 31
location of the system 39
logon as key operator 9
logon as system administrator 12
logon screen 9
low power mode time 24
lpd - line printer daemon 79
lpr - line printer remote 79
M
mac address 87
machine number 98
mailbox
remove all print jobs 58
mailbox cleanup 60
Océ VarioPrint 2090 Configuration and maintenance manual
manuals
configuration and maintenance 8
job 8
quick reference card 8
safety 8
refill the stapler(s) 122
remote print job 56
remote printing from user mailbox 57
restore defaults 21
restore factory defaults 21
N
S
network errors 83
network test values 83
new releases or updates 88
new software cd-rom 88
normal paper 52
save reports 108, 111
save the system log file 109
save trace log 114
scan counter 97
scan mode
1-sided 47
2-sided 47
serial number 98
set operator language 44
set the date 32
set the time 32
show errors 115
show host name 54
show the host name in the user list 55
size detection preferences 46
sleep mode
disable 27
sleep mode time 24
snmp
community name 77
enable 76
manager ip address 78
simple network management protocol 75
system description 77
software versions 100
complete system 103
operating system software version 103
printer ip software version 105
printer main software version 104
scanner ip software version 102
scanner main software version 101
smart imager version 103
staple
refill stapler(s) 122
stapler
access stapler 3 124
access staplers 1 and 2 123
access the on-line staplers 123
jaws of the staplers 123
O
océ telephone number 37
off-line stapler 124
on-line staplers 123
operator
language setting 43
operator language 43
operator panel time-out 42
P
paper group 45
paper size detection preferences 45
paper tray content 53
pin code
key operator 15
pin code system administrator 17
postscript settings 90
default media format 90
error page 90
job time out 90
staple 90
print counter 95
print the system log file 109
R
refill the paper trays 117
Index
135
refill stapler(s) 122
system administrator mode 12
system information 119
system location 39
T
tcp/ip settings
default gateway 68
enable dhcp 68
host name 68
ip address 68
subnet mask 68
telephone number
key operator 35
océ 37
test lpr print path 84
test mode 84
test tcp/ip 85
test the network connection
lpr 83
ping 83
toner 119
access the toner reservoir 120
add the toner 120
low toner level 119
refill toner 119
toner bottle 120
trace function 112
trace log file 112
trace mode 113
basic 113
detailed 113
off 113
U
until tonight 60
upgrade the controller software 88
url 13
136
Océ VarioPrint 2090 Configuration and maintenance manual
Documentation Status Form
Manual Name
Océ VarioPrint 2090 Configuration and maintenance manual
INAP-name
CONF. AND MAINT. MAN. GB
Océ Codenumber
1060002609
Language
Gb
Documentation Version
2003-04
Identified codenumber
28/09/99
Reviewed
xxx
Approved/Final
xxx
Reviewed
xxx
Approved
February 26, 2003
Final
February 26, 2003
Planned Release Dates
Status
Release date documentation
February 26, 2003
Name of document
1060002609p.pdf
Print/Copy book
Printbook
Paper size
A4
Finished format
A5 (14.85 x 21cm)
Number of sheets
Last Page Number: 136
Name of Cover
1060002609k.pdf
Paper
90 grams, wit A4/190 grams wit A4
fl.
Text on Cover
Océ VarioPrint 2090 Configuration and maintenance manual
fl.
Packing
Geseald, gekrompen
fl.
Stickers
n.v.t.
Wire-O
zwart
fl.
Wire-O
4 / 8 pages
fl.
Binder
n.v.t.
fl.
Quick Reference Card
n.v.t.
fl.
Copies ITC
1 stuks, afleveren poort 33
fl.
Printproof
Ja
Inkoop bonnummer exemplaren BU
fl.
Notes: Omslag in kleur
Van:
●
Rob Janssen
ITC Documentation & Distribution
Phone. 077-3595749
Fax. 077-3595427
DK 03.18 ver.3
Kopie:
Balie, Dept. D&D, Loc.8T427
Mr. J.Teeuwen, Dept. R-IM, Loc.3G21
Mrs. C. Goossens,Dept. Inkoop, Loc. 2R254