1
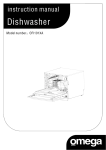
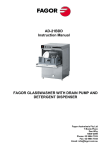
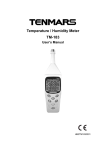
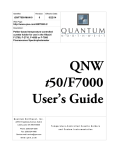
ChapterⅠ
1.1
1.2
1.3
ChapterⅡ
2.1
2.2
2.3
2.4
Instal lation----------------------------------------------------------- --1
Safety Instruction------------------------------------------------------ - 1
Instal lation Instruction--------------------------------------------------- 2
Tri al r unning---------------------------------------------------------- - 4
Maint enance---------------------------------------------------------- - 5
Forew ord-------------------------------------------------------------- 5
Troubleshooting-------------------------------------------------------- 5
Note----------------------------------------------------------------- -8
Attach ed drawings------------------------------------------------------ -8
Elect ric diagram-------------------------------------------------------- 9
1.1 Safety Instruction
Aft er unpacki ng, the appliance should be checked to see if there is any damage to it.
The dishwasher is intended to wash dishes and plates by adults.
When using the dishwasher , some basic principals should be followed:
1) Extended power cord and adaptor shoul d not be used.
2) The power cord should not be too long or knotted.
3) S wi tch off the power before maki ng any repair of the dishwasher.
Chi ldren should be kept away from the detergent and the opened dishwasher.
The n dishwasher should not be install ed in an unsheltered pl ace or exposed to the rain or other
nat ural environment.
Nev er touch the heating el ement during or immediately after use.
The dishwasher shoul d not be lean on or sit on when i t is open, otherwi se it will be overturned.
If th e dishwasher malfunctions, turn off the water inl et and cut off the power before you read the
ins truction of C hapterⅡ. If the problems cannot be solved by yourself, please contact the
pro fessi onal technici ans.
The dishwasher could not be repaired by unprofessional personnel wi th non-original spare par ts.
It is recommended that i f the di shwasher wi ll not be used for a long time, it should be cut off the
wat er inlet, remove the plug and keep the door of dishwasher aj ar.
1
1.2 In stallation Instruction
Un packing
1) Removing the packing accessories, please pay attenti on that the plastic bag should be out of the
reach of children.
2) Open the door of the dishwasher to check the baskets are placed in the proper pl ace
(m anufactures may fix the baskets by some simple ways for the sake of safety).
Locate the dishwasher
1) The dishwasher should be kept away from heating resources and not be exposed to the sun to
prevent its coating from fading or fal ling off.
2) The back of the dishwasher shoul d rest against the wa ll behind it and the sides, along the
adj acent cabinets or wall. The water supply and drain hose of the dishwasher coul d be positioned to
th e ri ght of the left to facili tate proper instal lation.
3) The dishwasher coul d not onl y be built in the cabinet and also be placed freel y.
Installation sketch map of free-stand type
MAX100c m
MIN40cm
2
Installation sket ch map of Built-in type
4 3 2
600
30
6 00
100
820
1
102
10
5
0
0
56
B
6
A
B
A
8
7
6
Installation steps:
1. leveling the appl iance
3. connecting chargi ng hose
5. disassembl e the top board
7. positioni ng in the cabinet
2.
4.
6.
8.
connecting drain hose
electrical conne ction
Leveling the app liance
Fix the top with t he board of cabinet
Note: Wh en makin g built-in installation of free-stand dish washer, after d issemble the top
board, the hook o f it situated on the upp er front corsspiece willbe extru d ed and needs to be
dispo sed
3
Leveling the appliance
Once the appliance is posi tioned, adjust the feet(screw them in o rout) to adj ust
the hei ght of the di shwasher, maki ng it level to ensure t he proper performance.
Charging hose connection
1.Connect the charging hose to a water faucet(with a uni coupl e).See
figure 4.
2.If the water pipe i s new or has not been used for an extended period
of time, let the water run to make sure that the water is clear and free o f
impurities, then connect i t wi th the charging hose of the dishwasher.
3.The water pressure i s 0.04-1.00Mpa.
Drain hose connectio n
MAX 100cm
MIN 40c m
Insert the drain hose into a drain pipe, or let i t run into a sink, but the
free end of the h ose must be at a height of less than or equal to 80cm
and must not be immersed in water.
Electr ical connection
1. After maki ng sure that the voltage and the frequency values for the
current i n the home correspond to those on the rating p late, insert the
plug i nto an electrical socket which is earthed properly. S ee figure 6.
2. If the electrical socket to whi ch the appl iance must be connected is
not appropriate for the pl ug, replace the socket rather th an using a
adaptor or the like as they could cause overheating and burns.
1.3 Trial Running
After installa tion, choose any one of the programs to run to check the di shwasher functio ns
wel l.
4
2.1 Foreword
Be fore any repai r service, you should check:
a) Whether the dishwasher i s properly installed according to the installatio n manual.
b) Whether the damaged components have been repaired or not.
c) Whether the charging hose and the drai n hose are properly installed.
d) Whether the di shwasher is level or not.
e) Whether there is salt in the water softener.
f) Whether there is rinse agent in the dispenser.
The ci rcuit board is the centrum of the whole control system of the dishwasher. When dishwasher
is washi ng bowels, Al l information come to the circui t, then the ci rcuit delivery various dictate
to every department of di shwasher to keep the dishwasher moving. the dishwasher move with a
arr anged program. If you know the program and structure of the d ishwasher, you wil l easy find
out al l kind of trouble of di shwasher.
2.2 Tro ub leshooting
Question s pu t forward b y u sers
The dis hwa she r do es not start
By misusag e of u sers
* Somet hing wron g with th e so cket
* No water (t he water valve is closed )
* Imp ro per electrical con nectio n
* Th e doo r is n ot properly closed
* Inco rrect p osition of charging h ose
The pro blems o f the d ishwash er itself
* Power cord
* "ON/OFF" switch
* Do or switch
* Wat er inlet valve
* Pressu re switch
* Aqu a- stop switch
Water f loods in t he dis hwashe r
* Air leakage of the ch amber
* Th e hose o f p ressure switch
* Pressu re switch
* Wat er inlet valve
The dis hwa she r do es not heat
* Malf un ction of heating elemen t
* Th e circuit is no t properly con tacted
* Malf un ction of t he therm oco uple
No water co mes in to the dish w asher * Wat er su pply is cut off
* Th e f ilter o f the water in let valve is
clog ged .
* Con nection to the inlet valve is
b ro ken or damag ed.
* Electrical connection is cut o ff.
* Pressure switch
* Aqu a- stop switch
* Th e so ften er is b lo cked.
5
The dish es are not clean enou gh after
washing
* Th e f ilter is clo gg ed.
* Unqualified detergen t or th e do sage
in t h e con tainer is not correct.
* No salt in the softener
* No rin se agent
* In co rrect loading of d ishes *
So meth in g wrong wit h t he drain pipe
in t h e ho me
* Flo w and pressure of washing pu mp
* Deterg en t is no t released from
disp enser
* Heating elem ent is no t wo rking
* Th e n oz zle is blocked by foo d
part icles
* No water comin g into th e
dish washer
* Th e d ispenser malfu nctions
* Sth wrong with t he pressu re switch
and th e charging water is no t enough
The dish washer couldn't
wash p rop erly
* Wro ng lo ading positio n of t he dish es.
* Sho rt circuit o f startup cap ac it an ce
* Wash in g m oto r is blocked o r bu rn t
* Pressu re switch
* Malf un ction of t he circu it bo a rd
The dishes ar e wet
* Th e cu sto mer ch ose t he program
wit h out drying perfo rmance
* Therm ocou ple d oesn't work
p ro perly
* Heating elem ent is m alf un ct io ns
* Somet hing is wro ng with t he
circuit b oard
The dish es are no t completely dried
* In co rrect loading of t he d ishes
* Earlier opening of the d oor
* No rin se agent or the dosag e is not
eno ug h
* In co rrect selecting th e p rogram
* The p assage of th e b reather i s
b lo cked
* The d rain pump does n ot dra in o ut
water
* Detergen t is no t released fro m the
d ispenser
Too much no ise
* Incorrect loading of dishes
* Noise from w ashing pump
* Noise from dr ain pum p
* Noise from w ater inlet valve
* Noise from br eather
Feelin g like t o be electrically
sho cked b y the d ishwasher
* Th e electrical wire in th e ho use is
not earth ed.
* Con nection of the t erm in al b ox
* Grou nd ing of t he heat in g ele men t
* Circuit an d its components
Water leakag e an d f lo od of the
dish washer
* To o much detergen t
* Using the detergen t with foam ,
wh ich is n ot the one int end ed for
u si n g with dishwash er
* Pressu re switch
* Do or gasket
* Wat er leakage of pipes, gask et s
and bo lts
* Drain h ose
* Wash in g pum p
* Soft ener valve
* Soft ener
* Breather
6
Odd smell in t he dishwashe r
* Food particles on the tub bot tom
* Food particles on the heating
element
* Plastic dishes used in t he
dishwasher
* T he w at er t emperatu re is to o
hig h when drying (overh eating)
* T herm ocou ple do esn't
wo rk p roperly
Long time for a washing cyc le
* Inlet pressure is to o lo w
* Incorrect locat io n of charging
and drain hoses or t hey are bent
* The f ilter o f inlet valve is blo cked
* Th e drain hose is crimped or bent
* M alf un ction of t he drain p um p
* Inf ill of t he inlet valve is b locked
* C log of the soft ener
* M alf un ction of t he therm ocouple
The det erg ent could not be released
fro m the dispenser
* Bad qu alit y o f the det erg ent
* The detergent is damp ed int o
blocks
* Wrong location of t he dishes
* T he p lug of detergen t container
cou ld not b e op ened .
* No act ion of the solenoid valve of
ele ct ric feeding dispenser.
* M alf un ction of t he elect ric circuit
* M alf un ction of t he therm ocoup le
Dishwasher stops when cyc ling
* The door is n ot complet ely shut
* The f ilter is blocked
* Too much detergent
* E lectric circuit
* Do or switch
* P ressu re switch
* T he circuit board
* P ower switch
Dishes are damaged or glassw are is
broken
* The dishes are not suitable for
washing in t he d ishwasher
* The dishes are overturned
* The w ashing temp erature is not
suitable f or glassware
* B asket is dam aged
* M alf un ction of t he therm ocoup le
The dishwasher does not dr ain
* Block of drain hose
* M alf un ction of drain pump
* I mproper connect ion of electric
circu it
* M alf un ction of t he therm ocoup le
Lime d epo sit s form on t he dishes
* Too much detergent
* Reduce the dosag e
The dish es look greasy and a blue f ilm
forms on them somet im es
* Too much rinse agent
* Reduce the dosag e
Dirty spots on t he surf ace of the
d ishwasher
* The detergent sticks to t he damp
surf ace
* Us e the deterg en t according t o t he
use r's manual
* Th e detergent should no t be spilled
on t he surface of the d ishwasher
Strange colo r of the surface of th e
washed dishes
* The salt is not int ended to use in
the dishwasher.
* T he influence of salt on the resin
7
2.3 Notes
1. Accordi ng to the program requiring, when the dishwasher is heated to a ce rtain
temperature, the circuit board will shut off the electric suppl y to the electrothermal
element.
2. Aqua-st op devi ce: start up the drain pump and make the dishwasher stop its running.
3. The 90℃thermostat i s closed under normal condition. When the dishwash er is heated to a certain
temperature, the thermostat will open to shut off the electri c supply to the el etrothermal el ements.
1 2 3 4
1
Pre-ri nse light: To c ome on whe n pr e-r inse .
2
3
Ri nse light: To c ome on whe n r ins e.
4 Dr ying l ight : To come on whe n dr ying.
Was h l ight: To come on whe n was h.
4. If the inlet valve has worked for 4 minutes, the pressure s witch has not acted, the dishwasher will
shut off all the loads and drain for 60 seconds, the al arm buzzer will ri ng for 30 seconds, at the same
time, the DRYING LIGHT coruscate then show on after drain ing.
5. If the drain pump ha s worked for 4 minutes, the pressure swi tch has not been reset, t he dishwasher
will shut off all the l oad s and drain for another 120 seconds after pressure swi tch reset, t he alarm buzzer
will ring for 30 seconds , at the same time, the RINSE LIGHT coruscate then show on afte r draining.
6. If the heating element have heated for 60 minutes, the the rmocouple has not acted, the dishwasher
will shut off all the l oads and drain for another 60 seconds af ter pressure switch reset, the alarm buzzer
will ring for 30 seconds, at the same time, the RINSE LIGHT and the DRYING LIGHT coruscate together
then show on after draining
7. If the micro switch for overflow protecti on has acted more than 2 seconds, the di shwasher will shut
off all the loads and drain for another 60 seconds after pressure switch reset, the alarm buzzer will ri ng
for 30 seconds, at the same ti me, the WASH LIGHT coru scate then show on after draini ng.
8. If the thermocouple have been checked for open circui t, the dishwash er wil l shut off al l the loads and
drain f or another 60 seconds after pressure switch reset, the alarm buzz er wi ll ring for 30 seconds, at the
same t ime, the WASH LIGHT and RINSE LIGHT coruscate together then s how on after draining.
9. If the thermocouple have been checked for s hort circuit, the dishwasher will shut off all the loads and
drain for another 60 seconds after pressure switch r eset, the alarm buz zer wi ll ring for 30 seconds, at the
same time, the WA SH LIGHT and DRY ING LIGHT co ruscate together then show on after draining.
2.4 Attached drawings
Electrical Drawi ng
8