1
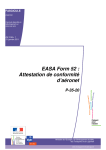
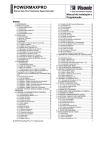
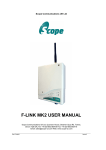
Page-Link Pro TM PC software for direct messaging to pagers and mobile phones User Manual Scope Communications UK Ltd, Quantum House, Steamer Quay, Totnes, Devon TQ9 5AL Tel: 01803 860700 Fax: 01803 863716 Email: [email protected] Web: www.scope-uk.com PLINKPRO/2 Page-Link Pro Information in this document is subject to change without notice. Companies, names, and data used in examples herein are fictitious unless otherwise noted. No part of this document may be reproduced or transmitted in any form or by any means, electronic or mechanical, for any purpose, without the express written permission of Scope Communications UK Ltd. 1997 Scope Communications UK Ltd., All rights reserved. Printed in the United Kingdom. Microsoft, MS, MS-DOS, Microsoft Windows 3.11, NT, 95 are all trademarks of Microsoft Corporation. NOTIFICATION OF COPYRIGHT This software package (“software”) is a proprietary product of Scope Communications UK Ltd., and is protected by copyright laws and international treaty. You must treat the software like any other copyrighted material, except that you may place the software on a single hard disk, provided that you keep the original software solely for backup or archival purposes. Copyright laws prohibit making additional copies of the software for any other reason. You may not copy the written materials accompanying the software without express written permission from Scope Communications UK Ltd. SOFTWARE LICENCE AGREEMENT Read this licence Agreement before using the enclosed software. This agreement is a legal contract between you, the end user, and Scope Communications UK Ltd., governing your use of the Software. Installing the accompanying software package indicates your acceptance of this Agreement. This agreement shall also be binding on any subsequent, authorised licensee. If you do not wish to agree to the terms of this Agreement, promptly return the complete software package, with disk(s) to the distributor from whom you obtained this product. You will receive a full refund provided you return the full Software package, and the disk package is unopened. If you have any questions concerning this Agreement, contact: Scope Communications UK Ltd. Attn: Customer Service Quantum House, Steamer Quay Totnes, Devon, TQ9 5AL UK. LICENCE 1. Scope Communications UK Ltd., grants you the right to use one copy of the Page-Link Pro software on a single-user computer, or on a single terminal workstation of a multi-user computer or Local Area Network (LAN). Scope Communications UK Ltd., grants you the right to use Enterprise Client on multiple workstations on a single LAN. 2. You may not sub licence, rent, or lease the software, but you may permanently transfer your licence to use the software and accompanying materials by delivering to another party the original diskettes and materials comprising the software package, including the title page of the reference manual. You must also simultaneously destroy all copies of the software and accompanying materials in your possession. Such transfer terminates your licence to use the software. The new recipient of the software and accompanying materials accepts this agreement and is licensed under the terms of this Agreement upon initially using the Software. 3. You may not de-compile, disassemble, reverse engineer, copy, transfer, or otherwise use the software except as stated in this Agreement. 03/03/00 Page 1 of 17 Issue 4 Page-Link Pro TABLE OF CONTENTS Section Page COPYRIGHT & LICENCE 1 OVERVIEW 3 INSTALLATION – Page-Link Pro 4 SETUP: Transmitter/Main Password/Modem Pagers Pager Groups 5 6 7 9 NETWORK INSTALLATION – Page-Link Enterprise Client 9 OPERATION – Page-Link Pro: Paging/Range Test Schedule Events Activity Log 11 12 15 OPERATION – Page-link Enterprise Client 16 TECHNICAL PARAMETERS 16 WIDE AREA SERVICES 17 03/03/00 Page 2 of 17 Issue4 Page-Link Pro OVERVIEW With Page-Link Pro software installed on a Server or Standalone computer, it will allow you to create pages for an On-Site paging transmitter and will also allow connection to a Wide Area paging service provider. The software will operate on Microsoft Windows 3.xx, Windows NT 3.51, 4.0 and Windows 95. After installation, you must select the paging transmitter for On-Site paging. If you are using the ConneXions unit from Scope Communications UK Ltd., you should select [Scope] for transmitter type. Page-Link Pro is not communication port sharing software, therefore the program can be run in the background for hot key operation. Some of the features of Page-Link Pro - Unlimited Pagers and Groups - Unlimited Wide Area Service Providers - Scheduling Automatic Pages - Automatic repeating of scheduled messages - Transmit pages to Alpha, Numeric, and Tone pagers at the same time - Print Activity Log - Long Message Capability - Attach contents of text files to a message - Search pager list using first character of pager description - Add senders signature to message Network operations require the installation of Page-Link Enterprise Client software on each workstation. The workstation has all the functions of the Server except the ability to ADD or DELETE pagers from the pager listing. During network operations Page-Link Pro on the server must be activated in order for Page-Link Enterprise Client to function. The Help menu is accessed from the on-line help file at any time simply by pressing the F1 key. Page-Link Pro and Page-Link Enterprise Client are designed to run on an IBM compatible PC with Microsoft Windows 3.xx, Windows NT 3.51 and 4.0, or Windows 95 installed. The licence issued with the software does not imply that you are licensed to use Microsoft Windows software from Microsoft Corporation. If the user does not understand the operations of MS-Windows, you should refer to the Windows operations manual before proceeding. 03/03/00 Page 3 of 17 Issue4 Page-Link Pro INSTALLATION Page-Link Pro 1. Floppy: insert the Page-Link Pro Disk 1 into the appropriate drive (example uses A:). MS-Windows 3.xx & NT 3.51 - Select [FILE], [RUN], type [A:\SETUP.EXE] and click [OK]. MS-Window 95 & NT 4.0 - Select [START], [RUN], type [A :\SETUP.EXE] and click [OK]. 2. CD: insert the CD into the appropriate drive (example uses D:). The program should Auto Run – follow the on-screen prompts. For manual installation, type D:\PAGELINK\CD\SETUP.EXE 3. The program will be installed into a directory called [C:\PAGELINK]. 4. When installation is complete, you will be prompted to register your details: 5. When prompted for comms configuration, select [CONFIGURE LATER]: 6. MS-Windows 3.xx & NT 3.51 - The install program will create a program Icon for you: 9. MS-Windows 95 & NT 4.0 - The install program will add Page-Link Pro to the [PROGRAM] menu. You can create a short-cut for the desktop, refer to your Windows operation manual. 10. This completes the installation of the paging software. 03/03/00 Page 4 of 17 Issue4 Page-Link Pro SETUP A. On-Site Transmitter 1. From the Main screen, select [CONFIGURE], [OPTIONS], [ON-SITE TRANSMITTER]. 2. Click on the DOWN ARROW at the right of the Paging Transmitter window and select the correct On-Site transmitter for your installation. 3. Check the [BAUD RATE], [PARITY], [DATA BITS], and [STOP BITS] to ensure they are set correctly for your transmitter selection. NOTE: Scope must be set for 9600,N,8,1 unless otherwise advised. B. Main 1. Select [CONFIGURE], [OPTIONS], [MAIN]. 2. Select the options you want by clicking once on the square next to the text. 3. Signature - Send the name of the person sending the page. 4. Always on top - Do you want the application to always be visible during any operation. Note: this feature must be turned off when editing in the Pager screen or the drop-down selection boxes for the various fields cannot be accessed. 5. Maximum size at startup - When application is activated it will be full screen. 6. Recurring Scheduled Messages Only - tick to repeat send a message automatically. 7. Send Message - When a pager is selected it will be highlighted, if [CLEAR SELECTED PAGER] is ticked, the highlight will be removed after paging is completed. 03/03/00 Page 5 of 17 Issue4 Page-Link Pro 8. Multi-Tone/Vibe Prompt (a) Show for Tone / Vibe pagers - This will prompt you to select an Alert (beep) mode for Tone only pagers (beep types A, B, C or D). (b) Show for Text and Numeric pagers – disused function. *Alert mode now activated by selecting [CONFIGURE] from the main toolbar and clicking on “Request Cadence”. *Page-link Pro only, this feature is not available on Enterprise Client 9. Password Protection Page-Link Pro offers password protection. Using the password will prevent unauthorised access to pager set up and the options menus. If you elect to use password protection, proceed as follows: 1. Click on the Password button in the Main menu 2. Enter your password information. 3. Select [OK]. 4. To change password at any time, reselect as in 1. You will be prompted for both the old and new password. If you no longer wish to use the Password feature, simply enter the old password and leave the “New Password” box blank. C. Modem If you have a modem installed and are going to use the Wide Area Paging option, complete the following. 1. Select the manufacture of the modem installed in your computer from the drop down menu. (to check modem type and Com port details, in Windows select Control Panel, Modems). 2. The Init String will be inserted automatically to match the modem selected. 03/03/00 Page 6 of 17 Issue4 Page-Link Pro D. Pagers 1. Select [CONFIGURE], [PAGERS], [TYPES]. 2. For each type of pager set the [MAX MESSAGE SIZE] and [ON-SITE DATA RATE] Note: most text pagers supplied by Scope are set to 1200 baud. Max. message size is dependent on pager type supplied (NEC20 = 120 char; NEC26 = 512 char). Check details supplied with your order. 3. Click the [+ADD]. 4. When you have completed entering the Pager Types click on [OK]. 03/03/00 Page 7 of 17 Issue4 Page-Link Pro 4. Click on the pager type below the word [TYPE] and select the type of pager you want to set up. 5. Press [ENTER]. 6. Using the arrow keys, move to the field under the [SERVICE] column. 7. Select the type of service for the pager you are installing. On-Site or one of the Wide Area providers. Press [ENTER] 8. Using the arrow keys, move to the field under the [PIN] column. 9. Type in PIN number and alert (beep) code for the pager you are installing. Press [ENTER]. (a) Scope On-Site Transmitter - seven digit Cap Code e.g. {0380008} {A,B,C or D}. (b) Wide Area Provider - Pin Number allocated by the service provider (see page 17). 10. Using the arrow keys move to the field under the [DESCRIPTION] column. 11. Type in the description of the pager to be installed. e.g. Ian Taylor. Press [ENTER]. Note: for ease of reference, you might find it useful to include the pager no. of the user in the description. For clarity, this can be placed in square brackets, as shown below. 12. Click on the [+ADD] key to add additional pagers. 03/03/00 Page 8 of 17 Issue4 Page-Link Pro E. Pager Groups 1. Select [CONFIGURE], [PAGER GROUP]. 2. Select [ADD]. 3. Enter the name of the group in the left hand column (Groups). 4. Select pager(s) for the group by clicking once on the pager name (in the All Pagers column) with the left mouse button. This will highlight the name and place it in the right hand column. 5. Select [OK]. This completes the set up of Page-Link Pro paging software. NETWORK INSTALLATION Page-Link Enterprise Client Page-Link Enterprise Client software allows you to create a page from any computer on your network. The software is network independent and does not use communication port sharing. It does not need specific network drivers or protocols e.g. Microsoft NetBeui or IPX/SPX. The software resides on the workstation like any other application. This allows the program to operate in the background. To install the Enterprise Client software on each workstation complete the following steps. 1. Ensure Page-Link Pro is running on the server. The [SERVER] is defined as any computer that your On-Site paging transmitter is connected to. 2. At the workstation, insert the CD into the appropriate drive (example uses D:). The program should Auto Run – follow the on-screen prompts. For manual installation, type D:\PLCLIENT\CD\SETUP.EXE For floppy installation, insert Disk 1 into the appropriate drive (example uses A:) and type A:\SETUP.EXE 03/03/00 Page 9 of 17 Issue4 Page-Link Pro 3. Accept the default drive or change to the correct one. DO NOT change the directory name. 4. Enter the complete path statement to the Page-Link Paging Server. 5. Enter your registration information. The name you enter on the registration will be the name used for the signature function during paging. 6. Follow the remaining prompts as they appear on the screen. This will complete the installation of the Client software. Repeat this installation on each workstation. 03/03/00 Page 10 of 17 Issue4 Page-Link Pro OPERATION A. Page-Link Pro The Page-Link Main window provides everything that you need to send custom or predefined messages to both individuals and groups. Sending Text Messages 1. Select the [PAGER(S)] you want to send a message to by clicking on the pager description, or use the pop-down menu under the Pager Groups heading and select the [PAGER GROUP] you want to send a message to. 2. Enter a message or select a predefined message to send. You can also edit predefined messages before sending. 3. Press the Send button. Sending Tone Only Messages 1. Select the [PAGER(S)] you want to send a message to by clicking on the pager description or use the pop-down under the Pager Groups heading and select the [PAGER GROUP] you want to send a message. 2. Leave the message to send field blank. Press the [SEND] button. 3. You will see a pop-up screen that asks you if you want to send a blank message. If you say “Yes”, another screen will allow you to select an alert type (A, B, C or D). 4. Select [OK]. B. Range Testing To ensure the On-Site transmitter will cover a specified area, you can use Page-Link Pro software to institute a repeat page at a given time. 1. Select [PAGER], [CONFIGURE], [START TEST]. 2. Enter the time between pages. 3. The Title Bar will start flashing. 4. Stop the repeat page. Select [CONFIGURE]. 5. Click on [START PAGE]. The Title Bar will stop flashing and the repeat page will stop. 03/03/00 Page 11 of 17 Issue4 Page-Link Pro C. Schedule You can schedule a single event, recurring event or recurring event with exceptions. (i). Single Event 1. Select [PAGER] or [GROUP] to receive the page. 2. Select the predefined message or create your own. 3. Select [SCHEDULE] button on the right of the main screen. The screen shown below will appear. 4. Enter the Date and Time you want the page to be sent. (ii) Recurring Event 1. Proceed as in 1-3 above, but do not set the date/time. Click on the [REPEAT] button. 2. The Recurring Event screen will be displayed, as shown below. 3. Select the Recurring events and the start date and time. 4. Clicking on Events will show a list of all events selected. 5. After completion, select [OK]. 03/03/00 Page 12 of 17 Issue4 Page-Link Pro (iii) Recurring Event with Exceptions 1. Select the recurring event as described above in (ii) Recurring Event. 2. Click on Exceptions and the following screen will be displayed: 3. Click on Add and the following screen will appear: 4. Select the date [On] or time span [During] when you don’t want to send a page. 5. Click on [OK] to accept. You may continue to add or edit exceptions as required. 03/03/00 Page 13 of 17 Issue4 Page-Link Pro 6. To review any scheduled events, select [View], [Status] and click on Scheduled Events. The following screen will appear: 7. The events can be re-sorted in alphabetic or numeric (date field) order by clicking on any of the field heading buttons e.g. clicking on the Pager button will re-sort the names in alphabetic order. Note: the sort will work from left to right, so entering surnames first might be more appropriate if you wished to sort on this field. 8. To view any Exceptions to a scheduled event, highlight the event, then click on [Edit]. The Recurring Events screen will appear. Click on Exceptions to review the excepted events. 03/03/00 Page 14 of 17 Issue4 Page-Link Pro D. Activity Log 1. Select [VIEW], [STATUS]. 2. The Activity Log displays all attempted pages, including their status (success, user aborted, etc). Adjust the log to meet your requirements. ie... how large each field will be. Click here with left mouse button and drag right or left to size. (for all Fields) 3. As with the Scheduled Events log (see page 14), clicking on any of the field header buttons will perform an alphanumeric sort on that field. 4. Click on [PRINT] button to produce a hard copy of all recorded events. E. Editing the Activity Log The Activity Log is stored in a file called [LOG.DAT]. In order to remove events from the log you must edit the log using a text editor like MS-Word or NotePad. To edit the Log.dat file complete the following steps. When used with Windows 3.xx or Windows NT 3.51 1. Select [FILE MANAGER] , [FILE]. 2. Select [ASSOCIATE], pick a text editor. {TEXT FILE (NOTEPAD.EXE)}. 3. In the {PCLIENT or PAGELINK} directory locate the [LOG.DAT] file. 4. Double click on the [LOG.DAT] file and it will appear in the text editor. 03/03/00 Page 15 of 17 Issue4 Page-Link Pro 5. Edit the file to remove all or part of the log. CAUTION: DO NOT REMOVE THE FIRST TWO LINES OF THE FILE When used with Windows 95, Windows NT 4.0 1. Select [START] , [PROGRAM]. 2. Select [WINDOWS EXPLORER]. 3. In the {PCLIENT or PAGELINK} directory locate the [LOG.DAT] file. 4. Double click on the [LOG.DAT] file and it will appear in the notepad editor. 5. Edit the file to remove all or part of the log. CAUTION: DO NOT REMOVE THE FIRST TWO LINES OF THE FILE. Operation Page-Link Enterprise Client Creating a page from the a workstation is done in exactly the same way as when using Page-Link Pro on a standalone computer. However, the following operations ARE NOT AVAILABLE from the workstations. 1) Adding or Deleting pagers from the pager list 2) Starting or stopping a Test Page 3) Changing On-Site transmitter selection 4) Dial out and Cancel Dial options Technical Parameters: Scope On-Site Transmitter See the information supplied with the transmitter. This is essential for ascertaining the pager identity codes (PIN). The default configuration settings for the transmitter serial port are as follows: Baud Rate: Parity: Data Bits: Stop Bits: 03/03/00 9600 None 8 1 Page 16 of 17 Issue4 Page-Link Pro Wide Area Services To access any external service providers, you will need a modem correctly installed and configured (see Set Up page 6). Full details of services available can be obtained from your telecom dealer. 1. From the Pagers screen, click on Services button and select Paging Service Providers. The following screen will be displayed: 2. Select the service you wish to access, or add the relevant service details using the Add button. Note: several service providers’ details have been pre-installed. However, some require a password to access the service and may also involve a monthly service charge. Please consult the relevant service provider for further details. 3. The details of the pager/mobile phone should be added in the Pagers screen (as per Pager Set Up, page 7). In the PIN column, the individual pager/phone access number should be entered. 4. In the Main window, select the relevant pager and message. Press Send. 5. Select [View], [Dial Out] to check the call status. The connection to the service provider, login request, data transmission and termination of the call will all be displayed in the dialogue screen as they occur. This will also indicate the final status i.e. “success”, or “error”. 6. Where the call is not successful, check the service provider details, paying particular attention to the password, PIN number and the baud rate. If the call fails after “waiting for login”, it is possible that the modem initialisation string needs changing. This is because some service provider terminals do not accept error checking or compression, features which are normally selected on most present day modems. Turn these features off by typing in the relevant codes for your modem into the Init String box on the Modem Configuration screen (see Set Up, page 6-7). For Hayes Compatible modems, the following Init String should be used: AT%C0\N0 (where 0= nought). If in doubt, check the manual supplied with your modem. ********************************************************* 03/03/00 Page 17 of 17 Issue4