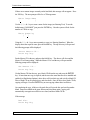
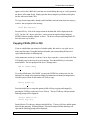
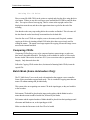
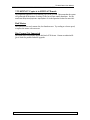
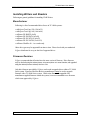
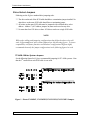
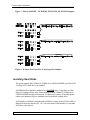
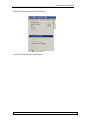
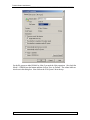
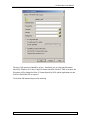
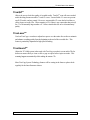
1
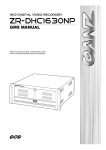
tm
TC-8000 Series
CD-R/RW Duplication Controller
User Manual
www.mediatechnics.com
With TrueCopy System Technology tm
TC-8000 Series User Manual________________________________________________________
tm
Powered By R-Quest
COPYRIGHT____________________________________________________
_
Copyright ©1999-2001 R-Quest Technologies, LLC (R-Quest TM). All rights reserved.
This manual and the software described in it are copyrighted with all rights reserved. No
part of this publication may be reproduced, transmitted, transcribed, stored in a retrieval
system or translated into any language in any form by any means without the written
permission of R-Quest TM.
TRADEMARKS__________________________________________________
_
R-Quest, CopyQuest, TC-8000, TC-8800, TC-8400, TrueCopy, TrueCopy System
Technology, TrueCopy Technology and Powered By R-Quest are trademarks of RQuest Technologies, LLC. Other brand names and product names are trademarks or
registered trademarks of their respective companies. R-Quest may also claim other names,
words or phrases contained in this manual as trademarks.
WARRANTY____________________________________________________
R-Quest warrants to the original purchaser that the equipment purchased will be free from
defects in material and workmanship for a period of one year. All warranty work should be
carried out by an official R-Quest distributor, or returned to the factory. Work carried out by
a non-authorized person will void the warranty.
If you discover physical defects in the media on which R-Quest software is distributed or in
the User’s Manual, R-Quest will replace the media or manual for a period of ninety (90)
days after the purchase of the retail customer. You must return the disk or manual to RQuest or an authorized R-Quest dealer within the warranty period accompanied by proof of
purchase.
R-Quest DISCLAIMS ALL IMPLIED WARRANTIES ON THE PRODUCT,
INCLUDING WITHOUT LIMITATION WARRANTIES OF MERCHANTABILITY,
PERFORMANCE AND FITNESS FOR A PARTICULAR PURPOSE. R-Quest WILL
NOT BE LIABLE FOR ANY BUG, ERROR, OMISSION, DEFECT, DEFICIENCY,
OR NONCONFORMITY IN ANY SOFTWARE. AS A RESULT, THE
SOFTWARE IS SOLD “AS IS”, AND THE PURCHASER ASSUMES THE
ENTIRE RISK AS TO ITS QUALITY AND PERFORMANCE.
R-Quest SHALL IN NO EVENT BE LIABLE FOR DIRECT, INDIRECT, SPECIAL,
INCIDENTAL, CONTINGENT OR CONSEQUENTIAL DAMAGES RESULTING
FROM ANY DEFECT IN THE SOFTWARE OR ITS DOCUMENTATION
ii
________________________________________________________TC-8000 Series User Manual
INCLUDING DAMAGES FROM LOSS OF DATA, EVEN IF R-Quest OR AN
AUTHORIZED R-Quest DEALER HAS BEEN ADVISED OF THE POSSIBILITY OF
SUCH DAMAGES. YOU AGREE THAT R-Quest’s LIABILITY ARISING OUT OF
CONTRACT, NEGLIGENCE, STRICT LIABILITY IN TORT OR WARRANTY
SHALL NOT EXCEED ANY AMOUNTS PAID BY YOU FOR THIS PRODUCT.
Any written or oral information or advice given by R-Quest dealers, distributors, agents or
employees will in no way increase the scope of this warranty. Nor may you rely on such oral
or written communication. Some states do not allow the exclusion or limitation of implied
warranties or liability for incidental or consequential damages, so the above limitation or
exclusion may not apply to you. This warranty gives you specific legal rights, and you may
also have other rights which vary from state to state.
Piracy / Illegal Copying________________________________________
The TC-8000 series copiers are designed to help you easily reproduce material for which
you own the copyright or have obtained permission from the copyright owner to make
copies. Unless you own the copyright or have permission from the copyright owner to make
copies, you may be violating copyright law and be subject to payment of fines, damages and
/ or other remedies. R-Quest accepts no responsibility for the use or misuse of this
equipment for illegal purposes. If you are uncertain about your rights, contact your legal
advisor.
TrueCopy System Technologytm_________________________________
This product incorporates TrueCopy System Technologytm which when used with
TrueCopytm recorders provides additional features that are of benefit to the duplication and
quality control process.
Several features are documented in this manual. Other features are working behind the
scenes, and are not mentioned further. Currently supported TrueCopy System Technologytm
features include:
TrueRIDtm – an Orange book compliant feature that allows for electronic watermarking of
recorded media.
TrueRIDtm Scan – a feature that allows media to be tracked to the recorder that created it.
TrueQAtm – a feature that allows the user to check the quality of recorded media.
TrueLasertm – a feature used on TrueCopytm recorders to maintain and enhance recording
quality over the entire recorder surface.
TrueSoundtm – a feature that allows the system to detect and reject audio masters likely to
cause a click or pop on copies.
iii
TC-8000 Series User Manual________________________________________________________
Additional features are being added, so please check regularly for the latest firmware
releases.
iv
________________________________________________________TC-8000 Series User Manual
TABLE OF CONTENTS
QUICK START ..............................................................................................................................................................1
BOX CONTENTS ........................................................................................................................................................ 1
OPERATING ENVIRONMENT ................................................................................................................................... 1
POWER ON ................................................................................................................................................................. 2
QUICK START COPYING (NOT CD TO CD) .......................................................................................................... 2
QUICK ST ART COPYING (CD TO CD).................................................................................................................... 3
QUICK START COMPARING .................................................................................................................................... 4
OPERATION..................................................................................................................................................................5
TURNING ON .............................................................................................................................................................. 5
KEYBOARD................................................................................................................................................................. 5
< YES Key.............................................................................................................................................................6
> NO Key..............................................................................................................................................................6
/\ Key .....................................................................................................................................................................6
\/ Key .....................................................................................................................................................................6
Enter Key..............................................................................................................................................................6
Stop Key................................................................................................................................................................6
LCD DISPLAY ............................................................................................................................................................ 6
M ENUS STRUCTURE ................................................................................................................................................. 7
Start Copying ......................................................................................................................................................7
Start Comparing .................................................................................................................................................7
Copy CD to CD....................................................................................................................................................7
Image Functions..................................................................................................................................................7
Load New Master ............................................................................................................................................. 7
List of Images .................................................................................................................................................... 7
Show HD Free Space ........................................................................................................................................ 7
Delete Image ...................................................................................................................................................... 7
Rename Image.................................................................................................................................................... 8
Defragment HD................................................................................................................................................. 8
Utilities .................................................................................................................................................................8
Hard Disk Utilities ............................................................................................................................................ 8
Show HD Free Space................................................................................................................................... 8
Show HD Info.............................................................................................................................................. 8
Defragment HD............................................................................................................................................ 8
System HD Format...................................................................................................................................... 8
Firmware Utilities ............................................................................................................................................. 9
Load System F/W ........................................................................................................................................ 9
Load F/W From CD..................................................................................................................................... 9
Load F/W XMODEM ................................................................................................................................. 9
Load Drive F/W ........................................................................................................................................... 9
TrueRID Scan.................................................................................................................................................. 10
TrueQA Scan................................................................................................................................................... 10
System Information......................................................................................................................................... 10
PCA Info.................................................................................................................................................... 10
Writer Info ................................................................................................................................................. 11
TrueRID Info............................................................................................................................................. 11
Hard Drive Info.......................................................................................................................................... 11
Upgrade License.............................................................................................................................................. 11
v
TC-8000 Series User Manual________________________________________________________
Show Current Key ..................................................................................................................................... 11
Enter New Key .......................................................................................................................................... 11
Setup Menu ........................................................................................................................................................11
Duplication Options ....................................................................................................................................... 11
Burn CD..................................................................................................................................................... 12
Compare Master........................................................................................................................................ 12
Compare Copy .......................................................................................................................................... 12
Multi Image HD......................................................................................................................................... 12
Ask Quantity ............................................................................................................................................. 13
Check CD-R Size....................................................................................................................................... 13
Enable CD+G............................................................................................................................................. 13
TrueRID..................................................................................................................................................... 13
Master Drive.............................................................................................................................................. 13
Read/Write Speed............................................................................................................................................ 13
Read Data................................................................................................................................................... 14
Read Audio ................................................................................................................................................ 14
Write.......................................................................................................................................................... 14
PASSWORD M ENU ................................................................................................................................................... 14
ENTERING TEXT ..................................................................................................................................................... 15
CD Image Name.................................................................................................................................................15
Key String...........................................................................................................................................................15
Numbers..............................................................................................................................................................15
COPYING CD-RS (NOT CD TO CD)....................................................................................................................... 15
COPYING CD-RS (CD TO CD)................................................................................................................................ 17
COMPARING CD-RS................................................................................................................................................. 18
BATCH M ODE (SOME A UTOLOADERS ONLY)................................................................................................... 18
APPENDIX A - ERROR MESSAGES ......................................................................................................................20
APPENDIX B - SETUP ...............................................................................................................................................22
DEFAULT SETUP .................................................................................................................................................... 22
Duplication Options Setup .............................................................................................................................22
Read/Write Speed..............................................................................................................................................22
INSTALLING W RITERS AND READERS................................................................................................................. 23
Manufacturer.....................................................................................................................................................23
Firmware Revision............................................................................................................................................23
Drive Select Jumpers........................................................................................................................................24
TC-8400 4 Writer System Jumpers................................................................................................................ 24
TC-8800 8 Writer System Jumpers................................................................................................................ 25
INSTALLING HARD DISKS ...................................................................................................................................... 26
SUPPORTED FORMATS.......................................................................................................................................... 27
M ENU STRUCTURE ................................................................................................................................................ 28
APENDIX C – HYPERTERMINAL...........................................................................................................................30
USING HYPERTERMINAL TO UPLOAD FIRMWARE ........................................................................................... 30
APPENDIX D – EASY CD CREATOR 4 .................................................................................................................34
USING EASY CD CREATOR 4 TO M AKE CDS FOR DISTRIBUTION................................................................... 34
APPENDIX E – TRUECOPY SYSTEM TECHNOLOGY......................................................................................38
TRUERIDTM ............................................................................................................................................................... 38
TRUERIDTM SCAN .................................................................................................................................................... 38
TRUEQA TM................................................................................................................................................................ 39
vi
________________________________________________________TC-8000 Series User Manual
TRUELASERTM........................................................................................................................................................... 39
TRUESOUNDTM ......................................................................................................................................................... 39
List of Figures
FIGURE 1 - PLEXTOR PX-R820T, PX-W8220T, PX-W124TS, PX-W1210TS JUMPERS..................................... 24
FIGURE 2 – R-QUEST TRUECOPY12STM & TRUECOPY16STM JUMPERS................................................................ 25
FIGURE 3 – PLEXTOR PX-R820T, PX-W8220T, PX-W124TS, PX-W1210TS JUMPERS.................................... 26
FIGURE 4 – R-QUEST TRUECOPY12STM & TRUECOPY16STM JUMPERS................................................................ 26
vii
Quick Start
Your new TC-8000 Series CD-R Tower is designed to allow fast, easy and reliable
duplication of CD-R discs.
The following sections will get you started copying or comparing CD-Rs quickly. Useful
features are ignored here, so after getting started using these instructions we recommend you
browse the Operation section to become familiar with all the powerful features of your TC8000 Tower. Possible errors are also bypassed. If you encounter problems see the Error
Messages section of this manual.
Box Contents
Carefully remove your TC-8000 CD-R Tower from it’s shipping carton and verify that all
parts are present. If there are missing or damaged parts contact R-Quest or an authorized
distributor immediately to correct any mis-packed or missing parts.
You should find the following packaged with your CD-R Tower:
??TC-8000 CD-R Tower
??Power Cord
??This user manual
NOTE:
If your TC-8000 CD-R Tower is damaged during shipment, please contact the freight
carrier first, then contact your distributor or R-Quest.
You should save your shipping materials so that if the need arises you can return your
CD-R Tower for service. This packaging was designed specifically for shipping your
CD-R Tower. Other packaging may not be as suitable.
Operating Environment
Your TC-8000 CD Tower system should be used in a climate controlled environment free of
dirt, dust, excess humidity, excessive heat or electro-magnetic interference.
1
TC-8000 Series User Manual________________________________________________________
Allow at least four (4) inches of clearance around the sides and back of the unit for
ventilation.
Power On
After the power is turned on the TC-8000 CD-R Tower goes through a series of self-tests.
If the Main Menu prompt does not appear within a minute or so see the Error Messages
section of this manual.
Quick Start Copying (Not CD to CD)
This quick start section assumes the Duplication Options (Setup Menu|Duplication Options)
are set as shipped from the factory. If they are not or if these instructions do not work then
go to the Operation chapter of this manual for detailed operating instructions.
Use the up /\ or down \/ arrow keys to put the > cursor (on the Left of the LCD display)
next to the Start Copying menu line. Press the ENTER key to select that menu function. If
there is already a CD image on the hard drive the following prompt will be displayed:
Read New Master?
Press the YES key. The next prompt will be for a CD Image name (this will be the first
prompt if there are no images on the hard disk).
Enter Image Name
[
]
To use the default name just press the ENTER key at this point. (See the Entering Text
section of the Operation chapter for instructions on entering an image name.) Next the
system will ask for the number of CD-Rs to copy:
Enter Quantity
[
]
Press the up arrow key /\ to set the quantity to [0001]. Then press the ENTER key to accept
the quantity. The top drive tray will open and the following prompt will be displayed:
Insert Master CD...
Press any key.
Put the Master CD in the tray and press the ENTER key. The tray will close, and the master
disk will start analyzing, then reading. When the Master CD is read the tray will open and
the following prompt will be displayed:
2
________________________________________________________TC-8000 Series User Manual
Get Master CD...
Press any key.
Get the Master CD from the tray, put a blank CD-R into the tray and press the ENTER key.
The CD-R Writer tray will close and you are copying your first CD-R! There is a timer at
the top right corner of the display. This counts down, and shows the approximate time to go
before the end of the recording.
Quick Start Copying (CD to CD)
This quick start section assumes the Duplication Options (Setup Menu|Duplication Options)
are set as shipped from the factory. If they are not or if these instructions do not work then
go to the Operation chapter of this manual for detailed operating instructions.
Use the up /\ or down \/ arrow keys to put the > cursor (on the Left of the LCD display)
next to the Copy CD to CD menu line. Press the ENTER key to select that menu function.
The next prompt will be for a CD Image name.
Enter Image Name
[
]
To use the default name just press the ENTER key at this point. (See the Entering Text
section of the Operation chapter for instructions on entering an image name.) Next the
system will ask for the number of CD-Rs to copy:
Enter Quantity
[
]
Press the ENTER key to accept the quantity (0000 will keep copying until stopped by
pressing the STOP key at the end of a set of discs). The top CD-R tray will open and the
following prompt will be displayed:
Insert Master CD...
Press any key.
Put the Master CD in the tray and press the ENTER key. The tray will close, and the master
disk will start analyzing. When the Master CD has been analyzed all the other trays will
open and the following prompt will be displayed:
Waiting for CD Drive
Place as many BLANK CD-Rs in the writers as required and close the drives using the drive
eject button. If there are any drives still open, press and hold the ENTER key until all drives
3
TC-8000 Series User Manual________________________________________________________
close. The copier will now start copying. There is a timer at the top right corner of the
display that counts down, and shows the approximate time to go before the end of the
recording.
Note that the reader may stop reading before the recorders are finished. This is because all
the data from the reader has already been transferred to the hard disk.
Once the first set of CD-Rs are complete, remove the master, and if required, continue
copying to all drives by inserting a blank CD-R in the drive that was previously used for
reading the master. The master is no longer required for copying, because the image is now
stored on the internal hard disk.
Quick Start Comparing
Using the Compare function is essentially the same as copying. The only difference is that
you use the Start Comparing menu selection. So see the Quick Start section above.
NOTE:
Because of the way Audio and Video CDs are recorded, CDs containing Audio or
Video tracks cannot be verified. This is not a limitation of the TC-8000 series
equipment, but a limitation of the CD error correction system.
4
Operation
This chapter provides detailed operating instructions for your TC-8000 CD-R Tower. Your
CD-R Tower has many options and features designed to make it more productive and easier to
use. Please read through this chapter carefully so that you can take full advantage of all the
features of your system.
Turning On
When the TC-8000 CD-R Tower is turned on it goes through a series of self-tests and
displays several messages.
Following are all the messages displayed during a normal power-up:
First:
TC-8000 Series
(c) 1999-2001
R-Quest Technologies
Then several status messages will be displayed. And Finally:
>Start Copying
Start Comparing
Copy CD to CD
Image Functions
If this series of messages are displayed then your CD-R/RW Tower is ready for use. If this
series of messages are not displayed or different messages are displayed see the Error
Messages section of this manual.
Keyboard
Following is the function of each key on the keyboard:
5
TC-8000 Series User Manual________________________________________________________
< YES Key
Left arrow or YES – If being prompted to enter a number or character this key moves the
cursor 1 character to the left. If prompted with a question this key answers YES.
> NO Key
Right arrow or NO – If being prompted to enter a number or character this key moves the
cursor 1 character to the right. If prompted with a question this key answers NO.
/\ Key
/\ (up arrow) – If being prompted to enter a number or character this key increments the
character at the cursor to the next higher character or number. If a menu is being displayed
this key moves the cursor to the next menu selection up.
\/ Key
\/ (down arrow) – If being prompted to enter a number or character this key decrements the
character at the cursor to the next lower character or number. If a menu is being displayed
this key moves the cursor to the next menu selection down.
Enter Key
If being prompted to enter a number or name this key accepts the currently displayed
selection. If a menu is being displayed the ENTER key moves 1 level deeper into the menu
structure. If the next item is executable it starts that process.
Stop Key
This key stops or aborts whatever is going on. When writing CD-Rs the system is busy and
this key may be sluggish so press and hold it down until prompted to do something else.
While a menu is being displayed the STOP key backs up 1 level higher in the menu
structure.
LCD Display
The LCD display is used either to display menus or to show status. For instance while
copying it shows what it is doing, the number it has to do, how many it has done and the
current mode (Disk at once or track at once).
6
________________________________________________________TC-8000 Series User Manual
Menus Structure
Use the up /\ and down \/ arrow keys to position the cursor (a > character on the left most
column of the display) to the desired menu item. Then use the ENTER key to select it.
Following is a description of each menu selection.
Start Copying
Use this menu option to start copying CD-Rs by reading the master to the hard disk and then
copy from the hard disk image. See the Copying CD-Rs section of this chapter for further
instructions
Start Comparing
Use this menu option to start verifying CD-Rs. See the Verifying CD-Rs section of this
chapter for further instructions.
Copy CD to CD
Use this menu option to read a master, save the data to the hard disk and make copies at the
same time. See the section Copying CD-Rs (CD to CD) for more information.
Image Functions
This menu option is used to maintain image files kept on the hard drive. This menu item will
not be shown if Multi Image HD is not enabled in the Setup|Duplication Options function.
Load New Master
Read CD and put the image on the hard drive without copying or verifying.
List of Images
Show all CD images currently stored on the hard drive
Show HD Free Space
Display the currently available hard drive space. If CD images have been erased more
space may be created by defragmenting the hard drive using Image Functions|Defragment
HD function.
Delete Image
Delete a CD image stored on the hard drive.
7
TC-8000 Series User Manual________________________________________________________
Rename Image
Rename a CD Image currently stored on the hard drive. See the Entering Text section of
this chapter for instructions on inputting text.
Defragment HD
Recover all hard drive space associated with erased CD images. Depending on the hard
drive size and the number and size of erased CD images this function can take several
minutes to complete.
Utilities
The utilities menu provides several useful functions required to maintain and set up your CDR Tower system.
Hard Disk Utilities
These utilities are used to set up and maintain the hard drive in your system. The hard
drive provides a temporary storage buffer for the CDs you will be copying or verifying.
Show HD Free Space
Display the currently available hard drive space. If CD images have been erased
more space may be created by defragmenting the hard drive using Image
Functions|Defragment HD function.
Show HD Info
Display the installed hard disk information. This includes manufacturer, model, drive
firmware revision and total space in megabytes (MB).
Defragment HD
Recover all hard drive space associated with erased CD images. Depending on the
hard drive size and the number and size of erased CD images this function can take
several minutes to complete.
System HD Format
This function initializes the hard drive directory structure. It should be run anytime a
new hard drive is installed in a system. This function can also be used to quickly erase
all images in the hard drive.
8
________________________________________________________TC-8000 Series User Manual
NOTE:
This function does not actually remove CD Images from the hard drive and is
not a secure erase of the image data. It simply marks all the hard drive as
unused and available for CD Images.
Firmware Utilities
Firmware Utilities allows the firmware used by the TC-8000 Tower and the CD-R or
CD-RW drives to be updated (depending on the drive model).
Load System F/W
The software that is used by the TC-8000 to copy CD-Rs may be updated from time to
time, to add new features or support for new drives. The following functions are used to
update the firmware in the machine.
Load F/W from CD
This function reads firmware from a firmware CD-R and installs it in the TC-8000
Duplicator electronics. A firmware CD-R can be created by writing an ISO-9660
CD-R with an R-Quest TC-8000 series firmware file in the root directory.
Load F/W XMODEM
This function allows firmware to be transferred to the TC-8000 Duplicator via the
serial (RS232) port using standard Xmodem protocol. Select which serial port to use
(Port 2 is the port on the rear of the machine), and what speed to run at (9600 baud
or 115000 baud). Typical host software would be HyperTerminal in Windows®.
Please refer to the HyperTerminal instructions in Appendix C.
Load Drive F/W
The drive manufacturer may update the software that is used by the CD-R or CDRW drives from time to time. This could be for bug fixes, new features or format
support, or to optimize the recording quality on new media as it becomes available.
A file containing R-Quest approved drive firmware can be obtained from the R-Quest
web site, or R-Quest authorized distributors. This is the ONLY file that should be
used to update the drives. Do not attempt to use any other file, as it may contain
firmware that has not been approved by R-Quest.
9
TC-8000 Series User Manual________________________________________________________
VERY IMPORT NOTE:
It is VERY IMPORTANT that you do not turn off the power while this function
is running. Turning off the power before the Duplicator has completed the
drive upgrade may leave your CD recorders in a state where they no longer
function correctly. If you are in any doubt about this, please contact R-Quest,
or an authorized R-Quest distributor before using this feature.
The update process is very simple, but user confirmation is requested several times before
the drives are actually updated. The drive firmware update file MUST be located in the
root directory of a standard ISO9660 CD-ROM. Choose the menu item
Utilities|Firmware Utilities|Load Drive F/W and follow the prompts on the LCD.
TrueRID Scan
This function is useful for tracking media through a production process and is only
available when using TrueCopytm recorders. This function will request that a CD be
inserted, and will then scan for RID codes on recorded media. If no RID is present then
“No RID Found” will be display. If an RID is present it will be displayed on the LCD.
The RID will contain a drive manufacturer code, and the drive’s electronic serial number.
Every drive has unique RID. A CD with an RID code can be traced to the exact drive
that recorded it. To find the electronic serial number of TrueCopytm drives select the
menu item Utilities|System Information|True RID Info.
TrueQA Scan
TrueQA Scan is only available when used with TrueCopytm recorders. TrueQA scan will
scan recorded media checking for uncorrectable C1 and C2 errors. Uncorrectable C1
errors are present on all CD media, and are normal. However, uncorrectable C2 errors
lead to bad data, or clicks & pops on audio CDs. When scanning a CD, if there is any
count other than zero (0) for C2, consider this disc to be of unsatisfactory quality.
Note: Some CD Copy protection schemes rely on ‘bad blocks’, and so scanning a
copy protected CD will often reveal uncorrectable C2 errors.
System Information
These functions are used to display information about the various components installed in
the CD Tower.
PCA Info
Display the installed firmware level, the number of writers found in the system, and the
number of writers licensed in this system.
10
________________________________________________________TC-8000 Series User Manual
Writer Info
Display CD-R writer manufacturer, model number and firmware revision. While it is
possible to use different writer types, and different firmware revisions, R-Quest
recommends using the same writer type and the latest available writer firmware.
TrueRID Info
Display TrueCopy recorder manufacturer, model number, RID (Recorder
Identification Number). This number is unique. No two recorders will have the same
number. This number corresponds to the information returned by the TrueRID Scan
(see Utilities), and can be used to track recorded media. This function is only
available with TrueCopy recorders.
Hard Drive Info
Display the manufacturer, model number and capacity of the installed hard drive.
Upgrade License
Enabled options can be changed via these functions. To get a new key to enable new
options contact R-Quest or an authorized R-Quest distributor.
Show Current Key
Display current installed options Key String. You MUST have this Key String
available when contacting R-Quest or an authorized R-Quest distributor to change
your installed options.
Enter New Key
Enter a new installed options Key String. Entering this Key String can change your
installed options. Contact R-Quest or an authorized R-Quest distributor to get a new
key string. See the Entering Text section of this chapter for instructions on entering
text.
Setup Menu
These menus are used to select various options available on the CD Tower.
Duplication Options
These functions set up options used during the duplication process. Use the up arrow /\
key to scroll up or press the down arrow key \/ to scroll down. Press the YES or NO
key to select the desired values.
When the displayed selections are correct press the ENTER key to save or press the
STOP key to exit and leave the options unchanged.
11
TC-8000 Series User Manual________________________________________________________
Burn CD
If set to NO the system is in simulate mode and will not actually write a CD-R. It
goes through all the motions and is a good test to see if the CD Tower is in operating
condition.
NOTE:
If this is set to NO the following warning message will be displayed: WARNING
Copier is in SIMULATE mode, Press YES to continue or any other key to cancel and the
BURN/SIM field of the LCD will show SIM (for Simulate Burn) while copying
CD-Rs
Compare Master
If set to YES the Master CD will be read a second time and the new read compared
with the first. If the data are not the same a BAD MASTER error will be displayed.
NOTE:
This feature is disabled for any Audio or Video tracks on the CD. This is not a
limitation of the TC-8000 series, but a limitation of the CD format low-level
error correction systems.
Compare Copy
If set to YES every CD-R just copied will be reread and compared to the data written
(The CD-R will be Verified). If the data are not the same or there is a read error the
CD-R will be considered bad and rejected.
NOTE:
This feature is disabled for any Audio or Video tracks on the CD. This is not a
limitation of the TC-8000 series, but a limitation of the CD format low-level
error correction systems.
Multi Image HD
If set to YES CDs read will named and stored on the hard drive for future use. Many
CD images can be kept on the hard drive.
If set to NO a CD read will still be saved to the hard drive but it will have no name
and will be overwritten by the next CD read.
NOTE:
If Multi Image HD is enabled and CD Images are stored on the hard drive and
then the CD Tower is operated with Multi Image HD set to NO all the previous
images may be lost.
12
________________________________________________________TC-8000 Series User Manual
Ask Quantity
If set to YES, the user will be prompted for a quantity to copy/compare. If set to
NO, the machine will copy until told to stop by pressing and holding the STOP key.
Check CD-R Size
If set to YES, the copier will check that the image will fit on the blank CD-R before
starting to write. If set to NO, the copier will attempt to write the image to the CD-R,
even if the blank is not large enough. This may mean that copies are rejected, because
the blank CD-R did not have sufficient room. This feature allows CD-Rs to be over
burned.
Enable CD+G
This option is only available when Plextor PX-W124TSi recorders are installed. This
will allow the copier to scan the additional R-W subcodes for the presence of CD+G
data. In order to copy CD+G, this option must be set to YES. If you discover that
regular Audio CDs appear as CD+G, you may want to set this option to NO.
TrueRID
This option allows the user to select whether the drive will record an RID to the
duplicated media. The RID can be read using the TrueRID scan function (see
Utilities). This option will be set to YES by default. If you experience problems where
older professional audio equipment displays the RID instead of ISRC codes, turn this
option off. This feature is available only with TrueCopy recorders.
Master Drive
This option allows the user to select which drives (recorder or CD-ROM drive if
installed) will be used to read the master. Use the left and right arrow keys to select
the desired drive.
Read/Write Speed
These select the drive speeds to use for each type of drive I/O. To select higher speeds
press the up arrow key /\. To select lower speeds press the down arrow key \/. Only
those speeds supported by the installed drive will be displayed.
When the displayed speeds are the desired speeds press the ENTER key to save or
press the STOP key to leave the speeds unchanged.
NOTE:
Slowing the read speed down can sometimes help reading scratched or otherwise
damaged CD-Rs.
13
TC-8000 Series User Manual________________________________________________________
Read Data
Select the speed used when the reader reads data tracks.
Read Audio
Select the speed used when the reader reads audio or video tracks.
Write
Select the speed used when the writing (recording / burning).
NOTE:
Make sure the CD-R media being used is rated for the speed being used. For
instance if writing at 16X make sure the media is rated for 16X write
Password Menu
The TC-8000 series copiers allow access to be restricted by passwords. A different
password can also be set for general use (Operator Password), and for system setup
(Setup Password). The passwords operate independently of each other, so it is possible,
for instance, to have a password required for setup, but no password required for
Operator use. It is also possible to have a single Operator Password to give access to
the whole machine, without additional password requirements for the Setup Menu.
Passwords are optional. May users never need to use passwords.
Each password must be setup separately. By default, no password is active, and the
machine can be used without passwords. To enable a password, choose either.
Operator Password
or Setup Password from the Setup Menu then select Enable Password.
The system will request a default password. This is a password that is fixed within every
machine – and cannot be changed. The default password is YES ENTER YES ENTER
YES ENTER. The reason for a default password is to prevent passwords being enabled
accidentally.
Now enter any six key sequence. The same key sequence will need to be repeated to
confirm the new password. From now on this password will need to be entered when
prompted. Remember, a different password can be set for Operator and Setup, so be
sure to use the correct password.
Each password can be changed or disabled via additional menu items that are displayed
once Passwords have been enabled.
14
________________________________________________________TC-8000 Series User Manual
Entering Text
Since there are no letters on the keyboard text must be entered with the arrow keys. When
text needs to be entered all available character positions are displayed between square
brackets as follows:
[ _ _ _ _ _ _ _ _ _ _ _ _ _]
If the initial text is not defined all blanks will be displayed. Otherwise the starting text will be
displayed. Press the left < or right > arrow to move the cursor the desired character
location. Then press the up /\ or down \/ arrow to increment or decrement the displayed
character.
Following are the differences for each type of text asked for in various places in the program.
CD Image Name
CD Image names are 14 characters long. Available characters are A-Z, 0-9 and space
(blank).
Key String
Key Strings are 14 characters long. Available characters are 0-9 and A-F.
Numbers
Numbers are 4 digits long. Available digits are 0-9.
Copying CD-Rs (Not CD to CD)
There are three basic methods of copying CD-Rs. The first is to read a master & start
copying immediately. The second is to start copying using a master image already stored on
the internal hard disk (usually created by a previous Copy job, or by using the Image
Functions|Load New Master function). The third is to use the Copy CD to CD function that
can read a master, store the data to the hard disk and make copies at the same time.
However, the last method may not be as reliable as the first two methods where a master
CD is scratched, or of a poor quality.
To start copying from a new master, use the up /\ or down \/ arrow keys to put the > cursor
(on the Left of the LCD display) next to the Start Copying menu line. Press the ENTER key
to select that menu function. If there is already a CD image on the hard drive the following
prompt will be displayed:
Read New Master?
15
TC-8000 Series User Manual________________________________________________________
If there are no master images currently on the hard disk, this message will not appear. Press
the YES key. The next prompt will be for a CD Image name.
Enter Image Name
[
]
Use the /\, \/, > & < keys to enter a name for the image (see Entering Text). To use the
default name (“NONAME”) just press the ENTER key. Next the system will ask for the
number of CD-Rs to copy:
Enter Quantity
[
]
Using the /\, \/, < & > keys enter a quantity to copy (see Entering Numbers). When the
display shows the required count, press the ENTER key. The top drive tray will open and
the following prompt will be displayed:
Insert Master CD...
Press any key.
Put the Master CD in the tray and press the ENTER key. The drawer will close and the
Master CD will start reading. When the Master CD is read the tray will open and the
following prompt will be displayed:
Get Master CD...
Press any key.
Get the Master CD from the tray, put a blank CD-R into the tray and press the ENTER
key. If more than one copy is required, and the tower has more than one drive installed and
enabled (see Duplication Options), other drives will eject their tray and wait for a blank CD.
Place a blank CD on all open drawers, and close them. Once all drives have blank CD-Rs,
copying will begin. Press the ENTER key to start copying without discs in all drives.
On completing the copy, all drives with good discs will eject the disc and wait for another
blank. Insert more blanks in the open drawers and close them again. Copying will
automatically start again once all drives are closed, and have blank CD-Rs.
If the message
Bad Disc
Press Any Key
16
________________________________________________________TC-8000 Series User Manual
appears, a drive has a BAD disc (one that was rejected during the copy or verify operation),
the drawer will remain closed. Simply open the drawer using the eject button, and replace
the disc with a new blank CD-R.
To Copy from an image that is already on the hard disk, select the menu item Start Copying
as above, but in response to the message
Read New Master?
Press the NO key. A list of the images stored on the hard disk will be displayed on the
LCD. Use the /\ & \/ keys to place the > cursor next to the required image and press
ENTER. Enter the quantity required, as above. The drives will open requesting blank CDRs in the same way as above.
Copying CD-Rs (CD to CD)
If you are satisfied that your master is of suitable quality, this can be a very quick way to
make your first copies. Using this function will enable you to start making the first set of
copies while the master is still being read.
At the main menu, use the up /\ or down \/ arrow keys to put the > cursor (on the Left of the
LCD display) next to the Copy CD to CD menu line. Press the ENTER key to select that
menu function. The next prompt will be for a CD Image name.
Enter Image Name
[
]
To use the default name ‘NO NAME’ just press the ENTER key at this point. (See the
Entering Text section of the Operation chapter for instructions on entering an image name.)
Next the system will ask for the number of CD-Rs to copy:
Enter Quantity
[
]
Press the ENTER key to accept the quantity (0000 will keep copying until stopped by
pressing the STOP key at the end of a set of discs). The top CD-R tray will open and the
following prompt will be displayed:
Insert Master CD...
Press any key.
Put the Master CD in the tray and press the ENTER key. The tray will close, and the master
disk will start analyzing. When the Master CD has been analyzed all the other trays will
open and the following prompt will be displayed:
17
TC-8000 Series User Manual________________________________________________________
Waiting for CD Drive
Place as many BLANK CD-Rs in the writers as required and close the drives using the drive
eject button. If there are any drives still open, press and hold the ENTER key until all drives
close. The copier will now start copying. There is a timer at the top right corner of the
display that counts down, and shows the approximate time to go before the end of the
recording.
Note that the reader may stop reading before the recorders are finished. This is because all
the data from the reader has already been transferred to the hard disk.
Once the first set of CD-Rs are complete, remove the master, and if required, continue
copying to all drives by inserting a blank CD-R in the drive that was previously used for
reading the master. The master is no longer required for copying, because the image is now
stored on the internal hard disk.
Comparing CD-Rs
Comparing CD-Rs allows a copy to be compared against a master image, to make sure
there are no detectable differences. This feature is not available for Audio or Video tracks,
because Audio/Video tracks do not have ECC (error correction codes) to guarantee data
integrity. Only data tracks have this.
Follow the Copying CD-R section above, but instead of inserting blank CD-Rs, insert the
copied CDs.
Batch Mode (Some Autoloaders Only)
The TC-8000 Series Tower can be used with autoloaders that support a tower controller.
Some of these autoloaders support batch mode. This is a method of copying more than one
master CD without starting each job individually.
This system relies on recognizing new master CDs in the input hopper, as they are loaded in
to the recorders.
Each master CD should be placed on the input stack together with the blanks in such a
manor that the master would be loaded first, followed by the blanks.
Each master and the required number of blanks should be placed in/on the input hopper until
all masters and blanks are on, or the input hopper is full.
Make sure that the first master is the first CD to be loaded.
18
________________________________________________________TC-8000 Series User Manual
A batch job will terminate if the input hopper is empty and all CDs have been recorded or if
the master being read has errors.
19
Appendix A - Error Messages
Following is a list of error messages that may be displayed.
No HARD DISK!!
This would appear during the power up sequence if no hard disk could be found. Check
that the power cable is correctly installed on the hard disk, and that the data cable is
correctly connected between the hard disk and the copy electronics. If in doubt, contact
your R-Quest authorised dealer. See the Installing Hard Disks section of Appendix C for
more info.
!! ERROR!! No Writers Found
This suggests that either no writers are installed, or that they are incorrectly installed. Check
power to each CD-R drive, and check that the SCSI cable is correctly connected to each
drive, and to the copy electronics. See Installing Readers & Writers section of Appendix C
for more info.
Make sure that every writer has a unique SCSI ID. If two SCSI devices have the same ID,
they will not work.
!! ERROR !! - No disc in drive
The system cannot detect a Master CD in the drive.
!! ERROR!! - Disc in drive appears to be blank
The system tried to read a Master, which appears to be blank. Check the Master CD and
try again.
User Data Corrupt
The user set-up (including Duplication Options) is corrupted. The system will automatically
reset the options to the factory settings.
Job Cancelled
The user pressed the stop key.
20
________________________________________________________TC-8000 Series User Manual
!! WARNING!! Copier is in SIMULATE mode
The duplication options are set to simulate, NOT write a CD-R. This means that the system
will go through all the motions of writing CD-Rs, but will not actually burn them. See the
menu item Setup Menu|Duplication Options|Burn CD in the Operation section for more info.
Bad Master
The system tried to read a master disc, but found an error. Try reading at a slower speed,
or replace the master with a new one.
Disc Format Not Supported
The system does not currently support this kind of CD format. Contact an authorized RQuest dealer for possible firmware upgrades.
21
Appendix B - Setup
Default Setup
Following is the default or as shipped from the factory configuration.
Duplication Options Setup
This menu is located at Setup Menu|Duplication Options. The factory defaults are:
Read/Write Speed
This menu is located at Setup Menu|Read/Write Speed.
The above speeds assume a TrueCopy 16S recorder is installed as the first drive. Other
speeds will apply for different drive types.
22
________________________________________________________TC-8000 Series User Manual
Installing Writers and Readers
Following are general guidelines for installing CD-R Writers.
Manufacturer
Following is a list of recommended drives for use in TC-8000 systems:
??R-Quest TrueCopy 12S (12x10x32)
??R-Quest TrueCopy 16S (16x10x40)
??Plextor PX-R820Ti (8x20)
??Plextor PX-W8220Ti (8x2x20)
??Plextor PX-W124TSi (12x4x32)
??Plextor PX-W1210TSi (12x10x32)
??Plextor UltraPlex 40 – As a reader only.
Other drive types may be supported from time to time. Please check with your authorized
R-Quest distributor for an up to date list of supported drives.
Firmware Revision
R-Quest recommends that all writers have the same version of firmware. Drive firmware
may be checked using the Utilities|System Information|Writer Info menu function, and upgraded
using the Utilities|Firmware Utilities|Load Drive F/W.
Only drive firmware provided by R-Quest can be used to upgrade drives within a TC-8000
Series system. Firmware files from the drive manufacturers cannot be used to upgrade
firmware with a TC-8000 Series system. While writer firmware be upgraded with
manufacturer supplied firmware outside the system, it is not recommended to use firmware
which is not approved by R-Quest.
23
TC-8000 Series User Manual________________________________________________________
Drive Select Jumpers
Following are the R-Quest standard drive jumpering rules:
?? The drive on the end of the SCSI cable should have a termination jumper installed. No
other drives on the same SCSI cable should have a termination jumper.
?? All writers on the same SCSI cable must be jumpered with a different drive select
address. Address 7 (all 3 address jumpers on) must not be used on any drive.
?? No more than four 12X drives or three 16X drives can be on a single SCSI cable.
NOTE:
While other cabling and jumpering configurations that follow the above rules will
work, R-Quest only tests with systems jumpered per the following figures. To insure
compatibility with future firmware and hardware configurations R-Quest highly
recommends that only the jumper configurations in the following figures be used.
TC-8400 4 Writer System Jumpers
See the following figures for R-Quest recommended jumpering for TC-8400 systems: Note
that the 3rd connector on each SCSI cable is note used.
Figure 1 - Plextor PX-R820T, PX-W8220T, PX-W124TS, PX-W1210TS Jumpers
24
________________________________________________________TC-8000 Series User Manual
Figure 2 – R-Quest TrueCopy12Stm & TrueCopy16Stm Jumpers
TC-8800 8 Writer System Jumpers
See the following figures for examples of R-Quest recommended jumpering for TC-8800
systems:
25
TC-8000 Series User Manual________________________________________________________
Figure 3 – Plextor PX-R820T, PX-W8220T, PX-W124TS, PX-W1210TS Jumpers
Figure 4 – R-Quest TrueCopy12Stm & TrueCopy16Stm Jumpers
Installing Hard Disks
The system requires that a UDMA/33, UDMA/66 or UDMA/100 EIDE or an Ultra SCSI
2 or Ultra SCSI 3 hard drive to be installed.
An EIDE hard drive should be configured as a MASTER drive. Using Slave or Cable
Select (CS) settings will not work. Most currently available UDMA/33, UDMA/66 or
UDMA/100 EIDE hard drives will work in TC-8000 series systems. If in doubt, please
contact your authorized R-Quest distributor for a list of known working drives.
SCSI hard drives should be configured with an ID that is unique on the SCSI bus cable (a
different ID from any other device). ID 7 can not be used for the hard drive (or any other
SCSI drive in the system).
26
________________________________________________________TC-8000 Series User Manual
Use the Utilities | Hard Disk Utilities | System HD Format menu selection to format the hard
disk after installation.
Supported Formats
Following are supported formats as of this writing. Contact your authorized distributor or
R-Quest for an updated list.
CD-ROM Mode 1, Form 1 (ISO 9660, UFS, HFS etc)
CD-XA Mode 2, Form 1 & 2
CD-DA (Audio – with ISRC, UPC and Sub Indexes)
CD-I (Green Book – CD-Interactive)
CD-I Ready
CD+G (Karaoke) (Requires Plextor PX-W124TSi Recorders)
Mixed Mode (Mode 1)
Mixed Mode (Mode 2)
Playstation (Developer)
CD-Extra (Blue Book – a.k.a. Enhanced CD, CD Plus)
Kodak Photo CD
Video CD (White Book)
DOS / Windows / MAC / Unix / Linux etc
Single / Multisession
Track At Once
Session At Once
Disc At Once
Many other formats are supported, but are not listed here. These additional formats can be
also be copied by the TC-8000 tower, because they are “logical” formats that adhere to
one of the above “physical” formats. If in doubt, please contact your authorised R-Quest
distributor.
27
TC-8000 Series User Manual________________________________________________________
Menu Structure
Following is the TC-8000 Tower menu structure.
TrueCopy
TrueCopy
TrueCopy
TrueCopy
28
________________________________________________________TC-8000 Series User Manual
29
Appendix C – HyperTerminal
Using HyperTerminal To Upload Firmware
Firmware can be transferred to the TC-8000 series Towers via CD-R or via the Serial port.
To send firmware via the serial port, we recommend using Windows HyperTerminal, and a
NULL MODEM CABLE. This type of cable is available from most computer supplies
companies.
HyperTerminal is normally present on most Windows computers. It can be found in Start
Programs | Accessories | Communications | HyperTerminal. Windows Menu
Click on the program icon, and the following screen should appear.
Enter the word ‘Direct’ in the name box, then click in OK.
30
________________________________________________________TC-8000 Series User Manual
Select the COM (serial) port you would like to use. On computers that use a serial port for
the mouse, you would normally select COM2. This is because the mouse normally uses
COM1. Then click OK.
31
TC-8000 Series User Manual________________________________________________________
You will need to configure the COM port to the correct speeds. This assumes you will
chose 115000 on the TC-8000 series tower. If this does not work (some older computers
cannot sustain this high speed) then chose 9600 instead. Now click OK. If you get an
error message telling you the program is unable to open the COM port, you will need to
select a different COM port to use.
Make sure you set the properties as shown here (or 9600 if you need 9600).
Next, Select Transfer | Send File (as below).
32
________________________________________________________TC-8000 Series User Manual
You will be prompted for the file to send. Use the browse button to find the file, and set the
protocol to Xmodem.
On the TC-8000 Series Tower, select Utilities | Load Firmware | Load F/W Xmodem.
Choose the port (normally Port 2) and make sure you chose the correct speed setting, so
that it matches the speed setting in HyperTerminal (9600 or 115000). Press the ENTER
key. The prompt :
XMODEM F/W UPLOAD
Press key to start
will appear. Press the ENTER key to start. Now press the SEND button on
HyperTerminal. The file transfer should now take place. On successful completion the
firmware file will automatically be saved in the TC-8800.
33
Appendix D – Easy CD Creator 4
Using Easy CD Creator 4 to Make CDs for Distribution
Many users ask how they should make CDs suitable for mass distribution. There are many
software packages available for CD mastering. R-Quest does not recommend any specific
package over another. However there are some basic recommendations.
1) For most reliable use on most computers – always master Disc At Once (DAO) for both
audio and data. For data CDs use only a single track.
2) Avoid using multisession unless this is required by your application.
3) If multisession is required, pay careful attention to whether the disc is fixated or not. If the
disc is fixated, no one will be able to add further sessions (i.e. add or delete files to the CD).
If the disc is NOT fixated, additional sessions may be added by the recipient of the CD,
which will allow files to be added or deleted.
4) Use Mode 1 where possible. Use Mode 2 CD-XA ONLY where it is required by your
application.
When using Easy CD Creator (pictures shown are from v4.02) there are some parameters that
should be setup prior to making a CD master. Fortunately most of these parameters can be
saved as the default setting.
34
________________________________________________________TC-8000 Series User Manual
Choose CD layout properties from the File menu
and the CD layout dialog box should appear.
35
TC-8000 Series User Manual________________________________________________________
Set the file system to either ISO9660 or Joliet if you need the Joliet extensions. Also check the
Mode 1: CDROM near the bottom and then click on “Save As Default”. The volume label can
also be set in this dialog box. Next click on the “File System” tab at the top.
36
________________________________________________________TC-8000 Series User Manual
The type of file names used should be set here. Note that if you are using long files names
allowed by Windows 95 or later, Long Files Names should be checked. If this is not done, the
files names will be changed to fit the 8.3 format allowed by DOS, and the application may not
be able to find all the files as expected.
Click on the OK button and proceed to mastering
37
Appendix E – TrueCopy System
Technology
All TC-8000 series systems include TrueCopy Technologytm capability. The combination of
a TC-8000 series tower with TrueCopytm recorders creates a system that is more powerful
than ordinary duplication systems that rely just on enhanced drive technology alone. This
more powerful combination of both TrueCopytm drives and a TrueCopy Systemtm controller
results in a far superior duplication system.
The additional features provided by TrueCopy System Technologytm benefit both the
duplication and quality control process, allowing more accurate copies to be made much
more easily. Almost all of these features are available exclusively on duplication systems
enabled with TrueCopy System Technologytm.
Several of these features are documented in this manual. Other features are working silently
behind the scenes and are not mentioned further. Currently supported TrueCopy System
Technologytm features include:
TrueRIDtm
Places an Orange Book compliant electronic watermark on the recorded media. Every disc
is optionally marked so that it can be traced back to the recorder that created it. This
electronic water mark can be viewed on the TC-8800 using the TrueRID Scan function. This
function can be turned ON/OFF in the Setup|Duplication Options menu.
TrueRIDtm Scan
Displays the RID (electronic water mark) on a recorded disc. This allows a disc to be
tracked to the recorder that created it. This function will request a CD be inserted, and will
then scan for RID codes on recorded media. If no RID is present then “No RID Found”
will be displayed. If an RID is present it will be displayed on the LCD. The RID will contain
a drive manufacturer code and the last ten digits of the recorder’s unique electronic serial
number. A CD with an RID code can be traced to the exact drive that recorded it. To find
the electronic serial number of TrueCopytm drives select the function Utilities|System
Information|True RID Info in the menu.
38
________________________________________________________TC-8000 Series User Manual
TrueQAtm
Allows the user to check the quality of recorded media. TrueQAtm scan will scan recorded
media checking for uncorrectable C1 and C2 errors. Uncorrectable C1 errors are present
on all CD media, and are normal. However, uncorrectable C2 errors lead to bad data, or
clicks & pops on audio CDs. When scanning a CD, if there is any count other than zero (0)
for C2 or an unusually large number of C1 errors consider this disc to be of unsatisfactory
quality
TrueLasertm
Used on TrueCopytm recorders to adjust laser power over the entire disc surface to maintain
and enhance recording quality from the beginning to the end of the recorded disc. This
feature is particularly important for high speed recording.
TrueSoundtm
Allows the TC-8000 system (when used with TrueCopy recorders) to scan audio CDs for
defects on masters likely to cause a click or pop on copies before copies are made. This
scanning happens automatically while reading the master CD.
More TrueCopy System Technology features will be coming in the future so please check
regularly for the latest firmware releases.
39
TC-8000 Series User Manual________________________________________________________
40
TM
Powered By R-Quest
TC-8000TM Series User Manual
Part Number 900-00016-01 Revision A
Copyright © 1999-2001 R-Quest Technologies, LLC
All rights reserved.
www.r-quest.com
TrueCopy System TechnologyTM