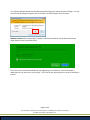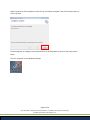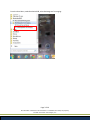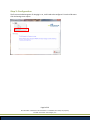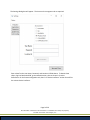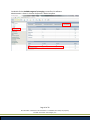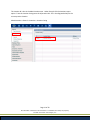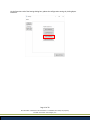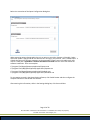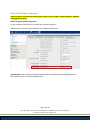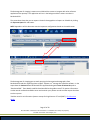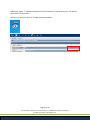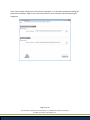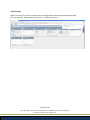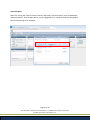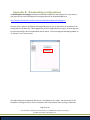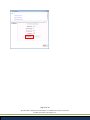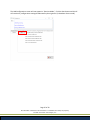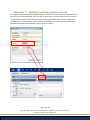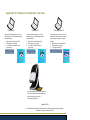
1
RevolutionEHR
Phone: 877-REVEHR-1
www.revolutionehr.com
[email protected]
Optos optomap Integration User
Guide
Updated: 10 Dec 2015
Page 1 of 29
All information contained in this document is confidential and solely the property
of Health Innovation Technologies, Inc.
Table of Contents
Table of Contents ................................................................................................. 2
Introduction ........................................................................................................ 3
Step 1: Installing the Software .............................................................................. 4
Step 2: Configuration ........................................................................................... 8
Step 3: Run Optos optomap ................................................................................ 14
Appendix A: Browser settings for RevIntegrator for Imaging.................................... 19
Appendix B: Broadcasting configurations .............................................................. 22
Appendix C: Updating existing patient records ...................................................... 27
Appendix D: Software installation overview ........................................................... 28
IMPORTANT NOTE: This User Manual is designed to provide practices all fundamental information
required to perform the setup without assistance. However, if assistance is needed, we request that a
call be scheduled with Customer Support. Due to the technical component and time required when
assisting practices with device integration, a scheduled call will ensure that the appropriate Subject
Matter Expert is available and has sufficient time to provide the help needed. To request a call with a
Subject Matter Expert, please email [email protected].
In addition, if you have a device rep coming onsite to help set up any new or existing equipment that will
integrate with RevolutionEHR, be sure to email ahead if you believe you will need assistance from
RevolutionEHR.
Copyright notice: Optos, optos and optomap are registered trademarks of Optos plc
Page 2 of 29
All information contained in this document is confidential and solely the property
of Health Innovation Technologies, Inc.
Introduction
The RevIntegrator for Imaging is a software application that installs and runs on PCs to integrate
RevolutionEHR to Optos optomap®. This software is designed to work behind-the-scenes to retrieve
data from RevolutionEHR and send it to optomap. Once this software is configured you generally won’t
have to interact with it. The software should be installed and configured on every PC in the practice.
Three quick steps to get it working:
1) Install
2) Configure
3) Run
Appendix D: Software installation overview is a graphical representation of the information below. To
utilize the export of patient demographics from RevolutionEHR into Optos optomap or the V2 Vantage
Pro system, the Scheduler or Capture software must be installed along with the RevIntegrator for
Imaging.
To utilize the review of a particular patient record from inside RevolutionEHR, the patient id in Optos
optomap or the V2 Vantage Pro system must match the patient id in RevolutionEHR. Additionally the PC
must run the V2 Vantage Pro Review software along with the RevIntegrator for Imaging.
Contact Information
For help with installation and configuration of this software contact:
Customer Support at 1-877-738-3471 extension 2
Page 3 of 29
All information contained in this document is confidential and solely the property
of Health Innovation Technologies, Inc.
Step 1: Installing the Software
The RevIntegrator for Imaging is free software that can be downloaded and used by any RevolutionEHR
customer. There is no special licensing or fees required to use it. The RevIntegrator for Imaging should
be installed on any PCs that are currently running Capture or Scheduler for exporting patient
demographics. It can also be installed on exam room PCs that are currently running Review.
It requires the following prerequisites to run on a PC:
A Supported Operating System: Windows 7 or above, Windows 7 Service Pack 1 or above,
Windows Server 2003 Service Pack 2, Windows Server 2008, Windows Server 2008 R2, Windows
Server 2008 R2 SP1, Windows Vista Service Pack 1, Windows XP Service Pack 3
A Supported PC: with an Intel-compatible x86 or x64 processor, recommended minimum of
Pentium 1 GHz or higher with 512 MB RAM or more, minimum disk space of 600 MB for x86
processors or 1.5 GB for x64 processors.
Software installed: Microsoft .NET Framework 4 Client Profile or above, which requires Windows
Installer 3.1 or later, and Internet Explorer 9 or later
Microsoft Windows Installer 4.5 or above, which can be downloaded from Microsoft’s Web site.
The latest version of the RevIntegrator for Imaging software can be downloaded from:
http://insight.revolutionehr.com/wp-content/uploads/RevIntegratorforImaging.msi
Page 4 of 29
All information contained in this document is confidential and solely the property
of Health Innovation Technologies, Inc.
To install the software double-click the RevIntegratorforImaging.msi and the process will begin. If a User
Account Control dialog box appears click Yes to allow it to make changes to this computer.
Windows 10 Note: When attempting to install this software on Windows 10, Windows SmartScreen
might display the warning shown below:
This is due to fact that RevolutionEHR does not digitally sign its installations. Click the checkbox "I
understand the risk and want to run this app". Then click the Run anyway button to start the installation
process.
Page 5 of 29
All information contained in this document is confidential and solely the property
of Health Innovation Technologies, Inc.
When complete the final installation screen will say “Installation Complete” and click the close button to
exit this process.
The RevIntegrator for Imaging is now installed and it can be launched from either of the places shown
below.
The icon will appear on the Windows Desktop:
Page 6 of 29
All information contained in this document is confidential and solely the property
of Health Innovation Technologies, Inc.
From the Start Menu, under RevolutionEHR, select RevIntegrator for Imaging:
Page 7 of 29
All information contained in this document is confidential and solely the property
of Health Innovation Technologies, Inc.
Step 2: Configuration
The first time the RevIntegrator for Imaging is run, it will need to be configured. From the Edit menu
click the Settings menu option.
Page 8 of 29
All information contained in this document is confidential and solely the property
of Health Innovation Technologies, Inc.
The Settings dialog box will appear. The items on the Integrator tab are required.
Enter values for the User Name, Password, and Location Id fields above. To obtain these
values, log into RevolutionEHR, go into Administration, then to General > Practice
Preferences. On the Partner Integrations tab, there’s a “Device Interfaces” section that will list
the various device interfaces.
Page 9 of 29
All information contained in this document is confidential and solely the property
of Health Innovation Technologies, Inc.
Credentials for the RevEHR Integrator for Imaging are used for this software:
Administration > General > Practice Preferences > Device Interfaces
Page 10 of 29
All information contained in this document is confidential and solely the property
of Health Innovation Technologies, Inc.
The Location Id is also in the Administration area. Under General click the Locations menu
option. From the Location Listing enter the # (Location Id is 377 in the diagram below) for the
current practice location.
Administration > General > Locations > Location Listing
Page 11 of 29
All information contained in this document is confidential and solely the property
of Health Innovation Technologies, Inc.
On the Extensions tab of the Settings dialog box, update the configuration settings by clicking Optos
Extension:
Page 12 of 29
All information contained in this document is confidential and solely the property
of Health Innovation Technologies, Inc.
Below is a screenshot of the Optos Configuration dialog box.
When exporting patient demographics there is an option to use either Capture or Schedule. Select
whichever option is appropriate for the device that’s running in your practice. Once “Enable Export” is
clicked then the entire filename statement to the executable (Capture.exe or Scheduler.exe) must
contain a valid path. Appendix D: Software installation overview contains more information the
software installation. Here are examples:
C:\Program Files\Optos\Optomap Application\Capture.exe
C:\Program Files (x86)\Optos\Optomap Application\Capture.exe
C:\Program Files\Optos\Optomap Application\Scheduler.exe
C:\Program Files (x86)\Optos\Optomap Application\Scheduler.exe
To view patient records in the Optos Review software, click Enable Review and then configure the
complete filename to the Review.exe software.
After entering this information, while in the Settings dialog box, click Save and Close.
Page 13 of 29
All information contained in this document is confidential and solely the property
of Health Innovation Technologies, Inc.
Step 3: Run Optos optomap
Important Note: For practices that have historic patient records in Optos, follow Appendix C: Updating
existing patient records.
Enable the Optos optomap Integration
From the Additional Preferences tab, enable the optomap Integration,
Administration > General > Practice Preferences > Additional Preferences
Important Note: After enabling the Optos Integration log out of the RevolutionEHR web application,
then log back in to see the newly enabled buttons.
Page 14 of 29
All information contained in this document is confidential and solely the property
of Health Innovation Technologies, Inc.
The RevIntegrator for Imaging is meant to work behind-the-scenes to integrate with other software
applications like optomap. The application will run in the background when actions are taken in
RevolutionEHR.
The screenshots show that you can export a Patient’s demographics to Capture or Schedule by clicking
the Export to Optos link and button.
NOTE: Appendix A of this document contains important configurations based on the web browser.
The RevIntegrator for Imaging goes to work querying the latest patient demographics from
RevolutionEHR and then exporting them to Optos’ Capture or V2 Vantage Pro Scheduler software. In the
export data the Patient Id from RevolutionEHR is populated along with Issuer of Patient Id equal to
“RevolutionEHR”. These details establish RevolutionEHR as the golden record* for patient information.
In other words use RevolutionEHR to enter and maintain your patient records and then export that data
to other systems.
*Golden record is an Information Systems concept for Single Source of Truth (SSOT). Click for more
details
Page 15 of 29
All information contained in this document is confidential and solely the property
of Health Innovation Technologies, Inc.
Additionally, Optos’ V2 Vantage Pro Review can be launched within a patient encounter. This process
opens Review to the patient.
Below is the icon for the Optos V2 Vantage Pro Review software:
Page 16 of 29
All information contained in this document is confidential and solely the property
of Health Innovation Technologies, Inc.
If this wasn’t already configured, the first time the integration is run, the Optos Configuration dialog box
below will be displayed. Page 11 of this User Guide contains more information about configuring this
integration.
Page 17 of 29
All information contained in this document is confidential and solely the property
of Health Innovation Technologies, Inc.
The following fields of information are exported from RevolutionEHR into Optos.
RevolutionEHR Field
Optos Field
Patient’s last name
Family name
Patient’s first name
Given name
Patient’s middle name
Middle name
Patient Id
Patient id
Patient’s Date of Birth
Patients birth date
Patient’s sex
Gender
Page 18 of 29
All information contained in this document is confidential and solely the property
of Health Innovation Technologies, Inc.
Appendix A: Browser settings for RevIntegrator for
Imaging
The RevIntegrator for Imaging uses a custom MIME type in the web browser to launch actions on local
PCs. This means that each web browser must have configuration settings. For each of the supported
browsers there are configuration instructions below. This configuration should only need to be done
once on the PC.
Firefox – clicking on the Export to Optos displays a popup window, click OK and the RevIntegrator for
Imaging application will start.
Page 19 of 29
All information contained in this document is confidential and solely the property
of Health Innovation Technologies, Inc.
Google Chrome
When first clicking the “Export to Optos” button in Google Chrome shows that a popup was blocked.
Click the option for “Always allow pop-ups from …” and then click Done.
Page 20 of 29
All information contained in this document is confidential and solely the property
of Health Innovation Technologies, Inc.
Internet Explorer
When first clicking the “Export to Optos” button in Microsoft’s Internet Explorer, the View Downloads
dialog box appears. Click the Open button, on the highlighted file, to export the Patient’s demographic
data and launch Capture or Scheduler.
Page 21 of 29
All information contained in this document is confidential and solely the property
of Health Innovation Technologies, Inc.
Appendix B: Broadcasting configurations
The RevIntegrator for Imaging should be installed and configured on every Optos PC in your practice.
The latest version of the RevIntegrator for Imaging software can be downloaded from:
http://insight.revolutionehr.com/wp-content/uploads/RevIntegratorforImaging.msi
Once you have a single PC configured and integrated properly you can use that PC to broadcast out its
configurations to all other PCs. While logged into the first configured and running PC, click Settings and
from the LAN Configs tab click the Broadcast Server button. This action begins broadcasting updates to
all “Receiver” PCs in your practice.
The LAN Configurations application will launch in “Broadcast Server” mode. That means this PC will
broadcast its settings to any PC, that’s connected to the same network, that’s running as a Receiver.
Page 22 of 29
All information contained in this document is confidential and solely the property
of Health Innovation Technologies, Inc.
Page 23 of 29
All information contained in this document is confidential and solely the property
of Health Innovation Technologies, Inc.
Move to each of the other PCs in your practice, start the RevIntegrator for Imaging software. Inside the
Settings dialog box, click LAN Configs, click the Receiver button. The RevIntegrator for Imaging will close
down while it locates the originally configured PC and copies those configuration settings.
Page 24 of 29
All information contained in this document is confidential and solely the property
of Health Innovation Technologies, Inc.
The LAN Configurations screen will now appear in “Receiver Mode”. Click the Start button and this PC
will receive any configurations settings broadcasted by the original PC (in Broadcast Server mode).
Page 25 of 29
All information contained in this document is confidential and solely the property
of Health Innovation Technologies, Inc.
The Receiver will quickly step through a process of backing up the existing configurations and then
saving the broadcasted files. After clicking the Exit button this process is complete and when
RevIntegrator for Imaging is re-run on this PC it will use the updated configuration settings.
Page 26 of 29
All information contained in this document is confidential and solely the property
of Health Innovation Technologies, Inc.
Appendix C: Updating existing patient records
The integration between RevolutionEHR and Optos is based on the Patient Id field. If the two systems
have the same patient Id number, they can “talk” to each other. Practices that have years of patient
records stored in Optos should consider manually updating the Patient ID to match the patient id in
RevolutionEHR. The Optos Patient ID field should be updated prior to clicking “Export to Optos” in
RevolutionEHR (otherwise two patient records will exist in Optos).
Page 27 of 29
All information contained in this document is confidential and solely the property
of Health Innovation Technologies, Inc.
Appendix D: Software installation overview
Front Desk PC
Export patient demographics to create a
matching patient in the optomap software.
Installed software:
· Web browser for RevolutionEHR
· RevIntegrator for Imaging
·
V2 Vantage Pro Scheduler.exe or
Capture.exe
Technicians’ PC
Final Exam Room PC
Export patient demographics to create a
matching patient in the optomap software.
Installed software:
· Web browser for RevolutionEHR
· RevIntegrator for Imaging
· V2 Vantage Pro Scheduler.exe or
Capture.exe
Inside the patient’s encounter, click the
Launch Optos Review button to view this
patient’s optomap images. Installed
software:
· Web browser for RevolutionEHR
· RevIntegrator for Imaging
· V2 Vantage Pro Review
If patient demographics aren’t exported, use
the tethered tablet to manually update the
patient id in optos to match the
RevolutionEHR patient id.
Page 28 of 29
All information contained in this document is confidential and solely the property
of Health Innovation Technologies, Inc.
For practices using the Daytona system, along with its tethered tablet, you’ll need to install Scheduler.exe on at least one PC somewhere in the practice.
Typically this PC might be at the front desk, or it might be a technician’s PC. This PC would be responsible for exporting patient demographics from
RevolutionEHR into the Optos system.
In order to install Scheduler.exe, locate the Vantage software for Image server (the PC that is used for saving images from an Optos camera where it is not
directly connected). On that server, browse to the location “C:\Program Files\Optos\Optomap Applications”, then locate scheduler.exe. This software
application can be copied to the front desk or technician’s PC, into a similar folder structure: “C:\Program Files\Optos\Optomap Applications\scheduler.exe”.
Page 29 of 29
All information contained in this document is confidential and solely the property
of Health Innovation Technologies, Inc.