1
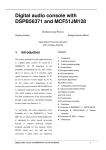
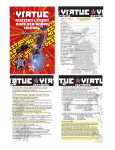
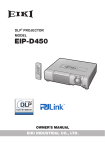
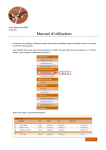
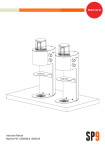
Software version 1.5 RELOADED® Board 1.0 for Shocker® and Nerve® PERFORMANCE HIGHLIGHTS Developed for hard gamers. Sustained rate of fire in all situations! High Trigger scan priority for maximum sensitivity. Automatic filtering of trigger bounces. No need to consider it! Automatic dwell adjustment depending of fire rate to avoid drop off. Nothing to adjust! Just drop in and PLAY! No need for mechanical mods of the Shocker. Seamless setup through the XTEND board FEATURES High Trigger poling rate Up to 27 bps while the eyes are enabled Automatic Drop Off Control (ADOC). Automatic Trigger Debounce (ATD). Power Aware Design (PAD) for maximum battery life. Exclusive Auto-Adaptive Loader Delay (A2LD) Automatic Force Fire (AF2) in case of obstructed barrel and empty breech while eyes are on. First Shot Boost (FSB) after inactivity Automatic eyes de-activation in case of loader problem All Adjustment parameters stored in non volatile memory. On board buzzer, vibrator and Tricolor led. Reloaded XtendTM LCD extension port NXL legal full auto mode with 15bps limit This board is a French Connection Paintball product designed for TONTON. The TONTON team has developed a new board for the popular Smart Part® SHOCKER® and NERVE®. The RELOADED® board process data from the trigger and the eyes using a unique combination of hardware and software improvements. Its objective is to provide a repeatable and accurate rate of fire, whatever the situation in the field. The RELOADED® is a flexible and state of the art electronic board that will ensure a sustained rate of fire while the player is under pressure, therefore allowing him to concentrate on the action instead of on his finger. The RELOADED® allows for fast programming through its unique GAME TYPE parameter. Five GAME TYPEs are available: Tournament, Enhanced1, Enhanced2, NXL mode, Max speed Full and Millennium mode. Just, set this parameter and the gun will automatically adjust all other parameters based on user defined starting values. The RELOADED® board can be extended through its on board RELOADED XTEND® port. The RELOADED XTEND® board is a remote control with an embedded LCD matrix. The RELOADED XTEND® remote control offers a valuable advantage over other SHOCKER® boards. It allows you to seamlessly program your favorite modes with crystal clear messages displayed on the LCD matrix. 2 Software version 1.5 Table of contend 1 2 3 4 5 6 7 8 9 10 Overview of the Board ______________________________________ 4 How to install your board?___________________________________ 5 Starting instructions________________________________________ 6 Turning the RELOADED® ON ________________________________ 6 Going to GAME mode_______________________________________ 7 5.1 EYES OPERATION_____________________________________ 7 Going to PROGRAMMING Mode ______________________________ 8 6.1 PARAMETERS DESCRIPTION ___________________________ 9 6.1.1 GAME TYPE_______________________________________ 9 6.1.2 DWELL __________________________________________ 11 6.1.3 SENSITIVITY _____________________________________ 12 6.1.4 ALARM TIMER DURATION __________________________ 12 6.1.5 AUTOMATIC DROP-OFF CONTROL __________________ 13 6.1.6 AUTOMATIC TRIGGER DEBOUNCE __________________ 13 Switching the GUN OFF ____________________________________ 13 How to program the board?_________________________________ 14 8.1 IN PROGRAMMING MODE _____________________________ 14 8.2 SAFETY_____________________________________________ 16 8.3 MEMORY CORRUPTION _______________________________ 16 8.4 PROGRAMMING VISUAL HELP _________________________ 17 8.4.1 POWERING THE GUN______________________________ 17 8.4.2 TURNING THE GUN ON ____________________________ 17 8.4.3 SELECTING GAME MODE __________________________ 17 8.4.4 TURNING THE GUN OFF ___________________________ 18 8.4.5 GOING TO PROGRAMMING MODE ___________________ 19 Troubleshooting __________________________________________ 20 9.1 SHOCKER® IS DIFFICULT TO SWITCH ON/OFF____________ 20 9.2 BREACKING PAINT ___________________________________ 20 9.3 VELOCITY IS INCONSISTENT___________________________ 20 9.4 THE SHOCKER® EXHIBIT LOW VELOCITY ________________ 21 9.5 THE SHOCKER® IS DROPPING OFF _____________________ 21 9.6 THE SHOCKER® IS GASSED UP, BUT DOES NOT SHOOT ___ 21 9.7 THE GUN FIRES AT A VERY LOW ROF WHATEVER THE RATE OF MY FINGERS _____________________________________ 21 Funny acronyms glossary __________________________________ 23 3 Software version 1.5 1 Overview of the Board The drawing below shows the different buttons and peripheral of the RELOADED®. In the future we will refer to the buttons using the capital letters given within brackets. This drawing does not represent the upper stock board of the SHOCKERTM. The On/Off button referred as (O) is located on this second board. It lights in blue and can be found at the back of the grip frame when the stock board is in place. Trigger (T) Tricolour Status LED (SL) Programming Button (P) Buzzer (B) Vibrator (V) XTEND LCD extension port 4 Software version 1.5 2 How to install your board? 1. Unscrew the grips and lift up the left part. 2. Unplug the 10 wire connector from the back of the stock board. Unplug the 9v battery from the stock board, if any. 3. Remove the two metal pins that retain the trigger switch and board in the frame. 4. Pull back on the top half of the stock board so the trigger switch can clear the frame then extract the stock board out of the frame, finishing with the bottom half. 5. Do the exact same step in reverse order with the RELOADED®. Starting with the bottom half and trigger switch facing the trigger, gently insert the board in the retaining slot at the bottom of the grip frame. 6. Line up the trigger switch with the two pin holes then insert the two retaining pins back into the frame and through the trigger switch mounting holes. 7. Plug the 10 wire connector into the RELOADED® board. Plug the 9V battery in the power socket beginning with the negative pole. Then gently insert in the remaining space of the grip frame. 8. Put the grips back in place or proceed to programming steps... 5 Software version 1.5 3 Starting instructions First install the reloaded in the frame grip of the gun and plug the ribbon cable in the Reloaded to connect the Dwell board to the Reloaded. Only, connect a good 9v battery (PP3 type) to the battery socket of the RELOADED®. The reloaded board tolerates down to 5.6v. To prevent bad battery, you must connect your battery beginning with the negative pole or the positive pole, not both at the same time. Not respecting that will lock the board in an alarm cycle. The board flashes its LED until you properly insert the battery. Right after you correctly plugged the battery, the board will perform a complete peripheral check. The Tricolor LED will flash green, then red. The blue LED will flash and the buzzer emit a three tone beep. Finally the board vibrates once to complete the boot sequence. This means the battery is correctly connected and has enough power. From this point, the RELOADED® is asleep and ready to serve (Sleep mode). The Power Aware Design (PAD) of the RELOADED® ensures more than 2 months in this mode. 4 Turning the RELOADED® ON To turn the RELOADED® board ON, just press and hold the power button (O) located on the back of the Frame Grip for more than two seconds. The Blue LED on the back of the frame will flash rapidly and stop on solid. The board will vibrate once and play the welcome music. You are now in ON-STATE. From this point you have three possibilities. 1. Quickly Press and Release the trigger (T) once to go to GAME mode. 2. Quickly Press and Release the orange button (P) once to go to PROGRAMMING mode. 3. Press and hold the ON/OFF button (O) for more than two seconds to switch the gun back off (Sleep mode) 6 Software version 1.5 5 Going to GAME mode Entering GAME mode is signaled by a three tone beep. In this mode, your gun is ready to deliver an unlimited amount of ball per second (bps). Just pull the trigger! The RELOADED® will automatically take care of the dwell regulation, Drop-off control (ADOC), recharge time, debounce, eyes activation and deactivation. This ensures no drop off during sustained sequences of fire. No need for you to manually handle the eyes. No need for fuzzy debounce considerations. Just play, shoot and enjoy! The board exhibits a default 27 bps! The question is… Will you make it? While in GAME mode, you can turn the gun OFF at any time by pressing and holding the power button (O) for more than two seconds. At this point, the Gun will vibrate twice, the “Good bye” music will sound and all LEDs will turn off. In GAME mode the blue led located on the back of the grip frame, is blinking. How fast it blinks depends on Eyes options. See below for more in depth explanations. 5.1 EYES OPERATION By default, the Eyes are systematically enabled when the marker is first turned on. Due to its unique Auto Adaptive Loader Delay (AALD) feature the RELOADED® board will adjust its Eyes setting to the loader delivery rate. If no ball is presented to the eyes after a short delay, the board will automatically deactivate the Eyes feature for a very short period of time. This is the Automatic Forced Fire (AF2) feature. 7 Software version 1.5 This allows an incredible flexibility when in the middle of a strategic move. If a ball is blocked at the entrance of the barrel and the breech is empty while Eyes are on, the RELOADED® will automatically disconnected the eyes, for this single shot. You won’t even notice it! Just concentrate on the action! The RELOADED® is in charge! Note: In order to be able to “dry fire”, the eyes system does not need to be turned off. Simply remove the loader, and the RELOADED® will adapt to the new situation. If for some reason (you fool!), you want to turn the Eyes, and all associated actions, off or back on, just push and release the power button quickly. This will toggle the Eyes on or off. When the Eyes system is active, the blue led at the back of the frame grip blinks rapidly. When it is disabled the blue led will change to a slow blinking sequence. 6 Going to PROGRAMMING Mode Entering the PROGRAMMING mode is signaled by a “welcome” music. In this mode, you can adjust the parameters for your particular gun and game style. The Programming Button is the only button on the RELOADED® board. To access it, open the left side of the grip, and look at the edge of the board. The button is right there, orange. You can’t miss it! Once, in this mode the board LED will light up GREEN. This means first parameter is selected. Because the RELOADED® exhibits an incredible level of sophisticated auto adaptive functions, there are very few parameters to set… … It’s a crystal clear 1, 2, 3 philosophy. 8 Software version 1.5 There are actually six different parameters that can be adjusted. DWELL , Sensitivity, ADOC and ATD are set once for all. The RELOADED® will automatically modulate those settings to ensure an appropriate service of the gun. In the same time, you just have to set the GAME type parameter to drastically change the behavior of the gun. Possible parameters are shown below and explained in the following sections: 1. Game type. 2. Dwell. 3. Sensitivity. 4. Alarm Timer Duration. 5. Automatic Drop-Off Control. 6. Automatic Trigger Debounce. 6.1 PARAMETERS DESCRIPTION 6.1.1 GAME TYPE GAME TYPE is used to rapidly set the game style. It will automatically adjust all inside parameters of the RELOADED® board so you have nothing else to do! GAME type parameter has 4 states: 1. Tournament 2. Enhanced level 1 3. Enhanced level 2 4. NXL mode 5. Max speed Full 6. MILLENNIUM tournament 9 Software version 1.5 Tournament type is the default setting. This mode is used for NPPL game type. In this mode, one trigger action will end up with one shoot. The rate of fire is the exact same rate as the player’s finger. Even debounce timings are automatically adjust by the board to get a fully legal shoot behavior. In this mode, the sensitivity parameter is ignored, but all other advanced features hereafter are available: • Automatic Drop-Off Control (ADOC) • Automatic Trigger Debounce (ATD) • Auto-Adaptive Loader Delay (A2LD) • Automatic Force Fire (AF2) • Automatic Eyes De-activation (AEDA) in case of loader problem Please see glossary for further explanation of funny acronyms! WARNING: THE TWO FOLLOWING MODES ARE NOT ALLOWED IN MANY TOURNAMENTS. THOSE MODES ARE HERE FOR FUN AND EXTREME SENSATIONS! IT IS THE PLAYER’S RESPONSIBILITY TO SET THE APPROPRIATE MODE COMPLYING WITH THE KIND OF TOURNAMENT HE PARTICIPATS. THE RELOADED® CAN NOT DO THIS FOR YOU! Enhanced level 1 type is dedicated for player who wants to fire at a reasonable rate of fire without too much concentration on their finger action. The RELOADED® board will detect a burst of fire. It will therefore increase the rate of fire during those small periods of time. For ease of pain, the reloaded will actually maintain a high rate of fire until your finger slows under half the sensitivity. During slow bursts the RELOADED® is in tournament mode. Enhanced level 2 is dedicated to aggressive player style or training game when players want to concentrate on strategy instead of finger action. 10 Software version 1.5 This mode will maintain a high rate of fire as soon as the sensitivity has been reached even if the actual rate of the finger slows down to half the sensitivity. Erratic breaks in the sequence are also compensated like in Enhanced level 1. If you stop shooting, the burst mode is reset and you must reach the Sensitivity threshold again to benefit from the enhance mode. During slow sequences the RELOADED® is in tournament mode. NXL mode is LEGAL in NXL league. It will allow a full mode after 3 balls in tournament mode (for safety reasons). Once those balls have been fired, the gun is set to full, with a legal limitation of 15 bps. This mode is maintained for 1 second after the last shoot. Pressing the trigger within this second will continue to fire in full. If one second elapses without any shoot, the full mode is lost and a 3 balls sequence must be fired again. The SENSITIVITY parameter is ignored in this mode. Max speed Full mode is dedicated to those sci-fi fans who ever wanted to posses a laser beam! In this mode, pulling and holding the trigger will fire the gun at its maximum rate of fire. The limitation is not in the Reloaded board but in the gun and loader technology. If you can feed its appetite, the reloaded will allow 27 bps !!!!! The SENSITIVITY parameter is ignored in this mode. In this mode, you better get a good loader to feed the unlimited appetite of the RELOADED®… …and pray for your opponents! MILLENNIUM Tournament mode is LEGAL in the MILLENNIUM league. It will allow every features availaibale in Game type 1 (Tournement) except that the Rate Of Fire (ROF) is limited to 15 balls per second. 6.1.2 DWELL DWELL is used to set the opening time of the solenoid of the gun. You must set this parameter accordingly with your gun technology. We have noticed that many things can influence this setting. First be sure that your Regulator is sufficiently 11 Software version 1.5 and correctly greased. Second, depending on your Bolt weight, you will have to tune this value. The RELOADED® board handles automatically all associated recharge time to properly service the gun. The range of settings is limited to truly usable and stable values. No fooling around with fuzzy option tuning! Explanation: Experiencing drop off or bolt not completely cycling are symptoms of poor adjustments. In this case you should turn the opening time up (the DWELL parameter). A dwell fewer than 7ms or above 12ms doesn’t make sense, since efficiency would be very poor, and risk of ball breakage very high! Some boards will allow this. We don’t! Dwell parameter can be adjust between 7ms and 12ms by steps of 0.5 ms. 6.1.3 SENSITIVITY SENSITIVITY is used to indicate the RELOADED® the minimum number of balls per second that can be considered a burst. Sensitivity can be adjusted between 1 and 4 by steps of 1. A setting of 1 corresponds to a very sensitive setting, 4 is the least sensitive. For information only, if Game type is set to Enhanced1, the sensitivity can be interpreted as follow: 1=6bps, 2=9 bps, 3=12 bps & 4=16 bps. While in Enhanced2, it would be: 1=8bps, 2=12bps, 3=16bps & 4=20bps. (don’t set to 4, knowing that 20 is impossible to reach!) 6.1.4 ALARM TIMER DURATION ALARM TIMER DURATION is used to indicate that x times 30 seconds (approx.) have elapsed. X ranging from 0, for no alarm, to 14 for 7 minutes. The Alarm counter starts immediately when you enter the GAME mode. If you want, you can wait for the beginning of the game in ON-STATE mode and press the trigger (T) to enter the GAME mode in the very last seconds of the OFFICIAL count down. When the Alarm timer duration has elapsed the gun vibrates three times and automatically restarts its count down. 12 Software version 1.5 6.1.5 AUTOMATIC DROP-OFF CONTROL AUTOMATIC DROP-OFF CONTROL (ADOC) is provided for fine tuning the gun. Depending on Bold characteristics, dwell mechanics and whether your regulator in greased or not, the gun can experience some drop-off, especially on the first shot and after a period of inactivity. So, you can therefore indicate the gun what “bonus dwell” should be added to this particular ball. The value is tunable between 0 and 8, 0 meaning no ADOC and 1 to 8 meaning milliseconds increment by steps of 0.5ms. For example, setting to 8 would add 4 ms of Dwell opening. Beware of to much ADOC. Since the more you open the DWELL the riskier you break a ball! 6.1.6 AUTOMATIC TRIGGER DEBOUNCE AUTOMATIC TRIGGER DEBOUNCE (ATD) is used to indicate the RELOADED® the minimum number of milliseconds it should wait before allowing the gun to accept another trigger event. This additional delay is added only on the two or three first shots. After that the delay is removed and the gun can cycle to its maximum rate of fire. This parameter can be set between 0, for no ATD, to 5 by steps of 10 ms. For example; setting to 3 will add 30ms of delay on the first 2 or 3 balls. 7 Switching the GUN OFF Switching the gun off can be done while in ON-STATE or in GAME mode. Turning it off from PROG. mode is not possible since you first must save your parameters. If you want to do so while in PROG. mode, first exit the PROG mode (see PROG mode section to learn more on how to do that) then switch off from the GAME mode. To switch the gun off, just press and hold the ON/OFF button (O) for more than two seconds. The gun will vibrates twice and the goodbye music will sound. All LED are now off and the board is asleep. With a brand new battery, the RELOADED® board can hibernate for more than 2 months. 13 Software version 1.5 8 How to program the board? The RELOADED® board sets a new standard in Gun programming behavior. Forget what you have been doing for years with other boards. You’ve entered the RELOADED® world. EXAMPLES Three things to know: • Each action in acknowledged by a beep. • The programming mode acts in a cycle manner. Pushing buttons will jump to next value. Each time you reach the maximum value; the RELOADED® adds one different beep and brings you back to the minimum value. 8.1 IN PROGRAMMING MODE Setting the Game type to Enhanced L2 In PROGRAMMING mode you have four possible actions: 1. Open the left side of the grip • The programming button is used to increment the value of parameters. 2. Turn on the marker. • The on/off button is used to change the active parameter. 3. Push the Prog. Button once to enter Programming mode. • 4. Push the prog button twice to set value of game type to Enhanced L2. The trigger is used to Save & Exit the PROGRAMMING mode. If you press and hold it for more than 2 seconds. • The trigger is used to read the current value, if you quickly press and release it. 5. Press and hold the trigger for 2 seconds to save and exit AND enter the GAME mode Your Game type is programmed and ready to be tested The board LED color will help you to figure out which parameter is selected. Solid Green Solid Orange Solid Red Blinking Green Blinking Orange Blinking Red Î Î Î Î Î Î Game type Dwell Sensitivity Timers FSB AMB NOTE: FOR SAFETY REASONS, PROGRAMMING THE GUN SHOULD BE DONE WITHOUT ANY BALL IN THE FEEDER SINCE YOUR GOING DIRECTLY TO GAME MODE AFTER PROGRAMMING. 14 Software version 1.5 n First you need to select the parameter you want to set. Push and release the on/off button to cycle through parameters. Push and hold the on/off button to cycle faster and automatically through the parameters. o You now need to change the value of the parameter. Programming Example 2: Setting the Sensitivity to 1: 1. Open the left side of the grip 2. Turn on the marker. 3. Push the Prog. Button once to enter Programming mode. 4. Push the On/Off button twice to select the SENSITIVITY parameter. 5. Starting from a sensitivity of 2,for example, push the programming button 3 times to set value of SENSITIVITY to 1. You have cycled trough the whole range and jumped back to the min value. 6. Press and hold the trigger for 2 seconds to save and exit AND enter the GAME mode. Push and release the Programming button to cycle through values. Push and hold the Programming button to cycle faster and automatically through the values. Remember: Each time you reach the maximum value, you jump to the minimum value. This situation will be indicated by a second and different beep. Each time the value is incremented, a beep is emitted making the tuning very easy. p If you don’t remember the value of a parameter, just quickly press & release de Trigger (T). The board will play one beep per increment of the parameter (10 beeps for a value of 10). q Once you are all set and satisfied with your tunings, just press and hold the trigger (T) for more than 2 seconds. Your parameters are saved in the non volatile memory of the board so that you don’t need to reprogram everything, next time you turn your gun on. You are now ready to test the new settings... …Enjoy! Your Sensitivity is programmed. Note : Pressing the trigger saves and exits AND gets you to the GAME mode with the parameters you just set. No need to turn the gun OFF and ON. 15 Software version 1.5 8.2 SAFETY The Saving of your parameters in the memory is acknowledged by the Blue LED blinking six times and a GAME mode welcome music. Release the trigger before the end of the music for maximum safety. For safety reason there is also a one second latency when you jump from PROG mode to GAME mode added to blue led blinking and music. 8.3 MEMORY CORRUPTION WARNING : Unpowering the board during save sequence will corrupt your parameters. If this happens, just go back to prog mode, and press and hold the prog button UNTILL you hear the two tone beep (it can be long, but no more than 255 beeps, so be patient!) of the board indicating that you have cycled to a correct value. Repeat this for each parameter. Once you are done, save all your parameters by pressing and holding the trigger for more than 2 seconds. During PROGRAMMING mode, powering the gun off is not allowed (nor advised) because of memory access. To turn your gun off, simply press and hold the trigger to Save & Exit, then press and hold the on/off button as usual, to switch off. Factory default programming is: • • • • • • Game type = Tournament Dwell = 8ms Sensitivity = 2 Alarm Timer duration = 0 Anti Drop Off Control = 1 (for 0.5 ms) Automatic Trigger Debounce = 3 for 30 ms 16 Software version 1.5 8.4 PROGRAMMING VISUAL HELP Here are some visual helps for better comprehension. 8.4.1 EXAMPLES POWERING THE GUN Action n Plug the battery into the socket. by pushing the trigger È PLAY! È Turn the gun OFF 9 9 Typical sequence example: Power the gun È Turn the gun ON È Select GAME mode What happens? 8.4.2 The board vibrates once and emits a two tone beep. The gun is ON but asleep! TURNING THE GUN ON First, power the gun. Then… Action n Press & hold on/off for 2 sec. What happens? 9 9 8.4.3 The Green, Blue and Red LED flash once. The gun vibrates once and plays the welcome music. SELECTING GAME MODE First, power the gun and turn it ON. Then… Action nPress and release the trigger. Examples of possible sequences in GAME mode: You can do this: nÆoÆ…ÆoÆoÆ…ÆoÆr or this… nÆpÆoÆ…ÆoÆqÆoÆr o Pull the trigger to fire as many times as you want! p Press & release the On/Off button q Press & release the On/Off button What happens? 9 9 9 The gun plays a three tone beep The gun is in GAME mode. The BLUE LED blinks rapidly. 9 9 The gun fires. Rate of fire depends on programmed parameters. Each time you fire the BLUE LED flashes. 9 9 9 The EYES are OFF. The BLUE LED blinks slowly. 9 9 The EYES are ON. The BLUE LED blinks rapidly. 17 Software version 1.5 8.4.4 TURNING THE GUN OFF This is not possible while in Prog. mode. Action n Press & hold the On/Off button for more than 2 seconds What happens? 9 9 The gun vibrates twice and plays the Goodbye music. The gun is asleep and can remain so for months. 18 Software version 1.5 8.4.5 EXAMPLES Typical sequence example: Power the gun È Turn the gun ON È Select PROG. mode by pushing the Programming button È Save & Exit to GAME mode È Test settings. È Close the grip and/or Turn the gun OFF Examples of possible sequences in PROG mode: GOING TO PROGRAMMING MODE Action What happens? n Press and 9 release the Programming button. o Press and release the On/Off button or press & hold the On/Off button to cycle trough parameters. nÆpÆpÆpÆq You can do this to change Dwell from 8ms to 9ms (by steps of 0.5ms) and Sensitivity from 1 to 3: nÆoÆoÆpÆpÆoÆpÆpÆq 9 9 9 9 p Press and release the Programming button or press & hold the programming button. q Press & hold the trigger for 2 seconds You can do this to set you gun to Full auto: 9 qbis Press & release the trigger 9 9 The gun plays a Welcome Prog. music. The gun is in PROGRAMMING mode. The GREEN LED is ON, meaning “Game type” parameter is selected. The gun beeps once for each action or beeps rapidly if you hold the button. The LED will cycle accordingly. SOLID GREENÆSOLID ORANGEÆSOLID REDÆ BLINKING GREENÆ BLINKING ORANGEÆ BLINKING RED for each action. When you reach the parameter you want to set, stop your action. Press and release (T) to hear one beep per unity (see 4bis). If you reach the last parameter the gun plays a different beep once and jumps to the first parameter. The gun beeps once for each action or beeps rapidly if you hold the button. The LED is ON and its color indicates the active parameter you are setting. If you reach the last value the gun vibrates once and jumps to the first value. 9 The gun “Saves & Exits” the programming mode and Jumps to GAME mode where you can instantly test the new setup. 9 The gun will “read” the current value of the parameter. It sounds once for each increment of the value. • • • • • • 1 beep for Tournament 2 beeps for Enhanced L1 3 beeps for Enhanced L2 4 beeps for NXL legal tournament 5 beeps for Max speed Full 6 beeps for Millennium tournament 19 Software version 1.5 9 Troubleshooting Below text in italic is extracted from the SHOCKER® user manual. 9.1 SHOCKER® IS DIFFICULT TO SWITCH ON/OFF 9 Check the solenoid wiring harness. It is maybe in 9 9 the way of the on/off button. To do so, remove the grip frame. Relocate wires away from switch and check for damage. Check if battery is not low (V < 5.5V) or dead. We have noticed that the switch on the solenoid board is sometime soldered to far from the frame. In this case contatc your Smart part dealer for adjustement… 9.2 BREACKING PAINT Most of the time Breaking paint is due to mechanical problems. The Shocker® Users manual says: 9 Paint to barrel match is wrong. The paint you are 9 9 9 using is too large for the barrel you are shooting it through. Ball Detents are damaged or missing. Check to make sure white delrin ball is intact and reactive on both sides. Replace if damaged or missing. Paint is too low quality or too brittle. Switch to a name brand, high quality manufacturer. Loader may not be keeping up if you deactivate the eye system in this case, check loader batteries or use a faster loader. 9 Check Reloaded battery. It may be low, causing incomplete cycling. 9.3 VELOCITY IS INCONSISTENT Warning: Velocity is very related with weather conditions. Outside temperature and humidity can drasticaly modify pressure regulation and paints diameter. 20 Software version 1.5 Most of the time inconsistent velocity is due to mechanical problems. The Shocker® Users manual says: 9 Clean regulator and inspect seat assembly. (See separate Max-Flo manual) 9 Check paint to barrel match. Paint may be too 9 large or too small for the barrel you are shooting it through. Find a paintball that fits your barrel properly. Check the Shocker® and Max-Flo regulator for leaks. 9.4 THE SHOCKER® EXHIBIT LOW VELOCITY 9 Your Reloaded battery is low. Replace with fresh name brand battery. 9 Turn the on/off valve on all the way. 9 Check your operating pressure so that it is at @190psi. Increase to 190psi if lower. 9 If pressure is at @190psi, slowly increase dwell setting. 9.5 THE SHOCKER® IS DROPPING OFF 9 FIRST OF ALL, clean and grease the Shocker® and the regulator and ckeck again. 9 Increase the dwell slightly. 9.6 THE SHOCKER® IS GASSED UP, BUT DOES NOT SHOOT 9 Turn the Reloaded board on. 9 Battery may be dead. Replace with fresh name brand battery. 9 Check to see if solenoid wiring harness has come free from either end of the circuit board. If yes then reconnect. 9.7 THE GUN FIRES AT A VERY LOW ROF WHATEVER THE RATE OF MY FINGERS Due to its AFF feature, while in Vision mode, the gun will fire wheter there are balls present or not. 21 Software version 1.5 9 But if balls have odd shapes or are badly 9 discolored. Each ball detecttion will have a penalty causing the gun to lower its ROF to 10 bps. You can remove the Vision eye or choose a different type of ball or check to see if you have previously broken a ball. Broken paint may cover the actual Vision eye and cause it to misread. Clean it with a paper towel and a small amount of alcohol. If this does not work, the eye may be damaged and will need to be replaced. Call Smart Parts or your local Smart Parts dealer for parts. The Vision may not read certain dark shell paints, such as black. While it is not a given that the Vision does not see black shell paint, continued failure of the Vision system with black shell paints should indicate for you to try a bit of a brighter shell paintball. 22 Software version 1.5 10 Funny acronyms glossary Automatic Intelligent Trigger Debounce (AITD) – Each time you press the trigger, the switch is activated. The switch is made of metal plates that will bounce for a short period of time. At the Board level those bounces are considered as independent trigger actions. Therfore the board must be abble to filter those “false events”. In the case of the RELOADED® board, the player has NOTHING to set up to handle this inherent property of a switch. The RELOADED® board knows exactly what to do with this intrinsec characteritic of the switch. Trigger/Switch Debounce (TSD) – Each time you press the trigger, it pushes on the switch lever. The switch is made of metal plates and springs. Their is a possition where the main metal plate is in an unstable equilibrium. In this forced state, the spring and the trigger give very litle room to the plate, it has ALMOST nowhere to go, but touches nearly nothing. In this configuration, the plate will/can oscillate between ON and OFF, causing the gun to “Run Away”. The RELOADED® board alows the player to set up a parameter that avoids this behaviour. Automatic Drop Off Control (ADOC) – The dwell’s solenoid is energized each time you fire. The ADOC feature controls and adapts the duration of the excitation depending on the situation. The more the dwell is open the faster you shoot. The RELOADED® board will automatically adjust all associated parameters to properly service the gun. Experiencing drop off, bolt not completely cycling or ball breakage are symptoms of poor adjustments. The solenoid service is a question of compromise between dwell opening duration and recharge time. The RELOADED® will take care of that automatically. 23 Software version 1.5 Auto Adaptive Loader Delay (A2LD) – After each shot, the gun must make sure a slight delay is added to the cycle to ensure you won’t chop the next ball. Thanks to its unique A2LD technology, the RELOADED® sets the appropriate delay for each ball, without any user action! First Shot Boost (FSB) – Due to electrical and pneumatic leakages of the solenoid, when the marker has been left sitting for a long period (approx. more than 30 seconds), the first shot suffers of drop off. To avoid this, The FSB feature will add an additional dwell boost to the first shot after such a long inactivity. WARNING: After 10 seconds of inactivity, the first ball velocity will be slightly higher (approx. 15 to 30 fps higher). Don’t forget to fire at least once before a chrony check! Recharge time – This is the amount of time needed to recharge the gun after a shoot. This includes: waiting for a ball to be present, let the air flow to the regulator, debounce the trigger, wait for the bolt to be pulled backward, etc… Some of those delays take place at the same time, some are unavoidable. The RELOADED® board automatically adjusts the different delays to service the gun at his optimum performance, what ever the circumstances. Auto Force Fire (AF2) – This feature will force the fire in the event a ball has been pushed slightly into the detents where the Eyes are unable to detect it. In this situation the RELOADED® will automatically handles the situation and corrects the problem so you can continue firing normally. You won’t even notice the problem as occurred. Automatic Eyes De-activation (AEDA) – In case of repetitive loading problem the RELOADED® will instantly activate its AEDA feature. This allows jumping from an HALO feeding rate to a “dry shoot” mode, in a snap, without any user action. 24 Software version 1.5 It is very important that you read the next two pages carefully. LIMITATION OF LIABILITY FRENCH CONNECTION PAINTBALL WILL NOT BE RESPONSIBLE FOR ANY DAMAGES OR INJURIES THAT ACCOMPANY OR RESULT FROM YOUR USE OF ITS PRODUCTS. THESE INCLUDE (BUT ARE NOT LIMITED TO) DAMAGES OR INJURY CAUSED BY ANY: (1) USE OF (OR INABILITY TO USE) THE RELOADED® BOARD; (2) USE OF (OR INABILITY TO USE) ANY PRODUCT TO WHICH YOU INTERFACE FROM OUR RELOADED® BOARD; (3) FAILURE OF PERFORMANCE; (4) ERROR; (5) OMISSION; (6) INTERRUPTION; (7) DEFECT; OR (8) DELAY IN OPERATION; WE ARE NOT LIABLE FOR ANY CONSEQUENTIAL OR INCIDENTAL DAMAGES, WHICH ARE DAMAGES INTENDED TO COMPENSATE SOMEONE DIRECTLY FOR A LOSS OR INJURY, DAMAGES REASONABLY EXPECTED TO RESULT FROM A LOSS OR INJURY, OR OTHER MISCELLANEOUS DAMAGES AND EXPENSES RESULTING DIRECTLY FROM A LOSS OR INJURY. FURTHERMORE, WE ARE NOT LIABLE EVEN IF WE HAVE BEEN NEGLIGENT OR IF OUR AUTHORIZED REPRESENTATIVE HAS BEEN ADVISED OF THE POSSIBILITY OF SUCH DAMAGES—OR BOTH. HOWEVER, IN CERTAIN STATES WHERE THE LAW MAY NOT ALLOW US TO LIMIT OR EXCLUDE LIABILITY FOR THESE INCIDENTAL OR CONSEQUENTIAL DAMAGES, THE ABOVE LIMITATION MAY NOT APPLY AND YOU MAY HAVE THE RIGHT TO RECOVER THESE TYPES OF DAMAGES. IN ANY EVENT, OUR LIABILITY TO YOU FOR ALL LOSSES, DAMAGES, INJURIES AND CLAIMS OF ANY KIND, WHETHER THE DAMAGES ARE CLAIMED UNDER THE TERMS OF A CONTRACT, OR THEY ARE CLAIMED TO BE CAUSED BY NEGLIGENCE OR OTHER WRONGFUL CONDUCT OR ANY OTHER LEGAL THEORY, WILL NOT BE GREATER THAN THE AMOUNT YOU HAVE PAID TO GET THE RELOADED® BOARD. DISCLAIMER THE MATERIAL IN THIS DOCUMENT IS PROVIDED AS IS. THIS MEANS THAT FRENCH CONNECTION PAINBALL DISCLAIMS ALL EXPRESS AND IMPLIED WARRANTIES ABOUT THE RELOADED® BOARD DESCRIBED IN THE DOCUMENT. THIS INCLUDES, BUT ITS NOT LIMITED TO, WARRANTIES THAT: (1) THE RELOADED® BOARD IS OF ANY PARTICULAR LEVEL OF QUALITY OR IS FIT FOR A PARTICULAR PURPOSE; (2) THAT THE FUNCTIONAL ELEMENTS CONTAINED IN THE RELOADED® BOARDS WILL BE UNINTERRUPTED OR ERROR-FREE; (3) THAT DEFECTS WILL BE CORRECTED; OR (4) THAT INFORMATION CONTAINED IN THE DOCUMENT IS ACCURATE AS OF ANY PARTICULAR DATE. 25 Software version 1.5 Trade and other Marks All products and company names mentioned in this document may be trade, service or registered marks of their respective owners. Use of any RELOADED® Logo or acronyms for commercial or noncommercial purposes without prior written consent of French Connection Paintball may constitute infringement of a registered mark. Ownership of Materials The information and images contained in this document is copyrighted and may not be distributed, modified, reproduced in whole or in part without the prior written permission of French Connection Paintball. Third Companies and Products Mention of third party products, companies and web sites in this document is for informational purposes only. French Connection Paintball assumes no responsibility with regard to the selection, performance or use of these products or vendors. Enforcement of Intellectual property rights French Connection Paintball actively and aggressively enforces its intellectual property rights. Piracy In many countries copyright law provides for severe civil and criminal penalties for the unauthorized reproduction or distribution of copyrighted material. Feedback and Information Any feedback you provide French Connection Paintball with shall be deemed non confidential and French Connection Paintball shall be free to use such information on an unrestricted basis. Official Language French is the Official Language of the French Connection Paintball and will prevail in all questions of interpretation. Legal Contacts If you have questions concerning the licensing or usage of French Connection Paintball marks or copyrighted materials contact French Connection Paintball by email at: [email protected] 26 Software version 1.5 Personal notes: 27