1
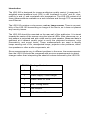
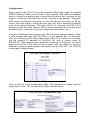
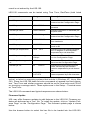
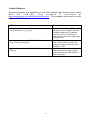
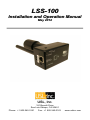
LSS-100
Installation and Operation Manual
May 2012
USL, Inc.
181 Bonetti Drive
San Luis Obispo, CA 93401
Phone: +1 805 549 0161
Fax: +1 805 549 0163
1
www.uslinc.com
DAX-202 User Manual
Page1
Introduction
The LSS-100 is designed for cinema auditorium quality control. It measures Cweighted sound pressure level (SPL) in dB, luminance in cd/m2 and ftL, chromaticity (x and y), and correlated color temperature. The LSS-100 makes all of
these measurements available on a web interface and through TCP commands
over Ethernet.
The LSS-100 contains a color sensor, not an image sensor. There is no possibility of the LSS-100 transmitting an image of the movie, so it does not present
any security issues.
The LSS-100 should be mounted on the rear wall of the auditorium. It is aimed
towards the center of the screen using the internal LEDs. After shows are run, a
test pattern is projected and pink noise sent to each speaker. Measured data is
gathered at a network control point to verify the projected luminance, color
chromaticity, and sound levels. These measurements are used to identify
lamps nearing end of life, misadjusted lamps, projector color problems, defective speakers or other audio components, etc.
Since measurements vary in different positions in the room, the measurements
from the LSS-100 should be compared with previous measurements to detect
changes rather than interpreting the absolute values delivered by the LSS-100.
LSS-100 Package Contents
1
LSS-100 Unit
1
Power Supply / USB Charger
1
Power Cable 30’ USB
1
Wall / Ceiling Mount
1
USB Adapter
1
LSS-100 User Manual
2
Configuration
Apply power to the LSS-100 using the supplied USB power supply. A standard
USB to USB-mini cable can be used, or the supplied USB cable and adapter
board. If using the supplied cable, connect the red wire to the + terminal on the
adapter, and connect the black wire to the - terminal on the adapter. The green
LED next to the Ethernet connector on the LSS-100 will light dimly for 30 seconds, then light brightly. During this time, the LSS-100 is checking its backup
copy of the system firmware. The green LED is lit whenever the LSS-100 is
powered unless the flash memory chip is being accessed (such as during the
firmware check, loading or saving of configuration information, etc.).
Connect an Ethernet cable between the LSS-100 and a laptop computer. Open
a web browser and type http://169.254.1.6 in the address bar. On most laptops, this will bring up the home page of the LSS-100. If it does not, try changing the laptop’s IP address to 169.254.1.123 with a subnet mask of
255.255.0.0. Most laptops have automatic crossover for Ethernet, but some
older ones do not. If the LSS-100 home page is still not visible, try using an
Ethernet crossover cable between the laptop and the LSS-100. The LSS-100
home page is shown below.
Click on the link to the Configuration Page. The username is “admin” and the
password is “ultra”. The Configuration Page is shown below.
3
DAX-202 User Manual
Page3
The Web Display Configuration allows various items to be shown or not shown
on the LSS-100 home page. Check or uncheck the items as desired, then press
the Save User Data button below the checkboxes.
Enter the Auditorium Data and press “Save User Data.” This data is not used
by the LSS-100, but is shown on the home page to help identify the theater and
auditorium.
Enter the desired NETBIOS Host Name, the IP Address, the Gateway, and the
Subnet Mask. Press “Save IP Config and Reboot” to save the new networking
data.
You should now be able to connect to the LSS-100 at the new IP address. If a
mistake was made and the LSS-100 cannot be found, momentarily hit the restore button (beside the Ethernet jack) to return to the default IP address of
169.254.1.6.
Installation
Use the supplied OmniMount 10.0 wall mount to attach the LSS-100 to the
auditorium back wall. Aim the lens and microphone towards the screen.
Thread the supplied nut onto the OmniMount threaded rod with the flat side of
the nut towards the threaded end and away from the ball. Thread the OmniMount threaded rod into the threaded hole on the LSS-100 turning the LSS-100
four turns, adjusting a fraction of a turn as required to point the LSS-100 towards the screen. Tighten the nut on the threaded rod against the LSS-100
case to firmly mount the LSS-100 to the threaded rod.
The supplied cable has the USB mini-B connector on one end and bare wires
at the other end. Drill a hole large enough for the power and Ethernet cables.
Push the power cable through the hole from the auditorium to the booth, then
pull through the excess cable. Route the cable to the supplied USB power supply. Cut, strip and tin the USB power cable. Tinning the leads is required to
ensure a good connection. If you do not have a soldering iron to tin the leads,
do not cut the wire. Instead coil up the excess wire and use the existing
stripped and tinned leads at the end of the cable. The wires are coated with an
insulating material that prevents a good connection unless the wires are tinned.
Connect the RED wire to the “+” terminal on the USB power adapter board.
Connect the BLACK wire to the “-” terminal. Polarity is critical.
Connect the Ethernet jack on the LSS-100 to the theater network. Tie the power and Ethernet cables to the LSS-100 using the cable tie mount on the side of
the LSS-100 to prevent connectors coming loose by accident. Power up the
LSS-100.
Turn the LSS-100 LED switch to on and adjust the focus control until the red
spots on the screen appear to be in focus. As the LSS-100 is adjusted out of
focus, the hole in the middle of the spots fills in. The hole in the center will be
4
open and the edges sharp when the LSS-100 is in focus. Once focus is set,
lock the lens position by tightening the thumb screw on the lens tube.
Project the test pattern on the screen. Position the LED spots to be in the center of the test pattern area. Since the projector lamp is much more powerful
than the LEDs in the LSS-100, it may be difficult to see the LED spots when
the test pattern is on. A simple method of seeing where the LED spots are
within the test pattern is to wave a hand through the projector beam, casting a
shadow on the screen. As the shadow moves across the screen, the LED
spots and their location within the test pattern will become visible. The LSS100 sensor is a linear sensor positioned midway between the LEDs. If the test
pattern is tall, adjust the LSS-100 to align the spots vertically. If the test pattern
is wide, rotate the LSS-100 to align the spots horizontally. Place the center of
the area between the spots in the center of the test pattern area. Lock the Omnimount position and turn off the LEDs.
Turn on a pink noise source on one of the auditorium speakers. The SPL indicated by the LSS-100 should be close to that measured with an SPL meter.
Again, due to system tolerances and variations in sound level throughout the
auditorium, the numbers will not match precisely. Bring up pink noise on each
speaker individually and note the SPL measured by the LSS-100. These will be
the reference levels used to discover changes in the auditorium.
TCP Interface
The LSS-100 uses TCP port 10001. It can accept 5 simultaneous TCP connections. Commands are lower case and terminated with a carriage return (0x0d).
Parameters, if any, are separated by tab characters (0x09). Responses are in
ASCII and terminated with a carriage return. If multiple values are returned,
they are separated with tab characters. In some cases, there may be a tab
character after the last response and before the carriage return. The com-
5
DAX-202 User Manual
Page5
mand is not echoed by the LSS-100.
LSS-100 commands can be tested using Tera Term, RealTerm (both listed
Command
Response
Description
lss100.sys.auditorium
1
Returns the auditorium number
entered on the Configuration Page
lss100.sys.cct
4511.929913
Returns the correlated color temperature
lss100.sys.cdm2
58581.395492
Returns luminance in candelas per
square meter
lss100.sys.comments
LSS-100 is great!
Returns the auditorium comments
entered on the Configuration Page.
lss100.sys.ftl
17725.709432
Returns measured luminance in
foot-Lamberts.
lss100.sys.spl
65.239520
Returns measured sound pressure
level in dB
lss100.sys.temperature
34.2
Returns LSS-100 internal temperature in degrees C and degrees F
separated by a tab character.
lss100.sys.theater_name
USL San Luis
Obispo
Returns the Theater Name entered
on the Configuration Page.
lss100.sys.theater_numb
er
123
Returns the Theater Number entered on the Configuration Page.
lss100.sys.ver
B
lss100.sys.xy
0.363515
0.371572
96.3
120110
Returns the circuit board revision
letter followed by the firmware
revision separated by a tab character.
Returns chromaticity xy coordinates separated by a tab character.
below), or telnet on operating systems that include it (Windows XP, Linux, Mac
OS). Since the LSS-100 does not echo commands or append line feed characters, Tera Term and similar programs should be set for local echo and CR+LF
on receiving a carriage return. These options are in the Setup – Terminal menu
on Tera Term.
The LSS-100 commands and typical responses are shown below:
Firmware Update
USL may offer firmware updates to add features to the LSS-100. Firmware updates are delivered as a “hex” file. To install the update, click on “Update Firmware Page” on the “Configuration Page.” The firmware update page is shown
below.
Use the browse button to select the hex file to be loaded into the LSS-100.
6
Press “Update Main Processor.” After the new code is uploaded to the LSS100, the browser will return a “Connection Reset” message. This happens
when the LSS-100 reboots with the new firmware.
If a firmware update is interrupted, it is possible for the LSS-100 to cease operating. To restore the factory firmware (allowing another attempt at the update),
hold down the restore button as power is applied to the LSS-100. If the button
is held for about 1 second before and 1 second after power is applied, the factory firmware will be reloaded and system configuration will remain unchanged.
Once the system is up and running, pressing the restore button will restore the
default IP address (169.254.1.6).
7
DAX-202 User Manual
Page7
Useful Software
Several programs are available on the USL website that should prove useful
with
the
LSS-100.
This
software
is
available
at
http://www.uslinc.com:8880/ftp/MultiProduct/ . The software that may be useful
with the LSS-100 is:
URL
Description
http://www.uslinc.com:8880/ftp/MultiProduct/Ether
net_Discoverer_v1_0_1.zip
Ethernet Discoverer – Finds USL
products on the network. Shows
the MAC address, IP address,
and host name. Clicking on a
listing opens the home web page
of the device.
http://www.uslinc.com:8880/ftp/MultiProduct/Realt
erm_2.0.0.57_setup.zip
RealTerm – A terminal program
that can be used to send commands and see responses over
RS232 or TCP.
http://www.uslinc.com:8880/ftp/MultiProduct/tterm
p23.zip
TeraTerm Pro – A terminal program that can be used to type
commands to the LSS-100 and
see responses.
8
Manual Revisions
111107 – Original manual.
120112 – Revisions for firmware and hardware changes.
120217— Revisions to accommodate hardware and firmware update/s.
120501 — Editorial revisions.
9
DAX-202 User Manual
Page9
Additional Manuals may be
viewed / downloaded at: www.uslinc.com
10
11
DAX-202 User Manual
Page11
USL, Inc.
181 Bonetti Drive
San Luis Obispo, CA 93401
Phone: +1 805 549 0161
Fax: +1 805 549 0163
12
www.uslinc.com