1
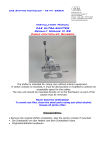
SYNERGY MFG. 870 INDUSTRIAL WAY, SAN LUIS OBISPO, CA (805) 242-0397 PPM-8112-02 – TJ/LJ/XJ/ZJ INNER C-GUSSET KIT GENERAL NOTES: These instructions are also available on our website; www.synergymfg.com. Check the website before you begin for any updated instructions and additional photos for your reference. The C-gussets in this kit help to prevent the factory Inner-C’s from bending. These gussets can be installed with the axle still in the vehicle and with knuckles still attached. While not necessary, we do suggest removing the knuckles and ball-joints when installing C-gussets as to prevent any heat damage to ball-joints. Be sure to disconnect the ground cable from the battery prior to welding as to prevent electrical damage to the vehicle. PARTS LIST: (2) 811205 TJ/LJ/XJ/ZJ LOWER C-GUSSETS (2) 811206 TJ/LJ/XJ/ZJ UPPER C-GUSSETS (1L & 1R) Parts / Tools Needed to complete installation: Basic simple hand tools. 4-1/2” angle grinder with abrasive attachments to remove paint and metal from inner C’s. Some form of welder. Mig is preferred, but Tig or stick welding is acceptable. Spray paint of desired color APPROXIMATE INSTALL TIME: 4-6 HOURS INSTALLATION: 1) Note, we do recommend removing the balljoints from the housing prior to installing C-gussets. Excessive heat from welding can damage the plastic internals of a stock ball joint as well as the rubber dust boots. Use discretion when welding. 2) Refer to your factory service manual for procedures on tearing the front axle down to the point of ball joint removal. 3) Fit the C-Gussets on the axle to see what areas need to be cleaned up in preparation for welding. Mark if needed. Note the orientation of the cut out for coil spring clearance. The cut should face the front of the vehicle. 4) Clean the areas to be welded as shown. 5) Once weld surfaces are prepared, place upper C-gussets in position. There will likely be a slight gap around the ball-joint area; use a C-clamp or vice grips to tighten the gusset in the proper welding position. 6) Once satisfied with gusset placement, tack in several locations and fully weld all areas as shown below. 7) With upper C-gussets fully welded on, start on the lowers. 8) First, trim the sway bar end link mount to allow clearance for fitment. 9) Mark a cut line beginning at the end of the weld on the axle side, straight out horizontally. 10) Cut along the marked line and grind smooth. 11) Tack the lower C-gusset on in several locations. It should fit around the previously cut sway bar mount as shown below. 12) Once tacked, fully weld as shown in the picture below. 13) After welding, clean off any weld burrs and paint the desired color to prevent corrosion. 14) Refer to your factory service manual to reassemble the front axle. Installation is Complete