1
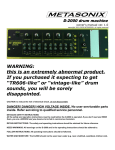
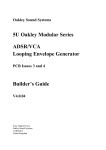
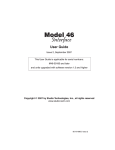
R60 selftuning MIDI/CV interface user's manual Warning: this device is intended for use only by experienced music and audio professionals. It is not intended for amateur use. Copyright 2010 Metasonix. All rights reserved. READ THIS CAREFULLY, DAMMIT!!!!!!!!! RETAIN INSTRUCTIONS: The safety and operating instructions should be retained for future reference. HEED WARNINGS: All warnings on the R-60 and in the operating instructions should be adhered to. FOLLOW INSTRUCTIONS: All operating instructions should be followed. WATER AND MOISTURE: The R-60 should not be used near water (e.g. near a bathtub, washbowl, kitchen sink, laundry tub, in a wet basement, near a swimming pool etc.). Care should be taken so that liquids are not spilled onto or near the enclosure. VENTILATION AND COOLING: The R-60 MUST be situated so that its location or position does not interfere with convective cooling. The R-60 MUST NOT be used on a bed, sofa rug or similar surface which may prevent proper cooling. It is NOT a toy. HEAT: The R-60 MUST be situated away from heat sources such as radiators, heat registers, stoves, or other devices (including power amps) that produce heat. POWER SOURCE: The R-60 must be connected to a power supply ONLY of the type described in the operating manual or as marked on the R-60. It uses +5v at 100 mA plus +12v and -12v at 10 mA. The power input is a standard Doepfer (tm) 16-pin IDC type, with the -12v pins on the BOTTOM. The pins above the +5v pin row are not used and not connected. Note: It is CRITICAL that the power supply be clean and free of noise. Homebrew power supplies, dirty connectors, or other issues may cause the R-60 to improperly tune a given VCO, of whatever type. VCOs vary greatly in design, response and waveform output. For these reasons, Metasonix cannot warranty the accuracy, reliability or repeatability of the R60's operation. Such accuracy, reliability or repeatability is heavily dependent on the VCO or synthesizer used with the R-60. CLEANING: The R-60 front panel should only be cleaned with a soft cloth moistened with water. Unplug the power supply before attempting to clean. It is NOT intended for use in wet or moist environments. NON-USE PERIODS: The R-60 should be shut off when left unused for a long period of time. DAMAGE REQUIRING SERVICE: The R-60 should be serviced by qualified service personnel when: --The power supply has been damaged; --The R-60 has been dropped, physically damaged, or subjected to force; --Liquid has been spilled onto the R-60 or it has been exposed to rain; --The R-60 does not appear to operate normally or exhibits a marked change in performance. SERVICING: The user should not attempt to service the R-60. All servicing should be referred to qualified service personnel. METASONIX LIMITED WARRANTY and standard legal disclaimer Thank you for purchasing this Metasonix product. The following terms and conditions apply: 1. Warranty period is for ONE YEAR from date of purchase with proof of purchase submitted. Warranty covers electrical failure of vacuum tubes and gas-filled tubes, except in cases explained in 3 below. 2. Operating instructions must be followed. This device was intended ONLY for use by AUDIO AND MUSIC PROFESSIONALS. IT IS NOT INTENDED FOR USE BY ORDINARY CONSUMERS!! Product must not have been damaged as a result of defacement, misuse, abuse, neglect, accident, destruction or alteration of the serial number, improper electrical voltages or currents, repair, alteration or maintenance by any person or party other than our own service facility or an authorized service center, use or installation of non-Metasonix replacement parts in the product, or the use of this product outside of the U.S.A. or Canada (except as a product distributed by an authorized Metasonix dealer), or modification of the product in any way, or incorporation of the product into any other products, or damage to the product caused by accident, fire, floods, lightning, or acts of God, or any use violative of instructions furnished by Metasonix. 3. Obligations of Metasonix shall be limited to repair or replacement with same or similar unit, at our option. To obtain repairs under this warranty, present the product and proof of purchase (e.g. bill or invoice) to the authorized Metasonix service center, transportation charges prepaid. When returning the product for repair, please pack it very carefully, preferably using the original packaging materials. Please also include an explanatory note. IMPORTANT: To save yourself unnecessary cost and inconvenience, please check carefully that you have fully read and followed the instructions in this instruction manual. This warranty is in lieu of all other expressed warranties, obligations or liabilities. ANY IMPLIED WARRANTIES, OBLIGATIONS, OR LIABILITIES, INCLUDING BUT NOT LIMITED TO THE IMPLIED WARRANTIES OF MERCHANTABILITY AND FITNESS FOR A PARTICULAR PURPOSE, SHALL BE LIMITED IN DURATION TO THE DURATION OF THIS WRITTEN LIMITED WARRANTY. Some states do not allow limitations on how long an implied warranty lasts, so the above limitations may not apply to you. IN NO EVENT SHALL WE BE LIABLE FOR ANY SPECIAL, INCIDENTAL OR CONSEQUENTIAL DAMAGES FOR BREACH OF THIS OR ANY OTHER WARRANTY EXPRESS OR IMPLIED, WHATSOEVER. Some states do not allow the exclusion or limitation of special, incidental or consequential damages, so the above limitation may not apply to you. This warranty gives you specific legal rights, and you may also have other rights which vary from state to state. METASONIX shall not be held liable for any incidental, consequential, or direct damages or expenses associated with the use or misuse of its products. METASONIX does not guarantee that any of its products are designed for any particular use or purpose. The entire risk of suitability and performance of this product lies with the user. Products manufactured and/or sold by METASONIX are not authorized for use as critical components in devices used in life support and other systems whose failure or performance could result in compromised safety or danger to life or property. NOTE: All sales are FINAL, especially custom designs. Only a Metasonix authorized dealer is permitted to return products to Metasonix for a refund or exchange. What the R-60 does: - Tunes from C1 (32.7 Hz) to C5 (1056 Hz) typical. Maximum tuning range will vary with the VCO and other system details. Expect about 2 to 4 octaves with your Metasonix oscillators. The R-60 does not care if the VCO is Hz/V or V/octave—if the VCO waveform is stable, the R-60 will attempt to set its internal tuning table to equal tempering over the maximum possible range. - There is a short delay between receiving the MIDI note message and setting the output CVx. The pitch change time of the connected VCO differs for every VCO, and can range from 1 ms to 20 ms. The delay is due to the VCO's inherent pitch-chaznge delay, and is not due to the R-60 (which responds in less than 1 ms). - The R-60 is monophonic on the last MIDI channel set. Channel 1 is the default on a new R-60 or after a hard reset. - Stores the last tuned CV scaling table in non-volatile memory. - 10 note buffer/memory. - +5v Gate out that follows MIDI keydown/keyup messages. - The R60 has a “smart” learn mode for a new MIDI channel. Just press the Learn button on the R-60 briefly, then any key on the keyboard controller. That received MIDI keydown message sets the R-60's operating MIDI channel, which is stored permanently (until a hard reset is peformed). Sending any MIDI message on the desired channel will set that MIDI channel, not just keydown. Also, if you send a MIDI keydown corresponding to a note value of “C”, the R-60 will set its internal lowest C note to that C, instead of the default lowest C = MIDI 24. - Built-in retrigger allows trills. SETUP AND TUNING PROCEDURE: read all parts below before attempting to use or retune! 1. Plug MIDI out of your keyboard controller of choice into the R-60 MIDI input. 2. Power up your Euro modular rig. (If the R-60 does not respond to MIDI keydown after power-up, try cycling the power off and on again.) Each R-60 ships as new with a default tuning table that is often usable with a Metasonix R-54 VCO, without performing the tuning procedure. So try the R-54 and R-60 together, and see if you can adjust the R-54 for a usable equal-tempered tuning, before trying to retune. If you must retune, or are using a V/octave VCO, set the R-54 with the recommended settings shown below. For other VCOs, use the square-wave or pulse-wave output, with no waveform or PWM modulation and output level at maximum. (Some VCO outputs might need to be amplified with a preamp to obtain good results. The R-60 wants to see a clean rectangular waveform at its input, with at least 1 v p-p signal strength.) Note that the maximum possible range the R-60 will control is limited to approximately 0 to +4.5v, so the range is limited by the CV response of the VCO, within that limitation. Different VCOs can give different tuning results with the R-60. Patience is recommended. 3. Patch the Audio Output of the R-54 into a mult. Feed one cable of that multed signal into a mixer or VCA (whatever you want to monitor the tuning procedure with) and one cable into the R-60 Audio Input. Patch the R-60 CV Output into the R-54 Pitch CV input. The R-60 Gate output can be patched into the gate input of a an envelope, or directly to the CV input of a VCA. Do whatever you want with it. The gate output is 0v low, +5v high and able to drive TTL inputs. VCO mult Audio input CV out To monitor amp (optional) Gate out R-60 From MIDI controller Audio out CV input 4. Press and hold the Learn button for 3 seconds. The LED will light solidly, indicating that the unit has set its CV output to 0V and is ready for tuning. Now adjust the VCO's pitch to 32Hz, or to a reasonably low pitch. This will be preset as the R-60's lowest operating pitch, occurring at MIDI note 24. 5. Press R-60 Learn button again, briefly (release when you hear the R60 start tuning itself.) The VCO pitch should start at about 32 Hz, or the lowest pitch you set the VCO to in step 5, and will start incrementing the CV (and thus the VCO pitch). The time needed will depend on the VCO's response speed. It would be wise to allow at least 45 seconds, although some VCOs will finish the procedure faster. 6. After the R-60 has finished tuning, the LED will blink with one of the listed blink codes. 7. Press and hold R-60 Learn button for 2 seconds. LED will stop displaying the listed blink code and should now light only when you send a note-on message from your MIDI keyboard. The LED will be off when no key is pressed, and on when a key is pressed. It's then displaying the Gate voltage. Note: The lowest tuned note will automatically be assigned to the C1 key of your controller ONLY if you do a MIDI reassign as shown above. Adjust the Octave Transpose or Range settings of your MIDI controller as needed for proper range control of the R-60 and VCO. Recommended settings for use of a Metasonix R-54 with the R-60 are shown below. Note that individual R-54s may require slightly different settings to obtain good results, so trial and error is recommended. It is CRITICAL that the signal fed to the R-60 is as clean, unvarying and repeatable as possible. Noisy power supplies and dirty connectors can cause all kinds of tuning problems. MASTER TUNING WAVESHAPE/ FILTER RESONANCE OVERDRIVE LEVEL MAX - dB OUTPUT LEVEL Max - dB 0dB -20 -10 LED Blink Codes: After a tuning cycle, the R-60 will display the following blink codes on its LED until the Learn button is pressed and held for 2 seconds. -_-_-_-_-_-_-_-_-_-_-_-_-_-_-_ (repeat) = No input signal detected -_--------______-_--------______ (repeat) = Input signal unreliable -____-____-____-__________ (repeat) = Some readings were successfully taken but autotune terminated early. ----____----____----_________(repeat) = Autotune completed successfully. Each dash is 200ms long. Each sequence is followed by a 3 second pause with the LED off. The sequence and pause is repeated until the next press and hold of the learn button for 2 seconds, at which stage the R-60 returns to normal operation mode. Note: sometimes the R-60 may show the “autotune terminated early” code, despite having successfully finished a full tuning cycle. Press the Learn button and try playing the VCO via the R-60 and MIDI keyboard to determine if a usable tuning range was obtained. (You might need to use the octave transpose or “low key” controls on your MIDI keyboard to find the usable range of the R-60. Because there is no industry standard for where MIDI note 24 falls on MIDI keyboards, we can't predict where the usable range will be.) Once tuned, the R-60's LED will light in time with your keyboard gate. If you are pressing keys and not hearing anything, look at the LED and strike a key. If the LED blinks when you strike a key, then you know that the R-60 is receiving MIDI data. Check the oscillator settings and output level and try the tuning procedure again. INSTALLATION AND MAINTENANCE Install the R-60 into any Euro-rack modular synthesizer cabinet using M3 machine screws. There is no need for the R-60 front panel to be grounded to the cabinet rails, as the power cable provides grounding. Powering the R-60 requires a power supply producing +5 volts at 100 mA AND +-12 volts DC at 10 milliamps. You MUST assure the power supply provides +5v on the proper power-bus connector pins and is able to handle the R-60 load plus the load of other modules. This power supply MUST BE CLEAN AND STABLE, or poor results will be obtained. (not used) +5v R-60 power connector pinout +12v (or +15v) Ground (common) -12v (or -15v) The R-60 MUST have +5v DC power. Many Euro synthesizer cabinets do not have +5v available, requiring the addition of an optional +5v power supply. If the cabinet has only 10-pin bus connectors, a 16-pin Euro bus will have to be installed to use the R-60. The Doepfer A-100AD5 add-on regulator may be added to a bus to provide +5v for the R-60. Some modern cabinets, such as the ones made by ModularWorld, already have +5v regulators installed on their busses. If the regulator chip does not have an attached heatsink, as the ModularWorld cases are currently equipped, we recommend adding a heatsink to prevent overheating of the regulator chip. Note: although the R-60 does not have space for an MOTM, Frac or “Dotcom” power connector for +-15 volt supply rails, the R-60 will work fine on +-15v rails rather than +-12v, as well as the mandatory +5v power. No modification of the R-60 is required, though a special adapter power cable might need to be fabricated with a +5v regulator added, to reduce the +15v to +5v (or an additional +5v regulated supply). This is an advanced mod, and requires the skills of an experienced technician. If the tuning procedure was interrupted or the R-60's memory was otherwise corrupted, a “hard reset” may be performed. Note that this is a last resort only—if the R-60 does not respond to MIDI keydown signals, try cycling its power first. Hard reset is simple: while holding down the Learn button, power up the R-60, then release Learn. The R-60 will set itself to its new (default) state: a fixed tuning table that should be suitable for a new R-54 VCO will be loaded and used, and the MIDI channel will be set to 1. The R-60 uses a single-chip Atmel ATMEGA88 microprocessor. Pitch of the VCO connected to it is sensed via a 0-5v input, and is processed with an amplifier having a gain of ~10, plus a clipper using a zener diode. The CV output is buffered, and the Gate output is 0 to +5 v, TTL compatible. MIDI IMPLEMENTATION The R-60 responds to a number of CC MIDI codes after tuning is completed. Note that the MIDI channel used to send these codes must be the same one previously set as above (or channel 1 if the R-60 is new or has undergone a hard reset). Messages responded to include: 1. MIDI Panic (forces note-off) 2. Note On 3. Note Off 4. Sustain Pedal (suppresses Note Off when sent) 5. Pitch Bend (default in a new R-60 is a range of about a fifth, which varies with octave being played) 6. CC86 sets the pitch-bend range – 4 ranges are possible 7. Modulation Wheel sets the depth of the R-60's in-built LFO, adds it to the CV output 8. CC77 also sets the depth of the in-built LFO, per standard MIDI spec. 9. CC76 sets the modulation LFO rate from ~30 seconds/cycle to ~30Hz. 10. CC85 sets the LFO type – 4 types: Saw, Square, Triangle (default) and “Sharkstooth” (rounded sawtooth). If you are confused or have ANY technical questions, feel free to contact us. Please DO NOT ASSUME and if you are not an experienced technician, DO NOT MODIFY THE CIRCUIT IN ANY WAY! 870 S. MAIN STREET #109 LAKEPORT CA 95453 USA 707-263-5343 [email protected], www.metasonix.com