1
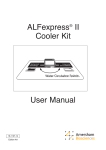
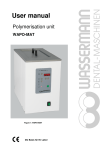
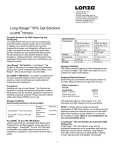
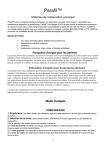
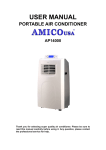
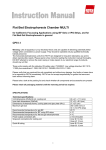
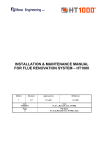
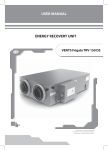
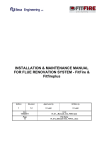
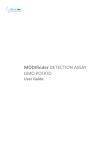
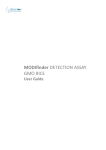
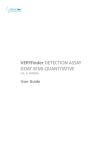
ReproSet ™
User Manual
18-1125-68
Edition AA
Important user information
Warranty and liability
!
Meaning: Consult the instruction manual to avoid
personal injury or damage to the product or other
equipment.
CAUTION!
The Caution sign is used to call attention to
instructions or conditions that shall be followed to
avoid damage to the product or other equipment. Be
sure not to proceed until the instructions are clearly
understood and all stated conditions are met.
Note
The Note sign is used to indicate information
important for trouble-free or optimal use of the
product.
Should you have any comments on this instruction, we
will be pleased to receive them at:
Amersham Biosciences
S–751 84 Uppsala
Sweden
Amersham Biosciences guarantees that the
product delivered has been thoroughly tested to ensure
that it meets its published specifications. The warranty
included in the conditions of delivery is valid only if
the product has been installed and used according to
the instructions supplied by Amersham Biosciences.
Amersham Biosciences shall in no event be
liable for incidental or consequential damages,
including without limitations, lost profits, loss of
income, loss of business opportunities, loss of use and
other related exposures, however caused, arising from
the faulty and incorrect use of the product.
Trademarks
ReproSet, ALF, ALFexpress and ReproGel are the
exclusive trademarks of Amersham Biosciences.
In view of the risk of trademark degeneration, it
is respectfully suggested that authors wishing to use
these designations refer to their trademark status at
least once in each article.
Copyright© 1997 Amersham Biosciences
All rights reserved. No part of this publication may be
reproduced, stored in a retrieval system or transmitted
in any form by any means, without permission in
written form from Amersham Biosciences.
Amersham Biosciences reserves the right to
make changes to the design and specifications without
prior notice.
Contents
Contents
1. Introduction ..........................................................................................1
2. Safety information................................................................................2
3. Product description ............................................................................3
4. Installation ............................................................................................5
5. Operation ..............................................................................................6
6. Maintenance........................................................................................10
7. Technical specifications....................................................................11
8. Ordering information ........................................................................12
ReproSet™
User Manual 18-1125-68 Edition AA
i
Introduction
1
1. Introduction
ReproSet is a laboratory instrument that emits UV-light. It is
intended for use during the photopolymerisation of Amersham
Biosciences ReproGel. The unit is designed for gel cassettes
from the ALF family of DNA sequencers.
ReproSet is equipped with 4 fluorescence lamps that have the major
part (more than 99%) of their light content in the UV-A region
(315-400 nm). This region is not considered harmful to the skin or
eye in normal use and thus permits an ‘‘open design’’ with easy
access to the gel cassette and convenient working conditions for the
user.
ReproSet™
User Manual 18-1125-68 Edition AA
1
2 Safety information
2. Safety information
ReproSet complies with Safety Standard EN61010-1/IEC 1010-1.
w
2
Even though the light from ReproSet is not considered harmful to
the skin or eye at moderate exposures, we still recommend the user
to avoid unnecessary exposure from close range. For this reason,
ReproSet is equipped with a switch that cuts off the light when the
lamp housing lid is raised to its upright position.
ReproSet™
User Manual 18-1125-68 Edition AA
Product description
3
3. Product description
Figure 1 shows the parts of ReproSet that are referred to in the
description, installation and maintenance sections of this manual.
Start button
Lamp housing lid
4x lamp starters
4x UVA-lamps
Timer
Protection pad
Support plate
Mains inlet
Fan outlet
Fuse holder and mains
voltage selector
Fig. 1. ReproSet parts referred to in this User Manual.
ReproSet™
User Manual 18-1125-68 Edition AA
3
3 Product description
Functional description of the timer
Figure 2 shows the different settings and indicators on the timer.
These are: The 'timer range' (A), the 'time unit' (B), the 'out
indicator' (C), the 'power indicator' (D), the 'mode selector' (E)
and the 'time set dial' (F).
The 'out indicator' (C) will give a steady light when the lamps are
on and the 'power indicator' (D) will flicker when the time count
function is active.
D
E
C
F
A
B
Fig. 2. Settings and indicators on the ReproSet timer. Do not alter the factory-set setting of E.
Note: The factory settings of (A), (B) and (E) are '0-12', 'min' and
'E' respectively. Do not alter the 'mode selector' (E) from this setting.
Alter the time setting by turning the setting dial (F) to the selected
time (from 1 to 12 minutes).
4
ReproSet™
User Manual 18-1125-68 Edition AA
Installation
4
4. Installation
Check the contents against the enclosed packing list and inspect all
parts for damage that may have occurred during transport. Report
deviations or damage to your local Amersham Biosciences
representative and the transport company concerned.
Unpack and install the lamps according to the separately enclosed
instructions (see also Section 6. Maintenance).
Place ReproSet on a bench of suitable height within reach of a
grounded mains outlet. Check that the bench top is level. This will
allow even distribution of gel solution when filling the cassette.
Position ReproSet so that the fan outlet is not blocked or restricted
when the lamp housing lid is in a horizontal position. Before
connecting the unit to mains, ensure that the fuse holder/mains
voltage selector (Fig. 3) is equipped with the correct fuse and placed
so that the appropriate mains voltage marking is positioned next to
the arrow symbol (see Table 1).
Fig. 3. Fuse holder/mains voltage selector.
Table 1. Ensure that the fuse holder/mains voltage selector is equipped
with the correct fuse.
Mains voltage
100 V
110, 115, 120 V
220, 230, 240 V
Frequency
50 or 60 Hz
60 Hz
50 Hz
Selector setting
100
120
220 or 240
Fuse
2.5 AT
2.5 AT
1.6 AT
For correct function, place the protection pad on the support plate
so that the logotype shows towards you.
ReproSet™
User Manual 18-1125-68 Edition AA
5
5 Operation
5. Operation
This section describes the procedure for UV polymerisation of
sequencing gels for the ALF family of automated DNA sequencers.
w
Placement of ReproSet
During use, place ReproSet on a horizontal bench top to allow even
distribution of the gel solution over the cassette surface. Position the
ReproSet out of sunlight to avoid exposing the gel solution to UV
light during casting. For the same reason, polymerise the gel in
ReproSet immediately after pouring.
Cleaning the cassette
Clean and assemble the cassette according to the instrument user
manual. ALFexpress Recommended Operating Procedure (ROP:s)
are available at Internet web site
http://www.amershambiosciences.com.
When using ReproSet for polymerisation, clean both sides of the
glassplates, since dirt on the surface will affect the light reaching the
gel solution and result in uneven polymerisation.
With the lamp housing lid in the upright position, make sure the
timer display scale is set to minutes and range to 0-12. Turn the
setting dial to the appropriate time, for ALFexpress see ROP
“Starting the run”. Available at Internet web site
http://www.amershambiosciences.com.
Fig. 4. ReproSet with the lamp housing lid in its upright position.
6
ReproSet™
User Manual 18-1125-68 Edition AA
Operation
5
Placing the cassette in ReproSet
Place the gel cassette in ReproSet according to Figures 5 or 6. Make
sure that the cassette is positioned in the centre using the position
guide marks on the protection pad.
Fig. 5. Placing the ALFexpress cassette in ReproSet.
Fig. 6. Placing the ALF cassette standing on its clamps in ReproSet.
Note: Make sure the solution is at room temperature before casting
the gel.
w
ReproSet™
User Manual 18-1125-68 Edition AA
Preparing the gel solution
The gel solution is prepared according to instructions on the package
insert.
CAUTION: Use gloves and avoid skin contact with the solutions.
7
5 Operation
Casting an ALFexpress gel
Remove the top from the nozzle. Pour the solution slowly and evenly
back and forth along the open slit between the glass plates at the
bottom of the gel cassette. Keep a steady pressure on the bottle
during this procedure.
Note: Lowering the pressure on the bottle can let air in and cause
bubbles in the gel. This can be avoided by first turning the nozzle
upwards before releasing the pressure on the bottle.
Tap the glass plate if the gel solution tends to stick to certain spots.
This tendency to stick may be due to dirty glass plates and/or the
glass plates not being treated with sufficient amounts of ethanol
before casting, and can cause bubbles in the gel.
Unlike chemically polymerised gels, there is no need to hurry when
removing air bubbles. If bubbles do occur, carefully remove them
with a bubble chaser. Remove the comb first, if necessary. If you use
the bubble chaser, apply some more gel solution to the bottom of the
cassette. This ensures that there is
Fig. 7. Casting the gel.
sufficient solution in the cassette. Let the filled cassette stand for a
minute so that the capillary movement of gel solution in the cassette
ceases. Uncap the large bottle with the remaining gel solution and
leave it under the UV light during exposure of the gel. This prevents
unpolymerised hazardous gel solution being left in the bottle.
For more information about gel casting procedures, see ALFexpress
User Manual 18-1127-13. Note the ROP “Starting the run”.
Available at Internet web site
http://www.amershambiosciences.com.
8
ReproSet™
User Manual 18-1125-68 Edition AA
Operation
5
Polymerising the gel
When the gel has settled, pull down the lamp housing lid of
ReproSet and push the start button. The gel will be exposed to UV
light for the time set on the timer.
Note: Unpolymerised gel solution will be polymerised unless it is
screened from the UV light and sunlight.
Fig. 8. Polymerising the gel.
Preparing the cassette for the run
The gel is ready for immediate use, but can be stored up to 1 hour at
room temperature before starting the run. If necessary, clean the
glass plate in the area of the laser beam before mounting the cassette
in the instrument.
Mounting the cassette and starting the run
Mount the cassette in the instrument and fill the buffer chambers
with buffer. Carefully remove the comb when the temperature has
reached running temperature. Rinse the wells with buffer, add the
samples and start the run. For more information, see ALFexpress
User Manual 18-1127-13. Note the ROP “Starting the run”.
Available at Internet web site
http://www.amershambiosciences.com.
Cleaning the ReproSet table
Remove spilled gel solution from the protection pad with water
and/or detergent.
ReproSet™
User Manual 18-1125-68 Edition AA
9
6 Maintenance
6. Maintenance
For correct function, use only the UVA-lamps and lamp starters sold
as replacement parts by Amersham Biosciences.
w
CAUTION: The UVA-lamps contain mercury. When replacing
the lamps, follow your local regulations for disposal of this
material.
We recommend you to replace all four UVA-lamps and lamp starters
if the light starts to flicker or at the latest after one year’s use or
approximately 2000-3000 exposures. Disconnect ReproSet from the
mains before replacing lamps or starters.
Replace old lamps by raising the lamp housing lid to its upright
position, turn the lamp 90° and gently pull the lamp towards you
from the holder.
Before inserting new lamps, make sure that the slits in the turnable
ring-shaped part (A) and the fixed part (B) of the lamp holders are
correctly aligned according to Figure 9. Insert the lamp with the two
contact pins oriented in line with the slit in the lamp holder. Turn
the lamp 90° so that the print on the lamp faces the reflector in the
lamp housing/lid.
A
B
Fig. 9. Align the slits in parts (A) and (B) before inserting new lamps.
Remove the lamp starters by turning them 90° anti-clockwise and
pulling straight out from the holder. Insert the replacement starter
and turn it clockwise until it snaps into position.
10
ReproSet™
User Manual 18-1125-68 Edition AA
Technical specifications
7
7. Technical specifications
Light source:
Mains voltage:
Power consumption:
Exposed area:
Timer range (factory setting):
Operating temperature range:
Operating humidity range:
Safety:
EMC:
ReproSet™
User Manual 18-1125-68 Edition AA
4 x 40 W low pressure mercury lamps
emitting UV-A
100/120 V +/- 10% 50/60 Hz,
230 V +/- 10% 50 Hz
450 VA
30 x 52 cm
1-12 min
+15 to +40 °C
< 80% relative humidity up to 31 °C,
decreasing linearly to 50% at 40 °C
(according to EN 61010-1)
LVD 73/23/EEC
EN 61010-1 (class I, installation
category II)
89/336/EEC
EN 50082-1
11
8 Ordering information
8. Ordering information
Designation
ReproSet complete
UVA-lamp (4-pack)
Protection pad
Lamp starter (4-pack)
ALFexpress User manual
ReproSet User manual
ReproGel High Resolution
12
Code No.
18-1125-64
18-1125-67
18-1125-66
18-1125-69
18-1127-13
18-1125-68
17-6001-08
ReproSet™
User Manual 18-1125-68 Edition AA
Printed in Sweden by TK i Uppsala, 9801.