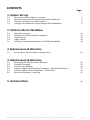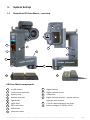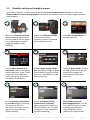
1
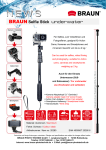
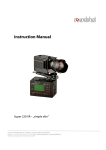
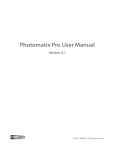
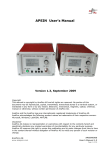
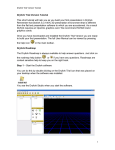
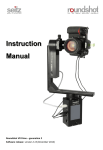
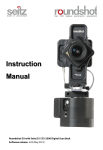
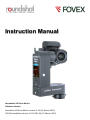
Instruction Manual Roundshot VR Drive Metric Software release: Roundshot VR Drive Metric version 2.14 (12 March 2015) FOVEX PanoMaker Version 1.6.16.365.55 (12 March 2015) Instruction Manual Roundshot VR Drive - version 4.0 – January 2010 - © by Seitz Phototechnik AG / Switzerland www.roundshot.ch page 0 Instruction Manual Roundshot VR Drive - version 4.0 – January 2010 - © by Seitz Phototechnik AG / Switzerland www.roundshot.ch page 1 CONTENTS 1. System Set-Up 1.1 1.2 1.3 1.4 Roundshot VR Drive Metric - overview Remote controlling the VR Drive Metric with wifi devices Checklist: setting up the digital camera Setting up the computer and activating FOVEX PanoMaker 2. VR Drive Metric Workflow 2.1 2.2 2.3 2.4 2.5 Workflow overview Setting up the VR Drive Metric hardware Image capture Image transfer Stitching of spherical panoramas with FOVEX PanoMaker 3. Maintenance & Warranty 3.1 Accessing the VR Drive Metric settings menu Page 3 4 5 6 11 12 16 18 19 23 4. Maintenance & Warranty 4.1 4.2 4.3 4.4 4.5 4.6 Recharging the VR Drive Metric batteries Transport & storage International Warranty Software update VR Drive Metric hardware: “Club VR Drive Metric” Software update FOVEX PanoMaker: “Club FOVEX” Return of equipment / recycling 5. Technical Data Instruction Manual Roundshot VR Drive Metric – April 2015 – © by Seitz Phototechnik AG / Switzerland www.roundshot.com 25 25 26 27 31 32 33 page 2 1. System Set-Up 1.1 Roundshot VR Drive Metric - overview 13 12 2 5 1 11 8 10 6 9 3 4 7 14 15 VR Drive Metric components 1 2 3 4 5 6 7 8 9 on/off button touch screen interface battery case battery case lock light meter spirit level 360° quick lock USB socket ethernet socket 10 11 12 13 14 15 Digital camera Digital camera screen Viewfinder Digital camera controls – please refer to separate user manual 2 LP-E6 camera batteries on slider battery charger LC-E6E for LP-E6 Instruction Manual Roundshot VR Drive Metric – April 2015 – © by Seitz Phototechnik AG / Switzerland www.roundshot.com page 3 1.2 Remote controlling the VR Drive Metric with wifi devices It is possible to remote control the VR Drive Metric with any computer or smart phone equipped with wifi. The first step is to connect the computer or smart phone to the VR Drive wireless network and type the following password: roundshot Then open any web browser and type in the URL : http://192.168.169.15. The browser window will now show the screen content of the VR Drive Metric. All functionalities are identical with the ones displayed on the touch screen. Summary of default IPs: P1 quality NO-HDR LOW ISO Router: VR Drive Metric: Browser: 192.168.169.2 192.168.169.15 192.168.169.15 Duration : 36s The default IPs can be changed, for example to adapt them to a different network. To do this, access the router software by opening a browser window with the IP 192.168.169.2 and change the IP range in the router. Adapt the IPs in the VR Drive Metric and in the Browser window. Instruction Manual Roundshot VR Drive Metric – April 2015 – © by Seitz Phototechnik AG / Switzerland www.roundshot.com page 4 1.3 Checklist: setting up the digital camera Your VR Drive Metric is delivered with the following camera parameters already correctly set. Please make sure not to change these as otherwise the capture or processing of images may not work properly. Always use manual exposure. With automatic exposure the VR Drive Metric can no longer set up the exposure values (exposure speed, f-stop, ISO/ASA). Always use manual focusing. To prevent any focus variation, the lens is covered with a calibration ring. Use a fast storage card with enough capacity. Set the white balance to a fixed value. When setting the white balance to “auto”, every image will have a different tone, making the stitching of the sphere problematic. Choose image quality JPEG L fine. Saving the images in RAW has no benefit as the stitching libraries in PanoMaker rely on 8-bit processing. Turn the “Auto rotate” feature to “off”. When automatically rotating the images the stitching will not perform correctly. Set the exposure increments to 1/3 steps. When selecting 1/2 steps the VR Drive Metric can no longer set up the correct exposures for HDR bracketing. Set the ISO speed setting increments to 1/3 steps. When selecting 1/1 steps the VR Drive Metric can no longer set up the correct exposures for HDR bracketing. Turn off any exposure bracketing sequence. The VR Drive Metric creates its own bracketing sequence by controlling the camera exposures, f-stop and ISO. Instruction Manual Roundshot VR Drive Metric – April 2015 – © by Seitz Phototechnik AG / Switzerland www.roundshot.com page 5 1.4 Setting up the computer and activating FOVEX PanoMaker 1.4.1 Setting up the computer FOVEX PanoMaker uses GPU processing for high speed stitching and tone-mapping of panoramas. The following computer configurations are compatible with the software: Minimum requirements (for example for a laptop for mobile use) CPU: CPU speed: RAM: OS: Video Card: Free Disk Space: Hard Disk: Intel or AMD supporting SSE2 instructions (4 cores) n/a 8 GB Windows 7 (64-bit) NVIDA or ATI (released in 2013 or later) with at least 3 GB memory at least 10 GB (depends on the scope of project/number of images) ideally SSD disks for fast image storage Please make sure to connect the laptop to a power source (mains) when processing the images. If the laptop runs on battery while processing, the performance of the video card will be reduced and the stitching will take significantly longer. Many laptops are equipped with two graphic (video) cards, the less powerful one being configured for battery use. When setting up the computer please make sure to assign the more powerful video card to be used with PanoMaker, otherwise the stitching will not work. This can be done by accessing the control panel of the graphic card by right mouse click on the desktop. Instruction Manual Roundshot VR Drive Metric – April 2015 – © by Seitz Phototechnik AG / Switzerland www.roundshot.com page 6 1.4 Setting up the computer and activating FOVEX PanoMaker (continued) 1.4.1 Setting up the computer (continued) Recommended requirements (for example a workstation for office use) CPU: CPU Speed: RAM: OS: Video Card: Free Disk Space: Hard Disk: Intel or AMD supporting SSE2 instructions (8 cores) ~4.7 GHz at least 16 GB Windows 7 (64-bit) NVIDA or ATI (released in 2013 or later) with at least 4 GB memory at least 10 GB (depends on the scope of project/number of images) SSD disks for fast image storage When using computers with video/graphics cards older than 2013 and /or with less than 3 GB of memory the stitching may nevertheless be completed, however, with errors. It is therefore very important to use the latest computer technology, in particular a high performance video/graphics card. Instruction Manual Roundshot VR Drive Metric – April 2015 – © by Seitz Phototechnik AG / Switzerland www.roundshot.com page 7 1.4 Setting up the computer and activating FOVEX PanoMaker (continued) 1.4.1 Setting up the computer (continued) Many laptops are often equipped with two graphics (video) cards. By default, the less powerful graphics card is used. To ensure that the Metric images can be processed, it is therefore required to assign the stronger graphics card (with at least 3GB memory) to the FOVEX PanoMaker program. Make a right mouse click on the desktop. Go to the graphics card utility (in this example NVIDIA): • Select “3D Settings - Manage 3D settings” in the task tree on the left • Select Program Settings in the window on the right • Add a new program by clicking “Add” and select the PanoMaker program from the following path: C:\Program Files\Fovex\PanoMaker\ PanoMaker.exe Assign the stronger graphics card to the following settings: • CUDA – GPUs • Power management mode: prefer maximum performance As every graphics card utility can have a different design, it may be necessary to assign the stronger graphics card to additional settings. Instruction Manual Roundshot VR Drive Metric – April 2015 – © by Seitz Phototechnik AG / Switzerland www.roundshot.com page 8 1.4 Setting up the computer and activating FOVEX PanoMaker (continued) 1.4.1 Setting up the computer (continued) FOVEX PanoMaker relies on the most recent Windows 7 or 8 operating systems. Please update your Windows 7 or 8 OS with Windows updates to the most recent version. The essential update is the following: https://support.microsoft.com/en-us/kb/2670838 It is also possible to use Mac laptop or desktops that match the performance requirements outlined on the previous pages. To run PanoMaker on a Mac, please install BootCamp with Windows 7 or 8 , update the operating system to the most recent version and select the Windows operating system on start-up. Instruction Manual Roundshot VR Drive Metric – April 2015 – © by Seitz Phototechnik AG / Switzerland www.roundshot.com page 9 1.4 Setting up the computer and activating FOVEX PanoMaker (continued) 1.4.2 Activating FOVEX PanoMaker After installing FOVEX PanoMaker on the computer, open the software and activate it with the customer identification key supplied with your VR Drive Metric. Go to “Help / Register product” When registering the product for the first time, a blank page is displayed. Press “Update License” Enter the customer identification key that has been provided with the purchase of your VR Drive Metric. The software connects with the FOVEX server and loads the Hardware IDs of the VR Drive Metric devices that are linked to the unique customer key. These Hardware IDs are provided in a list. At the same time, the software downloads the calibration files corresponding to the VR Drive Metric hardware. These calibration files are automatically applied when stitching images. We deliver every VR Drive Metric with a unique customer identification key (CID). If you possess several VR Drive Metric units and would like to group them under one only CID, please contact us by email. Instruction Manual Roundshot VR Drive Metric – April 2015 – © by Seitz Phototechnik AG / Switzerland www.roundshot.com page 10 1.4 Setting up the computer and activating FOVEX PanoMaker (continued) 1.4.2 Activating FOVEX PanoMaker (continued) 1 After purchase of the VR Drive Metric • a unique customer key is created on the FOVEX server • the VR Drive Metric hardware ID is stored in the FOVEX database and assigned to a customer key VR Drive Metric Unique customer key FOVEX PanoMaker 3 2 Online registration with customer identification key (CID) PanoMaker connects to the FOVEX server to • validate the customer key • load the VR Drive Metric hardware IDs assigned to a customer • download hardware-specific calibration files on the computer • A PanoMaker software with one unique customer key can be installed on up to 3 computers. • For customers owning several VR Drive Metric devices their hardware IDs can be grouped and can be used with one PanoMaker software (on up to 3 computers). • It is not possible to process images in PanoMaker from VR Drive Metric devices other than the ones licensed to the software. Instruction Manual Roundshot VR Drive Metric – April 2015 – © by Seitz Phototechnik AG / Switzerland www.roundshot.com page 11 2. VR Drive Metric Workflow 2.1 Workflow overview Typical time requirements Setting up the hardware • 1-2 minutes for start-up • Few seconds per new location depending on light situation Depends on • type of program (normal or HDR) • level of bracketing • choice of ISO/ASA • pausing/resuming Image capture Image transfer Stitching with FOVEX PanoMaker Typical capture time: • No HDR: 36 seconds • HDR with 3 brackets: 1 minute 10 seconds • HDR with 5 brackets: 1 minute 53 seconds • HDR with 7 brackets: 2 minutes 30 seconds • Depends on reading speed of memory card (USB 2.0 or 3.0), with high speed card 70 MB/sec. • 20 seconds for copying (reading + writing) 1 GB of data • • • • No HDR: 1 minute 15 seconds HDR 3 brackets: 2 minutes 7 seconds HDR 5 brackets: 2 minutes 20 seconds HDR 7 brackets: 2 minutes 33 seconds • When arranging the scene well and pausing/resuming to avoid movement no post production necessary Post production Optional post production in Photoshop: • White balance • Specific tone-mapping of 32-bit HDR into 8- or 16-bit RGB image* • Colour adjustments (especially for tonemapped HDR panoramas) * When using a VR Drive Metric HDR program, PanoMaker automatically creates an 32-bit HDR file and a tone-mapped 8-bit jpg image Instruction Manual Roundshot VR Drive Metric – April 2015 – © by Seitz Phototechnik AG / Switzerland www.roundshot.com page 12 2.2 Setting up the hardware Tripod Place the VR Drive Metric on top of a heavy-duty, solid tripod. Avoid using any additional levelling equipment. Most professional tripods come with a large 3/8’’ thread. Levelling Adjust the tripod with its legs so that the spirit on the VR Drive Metric is perfectly level. Turn VR Drive on Turn on the VR Drive Metric by pressing the “on” button. The camera will now swing into horizontal position pointing forward. Starting position + light meter Open the 360° quick lock and turn the VR Drive Metric into its starting position. When doing this, point the light meter into an area with average light intensity. Avoid turning the light meter directly into the sun or into the dark as otherwise the resulting panorama will be either under- or overexposed. Connect wifi remote control (optional) Connect a device (smart phone or computer) for remote control by enabling the wifi network (VR Drive) and by opening a browser window with the following IP: 192.168.169.15. It is also possible to connect the VR Drive Metric by ethernet cable to a computer. Check camera settings + empty memory card Make sure that all camera parameters are correctly set according to the check-list provided in section 1.3. Delete the images stored on the memory card to make space for new projects. Instruction Manual Roundshot VR Drive Metric – April 2015 – © by Seitz Phototechnik AG / Switzerland www.roundshot.com page 13 2.3 Image capture The VR Drive Metric is shipped with 8 standard programs: • • • • • • • • P1 no HDR ISO 100 P2 no HDR ISO 400 P3 HDR-3 ISO 100 P4 HDR-3 ISO 400 P5 HDR-5 ISO 100 P6 HDR-5 ISO 400 P7 HDR-7 ISO 100 P8 HDR-8 ISO 400 Select the arrows right/left to change programs Features of “no HDR” programs P1 quality P2 quality NO-HDR ISO 100 NO-HDR ISO 400 Duration : 36s Duration : 36s • Releases one image per position • Provides the images for a standard 8-bit panorama • Option “ISO 400” for faster capture in lower-light conditions • 15 positions • 15 images 36 seconds For all programs the exposure is read by the VR Drive Metric light meter and set via USB control on the camera. The USB connection is also used to release the images, for release control and for writing capture information into image metadata. To guarantee large and consistent depth of field the aperture (f-stop) of the camera is always fixed to f=11. The indicated program durations are estimates and depend on available light. The above examples are correct for daylight conditions (fast exposure speeds). When shooting indoors image capture may take longer – depending on choice of ISO/ASA. Capturing the images with low ISO/ASA provides better quality images (less noise). This is a benefit when using the spheres for 3D measurement applications. For 3D measurement projects please always use ISO/ASA=100 (P1, P3, P5 or P7 only). We can provide special programs for image capture at higher ISOs. However, the spheres created with such high ISO values will not be suitable for 3D applications. Please contact us by email to obtain these programs and follow the instructions for importing the programs provided in this instruction manual. Instruction Manual Roundshot VR Drive Metric – April 2015 – © by Seitz Phototechnik AG / Switzerland www.roundshot.com page 14 2.3 Image capture (continued) Features of HDR programs P3 HDR P4 HDR HDR-3 ISO 100 HDR-3 ISO 400 Duration: 1min 10s Duration: 1min 10s • Releases three images per position with 2-stop difference in exposure (bracketing) between images • Enables 32-bit HDR panoramas allowing better visibility of features • Option “ISO 400” for faster capture in lower-light conditions • 15 positions • 45 images P5 HDR P6 HDR HDR-5 ISO 100 HDR-5 ISO 400 Duration: 1min 53s Duration: 1min 53s • Releases five images per position with 2-stop difference in exposure (bracketing) between images • Enables 32-bit HDR panoramas allowing better visibility of features • Option “ISO 400” for faster capture in low-light conditions • 15 positions • 75 images P7 HDR P8 HDR HDR-7 ISO 100 HDR-7 ISO 400 Duration: 2min 30s Duration: 2min 30s 1 minute 10 seconds 1 minute 53 seconds • Releases seven images per position with 2-stop difference in exposure (bracketing) between images • Enables 32-bit HDR panoramas allowing better visibility of features • Option “high ISO” for faster capture in low-light conditions (1600 instead of 200) • 15 positions • 105 images 2 minutes 30 seconds Capturing the images with low ISO/ASA provides better quality images (less noise). This is a benefit when using the spheres for 3D measurement applications. For 3D measurement projects please always use ISO/ASA=100 (P1, P3, P5 or P7 only). We can provide special programs for image capture at higher ISOs. However, the spheres created with such high ISO values will not be suitable for 3D applications. Please contact us by email to obtain these programs and follow the instructions for importing the programs provided in this instruction manual. Instruction Manual Roundshot VR Drive Metric – April 2015 – © by Seitz Phototechnik AG / Switzerland www.roundshot.com page 15 2.3 Image capture (continued) Import additional (custom) programs If you require additional programs with different settings, please contact us so we can provide those programs to you. You can then import the programs and add them to the list of available programs: Important: Due to driver incompatibilities, not all USB data sticks can be used for updating the VR Drive Metric. For security, we supply a Roundshot USB data stick (capacity: 2 GB) with your VR Drive. 1. Copy the programs received by email on the Roundshot USB key 2. Insert the USB key into the VR Drive Metric USB port 3. Restart the VR Drive and quickly press on the “gear” symbol when the unit restarts: VR Drive 4. Press database/import/append (Press to view settings) settings general database database Import import database If a program number already exists, would you prefer to overwrite the old one or append as new? service menu import export overwrite append The new programs are added at the end of the existing programs with new program IDs. Instruction Manual Roundshot VR Drive Metric – April 2015 – © by Seitz Phototechnik AG / Switzerland www.roundshot.com page 16 2.3 Image capture (continued) Select the desired program and press “start” P1 P1 quality quality image/row Image/total Remaining time : 2/10 : 12/20 : 0min 36s While the VR Drive is running, the touch screen display shows the progress of image taking: • Image / row – shows the current row and image • Image / total – counts the completed images vs. total • Remaining time – gives an estimate of time remaining Stop the program any time by pressing the “stop” button. The VR Drive will return to its initial position. Pause the program any time by pressing the “pause” button. The VR Drive will pause at its current position. P1 P1 quality quality image/row Image/total Remaining time : 2/10 : 12/20 : 0min 36s Once the program is paused, it is possible to • Completely stop the image sequence by pressing “stop” • Resuming the image sequence by pressing “start” • Returning to any image and by pressing “back” and resuming by pressing “play” Pause and resume a program in case there is movement in the scene close to the camera. Moving objects or individuals in the scene will lead to ghosting effects in the HDR mixing. A clean panorama reduces the need for post-production and allows optimum results for 3D measurement. Instruction Manual Roundshot VR Drive Metric – April 2015 – © by Seitz Phototechnik AG / Switzerland www.roundshot.com page 17 2.3 Image capture (continued) The images are distributed in such a way that the area of the tripod will be covered with a black mask in the final panorama. Not capturing the nadir has the benefit of speed: less images need to be captured, making the capture process more efficient. 2.4 Image transfer Remove the memory card from the camera. Create a new folder called “input” on your computer, introduce the memory card in a card reader and start transferring the images. Important: Do not transfer the images using the wifi transfer feature of the camera. The camerainternal wifi relies on USB and may interfere with the VR Drive Metric USB control. Instruction Manual Roundshot VR Drive Metric – April 2015 – © by Seitz Phototechnik AG / Switzerland www.roundshot.com page 18 2.5 Stitching with FOVEX PanoMaker Start the FOVEX PanoMaker software. The software is structured along 3 tabs: • Input/Output • Settings • Report Input/Output tab As a first step, select the input folder from where PanoMaker will load the images for the stitching. Then define the output folder for the stitched panoramas. Activate or deactivate the xml file and/or log file. The xml file is only required when the images should also be stitched in third party stitching software. Define how the folders and output images should be named: • Timestamp: adds the current date/time as a file name • Counter: adds consecutive numbering to the output files Instruction Manual Roundshot VR Drive Metric – April 2015 – © by Seitz Phototechnik AG / Switzerland www.roundshot.com page 19 2.5 Stitching with FOVEX PanoMaker (continued) Settings tab Select the output size of the panorama in percent. Set the level of blending to be applied between images. A value of “7” normally provides best results. Activate/deactivate de-ghosting. This feature eliminates movement artefacts in HDR images. It will slow down the rendering process. Choose the type of tone-mapping to be performed for converting 32-bit HDR images into tonemapped 8-bit images. Activate HDR output for images captured with an HDR program (P2 and P3). This HDR output is only created if a series of bracketed images is available. Instruction Manual Roundshot VR Drive Metric – April 2015 – © by Seitz Phototechnik AG / Switzerland www.roundshot.com page 20 2.5 Stitching with FOVEX PanoMaker (continued) Report tab Press “start” to launch the processing. As a first step all images are grouped into projects and the corresponding xml data and log file data is created. The software confirms the successful stitching with “Project was computed… Processing was completed.” Once the processing is successfully completed, PanoMaker saves the stitched panoramas and subfolders in the output folder. This folder contains the following data: Contents of input folder: Contents of output folder: Original jpg images Stitched panoramas • 1 or several jpeg images (depending on level of bracketing) • 32-bit image (optional, with bracketing) • Tone-mapped 8-bit jpeg (with bracketing) Subfolders with • grouped jpeg images • log file • xml file • report file Most error messages are related to insufficient computation power of the video/graphics card. Please refer to section “Setting up the computer and activating FOVEX PanoMaker” for minimum computer processing requirements. Instruction Manual Roundshot VR Drive Metric – April 2015 – © by Seitz Phototechnik AG / Switzerland www.roundshot.com page 21 2.5 Stitching with FOVEX PanoMaker (continued) Log file The log file checks the consistency of grouped projects. It documents received images vs. missed images while indicating their distribution in the grid. [Complete] Panorama internal tag: 141119132424 Camera name: Canon EOS 6D Number of positions: 15 Number of exposures: 3 Total received images: 45 Total missed images : 0 --O: Received images X: Missed images 1 OOO 2 OOO 3 OOO 4 OOO 5 OOO 6 OOO 7 OOO 8 OOO 9 OOO 10 OOO 11 OOO 12 OOO 13 OOO 14 OOO 15 OOO ----1 IMG_4217 IMG_4218 IMG_4219 2 IMG_4220 IMG_4221 IMG_4222 3 IMG_4223 IMG_4224 IMG_4225 4 IMG_4226 IMG_4227 IMG_4228 5 IMG_4229 IMG_4230 IMG_4231 6 IMG_4232 IMG_4233 IMG_4234 7 IMG_4235 IMG_4236 IMG_4237 8 IMG_4238 IMG_4239 IMG_4240 9 IMG_4241 IMG_4242 IMG_4243 10 IMG_4244 IMG_4245 IMG_4246 11 IMG_4247 IMG_4248 IMG_4249 12 IMG_4250 IMG_4251 IMG_4252 13 IMG_4253 IMG_4254 IMG_4255 14 IMG_4256 IMG_4257 IMG_4258 15 IMG_4259 IMG_4260 IMG_4261 --- Instruction Manual Roundshot VR Drive Metric – April 2015 – © by Seitz Phototechnik AG / Switzerland www.roundshot.com page 22 2.5 Stitching with FOVEX PanoMaker (continued) Report file With the report file the user can check the following: • Time for stitching • Quality of stitching (RMS – root mean square of residuals- in pixels) • Possible reasons for unsuccessful stitching A typical RMS value lies between 0.2 and 0.5 pixels, indicating good quality stitching (sub-pixel accuracy). The main reason for unsuccessful stitching can be traced back to in insufficient features, for examples in regions without texture such as blue skies or blank walls. >> Project [Group_1] . . . Feature extraction & matching: 49.353 seconds. Bundle adjustment: images: 15, tie points: 19725, RMSR x(col): 0.330, y(row): 0.333 pixel. ------------------------------------------Total stitching time: 50.418 seconds. Creating panorama from exposure 1 of 3... Loading images... Panorama size is 9856x19712 (194 megapixels) Load all input images into memory... 2063.12 ms Find segment regions 57.003 ms Create low-resolution maps... 1293.07 ms Ghost removal... Create diffmaps on GPU 337.019 ms ExtractRegions 70.004 ms Create graph 174.01 ms Calculate ROD weights 79.004 ms Update masks... 7 ms 668.038 ms Creating composited image... Create low-res composite... 2848.16 ms Use low-res composite to blend full resolution... 1757.1 ms 5199.3 ms Creating panorama from exposure 2 of 3... Creating panorama from exposure 3 of 3... -----------------------------------Creating HDR... Saving hdr... Applying tone map... Saving tone mapped JPEG... ------------------------------------------Total Rendering time: 76.114 seconds. Instruction Manual Roundshot VR Drive Metric – April 2015 – © by Seitz Phototechnik AG / Switzerland www.roundshot.com page 23 3. Maintenance & Warranty 3.1 Accessing the VR Drive Metric settings menu Restart the VR Drive and quickly press on the “gear” symbol when the unit restarts: VR Drive (Press to view settings) press database/import/append parametros general base de datos service menu The following general settings are available: general general language English date time aut. turn off 10 min general manual movement auto exposure constant 25 manual movement reduce screen brightness 30s software hardware id remote radio off auto exposure ranges Instruction Manual Roundshot VR Drive Metric – April 2015 – © by Seitz Phototechnik AG / Switzerland www.roundshot.com page 24 3. Settings menu 3.1 Accessing the VR Drive Metric settings menu In settings/general it is possible to import or export Metric programs: database database Import import If a program number already exists, would you prefer to overwrite the old one or append as new? import export overwrite append To import or export programs, please use the roundshot USB key provided with the VR Drive Metric. The “service menu” is reserved for factory service only. Restart the VR Drive Metric to exit the settings menu. VR Drive (Press to view settings) Instruction Manual Roundshot VR Drive Metric – April 2015 – © by Seitz Phototechnik AG / Switzerland www.roundshot.com page 25 4. Maintenance & Warranty 4.1 Recharging the VR Drive The VR Drive and the connected camera are both powered by 2 rechargeable Li-Ion batteries. The battery status is indicated permanently on the display. Open the battery case lock and pull the battery case out of the VR Drive Metric hardware. Place the battery in the universal speed charger supplied with the VR Drive Metric. Connect the charger to a power source (110-220V). The normal recharge time is 2 hours per battery (red blinking LED). As soon as the charging process is complete, the LED changes to constant red. Charge 4.2 0 50 75 100 Transport & storage When transporting the VR Drive Metric from one location to the next, turn it off and place it in the explorer case. When turning the unit off, the camera will swing into its parking position looking straight up (+90°). If the VR Drive Metric is not used for a longer period of time, store it in the explorer case and keep it dry and cool. Instruction Manual Roundshot VR Drive Metric – April 2015 – © by Seitz Phototechnik AG / Switzerland www.roundshot.com page 26 4.3 International Warranty Your Roundshot VR Drive Metric is covered by the international 2-year Seitz warranty. The warranty is linked to the hardware ID (serial number) and is stored in our database. If there is any malfunction or defect of the equipment we will repair the VR Drive Metric at no cost. The warranty extends to technical defaults that are not caused by careless use, damage by transportation or other defaults not related to the manufacturing of the equipment. We invite you to register your product with us. Registering your product has several advantages: • Access to the latest VR Drive Metric software downloads and instruction manuals • Email software update alerts + release notes • Direct technical assistance in case of a problem Registering your product is a simple 2-step process: 1 Send us an email to [email protected] indicating the hardware ID of your VR Drive Metric as well as where you bought the equipment. 2 We will activate your membership and confirm your “Club” registration by email. Instruction Manual Roundshot VR Drive Metric – April 2015 – © by Seitz Phototechnik AG / Switzerland www.roundshot.com page 27 4.4 Software update VR Drive Metric: “Club VR Drive Metric” Connect to the “Club” website at www.roundshot.com. Please change your password on your first visit. The “Club VR Drive Metric” contains your registered product(s), the latest instruction manuals as well as the up-to-date VR Drive Metric software for download. Instruction Manual Roundshot VR Drive Metric – April 2015 – © by Seitz Phototechnik AG / Switzerland www.roundshot.com page 28 4.4 Software update VR Drive Metric: “Club VR Drive Metric” (continued) Download the latest VR Drive software from the “Club VR Drive Metric” website. Important: unzip the zipped folder. The software download consists of one directory and two files: The directory MTP_Cameras includes the parameters required for USB communication between VR Drive Metric and camera. The .vrd file contains the VR Drive Metric software. This software will also be updated to include new features and enhanced usability. Load the directory and the two files on the USB data stick provided with the VR Drive Metric. Important: Due to driver incompatibilities, not all USB data sticks can be used for updating the VR Drive Metric. For security, we supply a Roundshot USB data stick (capacity: 2 GB) with your VR Drive. We recommend that you use the original (and tested) Roundshot USB stick and keep it with your VR Drive Metric at all times. Turn the VR Drive Metric off by pressing the on/off button during several seconds. The screen will go black. Insert the Roundshot USB key into the USB drive. Start up the VR Drive Metric by pressing the on/off button during several seconds until the green Firmware Update progress bar appears. Instruction Manual Roundshot VR Drive Metric – April 2015 – © by Seitz Phototechnik AG / Switzerland www.roundshot.com page 29 4.4 Software update VR Drive Metric: “Club VR Drive Metric” (continued) On/off button Press several seconds Keep the VR Drive Metric on/off button pressed. Keep it pressed. Keep it pressed until the green Firmware update progress bar is displayed: Firmware update V. 02.013 Instruction Manual Roundshot VR Drive Metric – April 2015 – © by Seitz Phototechnik AG / Switzerland www.roundshot.com page 30 4.4 Software update VR Drive Metric: “Club VR Drive Metric” (continued) The VR Drive Metric will now load the new software from the USB key. This is confirmed with the status: “Firmware update / v xx.xxx”. • Please wait until the camera database is fully loaded before unplugging the USB key • Removing the USB before may lead to an incompatibility between VR Drive Metric software and camera database Once the software update is complete, the VR Drive Metric will also update the camera database if the update file is also loaded on the USB key. This process is confirmed with the message “camera data are being loaded”. camera data are being loaded. Data load successful. As soon as the camera database upload is finished, the VR Drive Metric will go into normal start-up mode. This is confirmed with the start-up screen. The software updates are now complete. (Press to view settings) All previous programs and settings remain intact. It is now safe to remove the USB stick. Instruction Manual Roundshot VR Drive Metric – April 2015 – © by Seitz Phototechnik AG / Switzerland www.roundshot.com page 31 4.5 Software update FOVEX PanoMaker: “Club FOVEX” Updating FOVEX PanoMaker Go to “Help / Check for software update” The software connects with the FOVEX server and checks for the last available software version. Download and install the software update by following the link. The VR Drive Metric purchase comes with a membership to the “FOVEX Club”. Depending on the duration and level of the membership, it entitles to software updates within versions or to new versions. Instruction Manual Roundshot VR Drive Metric – April 2015 – © by Seitz Phototechnik AG / Switzerland www.roundshot.com page 32 4.6 Return of equipment / recycling Your Roundshot product and the accessories are produced from highest quality materials and parts and will provide you continued pleasure. Should you nevertheless want to dispose of your Roundshot equipment one day, it should not be placed in normal waste. The correct disposal of your old equipment is a contribution to preventing possible negative causes for the environment. For optimum recycling we kindly ask you to return us your camera (with accessories) to the following address: Seitz Phototechnik AG Environment & Recycling Department Hauptstr. 14 8512 Lustdorf / Switzerland This return shipment to the manufacturer is free of charge. The service is available worldwide. Please contact us to arrange the return shipment and prepare the materials for the delivery. Your camera and accessories will be picked up by our courier service and will be recycled in our factory. We wish you continued success and fun with your Roundshot VR Drive Metric! Instruction Manual Roundshot VR Drive Metric – April 2015 – © by Seitz Phototechnik AG / Switzerland www.roundshot.com page 33 5. Technical Data Technical changes reserved April 2015 Instruction Manual Roundshot VR Drive Metric – April 2015 – © by Seitz Phototechnik AG / Switzerland www.roundshot.com page 34 Impressum Copyright by Seitz Phototechnik AG Hauptstr. 14 8512 Lustdorf / Switzerland PhotoCore AG Technoparkstr. 1 8005 Zürich / Switzerland ph: +41 52 369 68 00 email: [email protected] ph: +41 44 558 40 97 email: [email protected] www.roundshot.com www.photocore.ch www.fovex.com Technical changes reserved April 2015 Instruction Manual Roundshot VR Drive Metric – April 2015 – © by Seitz Phototechnik AG / Switzerland www.roundshot.com page 36