1
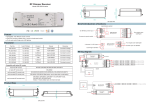
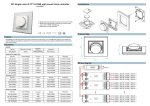
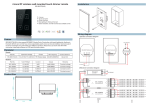
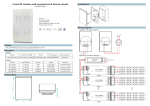
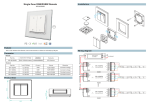
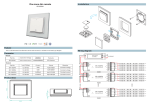
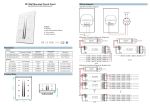
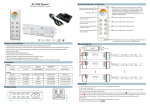
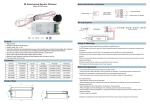
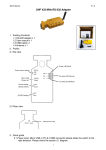
4 zone RF wireless wall mounted touch dimmer remote
Installation
SR-2805T2(US)
4 zones
Touch sensitive
Glass interface
Back lighting for finding in the dark
US wall mounted size
Wiring diagram
1)Sender Connection Diagram
110V-230VAC
N L
Feature
This is a RF Wireless full touch wall mounted dimmer Remote 4 zones
SR-2805T2-US(DC)
Power Supply
12-24VDC
Parameter
SR-2805T2-US(AC)
GND Vin
L
N
Remote
Part No.
Operation Voltage
Output
RF Frequency
Control distance
SR-2805T2(US)
12-24VDC/110-240VAC
RF Wireless Signal
434MHz/868MHz
About 30m
Receiver
110V-230VAC
SR-2501NEA
12-36VDC
4x8A
4x(96-288)W
Constant voltage
SR-2502N
12-36VDC
4x350mA
4x(4.2-12.6)W
Constant current
SR-2503N
12-36VDC
4x700mA
4x(8.4-25.2)W
Constant current
SR-2501NS
12-36VDC
1x8A
1x(96-288)W
Constant voltage
SR-2502NS
12-36VDC
1x350mA
1x(4.2-12.6)W
Constant current
SR-2503NS
12-36VDC
1x700mA
1x(8.4-25.2)W
Constant current
2)Receiver Connection Diagram
Power Supply
12-36VDC
110V-230VAC
1
Constant voltage
SR-2501N
Learning Key
Push
Switch
GND
RF Easy Dimmer
2
Remarks
4x(60-180)W
3
Output Power
4x5A
4
Output Current
12-36VDC
L
Input Voltage
N
Part No.
SR-2501N
L
N
4x5A
Product Size
PUSH
120.0
Operation
Zone 2
29.1
Zone 1
User manual when work with SR-2501/2/3N, SR-2501/2/3NS for single color:
1.Pairing with remote: connect well receiver, short press learning key on receiver,
then immediately touch any of
,to assign the receiver in any of the zone you want,
the led light will flash, means well paired.
You can pair endless of receivers to any of the zones you want.
2.Short touch
to turn ON/OFF the light,long touch it to dim up brightness, long touch
it again to dim down, long touch it again to dim up, so it's a up-down-up-down circulation.
75.0
Zone 3
Zone 4
3.If you want delete the receiver's learning data, just long press for 5 seconds the
learning key on receiver, the reciever will be deleted the learning, be set as factory
defaults.
Safety & Warnings
1) The product shall be installed and serviced by a qualified person.
2) IP20.Please avoid the sun and rain. When installed outdoors, please ensure it is mounted in a water proof
enclosure.
3) Always be sure to mount this unit in an area with proper ventilation to avoid overheating.
4) Please check if the output voltage of any LED power supplies used comply with the working voltage of the
product.
5) Never connect any cables while power is on and always assure correct connections to avoid short circuits
before switching on.
6) Please ensure that the cable is secured tightly in the connector
7) For update information please consult your supplier.
Warranty Agreement
1) We provide lifelong technical assistance with this product:
3-year warranty. We print date on every products, for example :1125 means year 2011,week 25.The
warranty is for free repair or replacement and covers manufacturing faults only.
For faults beyond the 3-year warranty we reserve the right to charge for time and parts.
2) Limited Warrenty
Any defects caused by wrong operation.
Any damages caused by unauthorized removal, maintenance, modifying, incorrect connection and
replacement of chips.
Any damages due to transportation, vibration etc. after purchase.
Any damages caused by earthquake, fire, lightning, pollution and abnormal voltage.
Any damages caused by negligence, inappropriate storing at high temperatures and humidity or near
harmful chemicals.
Product has been updated
3) Repair or replacement as provided under this warranty is the exclusive remedy to the customer.