1
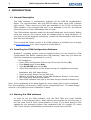
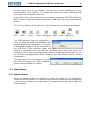
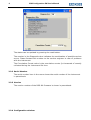
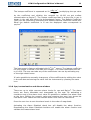
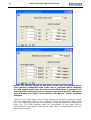
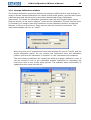
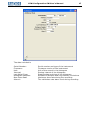
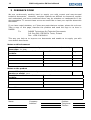
CSW Configuration Software
for RDS-80
User’s Manual
Ver. 1.00
2
CSW Configuration SW User's Manual
NOTE!
This document and the information herewith are copyrighted material as
mentioned in the copyright act. No part of this document may be copied
without written authorisation from the manufacturer.
This document is a user's guide for the CSW Configuration Software
package, which is the property of RADOS Technology Oy. Copying and resale
of the software without the manufacturer’s permission is strictly forbidden. The
user may make only one back-up copy of the program.
The manufacturer withholds the right to make changes in the contents of this
document without prior notice.
If you have any comments or suggestions for additions concerning either the
products or this document send them to:
RADOS Technology Oy
PO Box 506
20101 TURKU FINLAND,
Fax
+358 2 468 4601
Phone
+358 2 468 4600
There is a feedback form attached to the end of this document.
Copyright © RADOS Technology Oy 1995 - 2006
Software order number
Document number
Issue Date
Version
Validity
Document File/Author
1233-246
2096 5622
5.1.2006
1.0.0
RDS-80 firmware >= ver. 1.02.019
CSW Configuration SW for RDS-80 User’s Manual_1_0_0.doc/EL
CSW Configuration SW User's Manual
3
TABLE OF CONTENTS
1
2
INTRODUCTION.........................................................................................................4
1.1
General Description ...........................................................................................4
1.2
Installing the CSW Configuration Software ..................................................4
1.3
Starting the CSW software ..............................................................................4
Main window items ...................................................................................................6
2.1
General ................................................................................................................6
2.2 Menu Items .........................................................................................................7
2.2.1 Status window.............................................................................................7
2.2.2 Serial Number .............................................................................................8
2.2.3 Version..........................................................................................................8
2.2.4 Configuration window ................................................................................8
2.2.4.1
2.2.4.2
2.2.4.3
2.2.4.4
2.2.4.5
2.2.4.6
2.2.4.7
2.2.4.8
2.2.4.9
2.2.5
2.2.6
2.2.7
2.2.8
Isotope Coefficients and Counts window .............................................10
Cps/contamination and Alarm window .................................................11
Isotope Calibration window ....................................................................13
Histogram window ....................................................................................14
2.2.8.1
2.2.8.2
3
Disabled Menu Functions .................................................................................................... 9
Histogram ................................................................................................................................. 9
Alarm Level Change............................................................................................................ 10
Backlight.................................................................................................................................. 10
Accumulated Counts Reset .............................................................................................. 10
GM-pulse Chirp ..................................................................................................................... 10
Unit............................................................................................................................................ 10
Isotope Coefficient Change .............................................................................................. 10
Background Correction ...................................................................................................... 10
Interval and Last Write/Clear.......................................................................................... 14
Samples................................................................................................................................... 14
FEEDBACK FORM.....................................................................................................18
4
CSW Configuration SW User's Manual
1 INTRODUCTION
1.1 General Description
The CSW software is configuration software for the RDS-80 Contamination
Meter. The communication with the RDS-80 takes place using IrDA (infrared
light waves). There must be an IrDA port available in the PC for running the
CSW software. If an internal IrDA port is not available in the PC, an external
IrDA serial port or IrDA-USB adapter can be used.
The CSW software operates under the Microsoft Windows® environment. Before
using this manual, you need to know the fundamentals of using Windows®. If
you need to review Windows techniques, consult the documentation that comes
with Microsoft Windows®.
The unregistered limited version of the CSW software is available free of charge
at www.rados.com or by email request to [email protected].
1.2 Installing the CSW Configuration Software
Windows® operating system must be installed before you can install the CSW
Configuration SW. Before installing the CSW software, make sure you have the
IrDA-link installed and operational in your PC.
•
•
•
•
CD Installation:
Insert CSW Configuration SW set-up CD into the CD drive (D:).
From Start menu choose Run.
Type D:\SETUP and choose OK.
Follow the instructions on the screen during the installation procedure.
•
•
•
•
Installation with USP Hasp dongle:
Insert the Hasp dongle into the USP port
When/if Windows® shows “Found New Hardware Wizard”, click cancel
Run CSW setup as described above
Start CWS-software (the light of the Hasp Dongle should be always on)
Note: If the installation of the Hasp Dongle for some reason fails it can be installed
from the installation CD directory ”HASP_driver_setup/hdd32.exe”. The Hasp Dongle
must be in the USB port when installation is done.
1.3 Starting the CSW software
In order to run the CSW software, click the RDS CSW icon under RADOS
directory in the Programs Menu. When starting the program for the first time, it
will ask what kind of IrDA communication is used. If you have genuine IrDA
handled by the operating system (like integrated IrDA of a Laptop PC) select
YES. If you have an IrDA adapter connected to a serial port click NO.
CSW Configuration SW User's Manual
5
Now the main window of the CSW software appears on the screen.
The IrDA window is in the front side of the RDS-80, behind the display window
in the top right corner (see the figure below on the right). After initializing the
communication of the RDS-80, place the IrDA window of the RDS-80 in front of
the IrDA-adapter so that there is direct visibility between the two (see the
figure below on the left).
The traffic lights in the right bottom corner of the main window show the
communication status with RDS-80.
Green
Yellow
Red
online
waiting response from RDS-80
offline
6
CSW Configuration SW User's Manual
2 Main window items
2.1 General
There are several items in the main window. By clicking a menu item a subwindow will appear. Some of the menu items do not have a sub-window but
show directly the necessary information.
There are two menus in the menu bar of the main window, File and Options:
Clicking the About option in the File menu one can see the version of the CWS
Software. Clicking Exit will end the CSW Software.
When clicking the Settings in the Option Menu the following window will appear:
CSW Configuration SW User's Manual
7
On the upper part of the window one see the current parameters of the
communication with RDS-80. The parameter values are grey indicating that
they cannot be changed by the user.
If the IrDA-port in your computer is connected to serial port (RS-232) select the
RS232 button. Otherwise (with an internal or USB IrDA link) select the Genuine
button.
The icons on bottom of this and any other window have the following meaning:
Exit
Undo
Read
Clear
Histogram
Open
Sort
Save
Additional
The CSW-software requires registration in
order to utilize all features described in this
manual. Before the registration is possible,
a MemoHasp dongle must be connected to
the USB port of the computer. When the
dongle is connected click the Register Software menu item and enter the
Company (User) name and Registration Code provided with the dongle. If you
do not have the Registration Code linked to your MemoHasp dongle, contact
[email protected].
The Application Key is required to include
the service features into CSW software.
Please contact RADOS for details.
2.2 Menu Items
2.2.1 Status window
When the status window is activated it reads the status of self diagnostics
results of the instrument. The Status window shows the possible errors detected
in the instrument during the diagnostics. For diagnostics details see the RDS-80
User’s Manual.
8
CSW Configuration SW User's Manual
The status can be updated by pressing the read button.
The number in the Diagnostics box indicates the combination of possible various
errors. Please forward this number to the service engineer in case of problems
with the instrument.
The Cumulative Counts value is the cumulative counts (in thousands of counts)
collected during the instrument life time.
2.2.2 Serial Number
The serial number item in the menu shows the serial number of the instrument
in parenthesis.
2.2.3 Version
The version number of the RDS-80 firmware is shown in parenthesis.
2.2.4 Configuration window
CSW Configuration SW User's Manual
9
In the Configuration window one can change operational parameters of the
RDS-80.
2.2.4.1
Disabled Menu Functions
By activating/deactivating a checkbox in the Disabled Manu Functions one can
control the behaviour of the menu of the RDS-80 (for details see the RDS-80
User’s Manual).
In order to remove one or more items from the RDS-80 instrument menu
activate the corresponding checkbox and press the save button to store the new
configuration into the RDS-80.
2.2.4.2
Histogram
The RDS-80 can store up to 480 contamination values (cps or Bg/cm2) into the
internal memory (histogram). When the Status is set OFF no values are stored.
When the status is ON the contamination values are stored. The storage interval
can be selected in the Histogram menu. Depending on the Mode selection the
Maximum Value or Average Value during the Interval period will be memorized.
If Instant Value is selected the instant contamination value at the end of each
interval period will be memorized.
10
CSW Configuration SW User's Manual
2.2.4.3
Alarm Level Change
It is possible to prevent the user from changing the Alarm Levels of the RDS-80
When the checkboxes are deactivated, the Pulse/Contamination Alarm Levels
cannot be changed with the push button of the RDS-80.
2.2.4.4
Backlight
The backlight behaviour can be adjusted in the Configuration Menu group box.
Normally the backlight is lit when the push button of the RDS-80 is pressed
shortly. Depending on the configuration the backlight is on for 10 seconds after
the button is pressed shortly, or it switches on and off after each short press of
the button, or it is constantly on.
2.2.4.5
Accumulated Counts Reset
When the Accumulated Counts Reset checkbox is activated the user is allowed
to reset the accumulated counts in the RDS-80.
2.2.4.6
GM-pulse Chirp
The GM-pulses can be made audible by setting the GM-pulse Chirp Status ON.
Each GM-pulse gives a chirp when the Sensitivity is set at Not Divided. When
the Sensitivity is set at Divided/16, every sixteenth GP-pulse emits a chirp.
2.2.4.7
Unit
The displayed unit can be selected (cps or Bq/cm2) in the Unit group box of the
configuration window. Note: the pulse/contamination alarm levels are also
shown in the selected unit.
2.2.4.8
Isotope Coefficient Change
When the check box is selected the use of the Isotope Coefficient list is enabled.
When enabled user can select the desired coefficient from the eight coefficients
listed. NOTE: as a factory setting there is only coefficient for Sr90/Yr90 in the list.
2.2.4.9
Background Correction
When the Change Enabled check box is selected user can enable or disable
the use of background correction.
When the Recalculation Activated check box is selected the instrument will
carry out the recalculation when it will be next time switched on.
When the Correction Activated check box is selected the instrument will
perform the background correction.
2.2.5 Isotope Coefficients and Counts window
In the Isotope Coefficients window one can set and change the isotope specific
conversion factors. In the right upper corner of the window the current
accumulated counts (in thousands of counts) since the last reset is displayed.
One can reset the accumulated counts by pressing the clear icon at the bottom
of the window.
CSW Configuration SW User's Manual
The isotope coefficient is expressed as 10 x
11
mBq / cm 2
(multiplying the cps value
cps
by the coefficient and dividing the revenue by 10 000 we get surface
contamination as Bq/cm2). The isotope coefficient that is at the time in use is
shown in the edit box below the Accumulated Counts. The Default Coefficient
(645) can be restored by activating the Default Gamma Coefficient check box.
When the default coefficient is in use the displayed value corresponds to
cps/cm2.
The instrument is factory calibrated with Sr90/Yr90 source. The isotope coefficient
for this isotope is stored in the edit box number 1. All other coefficients are set
to 10 000. The user can take any of the coefficients into use by activating any
of the eight check boxes.
It’s also possible to manually change any of the coefficients by editing the value
in the edit box and storing the value into the instrument by pressing the save
icon.
2.2.6 Cps/contamination and Alarm window
There are up to eight common alarm levels for cps and Bq/cm2. The alarm
levels are freely selectable and changeable by the user. By activating a
checkbox next to the alarm level value it’s possible to validate one alarm level
at the time. Editing the numeric value and pressing the save icon stores the
new alarm level values and the selected alarm level into the instrument.
Press the sort icon to sort the alarm levels in the order of magnitude.
Activating the Alarm Disabled check box will disable the alarm function.
Deactivating the Alarm Disabled checkbox will enable the alarm function and
validate the lowest alarm level.
12
CSW Configuration SW User's Manual
NOTE: The numeric values of the alarm levels and the selected alarm
level remains unchanged even if the unit is changed. When changing
the unit please make sure that the correct alarm level is selected. For
instance when changing from cps display with alarm level of 100 cps to
Bq/cm2display the alarm level remains 100 Bq/cm2 unless manually
changed.
There is in the right upper corner of the window the maximum measured pulse
rate or contamination value in cps or Bq/cm2 (since the instrument was turned
on). The maximum pulse rate or contamination can be cleared by pressing the
clear icon. The CSW Software asks for confirmation of the pulse rate or
contamination reset before clearing the pulse rate or contamination from the
instrument memory.
CSW Configuration SW User's Manual
13
2.2.7 Isotope Calibration window
The isotope calibration procedure defines the isotope coefficient for a new isotope. In
order to do the isotope calibration one needs a large-area, planar, sources which have
a defined area and whose activity have been determined using a calibration
instrument. To initiate the calibration procedure type into the Contamination Value
field the activity of the source (Bq/cm2) and into the Calibration Timeout field the time
(in seconds) you need to take the instrument to the calibration position so that the
detector is on top of the source. Press save to start the timeout count down. The
instrument display will turn to “cALib”.
When the time out is elapsed the instrument display will turn to “cALSt” and the
actual calibration starts. Do not remove the instrument from the calibration
position until the self calibration is finished i.e. the instrument has restarted.
The new isotope coefficient will replace the existing isotope coefficient in use. It
can be moved to one of the selectable isotope coefficient by activating the
check box next to one of the eight options. The software asks confirmation to
update the new value into the list.
14
CSW Configuration SW User's Manual
If accepted the new value will be moved into the list. Pressing the save icon will
store the new value into the instrument.
2.2.8 Histogram window
In the Histogram window one can define the storage interval and download the
histogram data from the instrument into the PC. The histogram, when
activated, does not store the data when the instrument is switched off or is in
the communication mode. Therefore it is strongly recommended not to switch
off the instrument or to turn the IrDA communication on when making the
histogram recording. The histogram stores cps or Bq/cm2 whichever is selected
to be in use.
2.2.8.1 Interval and Last Write/Clear
In this group box one can define the storage interval for the histogram. The
interval is always given in seconds (e.g. set value for 10 minutes interval =
600). The interval can be changed by typing in the new value and clicking the
save icon.
Note that saving the new interval will always clear the histogram
memory. On the other hand the only way to clear the histogram memory is to
save the interval. In order just to clear the histogram (and not change the
interval) one should save existing interval value.
The Last Write/Clear box shows date and time when the interval was saved. To
read the current values from the RDS-80 click the read icon.
2.2.8.2 Samples
Download the histogram from the RDS-80 by pressing the read icon. The
number of sample, recording time and date, +, - or * sign and the dose rate
value will be displayed in the list box.
CSW Configuration SW User's Manual
15
The samples memory in the RDS-80 is a ring memory of 480 samples. Once it is
time to store the 481st sample, RDS-80 will replace the sample number one with
it. Thus the histogram function will not stop storing the new samples when the
memory is full but it will replace the oldest sample with the latest one. This
means that there are always 480 latest samples in the histogram.
When the time stamp of a record in the histogram is reliable (i.e. the
instrument was not switched off during the histogram recording) the + sign will
be shown on the recording line. The – sign indicates that the even if the
instrument had been switched off during the recording, the time stamp is still
recoverable. The * sign indicates that the time stamp is not reliable.
The Histogram Samples line shows first the number of samples in the memory,
in the middle the number revolutions of the ring memory and then the capacity
of the histogram memory (=480). For example, when the middle box (number
of revolutions) has value two and the number of samples value 40, it means
that the instrument has totally recorded 1000 (2x480+40) samples but only the
latest 480 are in the memory.
The graph of the histogram can be displayed by clicking the histogram icon.
16
CSW Configuration SW User's Manual
If the Use MS Excel® check box is activated (Note: MS Excel® must be installed
in the PC) the histogram data will be imported into an Excel spreadsheet. When
the Include Alarms check box is activated the valid dose rate alarm level can
bee seen in the graph. To store the histogram use the Excel save function.
Clicking the save icon will store the histogram values into a text file. The text
file can later be opened by any text editor or it can be imported into the CSW
software by clicking the open icon.
Clicking the additional (Σ) -icon the additional data window will appear.
CSW Configuration SW User's Manual
17
The data included is:
Serial Number:
Firmware:
Unit:
Interval:
Last Write/Clear:
Histogram samples:
Max Pulse Rate:
Alarm 1:
Serial number and type of the instrument
Firmware version of the instrument
Unit of the record in the histogram
Storing interval of the histogram
Starting date and time of the histogram
Number of samples and ring memory revolutions
Maximum dose rate during the recording
The valid dose rate alarm level during recording
18
CSW Configuration SW User's Manual
3 FEEDBACK FORM
We are continuously working hard to supply you with correct and easy-to-read
technical documents. However, complex systems are difficult to document, explain
and understand, and thus sometimes there may be mistakes or inadequacies in the
documentation. To correct these errors we would like to hear your opinion about this
document.
If you have noted mistakes, or if there are parts that are unclear, please let us know.
Take a copy of this page, describe the problem and send the copy to us here in
RADOS.
To:
RADOS Technology Oy/Technical Documents
P.O. Box 506, FIN-20101 Turku, Finland
Fax: +358-2-468 4601
This way you help us to improve our documents and enable us to supply you with
even better documents.
Notes on this document
Name of the document: CSW Configuration SW User’s Manual (2096 5622)
Issue date: 5.1.2006
Description of the mistake or Correction
problem
Notes on the product
Name of the product: CSW Configuration Software for RDS-80
Version or model: 1.0.0
Description of the mistake or Correction
problem
General Notes
Name:
Company:
Address:
Position:
Telephone:
Telefax:
ver. 1.0.0
Page no.