1
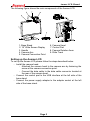
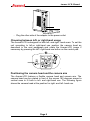
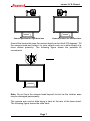
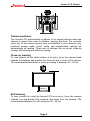
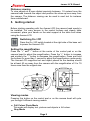
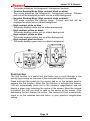
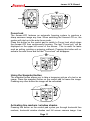
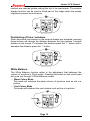
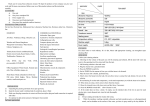
Aumax-LCD User Manual Version 2.2 Copyright © 2011 by Aumed All rights reserved Aumed Group Corp. 3/F Building D,No.31 Jiaoda Dong Road, Haidian District, Beijing 100044 China Tel: 86-10-82884173. Fax: 86-10-82884170 E-mail: [email protected] Website: www.aumedgroup.com www.aumed.cn Aumax-LCD Manual Aumed Anti-Blur Technology (AABT™) With the discovery of Video Magnifiers, the life quality of people with low vision changed dramatically, as the first thing we care about is products’ image quality. Keeping a clear image with unsteady hands & fast viewing is really what we need when reading. Different video magnifiers perform in extremely different ways; however, most video magnifiers lessen image perfection, leading to ghosting, blurring, flickering and flashing, which can easily make viewers dizzy or even sick. As the largest “Low vision solution provider” (LVSP) in China, Aumed is determined to carry out an imaging revolution for video magnifiers. “Aumed Anti-Blur” technology has been developed and built to solve all the sticky problems. Take Aumed Anti-Blur video magnifier and enjoy a clearer world. Your eyes will be naturally attracted to it. Wherever you are, whatever you see, this is Aumed Anti-Blur Technology(AABT™)! Aumed Group Corp. Add: 3/F Building D,No.31 Jiaoda Dong Road, Haidian District, Beijing 100044 China Tel: 86-10-82884173 Fax:86-10-82884170 www.aumed.cn www.aumedgroup.com Email: [email protected] Page 1 Aumax-LCD Manual Aumax-LCD User Manual Index 1. 2. 3. 4. 5. 6. 7. 8. 9. Introduction .......................................................................................... 3 About this manual ............................................................................ 3 Safety and care .................................................................................... 3 What’s in the box ................................................................................. 4 Getting to know your Aumax-LCD ........................................................ 4 Setting up the Aumax-LCD ............................................................... 5 Choosing between left- or right-hand usage ..................................... 6 Positioning the camera head and the camera arm ........................... 6 Camera positions ............................................................................. 8 Close-up viewing .............................................................................. 8 Self-viewing ...................................................................................... 8 Distance viewing .............................................................................. 9 Getting started ..................................................................................... 9 Switching On / Off ............................................................................ 9 Setting the magnification .................................................................. 9 Viewing modes ................................................................................. 9 Find function .................................................................................. 10 Auto-focus lock............................................................................... 11 Using the snapshot button.............................................................. 11 Activating line markers / window shades ........................................ 11 Positioning of lines / windows ......................................................... 12 White balance ................................................................................ 12 Left / right rotation .......................................................................... 13 Contact / product support ................................................................... 13 Warranty conditions ........................................................................... 13 Compliances ...................................................................................... 14 Specifications of the Aumax-LCD ....................................................... 15 Page 2 Aumax-LCD Manual 1. Introduction Congratulations on choosing the Aumax-LCD, an easily transportable autofocus video magnification system from Aumed. Use the Aumax-LCD for reading, writing, viewing photographs, doing crafts and lots more. The Aumax-LCD enables you to view printed text, images and objects up to 79 times magnification in different colours. With its ergonomic control panel, flexible camera arm and light-weight X-Y table the Aumax-LCD extends in operating and reading comfort. The Aumax-LCD can be used at home or in school and office settings. If you have any questions or suggestions concerning the use of this product, please contact your distributor or the Aumed headquarters using the contact information found at the end of this user manual. Your feedback is greatly appreciated. We hope you enjoy working with your Aumax-LCD. About this manual This user manual provides a comprehensive guide to the features and operation of the Aumax-LCD video magnifier. Pictures in this user manual may be different from the actual situation. Aumed preserves all the rights for the interpretation of all contents in this user manual. Please read this user manual carefully before using the Aumax-LCD and keep the user manual in a safe place for future reference. 2. Safety and care Only use the Aumax-LCD indoors. Do not expose the Aumax-LCD to extreme or rapid changes in temperature or humidity. Do not place Aumax-LCD near a radiator or heater, or where it will be exposed to direct sunlight. These conditions may damage electronics or optics of the Aumax-LCD. Do not use the Aumax-LCD near other electric appliances or inadequately shielded medical devices. It may cause an electromagnetic interference. Do not place this system on an unstable surface. It may fall, causing serious damage to the unit or injuries to the user. Handle the Aumax-LCD with care. Rough handling will damage the internal components. Page 3 Aumax-LCD Manual If moving the Aumax-LCD to another location, disconnect the power cord and other cables from external connectors. Carry the Aumax-LCD by grabbing the handle located at the rear of the unit for a safe and easy transport. The reading table and camera arm contain moving and removable mechanical parts. Please remind your safety while removing or adjusting the mechanical parts. (Users are recommended not to remove the mechanical parts frequently.) Injury may occur if fingers or lose items of clothing are caught in the operating mechanisms. If you have difficulty in operating the unit safely, please seek advice or contact your local Aumed distributor. Do not remove any parts of the Aumax-LCD. Contact your local Aumed distributor to service the Aumax-LCD if necessary. Do not open any of the components as this will void the warranty. Each component contains parts which should only be serviced by an Aumed repair specialist. Always turn the power off when the system is not in use. Always unplug the system before cleaning. Use a soft damp cloth to clean the exterior. Do not use cleaning agents or abrasive materials as they will damage your unit. Avoid touching the lens of the camera and keep it clean by using proper cleaning means. Use only the power adapter provided. Do not use the unit under 5°C or above 40°C Use of the Aumax-LCD other than that described in this user manual will exclude it from warranty conditions. 3. What’s in the box The Aumax-LCD packaging contains the following: The mainframe of Aumax-LCD A detachable camera unit A control pad A power cord This user manual Lens cloth Optionally a carrying case Optionally a X-Y table If any items are missing from your package, please contact your local Aumed distributor. 4. Getting to know your Aumax-LCD Page 4 Aumax-LCD Manual The following figure shows the main components of the Aumax-LCD. 1. Base Stand 2. 19” Wide Screen Display 3. Handle 4. Camera Arm 5. Camera Connection Point 6. Camera Head 7. Control Pad 8. Camera Rotation Axes 9. Slide Track Setting up the Aumax-LCD To set up the Aumax-LCD please follow the steps described below: Install the camera head: - Attached the camera head to the camera arm by fastening the screw at the camera connection point. - Connect the data cable to the data cable connector located at the rear of the camera head. Connect the control pad to the USB interface at the left side of the base stand. Connect the power supply adapter to the adapter socket at the left side of the base stand. Page 5 Aumax-LCD Manual Plug the other side of the adapter to the power outlet. Choosing between left- or right-hand usage The Aumax-LCD is designed for both left- and right- hand users. To set the unit according to left-or right-hand use position the camera head as described in the next paragraph and rotate the Aumax-LCD image if necessary by pressing the left / right-hand use button on the control pad. . Positioning the camera head and the camera arm The Aumax-LCD features a flexible camera head and camera arm. The camera head can be rotated in front of the screen 180 degrees around a vertical axes to fit both to left- and right-hand use. The following figure shows the camera head at the position for right- and left- hand use. Page 6 Aumax-LCD Manual Camera position for right-hand use Camera position for left-hand use Around the horizontal axes the camera head can be tilted 270 degrees. Tilt the camera head and rotate it to view objects such as a white board at a more distant proximity. The following figure shows the possible tilt movements. Note: Do not force the camera head beyond its limit as the rotation axes may be damaged permanently. The camera arm can be slide along a track at the rear of the base stand. The following figure shows the slide track. Page 7 Aumax-LCD Manual Camera positions The Aumax-LCD automatically re-adjusts to its original settings when the camera is turned from near to distance viewing and back. For example when you tilt the camera quickly from a whiteboard to your desktop, your preferred viewing mode, colour mode, and magnification settings will automatically be applied. Three sets of settings can be stored: close-up viewing, self-viewing and distance viewing. Close-up viewing To view objects on the table surface or to write, focus the camera head towards the desktop and position the close-up lens in front of the camera. The recommended distance for close-up viewing is between 30 – 40 cm. Self-viewing To view yourself by using the Aumax-LCD as a mirror, focus the camera towards you and position the close-up lens away from the camera. The recommended distance for self-viewing is 40 – 50 cm. Page 8 Aumax-LCD Manual Distance viewing To view objects at a more distant proximity between, 1-5 meters focus the camera head towards the object and position the close-up lens away from the camera. The distance viewing can be used to read text for instance from a whiteboard. 5. Getting started Before starting operating with the Aumax-LCD the camera head needs to be installed. For easy access to the control buttons and steady table movement, place your hands on the wrist support at the table front when using the Aumax-LCD. Switching On / Off Press the On / Off switch located at the right side of the base unit to power the Aumax-LCD. Setting the magnification Press the “+” and “-” button at the centre of the control pad or on the camera head to adjust the magnification. Press the “+” button to increase and similarly the “-“ button to decrease the magnification. Press and hold the buttons for more than 1 second to adjust the magnification continuously. The Aumax-LCD magnifies text and object placed on the desktop should be at least 40 cm away from the camera with the magnification of 2 to 79 times more than the original size. Viewing modes Pressing this button on the control pad or on the camera head will cycle you through 8 different viewing modes: Full Colour Photo Mode This mode will display text, pictures and objects in full colour. Gray Mode Page 9 Aumax-LCD Manual This mode enhances the foreground / background contrast. Positive Reading Mode (High contrast black on white) This mode enhances the foreground / background contrast. Pictures and text will be displayed as black text on a white background. Negative Reading Mode (High contrast white on black) This mode reverses the positive image. Pictures and text will be displayed as white text on a black background. High contrast white on blue This mode displays white text on a blue background. High contrast yellow on black This mode displays yellow text on a black background. High contrast yellow on blue This mode displays yellow text on a blue background. High contrast green on black This mode displays green text on a black background. Find function The find function is a useful tool that helps you to scroll through a text quickly by providing an overview of the document that you are reading. Press and hold this button on the control pad or on the camera head to activate the find function. When the find function is activated the AumaxLCD will automatically zoom out to the minimum magnification and will display a green sign indicating the centre of the screen. Move the camera to position the text you wish to read to the centre of the screen. After positioning the text release the button. The Aumax-LCD will automatically zoom in on the selected text and return to your previous magnification setting. Page 10 Aumax-LCD Manual Focus lock The Aumax-LCD features an automatic focusing system to produce a sharp onscreen image any time. When switching the Aumax-LCD on, the system will start up in the auto-focus mode. Press this button on the control pad to switch to Focus Lock which stops the Aumax-LCD from continuously focusing. The text “Focus lock” will be displayed on the upper left corner of the screen. This is useful for tasks such as writing, painting or enjoying craftwork. Pressing this button will reactivate the auto-focus and the text “Focus lock” will disappear. Using the Snapshot button The snapshot button allows you to take a temporary picture of a text or an image. Press the snapshot button on the control pad to freeze the image. Pressing any other button the image will be unfreezed. Activating line markers / window shades Pressing this button on the control pad cycles you through horizontal line markers, horizontal window shades and full screen camera image. Line Page 11 Aumax-LCD Manual markers are used as guides making the text to be read easier. The window shades function can be used to block part of the image when the screen brightness causes inconvenience. Positioning of lines / windows When horizontal line markers or the window shades are activated, pressing these buttons will change the distance between the line markers / window shades on the screen. To increase the distance press the “+” button and to decrease the distance press the “-” button. White Balance The White Balance function refers to the adjustment that balances the colours of a picture in Photo mode. Pressing this button on the control pad will cycle you through 2 White Balance modes: Warm Colour Mode This mode will enhance the warm colours of a picture such as red in a picture. Cool Colour Mode This mode will enhance the cool colours such as blue in a picture. Page 12 Aumax-LCD Manual Left / right rotation When positioning the camera according to the hand orientation from the left to the right side or the other way around the camera image will be displayed upside down. Simply press this button to adjust the camera image to the right position. 6. Contact / product support If you have questions about the operation, installation or setting of your system, please contact your Aumax-LCD distributor or closest Aumed office. Your Aumax-LCD distributor: 7. Warranty conditions Aumed warrants the Aumax-LCD effectively from the date of delivery, to be free of any defects in material and workmanship. Page 13 Aumax-LCD Manual Warranty is not transferable and does not apply to groups, multi users or agencies. The Aumax-LCD has been designed for the individual purchaser to be used in home and office environments. Aumed reserves the right to repair or replace any purchased Aumax-LCD with a similar or better product. In no event shall Aumed or its distributors be liable for indirect or consequential damages. This warranty is valid only when serviced in the country of original purchase and with intact seals. For additional warranty claims or service during or after warranty period, please refer to your distributor. Aumed takes no responsibility for use of this device other than described in this manual. 8. Compliances This product complies with the safety and EMC requirements of the directives: Safety: EN 60950-1 EMC: EN 50081-1 EN 55022 EN 55024 FCC FCC part 15 Class B WARNING: The use of accessories, transducers and cables other than those specified and sold by the manufacturer of the Aumax-LCD as replacement parts for components, may result in increased emissions or decreased immunity of the Aumax-LCD. This device bears the CE, FCC and approval mark. Page 14 Aumax-LCD Manual 9. Specifications of the Aumax-LCD Focus Monitor Magnification Dimensions Weight Viewing modes Auto-focus with focus lock 19” wide screen display (16:10) 3.5 X – 79 X 55 x 44 x 20 cm Approx. 11.25 kg Full colour photo mode Gray mode High contrast black on white High contrast white on black High contrast white on blue High contrast yellow on black High contrast yellow on blue High contrast green on black 100-240V AC 1800mA 50 - 60 Hz Power rating Net frequency Operating conditions Temperature Humidity 5°C to 40°C < 70%, no condensation Storage & transport conditions Temperature Humidity -10°C to 40°C < 95 %, no condensation Page 15 Page 1