1
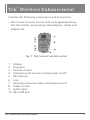
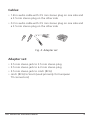
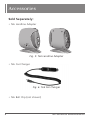
Tek® Wireless Enhancement
User Manual
Congratulations!
Dear Customer,
Your hearing instrument(s) equipped with e2e wireless®
2.0 technology can be controlled by your new Tek® Connect
remote control.
This remote control offers you more hearing convenience in
many situations. Via wireless technology, it links your hearing
instrument(s) to the expanding world of audio devices. Tek
helps you watch television, listen to music or talk on the phone.
These instructions, together with the guidance from your
Audiologist or Hearing Care Provider, will help you to
understand how your remote control works.
If you have further questions, please contact your Audiologist
or Hearing Care Provider.
Table of Contents
Tek® wireless enhancement . . . . . . . . . . . . . . . . . . . . . . . . 3
Accessories . . . . . . . . . . . . . . . . . . . . . . . . . . . . . . . . . . . . . 6
Safety Information . . . . . . . . . . . . . . . . . . . . . . . . . . . . . . . 7
Getting Started . . . . . . . . . . . . . . . . . . . . . . . . . . . . . . . . . . 9
Basic functions . . . . . . . . . . . . . . . . . . . . . . . . . . . . . . . . . 11
Charging the remote control . . . . . . . . . . . . . . . . . . . . . . 16
What is Bluetooth®? . . . . . . . . . . . . . . . . . . . . . . . . . . . . . 17
Using the remote control with a phone . . . . . . . . . . . . . . 18
Using the Tek Transmitter . . . . . . . . . . . . . . . . . . . . . . . . 25
Using the direct audio input . . . . . . . . . . . . . . . . . . . . . . . 31
Technical Information . . . . . . . . . . . . . . . . . . . . . . . . . . . . 33
Warranty and Service . . . . . . . . . . . . . . . . . . . . . . . . . . . . 35
Tek® Wireless Enhancement
Includes the following components and accessories:
• Tek Connect remote control with rechargeable battery,
Tek Transmitter, power plugs and adaptors, cables and adapter set.
Fig. 1: Tek Connect remote control
1
2
3
4
5
6
7
8
9
10
Display
Programs
Volume control
Telephone and remote control power on/off
Microphone
Treble
button
Lock
Hearing instrument status and power on/off
Treble control
Audio input
Mini USB port
TEK WIRELESS ENHANCEMENT
Read Out
button
3
Fig. 2: Tek Transmitter
11
12
13
14
15
On/Off switch
Sound level
Contact for power plug
2.5 mm stereo jack
LED
Read Out
• 2 Power plugs with country specific
adapters
button
(one for Tek Connect, one for Tek Transmitter)
• Can be used interchangeably with Tek Connect and
Treble
button
Tek Transmitter
Fig. 3: Power plug, adapters and cables
IN P U
T
OUT
4
P UT
TEK WIRELESS ENHANCEMENT
Cables:
• 1.8 m audio cable with 3.5 mm stereo plug on one side and
a 2.5 mm stereo plug on the other side
• 0.3 m audio cable with 3.5 mm stereo plug on one side and
a 2.5 mm stereo plug on the other side
IN P U
T
OUT
P UT
Fig. 4: Adapter set
Adapter set:
• 3.5 mm stereo jack to 2.5 mm stereo plug
• 3.5 mm stereo jack to 6.3 mm stereo plug
• 3.5 mm stereo jack to cinch (RCA)
• cinch (RCA) to Scart (used primarily for European
TV connectors)
TEK WIRELESS ENHANCEMENT
5
Accessories
Sold Separately:
• Tek Landline Adapter
Pair
RINGER
OFF
Enter
ON
Fig. 5: Tek Landline Adapter
• Tek Car Charger
Fig. 6: Tek Car Charger
• Tek Belt Clip (not shown)
6
TEK WIRELESS ENHANCEMENT
Safety Information
Note: The remote control is sensitive to extreme heat, high
humidity, strong magnetic fields (> 0.1T), X-rays and
mechanical stress. Do not expose the remote control to
extreme temperature or high humidity. Do not leave it
in direct sunlight. Do not immerse it in water.
WARNING
Wireless systems may interfere with measuring devices and
electronic equipment.
• Risk of interference with cardiac pacemakers. Do
not use the remote control if you are fitted with a
cardiac pacemaker.
• Do not use remote control in hospitals or airplanes.
• Have the lock activated in hospitals or airplanes.
• Prior to use in conjunction with an electronic implant
or life supporting system, have the electromagnetic
compatibility verified.
• Strangulation hazard when lanyard gets entangled, e.g.,
in moving mechanical parts of machines. Use only the
delivered breakaway lanyard. It will automatically snap
when it gets entangled.
In some countries restrictions for the usage of wireless
equipment exists. Refer to local authorities for further
information.
SAFETY INFORMATION
7
In case the hearing instrument is controlled by another
person’s remote control unit (RCU), please return RCU
and hearing instrument to your Audiologist or Hearing
Care Provider.
WARNING
• Choking hazard posed by small parts. Keep batteries,
small parts and remote control out of children‘s reach.
• If swallowed consult a physician or hospital immediately.
Note: Do not throw used batteries into household trash. Return
them to your Audiologist or Hearing Care Provider for
environmentally correct disposal.
WARNING
• Risk in explosive environments, e.g., mining areas!
• Don’t use your hearing instrument(s) and remote
control in areas where there is a danger of explosions.
WARNING
Risk of explosion when the rechargeable battery
is handled incorrectly.
• Do not short circuit, pierce, crush or disassemble the
rechargeable battery.
• Do not place in oven or fire.
• Do not immerse in water.
• Charge the rechargeable battery between 0ºC and 60ºC (32ºF and 140ºF).
• Remove the rechargeable battery when the instrument is
not in use for a prolonged period of time.
8
SAFETY INFORMATION
Getting Started
Before first use
Insert the rechargeable battery into the remote control.
The rechargeable battery is already charged and the
remote control is automatically on.
Display information
1 hearing program
2 program description (only available if programmed
by your Hearing Health Care Provider)
3 battery status of remote control
Fig. 7: Display information
The remote control will go into a stand-by mode when not in
use. In stand-by mode no information is shown on the display.
Press any key to turn the remote control back into active mode
to see the information on the display.
GETTING STARTED
9
Wearing the remote control
• For best results, use the remote control at a maximum
distance of 1 meter or less to the hearing instrument(s).
The remote control can be operated from your pocket,
when changing memory, volume control or treble
preference.
• When receiving an audio stream, for best listening quality,
wear the remote control with the lanyard around your
neck. This will ensure that the remote control and
hearing instrument(s) are optimally positioned.
• You can also set the remote control on the table in front
of you, or on the couch or chair next to you, for example,
when watching TV.
• For best listening quality turn the remote control in the same
direction you are facing.
• When using the telephone with the remote control, hold
the remote control in your hand or place in front of you on
a table and speak directly into the microphone, or wear the remote control with the lanyard around your neck.
3
1
4
2
5
1
3
4
2
5
1
3
2
4
5
Fig. 8: Wearing, watching TV, listening and talking
with your Tek Connect remote control.
10
GETTING STARTED
Basic Functions
Locking the remote control
Green
section
Lock
Unlock
Fig. 9: Lock and unlock
Your remote control has a lock on the left side.
• Slide the control to the bottom to enable the lock.
Pressing the buttons will now have no effect.
• Slide the control to the top to disable the lock.
Changing the program
The remote control allows you to control up to 5 programs
of your hearing instrument(s).
Your Audiologist or Hearing Care Provider will program the
settings in the different programs for your particular
listening needs.
BASIC FUNCTIONS
11
Programs
Volume
Fig. 10: Remote control programs and volume
Press the number of the desired hearing program. The
remote control display will show the number and name of
the program you are in. You will hear the acoustic signal for
the chosen program in your hearing instrument(s). (Fig. 10)
Changing the volume (Fig. 10)
/
• Press for louder.
/
• Press for softer.
/
/
/
/
/
/
/
/
/
/
/
12
/
/
BASIC FUNCTIONS
Changing the Treble (Fig. 11)
With the rocker switch on the right side of the remote
control you can change the tone of your hearing
instrument(s).
• Press + (up) for more treble.
• Press – (down) for less treble.
Read out
button
Treble
button
Remote control
on/off
Fig. 11: Treble, read out, and remote
control on/off buttons
Read out the hearing instrument information
This function allows you to view the current battery status,
volume and hearing program of your hearing instrument(s).
• Hold the remote control close to your hearing
instrument(s) (about 10 cm).
• Briefly press the read out button. (Fig. 11)
BASIC FUNCTIONS
13
The display of the remote control shows
you the following information: (Fig.12)
1current hearing program with description
2treble setting of hearing instrument(s)
3volume control setting of hearing instrument(s)
4battery status of hearing instrument(s) left/right
Fig. 12: Display
Turning the hearing instrument(s) on/off
• Press the read out button for at least 5 seconds to
turn your hearing instrument(s) off. (Fig.11)
• Press one of the program buttons on the remote control
to turn the hearing instrument(s) back on.
Turning the remote control on/off
• Press the red
symbol for about 5 seconds to turn the
remote control off. (Fig.11)
• Press the red
symbol for about 5 seconds to turn the remote control back on.
14
BASIC FUNCTIONS
Symbols
program number
Bluetooth connection active
phone connection
or
battery status of remote control
full
empty
charging
volume up/volume down
/
treble up/treble down
/
lock activated/deactivated
/
incoming call
active call
hearing instruments off
transmission error
/
/
searching Bluetooth audio stream/
Bluetooth audio stream active/
direct audio stream active
Read-out symbols
Treble and volume settings of
hearing instruments
battery status of left and right
hearing instrument
Fig. 13: Symbol Chart
BASIC FUNCTIONS
15
Charging the Remote Control
Charging process
• Connect the remote control with the power plug to a power
outlet. The charging process starts. Charging time is about
5 hours depending on the status of the rechargeable battery (Fig.13).
Charging is complete when the battery symbol shows a
full battery (Fig.13).
Running time of the rechargeable battery
The running time of the rechargeable battery depends on
the way the remote control is used.
• The most battery-consuming function is the streaming
transmission of audio signals. This function is active when
using the telephone or listening to an external device. The
rechargeable battery will provide about 5 hours of use time
under these circumstances before requiring recharge.
• When no transmission of audio signal is active but a phone
has been paired, the rechargeable battery will last several
days before requiring recharge.
• When no transmission of audio signal is active and no
telephone has been paired, the rechargeable battery lasts several months before requiring recharge.
• For prolonged operation, the Tek Connect remote control may be used while plugged in.
16
CHARGING THE REMOTE CONTROL
What is Bluetooth®?
®
Bluetooth technology provides a way to wirelessly connect
cell phones, laptops, headsets and other devices.
Over a Bluetooth connection the devices can exchange
information such as data, sound or even control commands.
The range of the Bluetooth connection in the Tek Connect
remote control is about 10 meters. Walls or other objects
between the devices can shorten this distance.
The Bluetooth symbol denotes whether a device is
Bluetooth compatible.
The Tek Connect remote control can be connected via
Bluetooth wireless technology to your cell phone or to
the Tek Transmitter.
Follow the instructions in the following chapters to hear the
sound of your cell phone, your TV or your MP3 player directly
in your hearing instrument(s).
WHAT IS BLUETOOTH®?
17
1
3
Using the Remote Control
with a Phone
4
2
5
1
3
2
4
5
3
1
4
2
5
The remote control allows you to use your hearing
instrument(s) as a wireless headset when you are
using a Bluetooth compatible phone or cell phone.
Instead of using the telephone receiver, you should speak
into your remote control and listen through your hearing
instrument(s).
Pairing remote control and phone
Before you can use the remote control with a phone for the
first time, you need to pair your phone and the remote control.
The pairing process is like an “introduction” of phone and
remote control. After the pairing process the phone and
remote control “know” each other. The pairing process does
not need to be repeated.
• Activate the Bluetooth function in your phone.The display
of your phone should show a Bluetooth symbol when the Bluetooth function is activated (see symbol Fig. 14).
18
USING THE REMOTE CONTROL WITH A PHONE
• Press the green
symbol on the remote control and hold for about 7 seconds. The remote control changes to pairing mode. You have 2 minutes to finish the pairing process.
• Search in the menu of your phone for other Bluetooth
devices.
Your phone should find another device called
“Tek Connect.” This is the remote control.
Fig. 14: Activate Bluetooth technology
Choose this device to pair phone and remote control. Your
phone should ask you to enter a PIN.
• Enter “0000”
• The remote control can only be paired with one phone
at a time.
Refer to the User Guide of your phone for more detailed
information on how to link devices via Bluetooth wireless
technology.
USING THE REMOTE CONTROL WITH A PHONE
19
Connecting remote control and phone
After pairing, the phone and remote control “know” each
other. Now, it is necessary to connect the remote control to
your phone. When connected, phone and remote control
“communicate” with each other.
When connected to the phone, the remote control will show
an incoming call on the display and transfer the sound of your
phone to your hearing instrument(s).
• Press the green
with the phone.
symbol to connect the remote control OR
• Connect the remote control using the menu on your phone.
The remote control shows the phone symbol when your phone
and your remote control are connected (see symbol Fig. 13).
Some of the following functions depend on the mode of
operation of your phone. The performance of the phones
described can differ slightly from the performance of your
particular phone.
Headset and hands-free
Most phones connect to the remote control via “hands-free”
mode. Some phones use the “headset” mode. Refer to the
table for the available functions in each mode. (Fig.15)
20
USING THE REMOTE CONTROL WITH A PHONE
Before using the remote control to make calls for the first
time you need to:
• activate the Bluetooth function in your phone.
• pair phone and remote control.
headset
hands-free
symbol shown in
remote control
taking the call
rejecting a call
terminating a call
shifting an existing call
Fig. 15: Headset and hands-free chart
Taking a call...
...when remote control and phone
are connected
The ringing is audible in your hearing instrument(s). The
remote control shows an incoming call (Fig.16). Depending
on your phone, ringing may not be audible in your hearing
instrument(s) when the phone is in silent mode.
USING THE REMOTE CONTROL WITH A PHONE
21
Fig. 16: Display of an incoming call
Press the green
symbol to accept the incoming call.
• Speak into the microphone of the remote control to talk.
It is optimal to speak within a range of about 45 cm to
the microphone.
• Press the red
symbol to end the call. Your hearing
instrument(s) automatically switch back to the hearing
program you were in before taking the call.
...when remote control and phone are
not connected
The ringing will not be audible in your hearing instrument(s).
The remote control does not show an incoming call.
• Press the green
symbol to transfer the incoming call to
the remote control.
• Press the green
symbol to accept the incoming call.
• Speak into the microphone of the remote control to talk.
It is optimal to speak within a range of about 45 cm to
the microphone.
22
USING THE REMOTE CONTROL WITH A PHONE
• Press the red
symbol to terminate the call.
Your hearing instrument(s) automatically switch back to the
hearing program you were in before taking the call.
Rejecting a call
...when remote control and phone are connected
• Press the red
symbol to reject an incoming call.
...when remote control and phone are not connected
• Press the green
symbol to transfer the incoming call
to the remote control.
• Press the red
symbol to reject an incoming call.
Making a call
• Press the green
and phone.
symbol to connect remote control
• Dial the desired number on your cell phone. You can hear
the call connection signal and the ringing in your hearing
instrument(s).
• Press the red
symbol to terminate the call.
• The phone call can also be ended by simply allowing the other caller to hang up and you will be returned to the
previous program.
USING THE REMOTE CONTROL WITH A PHONE
23
When shifting an existing call from/to the
remote control
• Press the green
symbol to transfer an existing connection from your phone to your remote control.
• Press the green
symbol to transfer an existing connection from your remote control back to the phone.
24
USING THE REMOTE CONTROL WITH A PHONE
Using the Tek Transmitter
The Tek Transmitter (Fig.17) allows you to use your hearing
instrument(s) as a wireless headset for any external device.
Connected to the desired device, the Tek Transmitter streams
the audio through the remote control and into your hearing
instrument(s).
Fig. 17: Tek Transmitter
1On/Off switch
2Sound level
3Contact for power plug
42.5 mm stereo jack
5LED
Read Out
button
USING THE TEK TRANSMITTER
Treble
button
25
Turning the Tek Transmitter on/off
• Use the On/Off switch to turn the Tek Transmitter on.
The blue LED blinks, indicating that the Tek Transmitter
is waiting to connect to the remote control. When the
blue LED is on constantly the connection to the remote
control is established.
• Use the On/Off switch to turn the Tek Transmitter off.
Turn the Tek Transmitter off when not in use.
Sound level
The sound level button allows you to increase or decrease the
volume of the audio signal of the Tek Transmitter. There are 5
volume settings.
• Press the sound level button to change the volume of the audio signal. The blue LED blinks to indicate the volume
setting.
Charging the Tek Transmitter
• Connect the Tek Transmitter with the power plug to a
power outlet. A red LED indicates that the charging
process is ongoing. Charging time is about 5 hours
depending on the status of the rechargeable battery.
Charging is complete when the red LED goes out.
26
USING THE TEK TRANSMITTER
Connecting the Tek Transmitter with
an external device
• Choose one of the cables provided and plug the 2.5 mm (smaller) stereo plug into the Tek Transmitter.
Depending on the device you want to connect the Tek
Transmitter to, different adapters are included in the
delivery (Fig.18):
1. 3.5 mm stereo jack to 2.5 mm stereo plug
2. 3.5 mm stereo jack to 6.3 mm stereo plug
3. cinch (RCA) to Scart
4. 3.5 mm stereo jack to cinch (RCA)
1
2
3
IN P U
4
T
OUT
P UT
Fig. 18: Adapters
The graphic on the following page shows how different
devices can be connected to the Tek Transmitter.
• Connect the external device to the Tek Transmitter
according to the diagram.
USING THE TEK TRANSMITTER
27
Fig. 19: Transmitter connecting to devices
28
USING THE TEK TRANSMITTER
Receiving the audio stream from an
external device
Connect the Tek Transmitter with the power plug to a power
supply. The Tek Transmitter has a rechargeable battery and can
also run for approximately 5 hours on a full charge without a
connection to a power source. Be sure to charge the battery
regularly in this case.
Using the remote control, change to the audio program. It will
take a few seconds for the remote control to connect to the
Tek Transmitter. The blue LED on the Tek Transmitter confirms
when the Bluetooth audio link is established.
You can now hear the sound of the TV or other device through
your hearing instrument(s).
For the best sound quality, keep the remote control in a
range of 10 metres to the Tek Transmitter and the hearing
instrument(s) in a range of 1 metre to the remote control.
• Keep the Tek Transmitter where you can see it.
10m
1m
Fig. 20: Using Tek Transmitter with TV
USING THE TEK TRANSMITTER
29
Receiving a phone call while watching TV
If your remote control and your phone are paired and
connected you can still receive phone calls when you are
connected to an external device. The hearing instrument(s)
will switch automatically to the telephone program when
your phone rings.
• Press the green
• Press the red
symbol to answer the phone.
symbol to reject the call.
The hearing instrument(s) will automatically switch back to
the audio program after you have finished the call.
30
USING THE TEK TRANSMITTER
Using the Direct Audio Input
The remote control allows you to use your hearing
instrument(s) as a wireless headset when you are listening to
your MP3 player or another audio device.
Fig. 21: Connecting to MP3 player
Connecting directly to your MP3 player
• Choose one of the cables provided and plug the 2.5 mm (smaller) stereo plug into the remote control.
• Connect the other side of the cable with a 3.5 mm jack on the external device. Use one of the adapters if your device does not have a 3.5 mm jack.
• Change to the audio program. The remote control shows
the symbol for direct audio input. You can hear the sound
of your MP3- player or other device through your hearing instrument(s).
USING DIRECT AUDIO INPUT
31
If you choose the audio program without an audio device
connected to your remote control, the remote control will
search for a connection to the Tek Transmitter.
Fig. 22: Display for audio program
Receiving a phone call while using direct
audio input
If your remote control and your phone are paired you can
still receive phone calls while using the direct audio input.
The hearing instrument(s) will switch automatically to the
telephone program when your phone rings.
• Press the green
• Press the red
symbol to answer the phone.
symbol to reject the call.
• Your hearing instrument(s) will automatically switch
back to the audio program.
32
USING DIRECT AUDIO INPUT
Technical Information
Operating frequencies: Fc=3.28 MHz
CE, FCC and IC compliance information can be found inside the
battery compartment.
Changes or modifications not expressly approved by the party
responsible for compliance could void the user’s authority
to operate the equipment.
Siemens Tek connect remote control
FCC: SGI-WL200AP
IC: 267AB-WL200AP
This Class B digital apparatus II radiocommunication device
complies with Part 15 of the FCC rules and Industry Canada
Standard RSS-210. Operation is subject to the following two
conditions:
(1) this device may not cause interference.
(2) this device must accept any interference, including
interference that may cause undesired operation of
the device.
TECHNICAL INFORMATION
33
This equipment has been tested and found to comply with
the limits for a Class B digital device, pursuant to Part 15
of the FCC rules and Industry Canada Standard RSS-210.
These limits are designed to provide reasonable protection
against harmful interference in a residential installation. This
equipment generates, uses and can radiate radio frequency
energy and, if not installed and used in accordance with
the instructions, may cause harmful interference to radio
communications. However, there is no guarantee that
interference will not occur in a particular installation. If
this equipment does cause harmful interference to radio or
television reception, which can be determined by turning the
equipment off and on, the user is encouraged to try to correct
the interference by one or more of the following measures:
• Reorient or relocate the receiving antenna.
• Increase the separation between the equipment
and receiver.
• Connect the equipment into an outlet on a circuit different
from that to which the receiver is connected.
• Consult the dealer or an experienced radio/TV technician
for help.
34
TECHNICAL INFORMATION
Warranty and Service
Your Tek Connect remote control and transmitter have a
one-year warranty that covers defects in material and
workmanship from original date of purchase. There is no
loss and damage coverage. Tek Connect remote controls and
transmitters received for warranty service at an authorized
Siemens Service Center will be repaired or replaced with new
or reconditioned components, without charge, to meet the
performance specifications of the products.
Warranty service must only be performed by an authorized
Siemens Service Center. Service performed by unauthorized
service entities voids this warranty and repairs so necessitated
will be done on a parts and labor cost basis.
This warranty does not cover malfunctions due to unusual
wear and tear or mistreatment of the product such as physical
shock or tampering with the product, any of which voids all
warranties.
In case of malfunction or loss, take your Siemens Tek
Connect remote control, transmitter and proof of purchase
to the Audiologist or Hearing Care Provider from whom
the unit was purchased. If factory service or replacement is
needed, your unit will be forwarded to an authorized Siemens
Service Center.
WARRANTY AND SERVICE
35
The Bluetooth® word mark and logos are
owned by the Bluetooth SIG, Inc., and any use
of such marks by Siemens AG is under license.
Other trademarks and trade names are those
of their respective owners.
Information in this brochure is subject
to change without notice. Copyright
© 2010 Siemens Hearing
Instruments, Inc. All rights reserved.
La marca y logotipos con la palabra Bluetooth®
son propiedad de Bluetooth SIG, Inc., y
cualquier uso de los mismos por parte de
Siemens AG se otorga bajo licencia. Otras
marcas y nombres comerciales son propiedad
de sus respectivos dueños.
La información en este folleto está sujeta a
cambio sin previo aviso. Derechos de autor
© 2010 Siemens Hearing Instruments, Inc.
Todos los derechos reservados.
Local Contact Information
Siemens Hearing Instruments, Inc.
P.O. Box 1397
Piscataway, NJ 08855-1397
www.usa.siemens.com/hearing
Global Siemens Headquarters
Siemens AG
Wittelsbacherplatz 2
80333 Muenchen
Germany
Global Business Unit
Siemens Audiologische Technik
GmbH
Gebberstrasse 125
91058 Erlangen
Germany
Phone: +49 9131 308 0
Global Siemens
Healthcare Headquarters
Siemens AG
Healthcare Sector
Henkestrasse 127
91058 Erlangen
Germany
Phone: +49 9131 84 0
www.siemens.com/healthcare
Legal Manufacturer in Canada
Siemens Hearing Instruments
A Division of Siemens Canada Limited
320 Pinebush Road,
Cambridge, ON, N1T 1Z6
Phone: (800)663-0620
Fax: (888)429-4644
www.siemens.ca/hearing
www.siemens.com/hearing
10425509 4/10 2.0 22P208 25K
SHI/11070-10